|
|
|
Porsche, and the Porsche crest are registered trademarks of Dr. Ing. h.c. F. Porsche AG.
This site is not affiliated with Porsche in any way. Its only purpose is to provide an online forum for car enthusiasts. All other trademarks are property of their respective owners. |
|
|

  |

| bbrock |
 Jan 16 2021, 08:39 PM Jan 16 2021, 08:39 PM
Post
#1821
|
|
914 Guru  Group: Members Posts: 5,269 Joined: 17-February 17 From: Montana Member No.: 20,845 Region Association: Rocky Mountains |
This Tranny is Ready to Grind
Finished up the transmission today. Still not sure how my backup light switch ended up in St. Louis but the vendor refunded my $ since they didn't have anymore in stock and I ordered from another source. So that was first on the list this morning. Here's the switch and a new pin from Porsche. 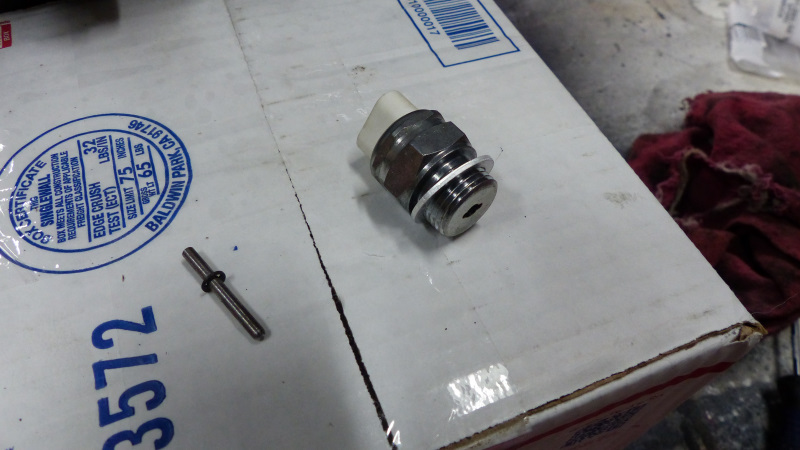 Pretty straight forward. First clean out your bunghole. 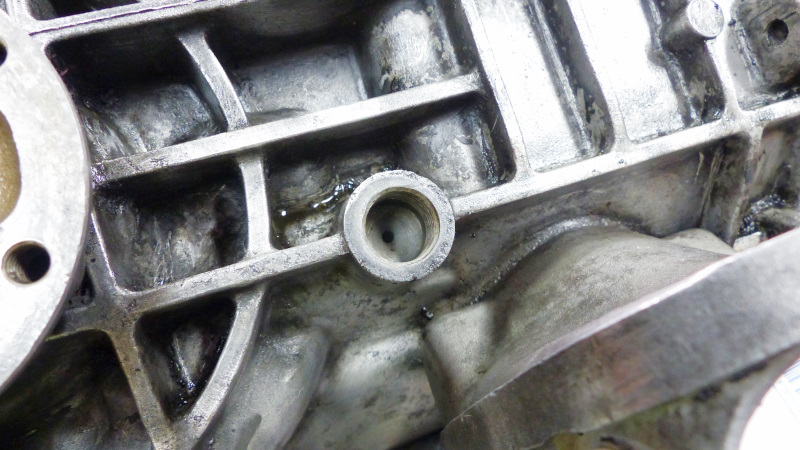 Insert pin. 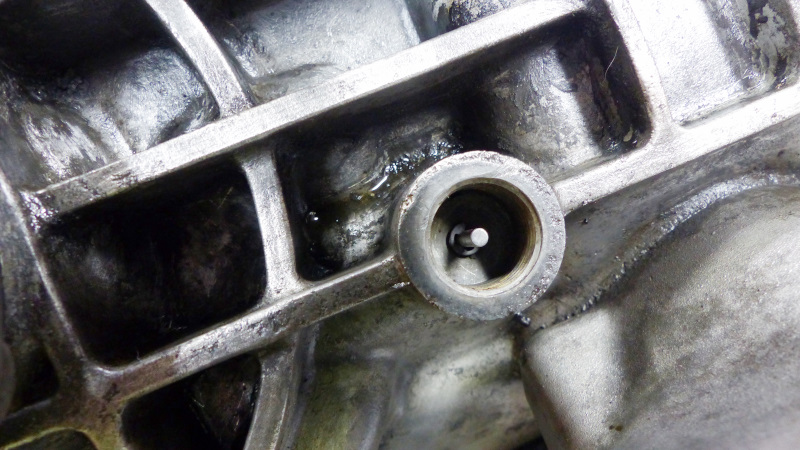 Torque the switch to 23-29 ft-lbs. 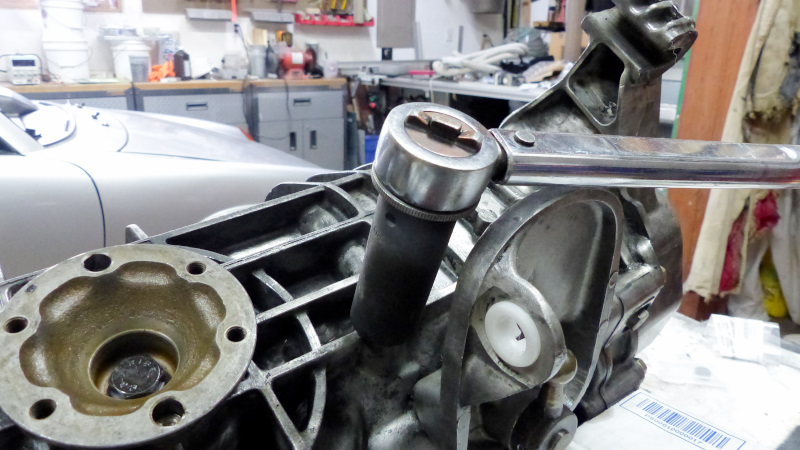 And done. 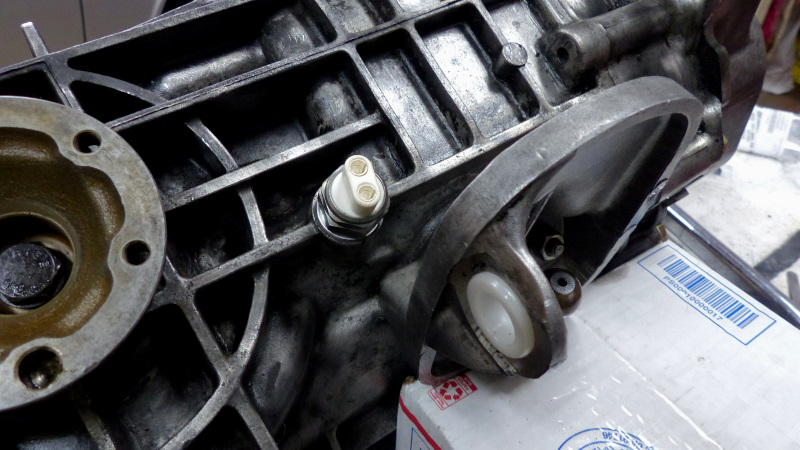 Next up was the speedo drive. Luckily there was a recent thread on this or I would have been scratching my head all day on how to get that little seal out. The solution is genius. Pop out the special metal washer with a pick. Then thread an M14 or 9/16 bolt into the old seal. Then knock it out from the other side with a drift. Easy peezy. 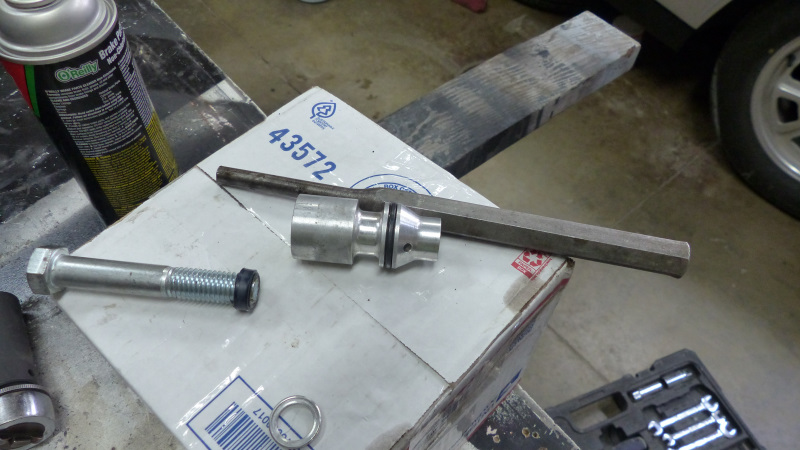 A thin coat of Vasoline on the new seal and it pretty much goes in with just thumb pressure. I did use a 12mm socket and a couple light taps to fully seat it. 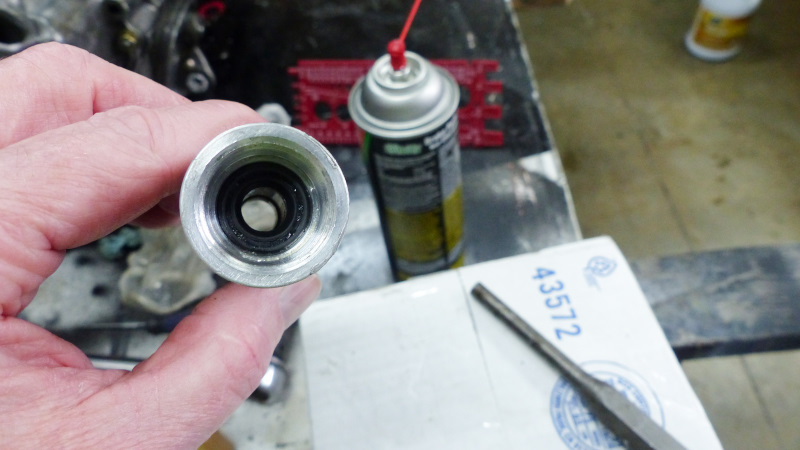 Then the special little washer goes back in. it goes in with thumb pressure and then I use the back side of a pick to make sure it was seated. 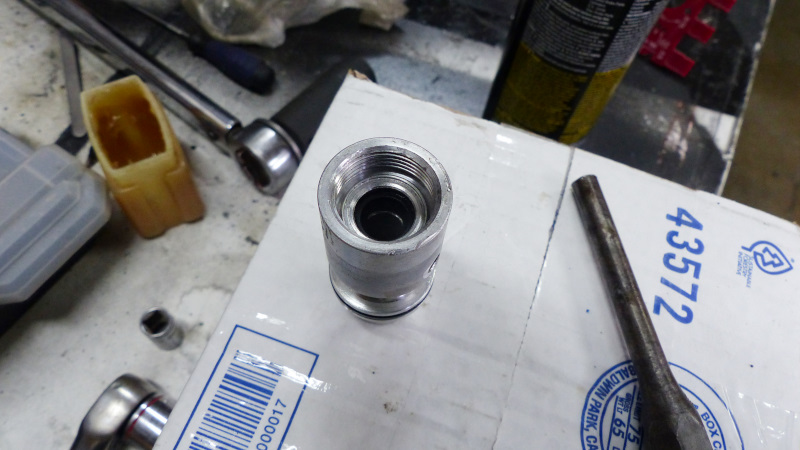 Now a new O-ring. Here's a tip. When you get out your bolt organizer to find a bold to pull the seal, don't accidentally toss the O-ring in there when you stow it away. I don't want to say how much time I wasted today looking for that little dickwad. 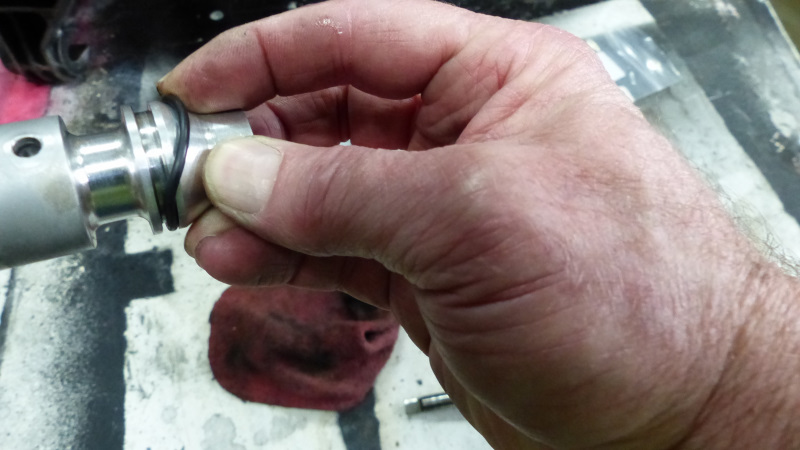 Nestled in nice and snug. 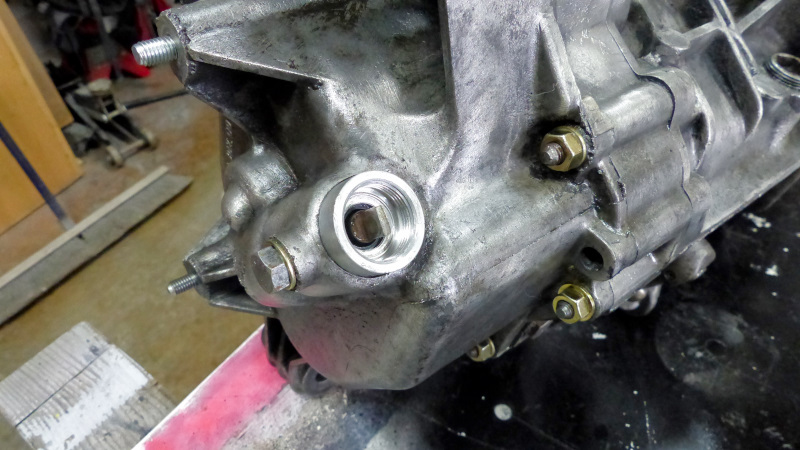 Last thing was to add a new VDO angle drive.  All new seals on the tranny now. Only thing left is to protect the case Porsche-style. Those who have followed this misadventure from the beginning may recall this from There are a few threads on this here and on the Bird. Apparently the engine and trans were coated with Tectyl when they left the factory. 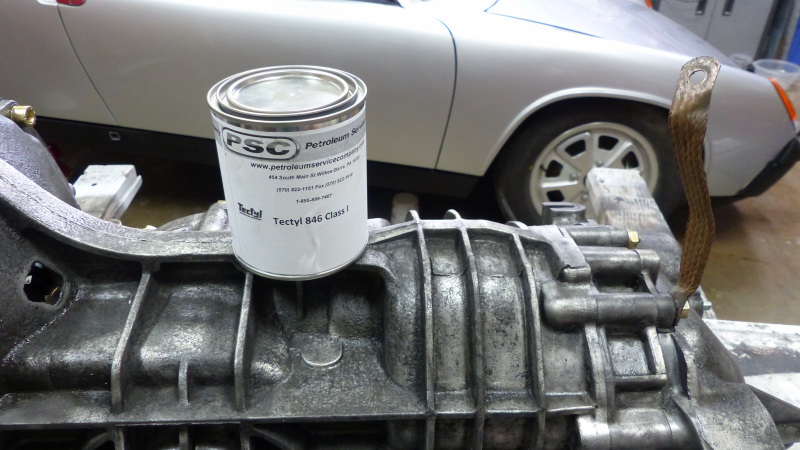 Tectyl is a lot like Cosmoline but if Porsche used Tectyl, that's what I use too. My hunch is that it was mainly intended to protect the mag during the trans-Atlantic trip and not much more, but someone on Pelican claimed there was a tech bulletin suggesting to refresh the Tectyl on transmission cases every couple of years to keep them protected. It doesn't matter. I'm after the new car experience so whatever toxic stench this throws as it bakes off, I want it. 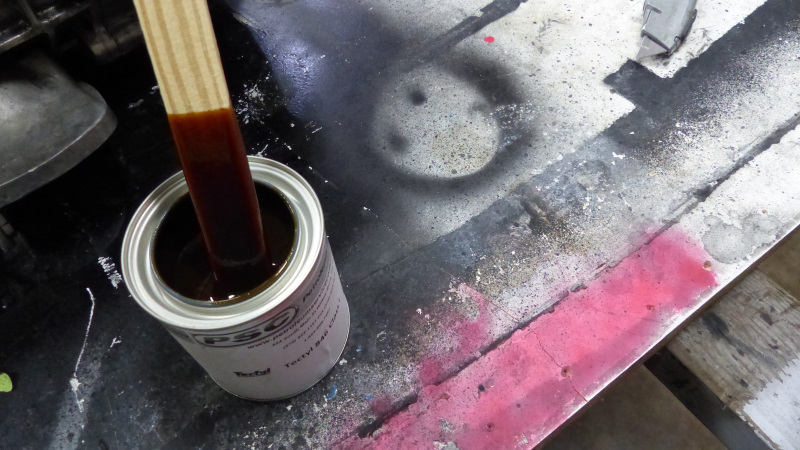 It was apparently sprayed on originally but I just daub it on with a cheap sponge brush. Over the next few weeks this will dry to a semi-hard waxy service with a light amber tint that says, "I'm loved by a crazy person." 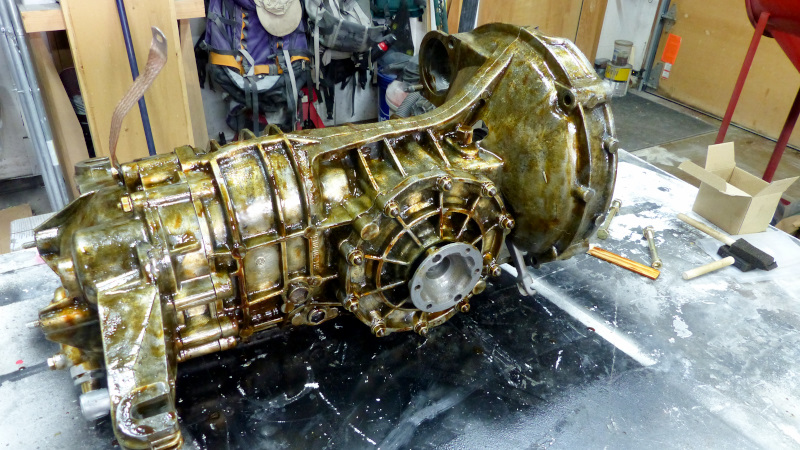 |
   |

 
|
| oldie914 |
Jan 17 2021, 02:11 AM
Post
#1822
|
|
Member Group: Members Posts: 119 Joined: 2-May 10 From: Germany Member No.: 11,680 Region Association: None |
Porsche's advice on Tectyl was correct. The Germans used an unblievable amount of salt on the roads in the early 1970's and cars on the autobahn were in a salt bath all winter long. Rule of thumb was two windshield washer water tank fillups per tank of gas.
|
|
|
|
| Superhawk996 |
Jan 17 2021, 10:40 AM
Post
#1823
|
|
914 Guru Group: Members Posts: 7,846 Joined: 25-August 18 From: Woods of N. Idaho Member No.: 22,428 Region Association: Galt's Gulch |
QUOTE(bbrock @ Jan 16 2021, 09:39 PM)  Pretty straight forward. First clean out your bunghole. I'm after the new car experience so whatever toxic stench this throws as it bakes off, I want it. (IMG:style_emoticons/default/lol-2.gif) It's funny because I hate new car smell. Thanks again for your leftover Tectyl from summer -- it will go to good use on the 911 mag case one of these days when it get's final assembly. |
|
|
|
| bbrock |
Jan 17 2021, 02:05 PM
Post
#1824
|
|
914 Guru Group: Members Posts: 5,269 Joined: 17-February 17 From: Montana Member No.: 20,845 Region Association: Rocky Mountains |
@914_7T3
A couple pages back I mentioned a problem with one of the distributor vacuum hoses. (IMG:http://www.914world.com/bbs2/uploads/post-20845-1608516367.jpg) This clearly needs to be fixed if I'm to have ANY hope of a smooth running engine. Ah yes, much better (IMG:style_emoticons/default/biggrin.gif) 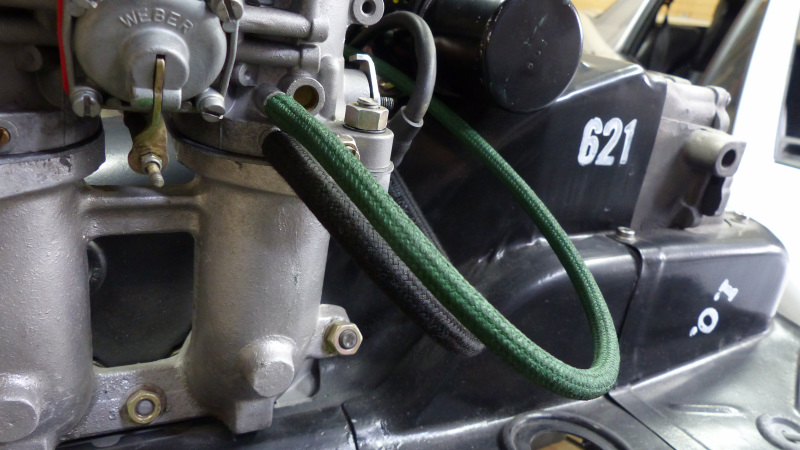 AFAIK, colored vacuum hoses are NLA. There is at least one thread asking if anyone had tried bleaching black braided hose and re-dying it the right color. The answer to that now is yes, and the answer to whether it works is NO! I tested a small scrap of new German Continental (OEM) hose in some bleach left overnight. What you get is a bare naked rubber hose with a bunch of still very black braid cloth fibers floating ghoulishly in the swill. Absolute fail. I started exploring fabric paint. Most of them are very translucent and intended to go on a white, or very light fabric. The consensus is that you can only make things darker with it. Then I found Jaquard Neopaque opaque fabric paint. 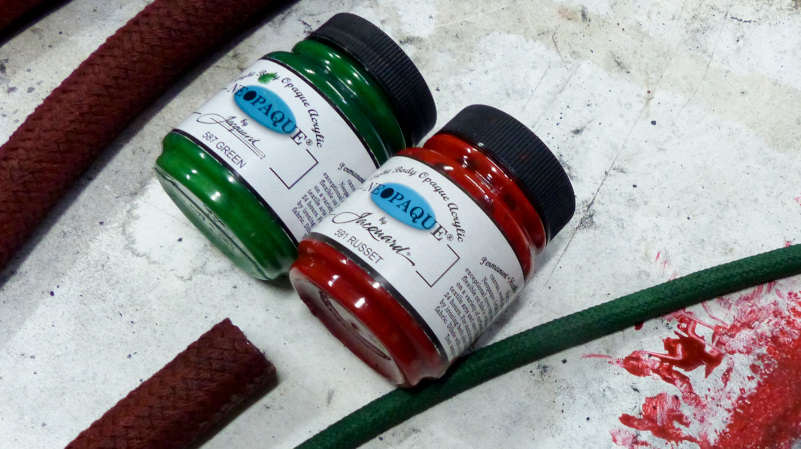 Reviews sounded promising. I ordered a small jar each of green, red, and russet. The manufacturer web site has online color chips that suck so it was really hard to tell what color I would get between red and russet so had to order both and figured I might need to mix paints to get the right color. I cleaned up the remnant of original red hose I had as best I could and ran some tests. The red was pukey bright. It would look great on a "My First Pony" t-shirt for a 6 year old girl, but not in a 914 engine bay. The Russet by itself looked pretty good to me trying, to account for 48 years of fade on the original hose. From bottom to top in the below pic is Red (air brushed), original remnant, Russet (sponge brushed), and the unpainted braided hose. 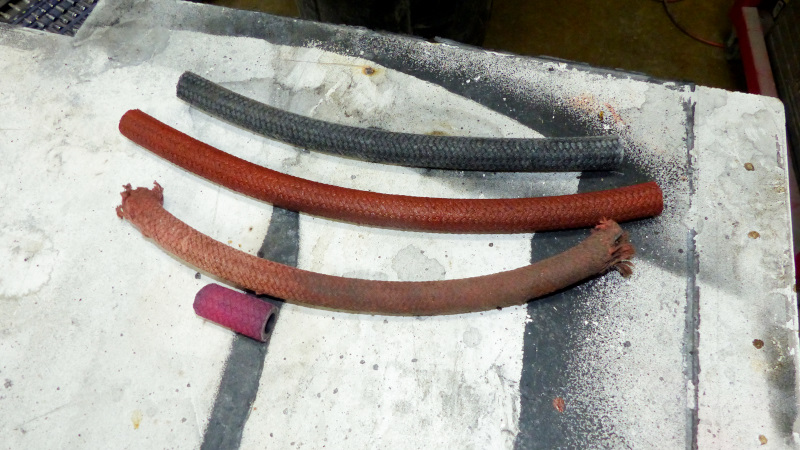 I tried to get fancy with my cheapo HF air brush but you have to dilute the paint so much it would take forever to build up the pigment. Instead, I applied with a sponge brush, working it into the braiding. It takes a 2-3 layers. The paint looks too thick when it first goes on but then soaks into the fabric and darkens. After it was dry (and even before), I used a stiff nylon brush pretty aggressively to smooth out the finish and pull up the cloth fibers so they weren't all stuck and matted. The end result was the cloth braiding a little stiffer feeling than the unpainted hose but close to the old hose that had seen plenty of heat cycling over the years. The hose itself is still flexible like new hose. For the green, I didn't have an original sample so just went with straight green. I suspect it is a little brighter than the original but close enough for me. 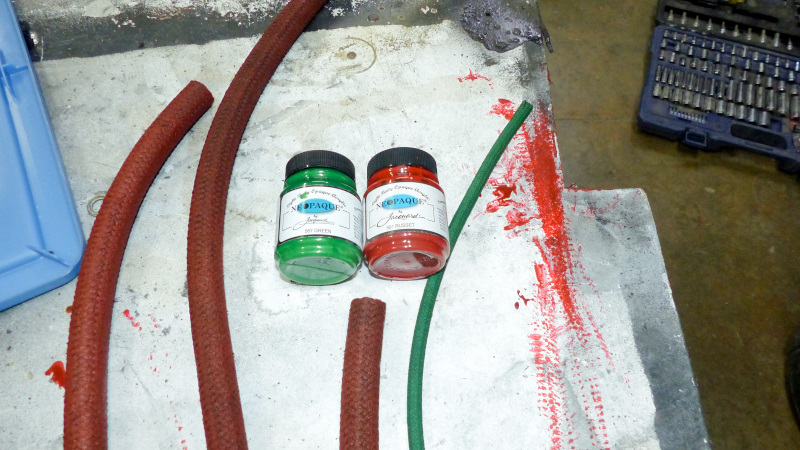 Here are some pics of the end result. No doubt the engine will breath and run much better with the proper colored hoses attached. (IMG:style_emoticons/default/laugh.gif) 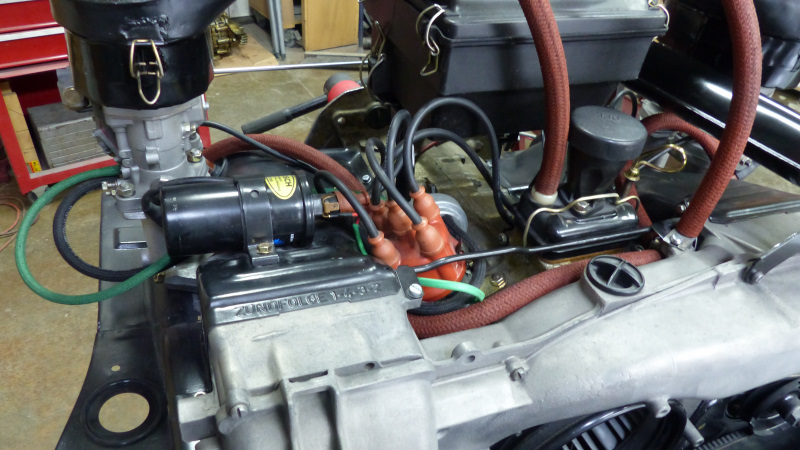 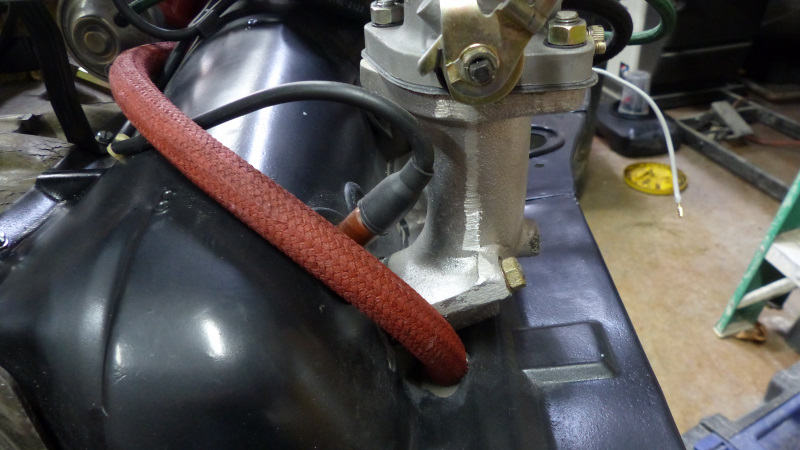 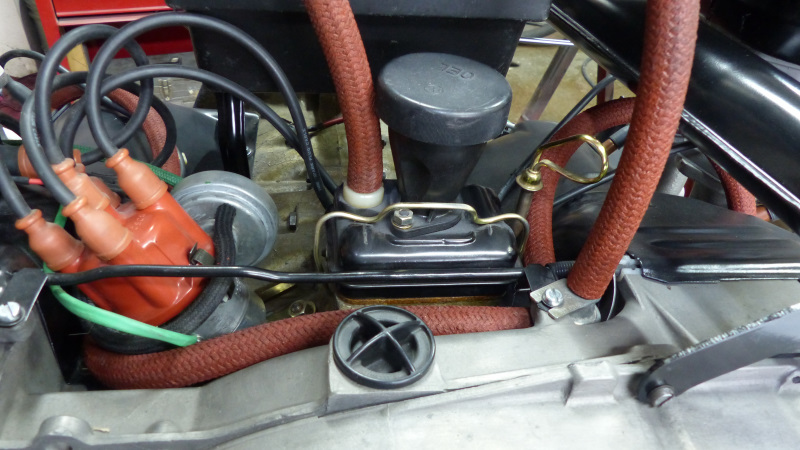 |
|
|
|
| bbrock |
Jan 17 2021, 02:13 PM
Post
#1825
|
|
914 Guru Group: Members Posts: 5,269 Joined: 17-February 17 From: Montana Member No.: 20,845 Region Association: Rocky Mountains |
QUOTE(Superhawk996 @ Jan 17 2021, 09:40 AM) QUOTE(bbrock @ Jan 16 2021, 09:39 PM) Pretty straight forward. First clean out your bunghole. I'm after the new car experience so whatever toxic stench this throws as it bakes off, I want it. (IMG:style_emoticons/default/lol-2.gif) It's funny because I hate new car smell. Thanks again for your leftover Tectyl from summer -- it will go to good use on the 911 mag case one of these days when it get's final assembly. @Superhawk996 , are you implying with your creative editing that my bunghole throws off toxic stench? Not true... because I cleaned it. (IMG:style_emoticons/default/lol-2.gif) |
|
|
|
| Superhawk996 |
Jan 17 2021, 02:52 PM
Post
#1826
|
|
914 Guru Group: Members Posts: 7,846 Joined: 25-August 18 From: Woods of N. Idaho Member No.: 22,428 Region Association: Galt's Gulch |
|
|
|
|

| Superhawk996 |
Jan 17 2021, 02:54 PM
Post
#1827
|
|
914 Guru Group: Members Posts: 7,846 Joined: 25-August 18 From: Woods of N. Idaho Member No.: 22,428 Region Association: Galt's Gulch |
Totally awesome work on the hose coloration. Very entertaining and practial too. Really will help make sense of the maze of hoses that can inhabit the 914 engine compartment. Even worse with FI.
The creativity and compulsion to innovate never cease to amaze. (IMG:style_emoticons/default/aktion035.gif) |
|
|
|
| bbrock |
Jan 17 2021, 05:34 PM
Post
#1828
|
|
914 Guru Group: Members Posts: 5,269 Joined: 17-February 17 From: Montana Member No.: 20,845 Region Association: Rocky Mountains |
QUOTE(Superhawk996 @ Jan 17 2021, 01:54 PM) Totally awesome work on the hose coloration. Very entertaining and practial too. Really will help make sense of the maze of hoses that can inhabit the 914 engine compartment. Even worse with FI. The creativity and compulsion to innovate never cease to amaze. (IMG:style_emoticons/default/aktion035.gif) You are suggesting there is practical value to this madness? (IMG:style_emoticons/default/wacko.gif) Try to rationalize this one, and tread lightly because you know you are an accomplice here. With carbs, the bunghole (had to sneak that word in again (IMG:style_emoticons/default/happy11.gif) ) for the CHT is unused. 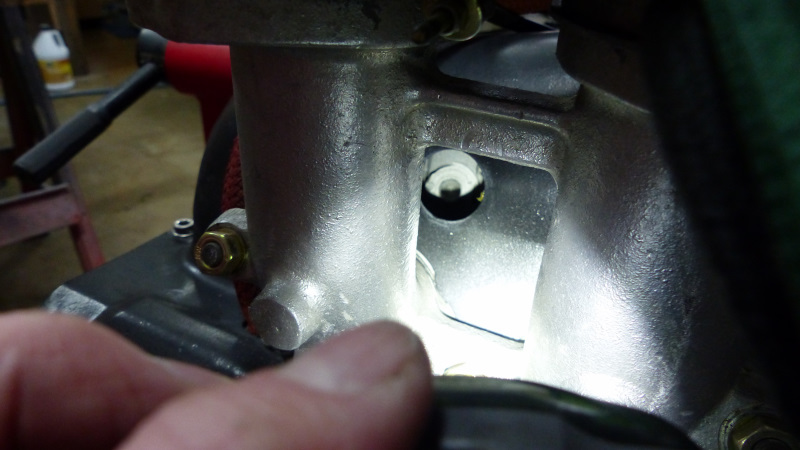 This was bugging me because I may have a plan for that for a possible future project. I don't want it to be filled with crap. With the help of @Superhawk996 , I sourced an M10x1.0 drain plug. I gooped up the head with grease to stick it to my socket, and put a smear of anti-seize on the threads. 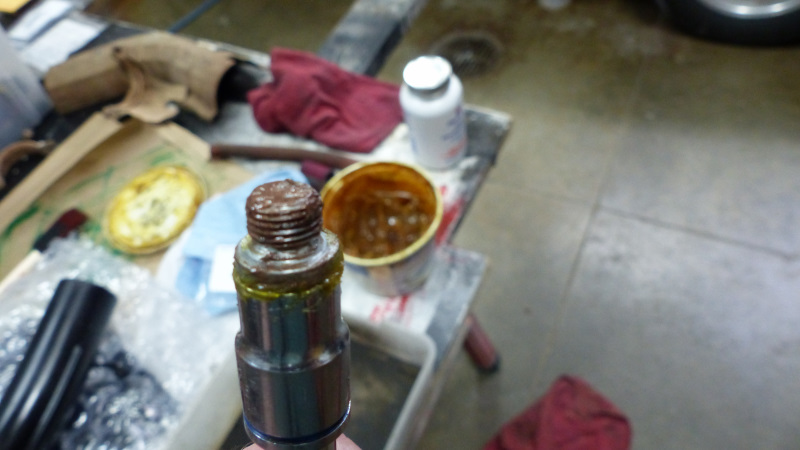 I snugged it just barely past finger tight and that is one nice little bunghole plug. 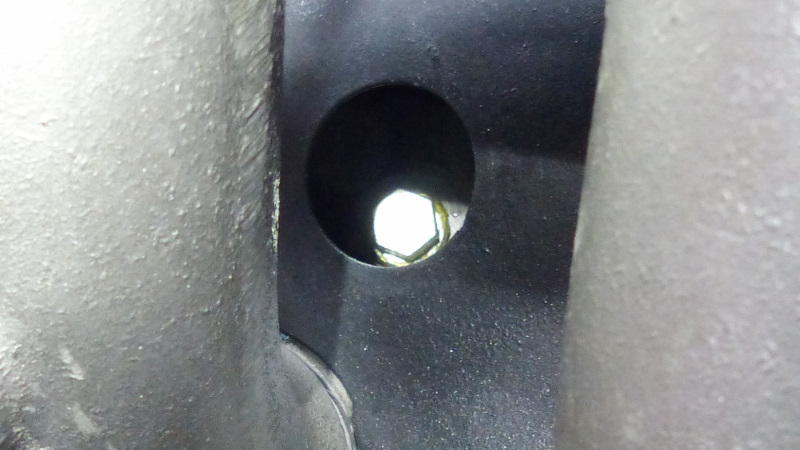 Then the grommet. 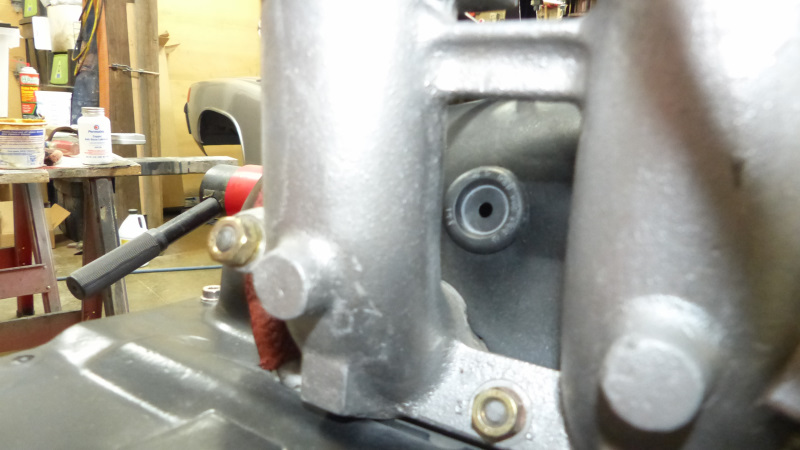 If this isn't a cry for help, I don't know what is. (IMG:style_emoticons/default/screwy.gif) But it's the details that count. (IMG:style_emoticons/default/shades.gif) |
|
|
|
| raynekat |
Jan 17 2021, 09:15 PM
Post
#1829
|
|
Advanced Member Group: Members Posts: 2,171 Joined: 30-December 14 From: Coeur d'Alene, Idaho Member No.: 18,263 Region Association: Pacific Northwest |
QUOTE(Superhawk996 @ Jan 17 2021, 12:54 PM) The creativity and compulsion to innovate never cease to amaze. (IMG:style_emoticons/default/aktion035.gif) I'd say that hits the "nail" in the coffin or on the head. Ha Can't say in my wildest mad scientist dreams I ever considered dying the fabric braided lines in my car. Brent ascends to such lofty escarpments that us mere mortals can only wishfully fantasize about.... He is definitely of a land of a "different height." (IMG:style_emoticons/default/wink.gif) |
|
|
|
| bbrock |
Jan 17 2021, 10:42 PM
Post
#1830
|
|
914 Guru Group: Members Posts: 5,269 Joined: 17-February 17 From: Montana Member No.: 20,845 Region Association: Rocky Mountains |
QUOTE(raynekat @ Jan 17 2021, 08:15 PM) QUOTE(Superhawk996 @ Jan 17 2021, 12:54 PM) The creativity and compulsion to innovate never cease to amaze. (IMG:style_emoticons/default/aktion035.gif) I'd say that hits the "nail" in the coffin or on the head. Ha Can't say in my wildest mad scientist dreams I ever considered dying the fabric braided lines in my car. Brent ascends to such lofty escarpments that us mere mortals can only wishfully fantasize about.... He is definitely of a land of a "different height." (IMG:style_emoticons/default/wink.gif) Ha! It might be your fault. I think you unleashed a monster with the flocking. (IMG:style_emoticons/default/beerchug.gif) |
|
|
|
| 914_7T3 |
Jan 17 2021, 11:38 PM
Post
#1831
|
|
Please forgive me, I'm new to all of this! Group: Members Posts: 1,898 Joined: 3-April 17 From: Los Angeles, CA Member No.: 20,991 Region Association: Southern California |
QUOTE(bbrock @ Jan 17 2021, 12:05 PM) @914_7T3 A couple pages back I mentioned a problem with one of the distributor vacuum hoses. (IMG:http://www.914world.com/bbs2/uploads/post-20845-1608516367.jpg) This clearly needs to be fixed if I'm to have ANY hope of a smooth running engine. Ah yes, much better (IMG:style_emoticons/default/biggrin.gif) AFAIK, colored vacuum hoses are NLA. There is at least one thread asking if anyone had tried bleaching black braided hose and re-dying it the right color. The answer to that now is yes, and the answer to whether it works is NO! I tested a small scrap of new German Continental (OEM) hose in some bleach left overnight. What you get is a bare naked rubber hose with a bunch of still very black braid cloth fibers floating ghoulishly in the swill. Absolute fail. I started exploring fabric paint. Most of them are very translucent and intended to go on a white, or very light fabric. The consensus is that you can only make things darker with it. Then I found Jaquard Neopaque opaque fabric paint. Reviews sounded promising. I ordered a small jar each of green, red, and russet. The manufacturer web site has online color chips that suck so it was really hard to tell what color I would get between red and russet so had to order both and figured I might need to mix paints to get the right color. I cleaned up the remnant of original red hose I had as best I could and ran some tests. The red was pukey bright. It would look great on a "My First Pony" t-shirt for a 6 year old girl, but not in a 914 engine bay. The Russet by itself looked pretty good to me trying, to account for 48 years of fade on the original hose. From bottom to top in the below pic is Red (air brushed), original remnant, Russet (sponge brushed), and the unpainted braided hose. I tried to get fancy with my cheapo HF air brush but you have to dilute the paint so much it would take forever to build up the pigment. Instead, I applied with a sponge brush, working it into the braiding. It takes a 2-3 layers. The paint looks too thick when it first goes on but then soaks into the fabric and darkens. After it was dry (and even before), I used a stiff nylon brush pretty aggressively to smooth out the finish and pull up the cloth fibers so they weren't all stuck and matted. The end result was the cloth braiding a little stiffer feeling than the unpainted hose but close to the old hose that had seen plenty of heat cycling over the years. The hose itself is still flexible like new hose. For the green, I didn't have an original sample so just went with straight green. I suspect it is a little brighter than the original but close enough for me. Here are some pics of the end result. No doubt the engine will breath and run much better with the proper colored hoses attached. (IMG:style_emoticons/default/laugh.gif) (IMG:style_emoticons/default/pray.gif) That is all! |
|
|
|
| doug_b_928 |
Jan 18 2021, 07:54 PM
Post
#1832
|
|
Senior Member Group: Members Posts: 730 Joined: 17-January 13 From: Winnipeg Member No.: 15,382 Region Association: Canada |
Wow, Brent. The hoses look fantastic. I didn't know they were supposed to be red and green; very cool.
|
|
|
|
| bbrock |
Jan 26 2021, 09:04 PM
Post
#1833
|
|
914 Guru Group: Members Posts: 5,269 Joined: 17-February 17 From: Montana Member No.: 20,845 Region Association: Rocky Mountains |
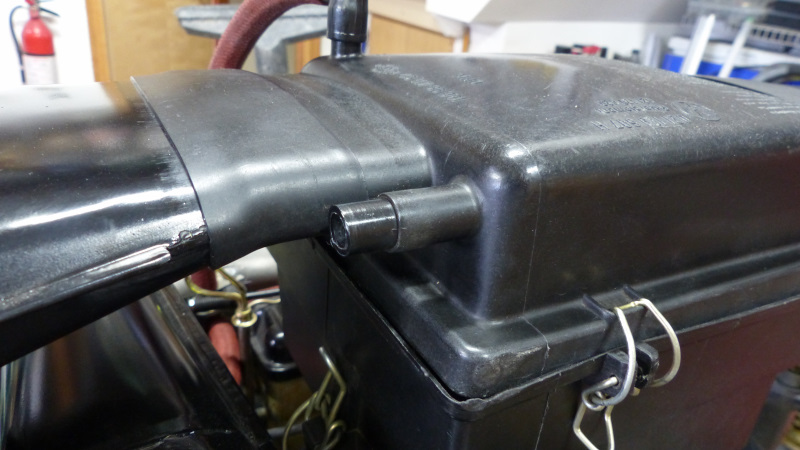
In case y'all haven't had anything to roll your eyes at lately, I should probably update on last weekends shenanigans. Had a non-Porsche project to work on so just did a few small jobs. First up was finishing a detail on the world's most awesome Type IV carb intakes. Last item was to provision for connecting the charcoal canister circuit and oil breather to the intake. There was already a port on for the vapor line but it was oversized. I thought it would be easy to source a 1/4" black plastic fitting to cut nipples from but I was wrong. I searched all the home improvement and hardware stores with no luck. Couldn't find anything on the Internets. Finally had to order it from McMaster. Even there, the selection was slim and I had to order a tubing that comes oversized with thick walls intended to be machined to size. I was looking for about 1/2" to fit the 12mm hose. Not have room in the shop for a lathe, I improvised by chucking the tubing in a 1/2" drill, clamping the drill in a vice, and sanding the tube down to get the right OD, and then drill out the ID. I should have gotten a pic to document what a dipshit I am, but here's a pic of the final product.
 Similar "drill" (get it? (IMG:style_emoticons/default/happy11.gif) ) for the oil breather. The original air cleaner had the breather port attached to one of the side ducts. I assume these are separated from the filter to prevent the oily vapor from fouling the filter element. That port, of course, was lost when I swapped them for my custom jobbies. Of course I stupidly forgot to weld in a steel tube on one of the ducts so had to go to plan B which was to install a tube on the plastic part of the side duct. I put it in at an angle to direct the vapor toward the carb (just like the original) and attached it by "welding" it in with an old soldering iron and a scrap of black zip tie. Strong as hell. 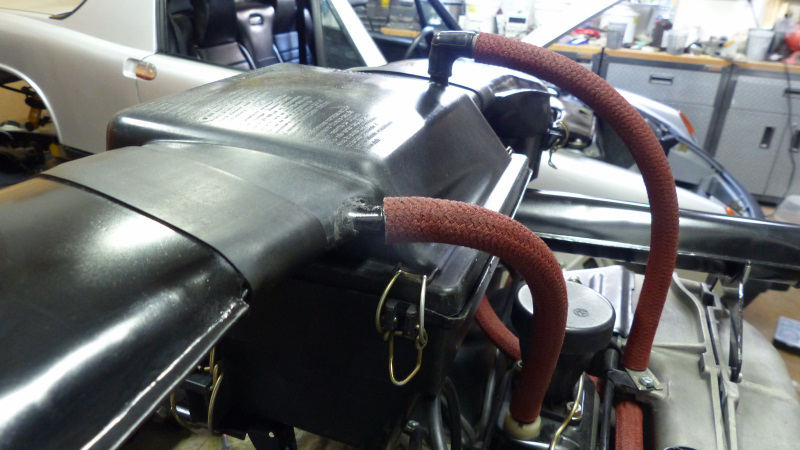 Here's how much tube I had to buy for those two little dinkass nipples. 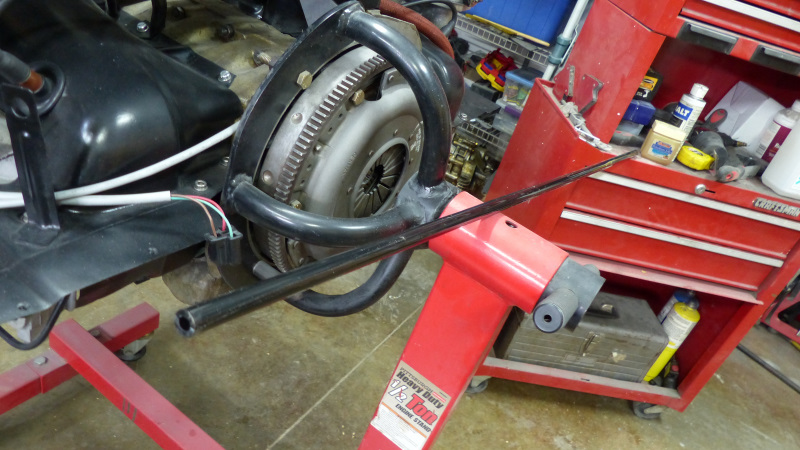 Next was finally fitting up the fuel pump. I've been waiting over 2 months for this NOS boot to arrive from Latvia. 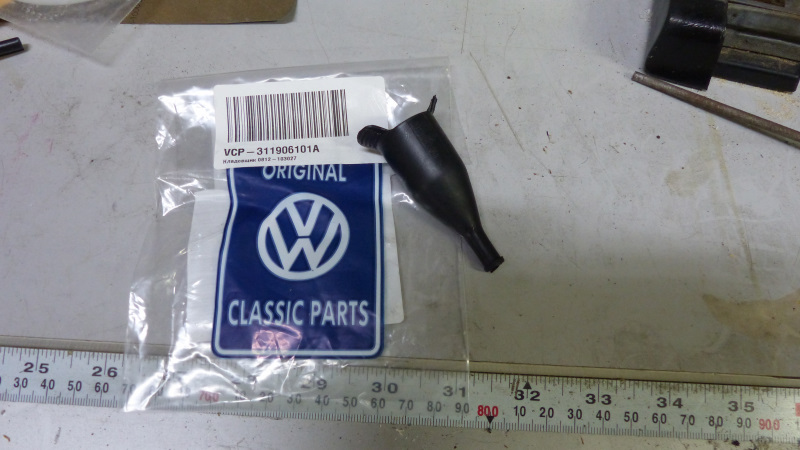 The fuel pump wires I ran in the harness were about 4" shorter than I would have preferred but that 4" would have been pretty expensive so I decided to roll the dice. Luckily, it managed to work. I ran out of good omega fuel hose clamps so this will have to be just a dry fit. Before you say anything about not being able to run a factory pump with carbs... sure you can. You just have to design the system for it. That's all on that for now. 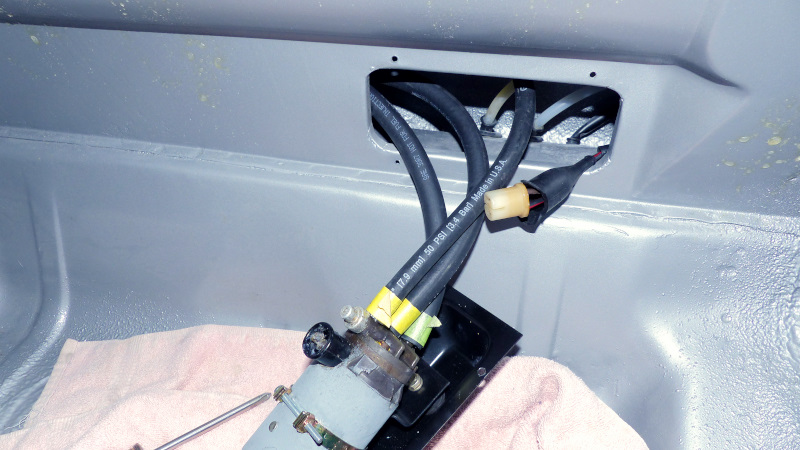 Everything fits nicely behind Door #1. 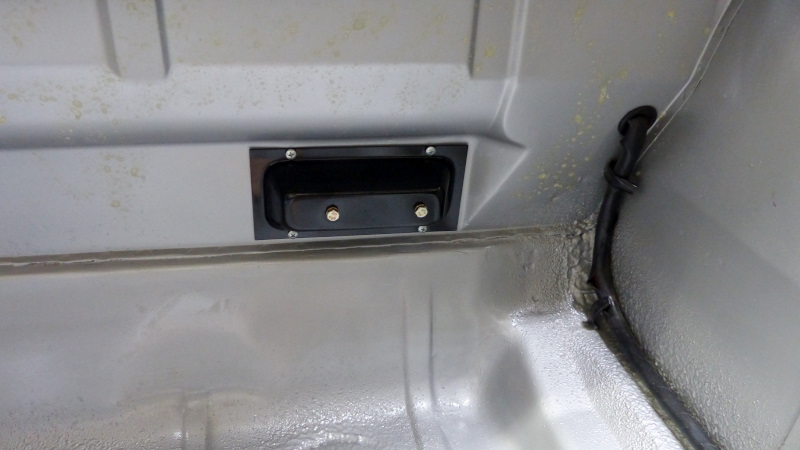 To make sure I don't forget about those missing hose clamps, I yellow-tagged the fuel filler so I don't start dumping fuel in the tank and make for a bad day. 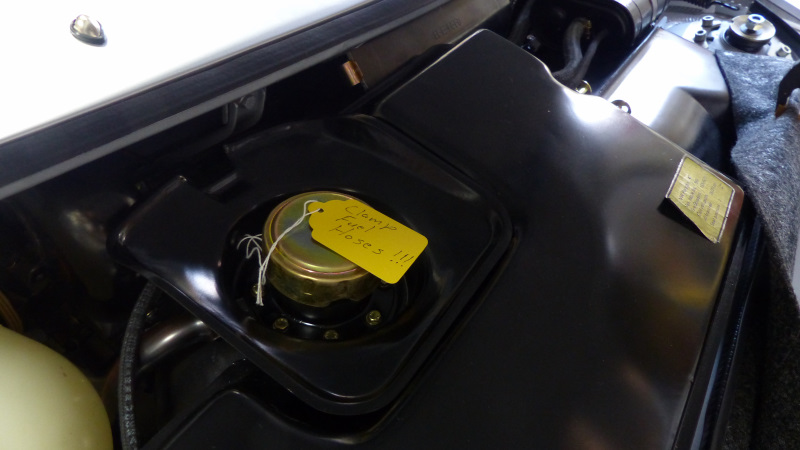 Now for the eye-rolling... I don't know if you've noticed, but there is a little plastic bushing that the windshield wiper arm spring connects to. This is a horrible pic because I painted it black when refurbing the arms.  Mine crumbled to dust so needed replaced. I bought a Delrin rod from McMaster for stock and cut discs to about the right width and fine tuned the width by running them over sandpaper on a flat surface. 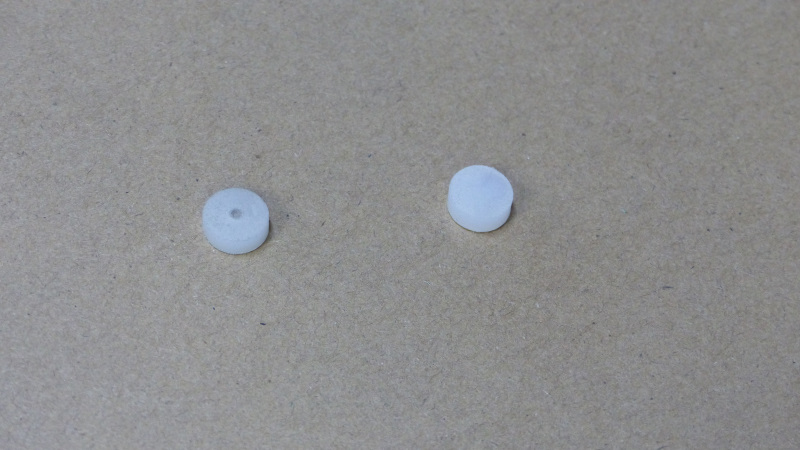 I used the wiper arm as a jig to mark the disc close to center with a hand drill, and then drilled the center hole on the drill press. 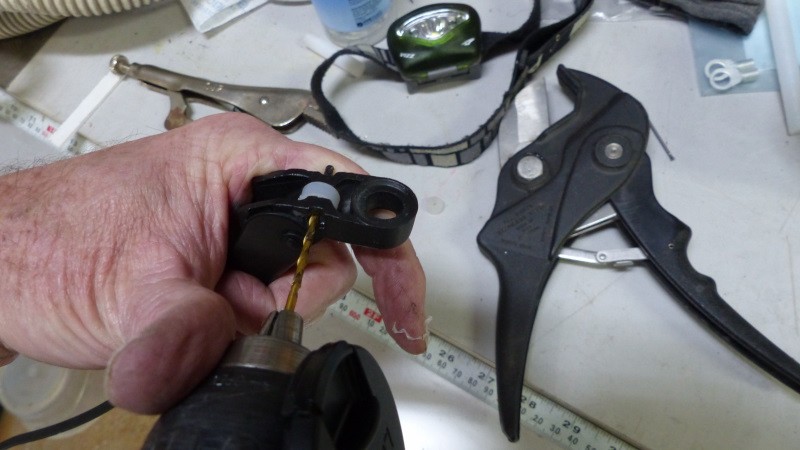 Next, I mounted the disc on a Dremel cutting disc arbor and chucked it in the drill press. I "turned" the disc down to the right OD using sandpaper on a paint stick. 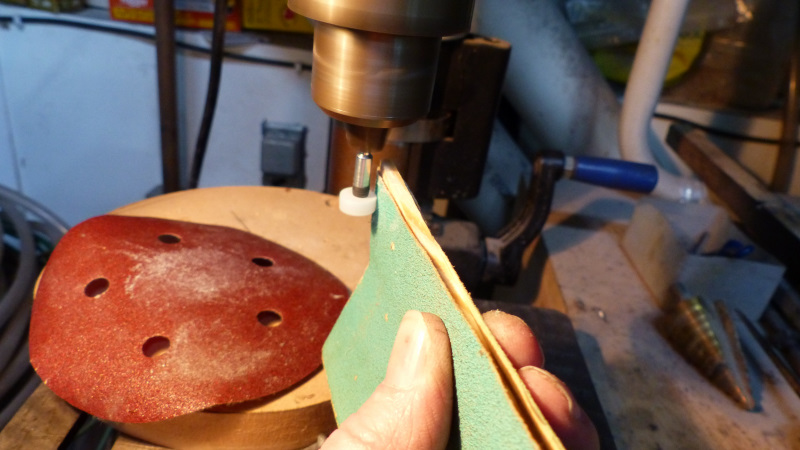 Now for the fun part - forming the groove for the spring hook. I tried several things that didn't work so well. What did work was a 6d finish nail, heated to my favorite flavor, cherry red. 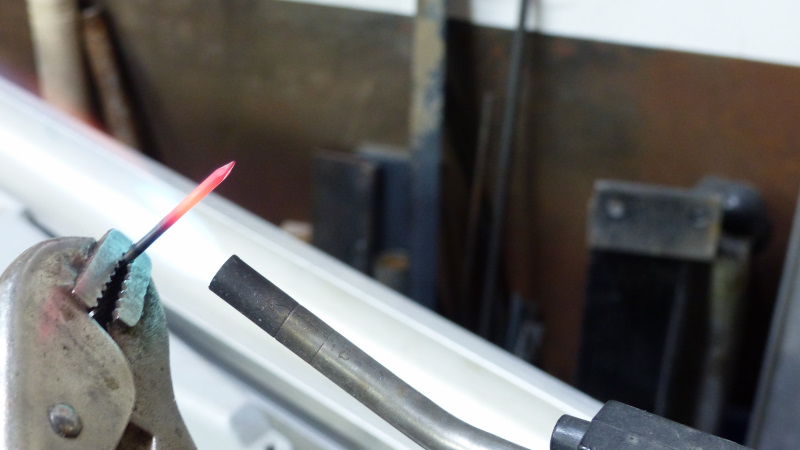 After quite a bit of back and forth, forming and test fitting, I had a nice little pulley shaped bushing. 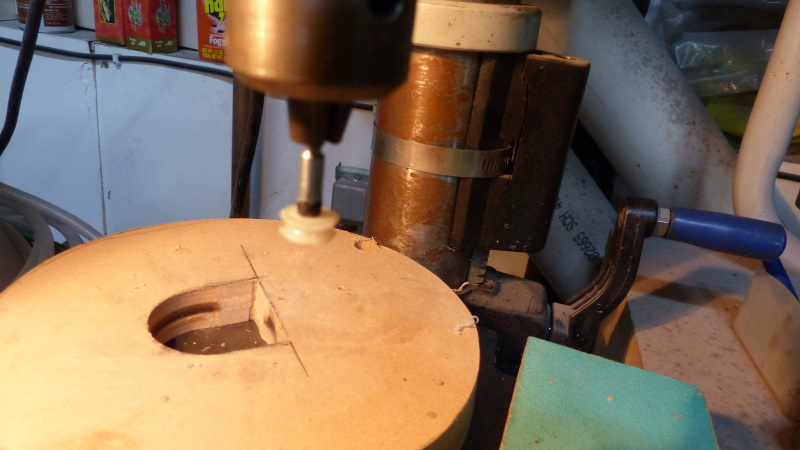 Here's one nestled in its home. 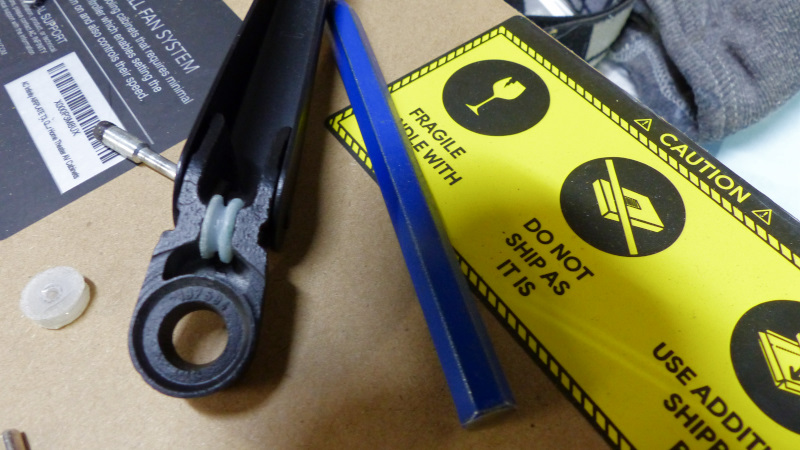 Now the not so fun part. Before trying to put the springs back on, eat your damn Wheaties. Those things were a Bee-otch to pull on. I'm could have rigged up some kind of lever jig to make it easier, but I manage to grunt those buggers on. And here they are. 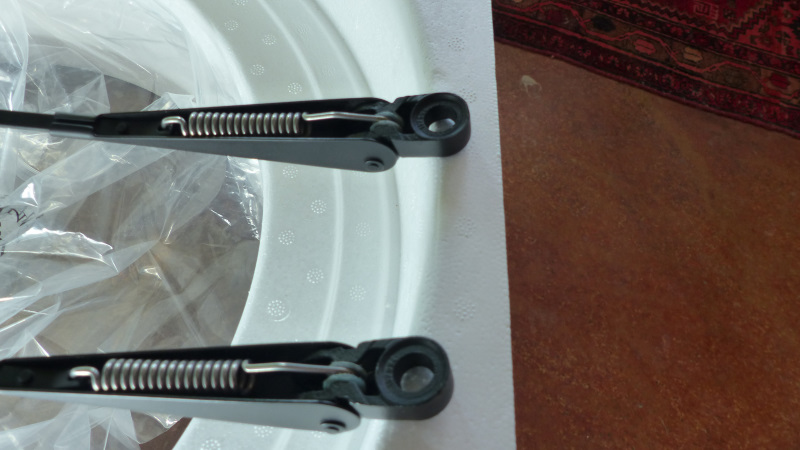 |
|
|
|
| Van914 |
Jan 27 2021, 06:26 AM
Post
#1834
|
|
Van914 Group: Members Posts: 702 Joined: 5-January 03 From: Cincinnati, Ohio Member No.: 90 Region Association: Upper MidWest |
Impressive!
|
|
|
|
| Superhawk996 |
Jan 27 2021, 08:31 AM
Post
#1835
|
|
914 Guru Group: Members Posts: 7,846 Joined: 25-August 18 From: Woods of N. Idaho Member No.: 22,428 Region Association: Galt's Gulch |
QUOTE(bbrock @ Jan 26 2021, 10:04 PM) Everything fits nicely behind Door #1. My pump is going up front for vapor lock reasons but I've never liked any of the front mount solutions. For some reason that space below the head lamp buckets is just wasted space and begging for something to go there but then the hose routing get's all whacky. Getting the pump noise further from the cabin would be a good thing. I don't know why, but, for some reason cuttting a hole in my front bulkhead rubs me the wrong way. But, the more I look at this it's becoming more appealing. Of course, the front bulkhead location was an OEM solution for obvious reasons (IMG:style_emoticons/default/laugh.gif) By the way do you ever sleep? (IMG:style_emoticons/default/lol-2.gif) |
|
|
|
| bbrock |
Jan 27 2021, 08:55 AM
Post
#1836
|
|
914 Guru Group: Members Posts: 5,269 Joined: 17-February 17 From: Montana Member No.: 20,845 Region Association: Rocky Mountains |
QUOTE(Superhawk996 @ Jan 27 2021, 07:31 AM) QUOTE(bbrock @ Jan 26 2021, 10:04 PM) Everything fits nicely behind Door #1. My pump is going up front for vapor lock reasons but I've never liked any of the front mount solutions. For some reason that space below the head lamp buckets is just wasted space and begging for something to go there but then the hose routing get's all whacky. Getting the pump noise further from the cabin would be a good thing. I don't know why, but, for some reason cuttting a hole in my front bulkhead rubs me the wrong way. But, the more I look at this it's becoming more appealing. Of course, the front bulkhead location was an OEM solution for obvious reasons (IMG:style_emoticons/default/laugh.gif) By the way do you ever sleep? (IMG:style_emoticons/default/lol-2.gif) I'm with you. I've had two 914s (including this one) with the fuel pump relocated to the steering rack area per factory tech bulletin. Neither was done with finesse but the location worked fine even though it looked like the after thought that it was. The one 914 I had with the fuel pump still in original location vapor locked quite frequently. Cutting a hole in the bulkhead was difficult for me, but in the end, I decided it was the right and proper relocation position. I haven't decided what to do with the bulkhead carpet yet. For now I just left it unglued in that area so it drapes over the blister for a stealth upgrade. I probably should source the little carpet blister to add so I can glue the bulkhead carpet down properly and still access the pump. |
|
|
|
| Dion |
Jan 27 2021, 06:40 PM
Post
#1837
|
|
RN Group: Members Posts: 2,926 Joined: 16-September 04 From: Audubon,PA Member No.: 2,766 Region Association: MidAtlantic Region |
Fantastic! Just fantastic work mate. Keep it coming. (IMG:style_emoticons/default/beerchug.gif)
|
|
|
|
| bbrock |
Jan 31 2021, 07:55 PM
Post
#1838
|
|
914 Guru Group: Members Posts: 5,269 Joined: 17-February 17 From: Montana Member No.: 20,845 Region Association: Rocky Mountains |
Myth Busting
I'm convince that Internet myths are impossible to kill, but it sure is fun to try. Today's myth is that you can't run carbs with a high pressure FI fuel pump. Nonsense. Lots of people do it and there are several good threads on it. The trick is to use a return line and bypass fuel pressure regulator. And no, it does not mean you are pressurizing part of your fuel circuit to 30 psi or whatever the pump is rated for. Pumps don't make pressure. Regulators do. For Webers, you install a bypass regulator that will bleed off enough fuel to make 3-4 psi and dump the rest into the return line where it feeds you reserve fuel reservoir the way Porsche intended. Do you have to set up carbs this way? Of course not. Are there benefits? Yes. So this was my task today - installing the regulator. Low pressure bypass regulators are not very common. The most used unit is the PMO regulator which seems to be the standard for Porsche carb conversions. (IMG:http://www.914world.com/bbs2/uploads_offsite/www.partsklassik.com-20845-1612144540.1.jpg) There is also Malpassi which is Italian and seems to be pretty commonly used in Europe. Aircooled.net recommends this brand but did not have the bypass version in stock so I ordered one on ebay from Germany. The two regulators cost about the same once you figure buying a separate pressure gauge for the Malpassi. To be honest, my decision was based purely on aesthetics. The PMO is a nice unit but screams after market whereas the Malpassi seemed like it would look more native to a 73 Porsche engine bay. First step was to modify the little bracket that came with the unit. I bent it 90 degrees. Then I drilled out the mount holes to repurpose my original MPS mounting grommets for an anti vibration mount. I don't want the regulator telegraphing fuel pump vibrations into the chassis. 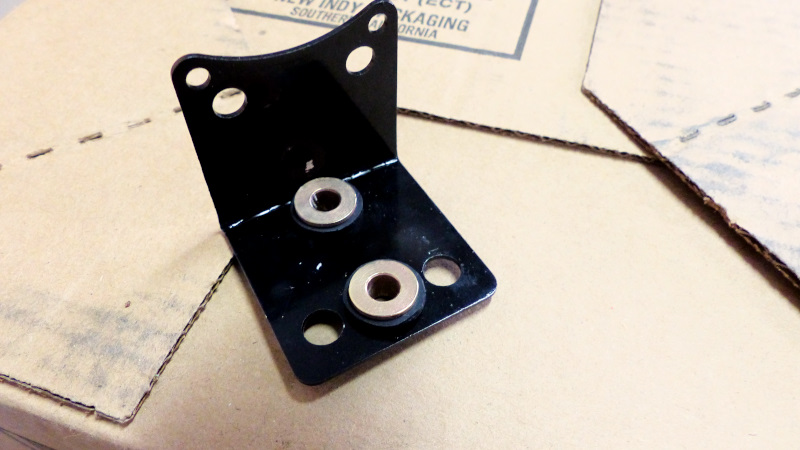 The bracket bolts to the MPS bracket on the chassis. Here's the view of the regulator mounted from above. 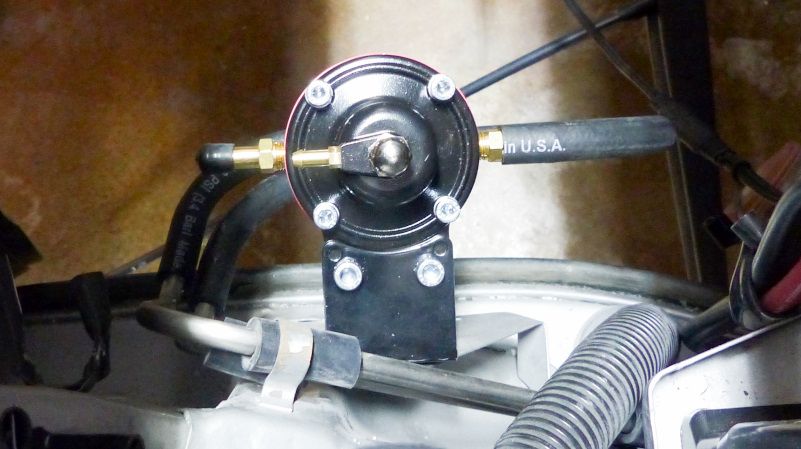 And from inside the engine bay. The hose coming out of the bottom is the return loop. Still need to pick up some good hose clamps before the permanent installation, but I like how this looks. After trying a lot of different locations, I decided to mount the pressure gauge on the right carb with a tee fitting which has been ordered. 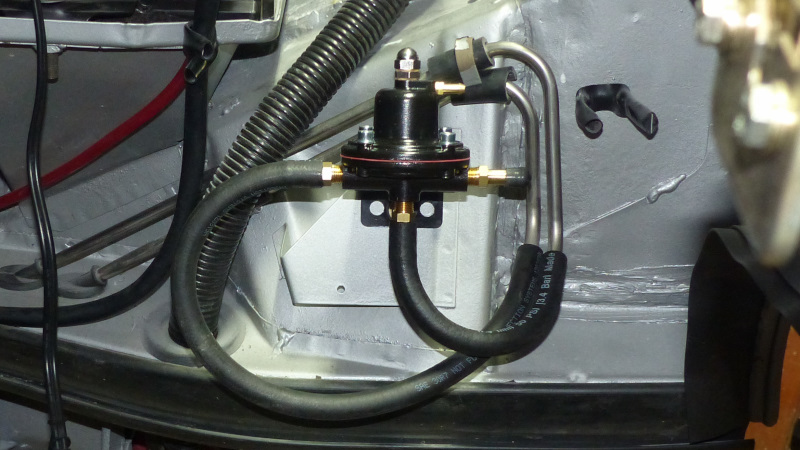 The other thing I did today was to shift shims around on my rocker shafts to offset the adjusters slightly on the valves stems. I'm still quite skeptical it makes any real difference, but can't argue with the fact many reliable engines have been built with the offset. 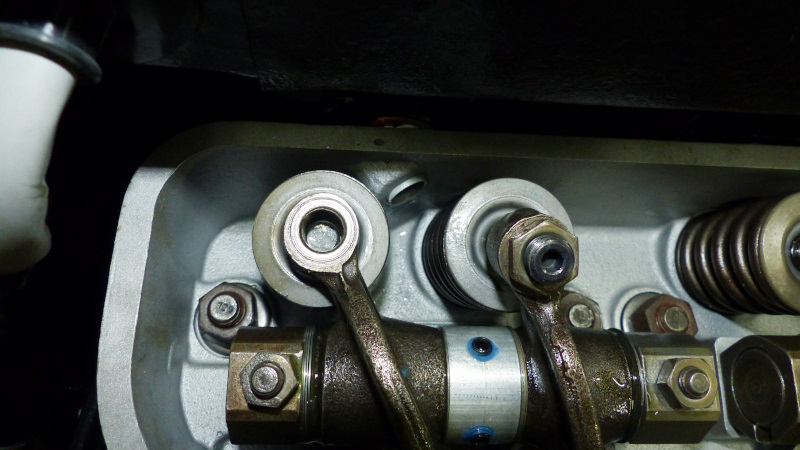 Just before quitting for the day, I snapped the pushrod tube retaining springs in just to get them off my table saw and discovered one of them looks pretty sketchy. It is worn right where it would contact the edge of one of the center blocks when snapped in place. Having that snap in a running engine doesn't sound like fun. I have a tub full of 3 engines worth of spare valve train parts but not a single retaining spring. How can that be? (IMG:style_emoticons/default/confused24.gif) I'll have to source a good used one. 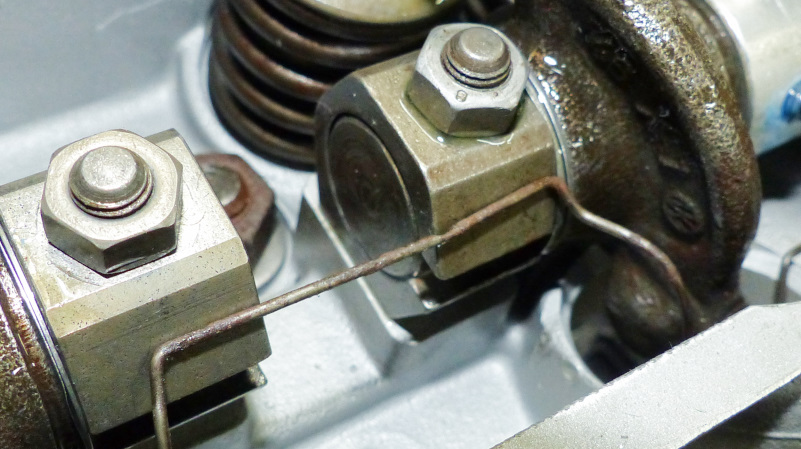 |
|
|
|
| bbrock |
Feb 7 2021, 09:52 PM
Post
#1839
|
|
914 Guru Group: Members Posts: 5,269 Joined: 17-February 17 From: Montana Member No.: 20,845 Region Association: Rocky Mountains |
Ground Hog Day
I spent this weekend redoing crap I've already done. I started a separate thread about my trailing arm bushing saga, but just to recap... Early in the build I bought 914Rubber's solid SS pivot shafts and poly/graphite bushings since that was the only option I could afford at the time. Then when 914R introduced their new rubber rear bushings, I jumped onboard. In the process of tearing down the trailing arms to install the new bushings, I decided the solid SS pivots were too damn heavy for a street car so swapped them for a pair of OE shafts. Then I discovered the fit of the bushings was not acceptable. I wound up doing what I should have done from the get go which is ti buy Elephant Racing bushings. Comparing Elephant with 914R, you can see that the walls of the 914R bushing (left) and the ID larger than Elephant. Measurements are on the other thread. 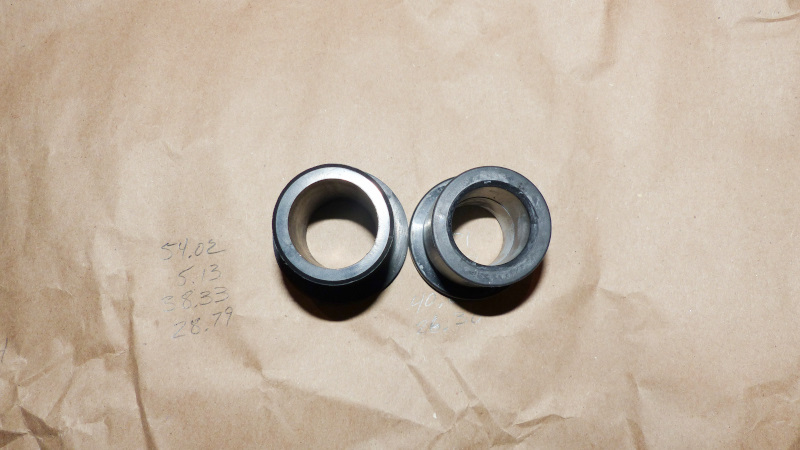 It took a lot of cranking on a pipe clamp to get the Elephant bushing in, but I managed even though my arm has been feeling it all weekend. 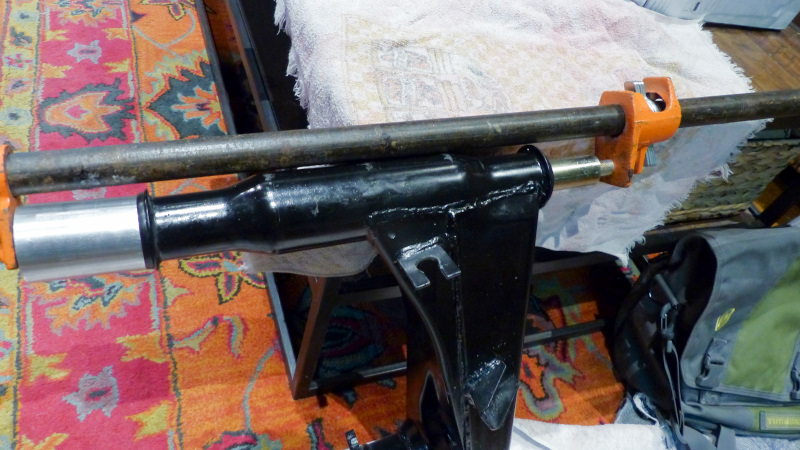 The result is a super tight fit just like OE. 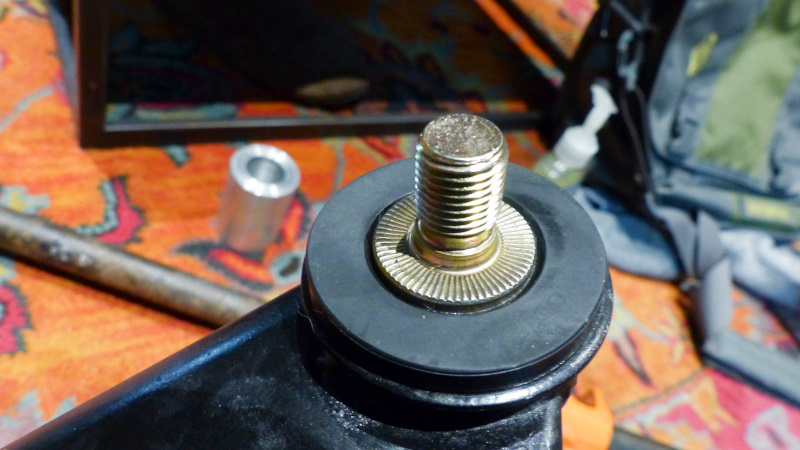 While the trailing arms were out, I installed the rear axles too. 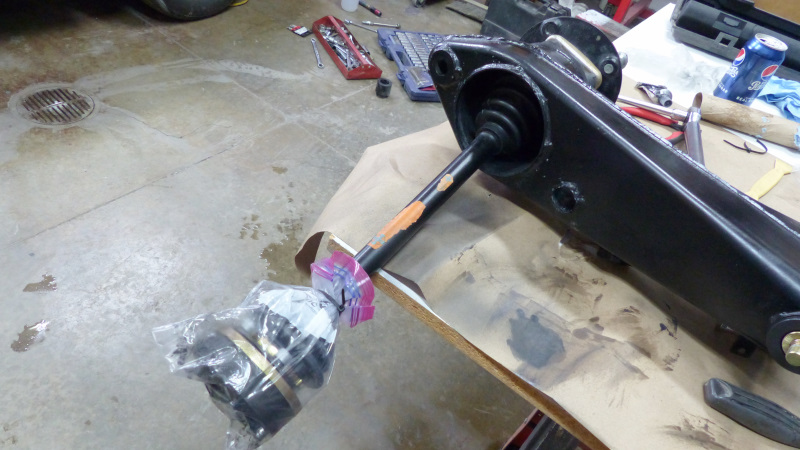 Between the rubber bushings that don't allow the outer mount bearing to pivot and the axles in place, reinstalling the trailing arms was quite a bit harder than before and required a copious amount of swearing. This won't look any different to you, but it sure does to me. So happy to have good OE style bushings in place. 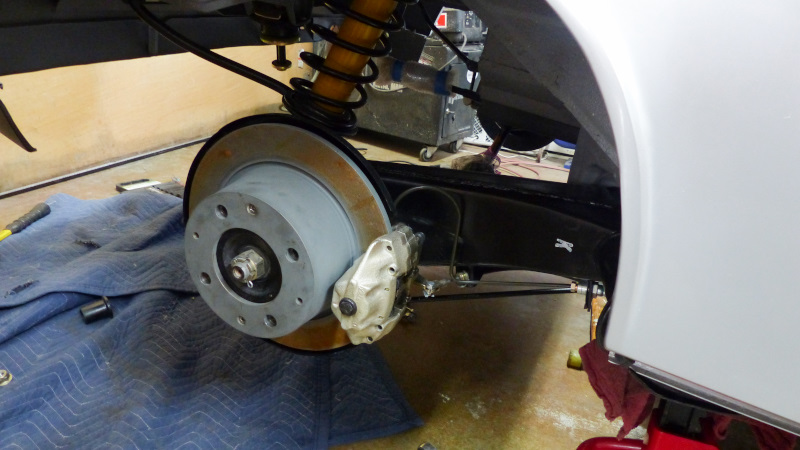 Next up was to lift the front onto jack stands to tackle a project I've been dreading. After filling and bleeding my brake system to a nice hard pedal, I was sickened to see my fluid reservoir slowly drain dry. I was fairly certain it had seeped past the MC grommets so I ordered new OEM grommets from Porsche a couple months ago. The inside of the gravel pan confirmed my diagnosis. I'm so happy I get to sand that down and repaint. 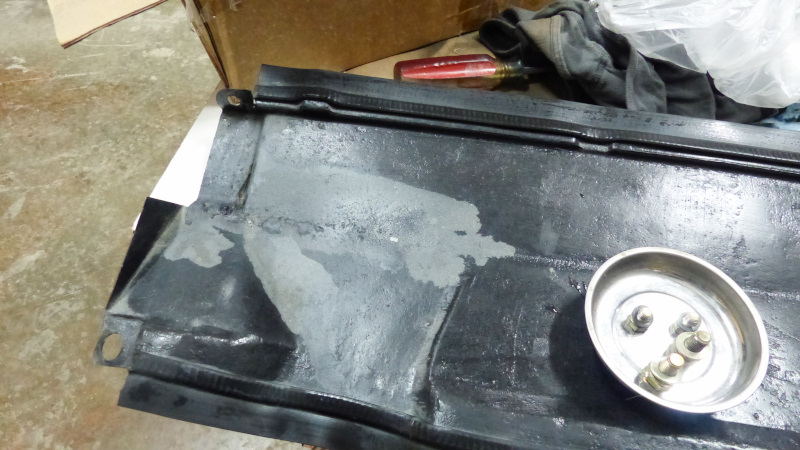 I was suspicious of the grommets that came with the 914R MC from the beginning because they were not nearly ad difficult to install as descriptions I've read. I also noticed when bleeding the lines that if I pushed the supply lines sideways at all, fluid would come out of the grommet. I should have stopped right there. Oh, and yes, the MC does have new metal washers from Porsche in it. A comparison between the 914R grommet with the OEM version raises concerns. Overall the 914R grommets looks to be a close replica of OE except the ID is considerably larger. The ID of the OEM grommet measured 7.16 mm while the 914R version measured 7.5 mm. 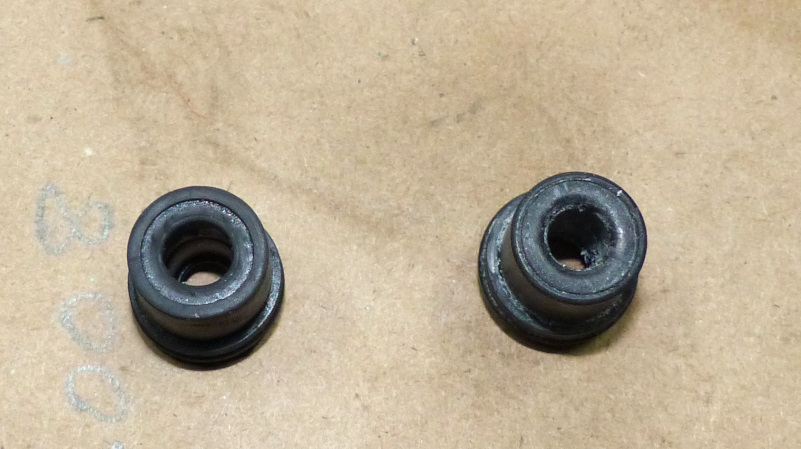 I can't say if the larger ID was caused by being installed for almost a year, but the OEM grommets took noticeably more force to slip over the flared steal fittings which I did after lubing them inside and out with brake assembly lube.  I used an 11mm flare nut wrench to pull the grommets down into the MC. The connection seems MUCH firmer and secure than the old grommets did. So far, no leaks. I'll leave the car on jack stands with no gravel pan for a week to monitor, but I'm optimistic. 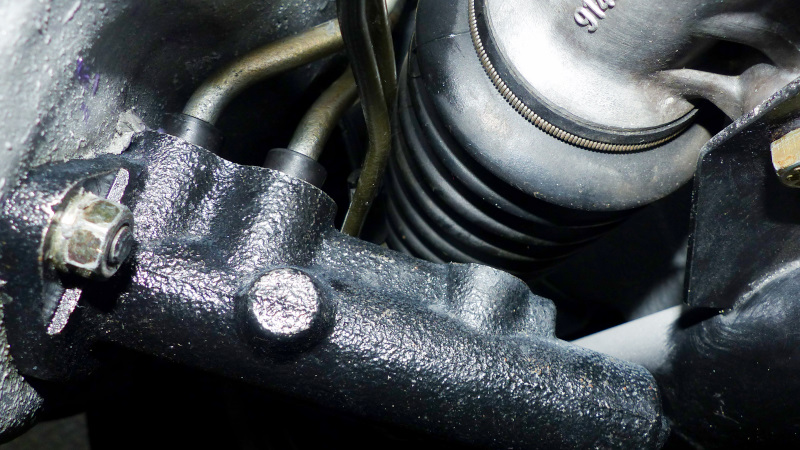 I'm curious if anyone else has had issues with the 914R grommets leaking. I'll be honest, I was in a bad mood most of the day over this. Anyone who has done this can attest it is no fun to do once, let alone a second time to replace shitty grommets. Worse, keeping brake fluid in the system is kind of important so if there is a defect here, we need to know. The OEM grommets are not expensive so I don't see any reason to use repops anyway. There was something good that came out of this though. While under the car I found this fuel hose hanging free and the connection is is supposed to connect with. 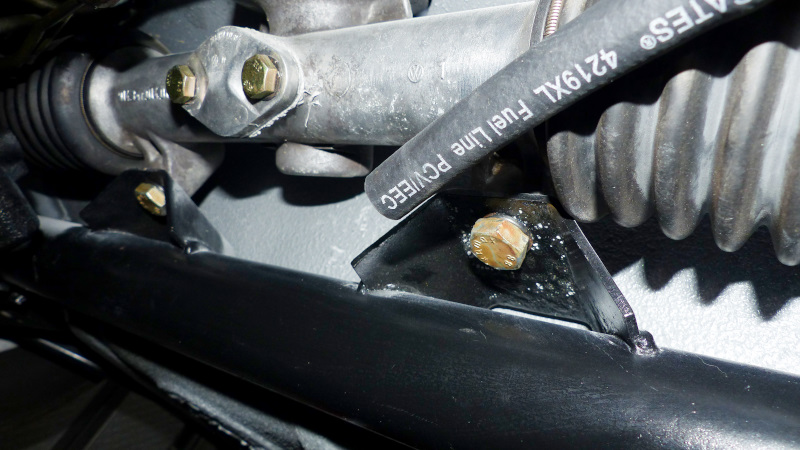 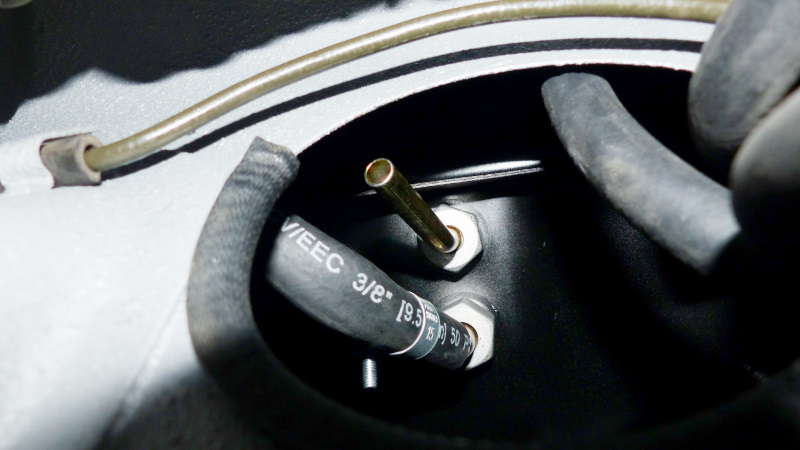 I had completely forgotten that I ran out of hose clamps working on those lines so left that last connection undone. I use those yellow tags to make sure I don't forget things like that but they only work if you actually used them (IMG:style_emoticons/default/slap.gif) Proper hose clamps were installed and the connection made. 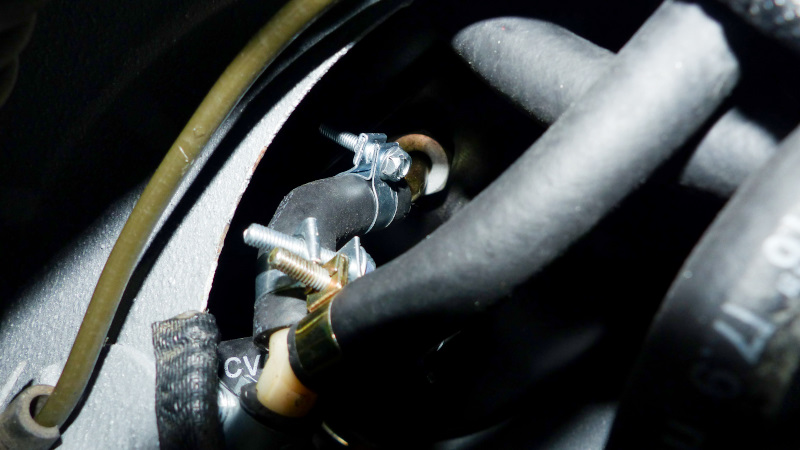 Those 3-port fuel pumps do make a mess of the fuel line routing, but a hundred bucks for a new pump seems unnecessary when the one I have functions well. I may wind up regretting that, but it's how I'm going to roll. Anyway, not the most fun weekend on the project but a bad day today with the MC grommets may have averted a worse mess in the near future. Here's hoping the brake fluid leak is fixed. (IMG:style_emoticons/default/hands.gif) |
|
|
|
| Superhawk996 |
Feb 8 2021, 08:59 AM
Post
#1840
|
|
914 Guru Group: Members Posts: 7,846 Joined: 25-August 18 From: Woods of N. Idaho Member No.: 22,428 Region Association: Galt's Gulch |
|
|
|
|
|
1 User(s) are reading this topic (1 Guests and 0 Anonymous Users)
0 Members:

|
Lo-Fi Version | Time is now: 29th May 2026 - 11:02 AM |
Invision Power Board
v9.1.4 © 2026 IPS, Inc.