|
|
|
Porsche, and the Porsche crest are registered trademarks of Dr. Ing. h.c. F. Porsche AG.
This site is not affiliated with Porsche in any way. Its only purpose is to provide an online forum for car enthusiasts. All other trademarks are property of their respective owners. |
|
|

  |

| andrewb |
 Dec 31 2017, 05:35 PM Dec 31 2017, 05:35 PM
Post
#201
|
|
Member  Group: Members Posts: 114 Joined: 25-May 10 From: UK Member No.: 11,762 Region Association: None |
QUOTE(bbrock @ Dec 31 2017, 05:50 PM)  QUOTE(andrewb @ Dec 31 2017, 12:09 AM) What are the little yellow tags you've left hanging on the car ? I just know there'll be a good reason and I want to copy it (IMG:style_emoticons/default/smile.gif) Those are my to-do reminders; mostly for tasks that were left undone because they would be easier when the car was repositioned on the rotisserie, or have to wait until some other task is completed. Picked a pack of these tags up at Staples and figured bright yellow dangly things would be hard to ignore. Good idea - I'll be doing the same - and apols for calling you Brett earlier. Now corrected. |
   |

 
|
| bbrock |
Jan 2 2018, 12:05 AM
Post
#202
|
|
914 Guru Group: Members Posts: 5,269 Joined: 17-February 17 From: Montana Member No.: 20,845 Region Association: Rocky Mountains |
QUOTE(andrewb @ Dec 31 2017, 04:35 PM) - and apols for calling you Brett earlier. Now corrected. Ha, that happens so often, I didn't even notice. (IMG:style_emoticons/default/beerchug.gif) Kind of random progress Started out yesterday harvesting bits from the old floor pan and circled back to end today bead blasting them. Combined with the two bungs and 4 carpet buttons I got from Garold, I'm good to go. 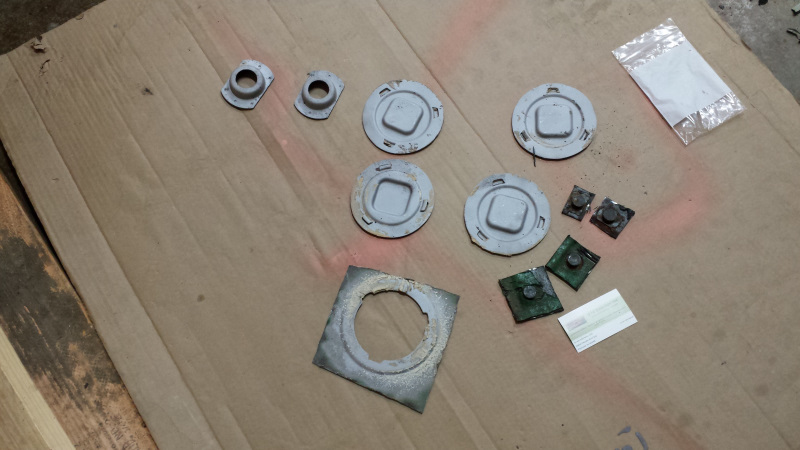 I decided to harvest the seat hinges too, even though I'll be installing a new set from RD. I'm glad I did though. Otherwise, I probably would have forgotten this little cable clip for the seat belt sensor.  After a couple weeks of sub-zero temps, we got a nice inversion yesterday so it was a balmy 21F up here on the mountain, even thought it hovered at, or below zero all day down in Bozeman. Not wanting to waste the nice sunshine, I hauled the car outside for some sun and sand, Montana style. I wasn't sure how well blasting would work in the cold, but it actually worked better than when it was warm.  I blasted the tunnel and inside the firewalls with crushed glass until I ran out of media. Normally, I would have just recovered most of the media from the tarp and sieved it for another go, but there was no keeping snow out of it, so it will need to be dried before it can be used again. Got the job mostly done but need to make another round. 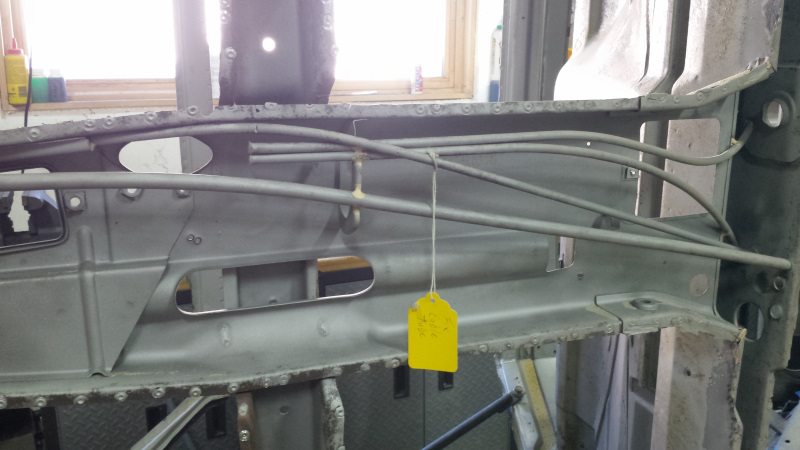 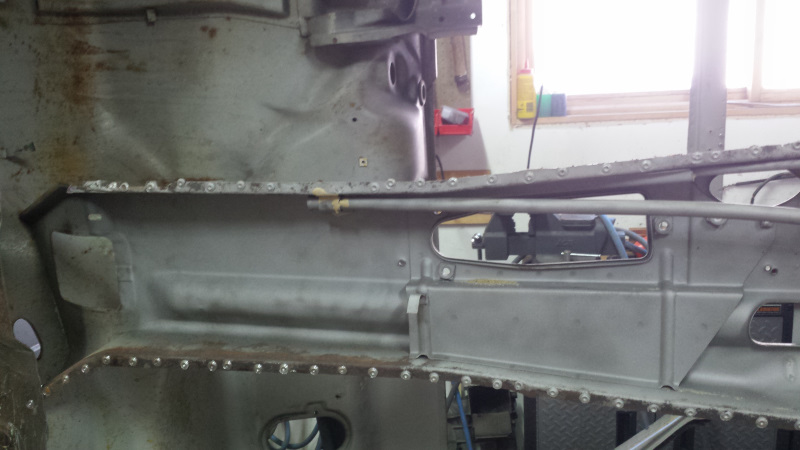 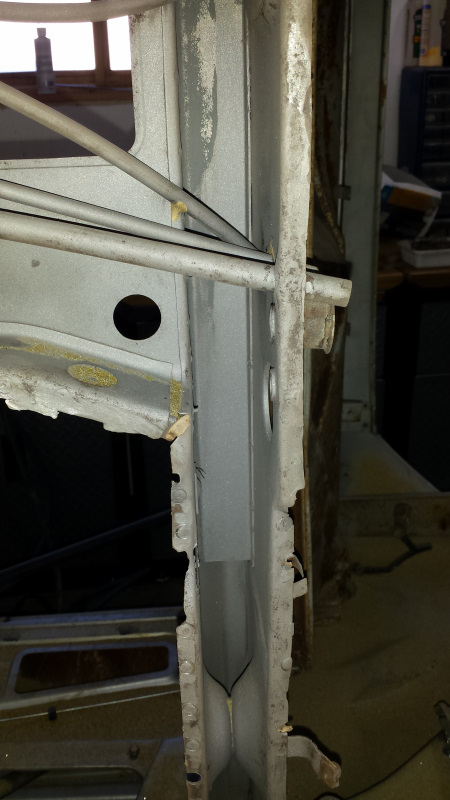 Headed to a New Year's Eve party early enough to pick up a couple more bags of media at the lumber yard, only to find they had closed early for the holiday. (IMG:style_emoticons/default/headbang.gif) So this morning, I dove into a task I have been dreading - fixing the corrosion where the hood release handle mounts thanks to years of mouse and weasel piss. 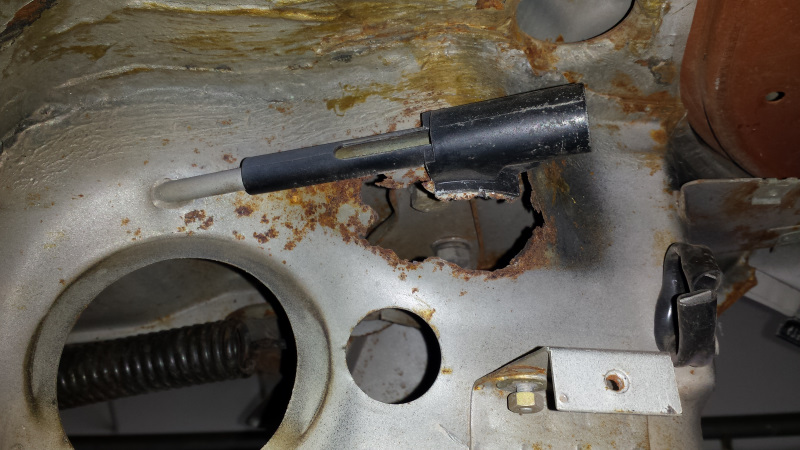 But with the floor out, access would never be better. The corrosion from the fuel tank side was so bad I had to reference the PET just to figure out what kind of fasteners I was dealing with. 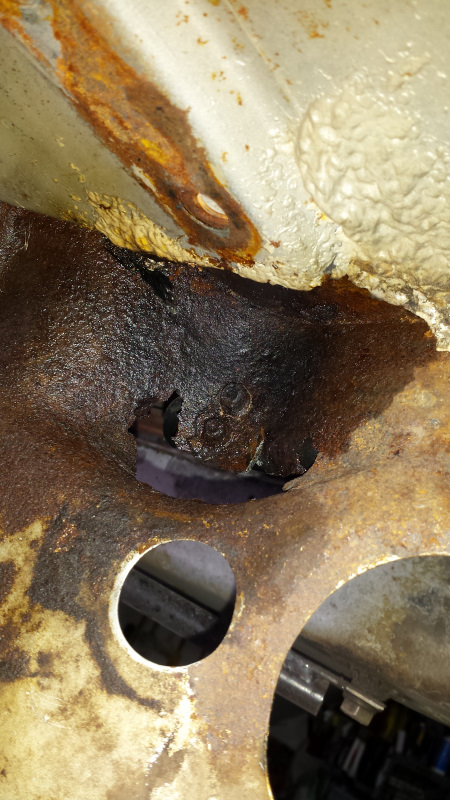 I cursed when I read they are pan head screws, but the gods were merciful today so after heating them with a torch yesterday and soaking them in penetrating oil overnight, they came loose with vice grips without much fight.  Now the challenge of fabricating a compound curved piece for that spot. I sharted by just hand bending the main part of the patch where the handle will mount. 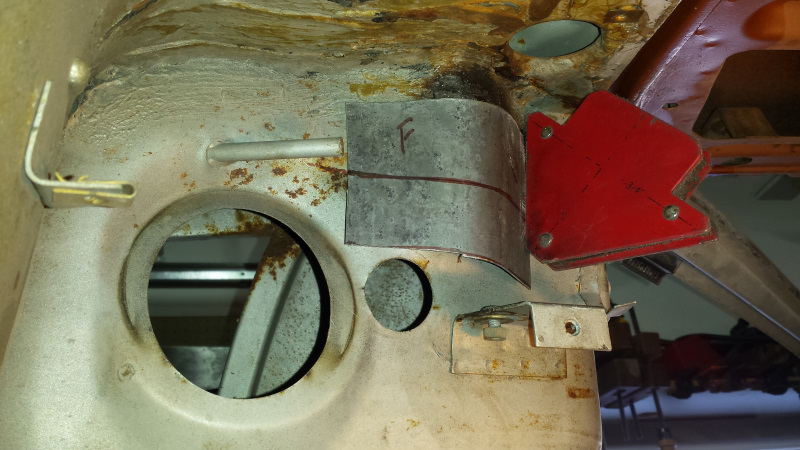 I've come close to buying or making a good set of stake dollies but couldn't quite justify the expense for just a couple parts. If I had them, I would have tried to hammer out the shape by forming tucks and shrinking them, but I gave up on that, and just made some relief cuts to form bends. It's starting to get there in this shot. 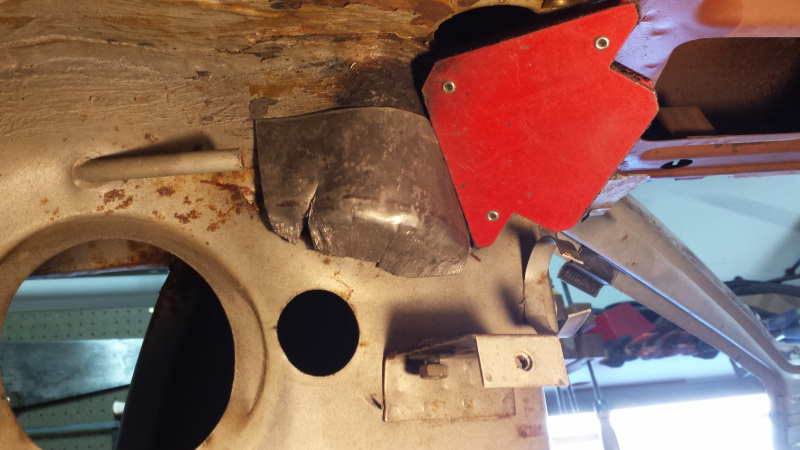 And then, just as things were getting interesting, my welding helmet lost its Mo Jo. (IMG:style_emoticons/default/headbang.gif) Batteries went dead. I put the helmet outside over lunch to see if they would recharge, but no luck. I thought these were supposed to go dark when the batteries died, mine didn't. I didn't have any spares and it wasn't worth a special trip to town. So that was it for welding for the day. Still some work to do on the patch, but not looking too bad.  I ground off all the spot weld tits from the floor flange, and then put on my X-country skis and played outside for awhile. After that, I finished the day by bead blasting the parts harvested from the floor yesterday. |
|
|
|
| bbrock |
Jan 7 2018, 12:20 AM
Post
#203
|
|
914 Guru Group: Members Posts: 5,269 Joined: 17-February 17 From: Montana Member No.: 20,845 Region Association: Rocky Mountains |
A whole week for a 6"x9" patch
On Monday, I got my welding helmet squared away and was back to work on the patch for the frunk cable pull mount under the dash. I'm not going to lie, this was a giant B and I had my doubts I could pull it off. It was so hard, I didn't take any progress picks because I was just floundering my way through. I got the patch shaped up pretty well and welded into place on Monday. On Wednesday, outside temps actually climbed above freezing for the first time in over a month, so I wheeled the rig outside for another round of media blasting. I got the tunnel and cross member cleaned up, then blasted both sides of the weasel latrine area I was patching. Of course, a big area beyond what I thought needed patch blew out into Swiss cheese. I spent a bunch of time zapping all the little holes shut with the welder, but when I had finished, it looked like crap so I cut it all out and started on a second patch to extend the first. Simpler curves on the second patch, so not as hard to shape, but it required a lot of tacking and tapping shape the patch as I welded to make it work. I finally got it in place and started the LONG process of grinding and then welding up exposed pinholes. Access to that area is terrible, even with the floor pan fully off. Then there is the cable tube for the trunk release, and fuse box brackets to add extra challenge and interfere with the welding gun and grinding tools. This was just a case of globing on melted steel and then sculpting with a cutoff wheel to pretend the welds weren't shitty. The whole time I kept thinking that Ben would probably flunk me on this assignment. Finally, I got things welded and shaped to something close to what I was after. 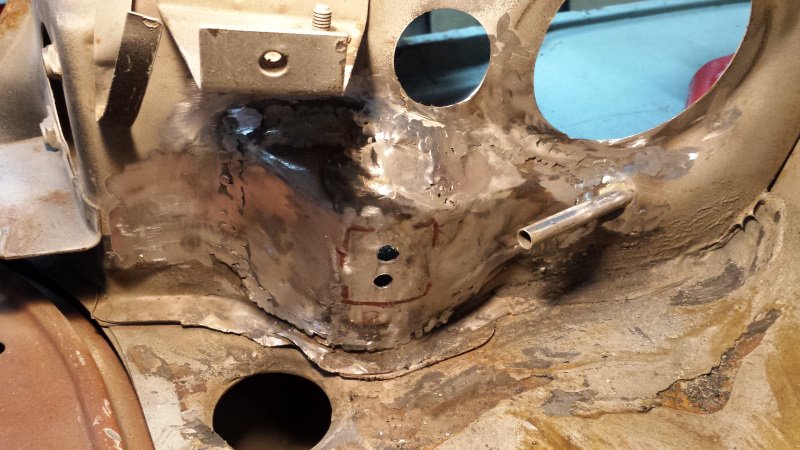 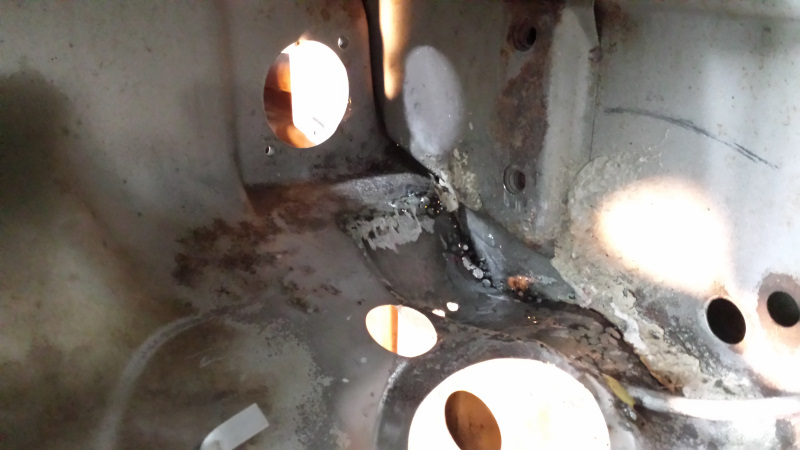 Of course, the real test was whether the trunk pull mount would fit. Luckily, it did. 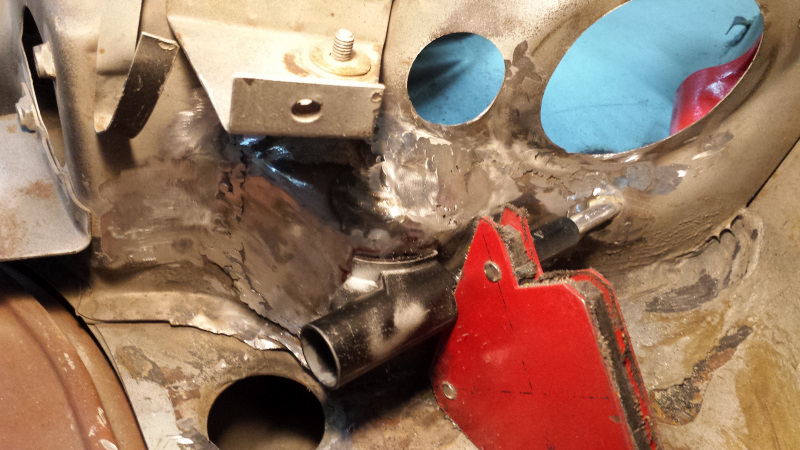 I didn't get too carried away smoothing welds that will be buried under seam sealer, and I'm not going to beat myself up too bad over needing a little FG reinforced filler to fill pin holes and a few minor rough spots. But after final grinding with a conditioning disk, it isn't too bad. A thin skim of filler and the repair should dissapear completely. 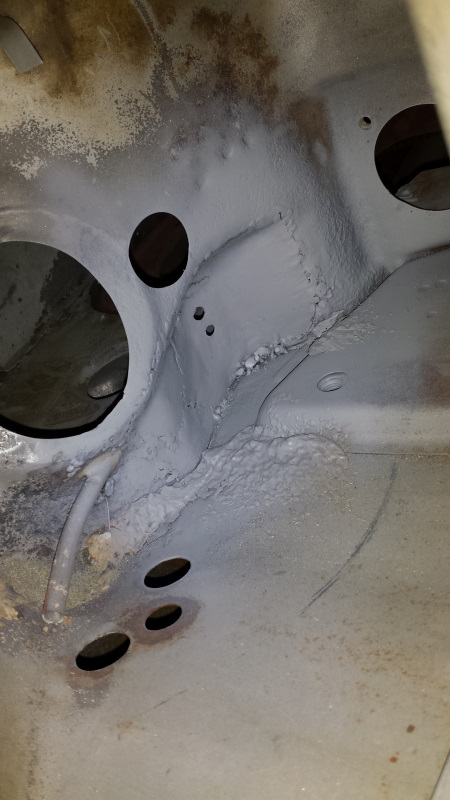 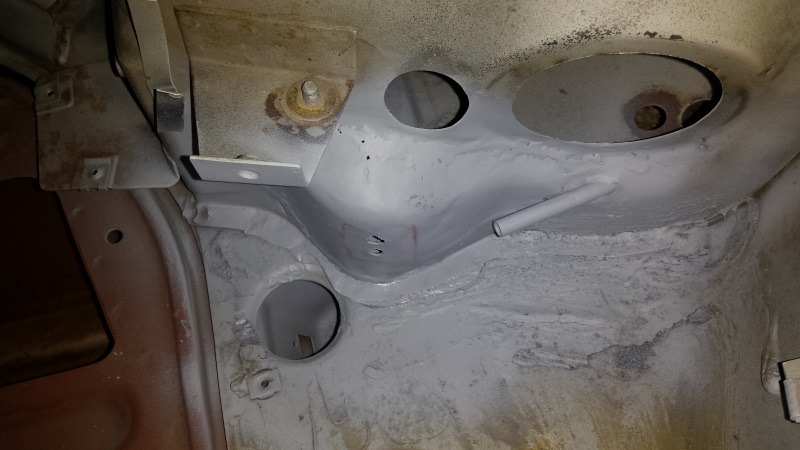 Boy, am I glad that is done! |
|
|
|
| euro911 |
Jan 7 2018, 12:44 AM
Post
#204
|
|
Retired & living the dream. God help me if I wake up! Group: Members Posts: 8,937 Joined: 2-December 06 From: So.Cal. & No.AZ (USA) Member No.: 7,300 Region Association: Southern California |
You're doing amazing fixes, dude.
Looking at your open tunnel pix, I think both my accelerator & clutch tubes need some attention near the rear firewall/bulkhead. I think the best approach is to cut out a couple squares from the underside to deal with them. then weld patches & shoot undercoating on them when done (IMG:style_emoticons/default/confused24.gif) |
|
|
|
| bbrock |
Jan 7 2018, 01:03 AM
Post
#205
|
|
914 Guru Group: Members Posts: 5,269 Joined: 17-February 17 From: Montana Member No.: 20,845 Region Association: Rocky Mountains |
Thanks. Now that I've fully dissected this tunnel, I think you are right on your proposed plan. I think you could cut off fairly large sections of tunnel from the underside and weld them back in pretty seamlessly. Luckily, the only tube repair needed on mine was a quick zap with the welder on the accelerator cable tube to fix a small nicked from the cutoff wheel getting the floor off. That tube rides right down on the tunnel floor right where I cut. (IMG:style_emoticons/default/headbang.gif)
|
|
|
|
| euro911 |
Jan 7 2018, 01:08 PM
Post
#206
|
|
Retired & living the dream. God help me if I wake up! Group: Members Posts: 8,937 Joined: 2-December 06 From: So.Cal. & No.AZ (USA) Member No.: 7,300 Region Association: Southern California |
When you get a chance, could you shoot a pic of this area showing the accelerator cable tube? ... I can't see where it ends at the front (IMG:style_emoticons/default/unsure.gif)
 |
|
|
|
| bbrock |
Jan 7 2018, 05:03 PM
Post
#207
|
|
914 Guru Group: Members Posts: 5,269 Joined: 17-February 17 From: Montana Member No.: 20,845 Region Association: Rocky Mountains |
QUOTE(euro911 @ Jan 7 2018, 12:08 PM) When you get a chance, could you shoot a pic of this area showing the accelerator cable tube? ... I can't see where it ends at the front (IMG:style_emoticons/default/unsure.gif) You bet. It is hiding under the clutch cable tube. Notice also that the accelator cable tube runs through its own reinforcement jacket and all the tubes are brazed in place rather than welded. I should have turned flash on for this pic, but hopefully you can see all the important bits okay. 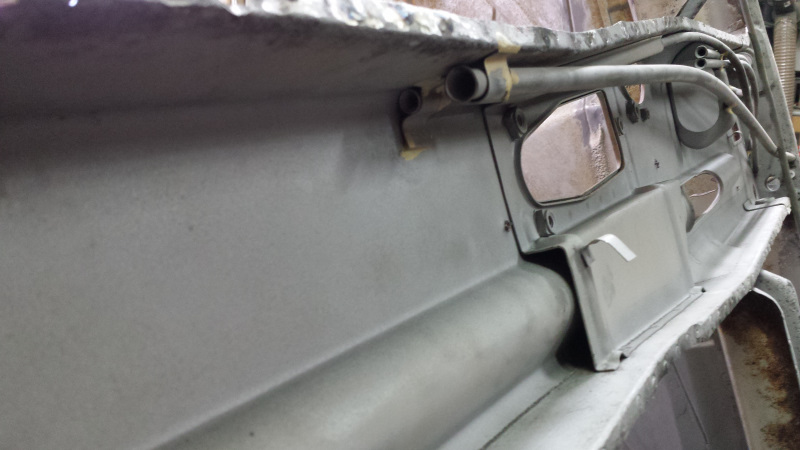 Also, there are a couple of those thin metal cable wraps for the fuel lines on the floor of the tunnel, so you will want to pay attention to those when you are cutting for access. (IMG:style_emoticons/default/beerchug.gif) |
|
|
|
| euro911 |
Jan 7 2018, 05:44 PM
Post
#208
|
|
Retired & living the dream. God help me if I wake up! Group: Members Posts: 8,937 Joined: 2-December 06 From: So.Cal. & No.AZ (USA) Member No.: 7,300 Region Association: Southern California |
Perfect, Brent - thank you ... exactly what I needed to see.
I'm tempted to extend the accelerator cable tube more forward, as I believe the cable has somehow wrapped itself around the hose for the hydraulic clutch set up that's running through the clutch cable's tube and causing the drag. I'll definitely heed your caution on cutting into the area (IMG:style_emoticons/default/idea.gif) |
|
|
|
| bbrock |
Jan 7 2018, 09:11 PM
Post
#209
|
|
914 Guru Group: Members Posts: 5,269 Joined: 17-February 17 From: Montana Member No.: 20,845 Region Association: Rocky Mountains |
Pedal area
I only worked a few hours on the car today. After the intensity of the trunk cable pull mount, I wanted to do something easy, yet satisfying today. So I decided to tackle the rust hole in the floor under the pedal area that won't be covered by the RD floor pan. 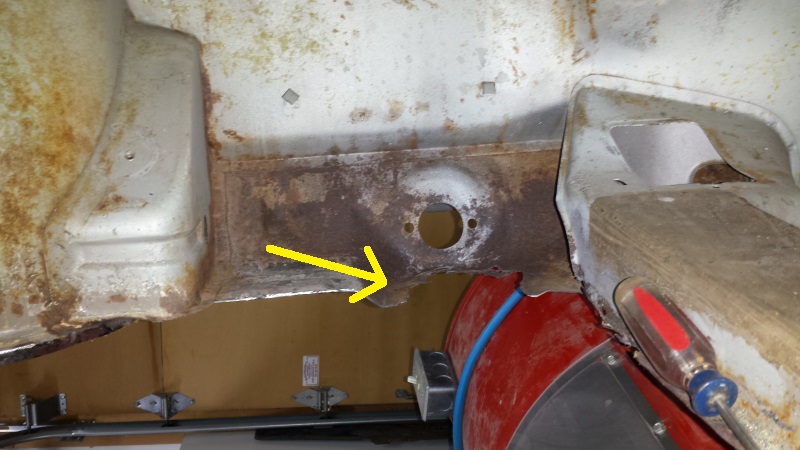 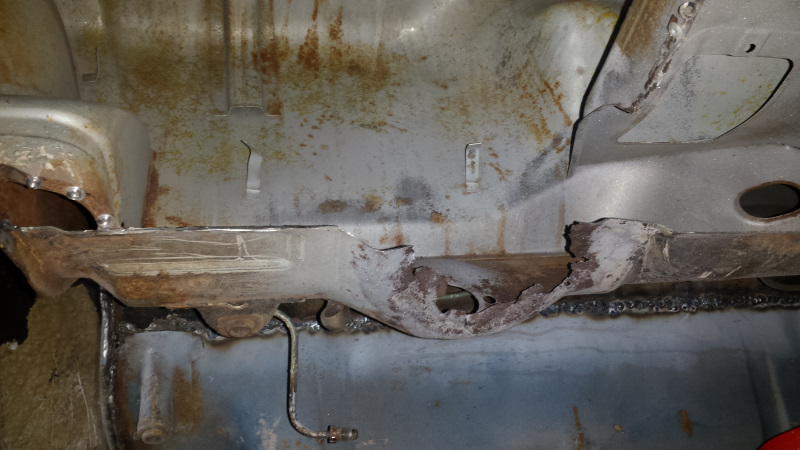 I wanted to replicate the original circular indentaion, so I made a very simple hammer form by cutting a hole with a hole saw in a 1/4" piece of birch plywood. The disc cutout is the same diameter as the metal discs that were seam sealed into those indents to plug U-shaped drain slits (I assuming for dipping the chassis). 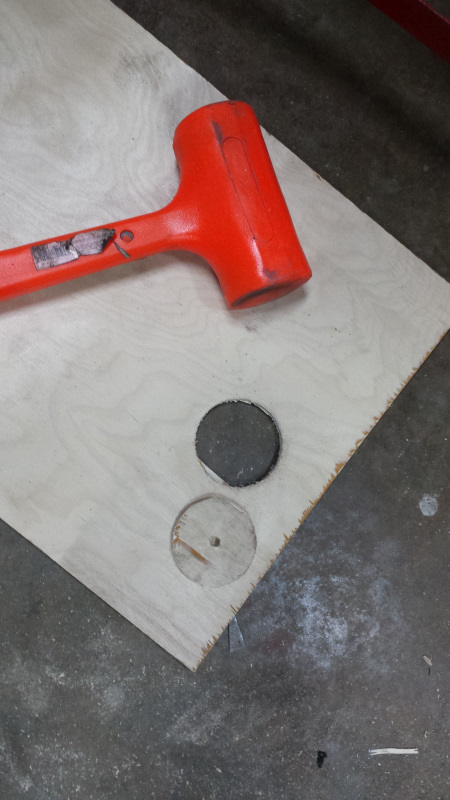 Hammer forming was a simple matter of placing a piece of 18 gauge sheet over the hole, placing the disc on top, and hammering the disc into the hole. Took about 3 minutes. I also did some simple bending on the vice to match the beading, and a little hammer to match some curves around the edges, and I had a nice patch. 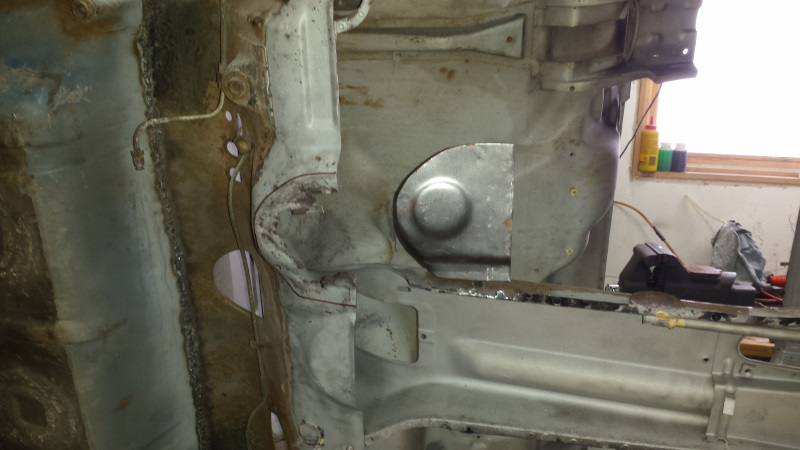 Then it was simply a matter of trimming the opening and welding in place with a few hammer taps here and there to fine tune the shape as I went for a perfect fit. I missed a couple areas while media blasting and intended to hit those with a flapper disc before welding, but I forgot. It caused a little sputter while welding, but not too bad. 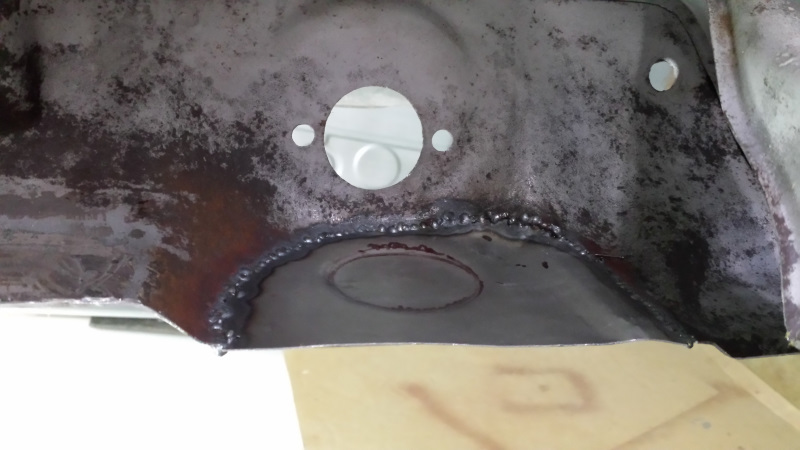 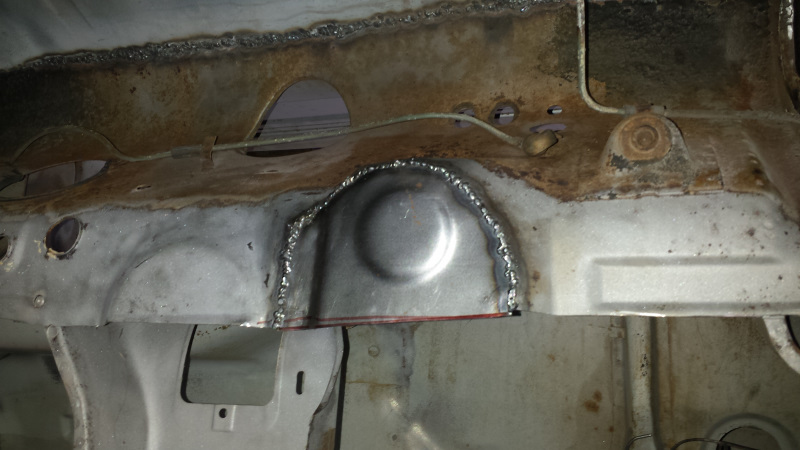 Then carefully grinding down the welds and finishing up with a conditioning disc to blend the joint, and it doesn't look half bad except my old, cheap, Campbell-Hausfeld die grinder that has been abused for 30 years died on me, so I won't be able to grind the weld on the inside until I replace it. 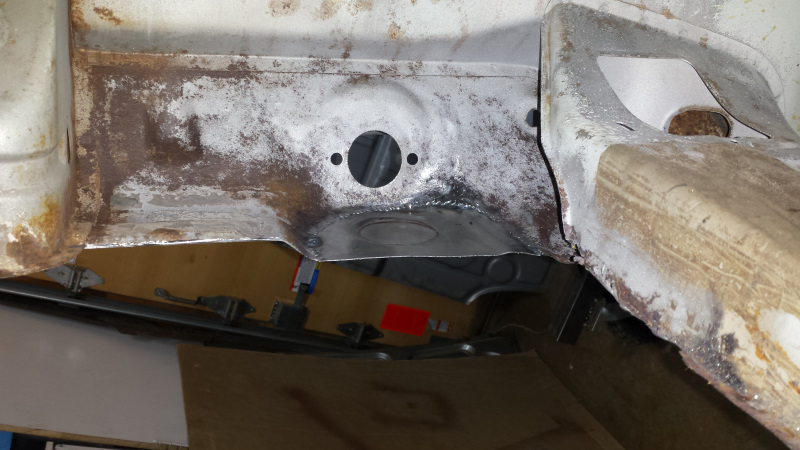 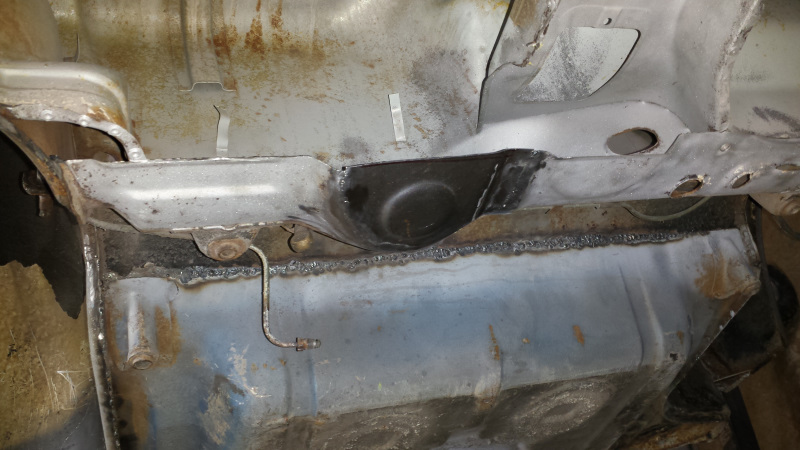 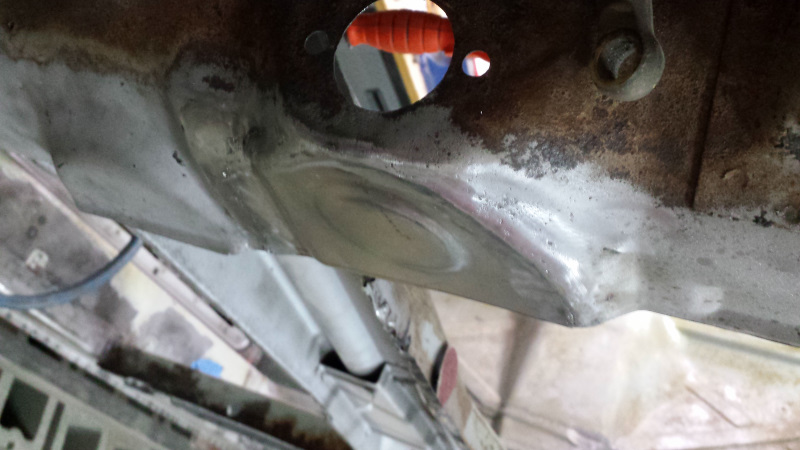 The last of the wire needed to finish my wire harnessed was delivered yesterday, so I might work on that tonight. |
|
|
|
| bbrock |
Jan 9 2018, 01:13 PM
Post
#210
|
|
914 Guru Group: Members Posts: 5,269 Joined: 17-February 17 From: Montana Member No.: 20,845 Region Association: Rocky Mountains |
Just got back from a trip to the doctor:
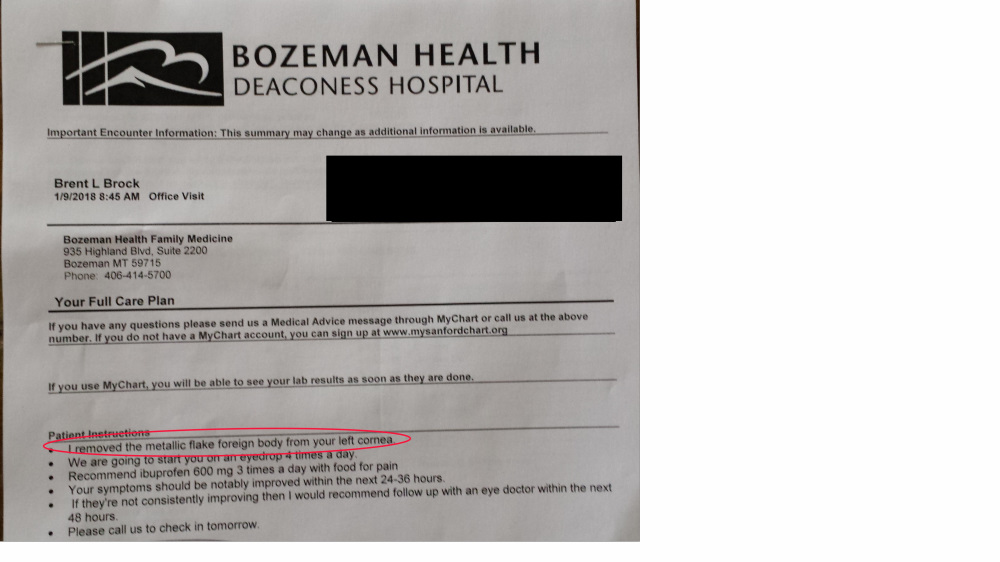 I know what you are thinking... that the dumbass wasn't wearing safety glasses. But I'm very careful to wear all the appropriate eye, hearing, and respiratory equipment. I finished my day of working on my car Saturday without incident. Later, I laid down on my back and felt a shower of crap fall from my eyebrows and into both eyes. I immediately got up and rinsed my eyes with saline but they still burned. I figured I must have scratched both corneas and they would heal. My eyes were pretty goopy on Sunday but I still managed to work some on the car. By yesterday, my right eye was healed but the left was getting worse. This morning, I noticed a black spec on my left eye that wouldn't come off with rinsing. So to the doctor, I went. Hopefully I'll be good as new in a day or so. But all this because I didn't wash my damn face after finishing work on the car. (IMG:style_emoticons/default/WTF.gif) |
|
|
|
| euro911 |
Jan 9 2018, 03:14 PM
Post
#211
|
|
Retired & living the dream. God help me if I wake up! Group: Members Posts: 8,937 Joined: 2-December 06 From: So.Cal. & No.AZ (USA) Member No.: 7,300 Region Association: Southern California |
Coincidentally, yesterday we had to take our 19 y/o Dachshund to the vet for the same reason, scratched cornea ... although she wasn't working on a car when it happened (IMG:style_emoticons/default/rolleyes.gif)
|
|
|
|
| bretth |
Jan 9 2018, 04:55 PM
Post
#212
|
|
Senior Member Group: Members Posts: 899 Joined: 23-June 15 From: Central TX Member No.: 18,882 Region Association: Southwest Region |
I got a tiny piece of rust stuck in my eye just from laying under a car and looking up into the frame one time. Just fell with gravity and they had to use the 'eye drill' to get it out. Hope you heal soon and continue with the great work you are doing.
|
|
|
|
| bbrock |
Jan 9 2018, 08:26 PM
Post
#213
|
|
914 Guru Group: Members Posts: 5,269 Joined: 17-February 17 From: Montana Member No.: 20,845 Region Association: Rocky Mountains |
(IMG:style_emoticons/default/yikes.gif) "eye" and "drill" are not two words that should be in the same sentence! Luckily, no such procedure for me. Just numbed it up and used a micro-spatula to scoop it off.
Hope the pup is doing better Mark. My eye sure is. |
|
|
|
| mbseto |
Jan 10 2018, 02:52 PM
Post
#214
|
|
Senior Member Group: Members Posts: 1,257 Joined: 6-August 14 From: Cincy Member No.: 17,743 Region Association: North East States |
My wife would never let me live something like that down. She always bugs me to groom my eyebrows. I just let them go wild. Didn't realize it was a safety issue...
|
|
|
|
| bbrock |
Jan 10 2018, 03:01 PM
Post
#215
|
|
914 Guru Group: Members Posts: 5,269 Joined: 17-February 17 From: Montana Member No.: 20,845 Region Association: Rocky Mountains |
QUOTE(mbseto @ Jan 10 2018, 01:52 PM) My wife would never let me live something like that down. She always bugs me to groom my eyebrows. I just let them go wild. Didn't realize it was a safety issue... Yeah, mine has recently started commenting on my wild eyebrows. Looks like I'm off to the eye specialist this afternoon. Thought I had this behind me, but then it got worse again. I think I've still got something scraping around in there. Hoping they don't have to break out the "eye drill." |
|
|
|
| porschetub |
Jan 10 2018, 03:53 PM
Post
#216
|
|
914 Guru Group: Members Posts: 5,082 Joined: 25-July 15 From: New Zealand Member No.: 18,995 Region Association: None |
eye drill !! the thought makes me almost (IMG:style_emoticons/default/barf.gif) .
Bummer that happened after how well those repairs turned out ,feel for you did the same myself years ago....bloody painful,get well soon. |
|
|
|
| bbrock |
Jan 10 2018, 07:33 PM
Post
#217
|
|
914 Guru Group: Members Posts: 5,269 Joined: 17-February 17 From: Montana Member No.: 20,845 Region Association: Rocky Mountains |
I'm happy to report I have no more shit in my eye and NO DRILLS (IMG:style_emoticons/default/piratenanner.gif) Doc says I should be at 90% by Friday. If they'd just send me home with a bottle of that Lidocaine for numbing, I'd be at 100% right now. Still have to laugh at the absurdity of the whole thing.
|
|
|
|
| mb911 |
Jan 10 2018, 07:44 PM
Post
#218
|
|
914 Guru Group: Members Posts: 7,742 Joined: 2-January 09 From: Burlington wi Member No.: 9,892 Region Association: Upper MidWest |
I have had this happen many times.. I now make sure I shower right after working on the car and grinding etc or wash my face at the least.
Also just bought some of kevlar reinforced filler yesterday specific for sealing all the weld joints.. I have a friend that does some pretty nice restos and swears by it and he goes right to bare metal then regular filler then epoxy over that.. He has had fantastic results.. I am still debating that.. |
|
|
|
| bbrock |
Jan 11 2018, 10:17 PM
Post
#219
|
|
914 Guru Group: Members Posts: 5,269 Joined: 17-February 17 From: Montana Member No.: 20,845 Region Association: Rocky Mountains |
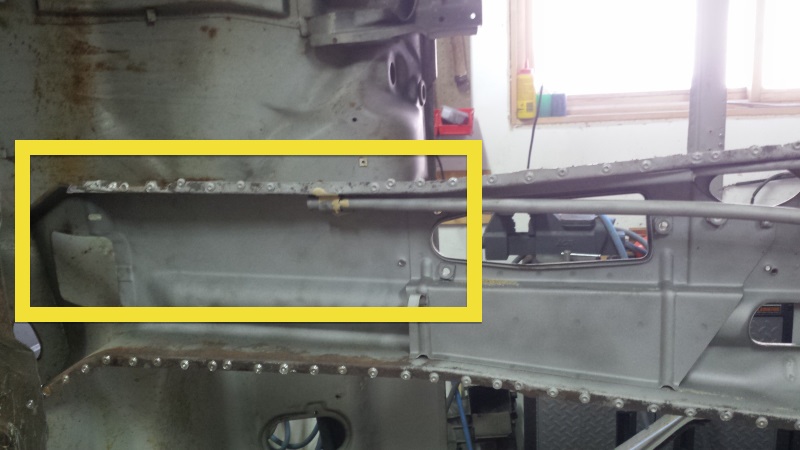
Back at it
My eye healed up enough to get back to work on the car this evening. Not much, but good to be making progress again. I've been debating how to treat the rusted lower edge and weld flanges of the firewall and floor cross brace where seam sealer had trapped moisture. The firewall definitely needs a couple patches, but there was generally mild pitting and several pin holes along most of the length of the firewall and brace. They were borderline, but replacing the entire lower edges seemed like overkill. So, I used a copper backing plate and turned down the MIG to low and started zapping pinholes and filling the deepest pits. It seemed kind of like cutting corners, but ultimately, I think the result is more sound and definitely less time consuming than several feet of butt welds.  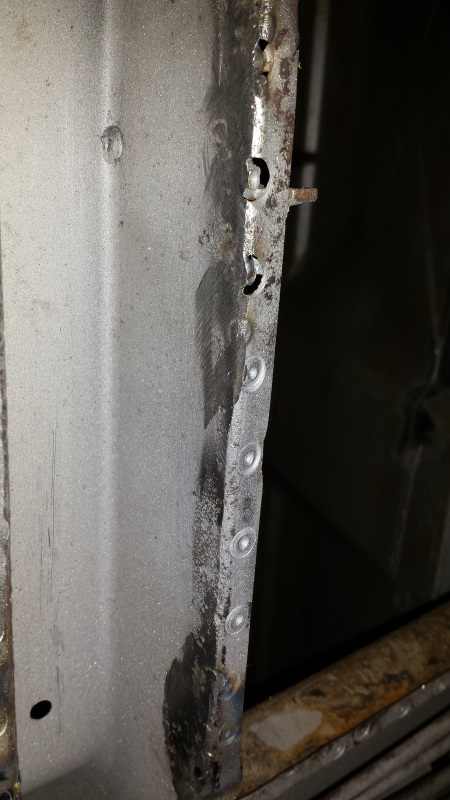 Now I can get back to the firewall patches I started a couple weeks ago. |
|
|
|
| mb911 |
Jan 12 2018, 06:17 AM
Post
#220
|
|
914 Guru Group: Members Posts: 7,742 Joined: 2-January 09 From: Burlington wi Member No.: 9,892 Region Association: Upper MidWest |
Mine was a bit worse so i had to do several feet of butt welds..
|
|
|
|
|
3 User(s) are reading this topic (3 Guests and 0 Anonymous Users)
0 Members:

|
Lo-Fi Version | Time is now: 18th April 2026 - 04:52 PM |
Invision Power Board
v9.1.4 © 2026 IPS, Inc.