|
|
|
Porsche, and the Porsche crest are registered trademarks of Dr. Ing. h.c. F. Porsche AG.
This site is not affiliated with Porsche in any way. Its only purpose is to provide an online forum for car enthusiasts. All other trademarks are property of their respective owners. |
|
|

  |

| bbrock |
 May 17 2021, 07:59 AM May 17 2021, 07:59 AM
Post
#2001
|
|
914 Guru  Group: Members Posts: 5,269 Joined: 17-February 17 From: Montana Member No.: 20,845 Region Association: Rocky Mountains |
QUOTE(Superhawk996 @ May 17 2021, 06:13 AM)  QUOTE(bbrock @ May 17 2021, 12:00 AM) For reasons that are not clear to me, this is not an uncommon sight along the roads around here. (IMG:style_emoticons/default/confused24.gif) (IMG:style_emoticons/default/laugh.gif) Here's the possibilities that I see. 1) Montana closed too many rest areas. I don't know if it was due to the Rona or just an opportunity for Montana to try to save money in the winter. When I passed though in March nearly every rest area along I-90 in Montana was closed. Other states on my route have not closed thier rest areas like Montana did. 2) Not enough trees to hide behind? That area is a bit barren along the highway! 3) Trolling for Beaver? 1) Not due to Rona. It's been that way since we've been here. I always counted it to being cheap-ass, but a lot of those rest areas were built back in the day when few dared travel in winter. Makes me wonder if the buildings and plumbing are not properly weatherized. Let's figure this as a possible contributing factor. 2) We can rule this one out. First, we have WAY more trees than were here historically, but I'll try not to spiral into an angry ecologist rant. But here's the deal. Guy gets out of big-ass RV. RV blocks view in one direction but why whip out the hose while facing the road? Turn your back to the road dude! 3) Quite possible. Judging by the looks of these guys, I'm doubting they have much success. QUOTE Car is looking great. Distributor and Pertronix woes are a mystery to me. Your experiences make points seem even more attrative to me. From what I've been able to learn, these kinds of problems seem to only apply to Pertronix III. I think they may have tried to get too clever and didn't fully work out the bugs. I had a thought this morning. What is the difference between the dizzy that works fantastically well with the Pertronix and those that don't? Vacuum advance. The 050 has a fixed mounting plate for the points so when the Pertronix is screwed in, it is fixed in place. The other mounting plates need to be able to move. I'm thinking that either the screw that holds the Pertronix mounting plate down could be a tad too long and causing the plates to rotate erratically, or maybe when they do rotate, it Fs up the alignment of the Pertronix pickup relative to the shaft lobes. Will have to do some more digging. |
   |

 
|
| bbrock |
May 22 2021, 09:01 PM
Post
#2002
|
|
914 Guru Group: Members Posts: 5,269 Joined: 17-February 17 From: Montana Member No.: 20,845 Region Association: Rocky Mountains |
Shields Up!
I took a half day off yesterday to drive 100 miles to Helena to pick up my new windshield. It was not a pleasant trip. They have a 3 mile stretch of highway stripped to gravel they are still having people drive over but the road is nearly impassable. I've rarely driven jeep trails deep into Forest Service land so bad. That meant I had to take the long way home because no way was I going to risk hauling my precious piece of glass over that. I did make it home with the windshield intact so today I finally got to close the greenhouse. I started with applying butyl primer to the pinch weld and windshield. 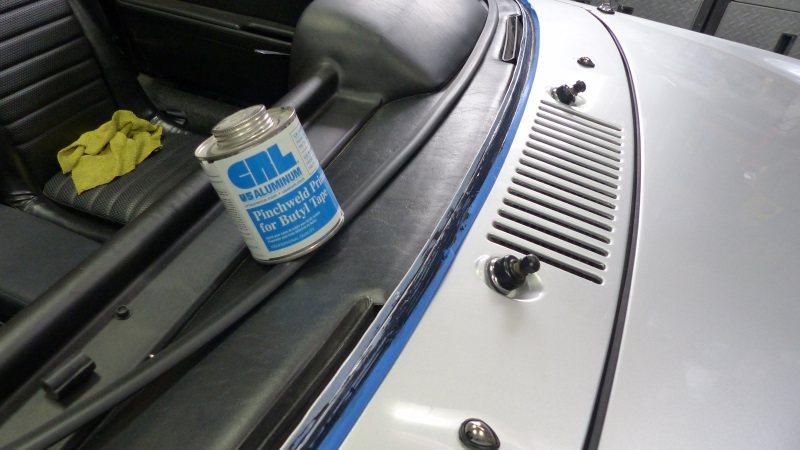 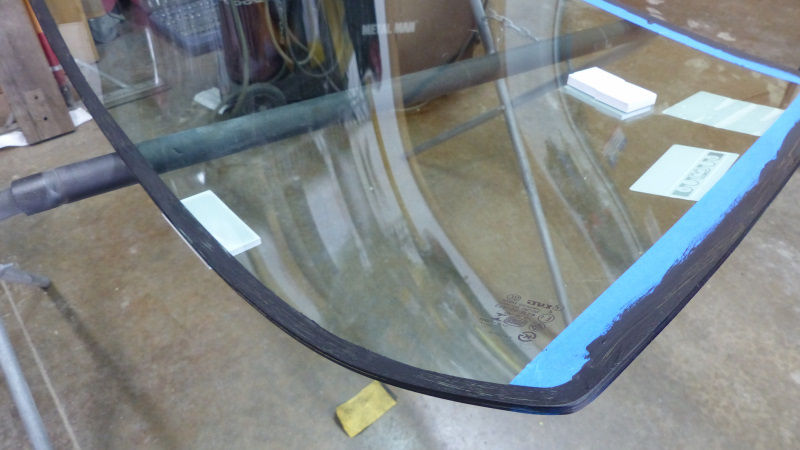 Then I installed the trim clips. I bought Genuine Porsche clips and found a 4mm socket on extension and tack hammer were just the ticket for tapping the clips into the holes. Then a small drift to tap the expansion pins down. Unfortunately, one of the clip holes had a rough edge and sheered the part that fits into the hole off when I tapped the pin down. I didn't buy extra clips unfortunately, so I cheated and glued the clip to the frame. I'm pretty sure it will work just fine and beats waiting for a new clip to arrive and giving our wrecking ball of a dog plenty of time to sneak into the garage and shatter the windshield. 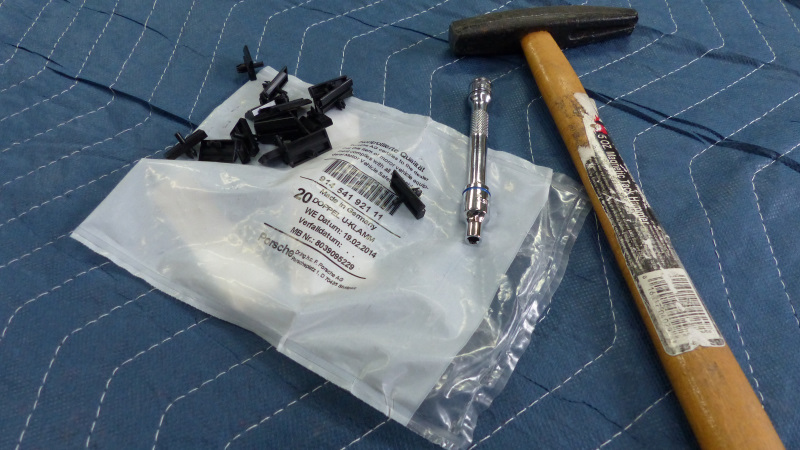 Next, a dry fit to mark the alignment. The Porsche FSM has very detailed instructions for windshield install, but I had to improvise some for the aftermarket windshield. For starters, the stock setting blocks are too thin so I cut new ones from a chunk of setting block material a glazier gave my years ago. 6mm thick seemed to center the glass nicely. 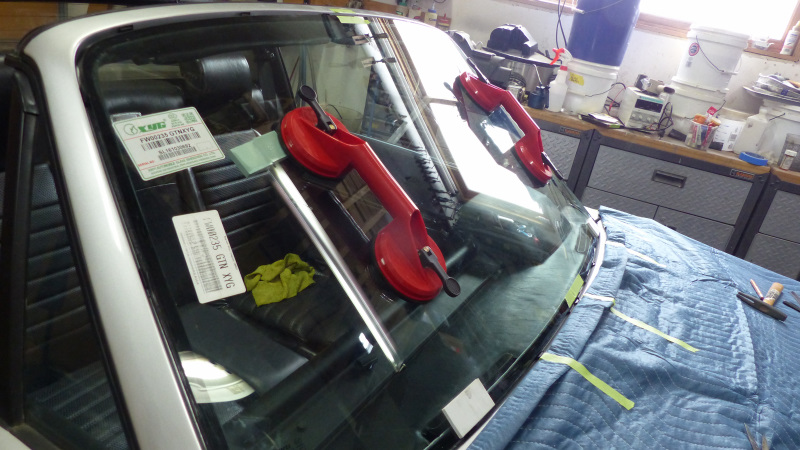 The last decision was which size butyl to use. I had both 3/8" and 5/16" ready. Porsche says 5/16" but I've read that aftermarket glass is thinner than OEM so 3/8" is better. I took all kinds of measurements and tested with small snubs of seal. It all came down to how much the caulk would squish when the glass was pressed on. In the end I decided to go with 3/8" but I still don't know if that was a good choice. The glass is sticking up just a little proud of the frame. However, Porsche used a caulk that had a wire running through it that was heated by running a current through to soften it and allow it to be compressed down to 4mm thick. My plan is to wait for a warm sunny day to heat it up and press it to the final set. I think it will work, but today was not that day. It looks more like January outside than the end of May. So for now, here is how she sits. 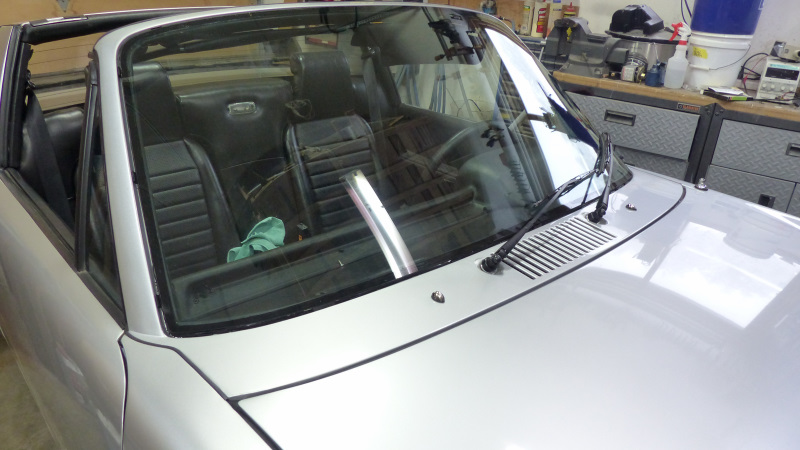 The day did not end on a high note though. First, I discovered the windshield wipers are not parking in their full down position. That's the problem with having the windshield delayed and not being able to fully test before the fresh air box and fuel tank went in. It would have been simple to fix then. Luckily, I have a bit of a work around because when I run the intermittent mode, the wipers stop fully down and if I flip the switch to off, they stay in that position. Might be good to start a pool on how long before I can't live with it anymore and dig in. My other problem is a running battle with the windshield washer. I love the fantastically stupid spare tire rig but confess that my loyalty is being tested. I've tried three different switch valves. Two of them weep through the nozzles when the switch is off, and the other has a blockage in it. I will order a new valve from CIP1. If that doesn't do it, time to go electric. |
|
|
|
| Cairo94507 |
May 22 2021, 09:45 PM
Post
#2003
|
|
Michael Group: Members Posts: 10,646 Joined: 1-November 08 From: Auburn, CA Member No.: 9,712 Region Association: Northern California |
Nice job getting the glass in Brent. (IMG:style_emoticons/default/beerchug.gif)
|
|
|
|
| 930cabman |
May 22 2021, 10:53 PM
Post
#2004
|
|
Advanced Member Group: Members Posts: 4,677 Joined: 12-November 20 From: Buffalo Member No.: 24,877 Region Association: North East States |
" I love the fantastically stupid spare tire rig but confess that my loyalty is being tested"
You are not the only one. If the windscreen is in the opening still in one piece, I would call it a victory. |
|
|
|
| Superhawk996 |
May 23 2021, 09:00 AM
Post
#2005
|
|
914 Guru Group: Members Posts: 7,846 Joined: 25-August 18 From: Woods of N. Idaho Member No.: 22,428 Region Association: Galt's Gulch |
QUOTE(bbrock @ May 22 2021, 11:01 PM) My plan is to wait for a warm sunny day to heat it up and press it to the final set. Please be super careful with this plan. Edge of windshield glass doesn't like to be pressed upon & super easy to crack it. Don't press it with your hands. Better to put the suction cups back on it and just give it a wiggle side to side & up and down than to press inward to set the butyl. If it doesn't wiggle at all, good! You'll get press force later on (uniformily distributed) by aero loads. Looking great! (IMG:style_emoticons/default/smile.gif) |
|
|
|
| preach |
May 23 2021, 01:21 PM
Post
#2006
|
|
Ridge Runner Group: Members Posts: 1,100 Joined: 27-March 10 From: Live Free or Die Member No.: 11,513 Region Association: North East States |
|
|
|
|
| Morph914 |
May 23 2021, 07:11 PM
Post
#2007
|
|
Member Group: Members Posts: 435 Joined: 22-August 16 From: St Augustine, FL Member No.: 20,326 Region Association: South East States |
Brent, we’re you able to do the windshield by yourself? Where did you get the suction cups?
I’m not looking forward to this task, I was thinking about having Safelight install it but I don’t think they will install with the buttyl. I’ll have to research further. Car is looking great, love the air intake! |
|
|
|
| bbrock |
May 23 2021, 08:50 PM
Post
#2008
|
|
914 Guru Group: Members Posts: 5,269 Joined: 17-February 17 From: Montana Member No.: 20,845 Region Association: Rocky Mountains |
QUOTE(Superhawk996 @ May 23 2021, 08:00 AM) QUOTE(bbrock @ May 22 2021, 11:01 PM) My plan is to wait for a warm sunny day to heat it up and press it to the final set. Please be super careful with this plan. Edge of windshield glass doesn't like to be pressed upon & super easy to crack it. Don't press it with your hands. Better to put the suction cups back on it and just give it a wiggle side to side & up and down than to press inward to set the butyl. If it doesn't wiggle at all, good! You'll get press force later on (uniformily distributed) by aero loads. Looking great! (IMG:style_emoticons/default/smile.gif) Noted. That's the reason for waiting until I can get the butyl good and hot to soften it up. I thought about trying to heat it up with a heat gun but nixed the idea for the same reasons you caution. Uneven heating along those edges could easily lead to a runner right across the glass and I for sure am not going to try to press the cold butyl down. If it won't bed down farther with gentle pressure, I'll just live with the way it is and make sure I use 5/16" butly next time... and this is Montana, so there will probably be a next time. Getting ready to have windshield #4 installed in the DD. QUOTE(Morph914 @ May 23 2021, 06:11 PM) Brent, we’re you able to do the windshield by yourself? Where did you get the suction cups? I’m not looking forward to this task, I was thinking about having Safelight install it but I don’t think they will install with the buttyl. I’ll have to research further. Car is looking great, love the air intake! You COULD do the install yourself, but your butt hole will be so tight when you are done, you won't be able to fart for a week. I was able to place the glass for dry fit by myself, but when it was time to lift the glass back off, and again for final placement, I got the wife to help. It took less than 15 minutes of her time and was super easy. I couldn't even get Safelight to call me back when I was trying to locate a windshield. I've heard people say they will only use urethane for installation due to liability, but I have no idea if it is true. It's really a pretty simple process. The work is all in the planning wanting to make sure it goes in perfect and knowing you only get one shot. To tell the truth, I've actually installed a windshield on a 914 by myself, but there the objective was just to get glass in the hole so I could get to work the next day. It is a whole different ballgame doing it for a resto. Weird day today. A shit ton of wet spring snow the last two day so, of course, the power went out about 3am this morning and wasn't restored until about 3pm this afternoon. The Internet didn't come back up until about 10 minutes ago. It put a real damper on progress today. Now almost all the snow is melted off and it looks like bright green spring again. |
|
|
|
| Morph914 |
May 24 2021, 01:30 PM
Post
#2009
|
|
Member Group: Members Posts: 435 Joined: 22-August 16 From: St Augustine, FL Member No.: 20,326 Region Association: South East States |
QUOTE(bbrock @ May 23 2021, 08:50 PM) QUOTE(Superhawk996 @ May 23 2021, 08:00 AM) QUOTE(bbrock @ May 22 2021, 11:01 PM) My plan is to wait for a warm sunny day to heat it up and press it to the final set. Please be super careful with this plan. Edge of windshield glass doesn't like to be pressed upon & super easy to crack it. Don't press it with your hands. Better to put the suction cups back on it and just give it a wiggle side to side & up and down than to press inward to set the butyl. If it doesn't wiggle at all, good! You'll get press force later on (uniformily distributed) by aero loads. Looking great! (IMG:style_emoticons/default/smile.gif) Noted. That's the reason for waiting until I can get the butyl good and hot to soften it up. I thought about trying to heat it up with a heat gun but nixed the idea for the same reasons you caution. Uneven heating along those edges could easily lead to a runner right across the glass and I for sure am not going to try to press the cold butyl down. If it won't bed down farther with gentle pressure, I'll just live with the way it is and make sure I use 5/16" butly next time... and this is Montana, so there will probably be a next time. Getting ready to have windshield #4 installed in the DD. QUOTE(Morph914 @ May 23 2021, 06:11 PM) Brent, we’re you able to do the windshield by yourself? Where did you get the suction cups? I’m not looking forward to this task, I was thinking about having Safelight install it but I don’t think they will install with the buttyl. I’ll have to research further. Car is looking great, love the air intake! You COULD do the install yourself, but your butt hole will be so tight when you are done, you won't be able to fart for a week. I was able to place the glass for dry fit by myself, but when it was time to lift the glass back off, and again for final placement, I got the wife to help. It took less than 15 minutes of her time and was super easy. I couldn't even get Safelight to call me back when I was trying to locate a windshield. I've heard people say they will only use urethane for installation due to liability, but I have no idea if it is true. It's really a pretty simple process. The work is all in the planning wanting to make sure it goes in perfect and knowing you only get one shot. To tell the truth, I've actually installed a windshield on a 914 by myself, but there the objective was just to get glass in the hole so I could get to work the next day. It is a whole different ballgame doing it for a resto. Weird day today. A shit ton of wet spring snow the last two day so, of course, the power went out about 3am this morning and wasn't restored until about 3pm this afternoon. The Internet didn't come back up until about 10 minutes ago. It put a real damper on progress today. Now almost all the snow is melted off and it looks like bright green spring again. So many places I could go with the anal retentive (IMG:style_emoticons/default/lol-2.gif) , but I will pass. If I do this myself, I will get some help. Sorry your weather can’t make its mind up. |
|
|
|
| 930cabman |
May 24 2021, 01:36 PM
Post
#2010
|
|
Advanced Member Group: Members Posts: 4,677 Joined: 12-November 20 From: Buffalo Member No.: 24,877 Region Association: North East States |
Being a first or second timer, I would recommend two sets of hands for sure. It's only glass, probably won't bite, but a pita if it breaks. 5/16 butyl is the product. Urethane is generally for structural applications
|
|
|
|
| bbrock |
May 29 2021, 09:45 AM
Post
#2011
|
|
914 Guru Group: Members Posts: 5,269 Joined: 17-February 17 From: Montana Member No.: 20,845 Region Association: Rocky Mountains |
I've been working on wheel alignment this week. For the most part, I followed @dan10101 's excellent video with a couple tips from some other string alignment vids I watched; and especially the great spreadsheet Dan developed which takes all the work out of calculating angles, plus a great toe angle calculator he links. I'll put them all here too:
https://www.youtube.com/watch?v=ILPv_skgtzE https://budgetoutlaws.com/file-downloads https://robrobinette.com/DIYAlignmentCalculator.htm There are additional links to tools and resources in the description of the video, so check it out. Thanks Dan (IMG:style_emoticons/default/beerchug.gif) I started with rear camber. Remember that I had to replace both the front trailing arm console and the pickup point ear, so this was a bit of a butt clencher to see if I got them in the right spot and able to align to spec. I was pleased that it required the same number of shims left and right (although I think slightly different combos of thicknesses) to bring the camber close to spec so that seemed a good omen for console location.  Next was setting toe. Here was my rig. The slotted pvc pipes were a tip from another video I watched. A slick way to make sure the strings are exactly the same distance apart on both bars. 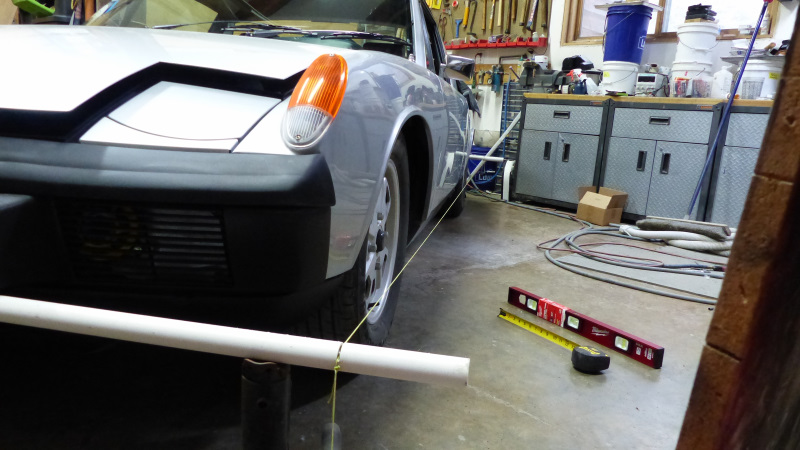 If I were to do this often, I'd make an adjustable cross bar that attaches to the front of the car and fit it with adjustable laser pointers on both ends. That way you wouldn't have to reset everything each time you jack the car up for adjustment and then roll it around to resettle the suspension before taking measurements again. It would take most of the fiddle out of a very fiddly process, especially on those rear wheels. After much trial and error, I first discovered that the adjustment range on the right wheel I was worried about ranges from way too much positive toe, to way too much negative toe. What a relief! (IMG:style_emoticons/default/piratenanner.gif) I also learned that by loosening the adjustment bolts and jacking up the car to take most, but not all of the weight off the trailing arms, I could find a sweet spot where I could nudge the toe without constantly swinging between too little and too much. The front end was much, MUCH easier. The new tires on my smooth, slick garage floor allow them to be adjusted easily in place. Here are the toe numbers I wound up with. The targets are -0.16 degrees each front wheel and -0.25 degrees on each wheel at the rear. 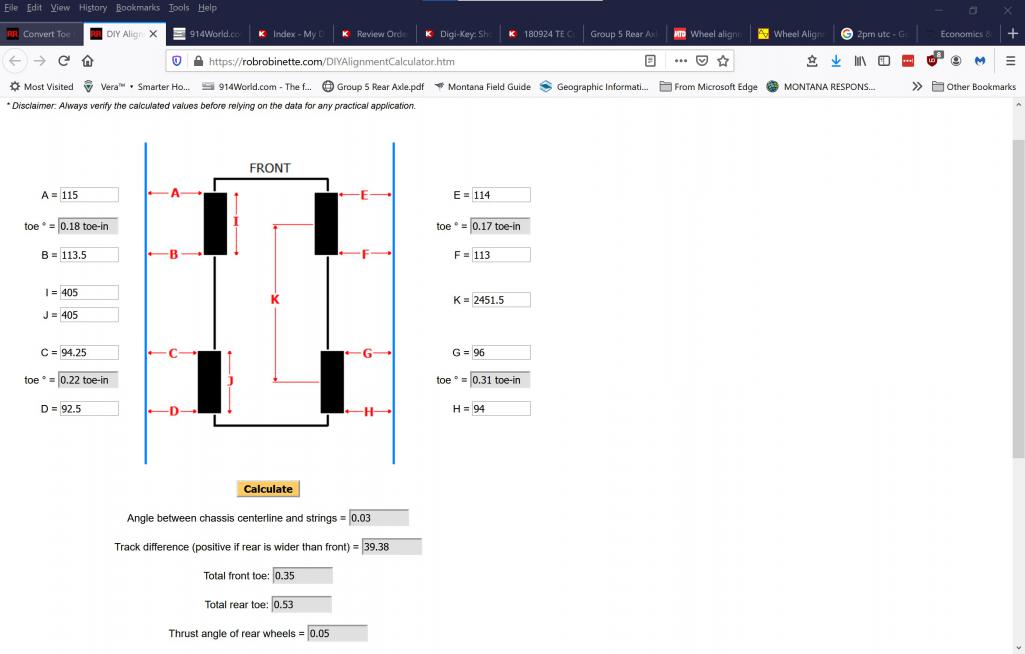 And here are the numbers for all four wheels including camber and castor as calculated by Dan's spreadsheet. Targets are 0 camber front, -0.5 degrees rear, and 6 degrees positive castor (front of course). 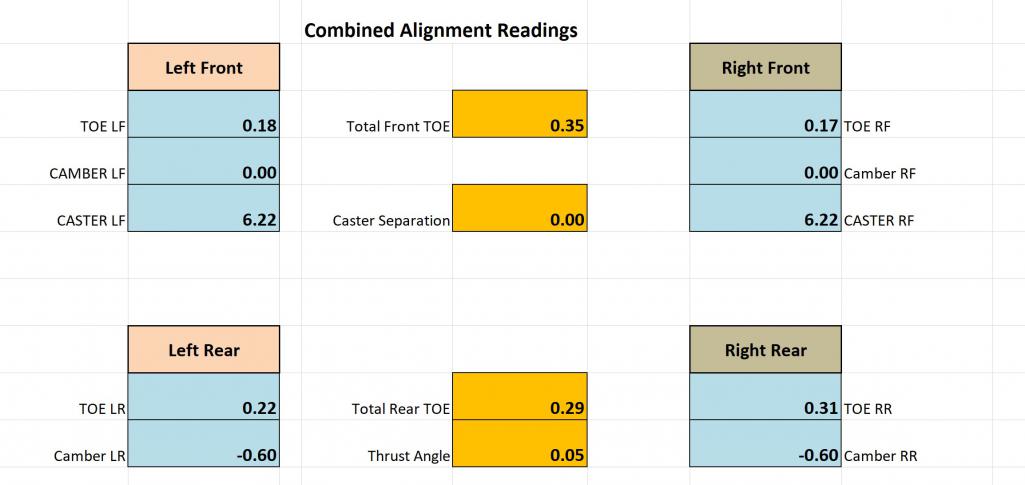 I had one little thing to check off the list before declaring this car ready for break-in procedure and test drive. That was to secure the rear shift console cover. 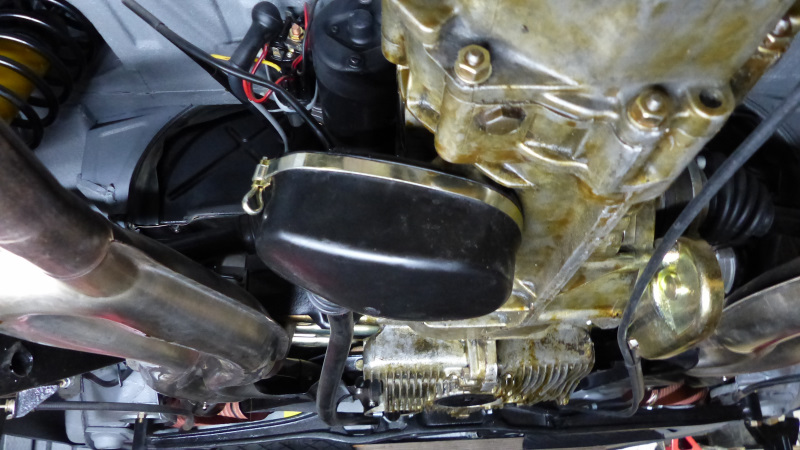 And with that, I declare it ready for the road. Stay tuned for results.... |
|
|
|
| Superhawk996 |
May 29 2021, 09:50 AM
Post
#2012
|
|
914 Guru Group: Members Posts: 7,846 Joined: 25-August 18 From: Woods of N. Idaho Member No.: 22,428 Region Association: Galt's Gulch |
Well done! (IMG:style_emoticons/default/popcorn[1].gif)
|
|
|
|
| Cairo94507 |
May 29 2021, 10:03 AM
Post
#2013
|
|
Michael Group: Members Posts: 10,646 Joined: 1-November 08 From: Auburn, CA Member No.: 9,712 Region Association: Northern California |
Absolutely stunning. Enjoy many many miles of smiles. (IMG:style_emoticons/default/beerchug.gif)
|
|
|
|
| bbrock |
May 29 2021, 02:10 PM
Post
#2014
|
|
914 Guru Group: Members Posts: 5,269 Joined: 17-February 17 From: Montana Member No.: 20,845 Region Association: Rocky Mountains |
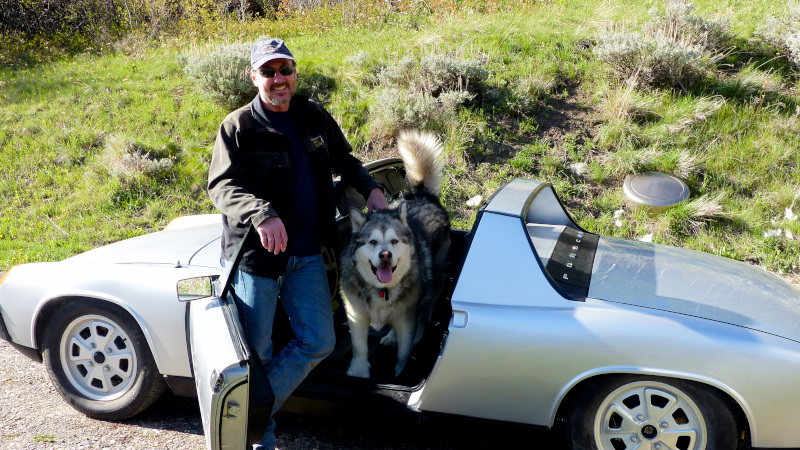
After cinching down the shift console cover yesterday, it was time for her real maiden voyage. Perhaps this should be captioned, "a fool heads to the unknown." No, despite his best attempt, Kalluq did not get to ride along.
 To document the occasion, I videoed the three miles to pavement and am dedicating it to Michael @Cairo94507 https://www.youtube.com/watch?v=QyoP8PsoxTg After the trains finally cleared the road, there were too many cars to continue video while playing chicken with the idiots, so the vid stops about 100 yards from the paved frontage road. Out on the frontage road, I took the car through break-in maneuvers. I followed Tom Wilson's procedure of accelerating from 20-50mph followed by engine braking back to 20 several times to help load the front and rear of the rings to help them seat. After repeating that about 6 times, I moved to the PMB procedure for bedding in the brakes. This requires first warming up the brakes by accelerating to 60mph and gently braking down to 45 mph several times, then followed by eight cycles accelerating to 60 mph and HARD braking to 10 mph before accelerating again. After the 5th cycle, I could smell the brakes. After the 8th cycle, the REALLY smelled hot but did not fade. Then I drove another 10 minutes without using the brakes to let them cool down. During the cool down, I was able to enjoy the ride while continuing to accelerate and decelerate, but not exceeding about 75% throttle. The car is shocking quite even with the top off. Not Lexus quiet but certainly comfortable. It is very smooth and pulls hard through the gears. The road I was on has some long sweepers but not tight turns and such, but from what I could experience on that road, the handling is superb. The car tracks straight for long distances with hands off the wheels and responds to steering input instantly but without feeling darty. I really couldn't be happier. I did not expect either the engine or handling to be dialed in so well at this point. After the brakes had time to cool down, I was at the edge of Livingston so drove in for the first full tank of gas in 35 years. 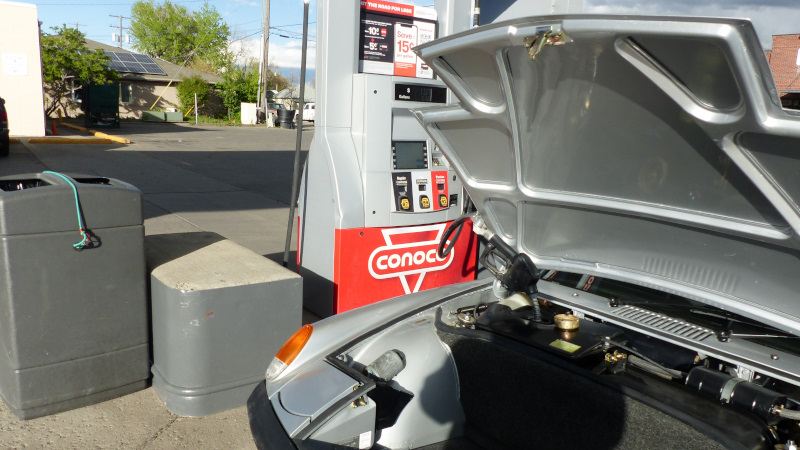 Up to this point, the only issue I'd detected was the speedo issue noted in the video. It is still reluctant to come off zero from a full stop, but once it jumps to life, seems to be functioning properly. Today I took it apart again and dug a little deeper to try cleaning out the needle spindle and nylon bearing it fits in, then relubricating with a drop of clock oil. That seems to have helped, but it still does want to pop to life until reaching 25 mph or so. After filling with ethanol free petrol, I hit the road again and noticed the engine seemed to have missed a step. It was really subtle and possibly my paranoia kicking in. Next stop was for the first pizza run in my new/old toy. 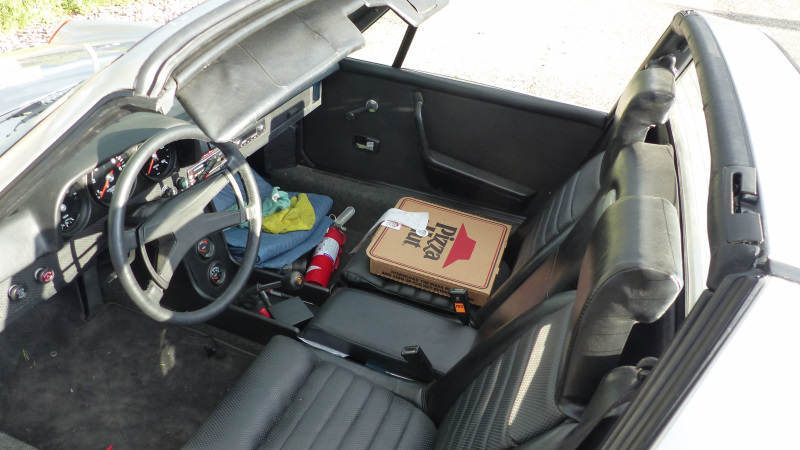 By the time I got back on the frontage road toward home, the engine was clearly falling off its game. The push back in your seat acceleration was gone and acceleration seemed rough. I immediately suspected the Pertronix but decided to soldier on and just hope for being able to make it home. By the time I reached the final climb over Bozeman Pass, the engine felt like it was firing on only two cylinders and 40 mph was about all she had in her. I was afraid if I pulled over, it would die and I wouldn't get it started again. Plus, I knew if I could make it another mile to the top of the pass, I could coast the next couple miles to our gravel road if needed. I did make it and just past our mailboxes, I finally pulled over. When the car continued to idle as smoothly as ever, I immediately knew what the problem was. No surprise, it was the IDIOT mechanic. I popped open the engine lid and snap off the 10 clips to remove my awesome air cleaner. Sure enough, one of the carb linkage rods was laying loose on top of the engine and the other was close to letting go. Some dipshit named Me had forgotten to tighten the lock nuts after dialing the linkage in. At least it was an easy fix and within 5 minutes I was back on the road to deliver the pizza. Other than yet another confirmation of my dumbassery, I'm really thrilled with how the car is perform already. The punch list is down to ten items. It includes: 1. aim headlights 2. final tune of carbs with the wideband and @dr.tim 's wizzardry. 3. replate hardware for heater flappers and install. 4. replace windshield washer valve when it arrives and reinstall knee pad. 5. straighten, repaint, and install windshield trim. 6. straighten wheel caps or buy new. 7. finish update of my console update (more on that later) 8. wash and clay bar body and install PPF on front half. 9. apply ceramic coating. 10. drive the shit out of it. |
|
|
|
| Superhawk996 |
May 29 2021, 02:18 PM
Post
#2015
|
|
914 Guru Group: Members Posts: 7,846 Joined: 25-August 18 From: Woods of N. Idaho Member No.: 22,428 Region Association: Galt's Gulch |
(IMG:style_emoticons/default/piratenanner.gif) Brent, that is truly awesome.
So happy to see this on the road and performing well. All the rest is just shakedown and wringing out the bugs! |
|
|
|
| KELTY360 |
May 29 2021, 02:31 PM
Post
#2016
|
|
914 Neferati Group: Members Posts: 5,189 Joined: 31-December 05 From: Pt. Townsend, WA Member No.: 5,344 Region Association: Pacific Northwest |
Must have been a great feeling out on the road really driving a 914 again!
Just one question: was the pizza still warm? |
|
|
|
| 930cabman |
May 29 2021, 02:47 PM
Post
#2017
|
|
Advanced Member Group: Members Posts: 4,677 Joined: 12-November 20 From: Buffalo Member No.: 24,877 Region Association: North East States |
+1, great story and I'm sure piloting her was great. Keep up the good work. Will you be following this with another 914 project?
|
|
|
|
| bbrock |
May 29 2021, 05:12 PM
Post
#2018
|
|
914 Guru Group: Members Posts: 5,269 Joined: 17-February 17 From: Montana Member No.: 20,845 Region Association: Rocky Mountains |
QUOTE(Superhawk996 @ May 29 2021, 01:18 PM) (IMG:style_emoticons/default/piratenanner.gif) Brent, that is truly awesome. So happy to see this on the road and performing well. All the rest is just shakedown and wringing out the bugs! Just got back from a trip to Bozeman. Biggest bug seems to still be the speedo but now it is the odo. After 49 miles it quit. I was told the crimp only method for fixing the pot metal gear would be temporary and I forgot to put a drop of super glue on it the last two times I was in there. I'm guessing that is the problem. Oddly, the speedo didn't stick at zero the last two times I brought it to a full stop so maybe this is a case of only getting one function or the other (IMG:style_emoticons/default/dry.gif) Also, it feels like the clutch cable has stretched slightly. I'm guessing this is not unusual during initial break in. It isn't bad, but the release isn't quite as high on the pedal as when I first adjusted it. QUOTE(KELTY360 @ May 29 2021, 01:31 PM) Must have been a great feeling out on the road really driving a 914 again! Just one question: was the pizza still warm? A man who knows the important questions to ask. It was warmish but then again, pizzas are never very warm by the time we get them home from carry out. Yes it did feel good. In some ways it was like driving a 914 for the first time. This car and its two predecessors all came to us with worn out tires, squishy shocks, and dried out bushings and they were still amazing to drive. This is the first time I've driven a well sorted specimen and is on a whole other level. QUOTE(930cabman @ May 29 2021, 01:47 PM) +1, great story and I'm sure piloting her was great. Keep up the good work. Will you be following this with another 914 project? Not unless it is in the distant future. I have plenty of projects left on the list, but will be very happy to take a break from cars for awhile other than a backlog of maintenance on our other cars. |
|
|
|
| bbrock |
May 29 2021, 05:22 PM
Post
#2019
|
|
914 Guru Group: Members Posts: 5,269 Joined: 17-February 17 From: Montana Member No.: 20,845 Region Association: Rocky Mountains |
Well there had to be a problem
For the last week I've noticed that Elizabeth, my wife, has taken an increased interest in the Porsche. She helped put in the windshield and spent a lot more time looking at it and asking questions than usual. Throughout the week she'd come out to the garage while I was working and just walking around it looking, then more questions like, "so what's left to do?" Today we planned to go for a drive and she had a couple errands to run in Bozeman, so that was the destination. I got the car ready to go and was standing on the driver's side when she said, "hey, what are you doing?" "Oh, do you want to drive?" I figured she'd want me to drive into town and she would drive home. "Well yeah. I'm not going in the Porsche if I can't drive it." So I handed her the keys and well... this looks like someone who thinks they own the car to me.  The whole way in she kept saying things like: "It's pretty fun." "I can't believe how smooth it is." "This is really nice." I think I might be screwed. (IMG:style_emoticons/default/unsure.gif) |
|
|
|
| 930cabman |
May 29 2021, 05:31 PM
Post
#2020
|
|
Advanced Member Group: Members Posts: 4,677 Joined: 12-November 20 From: Buffalo Member No.: 24,877 Region Association: North East States |
Lucky you, how did she do?
My wife is much too rough for any sporting car. Full on the gas then full on the brake. I am afraid if she has the keys, I will be spending more time in the car shop. For now she is reasonably happy in the passenger seat. |
|
|
|
|
1 User(s) are reading this topic (1 Guests and 0 Anonymous Users)
0 Members:

|
Lo-Fi Version | Time is now: 29th May 2026 - 08:36 AM |
Invision Power Board
v9.1.4 © 2026 IPS, Inc.