|
|
|
Porsche, and the Porsche crest are registered trademarks of Dr. Ing. h.c. F. Porsche AG.
This site is not affiliated with Porsche in any way. Its only purpose is to provide an online forum for car enthusiasts. All other trademarks are property of their respective owners. |
|
|

  |

| bbrock |
 May 29 2021, 05:52 PM May 29 2021, 05:52 PM
Post
#2021
|
|
914 Guru  Group: Members Posts: 5,269 Joined: 17-February 17 From: Montana Member No.: 20,845 Region Association: Rocky Mountains |
QUOTE(930cabman @ May 29 2021, 04:31 PM)  Lucky you, how did she do? My wife is much too rough for any sporting car. Full on the gas then full on the brake. I am afraid if she has the keys, I will be spending more time in the car shop. For now she is reasonably happy in the passenger seat. (IMG:style_emoticons/default/lol-2.gif) She did great. She rarely drives any of our stick shifts anymore so there was a bit of adjustment getting the pattern and feel down but she did great on the clutch. I gave her just a few rules. Don't lug the engine at one speed for a long time, try to keep it above 3K rpm, and avoid WOT until we have 300 miles on it. She did great at putting load on the engine to keep things mixed up and when we hit the bit of a chicane through the canyon into town, I could feel her leaning into the gas pedal as we progressed through the curve to feel the grip. It's funny. When we used to have his and hers 914s, she always complained that when I drove it made her sick but when she was behind the wheel, better get the barf bag out. We've both mellowed since then but I could see the 20 year old coming out in both of us again. |
   |

 
|
| wonkipop |
May 29 2021, 05:55 PM
Post
#2022
|
|
Advanced Member Group: Members Posts: 4,296 Joined: 6-May 20 From: north antarctica Member No.: 24,231 Region Association: NineFourteenerVille |
QUOTE(bbrock @ May 22 2021, 09:01 PM) My other problem is a running battle with the windshield washer. I love the fantastically stupid spare tire rig but confess that my loyalty is being tested. I've tried three different switch valves. Two of them weep through the nozzles when the switch is off, and the other has a blockage in it. I will order a new valve from CIP1. If that doesn't do it, time to go electric. watch out for those cipi valves mate - they are heaps of sh$t. made of junk from probably you know where. the little plunger that pushes in to the valve when you pull on the wiper lever is made of a very flexible plastic that looks like rigid nylon but is not, it bends and goes out of alignment and then your new valve is kaput. i'm like you, a kook who wanted to (and have) retained the nut case spare tyre powered washer. i thought my original valve was kaput so i ordered one of those cipi valves in. i broke it before i even had it installed just setting it all up connected to hoses and testing it. my heart sank. so i pulled my original out and put it through the ultra sonic cleaner about 10 times. blew air through it. soaked it in very warm water etc and i got it back from the dead. but mine wasn't leaking, just frozen by calcium deposits. good luck with yours but tip toe with the cipi valve. it looks like the original part but its not german spec plastics. in particular watch out for the little white needle that pushes the valve. (IMG:style_emoticons/default/beerchug.gif) well done getting your car back on the road, it looks fantastic and sounds like it drives like it looks. |
|
|
|
| 930cabman |
May 29 2021, 05:59 PM
Post
#2023
|
|
Advanced Member Group: Members Posts: 3,061 Joined: 12-November 20 From: Buffalo Member No.: 24,877 Region Association: North East States |
but I could see the 20 year old coming out in both of us again.
Once again, lucky man |
 |
|
| Superhawk996 |
May 29 2021, 06:04 PM
Post
#2024
|
|
914 Guru Group: Members Posts: 5,819 Joined: 25-August 18 From: Woods of N. Idaho Member No.: 22,428 Region Association: Galt's Gulch |
QUOTE(bbrock @ May 29 2021, 07:22 PM) Well there had to be a problem . . . well... this looks like someone who thinks they own the car to me. I think I might be screwed. (IMG:style_emoticons/default/unsure.gif) (IMG:style_emoticons/default/av-943.gif) You didn't think she tolerated all those years of negative cash flow for new parts without expecting a Return On Investment did you? (IMG:style_emoticons/default/shades.gif) |
|
|
|
| bbrock |
May 29 2021, 06:04 PM
Post
#2025
|
|
914 Guru Group: Members Posts: 5,269 Joined: 17-February 17 From: Montana Member No.: 20,845 Region Association: Rocky Mountains |
QUOTE(wonkipop @ May 29 2021, 04:55 PM) watch out for those cipi valves mate - they are heaps of sh$t. made of junk from probably you know where. the little plunger that pushes in to the valve when you pull on the wiper lever is made of a very flexible plastic that looks like rigid nylon but is not, it bends and goes out of alignment and then your new valve is kaput. Ah crap. That isn't what I wanted to hear. Do you think swapping over the little plastic plunger from one of the originals would solve the problem on the CIP1 valve? I might try some soaks with the valves I have. I suspect the two that leak have some debris lodged in them. Unfortunately my ultrasonic cleaner wen kaput. Maybe I should try the valve from my NOS switch after all. Kind of hate to break up the unit, but it has an ugly scratch through the printing on the lever. |
|
|
|
| wonkipop |
May 29 2021, 06:07 PM
Post
#2026
|
|
Advanced Member Group: Members Posts: 4,296 Joined: 6-May 20 From: north antarctica Member No.: 24,231 Region Association: NineFourteenerVille |
QUOTE(bbrock @ May 29 2021, 06:04 PM) QUOTE(wonkipop @ May 29 2021, 04:55 PM) watch out for those cipi valves mate - they are heaps of sh$t. made of junk from probably you know where. the little plunger that pushes in to the valve when you pull on the wiper lever is made of a very flexible plastic that looks like rigid nylon but is not, it bends and goes out of alignment and then your new valve is kaput. Ah crap. That isn't what I wanted to hear. Do you think swapping over the little plastic plunger from one of the originals would solve the problem on the CIP1 valve? I might try some soaks with the valves I have. I suspect the two that leak have some debris lodged in them. Unfortunately my ultrasonic cleaner wen kaput. Maybe I should try the valve from my NOS switch after all. Kind of hate to break up the unit, but it has an ugly scratch through the printing on the lever. yes that could work, what happened is that the askew nylon plunger stuffed up the innards when it went askew. so given this tip a bloke like you can make a good one out of the two. take a close look at the little white plunger when you get the cipi valve. the rest of the part is identical to the originals. |
|
|
|
| porsche914rick |
May 29 2021, 07:11 PM
Post
#2027
|
|
Member Group: Members Posts: 66 Joined: 6-August 14 From: Seymour, TN Member No.: 17,744 Region Association: South East States |
|
|
|
|
| raynekat |
May 29 2021, 08:41 PM
Post
#2028
|
|
Advanced Member Group: Members Posts: 2,158 Joined: 30-December 14 From: Coeur d'Alene, Idaho Member No.: 18,263 Region Association: Pacific Northwest |
(IMG:style_emoticons/default/driving.gif) (IMG:style_emoticons/default/smilie_pokal.gif) (IMG:style_emoticons/default/cheer.gif) (IMG:style_emoticons/default/aktion035.gif) (IMG:style_emoticons/default/driving-girl.gif)
Had to get out all the good "emoji's" for you Brent. Well done there. Sounds like you've got the big stuff licked and just some sorting or fine tuning to go. Enjoy it Man..... Maybe your snow is gone until Sept? Ha |
|
|
|
| Morph914 |
May 30 2021, 07:12 AM
Post
#2029
|
|
Member Group: Members Posts: 435 Joined: 22-August 16 From: St Augustine, FL Member No.: 20,326 Region Association: South East States |
Very happy for you! (IMG:style_emoticons/default/piratenanner.gif) It’s great to see the car back on the road, and the both of you enjoying it!
|
|
|
|
| tygaboy |
May 30 2021, 08:04 AM
Post
#2030
|
|
914 Guru Group: Members Posts: 5,292 Joined: 6-October 15 From: Petaluma, CA Member No.: 19,241 Region Association: Northern California |
OK Brent, I bow to your superior strategy and results:
Running/driving by page 100 and SORTED (all but, anyway) TWO pages later! (IMG:style_emoticons/default/pray.gif) Respect! In all seriousness: Has it hit you yet what an epic journey you've shared with us? And what a great job you've done? Take a minute (if you haven't already) to step back, appreciate your work and pat your self on the back. (I vote sticky this thread!) And when you're out in your shop, music off, just looking at your car and you notice all that silence? That's all of us, there with you in sprint, mouths open, speechless (and a little jealous!) just staring at your beautiful, beautiful outcome. (IMG:style_emoticons/default/drooley.gif) (IMG:style_emoticons/default/smilie_pokal.gif) (IMG:style_emoticons/default/wub.gif) Thanks again for sharing! Well done! And be proud. Be very proud. |
|
|
|
| dr.tim |
May 30 2021, 09:15 AM
Post
#2031
|
|
Member Group: Members Posts: 101 Joined: 17-December 11 From: Butte, America Member No.: 13,907 Region Association: Rocky Mountains |
QUOTE(bbrock @ May 29 2021, 02:10 PM) 1. aim headlights 2. final tune of carbs with the wideband and @dr.tim 's wizzardry. 3. replate hardware for heater flappers and install. 4. replace windshield washer valve when it arrives and reinstall knee pad. 5. straighten, repaint, and install windshield trim. 6. straighten wheel caps or buy new. 7. finish update of my console update (more on that later) 8. wash and clay bar body and install PPF on front half. 9. apply ceramic coating. 10. drive the shit out of it. Well, on #2 I think you are most of the way there with a close (enough) tune and the wideband. If your idle screws are not very responsive and there is a flat spot (or pop) coming off idle you are idling in the progression circuit. At idle, the snail should read less than 4.. The 'idle' jets actually tune the progression mix, and the idle screws tune the idle mix. On #10, I can help with that too. PCA has a fun-run coming up on June 19, And there is always our fall Beartooth dawn-patrol run.  |
|
|
|
| Jamie |
May 30 2021, 09:15 AM
Post
#2032
|
|
Senior Member Group: Members Posts: 1,031 Joined: 13-October 04 From: Georgetown,KY Member No.: 2,939 Region Association: South East States |
QUOTE(wonkipop @ May 29 2021, 04:07 PM) QUOTE(bbrock @ May 29 2021, 06:04 PM) QUOTE(wonkipop @ May 29 2021, 04:55 PM) watch out for those cipi valves mate - they are heaps of sh$t. made of junk from probably you know where. the little plunger that pushes in to the valve when you pull on the wiper lever is made of a very flexible plastic that looks like rigid nylon but is not, it bends and goes out of alignment and then your new valve is kaput. Ah crap. That isn't what I wanted to hear. Do you think swapping over the little plastic plunger from one of the originals would solve the problem on the CIP1 valve? I might try some soaks with the valves I have. I suspect the two that leak have some debris lodged in them. Unfortunately my ultrasonic cleaner wen kaput. Maybe I should try the valve from my NOS switch after all. Kind of hate to break up the unit, but it has an ugly scratch through the printing on the lever. yes that could work, what happened is that the askew nylon plunger stuffed up the innards when it went askew. so given this tip a bloke like you can make a good one out of the two. take a close look at the little white plunger when you get the cipi valve. the rest of the part is identical to the originals. Enough with all the fancy extra plumbing stuff for the windscreen, a small bottle of Rain-X in the door pocket with a paper towel works just great! (IMG:style_emoticons/default/poke.gif) |
|
|
|
| 914_7T3 |
May 30 2021, 03:45 PM
Post
#2033
|
|
Please forgive me, I'm new to all of this! Group: Members Posts: 1,853 Joined: 3-April 17 From: Los Angeles, CA Member No.: 20,991 Region Association: Southern California |
Brent,
I am so happy for you after watching the video! I know the feeling of that first real drive and its awesome! TBH, the first 500+ miles was still paranoid inducing not knowing what was and wasn't normal during the break in process. If you are happy now, you are going to be ecstatic later! Enjoy every mile...... (IMG:style_emoticons/default/driving.gif) (IMG:style_emoticons/default/driving-girl.gif) (IMG:style_emoticons/default/driving.gif) |
|
|
|
| Lucky9146 |
May 30 2021, 06:40 PM
Post
#2034
|
|
Always Wanted A Bigger Go Cart Group: Members Posts: 1,613 Joined: 22-September 14 From: Poway California Member No.: 17,942 Region Association: Southern California |
Fun to see you completing this and starting to enjoy. You certainly did a great job!
Love to see the support of this community. Man, that is a long gravel road. (IMG:style_emoticons/default/blink.gif) Congrats! (IMG:style_emoticons/default/beerchug.gif) (IMG:style_emoticons/default/first.gif) (IMG:style_emoticons/default/driving.gif) (IMG:style_emoticons/default/white914.jpg) |
|
|
|
| bbrock |
May 30 2021, 09:22 PM
Post
#2035
|
|
914 Guru Group: Members Posts: 5,269 Joined: 17-February 17 From: Montana Member No.: 20,845 Region Association: Rocky Mountains |
QUOTE(tygaboy @ May 30 2021, 07:04 AM) OK Brent, I bow to your superior strategy and results: Running/driving by page 100 and SORTED (all but, anyway) TWO pages later! (IMG:style_emoticons/default/pray.gif) Respect! Ahem. By my count it was mostly sorted in ONE page. Page 102 has been mostly people saying how obviously wonderful I am. (IMG:style_emoticons/default/shades.gif) (IMG:style_emoticons/default/av-943.gif) Let's get real here though. Sorting a car to stock spec has its challenges, but nothing compared to what you and your radical modifier cohorts are doing. Really, it is just a paint by numbers operation to go stock. The numbers being the specs in the factory manual. That's a whole different game from using the 914 as a platform to engineer a whole new car. (IMG:style_emoticons/default/pray.gif) But in all seriousness, deeply touched by the support and inspiration I've received from the community. It is my honor to have shared this adventure with you all. But we aren't done yet! QUOTE(Jamie @ May 30 2021, 08:15 AM) Enough with all the fancy extra plumbing stuff for the windscreen, a small bottle of Rain-X in the door pocket with a paper towel works just great! (IMG:style_emoticons/default/poke.gif) BLASPHEMY! How could you NOT want such a ridiculously stupid contraption? Full disclosure, Crazy Clock and Mouse Trap were two of my most favorite games when I was a kid. That said, I drove a 914 with non-functioning wipers for a couple years and yes, got along fine with just Rain-X in most situations. QUOTE(914_7T3 @ May 30 2021, 02:45 PM) Brent, I am so happy for you after watching the video! I know the feeling of that first real drive and its awesome! TBH, the first 500+ miles was still paranoid inducing not knowing what was and wasn't normal during the break in process. If you are happy now, you are going to be ecstatic later! Enjoy every mile...... (IMG:style_emoticons/default/driving.gif) (IMG:style_emoticons/default/driving-girl.gif) (IMG:style_emoticons/default/driving.gif) Thanks! Yes, paranoia for sure. In reality, I just got back from my first "real" drive about a half hour ago. At the end of that long gravel road is a beautiful, lightly trafficked road that twists its way up into the Bridger Mountains. I finally got a chance to let it unwind and toss it hard into the curves. Yeah, it was fun. Still needs some engine tuning I think and a few other issues to sort out, but I wouldn't change a goddamn thing on the suspension. Just phenomenal. That's a bit of a spoiler alert though. It was a nice cap on an otherwise mostly frustrating day. Will update about that later. |
|
|
|
| bbrock |
May 31 2021, 09:50 AM
Post
#2036
|
|
914 Guru Group: Members Posts: 5,269 Joined: 17-February 17 From: Montana Member No.: 20,845 Region Association: Rocky Mountains |
QUOTE(dr.tim @ May 30 2021, 08:15 AM) Well, on #2 I think you are most of the way there with a close (enough) tune and the wideband. If your idle screws are not very responsive and there is a flat spot (or pop) coming off idle you are idling in the progression circuit. At idle, the snail should read less than 4.. The 'idle' jets actually tune the progression mix, and the idle screws tune the idle mix. Wide band has not been set up yet but are you talking about the 4 idle mix screws at the bottom of the carbs rather than the ones that set the butterfly stops at idle? I'm not getting a flat spot or popping coming off idle. In fact, I'm surprised at how responsive it is without vacuum advance. It doesn't respond much to those mixture screws though and the snail is definitely above 4 at idle. During my run yesterday, I was getting some slight popping coming off throttle after accelerating through a curve and especially coming off throttle downhill with engine braking. Still much to learn. No to catch up. Saturday night I tore down the speedo/odo yet again to fix the slipping pot metal gear for a second time. What a PITA that job is. This time I used a tip I read to center punch the edges of the gear hub when deforms the metal inward to "stake" the gear to the shaft. For extra measure, I put a thin smear of JB weld inside the gear hub to convince it to stay put. While I was there, I got a drop of clock oil on a part of the needle spindle I couldn't reach before. Put it back together and took it for a test drive. The lazy speedo needle seemed to be fixed and the odo was working properly. That felt like victory. (IMG:style_emoticons/default/piratenanner.gif) Moving on to yesterday's comedy of errors. The day started well. There was something about the brakes that seemed off to me. I couldn't really describe it, just something intangible. Then I realized this little sticker was on the brake reservoir when I took it out of the car. Don't know what it is and can barely read it, but I'm sure it is important, so back on it went. 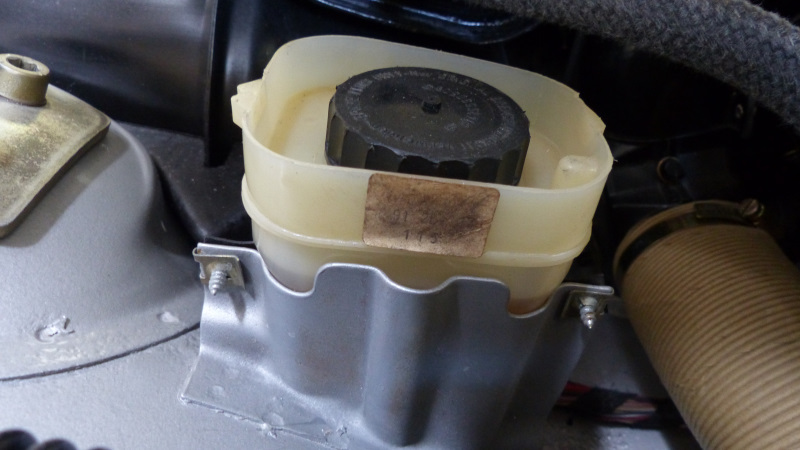 Yeah, that's the ticket! (IMG:style_emoticons/default/rolleyes.gif) More to reality, I'm surprised I haven't needed to bleed the brakes a second time after driving the car. The peddle is high and firm. If anything, it has gotten more firm as the pads bedded in. Really a little too firm for my taste. I would prefer a 17mm MC but this 19mm from 914Rubber is doing the job. It is only a preference thing. Next I spent an hour setting up to replate the hardware to mount the heater flapper boxes. Got a really nice yellow chromate finish on them and hung them in the sun to harden. Then I turned to one of the flapper boxes that was missing the gaskets on the valves. Yes, I realize they will work fine without those gaskets but... Do you really think I could do that? (IMG:style_emoticons/default/screwy.gif) I bought a sheet of exhaust gasket material and cut new gaskets with a couple hole saws. First one is 3" of OD. The 3" saw I have on hand is not a bimetal saw so it did not want to go through the metal mesh in the gasket material.  Other than dulling the saw, that was probably a good thing because it made it easier and safer to hold the material to cut the ID with a 1-5/8" bimetal saw. 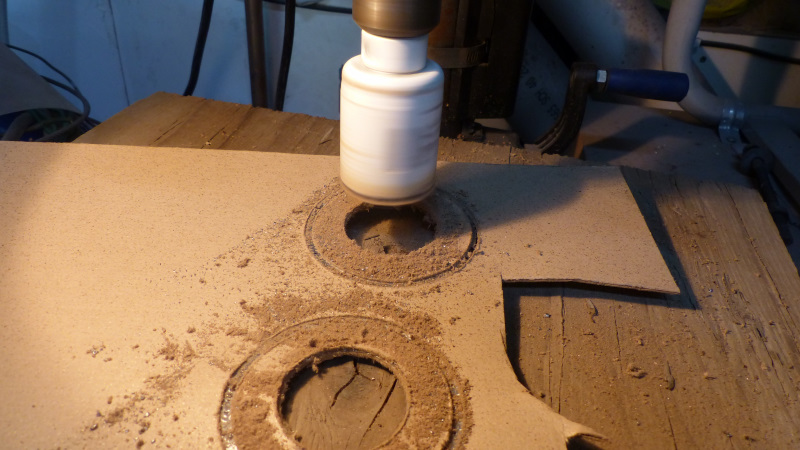 Then I cut the metal mesh with snips and finished the edges on a grinder. 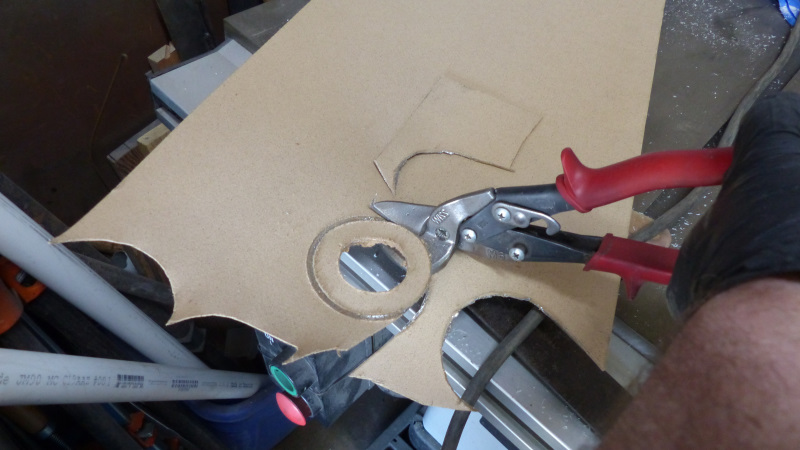 The original gaskets are crimped in to the valve plates. For the replacements, I had some high temp adhesive left over from installing new gaskets in our clothes dryer a few weeks ago. 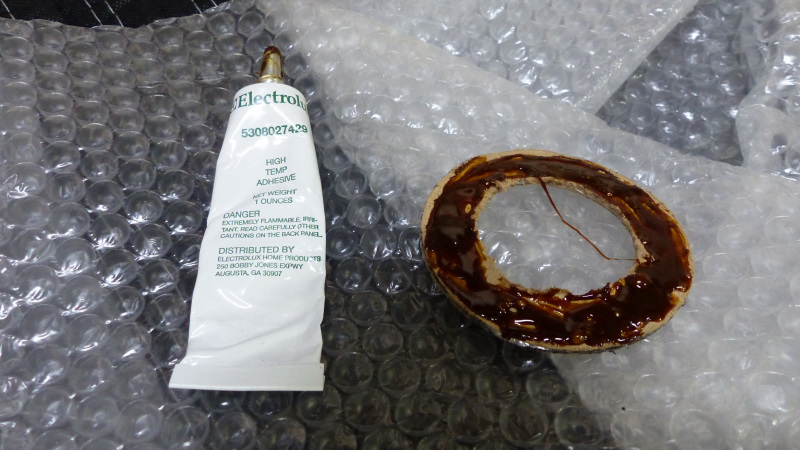 And there we are. New gaskets. 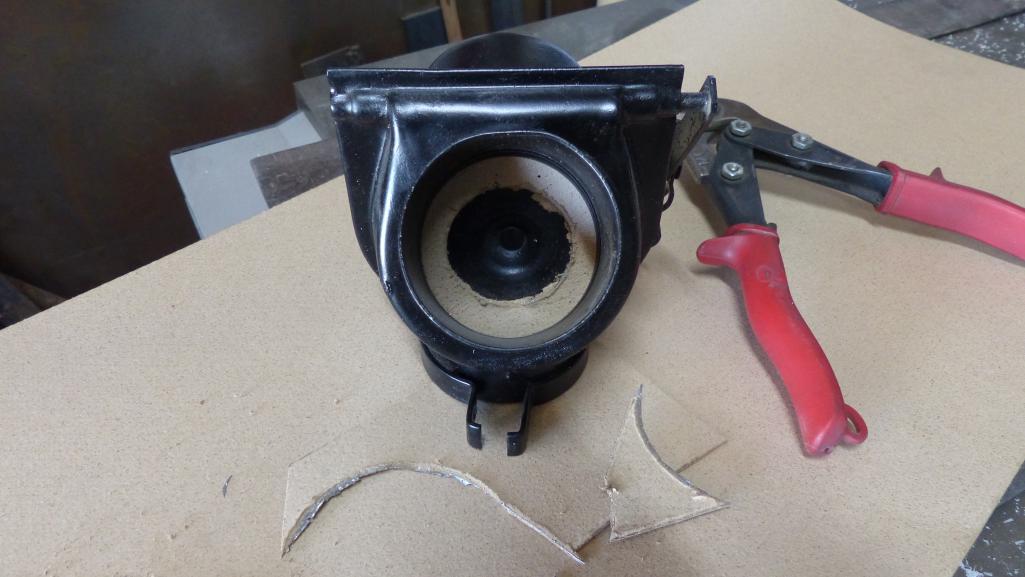 So far the day was going well and we ran into town to run some errands. When we got home, I retrieved the replated hardware that had been hanging to dry and the flapper that was sitting in the sun to help the adhesive cure and brought them into the garage to prepare to install in the car. I assembled a bolt in one barrel nut and the clamping bolt onto the flapper. Then turned to the other barrel nut and found it was missing. (IMG:style_emoticons/default/WTF.gif) I spent two full hours looking for that little f'er in the shitshow of my shop but no luck. Finally gave up and placed another Belmetric order. I decided to go ahead and install the flappers and at least get one side of the heaters hooked up. Mounting went okay. I did cut the high temp flexible hoses from flapper to heater tubes in the longs to length. Showing off some plating, this clamp bolt is NOS. 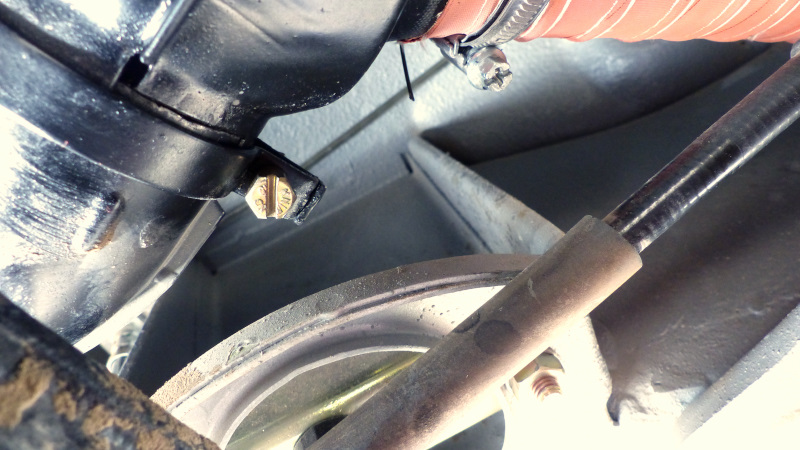 and this is the bolt donated by @brant after replating. 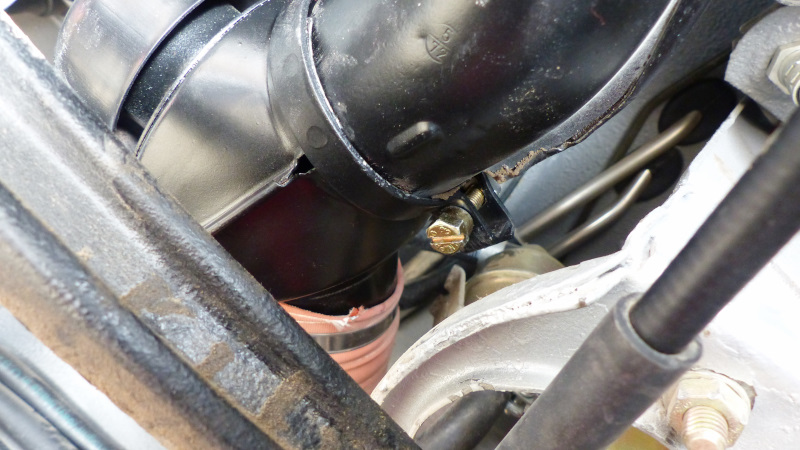 Here's where things really started to go to (IMG:style_emoticons/default/stromberg.gif) The heater cable did not reach to the passenger side and was long on the driver's side. I probably just installed the damn thing backwards but it didn't come with any instructions. You probably don't recall that I was concerned that the cables 914Rubber sells for hood, engine, and heater are made with soft wire instead of the hardened music wire of OEM. In fact, they are so soft the feel more like aluminum than steel. The heater wire was the only one I used and I thought I could adjust the lengths by repositioning the bend where it goes through the lever on the tunnel. That worked until it didn't. One bend and the cable broke in half (IMG:style_emoticons/default/headbang.gif) I now have an OEM cable on order from Sunset Porsche. The only good news is that the heater duct circuit is not closed so dust can migrate into the heater tubes and cockpit. After that frustration, it was time for the first real test drive already mentioned. Hopped in the car and started down the road and noticed the speedo was a little jumpy and the odo wasn't working. Drove to the nearest spot I could pull over and disconnected the cable from the gauge before heading back to the house for yet another tear down. As suspected, a tiny amount of JB weld had migrated onto the shaft and set up over night just enough to jam the mechanism. It took only a second to pop it loose and have the odometer gears spinning properly again, but the damage was done. The drive gear coming off the cable chewed up the nylon skew gear and the mechanism now has a hitch that is catching the cable enough that it winds up a little tension before releasing. That's what's causing the needle to jump and probably will shorten cable life if not corrected. Searching for a replacement gear now. 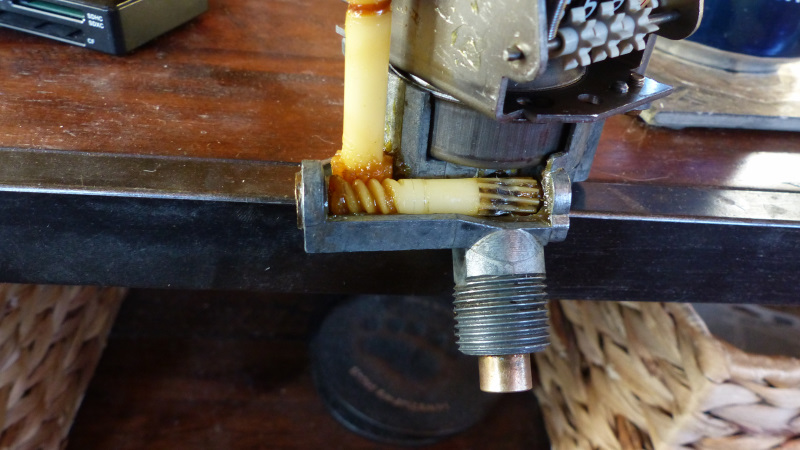 Then off for the test drive. Ran great but added a couple things to the punch list. The driver's tilt mechanism is popping out so every time I sit in the seat, it pops loose and sends me flinging backward to land right on my anger nerve. Also, I had forgotten that the plastic contact socket on my right front turn signal was trash and I had cobbled it together for testing. I meant to replace it and forgot. It is not reliable on the road. Overall, pretty minor things to work through although I'm getting tired of the amount of time and aggravation wasted replacing NSPs (New Shit Parts). |
|
|
|
| wonkipop |
Jun 1 2021, 02:10 AM
Post
#2037
|
|
Advanced Member Group: Members Posts: 4,296 Joined: 6-May 20 From: north antarctica Member No.: 24,231 Region Association: NineFourteenerVille |
watched your vid.
montana has aussie roads. nice part of the world by the looks of it. bit of an aussie moment coming across the train tracks---and sure as sh&t here comes a train. and its 15 miles long. listening to vid sounds like your car passed the rattle test dished out by the back road, ........tight. (IMG:style_emoticons/default/beerchug.gif) |
|
|
|
| bbrock |
Jun 2 2021, 05:17 PM
Post
#2038
|
|
914 Guru Group: Members Posts: 5,269 Joined: 17-February 17 From: Montana Member No.: 20,845 Region Association: Rocky Mountains |
QUOTE(wonkipop @ Jun 1 2021, 01:10 AM) watched your vid. montana has aussie roads. nice part of the world by the looks of it. Well that's weird, here I thought that Australia had Montana roads (IMG:style_emoticons/default/confused24.gif) I forgot to post my Sunday update. Two somewhat small tasks. First was that seat tilt catch. I'm afraid it isn't great news. The proper fix would be to cut the seat hinges and more them forward so the adjustment dog fits completely in the adjustment teeth. 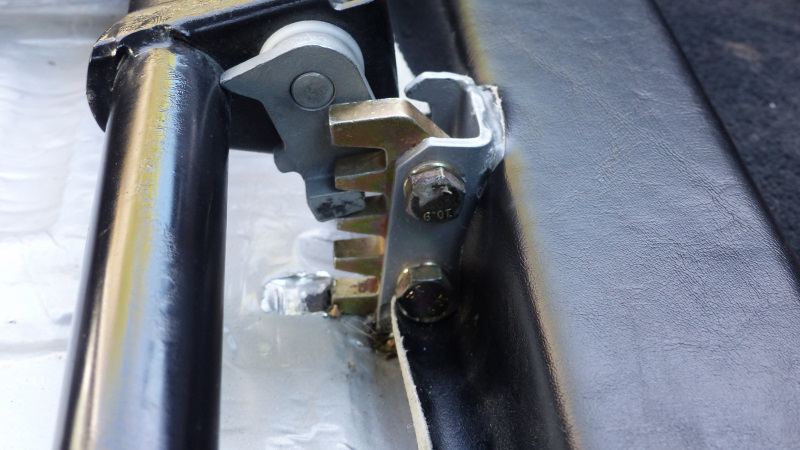 You might understand my reluctance to do that at this stage of the game. Lesson learned for those playing at home. Make sure you have your seat rails assembled and handy for proper placement when welding in those hinges. I'm about a 1/4" off. I opted to file out the adjustment where the rails bolt to the hinges a little more to let the seat move forward more, and maxed out the top tilt of the adjustment teeth to get more engagement with the dog. I can no longer pop the front of the seat out by pushing on the back, but need to do a little more filing for extra measure. Trying to decide how much of a safety issue this would be if the adjustment popped loose if I got rear ended and the seat suddenly rocked back the few inches before hitting the firewall. I failed to mention another issue that cropped up which was that the shifter was really stiff. It was especially bad going into 4th and 5th and moving the shifter to the right felt more spring loaded than the spring gate on the left. It also felt like it was grinding moving the lever from 4th to 5th. I haven't owned a 914 with new shift bushings before so at first thought that was just part of the deal. It became obvious something was wrong so I went fishing for interference in the tunnel. I finally found it. The seat belt shoulder bolt to attach the receiver latch was too long. This is a bad pic but you can just see it poking out at the front of the tunnel opening there. 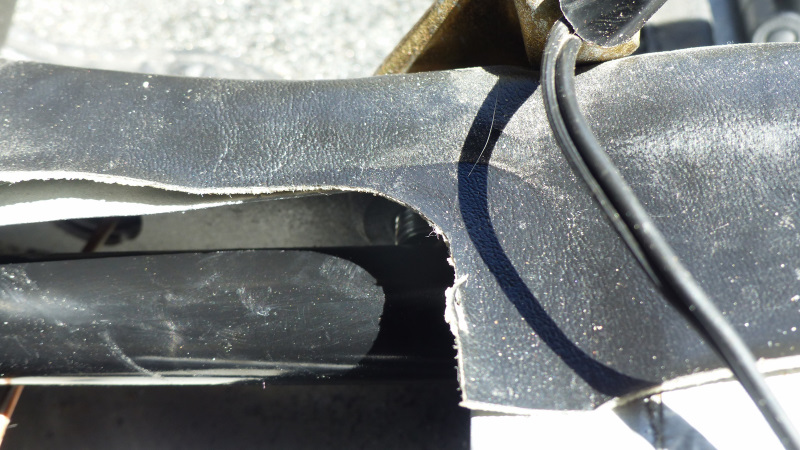 There are a couple lengths of the Repa shoulder bolts and I couldn't find good guidance on which went where so I guessed... wrongly as it turned out. After swapping bolt lengths, it shifts like butter. 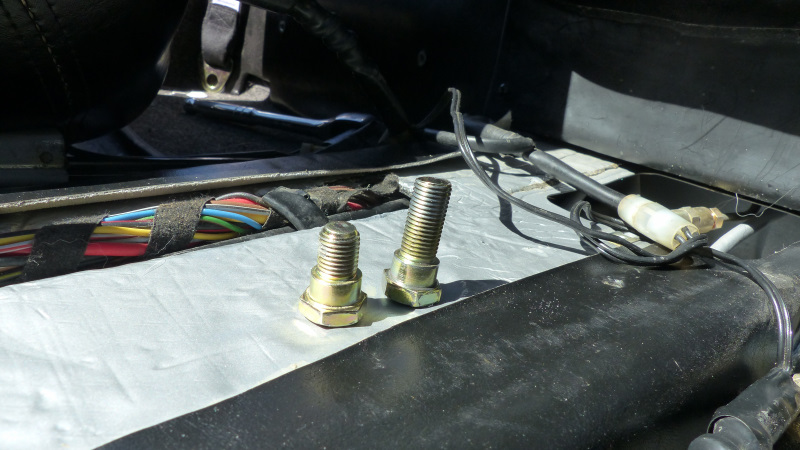 |
|
|
|
| mepstein |
Jun 2 2021, 05:33 PM
Post
#2039
|
|
914-6 GT in waiting Group: Members Posts: 19,271 Joined: 19-September 09 From: Landenberg, PA/Wilmington, DE Member No.: 10,825 Region Association: MidAtlantic Region |
The seatbelt bolt issue is a common one but at least you figured it out quickly.
|
|
|
|
| Superhawk996 |
Jun 3 2021, 07:02 AM
Post
#2040
|
|
914 Guru Group: Members Posts: 5,819 Joined: 25-August 18 From: Woods of N. Idaho Member No.: 22,428 Region Association: Galt's Gulch |
QUOTE(bbrock @ Jun 2 2021, 07:17 PM) You might understand my reluctance to do that at this stage of the game. Lesson learned for those playing at home. Make sure you have your seat rails assembled and handy for proper placement when welding in those hinges. I'm about a 1/4" off. I opted to file out the adjustment where the rails bolt to the hinges a little more to let the seat move forward more, and maxed out the top tilt of the adjustment teeth to get more engagement with the dog. I can no longer pop the front of the seat out by pushing on the back, but need to do a little more filing for extra measure. You might want to slightly slot the welded bracket and/or the comb to get a little more engagment. The combination of all three will probably get you there. |
|
|
|
|
1 User(s) are reading this topic (1 Guests and 0 Anonymous Users)
0 Members:

|
Lo-Fi Version | Time is now: 15th May 2024 - 01:44 PM |
Invision Power Board
v9.1.4 © 2024 IPS, Inc.