|
|
|
Porsche, and the Porsche crest are registered trademarks of Dr. Ing. h.c. F. Porsche AG.
This site is not affiliated with Porsche in any way. Its only purpose is to provide an online forum for car enthusiasts. All other trademarks are property of their respective owners. |
|
|

  |

| 76-914 |
 Jan 12 2018, 04:11 PM Jan 12 2018, 04:11 PM
Post
#221
|
|
Repeat Offender & Resident Subaru Antagonist  Group: Members Posts: 13,878 Joined: 23-January 09 From: Temecula, CA Member No.: 9,964 Region Association: Southern California |
QUOTE(bbrock @ Jan 10 2018, 05:33 PM)  I'm happy to report I have no more shit in my eye and NO DRILLS (IMG:style_emoticons/default/piratenanner.gif) Doc says I should be at 90% by Friday. If they'd just send me home with a bottle of that Lidocaine for numbing, I'd be at 100% right now. Still have to laugh at the absurdity of the whole thing. The eye drill is psychedelic. It's just a rubber disc that rotates and snags the metal piece. It's a fantastic light show when it's swirling. 20 different colors blossom in a kaleidoscopic pattern. Unbelievable effect. I don't know why the brain see's this in this manner but it is beautiful. BTDT. (IMG:style_emoticons/default/beerchug.gif) |
   |

 
|
| bbrock |
Jan 15 2018, 12:36 AM
Post
#222
|
|
914 Guru Group: Members Posts: 5,269 Joined: 17-February 17 From: Montana Member No.: 20,845 Region Association: Rocky Mountains |
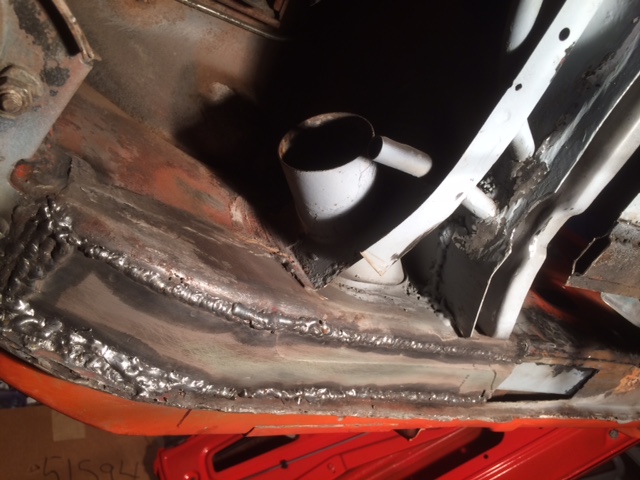
QUOTE(76-914 @ Jan 12 2018, 03:11 PM) The eye drill is psychedelic. It's just a rubber disc that rotates and snags the metal piece. It's a fantastic light show when it's swirling. 20 different colors blossom in a kaleidoscopic pattern. Unbelievable effect. I don't know why the brain see's this in this manner but it is beautiful. BTDT. (IMG:style_emoticons/default/beerchug.gif) Dangit! Now I'm bummed I didn't get the drill! But how about an update? Friday, I finally got around to repairing the turn signal lens that broke when the shelf of parts bins collapsed months ago. (IMG:http://www.914world.com/bbs2/uploads/post-20845-1514096163.jpg) I wound up using aircraft paint stripper to solvent bond the pieces together. It is basically gelled methyl chloride which is the stuff used to solvent weld acrylic. It makes a good, strong bond. (IMG:http://www.914world.com/bbs2/uploads/post-20845-1515857820.jpg) (IMG:http://www.914world.com/bbs2/uploads/post-20845-1515857852.jpg) You'd never know it was ever busted. Come On Baby Light My Firewall Lot's of little repairs needed before the floor can go in. Saturday started off a bit rocky as I fired up the cutting wheel and almost immediately, some piece of crap bounced at a weird angle and shot behind the side shield of my very expensive prescription safety glasses, and into the same damn eye!!! (IMG:style_emoticons/default/fyou1.gif) Luckily, a quick rinse with saline got it out without doing more damage to my already traumatized cornea. First on the agenda was the firewall repairs I started a couple weeks ago. Both inside lower corners were rusted. 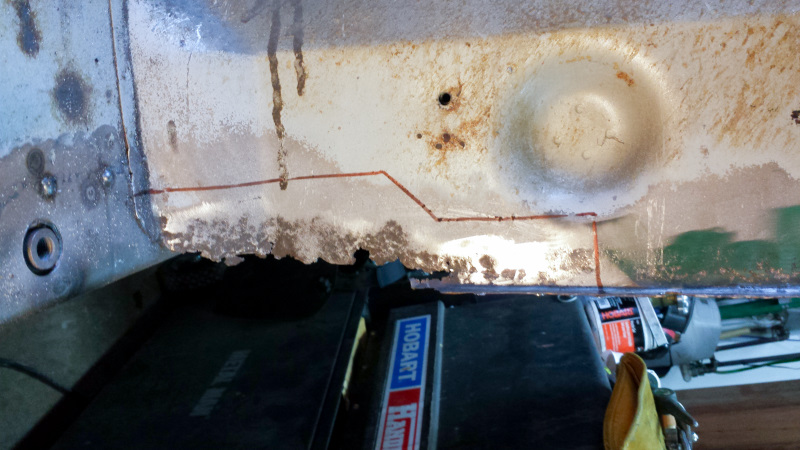 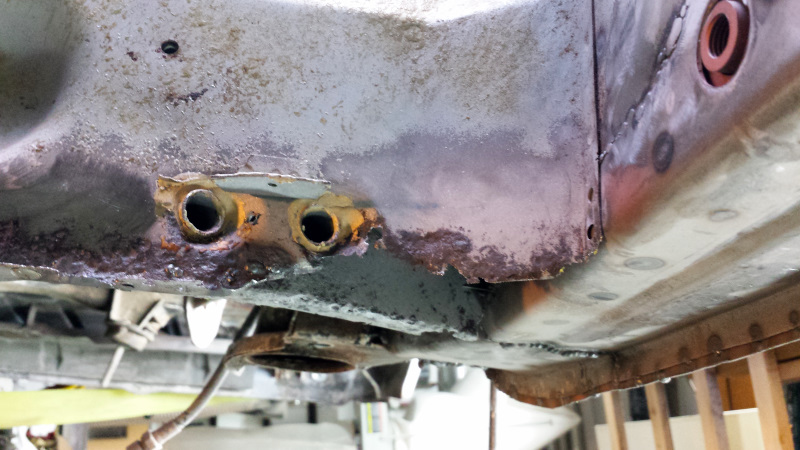 To fit patches, I needed to fit the floor panel in place. So, I trimmed the flanges down to correct size, and clamped and zip screwed the rear panel in. It looks so nice, it is tempting to start welding it in. But there is a lot of work that needs to be done before I'm ready for that. 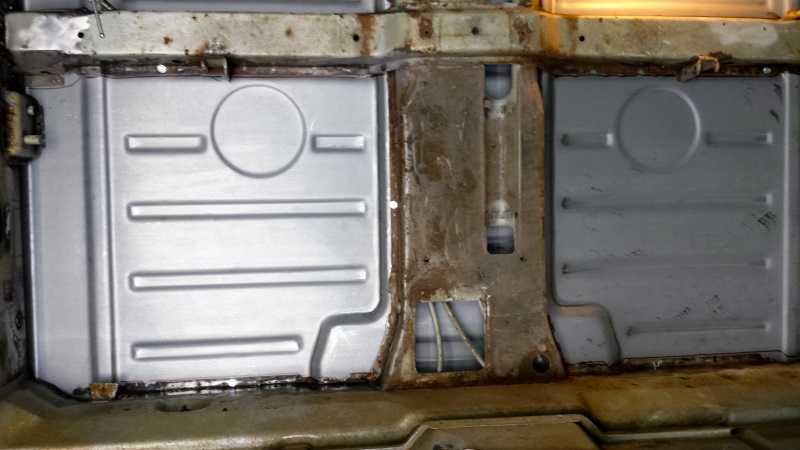 Here are the patches. 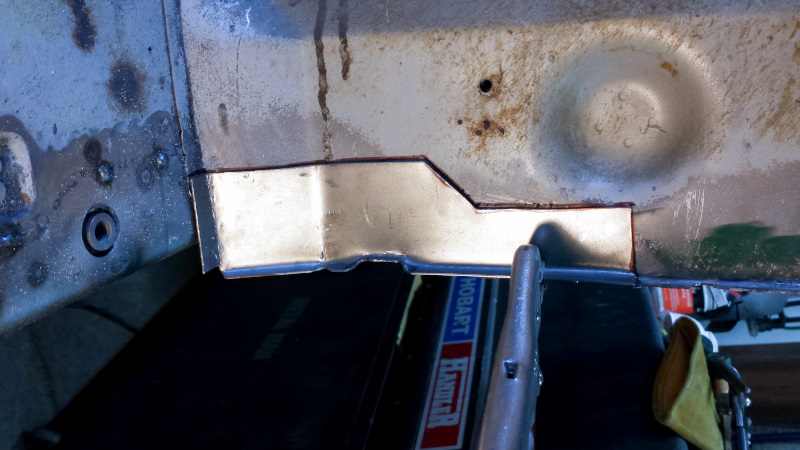 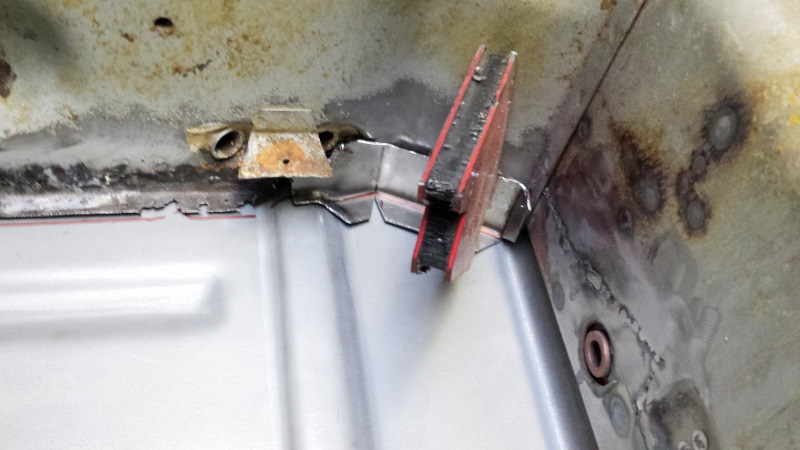 And the repairs 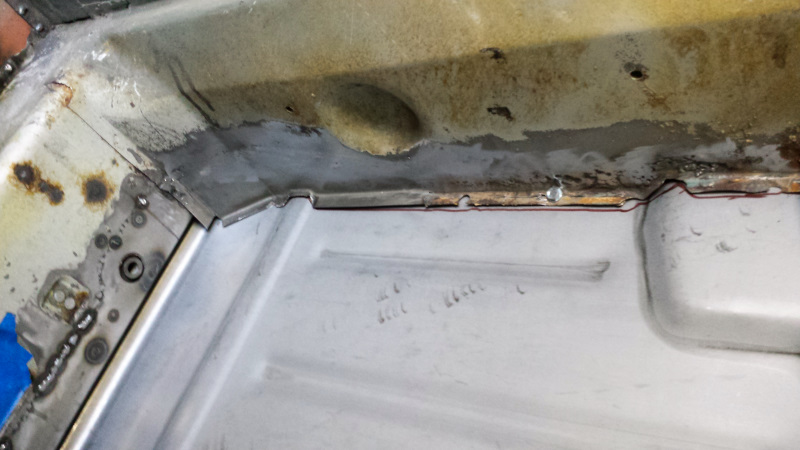 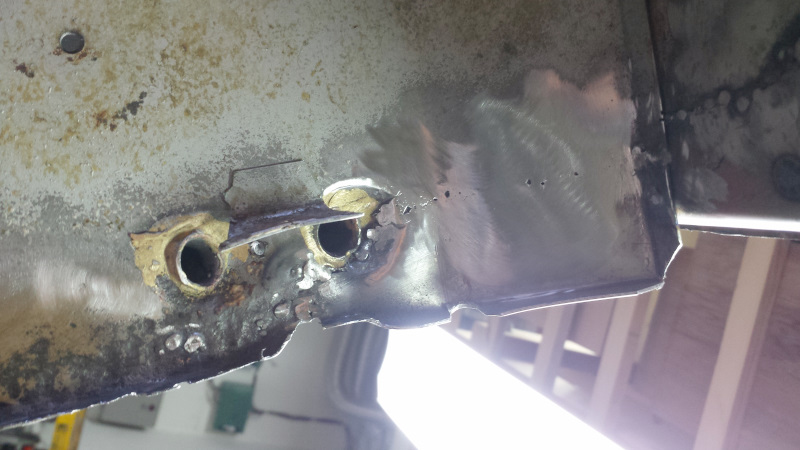 Working around those brazed in e-brake cable tubes was loads of fun. There are a few boogers in the welds because I was getting some sort of contamination causing the pool to bubble. The metal is clean on both sides so I don't know what caused it. But it got worse the closer I got to that braze joint so I wonder if it was brass spatter? (IMG:style_emoticons/default/confused24.gif) Anyway, I probably could have fixed it for a completely invisible joint, but decided to let sleeping dogs lie. That booger down by the tube looks worse in this pic, but I may go in with the Dremel to clean it out. I might also touch up the braze when I braze in the air vent tubes in the door jambs. Here's the backside of that patch. I ground it down a little after this pic was taken, but didn't get too carried away. It will be hidden and I didn't want to risk nicking those tubes. 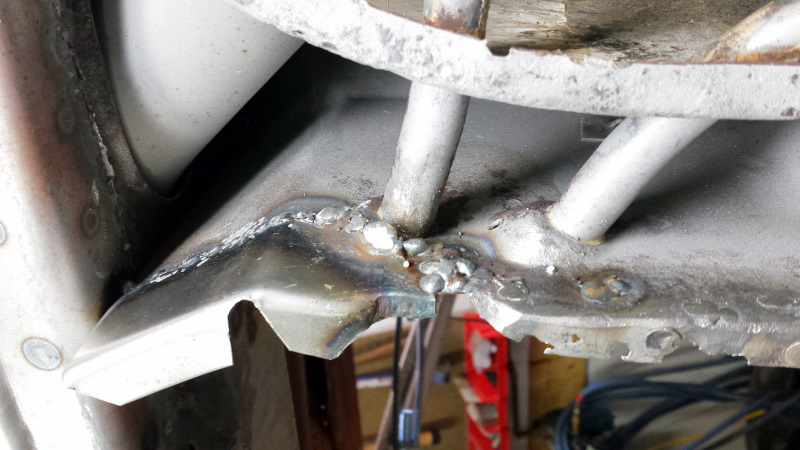 As a side note, here's a comparison of Eastwood's rattle can 2K epoxy primer vs. PPG DPFL50. Eastwood is the first pic. Notice how the paint scraped off when I fished that heater tube through the long and firewall. The PPG painted tube is unscathed (well, not quite. There is a scrape where I nicked it with a cutting wheel. Can't blame the paint for that). The Eastwood paint also has a chalkier feel to it whereas the PPG is like armor. I'm not impressed with the Eastwood product. 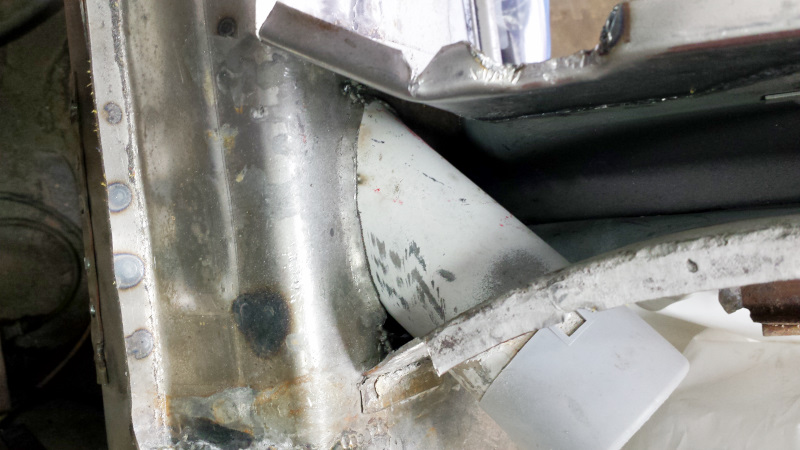 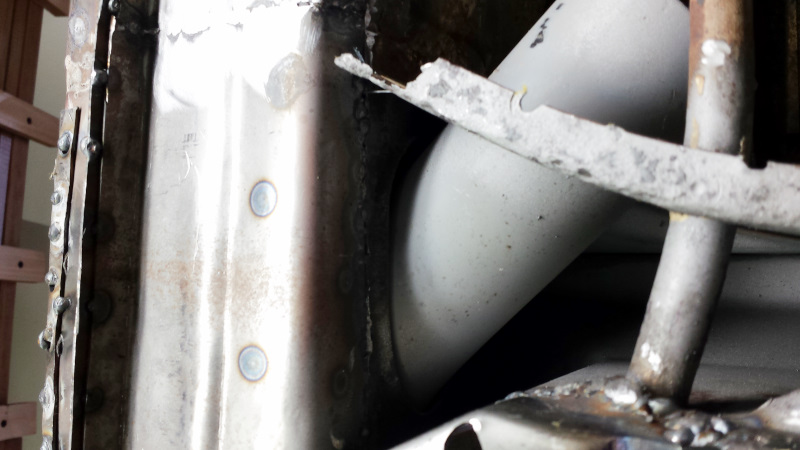 Next up were some dinky little patches on the corners of the lower outer firewall. I'll only show the larger one. This one was tricker than I expected because the firewall curves in two directions here. I couple taps with the shrinker and stretcher made it work. The other side was shorter so I was able to just do a straight patch. I only ground these enough to remove any MIG whiskers since they will be buried under seam sealer and they aren't very accessuible for grinding. 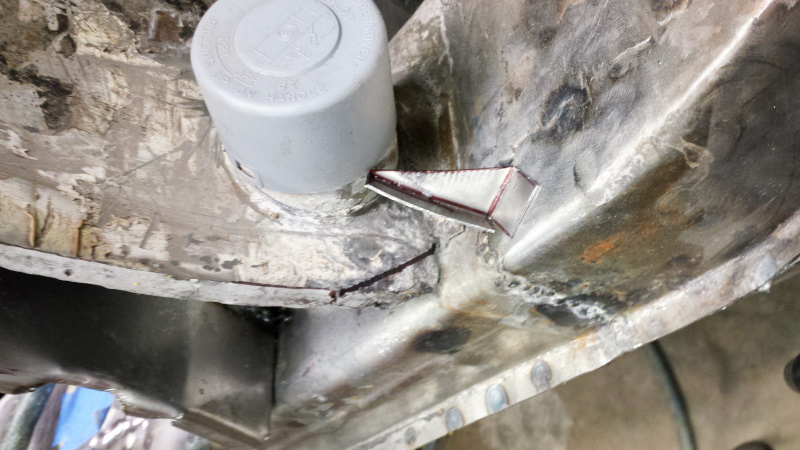 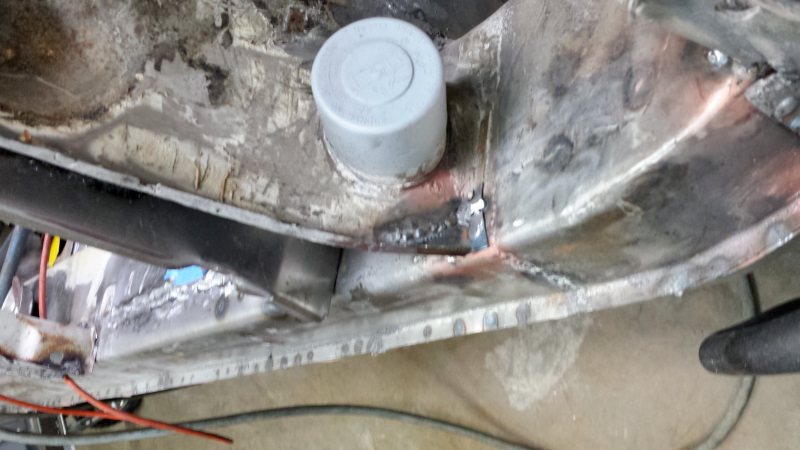 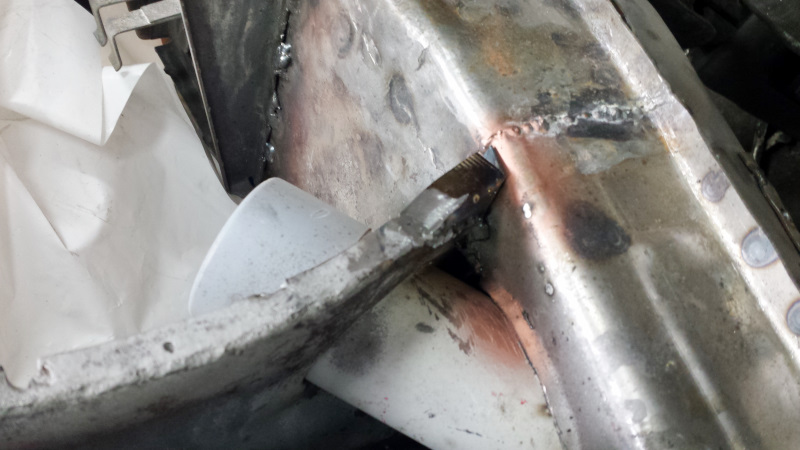 Next, I reworked some of the weld on the inner long and ran over the whole thing with the shrinking disc since access would never be better. I'm pretty ashamed of those welds. Structurally, they are strong, but no pretty. Luckily, my skills have improved since then. Now I'm mediocre. The instruction booklet that comes with the shrinking disc says it is NOT magic. But it's the closest thing to real magic I've ever witnessed. It's really amazing how a warbly surfaces tightens up and straightens out after using this thing... like magic. 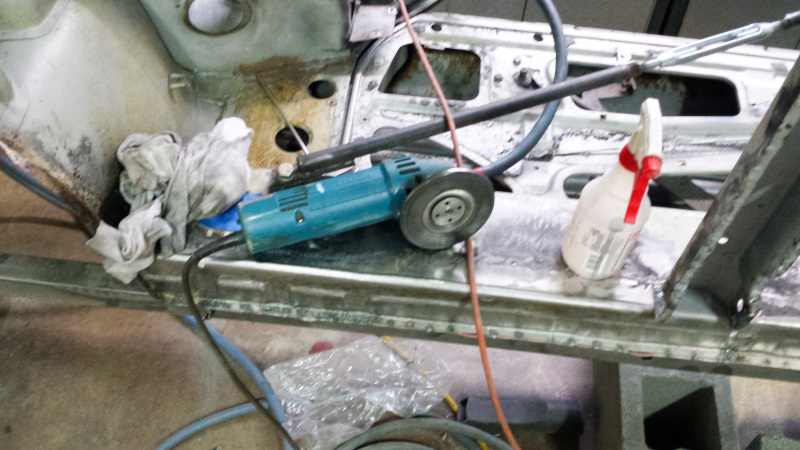 A couple of small repairs to flanges were needed. Those were quick and easy. One on the inner firewall. 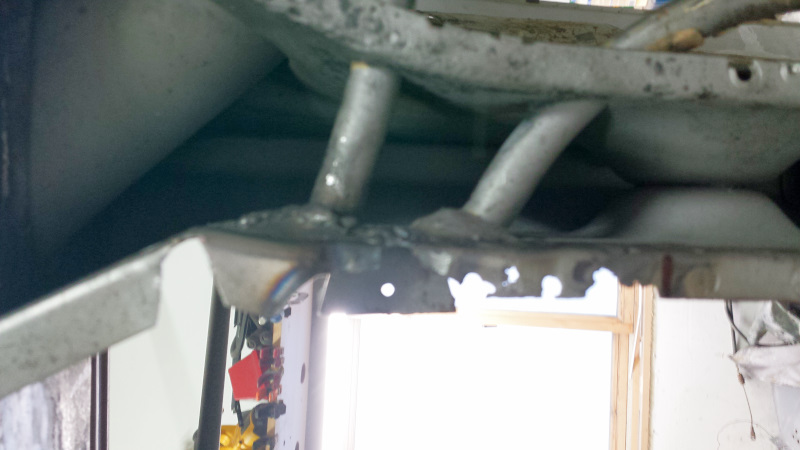 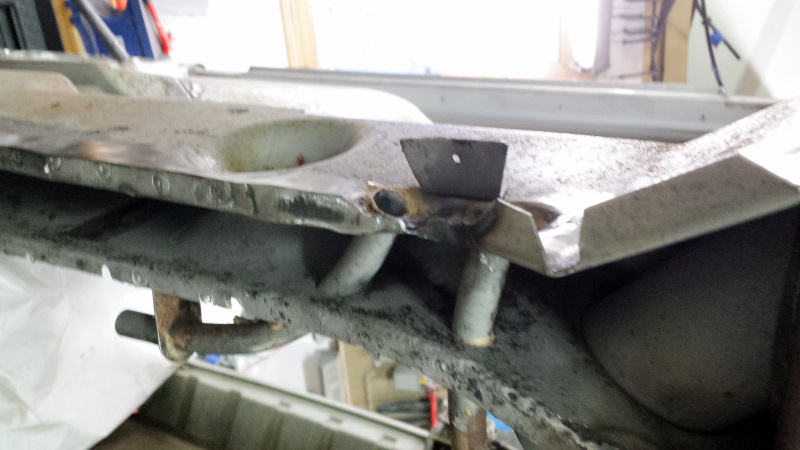 And one on the cross member. I guess I didn't take pics of that one. Finally, a small section at the front of the tunnel next to the pedals had rusted out at the bottom. Again, I forgot to take a pic of the damage. But here's the repair. 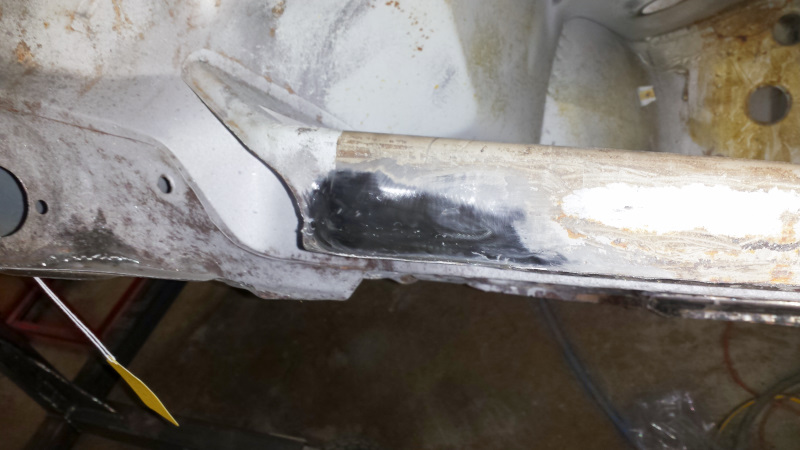 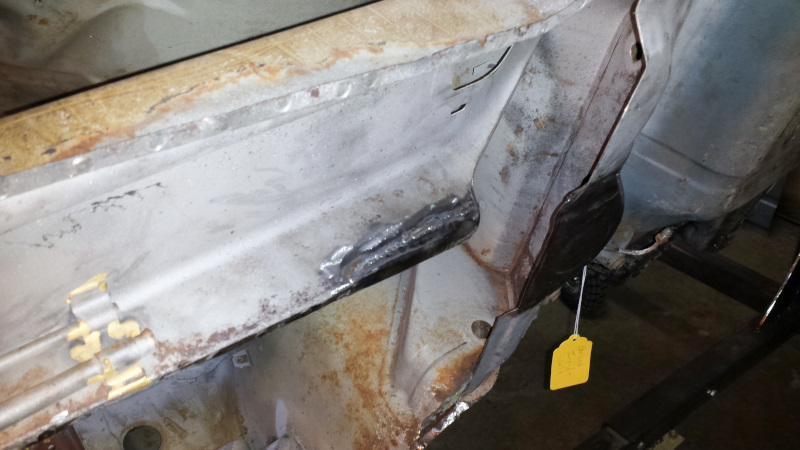 Still a few things to do before the floor goes in, but getting close. Getting close to an exciting milestone is a danger point. I have to keep myself in check to not get over eager and skip a step. Take deep breaths, slow down, and think it through. |
|
|
|
| cary |
Jan 15 2018, 08:32 AM
Post
#223
|
|
Advanced Member Group: Members Posts: 3,900 Joined: 26-January 04 From: Sherwood Oregon Member No.: 1,608 Region Association: Pacific Northwest |
Looks like a productive weekend.
Keep up the good work. |
|
|
|
| KELTY360 |
Jan 15 2018, 11:50 AM
Post
#224
|
|
914 Neferati Group: Members Posts: 5,186 Joined: 31-December 05 From: Pt. Townsend, WA Member No.: 5,344 Region Association: Pacific Northwest |
QUOTE(76-914 @ Jan 12 2018, 02:11 PM) The eye drill is psychedelic. It's just a rubber disc that rotates and snags the metal piece. It's a fantastic light show when it's swirling. 20 different colors blossom in a kaleidoscopic pattern. Unbelievable effect. I don't know why the brain see's this in this manner but it is beautiful. BTDT. (IMG:style_emoticons/default/beerchug.gif) Ssssssh.....the feds will hear about it and make it illegal. (IMG:style_emoticons/default/smoke.gif) |
|
|
|
| Dave_Darling |
Jan 15 2018, 12:03 PM
Post
#225
|
|
914 Idiot Group: Members Posts: 15,338 Joined: 9-January 03 From: Silicon Valley / Kailua-Kona Member No.: 121 Region Association: Northern California |
Since you have the tunnel apart and access from the inside, it might be a really good time to reinforce the clutch tube mounting points. Having the tube break loose is a distressingly common thing in 914s...
--DD |
|
|
|
| bbrock |
Jan 15 2018, 12:09 PM
Post
#226
|
|
914 Guru Group: Members Posts: 5,269 Joined: 17-February 17 From: Montana Member No.: 20,845 Region Association: Rocky Mountains |
QUOTE(Dave_Darling @ Jan 15 2018, 11:03 AM) Since you have the tunnel apart and access from the inside, it might be a really good time to reinforce the clutch tube mounting points. Having the tube break loose is a distressingly common thing in 914s... --DD Glad you mentioned that. I was contemplating that over the weekend. All the braze joints on all the tubes look in great shape with no stress fractures, but still, I was thinking how much it would suck to have one of them break after getting this thing all together. I'll do some searching on how others have done this, but any tips on the best way to reinforce would be appreciated. Of course, I'll also be treating the tunnel with Jasco and spraying with epoxy primer before buttoning things up too. Thanks for reminding me not to neglect this task. |
|
|
|
| bbrock |
Jan 16 2018, 09:04 AM
Post
#227
|
|
914 Guru Group: Members Posts: 5,269 Joined: 17-February 17 From: Montana Member No.: 20,845 Region Association: Rocky Mountains |
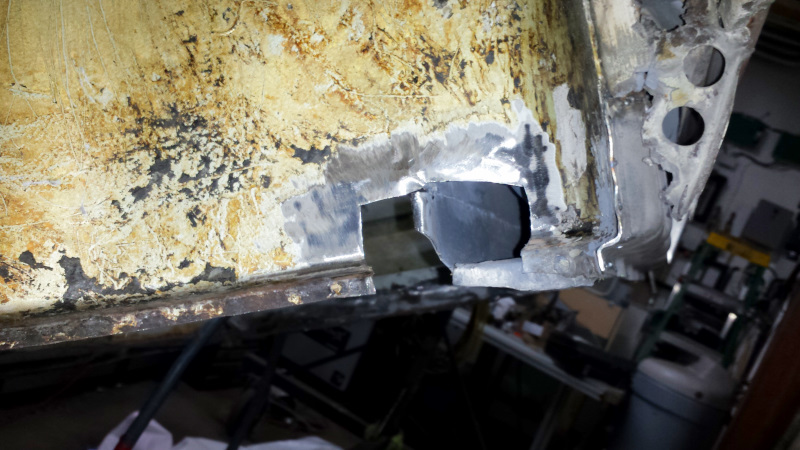
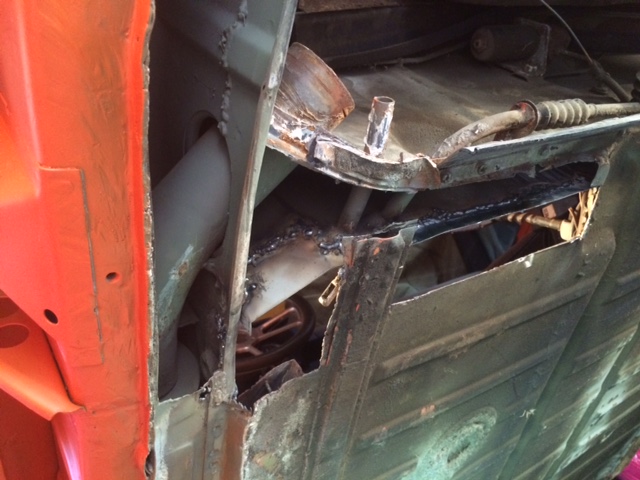
QUOTE(Dave_Darling @ Jan 15 2018, 11:03 AM) Since you have the tunnel apart and access from the inside, it might be a really good time to reinforce the clutch tube mounting points. Having the tube break loose is a distressingly common thing in 914s... --DD It's a Series of Tubes Dave probably saved my a$$. At lunch yesterday, I took another look at my clutch tube and found one of the braze joints at the front end cracked and the tube wiggling around a little. You can see it in the first pic below. I'm sure it wasn't cracked Sunday morning when I inspected all the tubes. I'm guessing all the vibration cutting out the patch on the front of the tunnel created the crack. That's probably how the failure starts. I read up on clutch tube repairs, and was particularly looking for info on failure modes to understand how to prevent. Lot's of reading available, but I found this thread particularly helpful. Mark S., if you haven't seen it, you should check it out before beginning your repair. It might save you cutting into the floor of your tunnel. It looks like the main failures are caused by the bracket breaking loose at the front, or rusting out where it passes through the firewall at the rear. The problem at the front looks to be more a problem with the brazing used to attach the bracket than the bracket itself. So, my solution up threre was just to turn the welder down low and sneak a bunch of tack welds in around the brazing. I slipped a drill bit the same size at the tube I.D. to make sure the tube stayed round and the correct dimension. 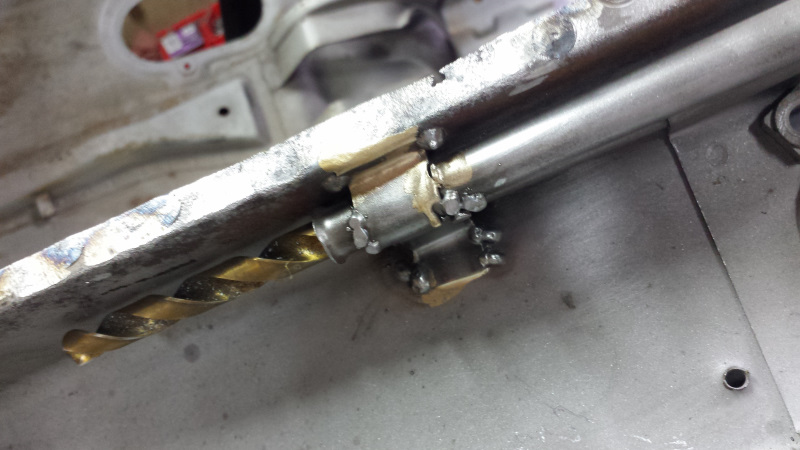 I think this should be sufficient to keep the tube attached to the bracket and bracket attached to the wall with no flexing to lead to metal fatigue. On the rear, I made a little bracket to add additional attachment support beyond just the firewall. 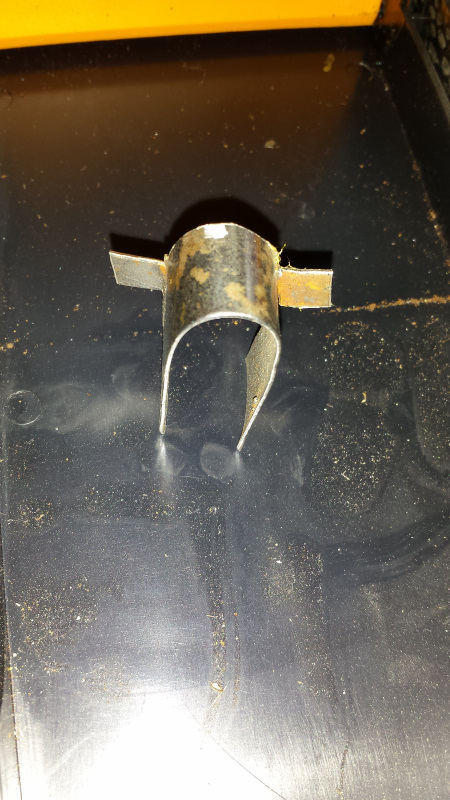 The bracket is tack welded to the tube, the firewall, and the two bottom tabs will be plug welded to the floor when it is installed.  Hopefully this will prevent a future crisis, but opinions are welcome. I'm also going to treat the insides of the tubes with Jasco and after the chassis is painted, I'll pull a swab soaked with Teflon dry lube through them. |
|
|
|
| euro911 |
Jan 16 2018, 01:58 PM
Post
#228
|
|
Retired & living the dream. God help me if I wake up! Group: Members Posts: 8,937 Joined: 2-December 06 From: So.Cal. & No.AZ (USA) Member No.: 7,300 Region Association: Southern California |
The front of the clutch cable tube on my '75 had been 'repaired' by a PO with a brace that was bolted in to secure it in place. The rear of the tube has definitely broken loose from the firewall, so that's the area I'll focus on first.
I also want to install a J-West RennShift lever, so I'll probably remove the entire shift rod assembly, allowing me to inspect the tunnel better with an inspection camera - it's pretty cluttered in there right now and hard to see very well. Pretty sure I'll have to cut out a section of the floor of the tunnel to effect tube repair at the firewall. |
|
|
|
| bbrock |
Jan 16 2018, 03:12 PM
Post
#229
|
|
914 Guru Group: Members Posts: 5,269 Joined: 17-February 17 From: Montana Member No.: 20,845 Region Association: Rocky Mountains |
QUOTE(euro911 @ Jan 16 2018, 12:58 PM) The front of the clutch cable tube on my '75 had been 'repaired' by a PO with a brace that was bolted in to secure it in place. The rear of the tube has definitely broken loose from the firewall, so that's the area I'll focus on first. I also want to install a J-West RennShift lever, so I'll probably remove the entire shift rod assembly, allowing me to inspect the tunnel better with an inspection camera - it's pretty cluttered in there right now and hard to see very well. Pretty sure I'll have to cut out a section of the floor of the tunnel to effect tube repair at the firewall. Well, it was worth a shot. I agree, I didn't see anything for the firewall end that would provide a shortcut. But when I read the technique for drilling small holes in the side of the tunnel to plug weld the front bracket back to the wall, it gave me hope for you project. |
|
|
|
| euro911 |
Jan 16 2018, 05:21 PM
Post
#230
|
|
Retired & living the dream. God help me if I wake up! Group: Members Posts: 8,937 Joined: 2-December 06 From: So.Cal. & No.AZ (USA) Member No.: 7,300 Region Association: Southern California |
Oh, I definitely appreciate all the tips and recommendations, Brent. Since I'll be cutting into the tunnel anyway, I may go ahead and do a better fix on the front tube support 'while I'm in there'.
I've been fortunate in that there wasn't much rust on the car, and most has been dealt with - nowhere near what you've had to work on ... it's just those last little nagging bits left to address (IMG:style_emoticons/default/sawzall-smiley.gif) (IMG:style_emoticons/default/smash.gif) (IMG:style_emoticons/default/welder.gif) Your progress thread has been very educational and an inspiration to many of us (IMG:style_emoticons/default/beerchug.gif) |
|
|
|
| bbrock |
Jan 16 2018, 09:06 PM
Post
#231
|
|
914 Guru Group: Members Posts: 5,269 Joined: 17-February 17 From: Montana Member No.: 20,845 Region Association: Rocky Mountains |
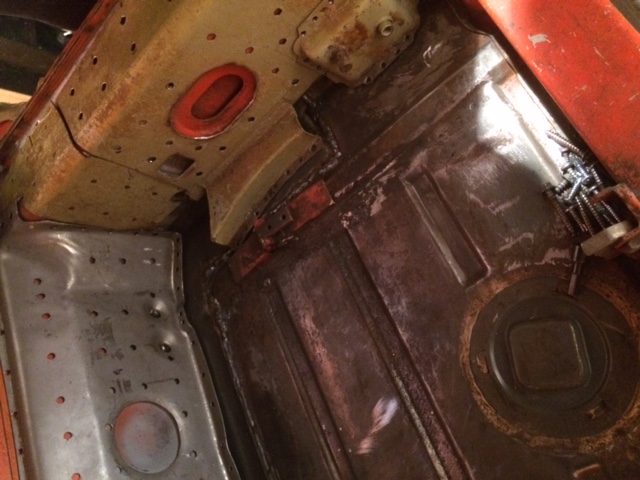
Just a couple little tasks to update. Yesterday I started working on a patch for the driver's front inner wheel well where it meets the long. I left those open on both sides, thinking I'd use them for access inside the longs to spray cavity wax. But they aren't really needed and I need to patch them before the floor can go in.
 Nothing very eventful other than I ran out of time before finishing grinding, but finished that up tonight. 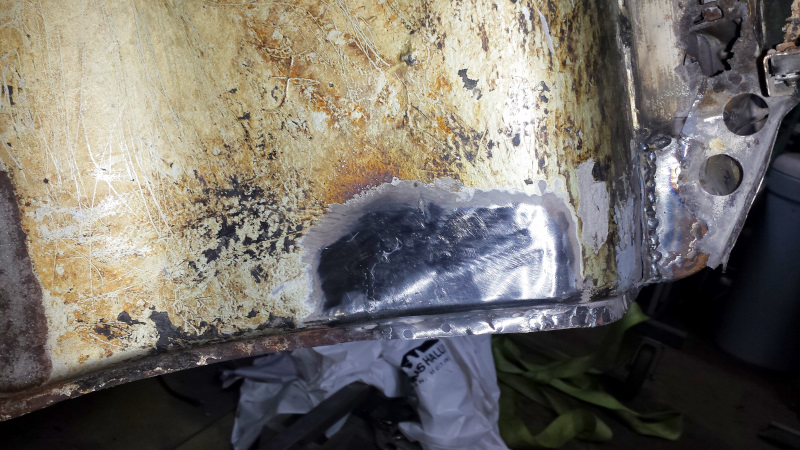 Still a couple shrink dinks in there which is frustrating, but close to invisible. While I was over there, I glued this piece back on with a little BB Weld, mostly just to have one less loose piece rattling around in the shop. I still need to fab a new rocker bracket there that will include a patch for a small rust spot further up in the wheel well, but that can wait. 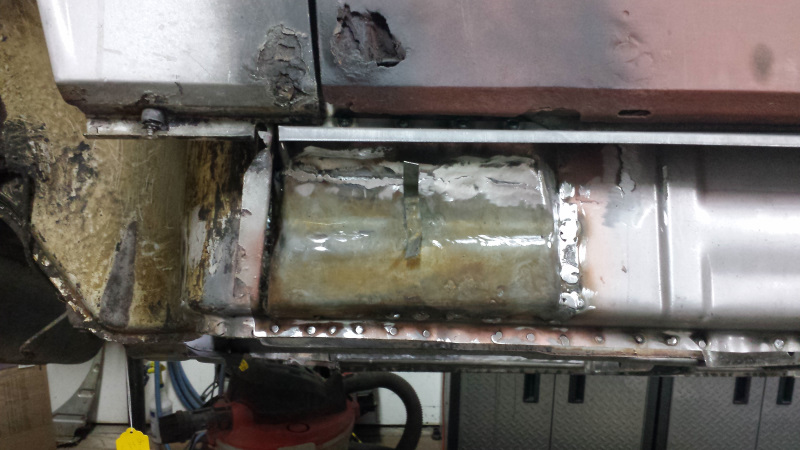 I wore out my last grinding disc so will have to finish grinding later, and frankly, I was getting pretty sick of grinding so needed to do something else. So, I moved over to the other inner wheel well to start on that patch. It is the last patch needed before the floor goes in. You probably don't remember this one, but I sure do. This is the patch I spent a lot of time on and really struggled - and ultimately, through the patch away. I punted by patching only the part I needed to do the longitude repair; hoping my skills would improve by the time I circled back around to it. I doubt they have. I know my toolkit hasn't improved. 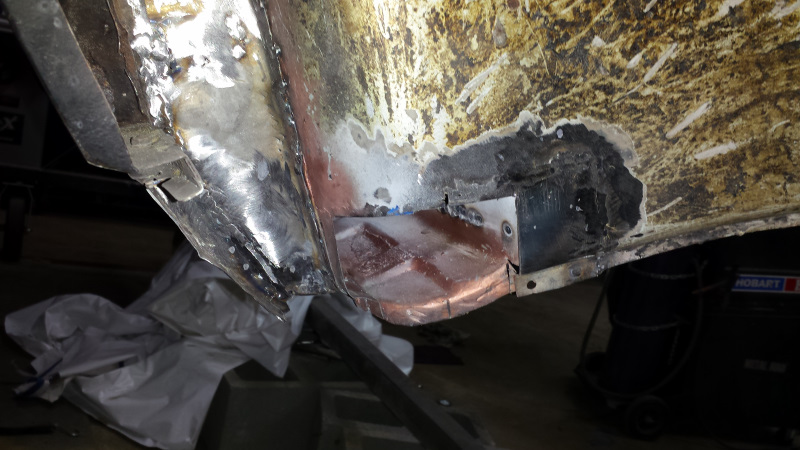 I got this far with the patch: 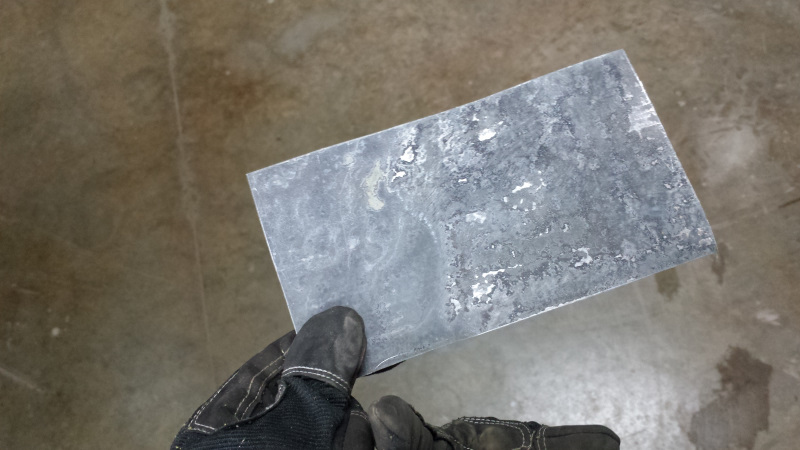 Then I realized I wasn't just tired of grinding, I was just tired. I need to be fresh to tackle this next patch. So I shoved all my crap up under the car so my wife could get her car in the garage when she got home, and called it a night. 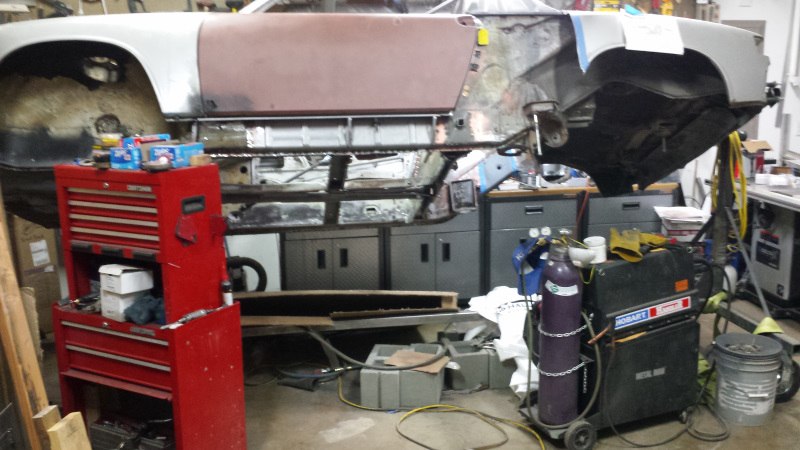 |
|
|
|
| bbrock |
Jan 16 2018, 09:08 PM
Post
#232
|
|
914 Guru Group: Members Posts: 5,269 Joined: 17-February 17 From: Montana Member No.: 20,845 Region Association: Rocky Mountains |
QUOTE(euro911 @ Jan 16 2018, 04:21 PM) Oh, I definitely appreciate all the tips and recommendations, Brent. Since I'll be cutting into the tunnel anyway, I may go ahead and do a better fix on the front tube support 'while I'm in there'. I've been fortunate in that there wasn't much rust on the car, and most has been dealt with - nowhere near what you've had to work on ... it's just those last little nagging bits left to address (IMG:style_emoticons/default/sawzall-smiley.gif) (IMG:style_emoticons/default/smash.gif) (IMG:style_emoticons/default/welder.gif) Your progress thread has been very educational and an inspiration to many of us (IMG:style_emoticons/default/beerchug.gif) Thanks for the kind words Mark. I think if it is inspirational, it should only be for showing how far stubbornness can compensate for lack of tools and skill. But it's getting there. |
|
|
|
| marksteinhilber |
Jan 17 2018, 03:06 PM
Post
#233
|
|
Member Group: Members Posts: 229 Joined: 18-October 12 From: Foothill Ranch, CA 92610 Member No.: 15,057 Region Association: Southern California |
Yep, your firewall repairs are very similar to what I did over the last couple years. It's coming along great& #33;
   [attachmentid [attachmentid=635479] 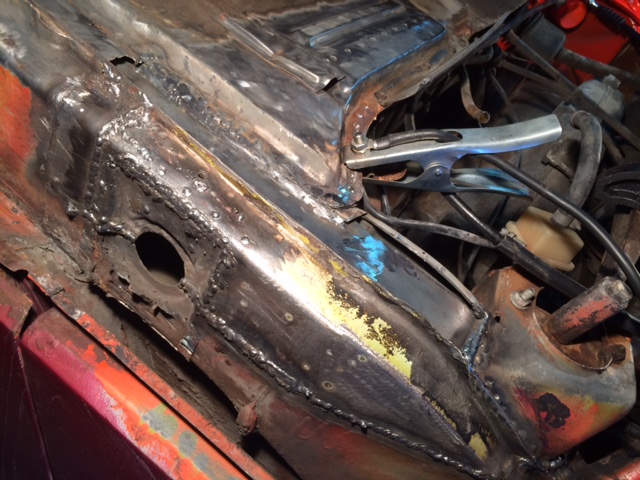 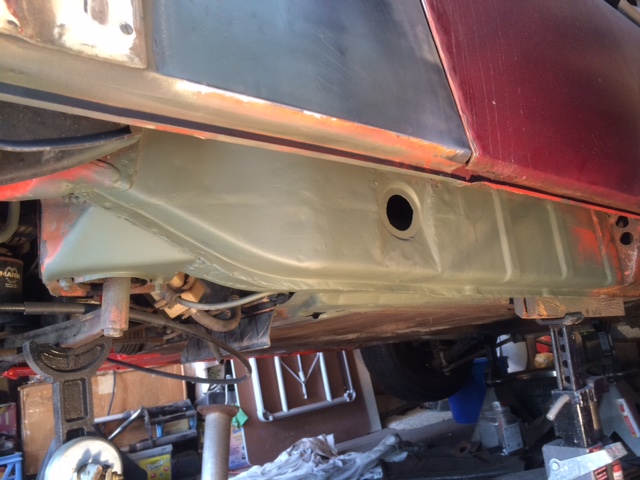  [attachme [attachmentid=635483] Attached image(s) 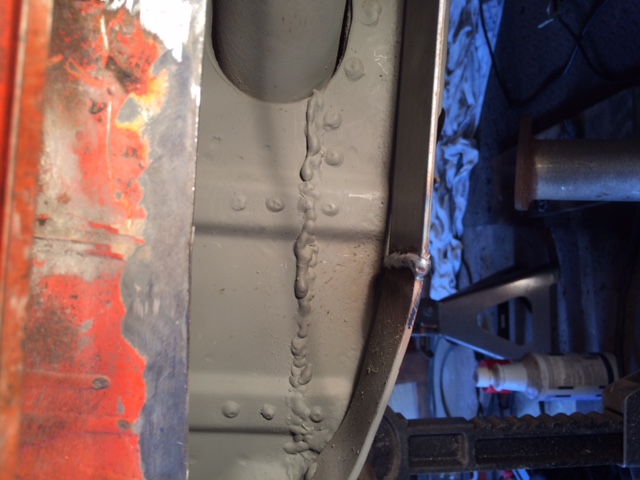 
|
|
|
|
| bbrock |
Jan 17 2018, 04:35 PM
Post
#234
|
|
914 Guru Group: Members Posts: 5,269 Joined: 17-February 17 From: Montana Member No.: 20,845 Region Association: Rocky Mountains |
QUOTE(marksteinhilber @ Jan 17 2018, 02:06 PM) Yep, your firewall repairs are very similar to what I did over the last couple years. It's coming along great! Sweet! Nice to see I'm in good company! |
|
|
|
| bbrock |
Jan 18 2018, 11:37 PM
Post
#235
|
|
914 Guru Group: Members Posts: 5,269 Joined: 17-February 17 From: Montana Member No.: 20,845 Region Association: Rocky Mountains |
Banishing Rust
I'm getting closer to spraying primer before the floor goes in. Yesterday before work, I sprayed all the tunnel internals and weld flanges with Jasco and let it sit for the day. For inside the tubes, I ran a piece of bailing wire through and then hooked on a small patch of rag soaked with Jasco, then pulled the rag through the tube. I repeated that several times for each tube. The rag came out pretty rusty looking the first time through the clutch tube. After work, I sprayed everything lightly again to reactive the acid, then I rinsed with water to neutralize. I repeated the tube treatment, but with water. 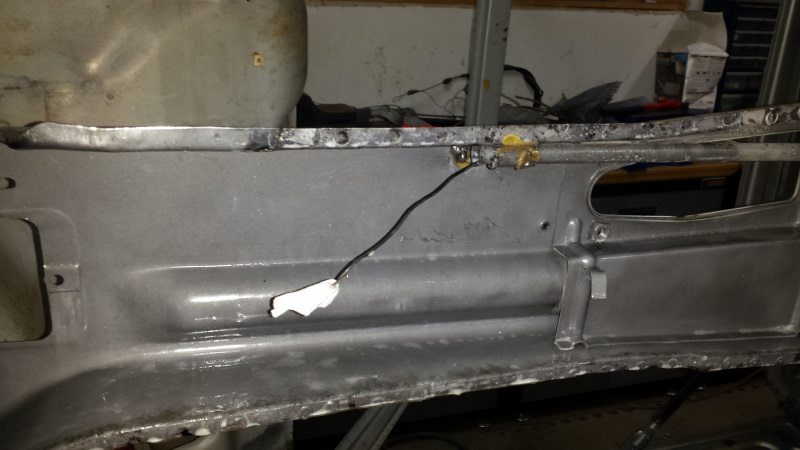 Tonight, I scrubbed all the loose phosphate off with a red Scotch Brite pad. This is the before pic. 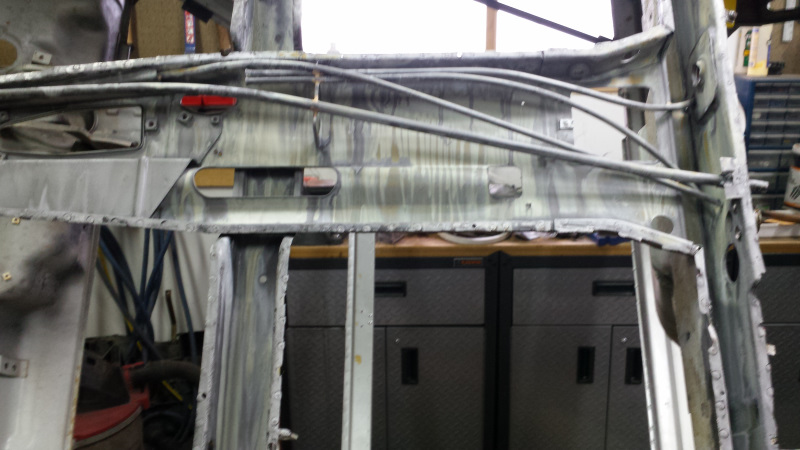 And the Words of the Prophet are Written on the Forum Walls QUOTE(bbrock @ Jan 16 2018, 08:06 PM) This is the patch I spent a lot of time on and really struggled - and ultimately, through the patch away. I punted by patching only the part I needed to do the longitude repair; hoping my skills would improve by the time I circled back around to it. I doubt they have. I know my toolkit hasn't improved. My doubts about being able to pull off that inner wheel patch proved true. After struggling again to make the patch in one piece, I gave up and cheated by cutting off the weld flange around the curve. That made it a lot easier to make the curve, but fitting the patch was a giant PITA because there are a lot of very subtle curves that could only be fitted by tacking in a little at a time. By the time I got to the far end, the curves had widened the gap (the top in pic below). Not so far I couldn't close it with the welder, but not ideal. When I got almost finished with the welding, I peaked at the patch from inside the cabin and found the top edge (on the right in the picture below) a full thickness off. This confused me for awhile because the surfaces were perfectly flush on the other side. Then I realized the cut line for this patch went right through the weld of the old patch that had been removed. I didn't intend to do that, it was just another screw up. The upshot being that the metal was thicker there and caused the misalignment on one side. 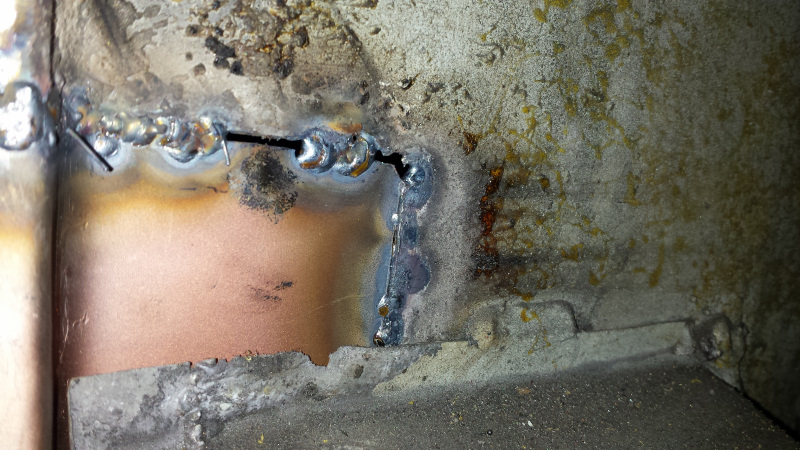 So tonight I got to grind that all back down, cut that weld open, and try again. Luckily, it worked this time. 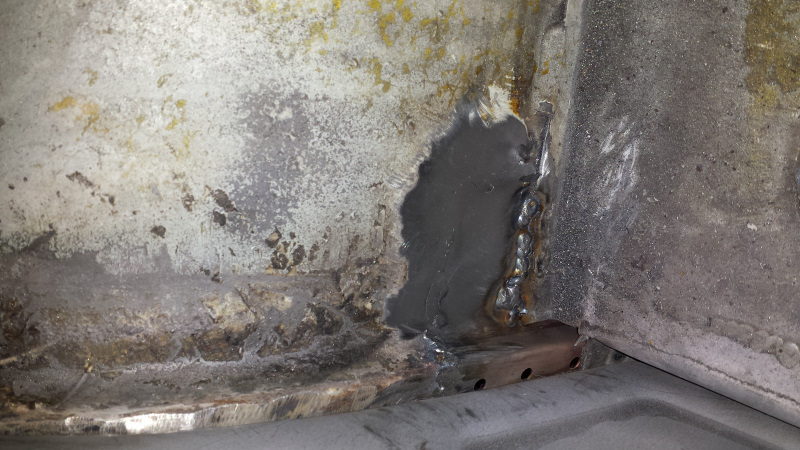 I was only able to rough grind the outside with a cutting wheel because I'm still out of grinding discs. I got the inside done by cycling back through the best of the used ones. I still had that gap to fill where I cut off the flange, so I made a dinky little flange patch. 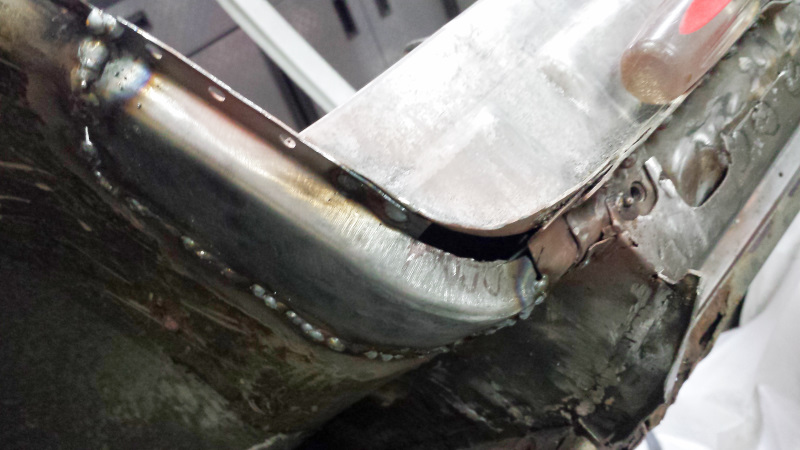 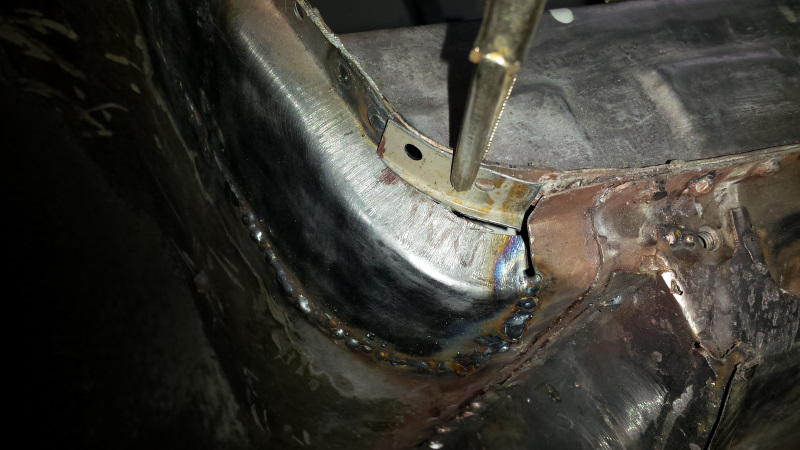 I didn't like how shrinking the large patch flattened out the bottom radius, so I piled on some extra material with the welder so I could sculpt the correct radius back in. Again, compensating for lack of skill here. 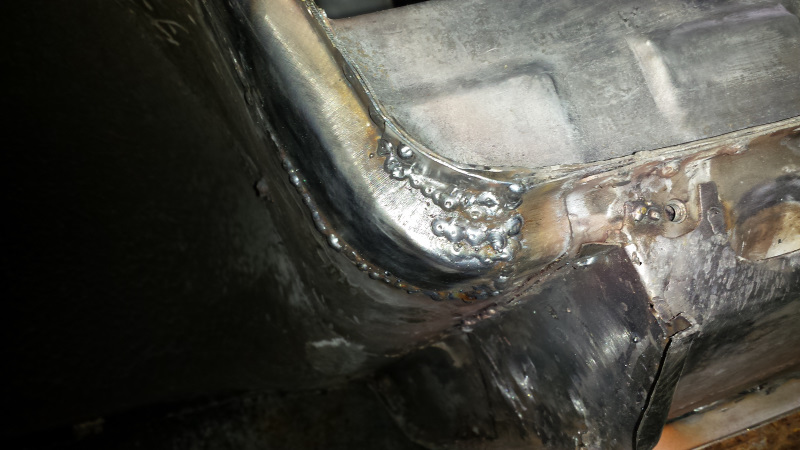 Again, rough grind only with a cutoff wheel, but you get the idea.  Learning the Hard Way Now I'm in the home stretch to installing the floor. Next up was dry fitting the whole floor to make the final trim at the front edge. Before this, I had only fit the rear section because I was focused on getting the profile right for the firewall flanges. Bad idea! (IMG:style_emoticons/default/headbang.gif) When fitting these floors, you really should start at the front and work backward. When I fit the rear section, I lined up the edges of the rear flange and firewall. This positioned the panel too far forward, which I didn't know until I fit the front section and saw the overlap was too large. I'm probably the only one who would have noticed, but it threw the bead spacing off where the panels met. It wasn't a big deal to adjust, but it left me with a half dozen screw holes to zap shut, and I had to remark all the flange lines for masking before spraying primer. It is going to look nice. 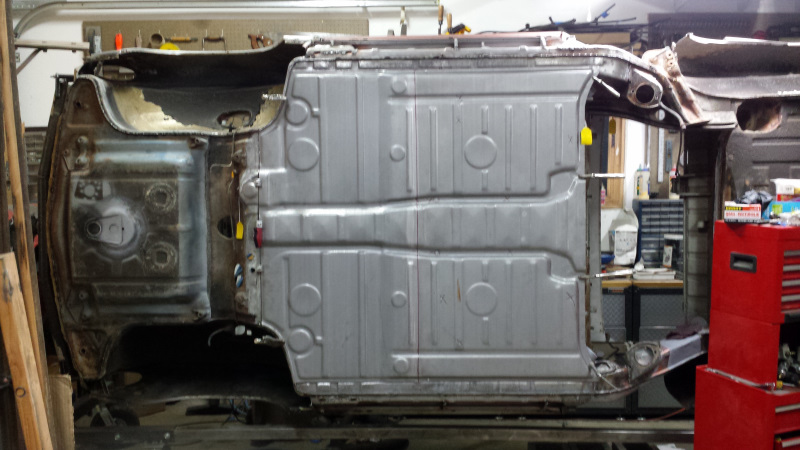  |
|
|
|
| bbrock |
Jan 22 2018, 01:37 PM
Post
#236
|
|
914 Guru Group: Members Posts: 5,269 Joined: 17-February 17 From: Montana Member No.: 20,845 Region Association: Rocky Mountains |
Floored!
Well, this is a big one. I don't think there will be another milestone like this until the chassis is all in primer. Friday, I started prepping the floor panels for installion, starting with welding on the two little cable hold downs for the fuel lines, then mixing up a small amount of epoxy primer to brush onto the inside channels of floor and seat reinforcements and tacking them in place. 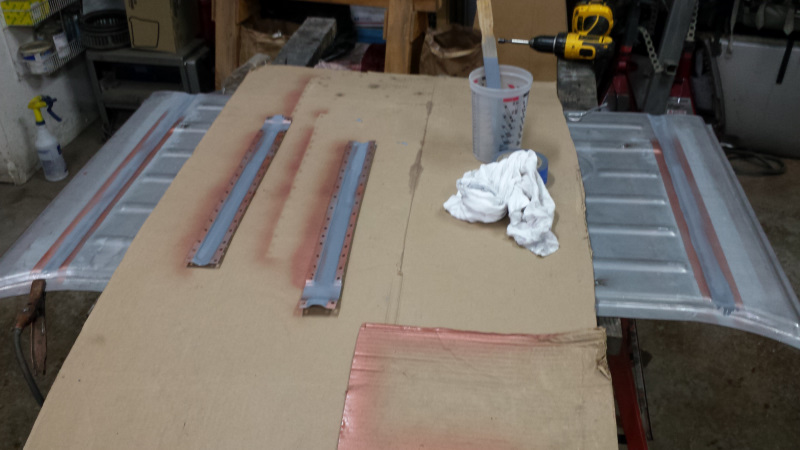 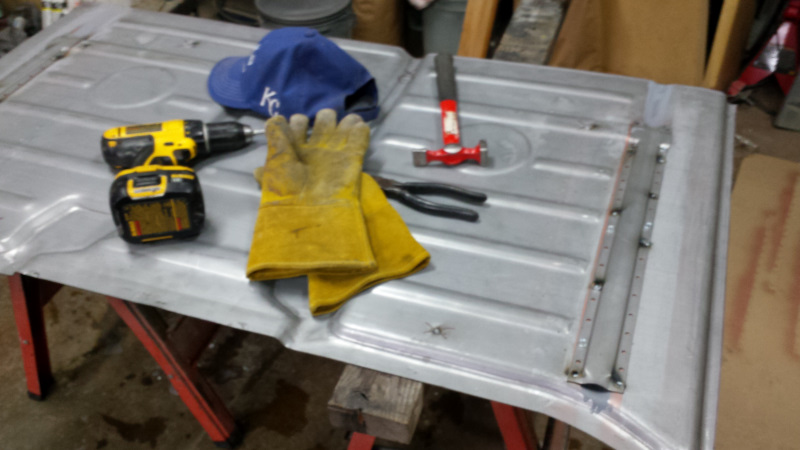 All of Saturday was spent continuing panel prep which included: welding on seat reinforcements, cutting spot weld access holes where the bung covers will go, final fitting and trimming, punching and drilling about a billion holes for plug welds, and finishing with a good coat of epoxy primer on all the interior tunnel and member areas. This took a long time because I decided to drill the floor pans rather than punch holes in the flanges. I just thought being able to do all the welding from the under side would be better light and access, would result in better welds, easier to grind, and would leave things clean and "untouched" looking inside the cabin. I lost track of how many times I fit and removed the pans from the chassis to get everything aligned just right and the flanges marked in the correct place. One important tip if you do this - MAKE SURE YOU DRILL ON THE CORRECT SIDE OF YOUR LINES (IMG:style_emoticons/default/headbang.gif) It's easy to shut off your brain doing such a monotonous task and let muscle memory take over. Here is what happens.  Getting the flanges around the wheel wells adjusted took some time. I had a minor panic attack when I fit the panel and couldn't get it to fit flush against the bottom of my fabricated longitude bottoms.  Since this was a fabbed part, my mind immediately raced to the conclusion that I made some fundamentally humongous F-up in fabrication. But it turned out to just be a little metal spur that got left behind and was pushing the floor pan up about 1/2 inch. It just took a few taps with a body hammer to adjust things to perfect alignment. Had to do the same on the other side, but less severe. I don't know if you can even make it out in this pic, but here is the little bugger. 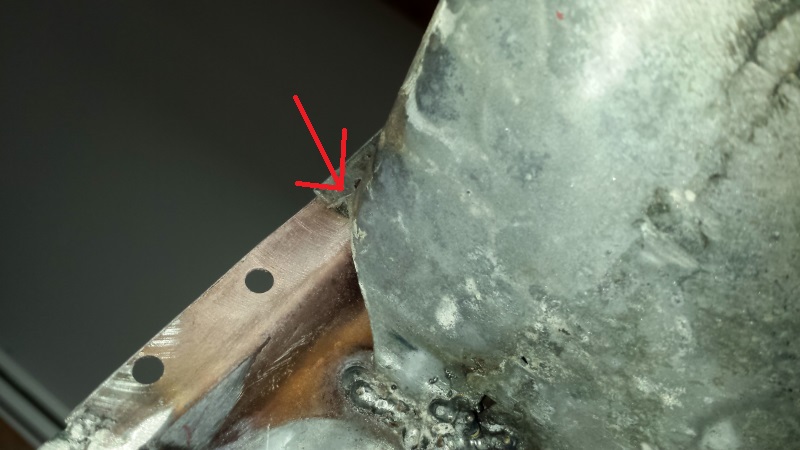 Saturday ended with spraying PPG DPLF epoxy primer and Sunday began by finishing up spraying Upol copper weld-thru primer on all plug weld areas. The panels and chassis were finally ready. (IMG:style_emoticons/default/monkeydance.gif) 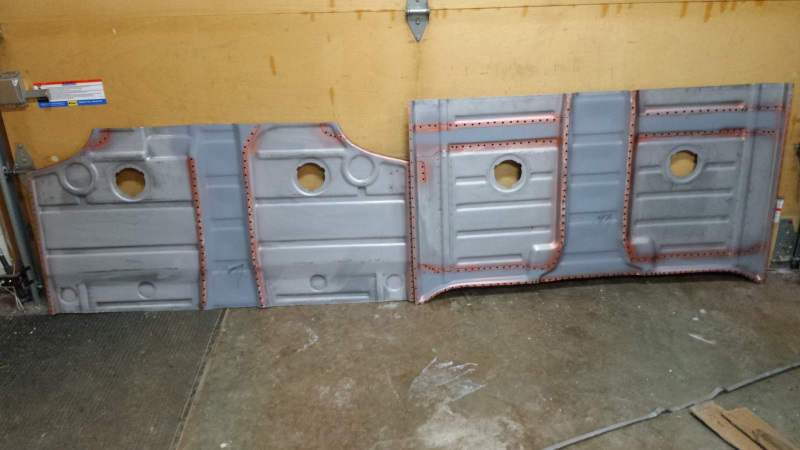 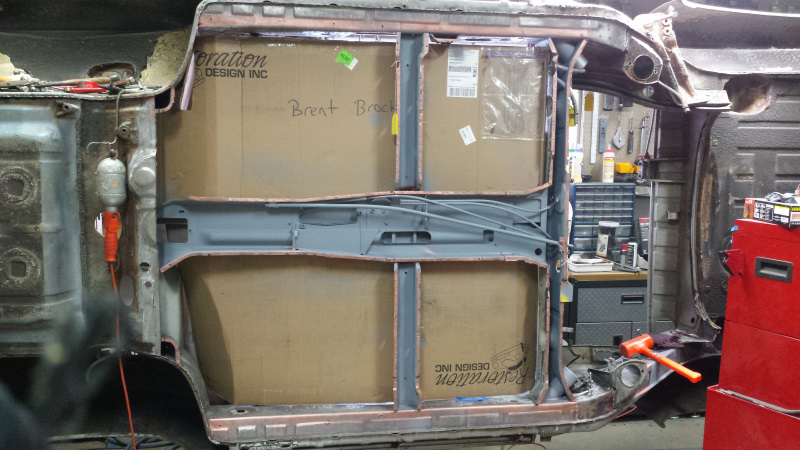 Then it was about three hours refitting panels, screwing and clamping them in place, and adjusting gaps to get everything just right. Notice that those spot weld access holes came in handy for clamping. They also let me reach in to install the little metal bars on the backs of the butt weld clamps. Not without pain and a little blood, but it worked.  After a couple hours of welding, it looked like this at the end of the day. 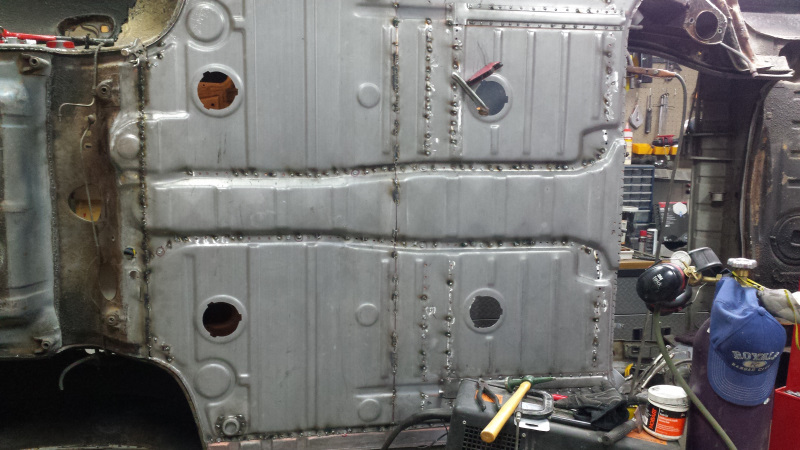 This morning, I couldn't leave it like that, so took the morning off to (almost) finish welding. I still need to plug weld the rear firewall, then grind the new panel flange flush with the old, then bead weld the edge the way the factory did - and, of course, I have a bit of grinding to do. I also still need to install the pedal reinforcement, seat mounts, and e-brake cable cover. But it is looking pretty nice. (IMG:style_emoticons/default/monkeydance.gif) (IMG:style_emoticons/default/monkeydance.gif) 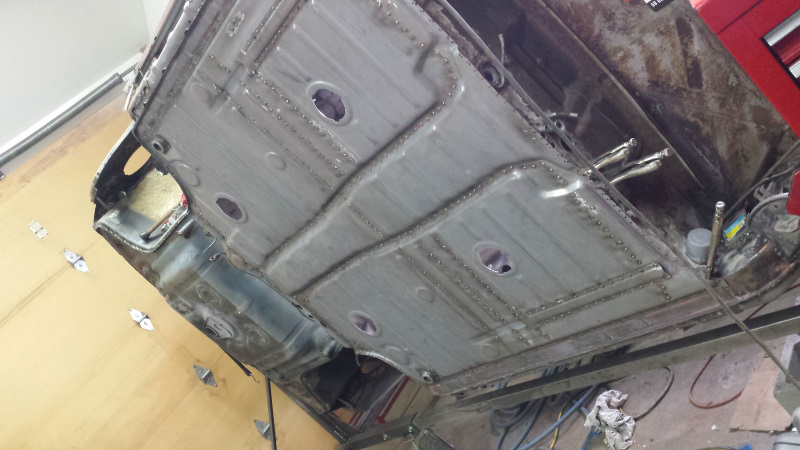 I think my effort drilling the pan instead of punching flanges paid off. There is still some housekeeping to do in there: welding a few holes where the rotabroach blew through, a few short bead welds on the tunnel and firewall, and some very minor grinding. Overall, I think it looks pretty clean and I won't have much grinding to do beyond the butt welds. Mostly just touching up where I filled screw holes and the few plug welds yet to be done from the inside. 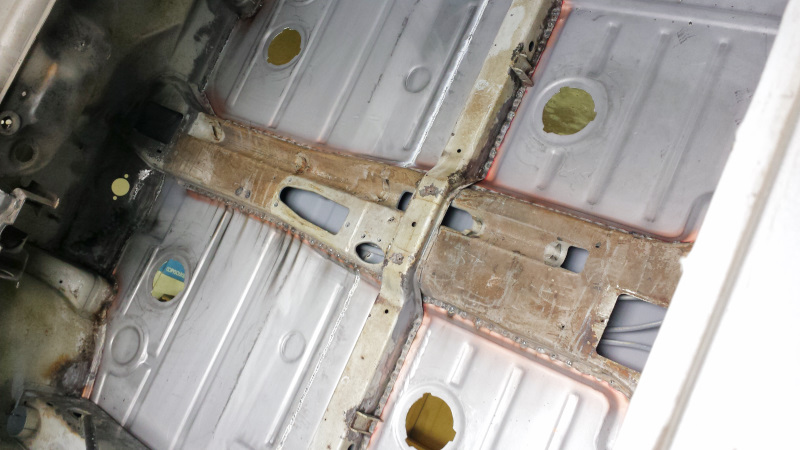 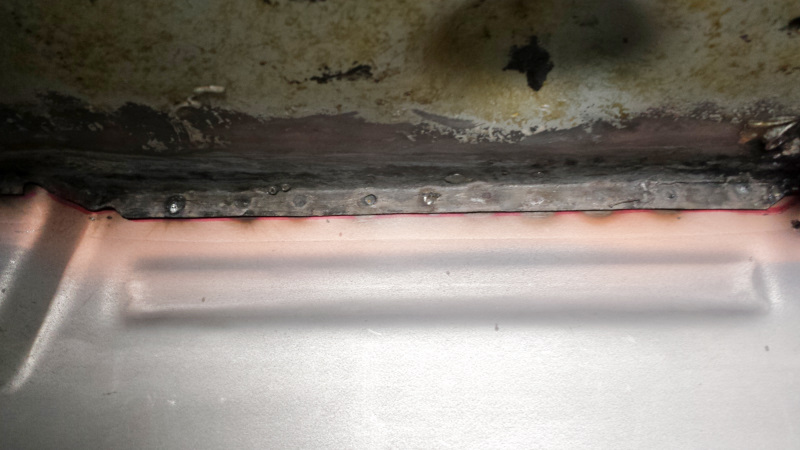  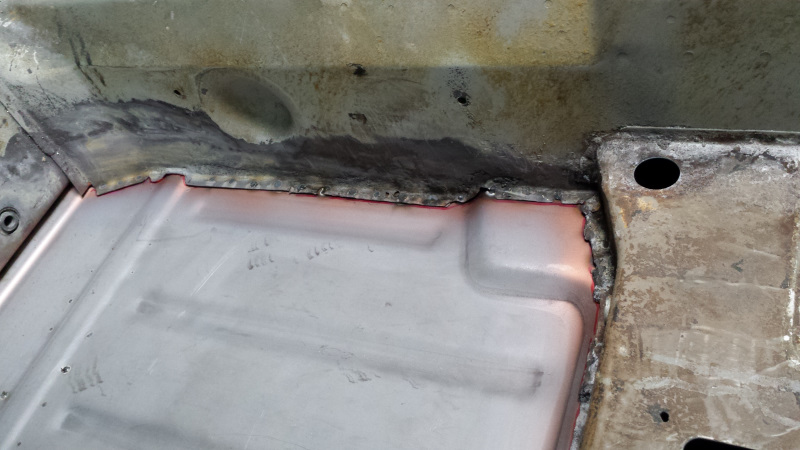 Attached image(s) 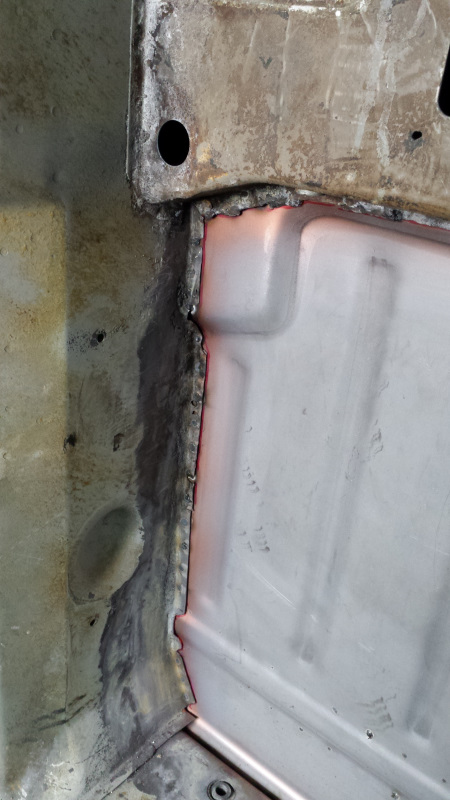
|
|
|
|
| uncle smokey |
Jan 22 2018, 08:19 PM
Post
#237
|
|
Newbie Group: Members Posts: 19 Joined: 4-June 11 From: PA Member No.: 13,157 Region Association: None |
That looks great. You are inspiring me to get working on mine again.
|
|
|
|
| bbrock |
Jan 22 2018, 11:14 PM
Post
#238
|
|
914 Guru Group: Members Posts: 5,269 Joined: 17-February 17 From: Montana Member No.: 20,845 Region Association: Rocky Mountains |
Jack Points
Finished welding the rear edge of the floor this evening, and added these decorative corner pieces. Yellow tag is a reminder to run a bead weld on the inner edge when I have the car flipped over. Not a fan of welding overhead. 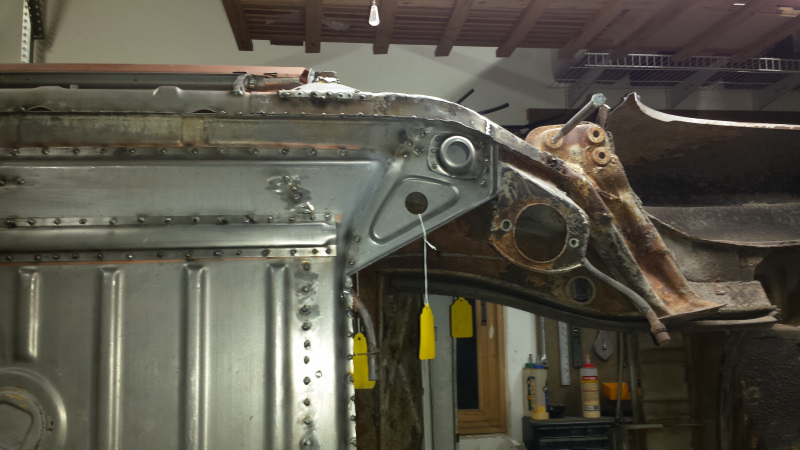 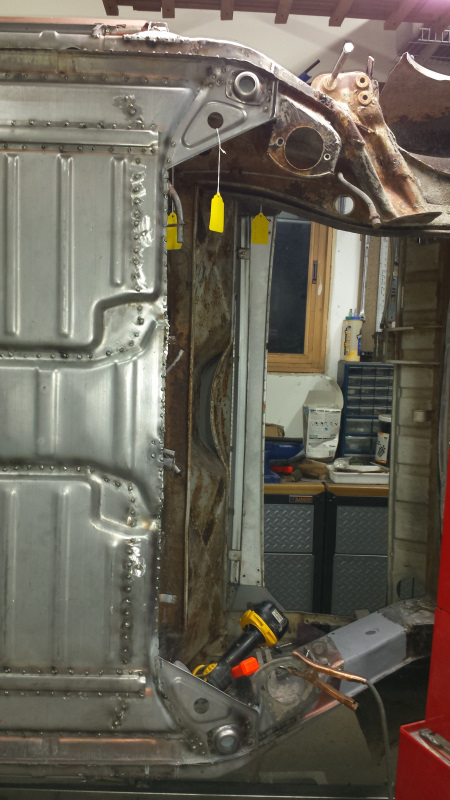 And here's one for andrewb (IMG:style_emoticons/default/biggrin.gif) 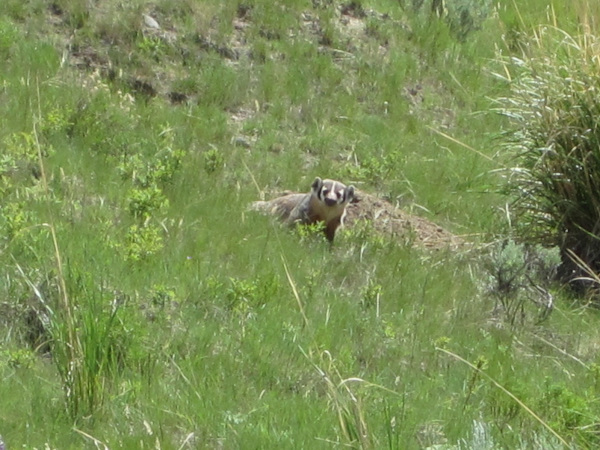 |
|
|
|
| bbrock |
Jan 31 2018, 12:48 AM
Post
#239
|
|
914 Guru Group: Members Posts: 5,269 Joined: 17-February 17 From: Montana Member No.: 20,845 Region Association: Rocky Mountains |
Back Into Hell
I had high hopes of finishing up welding in bits on the floor pan and reinstalling all the parts in the hell hole over the weekend. Things took a lot longer than expected, so I didn't get that far. But still made some good progress. First up was welding on the pedal support. That was pretty straightforward. The most time consuming part was mixing and applying epoxy primer to the internals of the pedal support, seat hinge brackets, and e-cable guide. 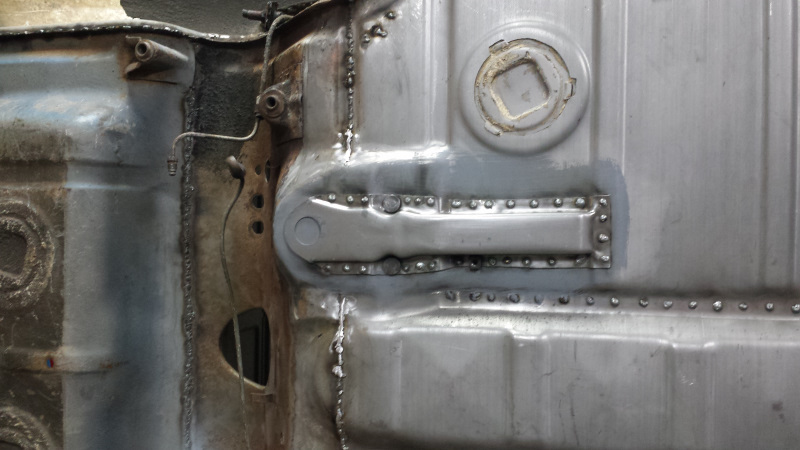 It's been a LONG time since this area of the floor wasn't Fred Flintstone. 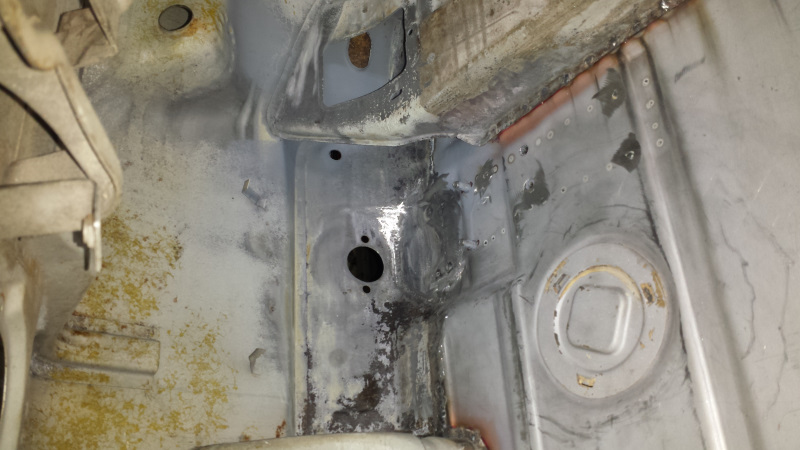 Next up was welding in the seat hinge brackets. That turned out to be a bigger PITA than expected, and chewed up a lot of time. It didn't go well either. Look close and you might be able to see the inner bracket on the passenger side got cocked when I screwed it in. 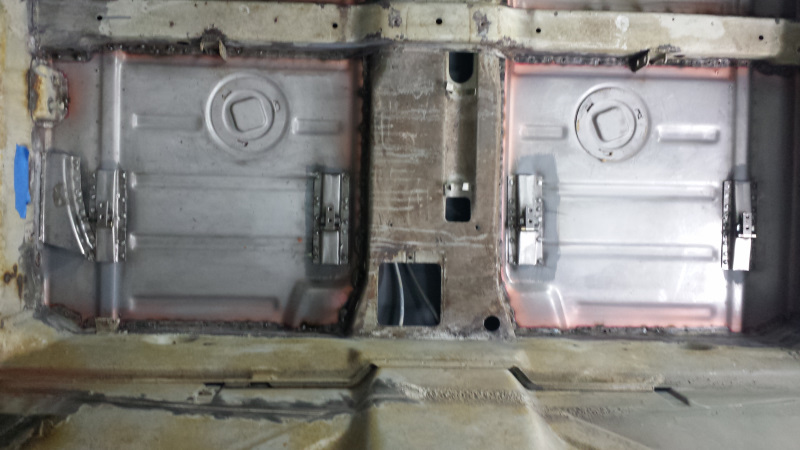 I'm blaming my cramped f'ing garage because to get the car level, I had to work with my ass smashed against a workbench against the wall. There just isn't room in there. I should have climbed inside the tub to get a better viewing angle as I welded it in. Anyway, the seat base bolts in but doesn't allow for any adjustment on the hinge bolts. So I'm going to have to tear that one out and try again. I hope I can salvage the bracket and hinge because those things are expensive. $50 to replace the bracket and hinge. The final floor task was zapping in the e-brake cable guide. I did have to trim it down a little to be the exact size as the original, but installation was uneventful. Next I moved to perhaps the most stressful item on the whole project - welding in the suspension console. With the new floor pan, I now had the landmark needed to measure for placement of the outer console. Factory spec is to insert a long bolt in the rear outer console hole that protrudes 182mm from the boss.  Then measure from the center of the bolt to the center of the front edge of the rear most form bead on the floor. The RD form bead edges aren't crisp like on the original floor, and I had replaced the floor, so I didn't go exactly by the factory spec. Instead, X marked the spot at the center of the bead. 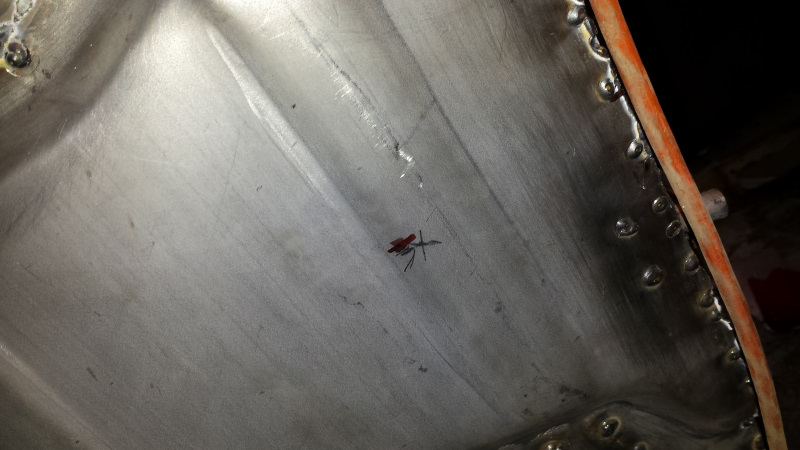 Then I measured from the drivers side console to get my reference measurement and positioned the passenger console to match that distance. Factory spec is 846mm and my reference measurement came in at 848mm. That seems astonishingly good considering the whole floor was replaced and the bead reference location is fuzzy at best. 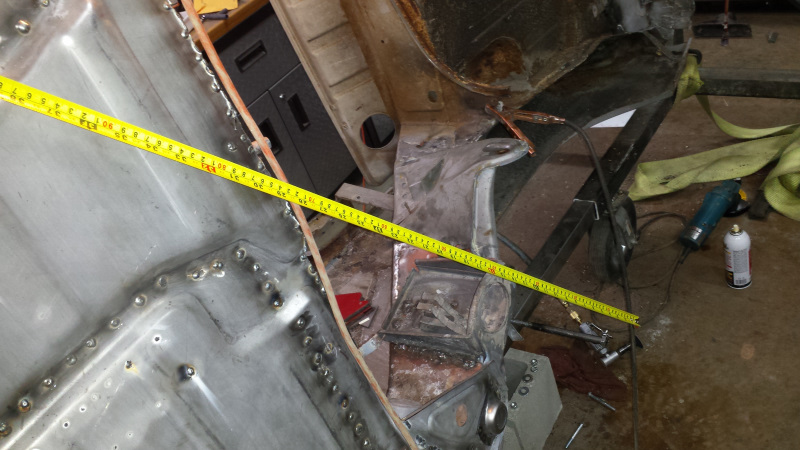 As extra precaution, I also measured from the outer edge of the console bolt boss to the edge of the rear sway bar mount bolt hole and made sure the measurements were the same for both consoles. 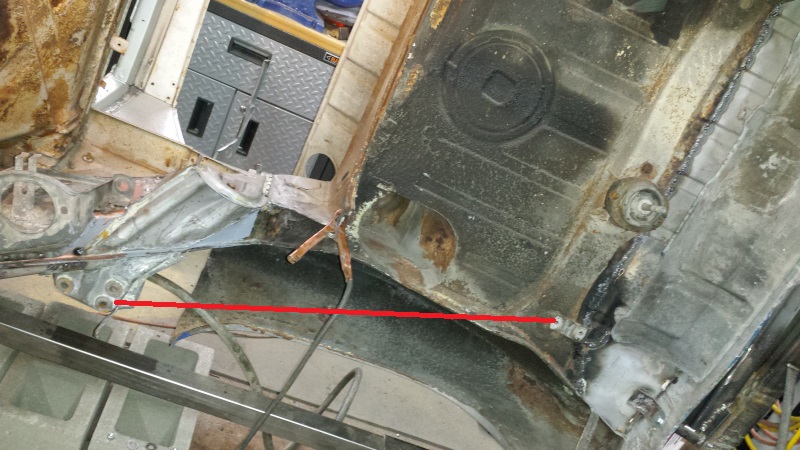 Then I just tacked the console in. I didn't take any progress pics because I was too stressed trying to get it right. Next was the outer console. I used Jeff Hail's measurements to make sure the distance between consoles was right. Jeff said to triangulate from the pivot pin holes to the center hole on the firewall. I couldn't figure out what center hole he was referencing, so I measured from the driver's side to the center of the rear edge of the floor pan and matched that on the other side. After that was tacked in, I mounted the crusty trailing arm to make sure everything fit and I had adjustment for alignment. It looked good, but I won't know how badly I screwed this up until alignment time I guess. 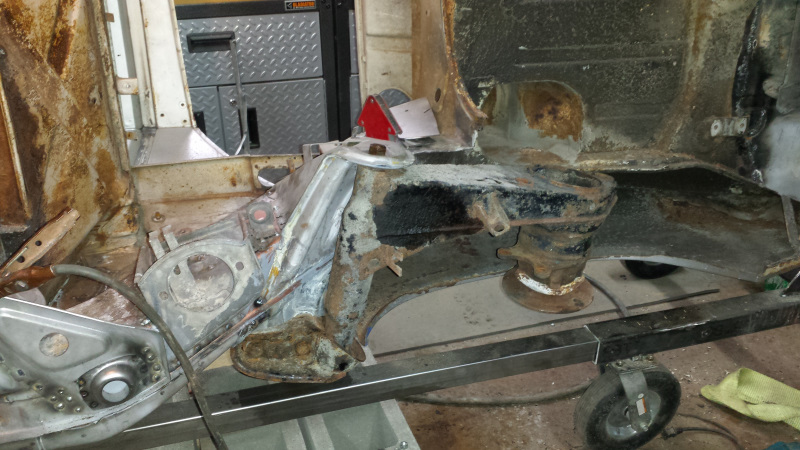 Last was to weld on the MiddleMotors/914Rubber console gussets. (IMG:http://www.914world.com/bbs2/uploads/post-20845-1507174131.jpg) It took a bit to figure out since there are three pieces in the gusset kit, but only two gussets. But I figured out Cary designed one of the gussets as two pieces to ease installation. I had to grind away a little where the gusset crosses the long flange to keep it from crowding the outer console mount boss. But after welding and grinding, it looks pretty close to what the factory did. 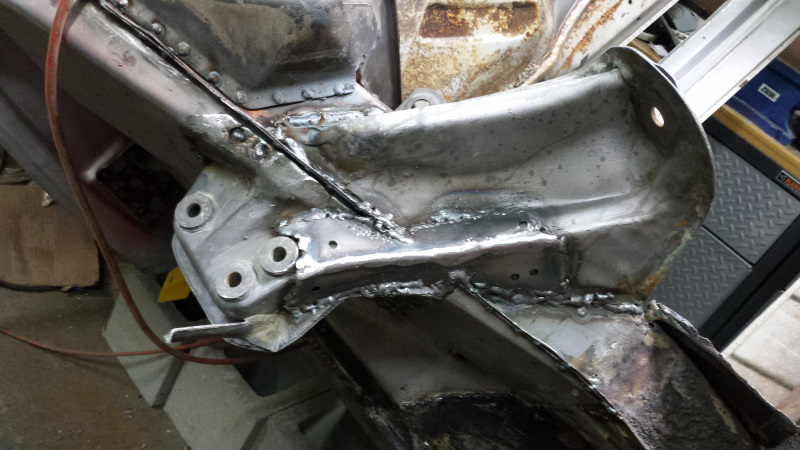 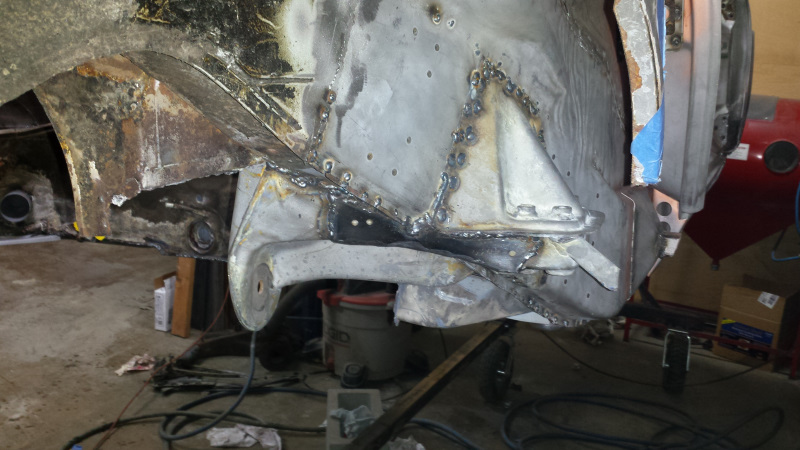 I just finished this tonight. When I installed these, I thought the holes were weep holes. But now I'm thinking they were intended to plug weld to position the pieces before hammering and bending. Maybe Cary will chime in, but I think I need to weld those in and drill a weep hole in the location the factory piece had. Finally, the other side. This was a real head scratcher. After fiddling with it and comparing to the other side, I'm fairly certain the slots for the long flange are cut wrong on this piece. I'm pretty sure this is the correct orientation of this piece. 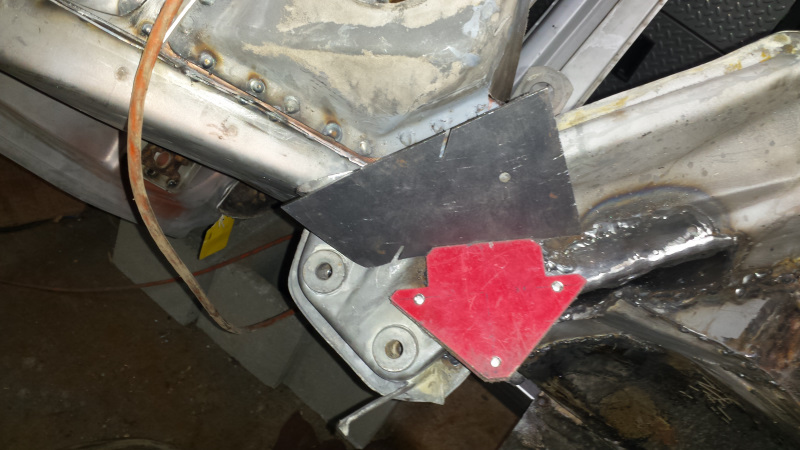 It won't be a big deal to close those slots and cut new ones, but I want to get confirmation from the designer before moving forward. So that's where I left it tonight. Here's a golden eagle that was hanging out on a deer carcass just a couple hundred yards from our driveway last Friday. 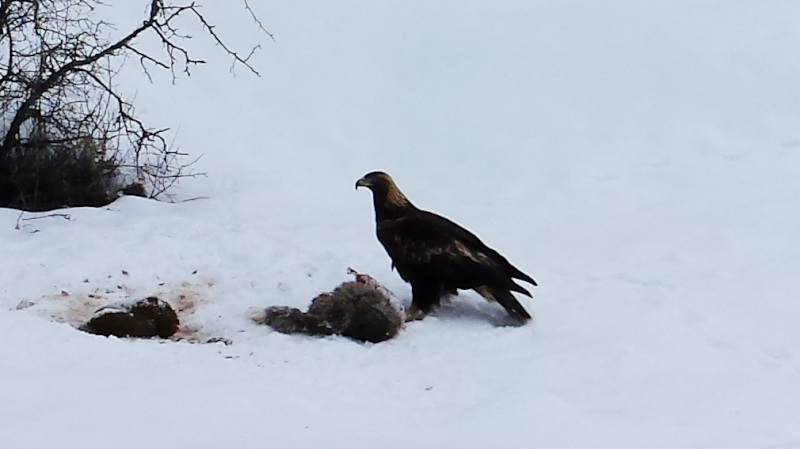 |
|
|
|
| andrewb |
Jan 31 2018, 06:04 AM
Post
#240
|
|
Member Group: Members Posts: 114 Joined: 25-May 10 From: UK Member No.: 11,762 Region Association: None |
QUOTE(bbrock @ Jan 23 2018, 07:14 AM) Cheers Brent. Funny looking critter (the badger - not you) (IMG:style_emoticons/default/biggrin.gif) Our European ones are quite different. |
|
|
|
|
3 User(s) are reading this topic (3 Guests and 0 Anonymous Users)
0 Members:

|
Lo-Fi Version | Time is now: 18th April 2026 - 04:52 PM |
Invision Power Board
v9.1.4 © 2026 IPS, Inc.