|
|
|
Porsche, and the Porsche crest are registered trademarks of Dr. Ing. h.c. F. Porsche AG.
This site is not affiliated with Porsche in any way. Its only purpose is to provide an online forum for car enthusiasts. All other trademarks are property of their respective owners. |
|
|

  |

| bbrock |
 Feb 3 2018, 12:15 AM Feb 3 2018, 12:15 AM
Post
#241
|
|
914 Guru  Group: Members Posts: 5,269 Joined: 17-February 17 From: Montana Member No.: 20,845 Region Association: Rocky Mountains |
Scheisse!
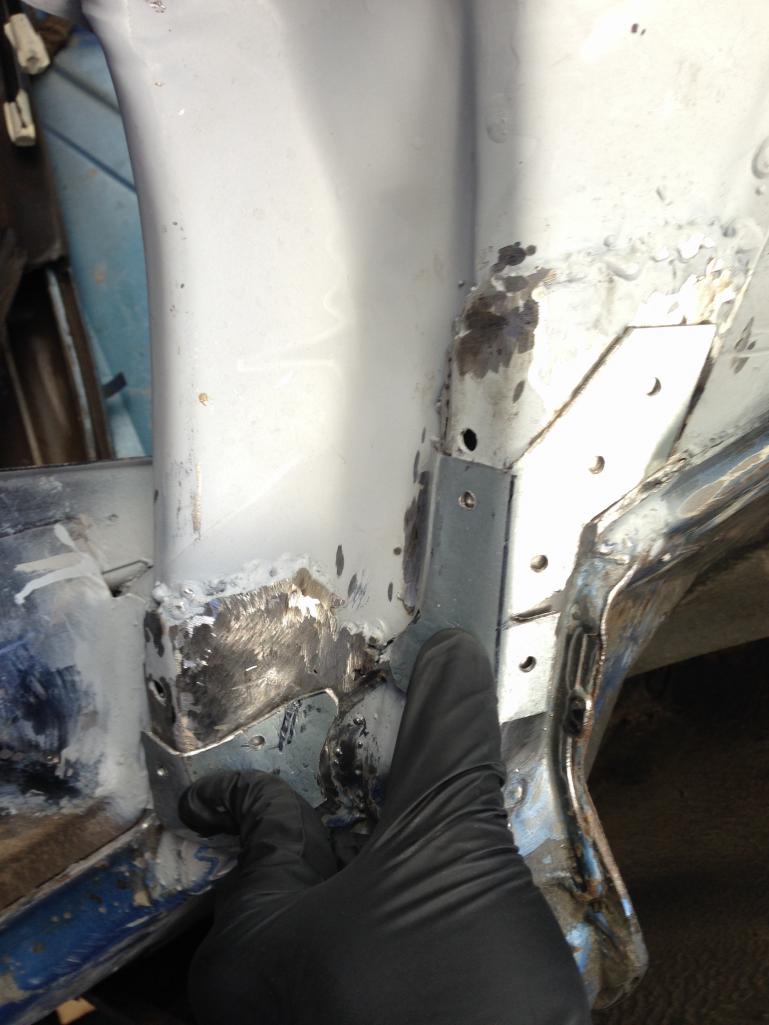
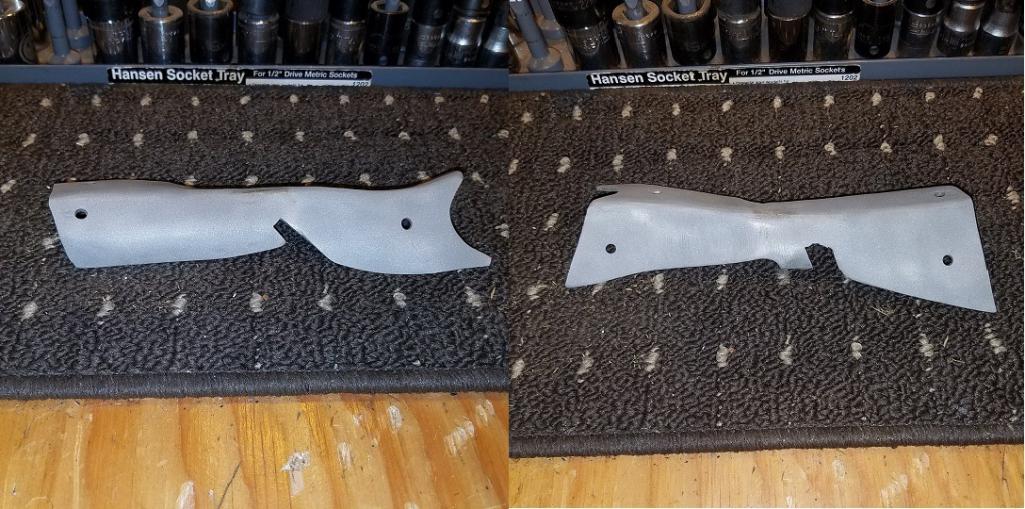
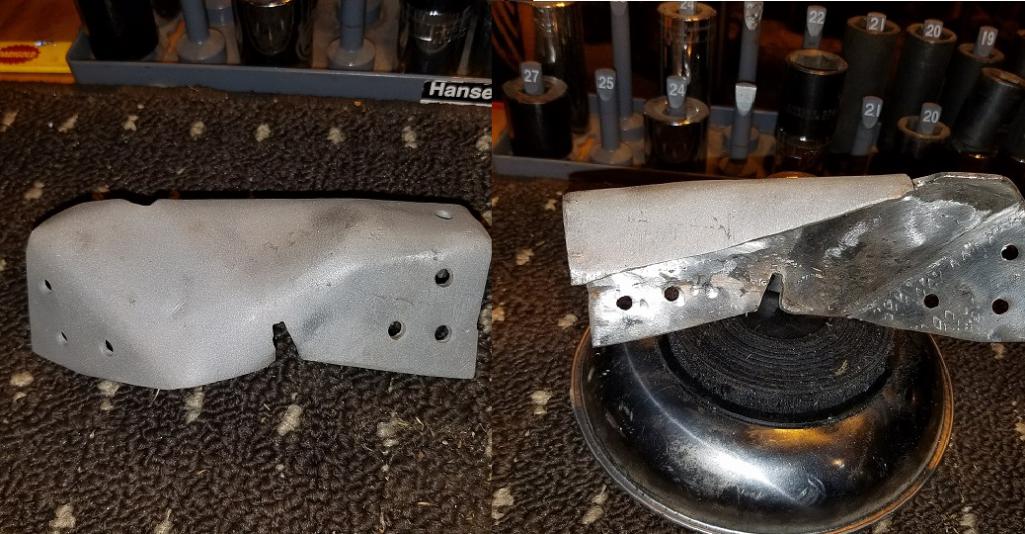
I spent a little time each evening this week struggling with the second gusset on the suspension console. Cary lent some much needed help figuring this out on another thread. The key was this pattern diagram that he posted. (IMG:http://www.914world.com/bbs2/uploads/post-1608-1517412830.jpg) I scaled that image up to as close to actual size as I could get, and printed it out to make a folding template. (IMG:http://www.914world.com/bbs2/uploads/post-20845-1517446019.jpg) The pattern was for the driver's side, but it was simply a matter of reversing the bends to fit the passenger side. (IMG:http://www.914world.com/bbs2/uploads/post-20845-1517446067.jpg) Despite being 12 gauge steel, it didn't take long to bend the piece into close to shape using only a couple of BFHs, a vice, and an anvil. Just a little trimming and taps with a hammer, and this would work perfectly well. (IMG:http://www.914world.com/bbs2/uploads/post-20845-1517451295.jpg) Kudos to Super-In-Law and Cary for designing this piece so it could be formed using minimal tools. That said, I have a knack for creating extra work for myself. The piece would have worked perfectly fine as a gusset for the console, but it didn't match the contour of the other side. Who would notice? Nobody! Not a damn soul.. except me. So I took another stab at it. First I made a new template using the driver's side as a pattern. Then I hammered most of the piece back flat and traced the new template onto the old part to trim it to the new profile. 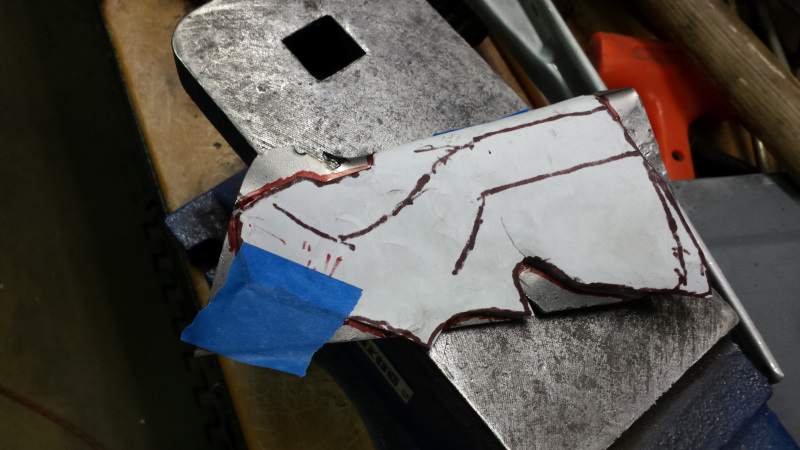 The new bend lines were tighter and more complex, so it was a bitch getting that thick steel to submit. I wound up making one relief cut to get the job done. By the time the piece had been shaped, then flattened, reshaped, cut, and shaped some more, it looked like it had been mauled by a grizzly. 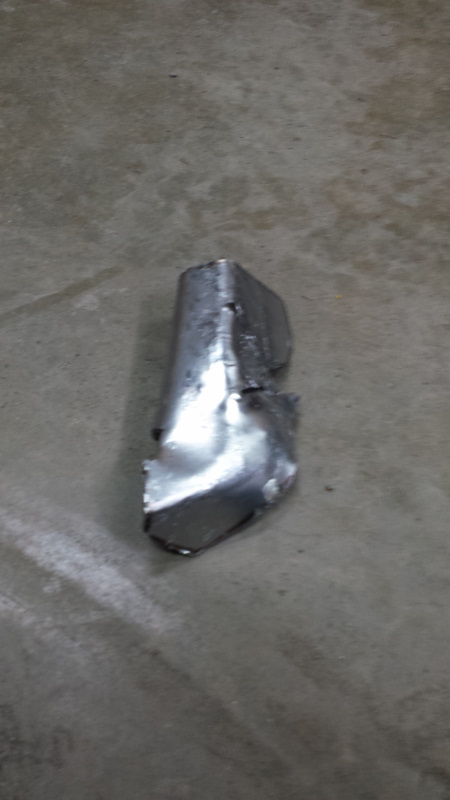 Finally, it was ready to go on. I tacked it into place and then tapped in the final shape and.... Oh hey, speaking of bears, how about a cute little black bear cub in Jellystone last spring? 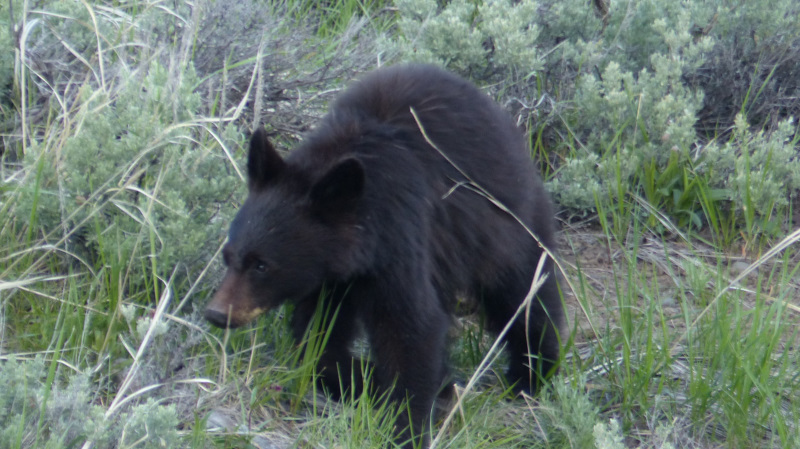 Or maybe the whole family? 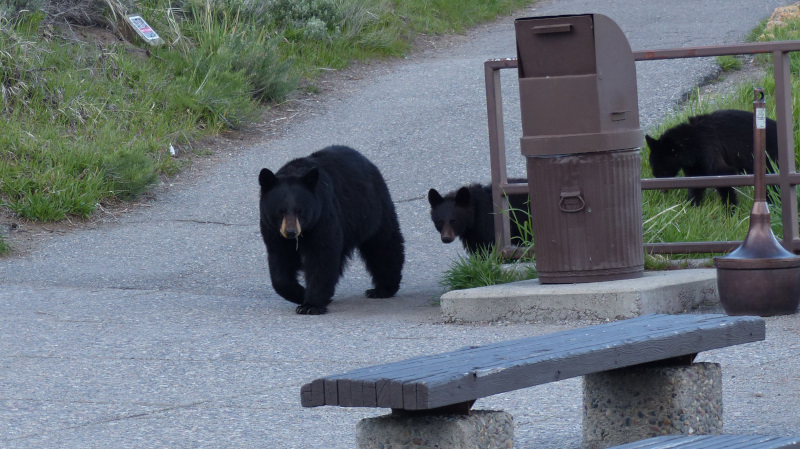 Now where was I? Oh yeah, I was about to show this. (IMG:style_emoticons/default/shades.gif) 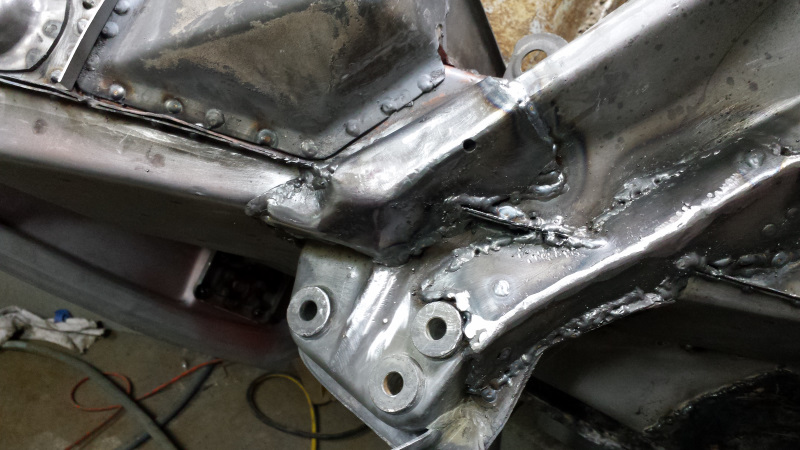 Funny how excited we can get over little pieces that nobody will ever notice. |
   |

 
|
| ndfrigi |
Feb 3 2018, 03:13 AM
Post
#242
|
|
Advanced Member Group: Members Posts: 2,980 Joined: 21-August 11 From: Orange County Member No.: 13,474 Region Association: Southern California |
this is what I did on a 71 I own before.
   |
|
|
|
| tygaboy |
Feb 3 2018, 08:39 AM
Post
#243
|
|
914 Guru Group: Members Posts: 5,810 Joined: 6-October 15 From: Petaluma, CA Member No.: 19,241 Region Association: Northern California |
QUOTE(bbrock @ Feb 2 2018, 10:15 PM)  Funny how excited we can get over little pieces that nobody will ever notice. You and I, we are of a kind. |
|
|
|
| burton73 |
Feb 3 2018, 12:23 PM
Post
#244
|
|
Senior member, and old dude Group: Members Posts: 3,994 Joined: 2-January 07 From: Los Angeles Member No.: 7,414 Region Association: Southern California |
QUOTE(tygaboy @ Feb 3 2018, 06:39 AM) QUOTE(bbrock @ Feb 2 2018, 10:15 PM) Funny how excited we can get over little pieces that nobody will ever notice. You and I, we are of a kind. Most of us here get excited in these very small details in both of your cars work. It truly is an art form to me. Like a parent, we know ever little detail of our kids. Bob B (IMG:style_emoticons/default/pray.gif) |
|
|
|
| mb911 |
Feb 3 2018, 12:48 PM
Post
#245
|
|
914 Guru Group: Members Posts: 7,742 Joined: 2-January 09 From: Burlington wi Member No.: 9,892 Region Association: Upper MidWest |
QUOTE(ndfrigi @ Feb 3 2018, 01:13 AM) this is what I did on a 71 I own before. I have never looked much into these.. Is it to just reinforce that area or did I miss the rust repair area? |
|
|
|
| bbrock |
Feb 3 2018, 03:17 PM
Post
#246
|
|
914 Guru Group: Members Posts: 5,269 Joined: 17-February 17 From: Montana Member No.: 20,845 Region Association: Rocky Mountains |
QUOTE(mb911 @ Feb 3 2018, 11:48 AM) I have never looked much into these.. Is it to just reinforce that area or did I miss the rust repair area? It's what the factory did. I'm assumig to tie the two consoles together for reinforcement. I could see where repeated hard cornering might try to tear the consoles off the long if they weren't tied together. Anyone know for sure? |
|
|
|
| cary |
Feb 4 2018, 07:28 AM
Post
#247
|
|
Advanced Member Group: Members Posts: 3,900 Joined: 26-January 04 From: Sherwood Oregon Member No.: 1,608 Region Association: Pacific Northwest |
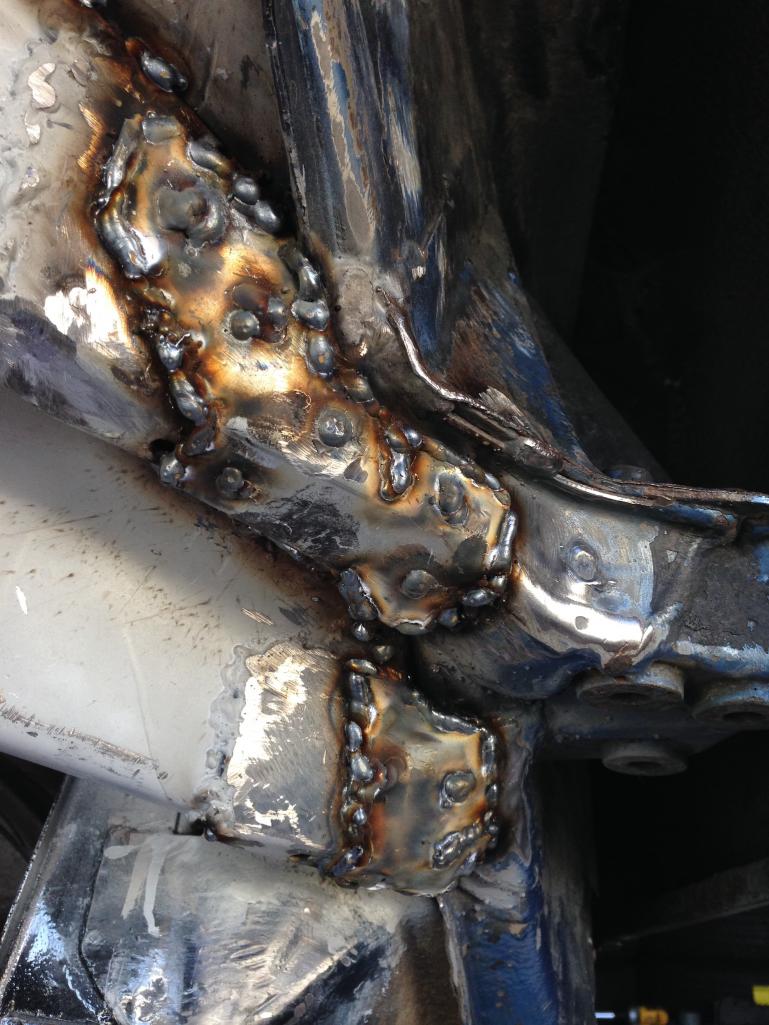
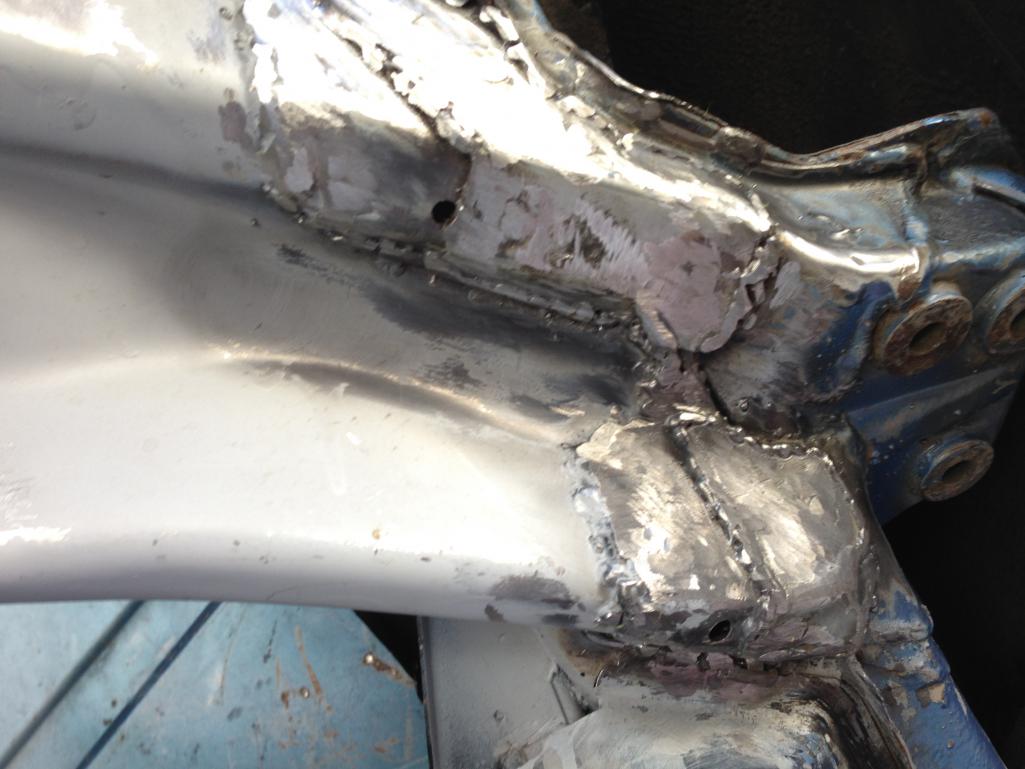
A little late to the party but here's a couple shots of Super In Law's built up pieces.
  |
|
|
|
| mb911 |
Feb 4 2018, 08:07 AM
Post
#248
|
|
914 Guru Group: Members Posts: 7,742 Joined: 2-January 09 From: Burlington wi Member No.: 9,892 Region Association: Upper MidWest |
QUOTE(bbrock @ Feb 3 2018, 01:17 PM) QUOTE(mb911 @ Feb 3 2018, 11:48 AM) I have never looked much into these.. Is it to just reinforce that area or did I miss the rust repair area? It's what the factory did. I'm assumig to tie the two consoles together for reinforcement. I could see where repeated hard cornering might try to tear the consoles off the long if they weren't tied together. Anyone know for sure? Yes the factory did it and all 914s have it my question was were yours rusted away? Or were you doubling the reinforcement? Nevermind I guess I nees to read that you installed a suspension console.. Carry on and great job |
|
|
|
| bbrock |
Feb 4 2018, 10:29 AM
Post
#249
|
|
914 Guru Group: Members Posts: 5,269 Joined: 17-February 17 From: Montana Member No.: 20,845 Region Association: Rocky Mountains |
QUOTE(cary @ Feb 4 2018, 06:28 AM) A little late to the party but here's a couple shots of Super In Law's built up pieces. Thanks for posting this. I was kicking myself for not having a comparison pic between Super In Law's design and what I ended up making. This shows how the piece flares to wider as it crosses the flange between the two consoles. The piece on the other side of my car i narrow and runs more or less straight over the flange. The other difference is that Super In Laws design took 15 minutes, tops, to form into shape. My piece took 3 hours of wearing out my arm. In the end, I'll bet both pieces work equally well as reinforcement. The only difference being cosmetic. If I were to do it over, I might follow Jack's lead on the other side and split that piece into 2 or 3 parts and weld them together. Still a lot more work though. |
|
|
|
| bbrock |
Feb 4 2018, 10:31 AM
Post
#250
|
|
914 Guru Group: Members Posts: 5,269 Joined: 17-February 17 From: Montana Member No.: 20,845 Region Association: Rocky Mountains |
QUOTE(mb911 @ Feb 4 2018, 07:07 AM) Yes the factory did it and all 914s have it my question was were yours rusted away? Or were you doubling the reinforcement? Nevermind I guess I nees to read that you installed a suspension console.. Carry on and great job Ah, yes. I was pretty sure I had misunderstood your question. Yeah, as Hell Holes go, my was up there with some of the most hellish we've seen. |
|
|
|
| mb911 |
Feb 4 2018, 11:02 AM
Post
#251
|
|
914 Guru Group: Members Posts: 7,742 Joined: 2-January 09 From: Burlington wi Member No.: 9,892 Region Association: Upper MidWest |
QUOTE(bbrock @ Feb 4 2018, 08:31 AM) QUOTE(mb911 @ Feb 4 2018, 07:07 AM) Yes the factory did it and all 914s have it my question was were yours rusted away? Or were you doubling the reinforcement? Nevermind I guess I nees to read that you installed a suspension console.. Carry on and great job Ah, yes. I was pretty sure I had misunderstood your question. Yeah, as Hell Holes go, my was up there with some of the most hellish we've seen. We are in similar stages.. Almost ready for a shutz gun and seam sealer.. |
|
|
|
| bbrock |
Feb 5 2018, 10:14 AM
Post
#252
|
|
914 Guru Group: Members Posts: 5,269 Joined: 17-February 17 From: Montana Member No.: 20,845 Region Association: Rocky Mountains |
Saying "hell no" to the Hell Hole
Had a very satisfying weekend working on the car. First up was some house keeping in the engine bay. I reworked the butt weld for the RD inner wheel well patch to make sure there was complete weld penetration along that seam, and fill any pinholes. I also replaced a couple hold down straps that had seen better days.  I also smashed a piece of copper pipe flat to use as a welding backer so I could clean up the edge of the passenger side engine lid brace that looked like a shark had taken a bite out of it thanks to some clumsy use of a 7" grinder when a younger me hacked in a new trunk hinge pivot oh so many years ago.  Then it was time to have some fun by installing the new RD engine shelf piece. It took some time to get the piece adjusted for a good fit, but not too bad. Sadly, I forgot to take a pic at this stage, so that will have to wait. Now it was time to prep for the battery tray. You'll be shocked to learn there was metal corrosion on the wall behind the battery tray (IMG:style_emoticons/default/lol-2.gif) So a patch had to go in. The pitting was restricted mostly to the flat area where the battery shelf attaches, but it did extend downward where the wall bends. I decided to clean up the area below the bend the best I could and just zap a couple of the worst pits with the welder. I didn't think the pitting was bad enough to justify the added work of trying to form a new patch to match those curves and risk not getting it right. You can see the outline of the new patch here. 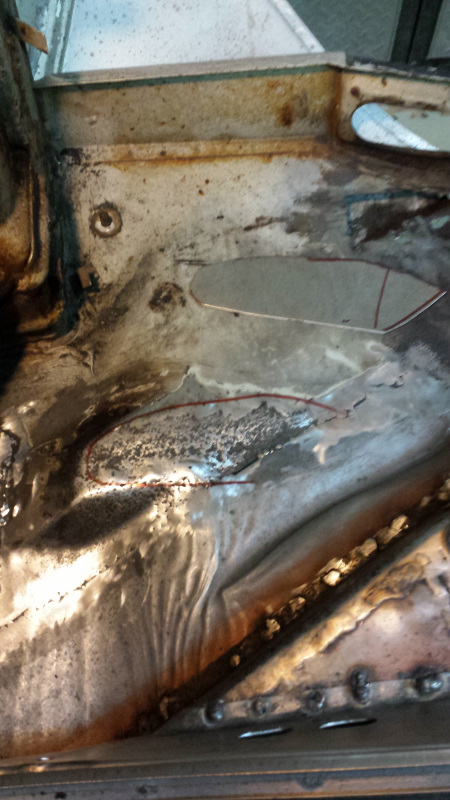 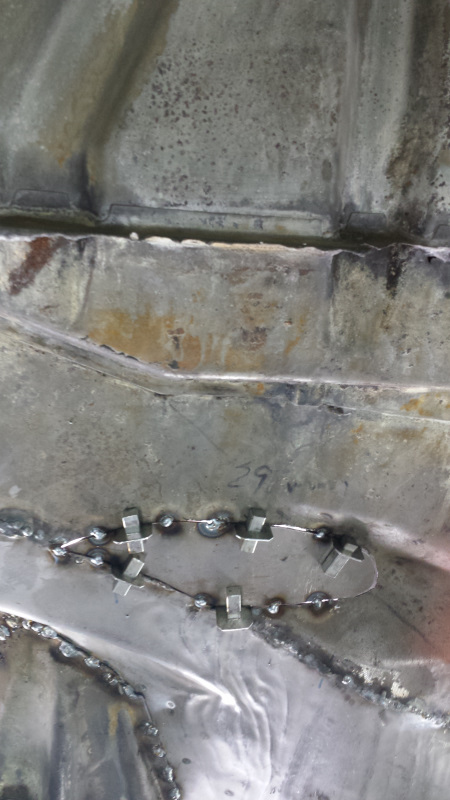 I welded the patch from the outside. It went well except a little blowout at the bottom where I ran into some of that oxidized metal. I ran out of 40 grit grinding discs which I like to use to knock down the welds before finishing with finer grit, so I'll save grinding of the outside for later. 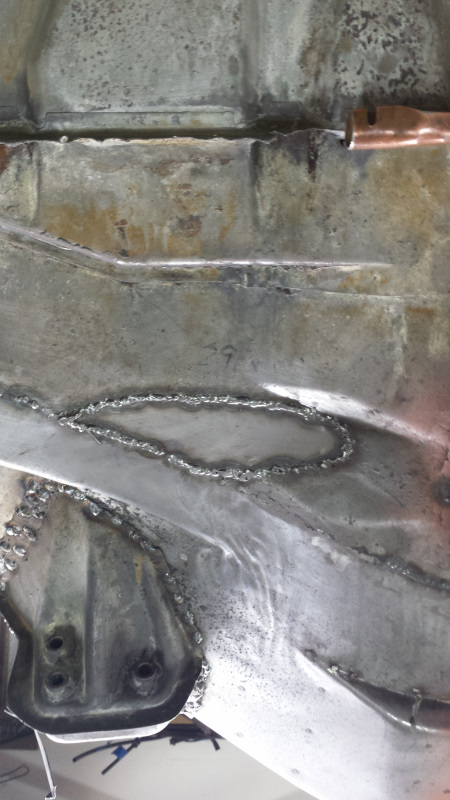 The inside got cleaned up though to make ready for the batter tray. 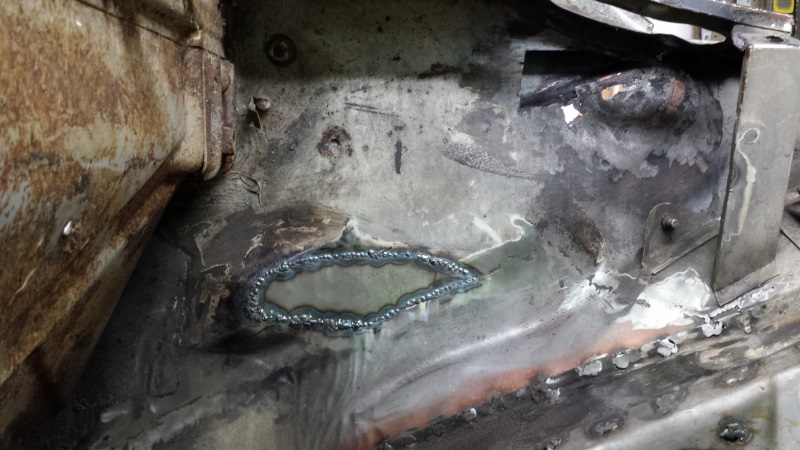 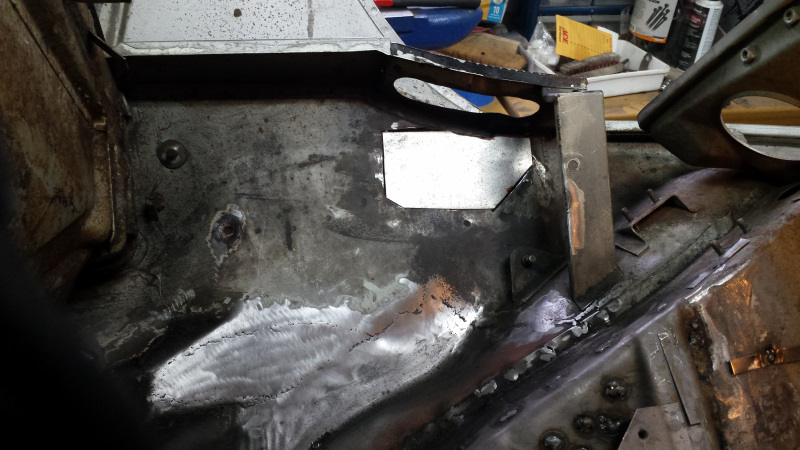 Now the battery will have a solid wall to lean against, but I wasn't ready for the tray yet. I needed to patch in the area behind the trunk pivot while there was good access. You can see the patch laid in in the last pic. And here it is welded in. Again, I'll save grinding until I get more discs. 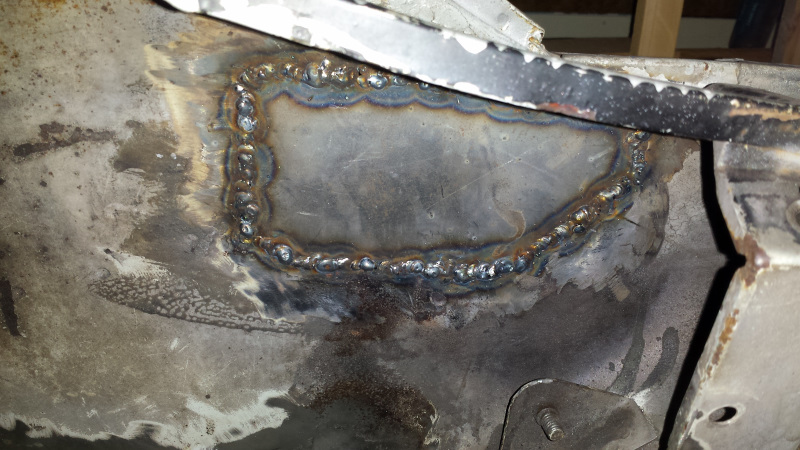 I was finally ready to install the tray. Time to get really nit picky again. RD's installation video suggests welding the tray to the support before installing in the car. That fine, but I didn't think I'd be able to weld that inward bent weld flange after the tray was on. There it is on the left side of this pic. 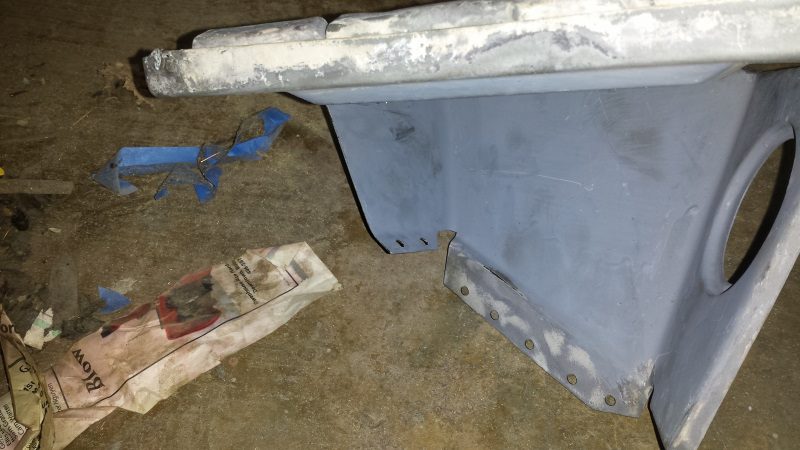 An alternative would be to weld in the support, then add the tray. But... yes, I'm picky and I wanted to hide the plug welds under the tray. I wouldn't be able to access the rearward flange from the bottom with the support in place. So I came up with a third option. First, I welded the tray on just at the rearward flange. 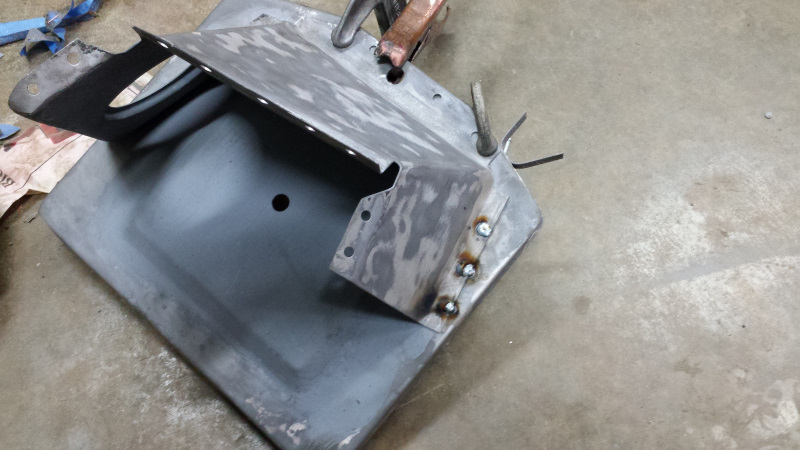 See how pretty the top looks? Almost like factory.  Next, I welded the support to the chassis, and now for the hat trick...  I bent back the tray so I could reach in and weld the inner flange. I'll admit this worked more elegantly in my head, but it did work. 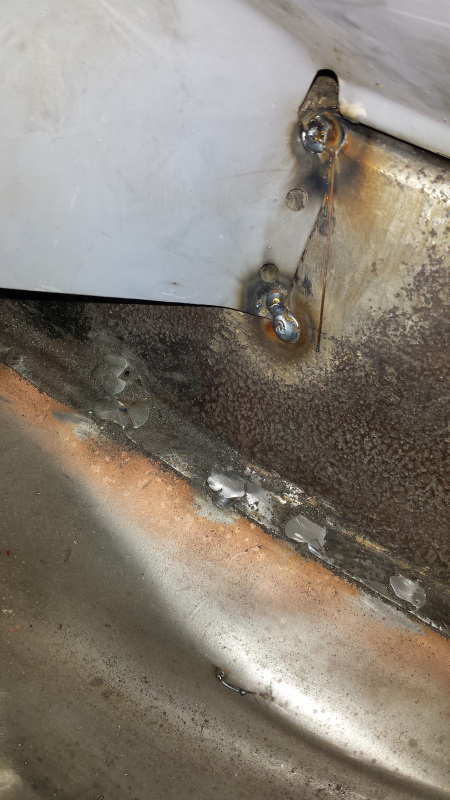 Then it was easy enough to plug weld the rest of the tray flanges. 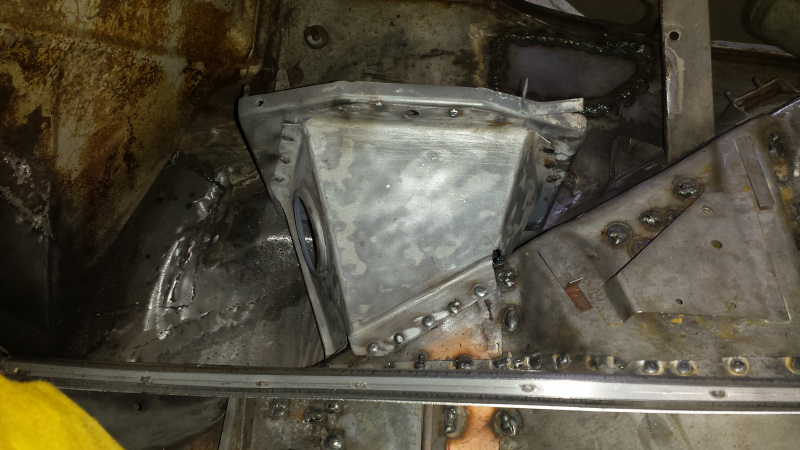 Just a couple tacks to attach the tray to the newly refurbished wall. 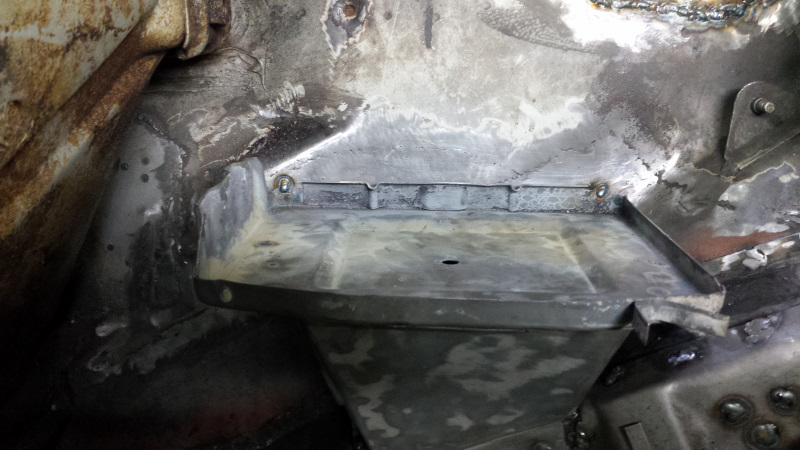 And with that... the Hell Hole was now a heavenly place with all the repairs complete! 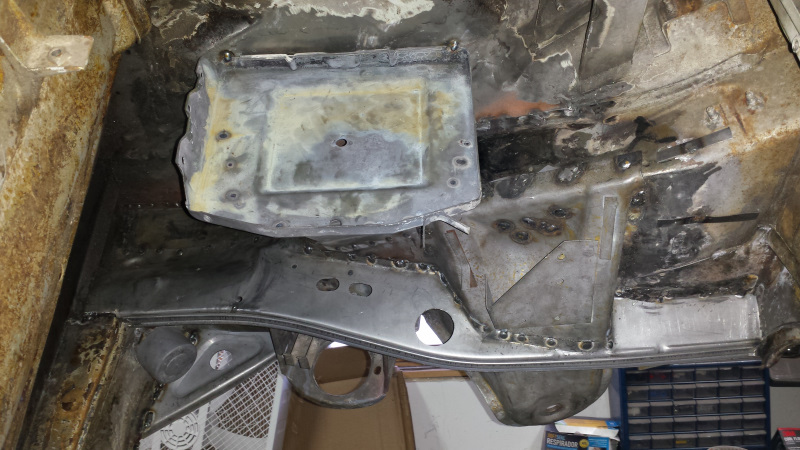 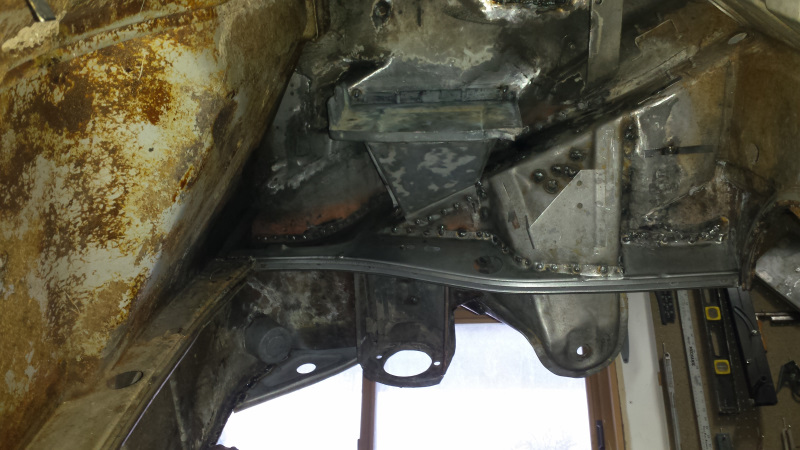 And look how pretty those welds on the battery tray are. Well worth the effort since this is the first thing anyone looking at the car will notice. (IMG:style_emoticons/default/av-943.gif) 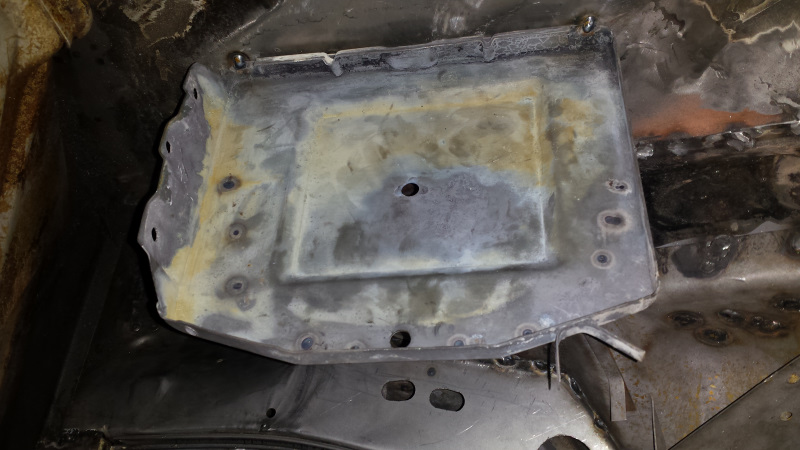 |
|
|
|
| tygaboy |
Feb 5 2018, 10:24 AM
Post
#253
|
|
914 Guru Group: Members Posts: 5,810 Joined: 6-October 15 From: Petaluma, CA Member No.: 19,241 Region Association: Northern California |
(IMG:style_emoticons/default/cheer.gif) (IMG:style_emoticons/default/aktion035.gif) (IMG:style_emoticons/default/smilie_pokal.gif)
Looking good! You have to be feeling pretty good having wrapped up that area. Keep on keepin' on! (IMG:style_emoticons/default/welder.gif) |
|
|
|
| Dion |
Feb 5 2018, 02:06 PM
Post
#254
|
|
RN Group: Members Posts: 2,926 Joined: 16-September 04 From: Audubon,PA Member No.: 2,766 Region Association: MidAtlantic Region |
Nice work Brent. I can appreciate the work you are doing. Since I’m tackling the same areas. Like the Bear visit. Not to hijack but saw a Grizzly in Yellowstone
this past summer... amazing. Subscribed |
|
|
|
| defianty |
Feb 5 2018, 02:12 PM
Post
#255
|
|
Senior Member Group: Members Posts: 659 Joined: 9-August 06 From: Essex, UK Member No.: 6,621 Region Association: None |
Great work Brent, like you I ticked off the hell hole area today too by installing the battery tray.
Looking forward to more updates. |
|
|
|
| bbrock |
Feb 5 2018, 02:37 PM
Post
#256
|
|
914 Guru Group: Members Posts: 5,269 Joined: 17-February 17 From: Montana Member No.: 20,845 Region Association: Rocky Mountains |
QUOTE(tygaboy @ Feb 5 2018, 09:24 AM) (IMG:style_emoticons/default/cheer.gif) (IMG:style_emoticons/default/aktion035.gif) (IMG:style_emoticons/default/smilie_pokal.gif) Looking good! You have to be feeling pretty good having wrapped up that area. Keep on keepin' on! (IMG:style_emoticons/default/welder.gif) QUOTE(Dion @ Feb 5 2018, 01:06 PM) Nice work Brent. I can appreciate the work you are doing. Since I’m tackling the same areas. Like the Bear visit. Not to hijack but saw a Grizzly in Yellowstone this past summer... amazing. Subscribed QUOTE(defianty @ Feb 5 2018, 01:12 PM) Great work Brent, like you I ticked off the hell hole area today too by installing the battery tray. Looking forward to more updates. Thanks all. High praise from folks who's work I admire! I think I'm approaching a cross roads on the project because I might be running out things I can do before stripping and blasting the rest of the chassis. The weather won't be cooperative for rollng the car outside for a few months yet so I might have to get creative. But I think I blasted enough ealier that I can get the guts under the sail panels and quarters cleaned and primered to put them back on. Would be nice to get that done. I just hope my welding skills have improved enough to pull it off. The next time anyone is heading to Yellowstone, give me a shout. My house is only a 1 hour drive from the north entrance. I'll hijack my own thread a bit. The black bear pic was at the end of a great day in Yellowstone. We met some relatively new aquaintenances down there to show them around. Over the course of one day we saw, pronghorn antelope, bighorn sheep, mountain goats, elk, bison, mule deer, red fox (from 4 feet away), wolves, coyote, golden eagle, prairie falcon, and moose. Ended the day at Tower Falls when that sow walked through with her two cubs. That's actually not an unusual day down there. No griz that day though. The badger was another Yellowstone excursion on 4th of July several years ago. Watched that badger kicking her cub out of the den for about 45 minutes. Both fascinating and brutal to watch. The poor cub couldn't understand why Mom was being so mean. There's more to that story but maybe for another time. |
|
|
|
| Dion |
Feb 5 2018, 03:51 PM
Post
#257
|
|
RN Group: Members Posts: 2,926 Joined: 16-September 04 From: Audubon,PA Member No.: 2,766 Region Association: MidAtlantic Region |
QUOTE(bbrock @ Feb 5 2018, 12:37 PM) QUOTE(tygaboy @ Feb 5 2018, 09:24 AM) (IMG:style_emoticons/default/cheer.gif) (IMG:style_emoticons/default/aktion035.gif) (IMG:style_emoticons/default/smilie_pokal.gif) Looking good! You have to be feeling pretty good having wrapped up that area. Keep on keepin' on! (IMG:style_emoticons/default/welder.gif) QUOTE(Dion @ Feb 5 2018, 01:06 PM) Nice work Brent. I can appreciate the work you are doing. Since I’m tackling the same areas. Like the Bear visit. Not to hijack but saw a Grizzly in Yellowstone this past summer... amazing. Subscribed QUOTE(defianty @ Feb 5 2018, 01:12 PM) Great work Brent, like you I ticked off the hell hole area today too by installing the battery tray. Looking forward to more updates. Thanks all. High praise from folks who's work I admire! I think I'm approaching a cross roads on the project because I might be running out things I can do before stripping and blasting the rest of the chassis. The weather won't be cooperative for rollng the car outside for a few months yet so I might have to get creative. But I think I blasted enough ealier that I can get the guts under the sail panels and quarters cleaned and primered to put them back on. Would be nice to get that done. I just hope my welding skills have improved enough to pull it off. The next time anyone is heading to Yellowstone, give me a shout. My house is only a 1 hour drive from the north entrance. I'll hijack my own thread a bit. The black bear pic was at the end of a great day in Yellowstone. We met some relatively new aquaintenances down there to show them around. Over the course of one day we saw, pronghorn antelope, bighorn sheep, mountain goats, elk, bison, mule deer, red fox (from 4 feet away), wolves, coyote, golden eagle, prairie falcon, and moose. Ended the day at Tower Falls when that sow walked through with her two cubs. That's actually not an unusual day down there. No griz that day though. The badger was another Yellowstone excursion on 4th of July several years ago. Watched that badger kicking her cub out of the den for about 45 minutes. Both fascinating and brutal to watch. The poor cub couldn't understand why Mom was being so mean. There's more to that story but maybe for another time. Sorry, slight hijack again. My family spent 4 days there in Yellowstone, Had dinner at the North Entrance in Gardiner,MT. Wish I would have known You were so close, would have been nice to meet up. Some awesome roads in Yellowstone for a 914 run. Ok back to the build Brent. Awesome all around! (IMG:style_emoticons/default/welder.gif) (IMG:style_emoticons/default/sawzall-smiley.gif) |
|
|
|
| bbrock |
Feb 8 2018, 09:22 AM
Post
#258
|
|
914 Guru Group: Members Posts: 5,269 Joined: 17-February 17 From: Montana Member No.: 20,845 Region Association: Rocky Mountains |
More OCD
This is covered in a separate thread, but I figured I should document my latest round of OCD. I had a yellow tag that needed to be taken care of before I can replace sail panels. That tag said to braze the fresh air tube in the door jamb and lower flange of the jamb where it meets the longitudinal. (IMG:http://www.914world.com/bbs2/uploads/post-20845-1518021748.jpg) (IMG:http://www.914world.com/bbs2/uploads/post-20845-1518021769.jpg) The ONLY reason I was going to braze is because "that's what the factory did." But I don't have an acetylene torch and can't justify the expense of one. Bernzomatic has a MAPP/Oxy brazing rig for cheap, but it gets unanimously horrible reviews. No problem, I've rented torches a few times in the past. After calling both locations of the one and only tool rental shop we have in the area, renting was out. I have one neighbor I thought might have a torch, so I left a voicemail. I also started a thread here on the world to get feedback from the brain trust. The unanimous opinion was to MIG and seal which makes perfect since and I planned to do. In the meantime, my neighbor called to say he had a torch and would bring it over when he got back from town. Before I could call him back to tell him I changed my mind, I got a call from the fraud alert center for one of our credit cards. Some $%# hacked our account, opened an online checking account, and transferred two cash advances from our card into the account. It is being remedied, but chewed up an hour and a half of my day. By the time I was finished, my neighbor was calling from in front of my house with the torch in his truck. Of course, since he'd gone to all that effort, I felt obligated to use it. I hadn't picked up a torch in 20 years and hadn't brazed in 30. But after a little practice on scraps, I was ready to melt some brass into those joints. Didn't take long at all. (IMG:http://www.914world.com/bbs2/uploads/post-20845-1518058633.jpg) (IMG:http://www.914world.com/bbs2/uploads/post-20845-1518058664.jpg) So there it is. Fresh air tubes are reattached "just like factory," and I do like the seal a little puddle of brass makes at the base of the jamb. It's a boring story, but documents one of those little side trips we all make on our restoration journeys. Since this is boring, here's a pic of a sandhill crane on her nest, taken just across the road from where the eagle pic was taken. 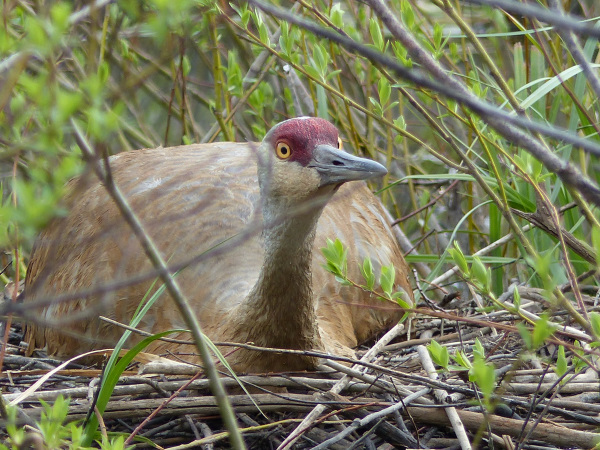 |
|
|
|
| mb911 |
Feb 8 2018, 02:52 PM
Post
#259
|
|
914 Guru Group: Members Posts: 7,742 Joined: 2-January 09 From: Burlington wi Member No.: 9,892 Region Association: Upper MidWest |
Brent,
Your driverside jamb is over the sill and pasenger side under the sill? Or is this just an illusion? Otherwise looks great.. |
|
|
|
| bbrock |
Feb 8 2018, 04:19 PM
Post
#260
|
|
914 Guru Group: Members Posts: 5,269 Joined: 17-February 17 From: Montana Member No.: 20,845 Region Association: Rocky Mountains |
QUOTE(mb911 @ Feb 8 2018, 01:52 PM) Brent, Your driverside jamb is over the sill and pasenger side under the sill? Or is this just an illusion? Otherwise looks great.. It's an illusion, but convincing enough I had to go down and take a look to verify. Jambs are over the sill on both sides. (IMG:style_emoticons/default/beerchug.gif) |
|
|
|
|
1 User(s) are reading this topic (1 Guests and 0 Anonymous Users)
0 Members:

|
Lo-Fi Version | Time is now: 18th April 2026 - 06:37 PM |
Invision Power Board
v9.1.4 © 2026 IPS, Inc.