|
|
|
Porsche, and the Porsche crest are registered trademarks of Dr. Ing. h.c. F. Porsche AG.
This site is not affiliated with Porsche in any way. Its only purpose is to provide an online forum for car enthusiasts. All other trademarks are property of their respective owners. |
|
|

  |

| tygaboy |
 Mar 18 2018, 02:10 PM Mar 18 2018, 02:10 PM
Post
#321
|
|
914 Guru  Group: Members Posts: 5,810 Joined: 6-October 15 From: Petaluma, CA Member No.: 19,241 Region Association: Northern California |
Installing my flares is coming up so let me be a little selfish and learn from your very recent experience:
Along those long-ish fender welds: Did you have much of a shrinkage ditch to correct? What's your take on how much your planishing moved the metal? I've always understood MIG welds are brittle and really don't like to be hammered due to a tendency to crack so I've tried to avoid it. I beat the crap out of the practice TIG welds I did recently and they seemed not to care. Not that I stress tested them or anything. Thoughts? |
   |

 
|
| bbrock |
Mar 18 2018, 02:44 PM
Post
#322
|
|
914 Guru Group: Members Posts: 5,269 Joined: 17-February 17 From: Montana Member No.: 20,845 Region Association: Rocky Mountains |
QUOTE(tygaboy @ Mar 18 2018, 02:10 PM)  Installing my flares is coming up so let me be a little selfish and learn from your very recent experience: Along those long-ish fender welds: Did you have much of a shrinkage ditch to correct? What's your take on how much your planishing moved the metal? I've always understood MIG welds are brittle and really don't like to be hammered due to a tendency to crack so I've tried to avoid it. I beat the crap out of the practice TIG welds I did recently and they seemed not to care. Not that I stress tested them or anything. Thoughts? I've been dying to dive into the gritty details but didn't want to bore people. Now I have an excuse. I should be able to say more about shrinkage ditches at the end of the day because they look more pronounced on the passenger's side than they were on this one. On this side the ditch was most noticeable at the top shoulder of the fender where it rolls to the sail panel. Cold planishing worked very well in that area. I was actually quite surprised how well it worked. It not only flattened out the ditch, but it also seemed to push the filler back out to thicken that little line the forms at the edge. After plannishing, it was very easy to make that part of the seam disappear with some light grinding. I'm not sure why it worked so much better in that location, but having the easiest access to the back of that spot without being a contortionist, and a dolly that fit the contour perfectly might have had something to do with it. Cold planishing worked pretty well on the rest of the welds too, but not as miraculous as that shoulder area. Remember that I used EZ Grind which is a softer alloy and it did seem to respond to the hammering more than the ER70S-6 (which feels like trying to bend a diamond). The ability to move that material with cold hammering was definitely limited, but it did seem to relax most of the shrink areas enough to grind out. I've had the same experience as you with normal MIG welds just wanting to crack when hammered. I'm pretty sure why Ben heats to dull red before hammering. Where it got interesting was where I filled pinholes. Spots where I was able to fill with a single, quick zap ground out clean without much shrink around the edge at all. But if I missed my original mark and drug the wire for just a fraction of a second to pull it over the hole, those shrink lines seemed set in stone and didn't respond to hammering. Now much of this might be because of poor technique. For right or wrong, I only ground the back side enough to smooth the lumps but left it proud. My thinking was that thickness would held force the metal to stretch and relax. Hindsight suggests that might have been dumb. The ironic bottom line is that the areas that had the deepest shrink ditch in the beginning, wound up finishing the best. We'll see what happens on the passenger side. Heading out there right now. |
|
|
|
| mb911 |
Mar 18 2018, 05:46 PM
Post
#323
|
|
914 Guru Group: Members Posts: 7,742 Joined: 2-January 09 From: Burlington wi Member No.: 9,892 Region Association: Upper MidWest |
QUOTE(bbrock @ Mar 18 2018, 12:44 PM) QUOTE(tygaboy @ Mar 18 2018, 02:10 PM) Installing my flares is coming up so let me be a little selfish and learn from your very recent experience: Along those long-ish fender welds: Did you have much of a shrinkage ditch to correct? What's your take on how much your planishing moved the metal? I've always understood MIG welds are brittle and really don't like to be hammered due to a tendency to crack so I've tried to avoid it. I beat the crap out of the practice TIG welds I did recently and they seemed not to care. Not that I stress tested them or anything. Thoughts? I've been dying to dive into the gritty details but didn't want to bore people. Now I have an excuse. I should be able to say more about shrinkage ditches at the end of the day because they look more pronounced on the passenger's side than they were on this one. On this side the ditch was most noticeable at the top shoulder of the fender where it rolls to the sail panel. Cold planishing worked very well in that area. I was actually quite surprised how well it worked. It not only flattened out the ditch, but it also seemed to push the filler back out to thicken that little line the forms at the edge. After plannishing, it was very easy to make that part of the seam disappear with some light grinding. I'm not sure why it worked so much better in that location, but having the easiest access to the back of that spot without being a contortionist, and a dolly that fit the contour perfectly might have had something to do with it. Cold planishing worked pretty well on the rest of the welds too, but not as miraculous as that shoulder area. Remember that I used EZ Grind which is a softer alloy and it did seem to respond to the hammering more than the ER70S-6 (which feels like trying to bend a diamond). The ability to move that material with cold hammering was definitely limited, but it did seem to relax most of the shrink areas enough to grind out. I've had the same experience as you with normal MIG welds just wanting to crack when hammered. I'm pretty sure why Ben heats to dull red before hammering. Where it got interesting was where I filled pinholes. Spots where I was able to fill with a single, quick zap ground out clean without much shrink around the edge at all. But if I missed my original mark and drug the wire for just a fraction of a second to pull it over the hole, those shrink lines seemed set in stone and didn't respond to hammering. Now much of this might be because of poor technique. For right or wrong, I only ground the back side enough to smooth the lumps but left it proud. My thinking was that thickness would held force the metal to stretch and relax. Hindsight suggests that might have been dumb. The ironic bottom line is that the areas that had the deepest shrink ditch in the beginning, wound up finishing the best. We'll see what happens on the passenger side. Heading out there right now. The continuing thought that MIG welds are harder then TIG is just not true. The reason why people like to TIG the body panels on because there is less deposition( depositing of metal) I have not shown much of my finish work on my thread simply because I am not there yet but you can easily move the metal regardless of welding process. The only argument for a "softer" weld would be if someone has the nuts to oxy/fuel weld the panels on because the whole process is slower. You heat the metal slower, weld slower, cools slower, thus all the carbon has a chance to normalize within the lattice structure of the steel. MIG is considered a cold metal transfer and has much more likelyhood of pin holes/porosity within the weld where as with TIG what you see on top is what you get all the way through. It is very unlikely that you can hide porosity within a TIG weld.. And to my point with more deposition you have that means more heat went into the weld area HAZ is then very large and requires more grinding and that is why MIG goes out of favor for body repairs. |
|
|
|
| bbrock |
Mar 18 2018, 10:50 PM
Post
#324
|
|
914 Guru Group: Members Posts: 5,269 Joined: 17-February 17 From: Montana Member No.: 20,845 Region Association: Rocky Mountains |
Good info there Ben. Much of this welding is still a puzzle to me, but I'm happy to say I"m not the same welder today that I was when I started this project. Hope I keep improving.
Now to finish off the progress for the weekend. This afternoon I started grinding on the passenger side but decided that when my compressor needed to catch up, I'd shift back to the driver's side to run the shrinking disc over it to see how much of the warble I could take out. I thought that way, I'd stay busy enough to keep the English butler out of my head. It didn't work. If an actor from the 60s has to be in my head, why couldn't it be Julie Newmar? I could handle that. (IMG:style_emoticons/default/drooley.gif) Anyway, the disc did its magic and gosh darn it, I AM going to declare victory. There is still much metal finishing to do but the panel is close enough that I'll need to shoot a guide coat and block it before I can do any more. I'm very happy with it now. (IMG:style_emoticons/default/aktion035.gif) 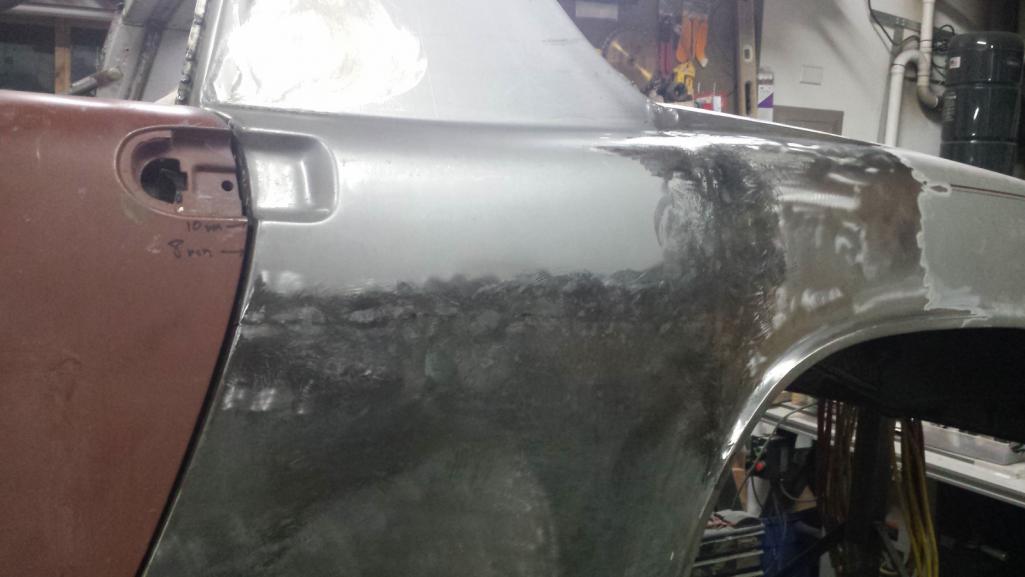 On the pass side, I decided to mix it up a little and went more aggressive grinding the back side before hammering. 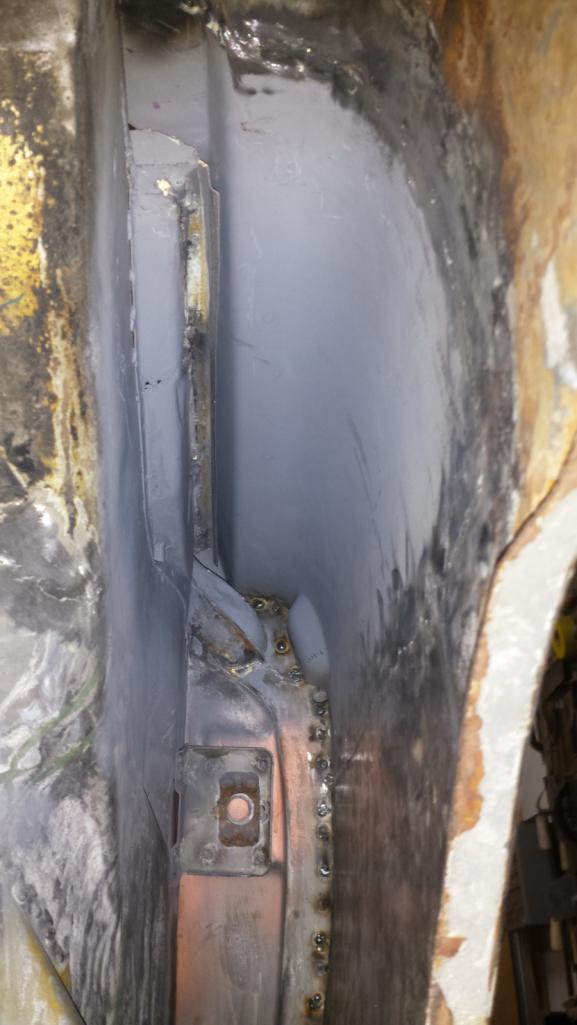 I also decided to intermix grinding with shrinking because there were some issues with the panel. First, there was some serious oil canning at the bottom. I think that was left from the fender bender crease that prompted the quarter inch of bondo. Second, there were a couple of wicked bulges above the seam between the sail panel and quarter. Those were on me. I hadn't noticed the RD panel had a sharp roll toward the bottome edge that should have been flattened out a little before welding it in. The worst bulge was so high and tight that I was worried I would have to cut the panel to relieve the stress and flatten it. But that shrinking disc is pure witchcraft I tell you. It took quite a few passes, but those bulges laid down like lambs. I'm really happy with the line I wound up with.  I got as far as rough grind with 36 grit and hammering all the seams with hammer and dolly. It looks like most have raised to where they'll grind smooth except right at the shoulder roll at the top of the quarter. I'm going to use some heat on that to try to relax that metal more. This time, I'm going to fill pinheads before finishing the grinding. I'm thinking about filling them from the backside this time. It's getting there, I think.  |
|
|
|
| mb911 |
Mar 19 2018, 09:18 AM
Post
#325
|
|
914 Guru Group: Members Posts: 7,742 Joined: 2-January 09 From: Burlington wi Member No.: 9,892 Region Association: Upper MidWest |
I like the shrinking disc idea. I might try that a bit..
|
|
|
|
| raynekat |
Mar 21 2018, 05:32 PM
Post
#326
|
|
Advanced Member Group: Members Posts: 2,171 Joined: 30-December 14 From: Coeur d'Alene, Idaho Member No.: 18,263 Region Association: Pacific Northwest |
How's life up on Montana?
Bet you're ready for some Spring weather? Looking forward to hearing about your updates. |
|
|
|
| bbrock |
Mar 22 2018, 10:02 AM
Post
#327
|
|
914 Guru Group: Members Posts: 5,269 Joined: 17-February 17 From: Montana Member No.: 20,845 Region Association: Rocky Mountains |
QUOTE(raynekat @ Mar 21 2018, 05:32 PM) How's life up on Montana? Bet you're ready for some Spring weather? Looking forward to hearing about your updates. Ha! Spring is in full bore here and it sucks. Spring weather here is a 3-month tug-o-war between winter and summer. Right now we are in the muddy, slushy, slop stage but there will be several more foot+ snow dumps followed by more slop between now and June. Slow going I've been picking away at the passenger side quarter. Feels like a lot of work without much progress and it isn't as pretty as the driver's side. I started with filling pinholes. I don't know how other people do this, but I'm having good luck with placing a trouble light on the back side of the panel and then chasing stars with the welder.  This time, I decided to try filling the holes from the backside to see what that did. I liked the result! It leaves these little zits on the face of the panel with very little shrink. 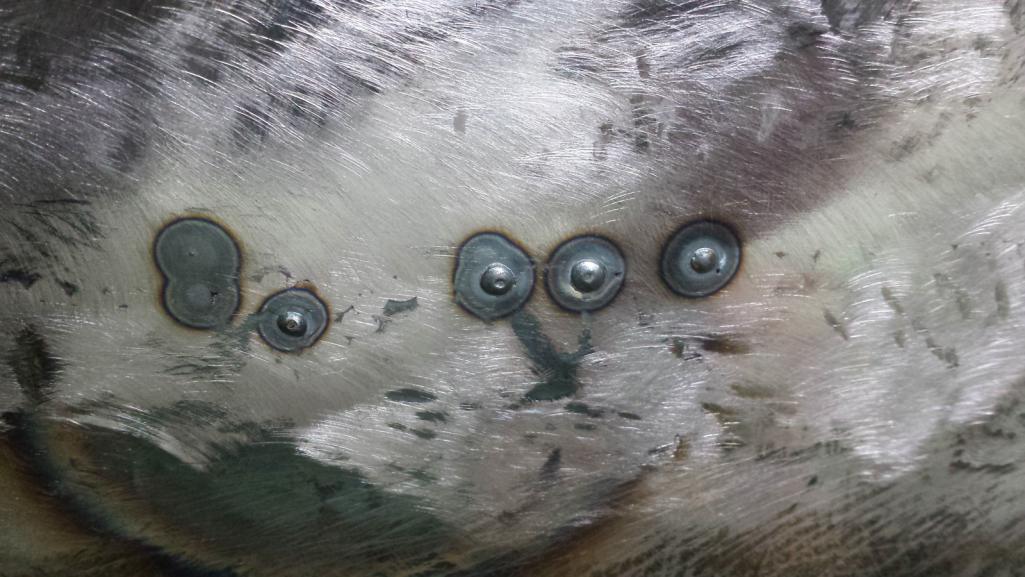 It only takes a little touch with an 80 grit disc to make them disappear. The shrink lines in this photo are from the original seam, not the pinholes that were filled. 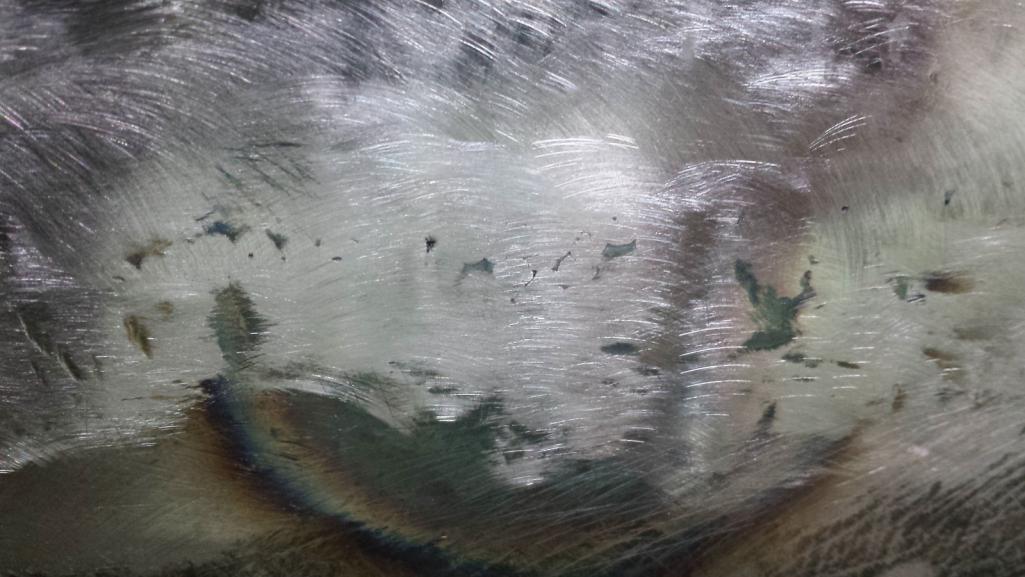 Those shrink lines were next. I mentioned earlier that the "ditch" seemed deeper on this side than the other. I'm not sure why that is because the welder was set the same and I thought I was being just as careful to keep the heat down. Running over with the hammer and dolly cold got some of them out. I heated some of the worst areas and that helped a little. Unfortunately, my ancient JC Whitney hammer I was using had developed a little ridge on the edge that I hadn't noticed, and every time I whacked the panel, I put a nice little mark in it about as deep as the shrink I was trying to lose.  And try as I might, I just couldn't hammer them all away. So, I decided to try dialing the welder down low and see if I could add material to fill those voids. And try as I might, I just couldn't hammer them all away. So, I decided to try dialing the welder down low and see if I could add material to fill those voids. 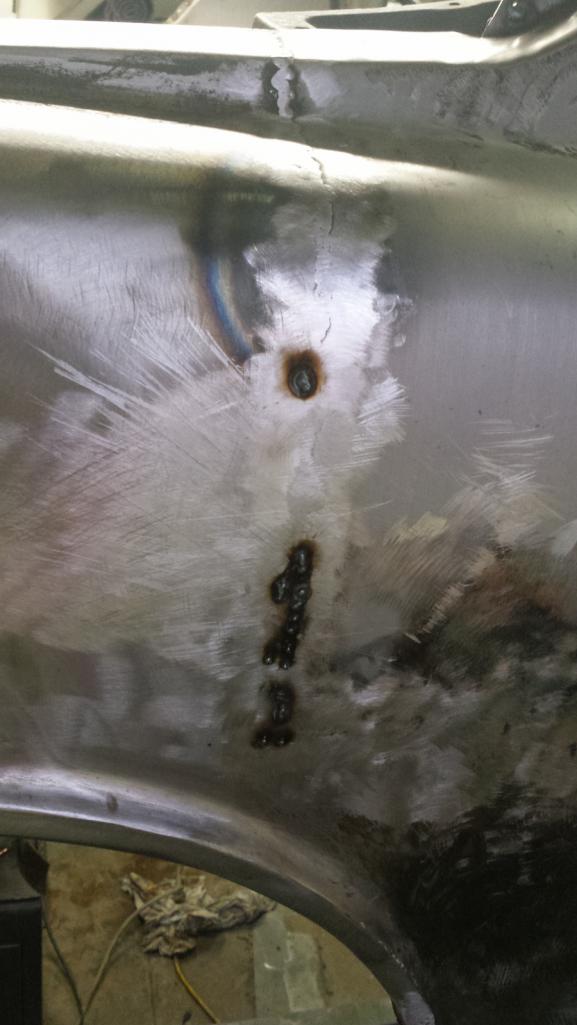 I honestly thought I'd just wind up chasing the problem across the panel, but to my surprise, it helped. I don't have a pic to prove it, so you'll just have to trust me. Now the question is, how much of that do I want to do? (IMG:style_emoticons/default/confused24.gif) Warp Nine Captain You may recall this side had the collision damage. Looked like probably a minor parking lot scrape that left two creases from the door jamb rearward that the PO's body shop had pulled out with a slide hammer and slapped on a 1/4 inch of bondo. Before welding the panel back on, I hammered out the creases as best I could, but did not fill the holes. Big mistake (IMG:style_emoticons/default/headbang.gif) In hindsight, I should have filled and ground the holes and then gotten the panel flat before putting back on the car. The upshot is that I spent several hours chasing oil canning around the panel. I would shrink and/or hammer and dolly a bulge flat and lose the oil can, only to have it reappear after smoothing out another warble elsewhere on the panel. No doubt, this is my inexperience showing, and not understanding how to apply the "first in - last out" concept on this panel. But eventually, I was able to get it to where a guide coat and blocking is needed to straighten it more (same level of finish as the driver's side). It's tempting to continue on and finish, but I think it makes more sense at the project level to move on to finish patchwork and rough grinding all the seams; then go over the entire car with a guide coat, blocking, and metal finishing. So, here's where I'm leaving it for now. 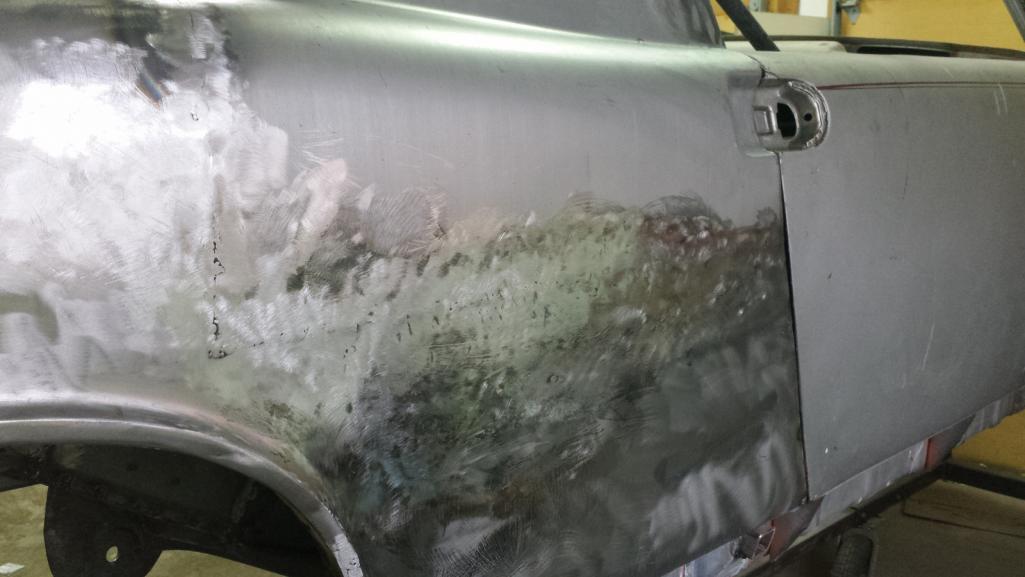 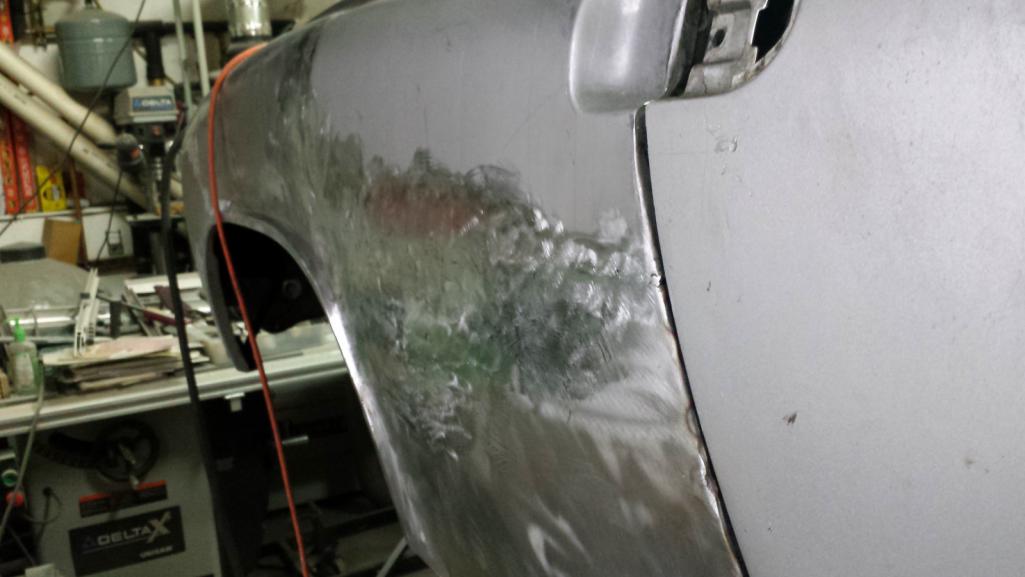 I may still work on some of those shrink lines, and I should be able to hammer the panel flat, but ultimately, it will need a bit of filler to at least fill those hammer marks. That makes me less enthusiastic about making every single weld line disappear. But at least it is going to have a LOT less filler than before. I swear I lightened that panel by 3 lbs. removing that filler. There was one more task I finished up this morning. I needed to weld up the inside, bottom edge of the sail panel where it meets the trunk seal channel. Didn't take a before shot, but that went pretty well although I need to figure out how to get into the back side of that channel to get it smooth. Too tight for the angle grinder. 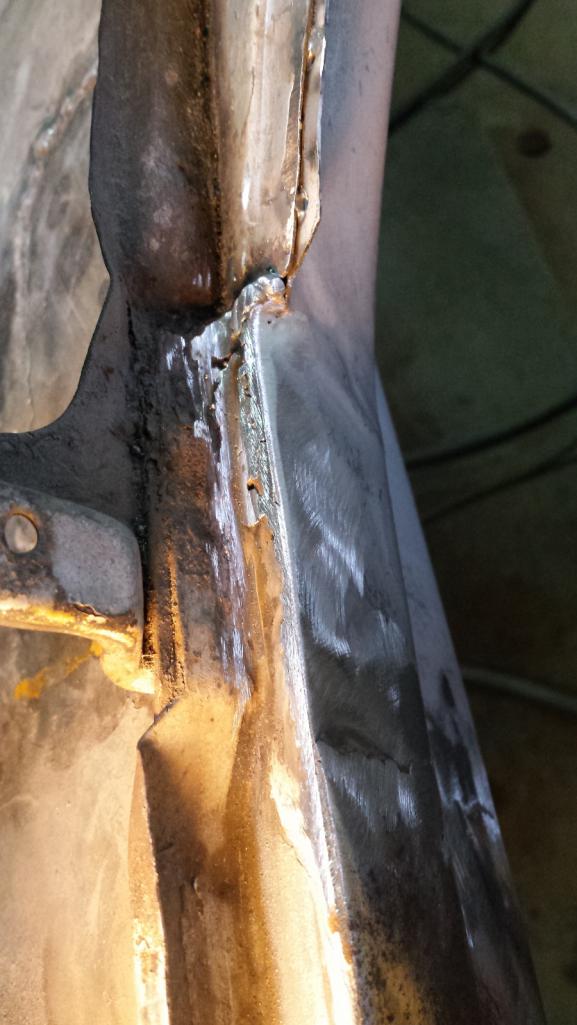 This next pic also shows some significant shrinkage at the shoulder of the quarter and where I didn't quite have the tail edge of the sail panel aligned. I had a clamp in there, but still didn't get it. You can also see some pitting left behind by moisture getting trapped under the thick bondo that was there. My thinking is that I'll address that with some body solder and will just address the weld seams the same way while I'm there.  |
|
|
|
| mb911 |
Mar 22 2018, 10:11 AM
Post
#328
|
|
914 Guru Group: Members Posts: 7,742 Joined: 2-January 09 From: Burlington wi Member No.: 9,892 Region Association: Upper MidWest |
Looks good.. Was just talking with a world class triumph car restorer this morning about metal finishing. He echoed my concerns of thining the metal too much by making the weld disappear and said allot of times you take a panel which might be 18 or 19 GA and thin it to 22 or thinner in spots and thus cracking can occur.. I think the goal is to get as much warpage as possible out with the majority of the weld removed and let filler do the rest. The quality is so much better then what it was 20 years ago.. Your car will finish very nice..
|
|
|
|
| bbrock |
Mar 22 2018, 10:25 AM
Post
#329
|
|
914 Guru Group: Members Posts: 5,269 Joined: 17-February 17 From: Montana Member No.: 20,845 Region Association: Rocky Mountains |
QUOTE(mb911 @ Mar 22 2018, 10:11 AM) Looks good.. Was just talking with a world class triumph car restorer this morning about metal finishing. He echoed my concerns of thining the metal too much by making the weld disappear and said allot of times you take a panel which might be 18 or 19 GA and thin it to 22 or thinner in spots and thus cracking can occur.. I think the goal is to get as much warpage as possible out with the majority of the weld removed and let filler do the rest. The quality is so much better then what it was 20 years ago.. Your car will finish very nice.. Thanks Ben, that is very good to hear. The rule I've been trying to apply is that if I can feel that the weld is thicker than the parent material with my hands, then I grind some more. If not, I stop. I also do a lot of rapping on the panels with my knuckles. I don't know what that tells me but if it feels solid, it makes me happy. (IMG:style_emoticons/default/biggrin.gif) |
|
|
|
| tygaboy |
Mar 22 2018, 10:50 AM
Post
#330
|
|
914 Guru Group: Members Posts: 5,810 Joined: 6-October 15 From: Petaluma, CA Member No.: 19,241 Region Association: Northern California |
Brent - I really appreciate the details you're documenting. Speaking for myself, I'm a rank amateur at all this and while reading the books/watching the videos by the experts gives one the "book smarts", there's no substitute for "street smart" (or in this case, "shop smarts"! (IMG:style_emoticons/default/laugh.gif)
And it's encouraging (for me, at least) to see others climb the learning curve as I do the same. Much as I appreciate those experts, nothing is as frustrating as watching how easy they make it look then realizing that just ain't the case! So again, thanks for sharing all the good/bad and learnings! Much appreciated. (IMG:style_emoticons/default/aktion035.gif) Hey, I know! On the All Metal Shaping site (AWESOME site, btw), they have a "Metal Shaper of the Month" they award. Acknowledging that Kent would win every month (!!!), I hear-by nominate you as the first monthly "914 Rustorer of the Month, March 2018"! Congratulations. This award, plus $1.75, will get you a small coffee. |
|
|
|
| burton73 |
Mar 22 2018, 11:05 AM
Post
#331
|
|
Senior member, and old dude Group: Members Posts: 3,994 Joined: 2-January 07 From: Los Angeles Member No.: 7,414 Region Association: Southern California |
QUOTE(tygaboy @ Mar 22 2018, 09:50 AM) Brent - I really appreciate the details you're documenting. Speaking for myself, I'm a rank amateur at all this and while reading the books/watching the videos by the experts gives one the "book smarts", there's no substitute for "street smart" (or in this case, "shop smarts"! (IMG:style_emoticons/default/laugh.gif) And it's encouraging (for me, at least) to see others climb the learning curve as I do the same. Much as I appreciate those experts, nothing is as frustrating as watching how easy they make it look then realizing that just ain't the case! So again, thanks for sharing all the good/bad and learnings! Much appreciated. (IMG:style_emoticons/default/aktion035.gif) Hey, I know! On the All Metal Shaping site (AWESOME site, btw), they have a "Metal Shaper of the Month" they award. Acknowledging that Kent would win every month (!!!), I hear-by nominate you as the first monthly "914 Rustorer of the Month, March 2018"! Congratulations. This award, plus $1.75, will get you a small coffee. (IMG:style_emoticons/default/agree.gif) Bob B |
|
|
|
| mb911 |
Mar 22 2018, 11:16 AM
Post
#332
|
|
914 Guru Group: Members Posts: 7,742 Joined: 2-January 09 From: Burlington wi Member No.: 9,892 Region Association: Upper MidWest |
QUOTE(burton73 @ Mar 22 2018, 09:05 AM) QUOTE(tygaboy @ Mar 22 2018, 09:50 AM) Brent - I really appreciate the details you're documenting. Speaking for myself, I'm a rank amateur at all this and while reading the books/watching the videos by the experts gives one the "book smarts", there's no substitute for "street smart" (or in this case, "shop smarts"! (IMG:style_emoticons/default/laugh.gif) And it's encouraging (for me, at least) to see others climb the learning curve as I do the same. Much as I appreciate those experts, nothing is as frustrating as watching how easy they make it look then realizing that just ain't the case! So again, thanks for sharing all the good/bad and learnings! Much appreciated. (IMG:style_emoticons/default/aktion035.gif) Hey, I know! On the All Metal Shaping site (AWESOME site, btw), they have a "Metal Shaper of the Month" they award. Acknowledging that Kent would win every month (!!!), I hear-by nominate you as the first monthly "914 Rustorer of the Month, March 2018"! Congratulations. This award, plus $1.75, will get you a small coffee. (IMG:style_emoticons/default/agree.gif) Bob B (IMG:style_emoticons/default/agree.gif) |
|
|
|
| tygaboy |
Mar 22 2018, 11:26 AM
Post
#333
|
|
914 Guru Group: Members Posts: 5,810 Joined: 6-October 15 From: Petaluma, CA Member No.: 19,241 Region Association: Northern California |
And re: the monthly award, there are so many we need to thank. As with the acceptance speeches at the Oscars, I feel compelled to give shout-outs or "who's next?" to many others who I'll cite as inspiring me:
Cary, Ben, Defianty, the aforementioned Kent... EDIT: Yes, Dion, too! I'm sure I'm missing others, apologies to you. |
|
|
|
| bbrock |
Mar 22 2018, 11:52 AM
Post
#334
|
|
914 Guru Group: Members Posts: 5,269 Joined: 17-February 17 From: Montana Member No.: 20,845 Region Association: Rocky Mountains |
QUOTE(tygaboy @ Mar 22 2018, 10:50 AM) Acknowledging that Kent would win every month (!!!), I hear-by nominate you as the first monthly "914 Rustorer of the Month, March 2018"! Congratulations. This award, plus $1.75, will get you a small coffee. Oh my! This is such an honor. I have so many people to thank.... (IMG:style_emoticons/default/first.gif) Seriously though, I really appreciate these comments. I've wondered often how much detail should go into these posts. I've learned so much from Cary's detailed posts that I thought I'd try to give some back, if only to document the struggle. And yes, I've been frustrated by being able to easily find examples of the perfect butt joint but struggle to find details of how they got there. Of course, one way or the other, I'll get the body surfaces perfect and then F it all up somehow with the paint (IMG:style_emoticons/default/av-943.gif) Haven't been on the Metal Shaping site for a few months and need to get back over there. And I want to add Dion to the list of inspirations. A fellow warrior in our current cohort touched by the madness! |
|
|
|
| Dion |
Mar 22 2018, 12:05 PM
Post
#335
|
|
RN Group: Members Posts: 2,926 Joined: 16-September 04 From: Audubon,PA Member No.: 2,766 Region Association: MidAtlantic Region |
Aww shucks! Heheheh thanks for the shout out fellas.
Tons I need to learn. You guys do make it look easy. (IMG:style_emoticons/default/first.gif) Besides misery loves company, but this is the best kind of misery. It’s actually therapeutic for me working with this project and following you guys. Have at it! (IMG:style_emoticons/default/beerchug.gif) |
|
|
|
| mb911 |
Mar 22 2018, 02:12 PM
Post
#336
|
|
914 Guru Group: Members Posts: 7,742 Joined: 2-January 09 From: Burlington wi Member No.: 9,892 Region Association: Upper MidWest |
Chris, Dion we should just merge our threads to this page amd just all post progress. Though my thread doesn't get much feedback I may be an anchor to this thread. (IMG:style_emoticons/default/biggrin.gif)
|
|
|
|
| bbrock |
Mar 22 2018, 03:59 PM
Post
#337
|
|
914 Guru Group: Members Posts: 5,269 Joined: 17-February 17 From: Montana Member No.: 20,845 Region Association: Rocky Mountains |
QUOTE(mb911 @ Mar 22 2018, 02:12 PM) Chris, Dion we should just merge our threads to this page amd just all post progress. Though my thread doesn't get much feedback I may be an anchor to this thread. (IMG:style_emoticons/default/biggrin.gif) Hey man, this thread doesn't work without you out front ahead of me so I can copy. Stop fiddling with that water pumper and get busy. (IMG:style_emoticons/default/poke.gif) |
|
|
|
| mb911 |
Mar 22 2018, 04:08 PM
Post
#338
|
|
914 Guru Group: Members Posts: 7,742 Joined: 2-January 09 From: Burlington wi Member No.: 9,892 Region Association: Upper MidWest |
QUOTE(bbrock @ Mar 22 2018, 01:59 PM) QUOTE(mb911 @ Mar 22 2018, 02:12 PM) Chris, Dion we should just merge our threads to this page amd just all post progress. Though my thread doesn't get much feedback I may be an anchor to this thread. (IMG:style_emoticons/default/biggrin.gif) Hey man, this thread doesn't work without you out front ahead of me so I can copy. Stop fiddling with that water pumper and get busy. (IMG:style_emoticons/default/poke.gif) Lol. Plan to prime this weekend along with working on the water pumper. |
|
|
|
| bbrock |
Mar 22 2018, 04:10 PM
Post
#339
|
|
914 Guru Group: Members Posts: 5,269 Joined: 17-February 17 From: Montana Member No.: 20,845 Region Association: Rocky Mountains |
QUOTE(mb911 @ Mar 22 2018, 04:08 PM) QUOTE(bbrock @ Mar 22 2018, 01:59 PM) QUOTE(mb911 @ Mar 22 2018, 02:12 PM) Chris, Dion we should just merge our threads to this page amd just all post progress. Though my thread doesn't get much feedback I may be an anchor to this thread. (IMG:style_emoticons/default/biggrin.gif) Hey man, this thread doesn't work without you out front ahead of me so I can copy. Stop fiddling with that water pumper and get busy. (IMG:style_emoticons/default/poke.gif) Lol. Plan to prime this weekend along with working on the water pumper. (IMG:style_emoticons/default/popcorn[1].gif) |
|
|
|
| 914Toy |
Mar 22 2018, 04:12 PM
Post
#340
|
|
Senior Member Group: Members Posts: 746 Joined: 12-November 17 From: Laguna beach Member No.: 21,596 Region Association: Southern California |
QUOTE(bbrock @ Mar 22 2018, 03:10 PM) QUOTE(mb911 @ Mar 22 2018, 04:08 PM) QUOTE(bbrock @ Mar 22 2018, 01:59 PM) QUOTE(mb911 @ Mar 22 2018, 02:12 PM) Chris, Dion we should just merge our threads to this page amd just all post progress. Though my thread doesn't get much feedback I may be an anchor to this thread. (IMG:style_emoticons/default/biggrin.gif) Hey man, this thread doesn't work without you out front ahead of me so I can copy. Stop fiddling with that water pumper and get busy. (IMG:style_emoticons/default/poke.gif) Lol. Plan to prime this weekend along with working on the water pumper. (IMG:style_emoticons/default/popcorn[1].gif) Perhaps this comment is too late, but I think your door braces should not be in tension but should be in compression (IMG:style_emoticons/default/sad.gif) |
|
|
|
|
3 User(s) are reading this topic (3 Guests and 0 Anonymous Users)
0 Members:

|
Lo-Fi Version | Time is now: 18th April 2026 - 10:27 PM |
Invision Power Board
v9.1.4 © 2026 IPS, Inc.