|
|
|
Porsche, and the Porsche crest are registered trademarks of Dr. Ing. h.c. F. Porsche AG.
This site is not affiliated with Porsche in any way. Its only purpose is to provide an online forum for car enthusiasts. All other trademarks are property of their respective owners. |
|
|

  |

| Lucky9146 |
 May 28 2018, 09:42 PM May 28 2018, 09:42 PM
Post
#441
|
|
Always Wanted A Bigger Go Cart  Group: Members Posts: 1,710 Joined: 22-September 14 From: Poway California Member No.: 17,942 Region Association: Southern California |
Great to watch and see the problem solving and welding. Looking good!
It's nice to see progress (IMG:style_emoticons/default/beerchug.gif) (IMG:style_emoticons/default/driving.gif) (IMG:style_emoticons/default/white914.jpg) |
   |

 
|
| bbrock |
May 28 2018, 09:58 PM
Post
#442
|
|
914 Guru Group: Members Posts: 5,269 Joined: 17-February 17 From: Montana Member No.: 20,845 Region Association: Rocky Mountains |
QUOTE(Lucky9146 @ May 28 2018, 09:42 PM)  Great to watch and see the problem solving and welding. Looking good! It's nice to see progress (IMG:style_emoticons/default/beerchug.gif) (IMG:style_emoticons/default/driving.gif) (IMG:style_emoticons/default/white914.jpg) Thanks, and right back at you. I love your GT project but those seats... well that's a WHOLE other level! (IMG:style_emoticons/default/drooley.gif) (IMG:style_emoticons/default/beerchug.gif) |
|
|
|
| bbrock |
Jun 17 2018, 10:24 PM
Post
#443
|
|
914 Guru Group: Members Posts: 5,269 Joined: 17-February 17 From: Montana Member No.: 20,845 Region Association: Rocky Mountains |
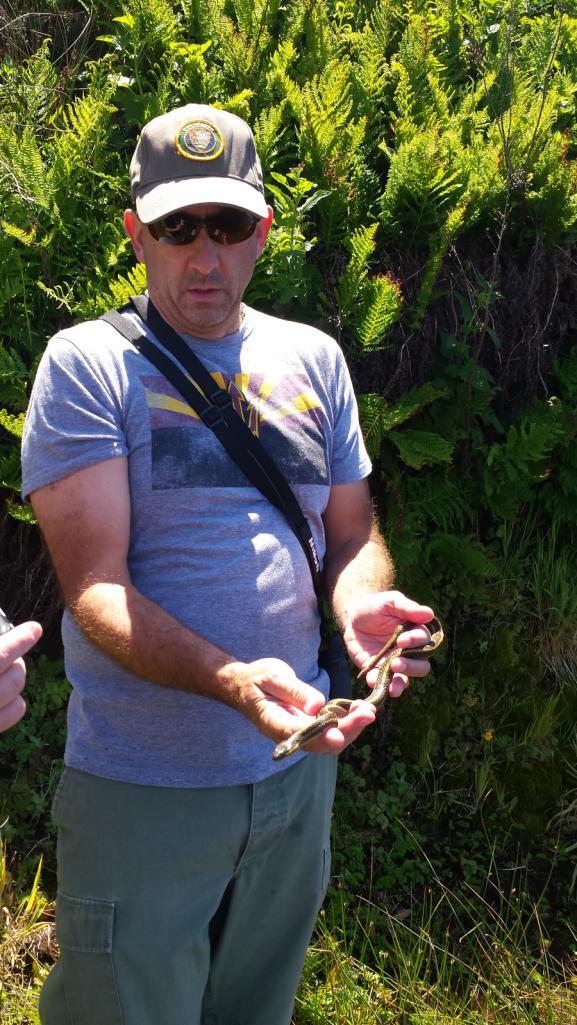
Overdue for an update. I've had a few distractions from the project. Two weeks ago I made a quick trip to Petaluma to visit friends. Turns out my friend lives only a couple miles from Tygaboy so I managed to pay Chris a visit and got to meet the infamous Martin. I really enjoyed visiting with Chris and seeing his amazing project. That hight tech jigsaw puzzle makes a lot of sense when you see it in person. Unfortunately, I wasn't able to attend the fabulous fab workshop at Chris' place the following day. Instead, I was out on Point Reyes with a bunch of other biologist nerds doing biologist nerd things. Here's my friend Tim showing off an aquatic garter snake.
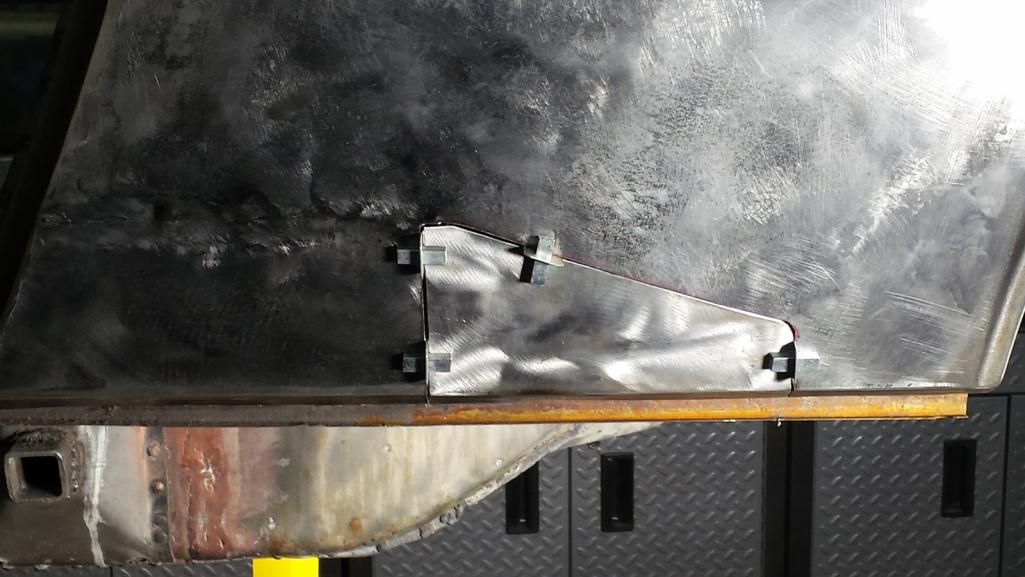
 When I got home, I had a lot of other chores to attending to that kept me away from the car and enjoying the nice Montana weather. This Poor Frankenpanel Finally, I was able to get back to the Porsche around mid-day last Sunday. Some days you go to the shop and everything just seems to click. Last Sunday was not that day. I dug into repairing the lower portion of the left rear quarter. First I made a template tracing the rear door edge so I could match the contour for a perfect match with the patch. 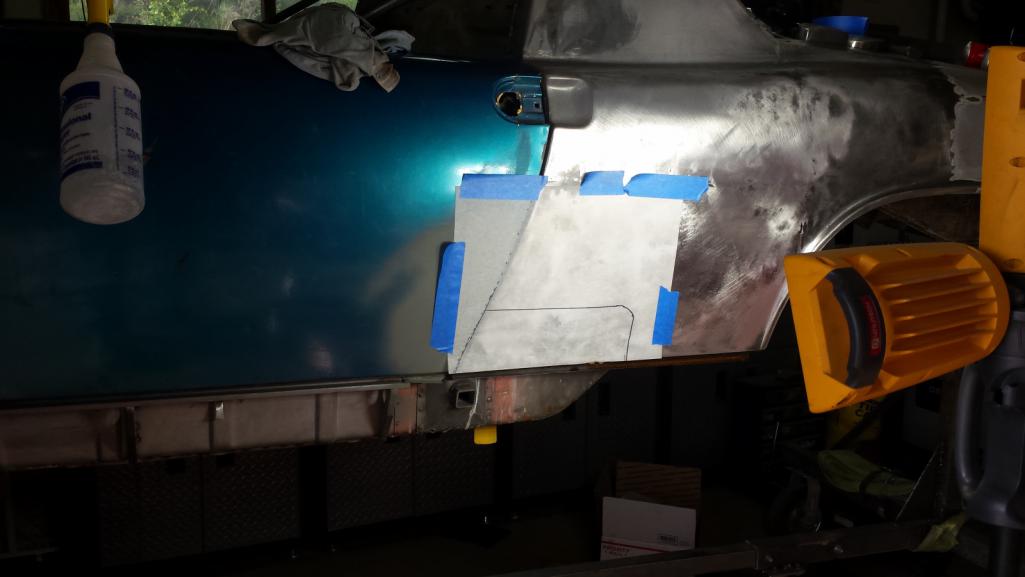 Cut the patch from the old door and clamped it in. Looks pretty good. 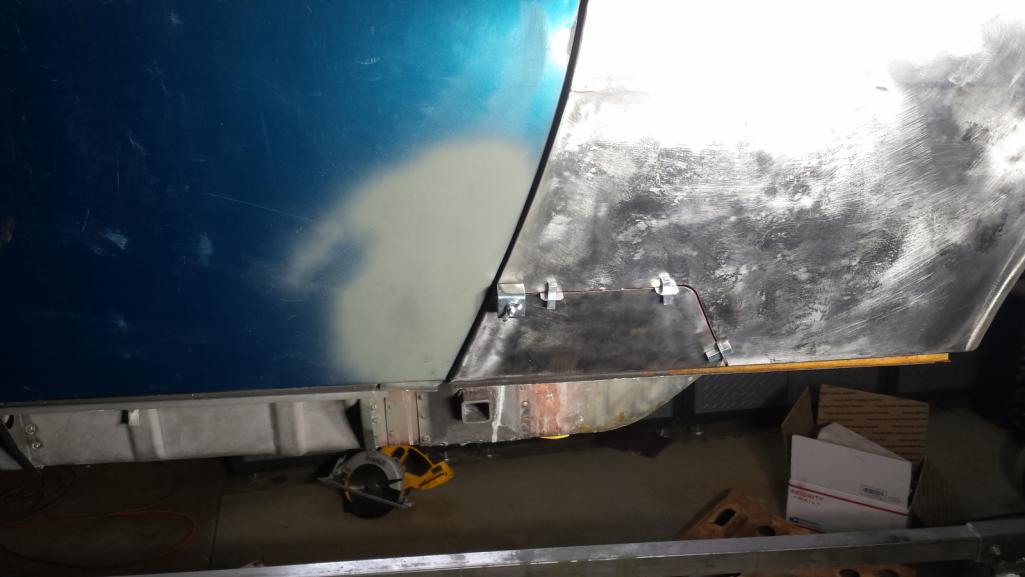 Welded it in and that's when things started going sour. It looks pretty good here. 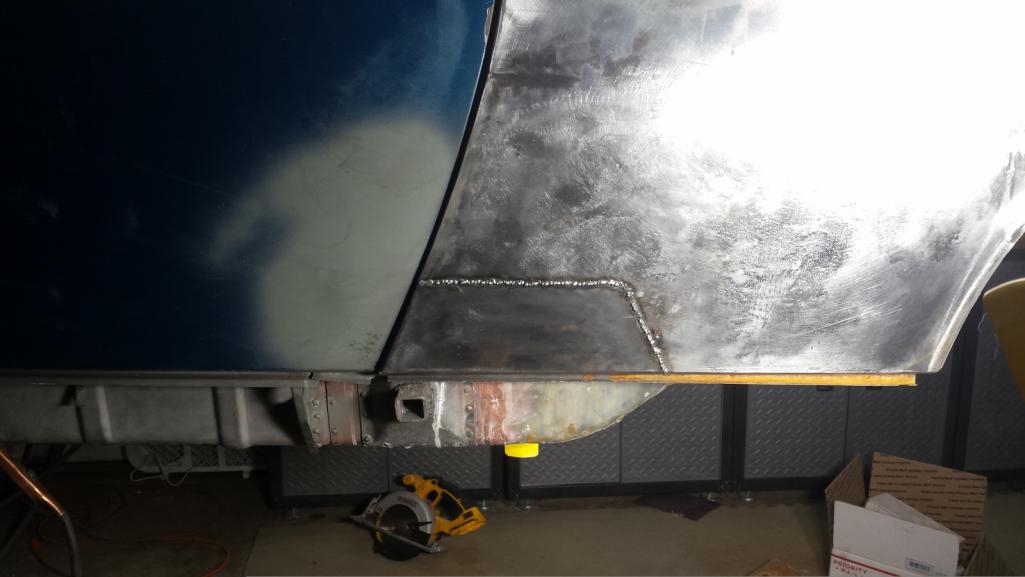 But the bend at the lock post wasn't as crisp as the original and I had pretty good luck sharpening the RD panels up with a body hammer. So I tried that on the bottome and totally F@##d up the gap. (IMG:style_emoticons/default/headbang.gif) I think I can fix it without cutting but it will require a long, thick piece of bar stock that I didn't have on hand so will have to wait. The other problem is that I started getting nasty blowout on the vertical section of butt seam. 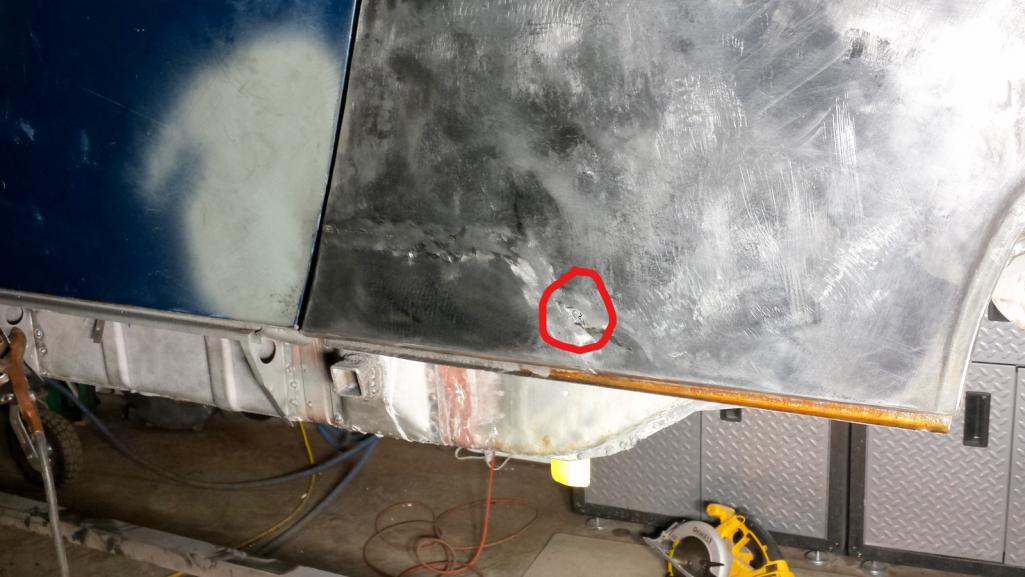 When I cut that opening, the metal looked nice and solid all around the edge, but after the blowout, I peaked around back to find lead spatter out around pitted metal. Just a reminder, this was the panel I farted around with body solder to fill, smooth, and strengthen some moderately pitted areas. The damn stuff sure works because when I inspected to size the patch, it looked like clean, smooth, shiny sheet metal back there. That is - until the welder hit it. (IMG:style_emoticons/default/headbang.gif) That meant yet another patch had to go in to this poor quilt of a panel. I was really starting to envy those who can just RR the whole quarter with NOS. 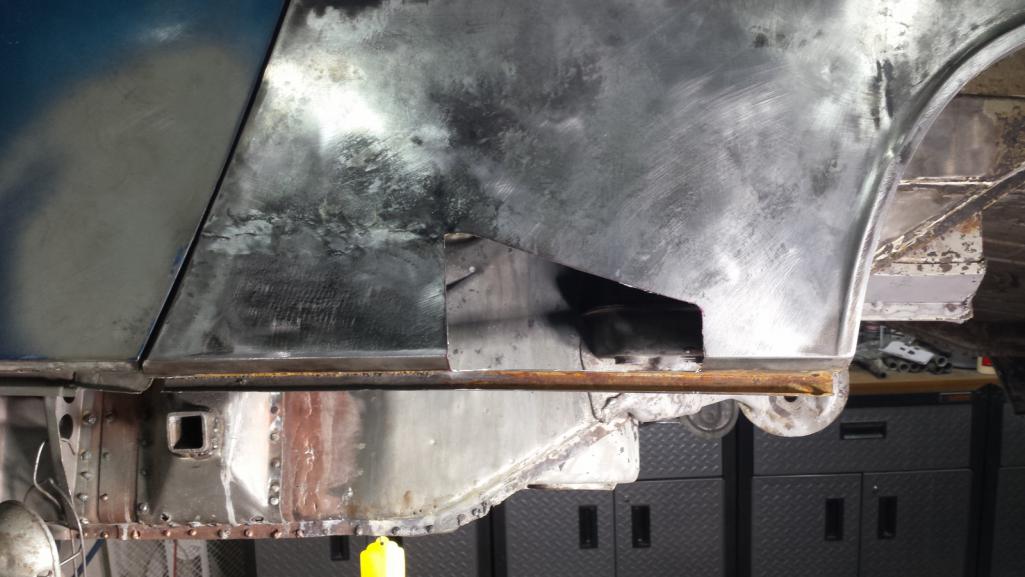 |
|
|
|
| bbrock |
Jun 17 2018, 10:25 PM
Post
#444
|
|
914 Guru Group: Members Posts: 5,269 Joined: 17-February 17 From: Montana Member No.: 20,845 Region Association: Rocky Mountains |
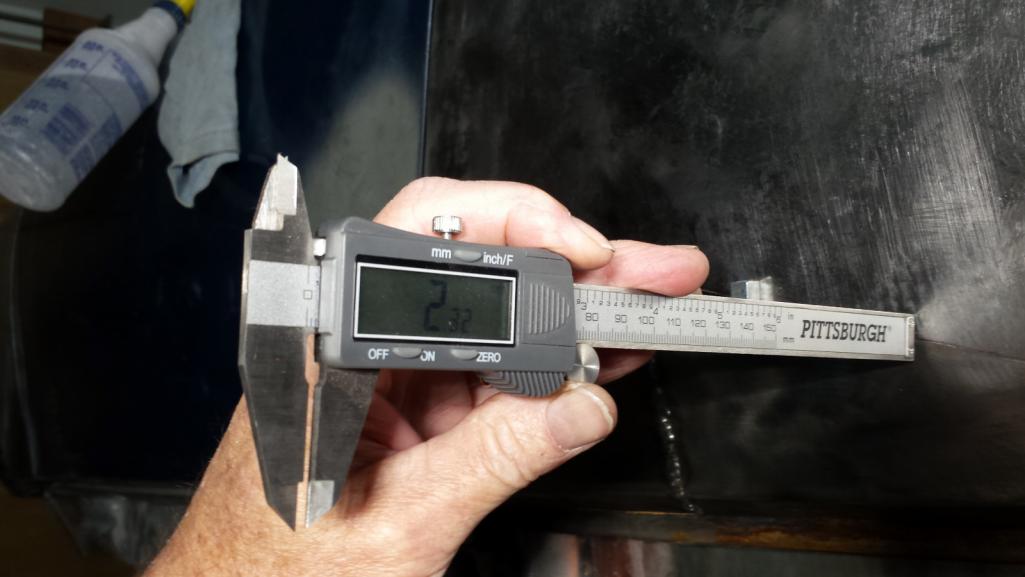
Yesterday I put the patch in and it fit pretty well except the edges were out of alignment by a couple millimeters in a couple spots.
  I could have easily clamped the patch in to match, but I could feel a couple of bulges in the quarter so I pulled out the good 'ol shrinking disc. After a few passes with the disc, the patch aligned perfectly. There was still a bulge above the first patch that wouldn't shrink out, so I had to make a relief cut in the seam for the first patch. 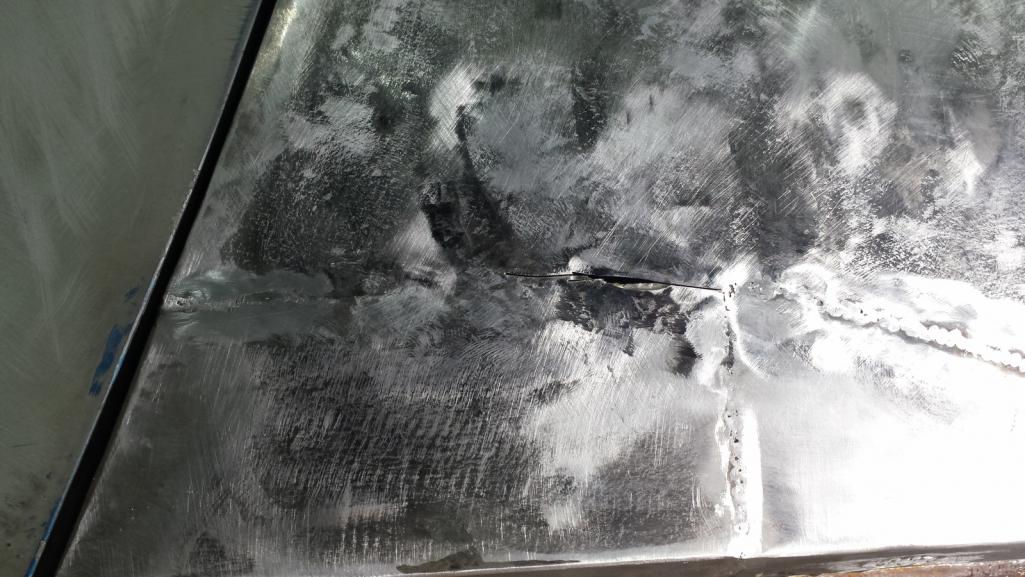 Then the shrinking disc was able to to do it's magic before the switch on my grinder suddenly quit. (IMG:style_emoticons/default/headbang.gif) But today I was able to finish the patch work with a lot of tweaking and cussing. It's still a work in progress as that panel needs a lot of work to straighten it out. I'm pretty sure it will need a bit of bondo, but I'll get it as close to straight as I possibly can. 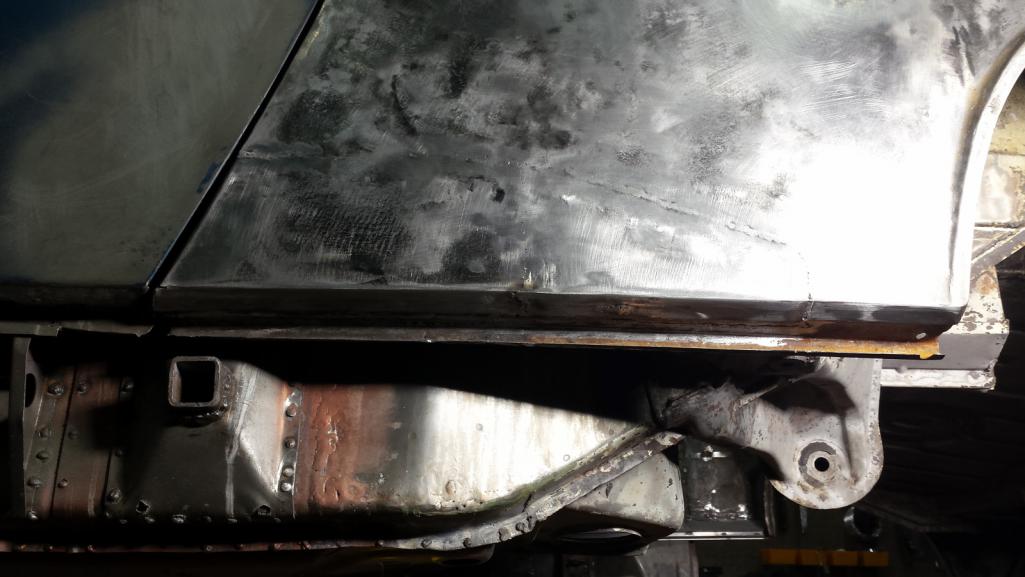 |
|
|
|
| bbrock |
Jun 17 2018, 10:42 PM
Post
#445
|
|
914 Guru Group: Members Posts: 5,269 Joined: 17-February 17 From: Montana Member No.: 20,845 Region Association: Rocky Mountains |
Re-hinged
Finally today, I needed a break from tedious panel repair and decided to weld in the trunk hing pivots now that I have a trunk lid to align. First I had to find where I put the dang pivots. That took about 45 minutes. Then aligning the lid just so to get the pivots in the right place. I hit them with 3 plug welds on each side plus 5 tack welds on the edges just to be sure. This picture makes those welds look pretty crappy even though they look nice in life. I'll still grind them down a bit before painting though. 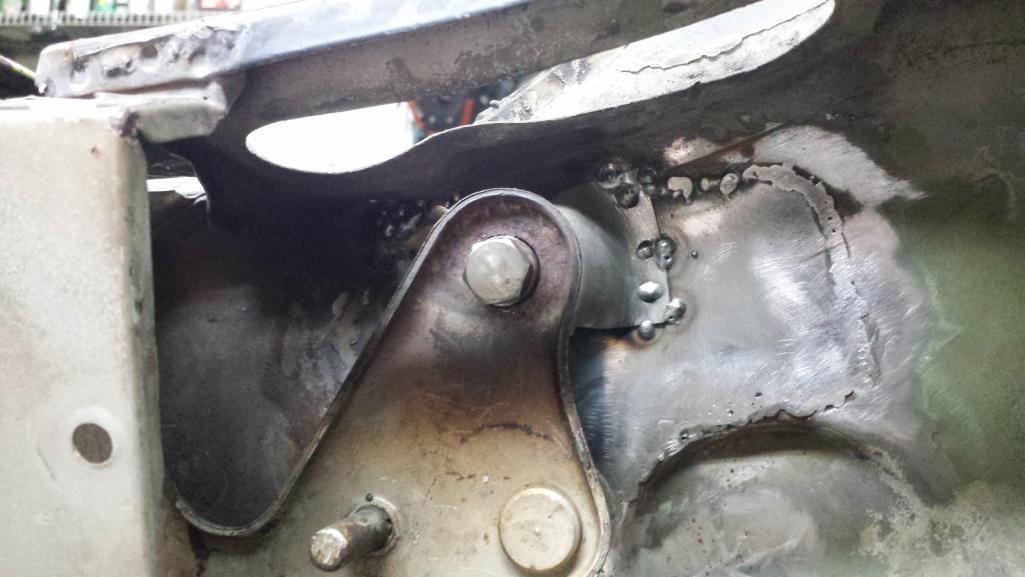 My new old trunk lid needs just a little adjustment. There is a low spot along the left edge and just a more subtle one near the hinge on the right. I'm guessing this was caused by reefing the lid down on my roof rack with ratchet straps for the ride home from Iowa. It should be easy to gently persuade the lid back to the right curve and I'd rather have this than having it fly off the roof in transport. 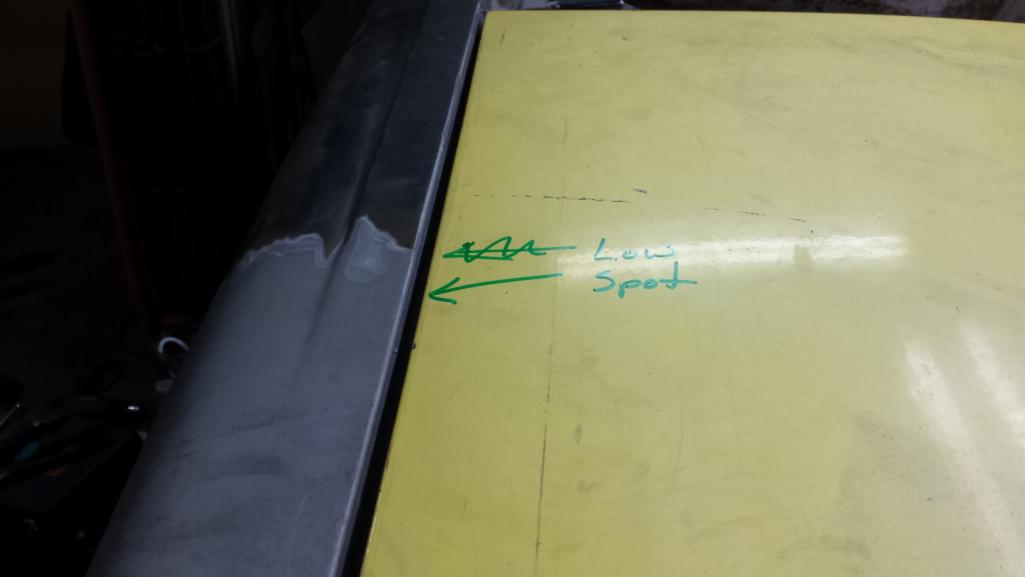 The lid actually goes up and down like it is supposed to. That's nice. (IMG:style_emoticons/default/smile.gif) 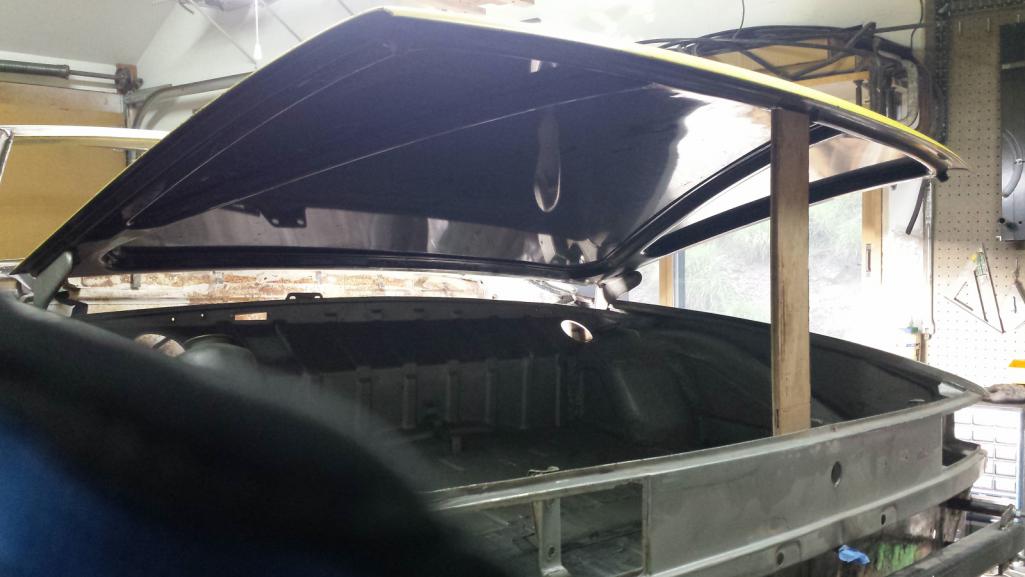 |
|
|
|
| Dion |
Jun 18 2018, 05:27 AM
Post
#446
|
|
RN Group: Members Posts: 2,926 Joined: 16-September 04 From: Audubon,PA Member No.: 2,766 Region Association: MidAtlantic Region |
Perseverance! Nice one Brent. You’ve certainly had some challenges.
Looking great. Those trunk hinges can be tedious. It’s coming along nicely. Bang on! |
|
|
|
| tygaboy |
Jun 18 2018, 07:22 AM
Post
#447
|
|
914 Guru Group: Members Posts: 5,810 Joined: 6-October 15 From: Petaluma, CA Member No.: 19,241 Region Association: Northern California |
QUOTE(Dion @ Jun 18 2018, 04:27 AM) Perseverance! Nice one Brent. You’ve certainly had some challenges. Looking great. Those trunk hinges can be tedious. It’s coming along nicely. Bang on! (IMG:style_emoticons/default/agree.gif) What Dion said. Brent, it was great meeting you and I hope to make it to your place at some point. Good to see you back at it. Keep on keepin' on! |
|
|
|
| bbrock |
Jun 18 2018, 04:17 PM
Post
#448
|
|
914 Guru Group: Members Posts: 5,269 Joined: 17-February 17 From: Montana Member No.: 20,845 Region Association: Rocky Mountains |
Thanks guys. It may be more stubbornness than perseverance but I appreciate the encouragement. Whatever challenges I have faced can be chaulked up to two things: I'm a CSOB on a budget so am trying to salvage bits that most people would just remove and replace; and I'm punching way above my weight class with respect to the skills this project demands. I knew that going in and it is what I enjoy about it.
I also forgot to mention that I started last Sunday by replacing the diodes (and both capacitors) on my welder for a second time. It is a total PITA job that set me in a foul mood before diving into that rear quarter bottom. No doubt that contributed to stupid mistakes. (IMG:style_emoticons/default/beer3.gif) Made a little progress today. First I flipped the car around in the shop which isn't easy, but gives me better access to the passenger side. Time to dive into this mess. 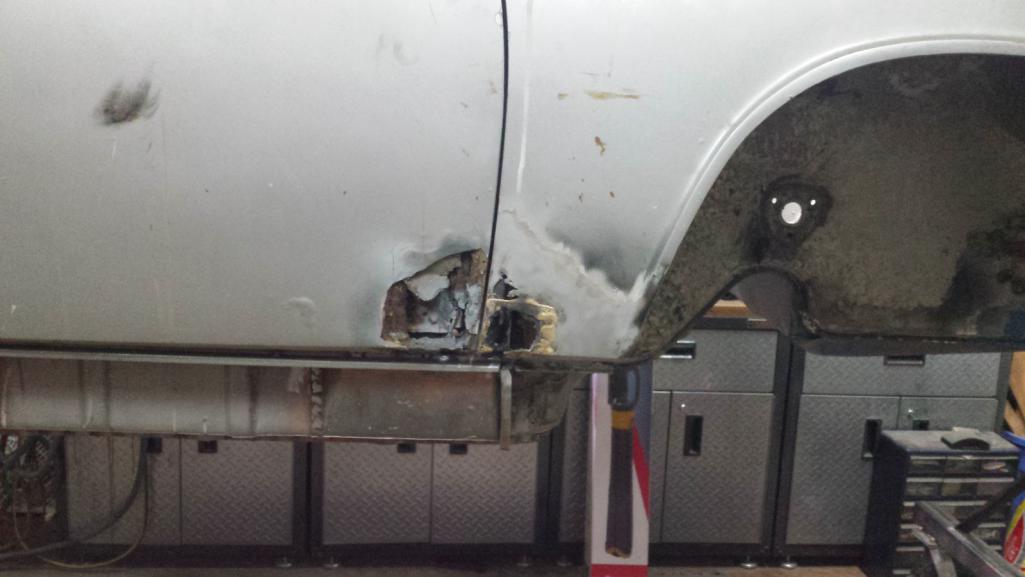 Nasty rot at the bottom of the door and fender. Somebody has been in there before to braze in patches (there was one on the door too but it is gone now). Let's see what I can do with that door rot first. Well that was easy! Thanks to Marc O. (IMG:style_emoticons/default/av-943.gif) A couple bolts and even the gaps and alignment look good. (IMG:style_emoticons/default/cheer.gif) 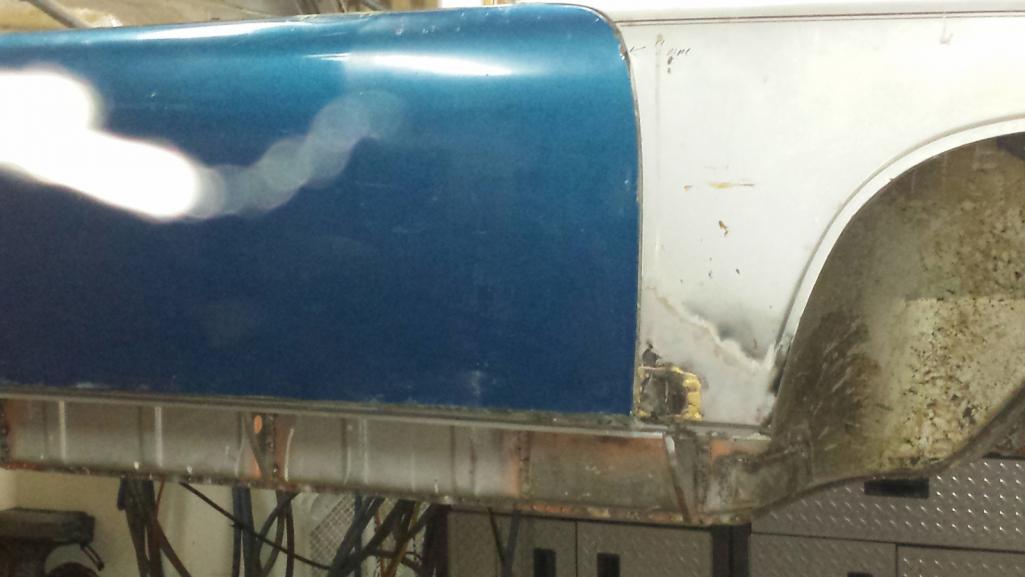 |
|
|
|
| TravisNeff |
Jun 18 2018, 04:30 PM
Post
#449
|
|
914 Guru Group: Members Posts: 5,082 Joined: 20-March 03 From: Mesa, AZ Member No.: 447 Region Association: Southwest Region |
You have got some serious courage Brent. (IMG:style_emoticons/default/popcorn[1].gif)
|
|
|
|
| bbrock |
Jun 26 2018, 09:10 PM
Post
#450
|
|
914 Guru Group: Members Posts: 5,269 Joined: 17-February 17 From: Montana Member No.: 20,845 Region Association: Rocky Mountains |
Metal Origami
Had some distractions be finished up the fender patch this evening. It was largely just a repeat of what I did on the other side so I'll try not to repeat, but the lower hinge post repair was more extensive so I'll give a little detail how I approached it. That little piece is quite a complicated affair. there is a flat area that fills the space between the fender wall and inner hinge post with a flange that spot welds to the chassis inside the fender, then there is a little bead around the perimeter that makes a little step out to the outer flange where the fender skin crimps on. The step is shallow in depth at the top but tapers to deeper at the bottom, and the whole affair curves around at the bottom to follow the fender contour. That area is not visible with the doors on, even when they are open, so I wasn't concerned with getting an absolutely exact match. I just wanted to match the structural function but get as close to the original as possible. It took some time to figure out how to tackle this with my caveman set of tools. It started with making a cardboard template of the inner flat area. 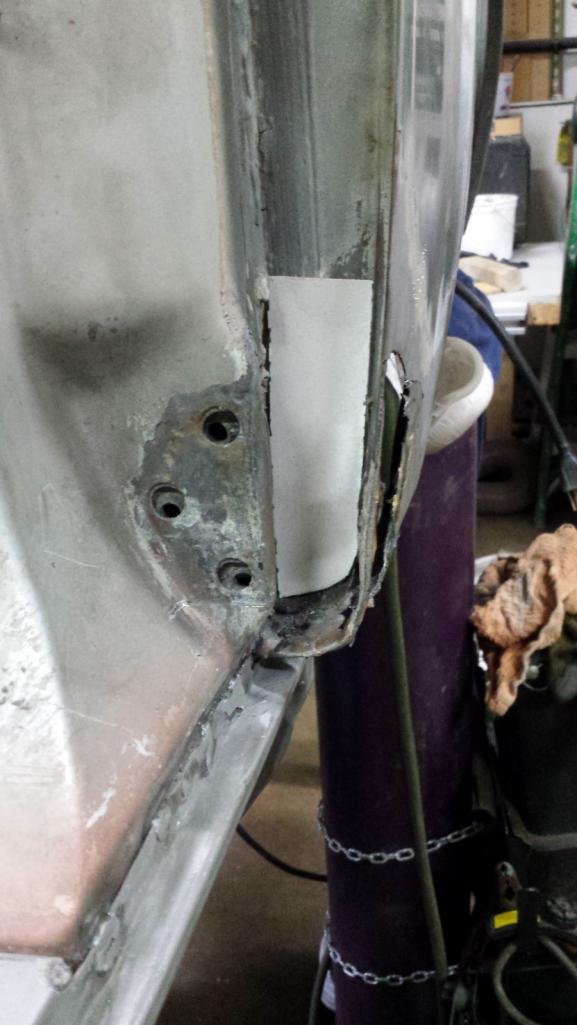 The template was transferred to a metal blank and then the bend line for the spot weld flange was marked and the piece was trimmed leaving plenty of extra metal for the step bead and crimp flange. 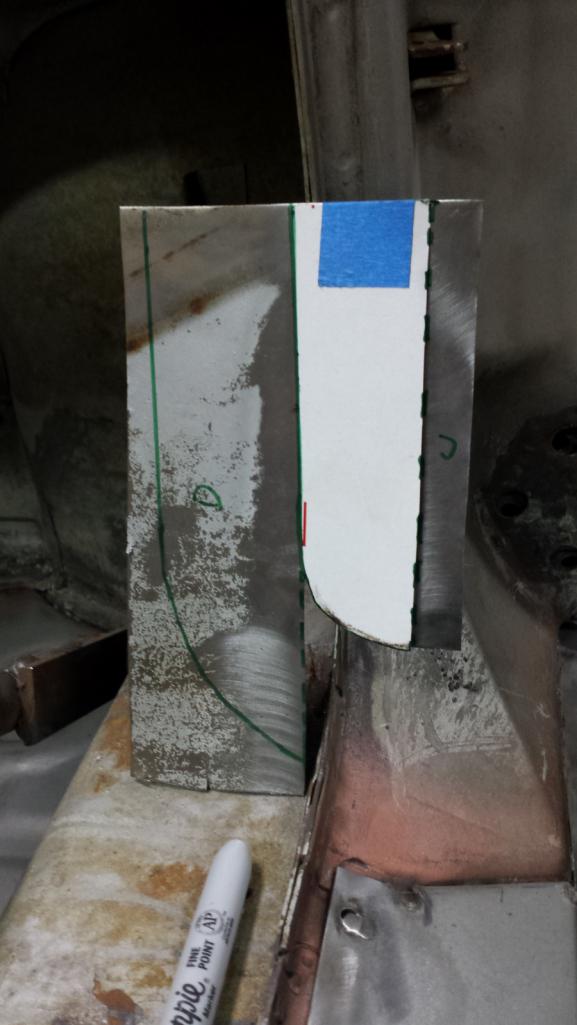 Then the line for the step bead was marked. It looks goofy here but will make sense later. 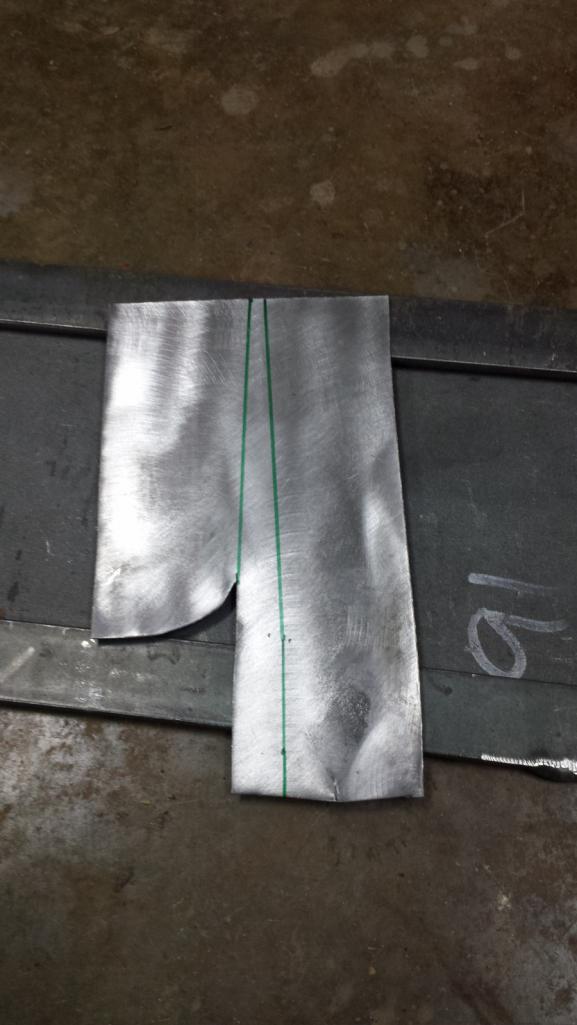 Next, I dusted off the old hammer form used for fabbing the inner long bottoms and banged out the step.  Then into the brake to form the outer wall with step bead and flange. 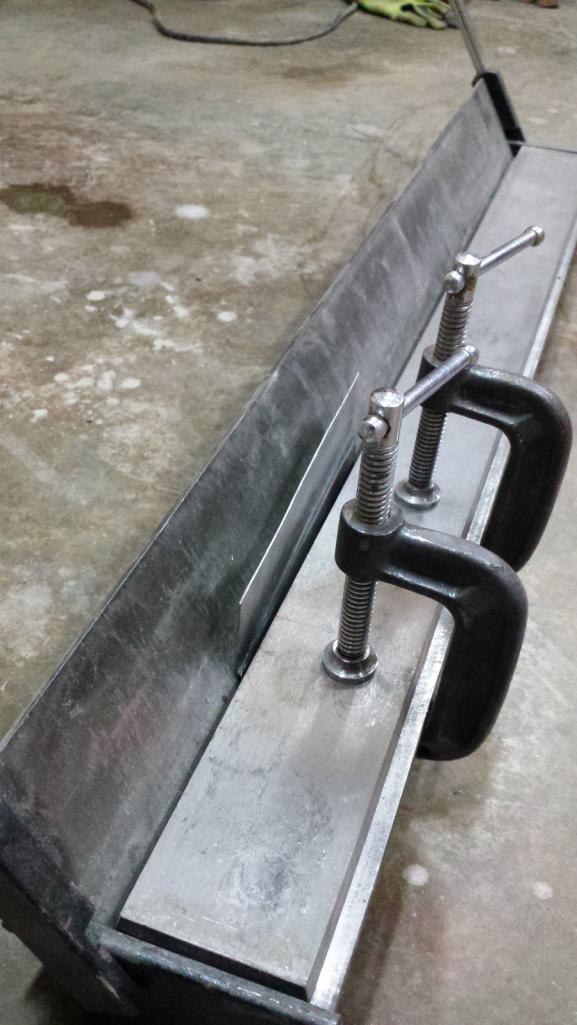 Finally, the bottom was rolled to form the piece. After bending the spot weld flange in the vice, it was ready for trimming. 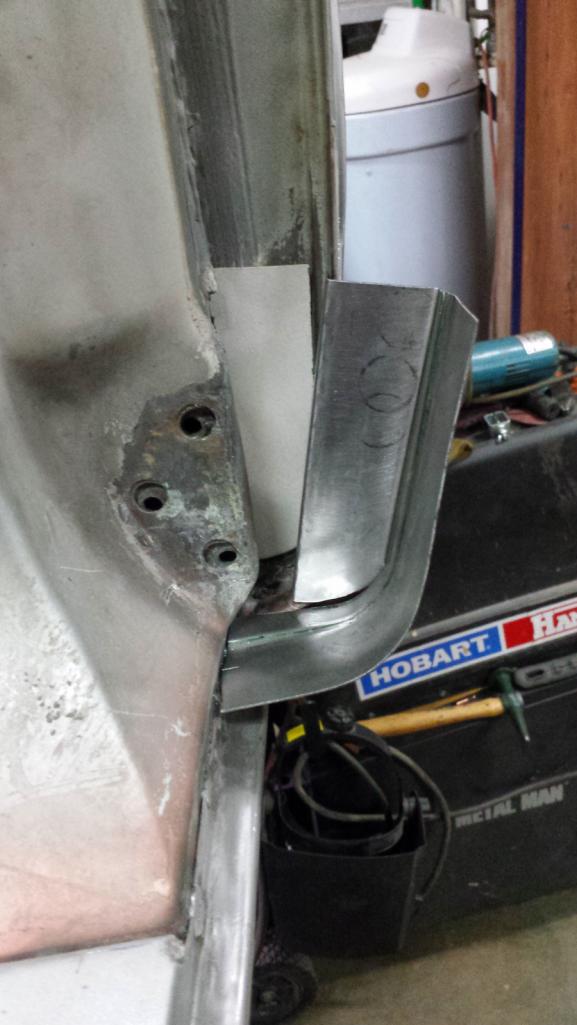 The tricky part was removing the original material but leaving enough of an outline to serve as a kind of wire frame for final fitting and trimming. 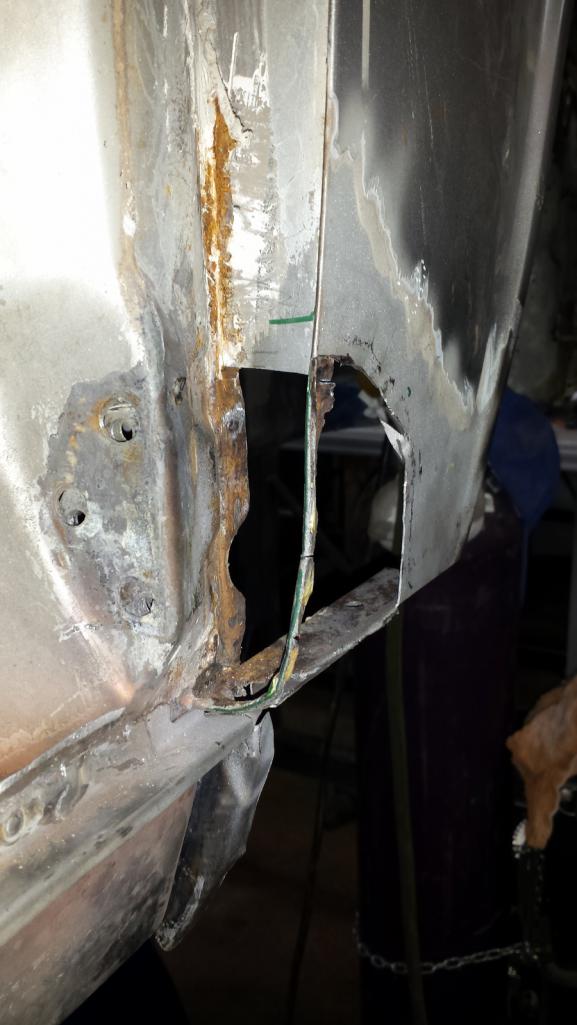 Then I could clamp the patch in place and use the frame to mark trim lines. 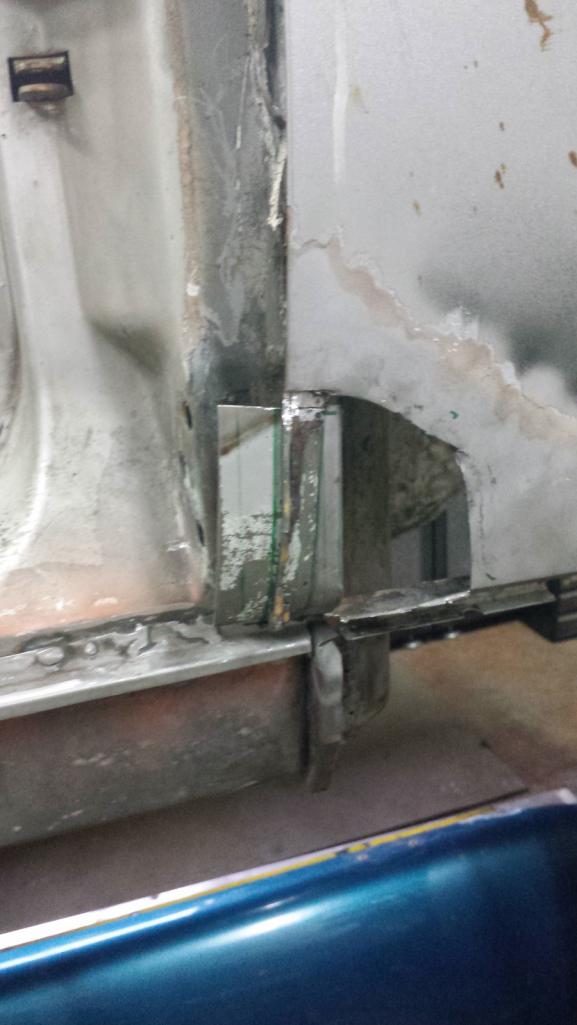 Final trim was done but grinding away the original door skin that remained on the wire frame with the patch clamped in place. That brought the edges of the new crimp flange exactly to the depth of the originals.  too be continued... |
|
|
|
| bbrock |
Jun 26 2018, 09:16 PM
Post
#451
|
|
914 Guru Group: Members Posts: 5,269 Joined: 17-February 17 From: Montana Member No.: 20,845 Region Association: Rocky Mountains |
The hinge post patch clamped in place and ready to weld.
 Welded in and ground off. With just a touch of filler, you will be hard pressed to notice it was patched even with the door off.  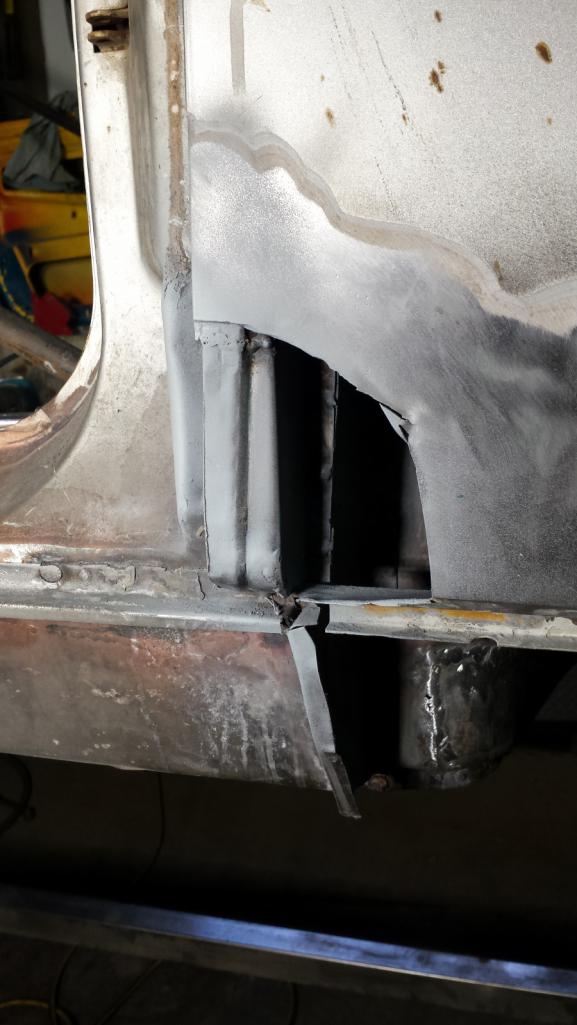 Patching the skin was just like the other side, so I won't bore by repeating those details. Next time I take the doors off, I'll tune the flanges on both sides a little and finish off the inner crimp flanges. Just a spot of filler and that patch will completely disappear. 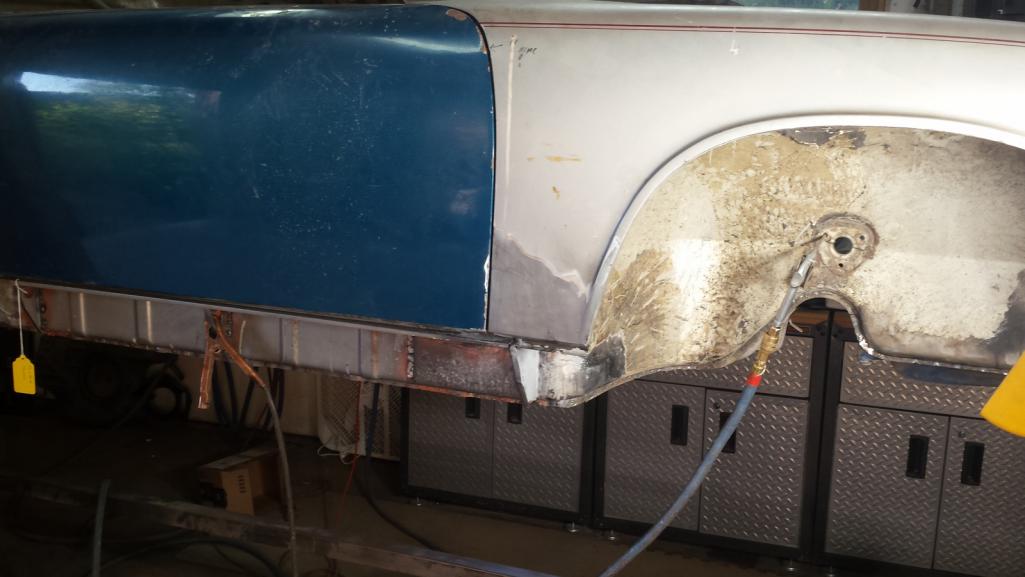 |
|
|
|
| TravisNeff |
Jun 26 2018, 10:28 PM
Post
#452
|
|
914 Guru Group: Members Posts: 5,082 Joined: 20-March 03 From: Mesa, AZ Member No.: 447 Region Association: Southwest Region |
Nice work, that looks to be pretty tricky to fabricate and not much room to weld.
|
|
|
|
| dr.tim |
Jun 27 2018, 06:52 AM
Post
#453
|
|
Member Group: Members Posts: 101 Joined: 17-December 11 From: Butte, America Member No.: 13,907 Region Association: Rocky Mountains |
Keep going!
|
|
|
|
| cary |
Jun 27 2018, 07:19 AM
Post
#454
|
|
Advanced Member Group: Members Posts: 3,900 Joined: 26-January 04 From: Sherwood Oregon Member No.: 1,608 Region Association: Pacific Northwest |
Nice work ...........
I hope to get back to welding next month. |
|
|
|
| Dion |
Jun 27 2018, 07:45 AM
Post
#455
|
|
RN Group: Members Posts: 2,926 Joined: 16-September 04 From: Audubon,PA Member No.: 2,766 Region Association: MidAtlantic Region |
Nice one Brent.
|
|
|
|
| bbrock |
Jun 28 2018, 02:22 PM
Post
#456
|
|
914 Guru Group: Members Posts: 5,269 Joined: 17-February 17 From: Montana Member No.: 20,845 Region Association: Rocky Mountains |
Just a quick one
I had to leave this gap in the lower apron early in the project when I patched the tail section. At the time, even a simple patch like this was intimidating so thought it best to get some more welding and fabbing practice before coming back to it. 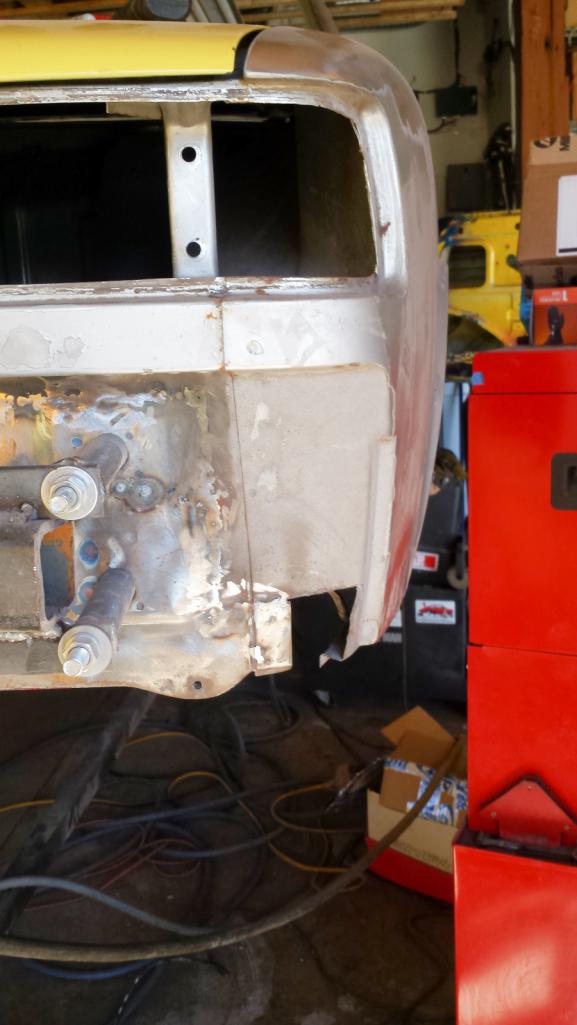 Filled the hole. 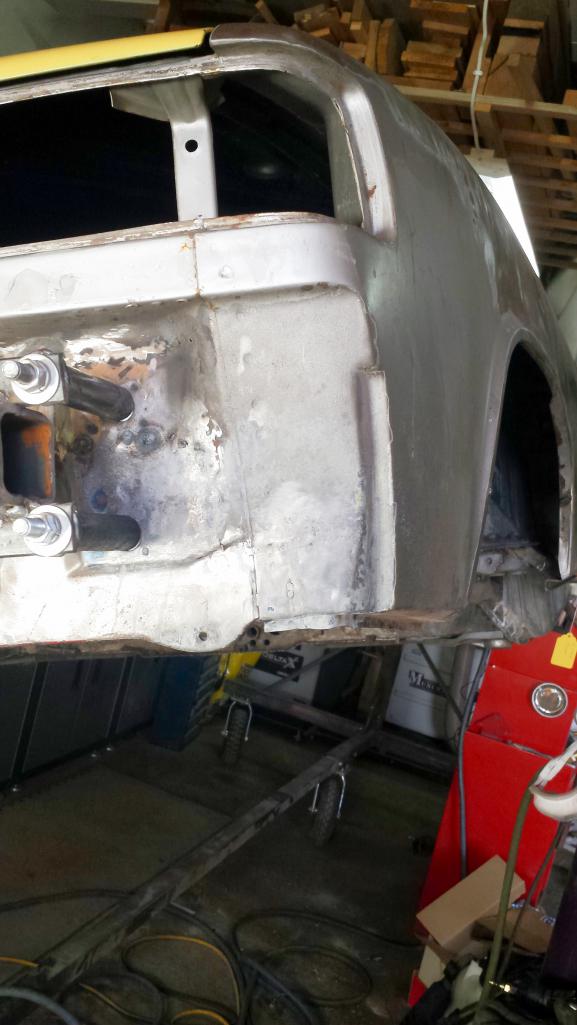 |
|
|
|
| aggiezig |
Jun 28 2018, 02:49 PM
Post
#457
|
|
Porsche Wannabe Group: Members Posts: 321 Joined: 13-January 16 From: Austin, TX Member No.: 19,557 Region Association: Southwest Region |
Your car and your fabrication skills have come such a long way. Looking great, Brent!
|
|
|
|
| bbrock |
Jul 2 2018, 10:46 PM
Post
#458
|
|
914 Guru Group: Members Posts: 5,269 Joined: 17-February 17 From: Montana Member No.: 20,845 Region Association: Rocky Mountains |
Bumper Bracket from Hell (Part 1)
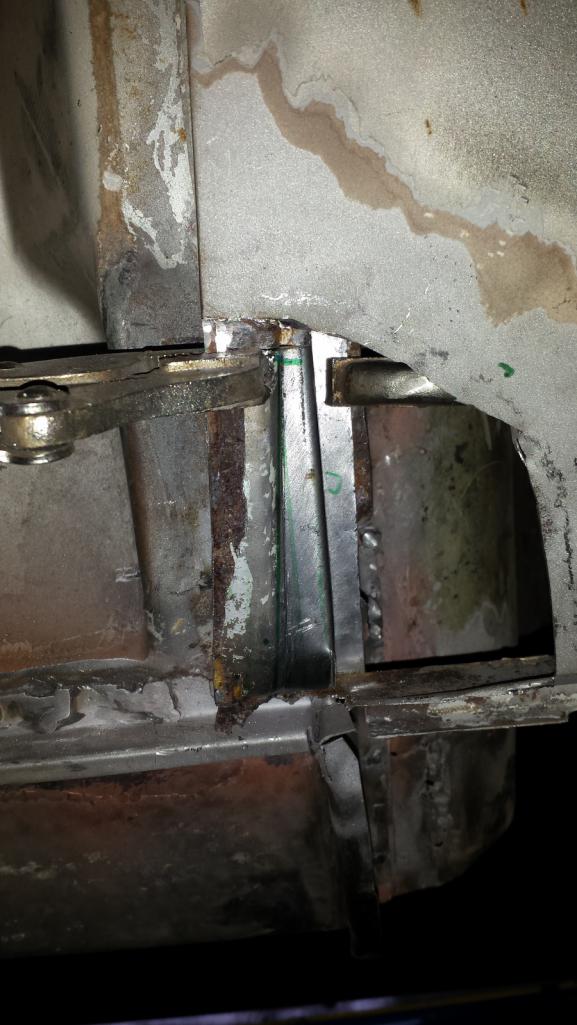
I've spent the last week tackling that nasty tinworm nest I found back in May under the headlight bucket and behind the right bumper bracket. It sure looks innocent from this side but I was NOT looking forward to this job. 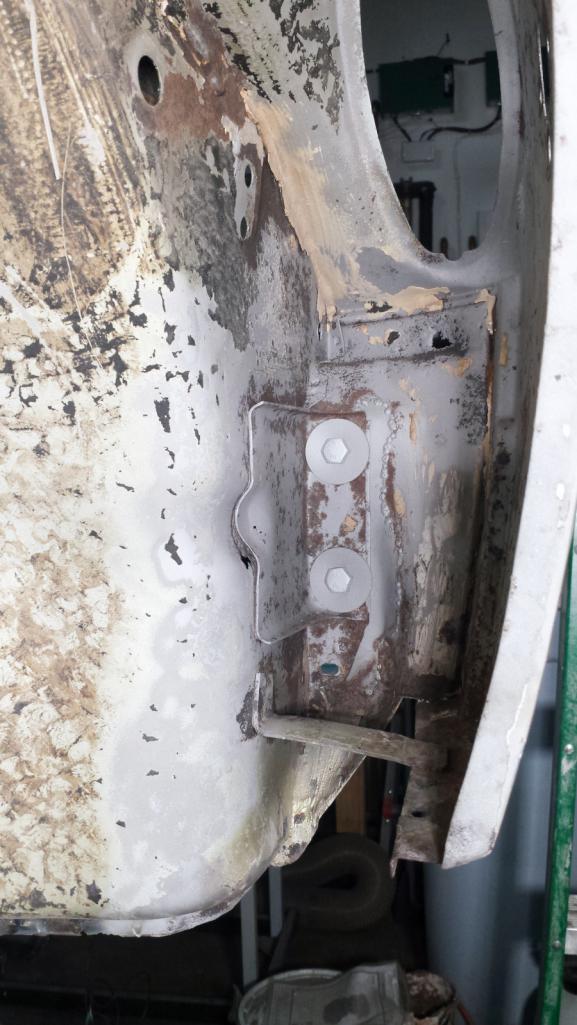 I got a salvaged bumper bracket from Garold and Plan A was to just cut wide around the replacement bracket and butt weld the whole patch in as a unit. Unfortunately, the replacement is from the other side of the car so that won't work. 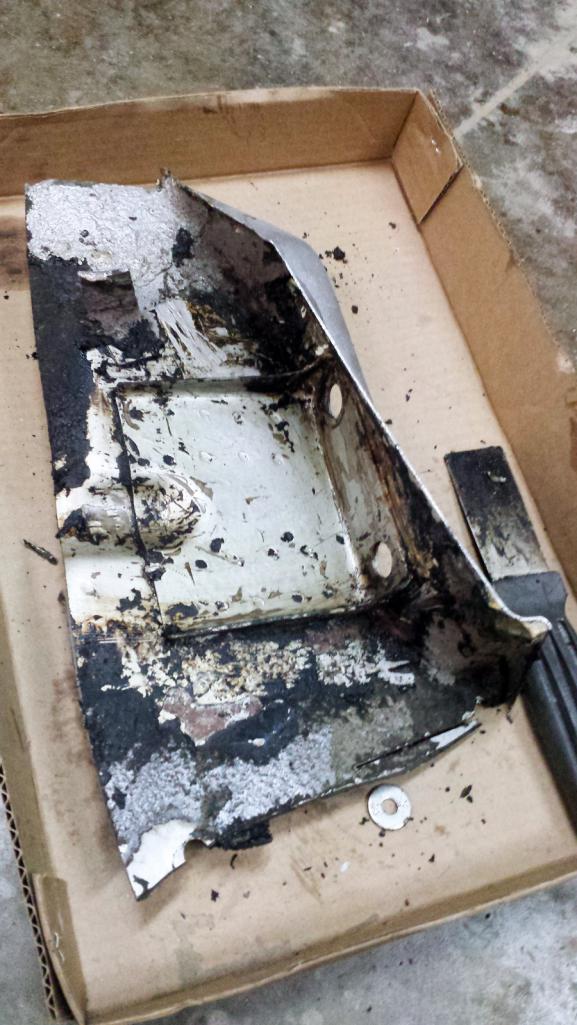 Plan B is to liberate the bracket from the salvage part, then cut a patch from the inner fender wall that can be flipped over to fit the right side. The salvage patch includes a long indent that would be tough to fabricate and I'd never get it to match as perfectly. I went too deep cutting those spot welds so will have to do some repair on that patch. Cutting this piece apart is about as fun as cutting out the rear suspension console and engine mount. 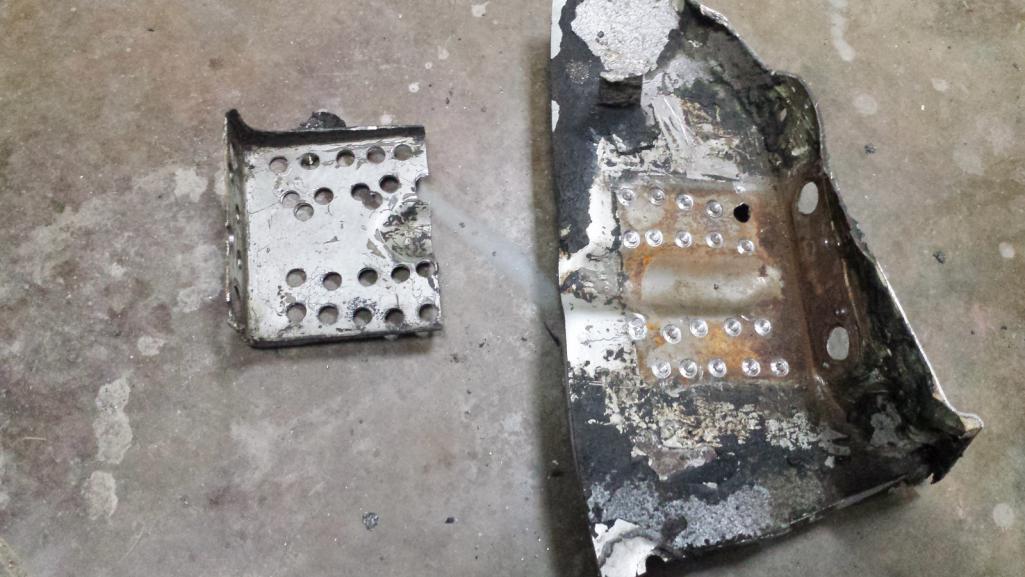 Now I had to cut the bumper bracket out of my car, but first, I had to rig an alternative support since the thing I was going to remove was holding up one quarter of the chassis on the rottiserie. The fog light uses an surprisingly large M10 bolt and looked like a good candidate. So I bent a piece of bar stock to bolt in that location, and welded the other end to the rotisserie bar. 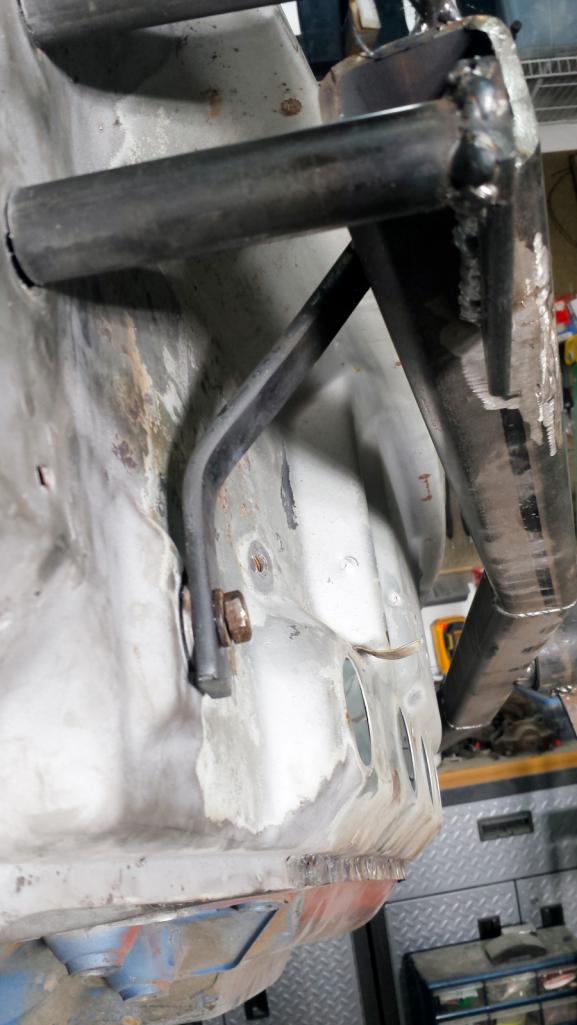 Removing the bracket takes several hours of grinding and a copious application of F-bombs working in cramped quarters. The nice thing about working in this area is about every 10 minutes, you ram your back into the sharp corner of the rocker cover flange in the wheel well behind you. Lot's of breaks were required but I finally ground the entire bracket into fine shavings to reveal what all the fuss is about. 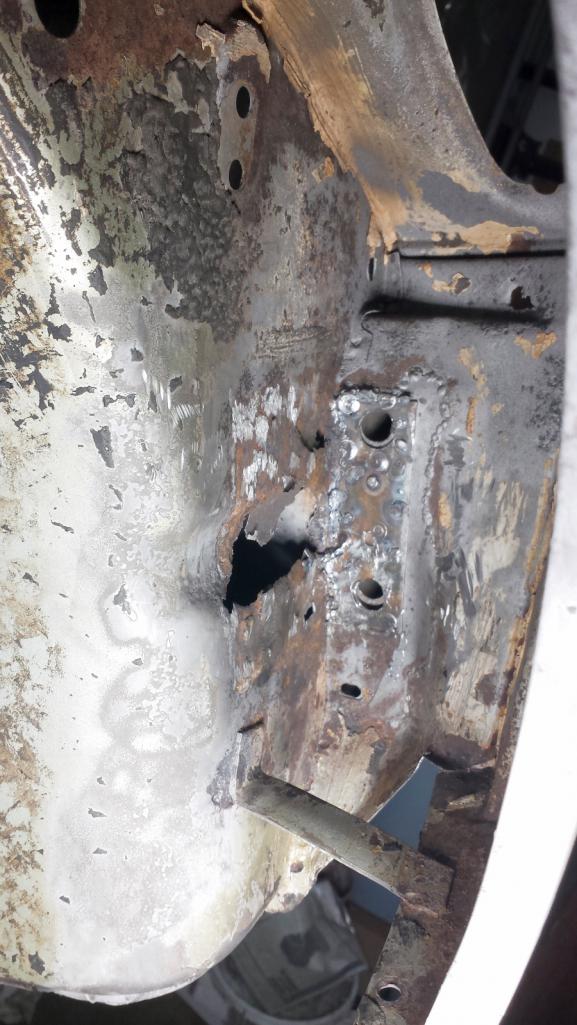 Then the long process of trimming the patch piece and cutting an opening to plug it into. This took a lot of switching back and forth between tools and getting creative with attachments. In the middle of this, my trustly $14 HF mini angle grinder took a dump so I had to make an unplanned run into town. Knowing that the HF quality control isn't great and not wanting to risk getting home to discover my replacement grinder was a dud like the first one I bought, I picked up a Husky brand at the Home Despot. Online reviews looked good and I will say it is a nice step up from the HF unit, and quality is much nicer than the POS Kobalt die grinder I bought at Lowes. Anyway, eventually I had a hole worthy of a patch. 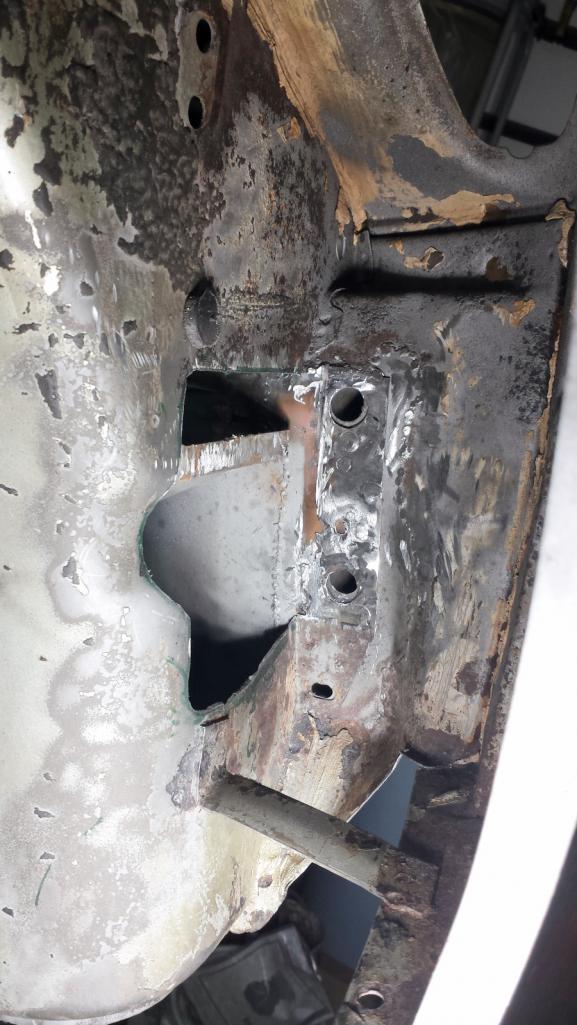 And a patch to plug the hole. 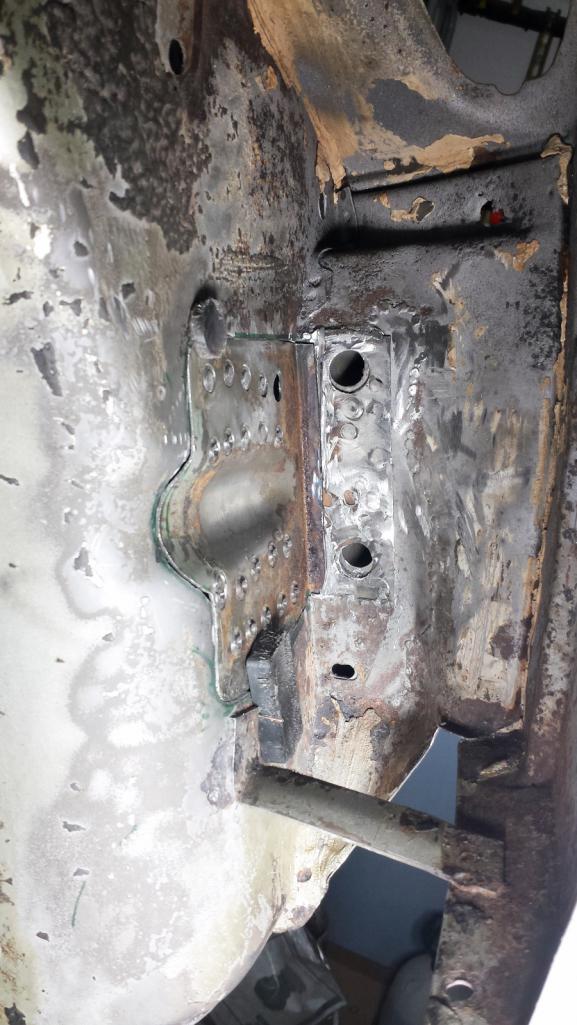 There is still a lot of work to do but this gives a pretty good idea of where things are heading. Stay tuned... |
|
|
|
| defianty |
Jul 3 2018, 04:05 AM
Post
#459
|
|
Senior Member Group: Members Posts: 659 Joined: 9-August 06 From: Essex, UK Member No.: 6,621 Region Association: None |
Keep it up Brent, you're doing a sterling job there!
|
|
|
|
| flyer86d |
Jul 3 2018, 05:25 AM
Post
#460
|
|
Member Group: Members Posts: 484 Joined: 12-January 11 From: Corea, Maine Member No.: 12,585 Region Association: North East States |
I have been doing rust repairs on my cars since the mid 1970s. I have to admit that it is a learning process. Some of my first attempts were amateurish at best when I replaced the first set of jack points on our 71. I’ve done rockers, suspension pickups, and hell holes since. Also rear subrails and torque boxes on early Mustangs and floorpan repairs. I rebuilt the 1929 Ford Roadster body that became my period Rod. I picked up pointers and techniques along the way but seeing your work, as well as Kent’s and Jeff Hail’s has really taught me a lot. The patient fabrication and weld finishing really cuts down on the finish bodywork and filling. Great work and I thank you all.
Charlie |
|
|
|
|
3 User(s) are reading this topic (3 Guests and 0 Anonymous Users)
0 Members:

|
Lo-Fi Version | Time is now: 19th April 2026 - 04:17 AM |
Invision Power Board
v9.1.4 © 2026 IPS, Inc.