|
|
|
Porsche, and the Porsche crest are registered trademarks of Dr. Ing. h.c. F. Porsche AG.
This site is not affiliated with Porsche in any way. Its only purpose is to provide an online forum for car enthusiasts. All other trademarks are property of their respective owners. |
|
|

  |

| bbrock |
 Jul 3 2018, 10:22 AM Jul 3 2018, 10:22 AM
Post
#461
|
|
914 Guru  Group: Members Posts: 5,269 Joined: 17-February 17 From: Montana Member No.: 20,845 Region Association: Rocky Mountains |
QUOTE(flyer86d @ Jul 3 2018, 05:25 AM)  I have been doing rust repairs on my cars since the mid 1970s. I have to admit that it is a learning process. Some of my first attempts were amateurish at best when I replaced the first set of jack points on our 71. I’ve done rockers, suspension pickups, and hell holes since. Also rear subrails and torque boxes on early Mustangs and floorpan repairs. I rebuilt the 1929 Ford Roadster body that became my period Rod. I picked up pointers and techniques along the way but seeing your work, as well as Kent’s and Jeff Hail’s has really taught me a lot. The patient fabrication and weld finishing really cuts down on the finish bodywork and filling. Great work and I thank you all. Charlie Charlie, thanks for your compliments. I'm not close to the same league as Jeff and Kent, and to be mentioned with them is truly humbling. The first rocker repair on a 914 I did was in the 80s and resulted in a door that had to be slammed a little thanks to me not understanding how heat shrinks metal. Even on this project, when I go back to the repairs I made in the beginning, they make me cringe a little because they are going to require a lot more cleanup than they would if I knew what I was doing, but I am determined to get them in shape before paint goes on. Now the guy I "complain" about the most - which means I take inspiration from is Stephen (defianty). If you believe his story (and I still suspect he may be a ringer), he's just a guy like us figuring out this stuff as we go. Yet, the quality he produces is up there with the seasoned pros. Kind of annoying. (IMG:style_emoticons/default/laugh.gif) |
   |

 
|
| bbrock |
Jul 4 2018, 08:08 PM
Post
#462
|
|
914 Guru Group: Members Posts: 5,269 Joined: 17-February 17 From: Montana Member No.: 20,845 Region Association: Rocky Mountains |
Bumper Bracket from Hell (Part 2)
Well Happy 4th everyone. I spent the day back on task. Yesterday I prepped my patch by filling all the rings left by going to deep with the rotabroach. The piece is part of the crush zone behind the front bumper so I wanted to make sure it retained its original strength. Right or wrong, I filled the holes with Easy Grind wire because that stuff seems a little more ductile and seems to match the characteristics of the original metal a little better. I switched back to regular .023 wire for actually welding the patch in. Here it is welded in place. Not too bad considering what a PITA the access to that area is. 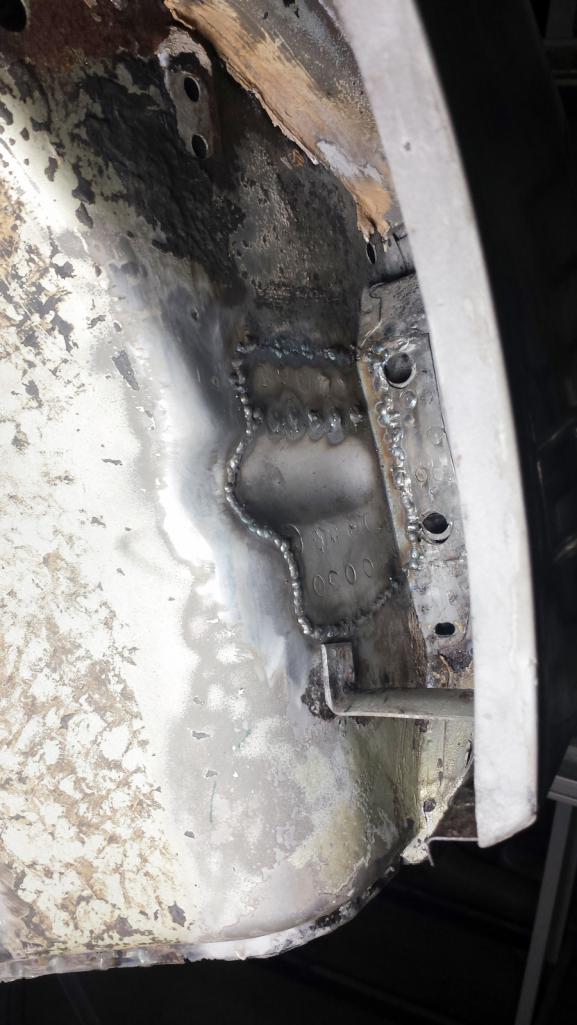 And here it is after grinding. I didn't go too crazy since nearly the entire thing gets covered by the bracket. 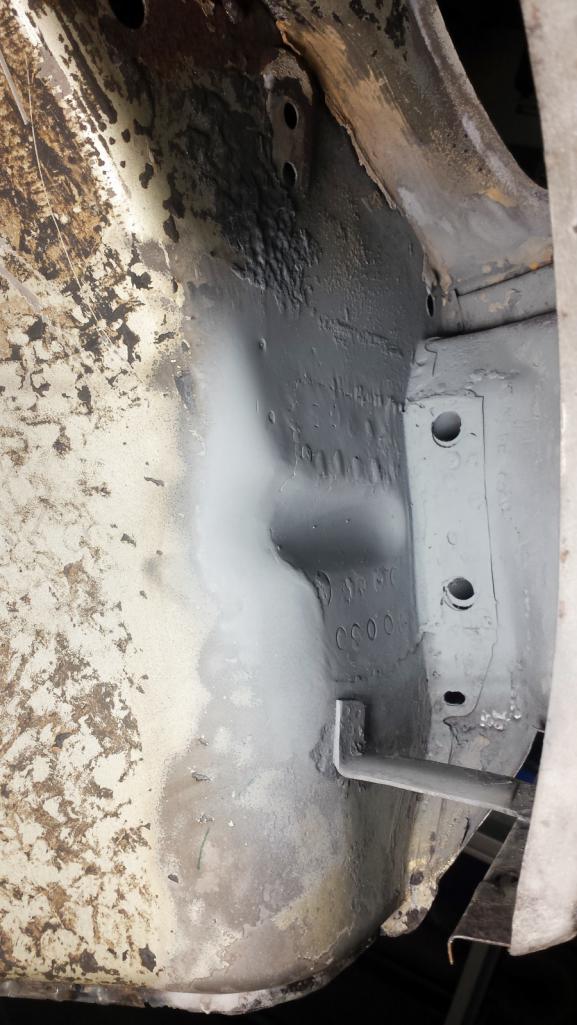 Next was the bracket itself. Take a look at the shit show left after welding! What a PITA that was! (IMG:style_emoticons/default/bootyshake.gif) It is totally blind welding with little room to manipulate the nozzle. Just line the wire up with the center of a plug weld which completely blocks hour view, the pull the trigger and wiggle the nozzle around the best you can. Pull away and realign with the areas you missed, and go blindly at it again. Oh, and half the time you are welding with the nozzle twisted in weird positions. For several welds, I had to squeeze the trigger with the heel of my hand. Awkward. But the thing is stuck for sure and I pity the poor bastard who has to take it off again. 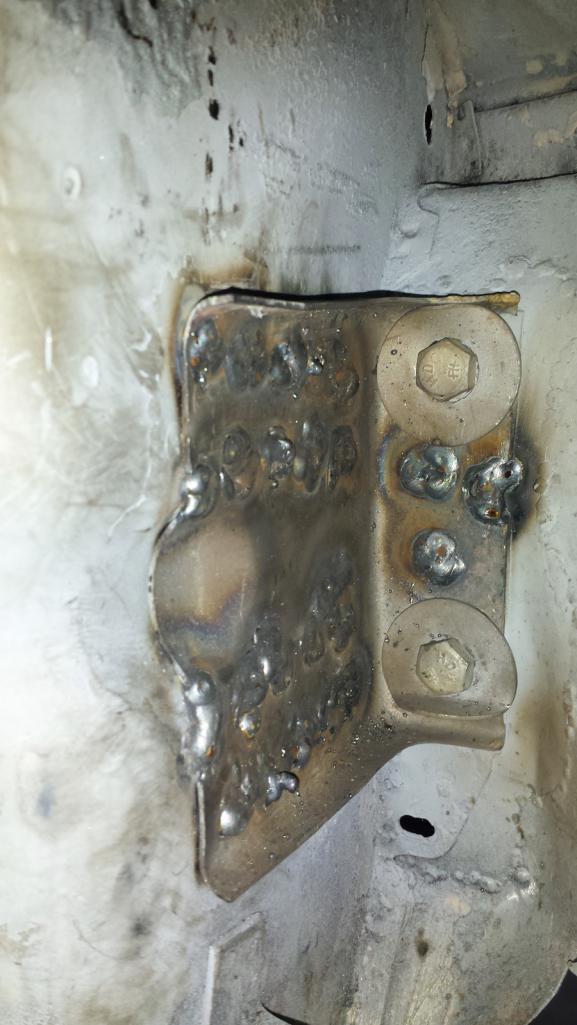 Then after a lot of grinding, it isn't too bad. It was tempting to keep working on it to make it more presentable, but this bracket is going to be covered with bed liner and it just wasn't worth the cost of expensive grinding consumables to keep going. 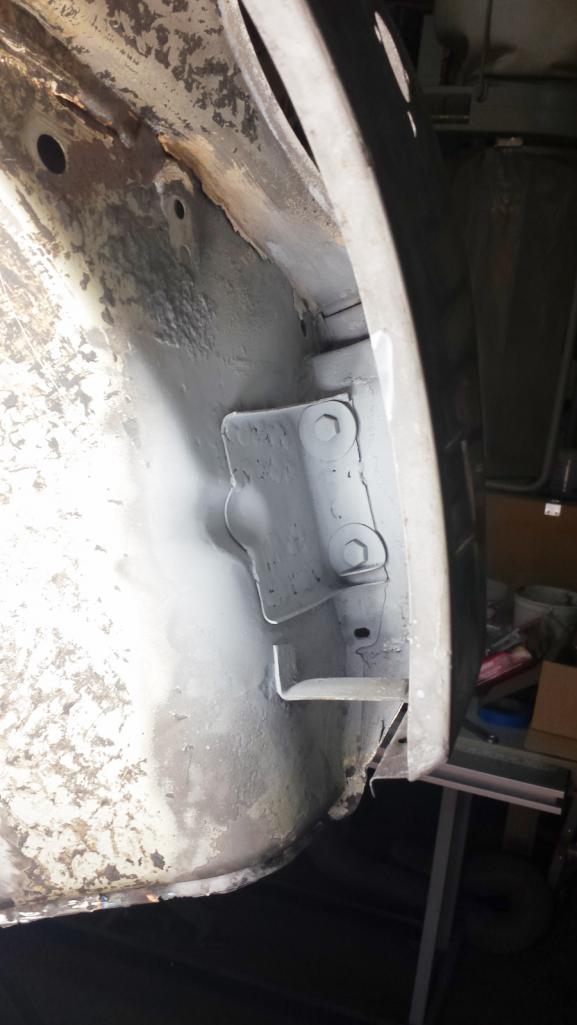 This is really the money shot anyway since it's the most visible part of the patch. 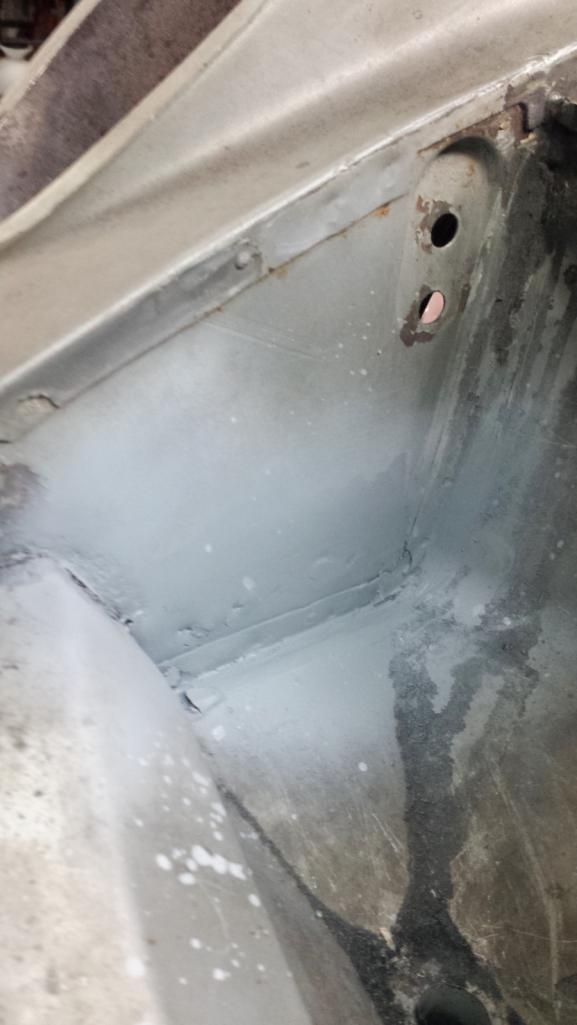 And here's a shot under the headlight bucket where there used to be a nasty rust hole. I'll try to sneak in there and clean that up a bit later, but once the trunk reinforcement is back in, this area will be hidden in the nether regions. 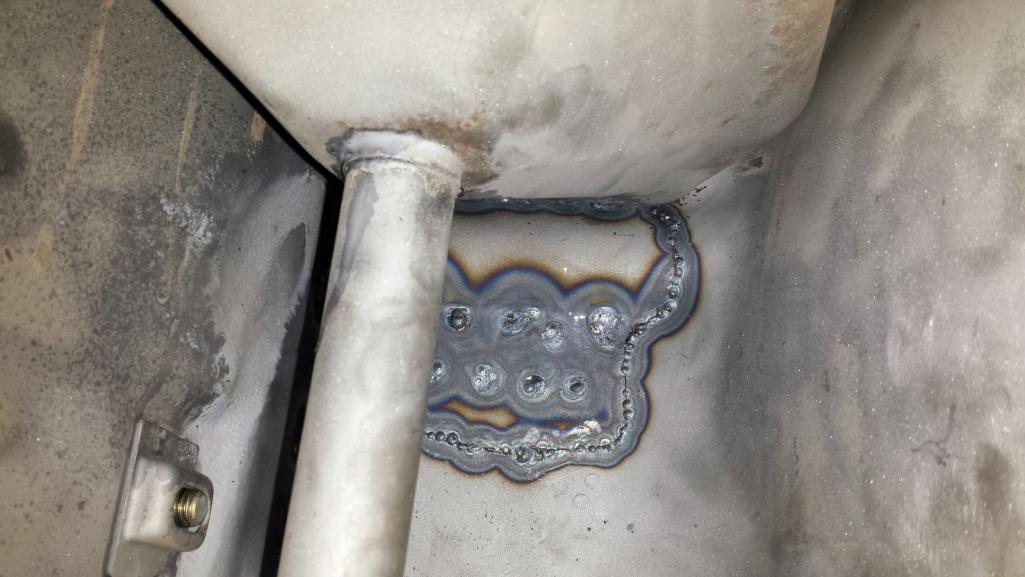 Wait a minute... (IMG:style_emoticons/default/blink.gif) was that?... Why yes. Yes it was. That was the last major rust patch on this car! There are some small dinky things to do, but I just completed the last of the curse-worthy patches. I think this calls for a celebratory dance: https://www.youtube.com/watch?v=BiAwpYIkRmU |
|
|
|
| Dion |
Jul 4 2018, 08:31 PM
Post
#463
|
|
RN Group: Members Posts: 2,926 Joined: 16-September 04 From: Audubon,PA Member No.: 2,766 Region Association: MidAtlantic Region |
(IMG:style_emoticons/default/beerchug.gif) (IMG:style_emoticons/default/pray.gif) top work Brent!
Always a pleasure seeing your progress. I’ve been neglecting mine. Distracted by my sons 944. Awesome work mate. Man you’ve accomplished a lot. Looking forward to your next endeavor. Cheers mate! |
|
|
|
| bbrock |
Jul 4 2018, 09:37 PM
Post
#464
|
|
914 Guru Group: Members Posts: 5,269 Joined: 17-February 17 From: Montana Member No.: 20,845 Region Association: Rocky Mountains |
QUOTE(Dion @ Jul 4 2018, 08:31 PM) (IMG:style_emoticons/default/beerchug.gif) (IMG:style_emoticons/default/pray.gif) top work Brent! Always a pleasure seeing your progress. I’ve been neglecting mine. Distracted by my sons 944. Awesome work mate. Man you’ve accomplished a lot. Looking forward to your next endeavor. Cheers mate! What is it with you guys getting hijacked by your son's 944s. Is there some special club I haven't heard about? (IMG:style_emoticons/default/poke.gif) |
|
|
|
| Dion |
Jul 5 2018, 04:41 AM
Post
#465
|
|
RN Group: Members Posts: 2,926 Joined: 16-September 04 From: Audubon,PA Member No.: 2,766 Region Association: MidAtlantic Region |
QUOTE(bbrock @ Jul 4 2018, 07:37 PM) QUOTE(Dion @ Jul 4 2018, 08:31 PM) (IMG:style_emoticons/default/beerchug.gif) (IMG:style_emoticons/default/pray.gif) top work Brent! Always a pleasure seeing your progress. I’ve been neglecting mine. Distracted by my sons 944. Awesome work mate. Man you’ve accomplished a lot. Looking forward to your next endeavor. Cheers mate! What is it with you guys getting hijacked by your son's 944s. Is there some special club I haven't heard about? (IMG:style_emoticons/default/poke.gif) (IMG:style_emoticons/default/lol-2.gif) In my defense it’s a case of having a (IMG:style_emoticons/default/driving.gif) “running” sports-car to “test drive” it’s a moment of weakness. I’ll be on task soon. Seriously though nice progress on yours. (IMG:style_emoticons/default/aktion035.gif) |
|
|
|
| mb911 |
Jul 5 2018, 05:01 AM
Post
#466
|
|
914 Guru Group: Members Posts: 7,742 Joined: 2-January 09 From: Burlington wi Member No.: 9,892 Region Association: Upper MidWest |
QUOTE(bbrock @ Jul 4 2018, 07:37 PM) QUOTE(Dion @ Jul 4 2018, 08:31 PM) (IMG:style_emoticons/default/beerchug.gif) (IMG:style_emoticons/default/pray.gif) top work Brent! Always a pleasure seeing your progress. I’ve been neglecting mine. Distracted by my sons 944. Awesome work mate. Man you’ve accomplished a lot. Looking forward to your next endeavor. Cheers mate! What is it with you guys getting hijacked by your son's 944s. Is there some special club I haven't heard about? (IMG:style_emoticons/default/poke.gif) Yup it's club you want to join? (IMG:style_emoticons/default/biggrin.gif) looks great.. You have caught up to me . I have to make and upper cowl hood seal channel repair and plug the trunk push button hole for the GT look.. Then final body work.. Great work again. |
|
|
|
| bbrock |
Jul 5 2018, 07:54 AM
Post
#467
|
|
914 Guru Group: Members Posts: 5,269 Joined: 17-February 17 From: Montana Member No.: 20,845 Region Association: Rocky Mountains |
QUOTE(mb911 @ Jul 5 2018, 05:01 AM) Yup it's club you want to join? (IMG:style_emoticons/default/biggrin.gif) looks great.. You have caught up to me . I have to make and upper cowl hood seal channel repair and plug the trunk push button hole for the GT look.. Then final body work.. Great work again. We have no kids so can't qualify for the club, but I was tempted to make an offer on a 944 that sat in a field 3 miles down the road a number of years ago. I left a lot of grinding and metal finishing to do as parts were going on, so you may still be a little ahead, but I'm closing the gap. Going into the tent for final complete media blasting today, then lots more grinding, fixing pinholes, and prepping for primer. I think this project may send me to therapy. I had a dream last night where I looked at the car and had not noticed that the left front fender was practically falling off the car from rot. Luckily, I woke up from that nightmare. (IMG:style_emoticons/default/lol-2.gif) |
|
|
|
| bbrock |
Jul 5 2018, 09:02 PM
Post
#468
|
|
914 Guru Group: Members Posts: 5,269 Joined: 17-February 17 From: Montana Member No.: 20,845 Region Association: Rocky Mountains |
Let's Get Naked!
Spent quite a bit of time reconfiguring to roll the chassis out into the tent so I could begin the long process of blasting the remaining paint and surface rust off. After a very cold and rainy spring (we actually had frost on our deck yesterday), as soon as I rolled the car into the tent, the sun popped out and started blazing down with a forecast for record breaking temps the next few weeks. Perfect timing for for working in an enclosed tent wearing a hood doing an already dirty and miserable job. (IMG:style_emoticons/default/mad.gif) I wound up with just enough time to blast the bottom of the frunk clean. Starting to get excited about the idea of having a fully stripped chassis.  |
|
|
|
| KELTY360 |
Jul 6 2018, 08:20 AM
Post
#469
|
|
914 Neferati Group: Members Posts: 5,186 Joined: 31-December 05 From: Pt. Townsend, WA Member No.: 5,344 Region Association: Pacific Northwest |
Nice solution on supporting that corner for the bracket and bucket repair. Bet you're glad that's in the rear view mirror. Are you concerned it's going to get a little boring without all the cutting, welding, shaping, pounding and pondering you've had to do to get to this point?
(IMG:style_emoticons/default/sawzall-smiley.gif) (IMG:style_emoticons/default/smash.gif) (IMG:style_emoticons/default/welder.gif) (IMG:style_emoticons/default/idea.gif) (IMG:style_emoticons/default/biggrin.gif) Congrats! |
|
|
|
| Cairo94507 |
Jul 6 2018, 08:33 AM
Post
#470
|
|
Michael Group: Members Posts: 10,612 Joined: 1-November 08 From: Auburn, CA Member No.: 9,712 Region Association: Northern California |
Great work and blasting that chassis clean is the best way to find all of the damage and rust needing correcting. (IMG:style_emoticons/default/beer.gif)
|
|
|
|
| bbrock |
Jul 6 2018, 10:38 AM
Post
#471
|
|
914 Guru Group: Members Posts: 5,269 Joined: 17-February 17 From: Montana Member No.: 20,845 Region Association: Rocky Mountains |
QUOTE(Cairo94507 @ Jul 6 2018, 08:33 AM) Great work and blasting that chassis clean is the best way to find all of the damage and rust needing correcting. (IMG:style_emoticons/default/beer.gif) A prophetic statement! I sneaked out for a round of blasting this morning while the weather was cool. Found this nasty surprise on the front left fender.  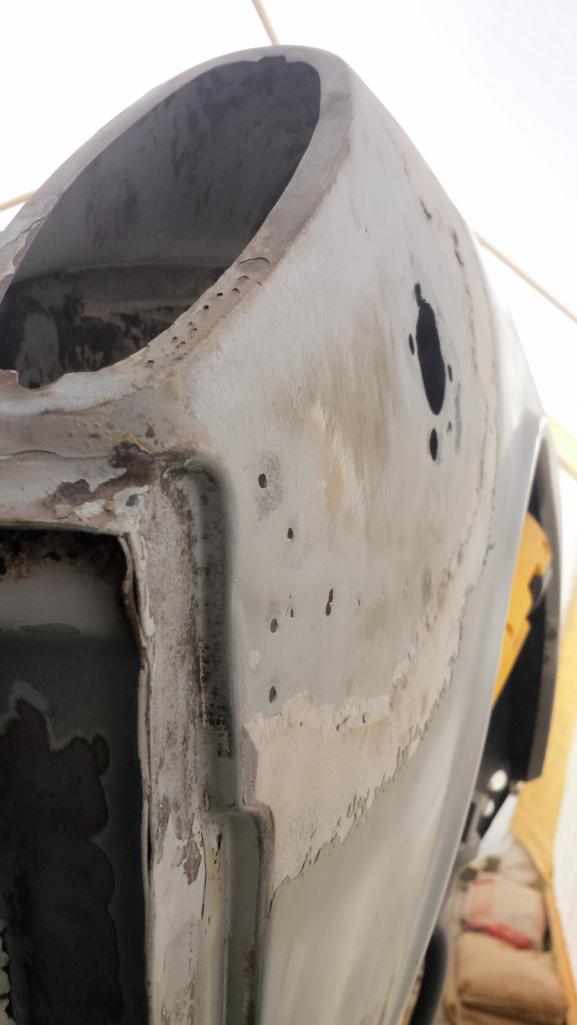 Similar to the right quarter, it looks like they did a good job of bringing the metal back to very close to straight, and then drilled and slathered on way more Bondo than necessary. Over 3/16" in this case. I was worried the fender would be trashed but the rust is confined around the drill holes and wart. The wart was going to disappear anyway so mostly this adds the job of welding those holes up and trying to straighten the panel properly. Boring Marc? I don't think so. This car is still throwing enough curveballs to keep things interesting. And the closer I get to paint, the more terrified I get. (IMG:style_emoticons/default/yikes.gif) Thanks for all the encouragement everyone! (IMG:style_emoticons/default/beerchug.gif) |
|
|
|
| KELTY360 |
Jul 6 2018, 01:30 PM
Post
#472
|
|
914 Neferati Group: Members Posts: 5,186 Joined: 31-December 05 From: Pt. Townsend, WA Member No.: 5,344 Region Association: Pacific Northwest |
QUOTE(bbrock @ Jul 6 2018, 09:38 AM) QUOTE(Cairo94507 @ Jul 6 2018, 08:33 AM) Great work and blasting that chassis clean is the best way to find all of the damage and rust needing correcting. (IMG:style_emoticons/default/beer.gif) A prophetic statement! I sneaked out for a round of blasting this morning while the weather was cool. Found this nasty surprise on the front left fender. Similar to the right quarter, it looks like they did a good job of bringing the metal back to very close to straight, and then drilled and slathered on way more Bondo than necessary. Over 3/16" in this case. I was worried the fender would be trashed but the rust is confined around the drill holes and wart. The wart was going to disappear anyway so mostly this adds the job of welding those holes up and trying to straighten the panel properly. Boring Marc? I don't think so. This car is still throwing enough curveballs to keep things interesting. And the closer I get to paint, the more terrified I get. (IMG:style_emoticons/default/yikes.gif) Thanks for all the encouragement everyone! (IMG:style_emoticons/default/beerchug.gif) Too bad you didn't take that left ft corner I have when you had the chance. (IMG:style_emoticons/default/slap.gif) (IMG:style_emoticons/default/bye1.gif) |
|
|
|
| bbrock |
Jul 6 2018, 01:38 PM
Post
#473
|
|
914 Guru Group: Members Posts: 5,269 Joined: 17-February 17 From: Montana Member No.: 20,845 Region Association: Rocky Mountains |
QUOTE(KELTY360 @ Jul 6 2018, 01:30 PM) Too bad you didn't take that left ft corner I have when you had the chance. (IMG:style_emoticons/default/slap.gif) (IMG:style_emoticons/default/bye1.gif) (IMG:style_emoticons/default/lol-2.gif) That was the very first thing that popped in my mind as soon as I discovered it. (IMG:style_emoticons/default/wacko.gif) But after removing enough filler to get the whole picture, I'd still rather patch the holes on this fender than cut the corner out and have to contend with another long butt weld. |
|
|
|
| bbrock |
Jul 12 2018, 07:11 PM
Post
#474
|
|
914 Guru Group: Members Posts: 5,269 Joined: 17-February 17 From: Montana Member No.: 20,845 Region Association: Rocky Mountains |
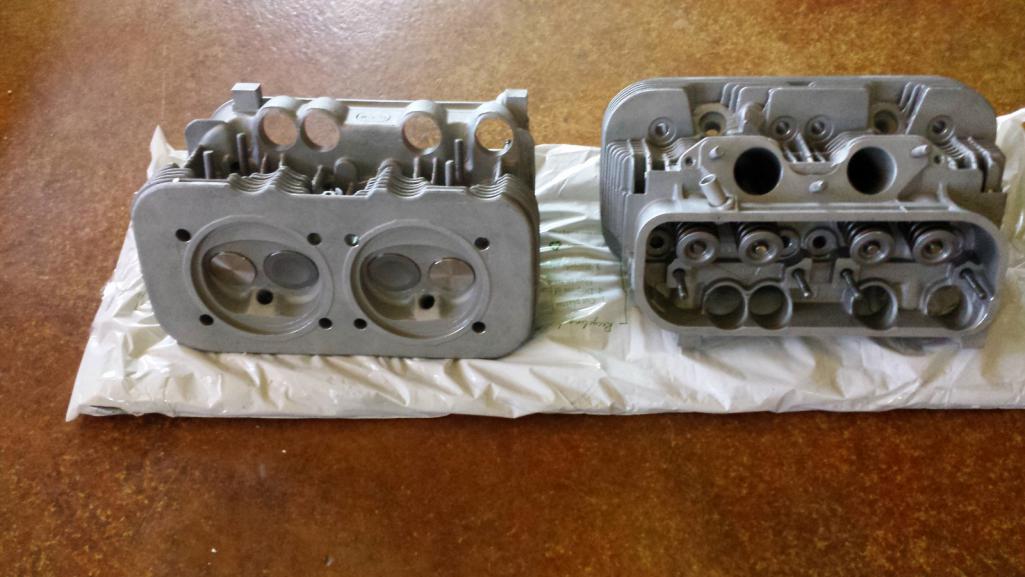
Not much happening with the car lately. Family visited over the weekend, going on a short trip this weekend, and friends in the area next week. But the UPS folks dropped off a package from Dave Bonbright at Engine Masters today. New guides, springs, valves, and studs. I forgot to ask if he had to replace seats but his reputation is such that I trust his judgement. The work looks spectacular. I'll try not to get diverted from the chassis work too much. (IMG:style_emoticons/default/smile.gif)
 |
|
|
|
| Dion |
Jul 12 2018, 07:24 PM
Post
#475
|
|
RN Group: Members Posts: 2,926 Joined: 16-September 04 From: Audubon,PA Member No.: 2,766 Region Association: MidAtlantic Region |
Ooooh, fresh heads (IMG:style_emoticons/default/wub.gif) This car deserves them. (IMG:style_emoticons/default/thumb3d.gif)
|
|
|
|
| bbrock |
Jul 23 2018, 07:52 PM
Post
#476
|
|
914 Guru Group: Members Posts: 5,269 Joined: 17-February 17 From: Montana Member No.: 20,845 Region Association: Rocky Mountains |
Not the Blast You Might Think
I've had a lot of distractions keeping me from working on the car, but I've also been spending a lot of time media blasting. The subject of DIY chassis blasting pops up now and again, so I thought it might be worth sharing my experience so far. First, let's be honest. You have to be a masochist to take this task on unless you have access to some premo equipment. If there is one part of this project that I would have liked to farm out, this is it. But I'm a pathologically CSOB trying to do this on a budget without putting more actual cash into the project than the car will be worth coming out. Second, the best time to blast a chassis is at the beginning of the project, not 1/3 to 1/2 of the way through like I'm doing. Having the car stripped to bare metal from the start would just make the rust repair more pleasant, and save time stripping areas piecemeal to find the sound metal. I didn't take my own advice simply because I had serious doubts about prospects for success going into the project. DIY media blasting is a huge investment in time, and not a small investment in $$. I wanted to make sure I could actually make this car straight and sound before making that investment. Also, with all the sheet metal that was replaced, there is a lot less left to blast now than in the beginning. Enough of coulda shoulda, here's what I'm doing. I'm using the el cheap HF 40 lb. media blaster (IMG:http://www.914world.com/bbs2/uploads_offsite/shop.harborfreight.com-20845-1532397146.1.jpg) I've never used a blaster before so don't have a comparison, but it seems to work okay. I'm running it with about 50 psi pressure which is about 40 psi delivered when in operation. The unit has 4 ball valves to control air to the tank, air to the nozzle, media to the nozzle, and a shutoff at the nozzle. Every review says the valve at the nozzle will wear out within a few minutes of use. Mine lasted a surprisingly long time, but it has gone now. I believe Cary recommended buying the optional deadman valve which I think I will do next time I'm in town. The thing is a bit fiddly to dial in, but once you do, it operates pretty well. The ceramic nozzles are a little prone to clogging when new because they start with a small opening which widens with use until it has to be discarded. I've read complaints that the nozzles wear out fast, but I blasted at least 50 pots of media before my first one wore out. The area that can be blasted is small - only about a square inch with a new nozzle, a little wider as the nozzle wears, but once you have grit flowing, I build a steady rhythm and can strip about 2 sq. ft. before my 60 gal. compressor cycles on. By that time, the hood is starting to fog so it's a good time for a short break. The biggest frustration is the hood. The blaster comes with a worthless POS so I bought HF's "upgrade" hood. Also a POS that flops around on your head and fogs up as soon as you put it on. I wound up getting this hood: (IMG:http://www.914world.com/bbs2/uploads_offsite/images-na.ssl-images-amazon.com-20845-1532397146.2.jpg) https://www.amazon.com/gp/product/B00442XOK...=UTF8&psc=1 I'll describe this one as adequate, but barely. It has better ventilation so doesn't fog too bad as long as the temperature is not too hot or too cold and the humidity is not too high. Because of this, I'm limited to blasting in the mornings and evenings. The hood also has a piece of aluminum window screen in front of the plexiglass window which reduces the amount of peppering and etching the plexi gets. I'm still on the original piece but frequently remove it for cleaning and polishing. I think I'm going to try a glass window to see if it lasts longer (with safety glasses worn under the hood of course). Had I seen this hood when I started, I probably would have given it a try: https://www.fullsource.com/north-safety-pa1...ASABEgLRsvD_BwE What I have is working and an hour or two in the morning and the same in the evening is really about as much blasting fun as one needs. For media, I'm mostly using medium crushed glass at $21/bag at my local lumber yard. The last time I passed through Billings, I picked up several bags of Black Diamond Medium Blasting Abrasives at $8/bag. It works almost as well as the crushed glass but seems to wear out faster. Unfortunately, it is a 300+ mile round trip to get it which eats up the savings. I have my tent set up with a tarp on the ground to catch spent media. I vacuum up the used media with the shop vac and pour it through a window screen into a bucket for reuse. The cheap media seems to be good for 2-3 trips through the blaster before it become too dusty to use (oh yeah, I wear a P95 dust mask while blasting). The crushed glass is good for at least 3 and maybe 4 cycles through the blaster. It's a pain in the ass, but saves money. So far I've spent probably 12 hours actually blasting and another 4 or so vacuuming and sieving media. I've almost completed blasting the front clip of the car which I think will be the most difficult. That does not count the outer body skins which are being stripped with a stripping wheel but I may switch to chemical stripping. My guess is that the front clip is about 1/3 to 1/2 of the total job. So making progress slowly. Like I said, you have to be a masochist. Now for a few pics: [Warning: these pictures contain nudity. Parental discretion is advised.] Sorry for the wonky colors. The tent throws an odd light that doesn't always adjust out. 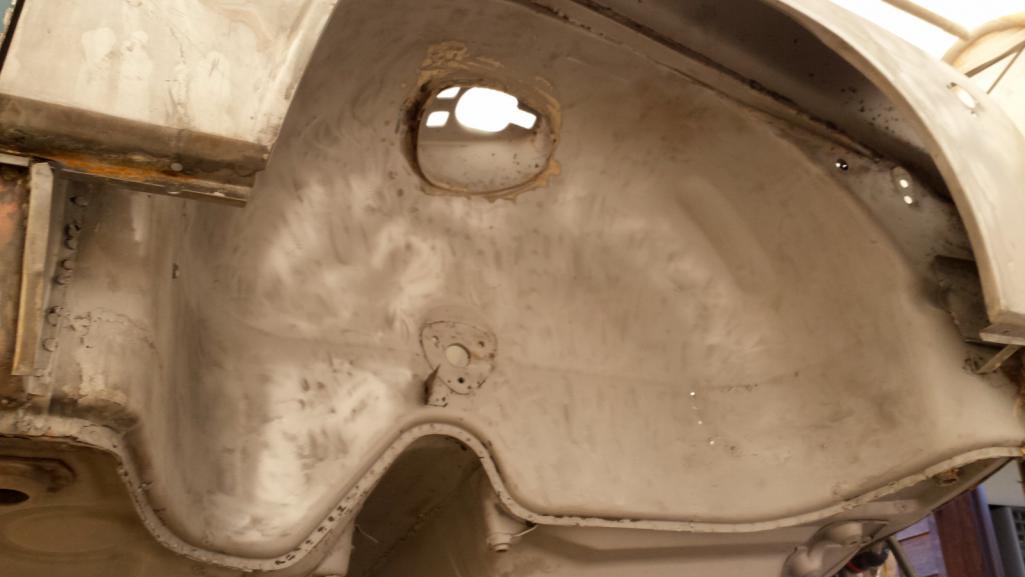 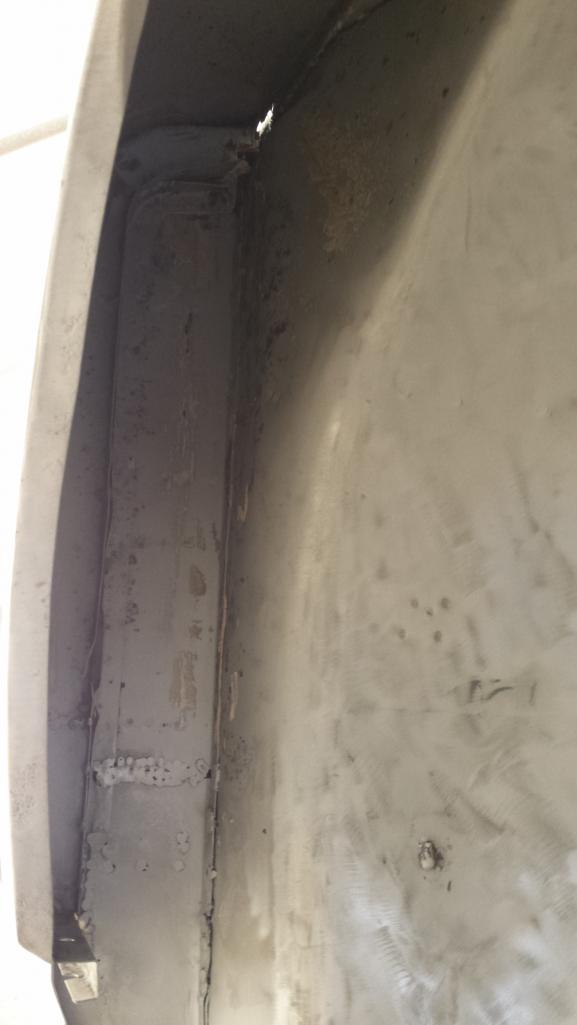 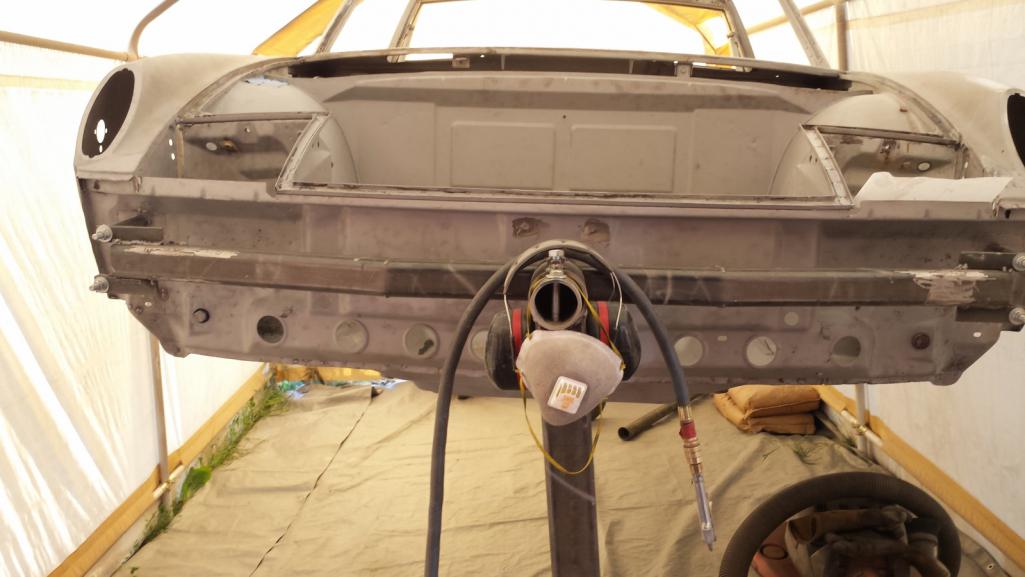 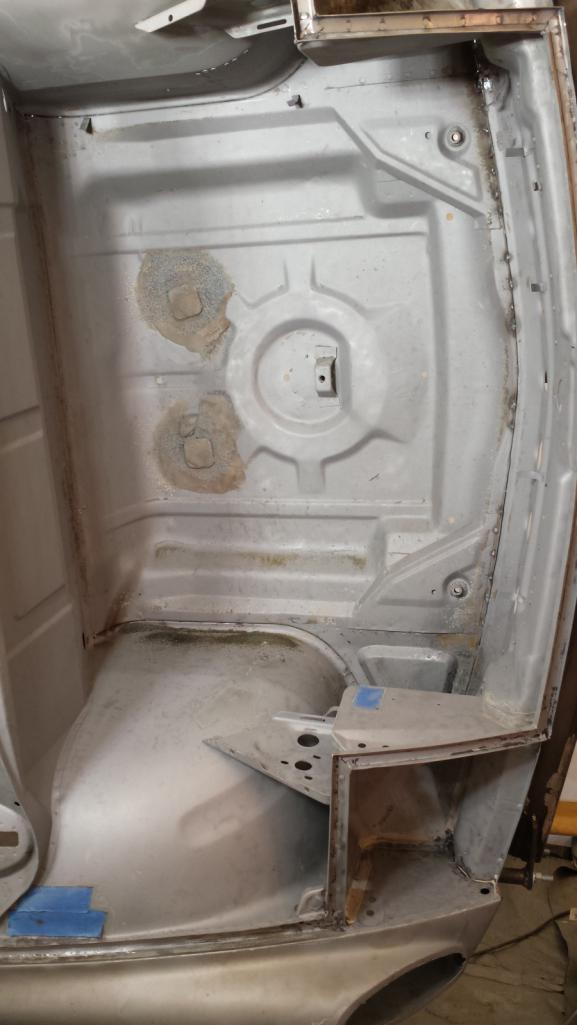 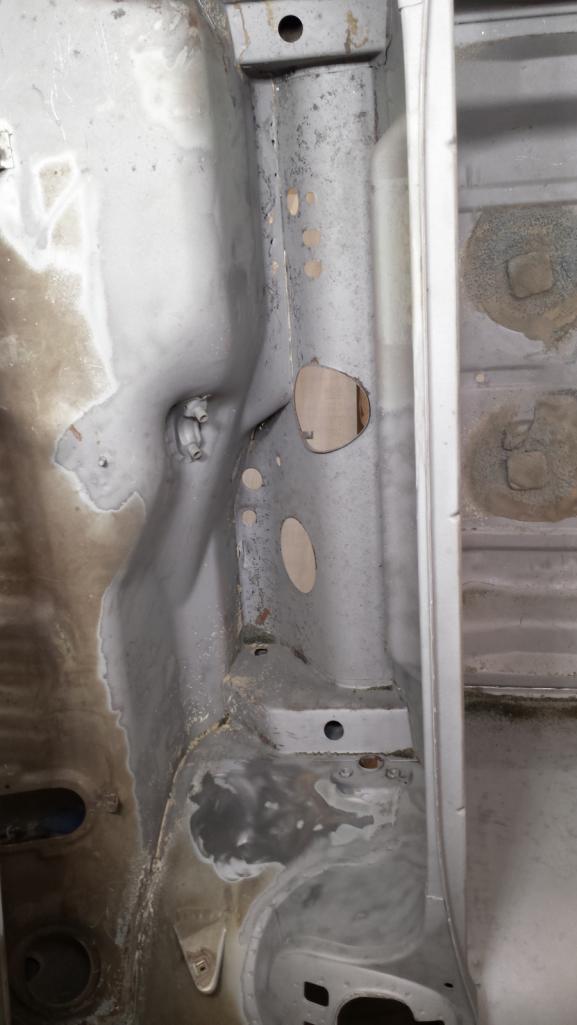 |
|
|
|
| mepstein |
Jul 23 2018, 08:28 PM
Post
#477
|
|
914-6 GT in waiting Group: Members Posts: 20,637 Joined: 19-September 09 From: Landenberg, PA/Wilmington, DE Member No.: 10,825 Region Association: MidAtlantic Region |
We take ours to a local (1.5 hours away) commercial blaster. They mostly use plastic media but supplement with more aggressive media on rusty areas. Drop off, pick up a couple weeks later and pay around $12-1500 unless we want epoxy primer, add $300. Plastic media is nice because it doesn’t hold water unlike sand or glass. It also doesn’t seem to get trapped in the seams as much. We’ve looked into diy since we send a chassis over every couple months but after buying the equipment and material and paying labor, it barely pencils out.
|
|
|
|
| dr.tim |
Jul 23 2018, 09:42 PM
Post
#478
|
|
Member Group: Members Posts: 101 Joined: 17-December 11 From: Butte, America Member No.: 13,907 Region Association: Rocky Mountains |
I delivered (and picked up) a BMW 2002 to these guys:
http://blastingtechnologies.com I want to say the job was on the order of $800 with a turn around under a week. |
|
|
|
| bbrock |
Jul 23 2018, 11:06 PM
Post
#479
|
|
914 Guru Group: Members Posts: 5,269 Joined: 17-February 17 From: Montana Member No.: 20,845 Region Association: Rocky Mountains |
QUOTE(dr.tim @ Jul 23 2018, 09:42 PM) I delivered (and picked up) a BMW 2002 to these guys: http://blastingtechnologies.com I want to say the job was on the order of $800 with a turn around under a week. That's the only shop I found that I considered - and I did think hard about it. Everyone else around here seems to be focused on blasting brick and stuff so wouldn't trust them with a car. Doing it myself isn't fun, but it mostly just costs time and is saving me coin so I will soldier on. Actually, I don't mind doing it. There is a certain satisfaction in watching the paint and rust strip off to reveal clean metal. It's just slow and messy. My post probably comes off whinier than intended. I just want people to know blasting a full chassis DIY with cheap equipment is possible, but serious work. (IMG:style_emoticons/default/beer3.gif) |
|
|
|
| bbrock |
Jul 29 2018, 02:11 PM
Post
#480
|
|
914 Guru Group: Members Posts: 5,269 Joined: 17-February 17 From: Montana Member No.: 20,845 Region Association: Rocky Mountains |
Lucky 13
Is this too much? My goal for this resto is to enjoy the experience of owning this car when it was new. Part of that experience would have been that when the driver's headlight was changed or serviced, you'd see the number "13" hand written in marker in the bucket. 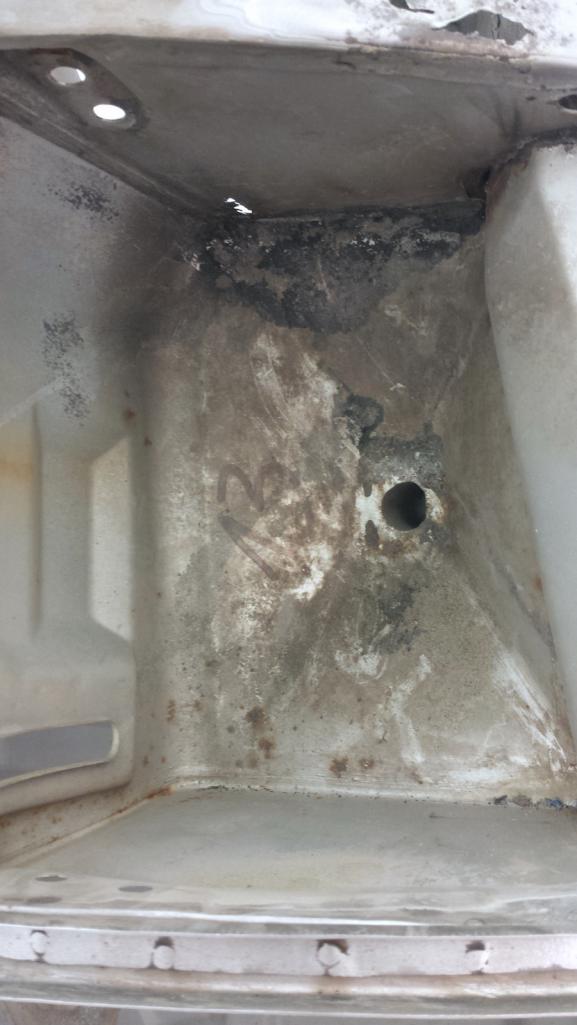 So a quick trace was made to help me put it back after paint. 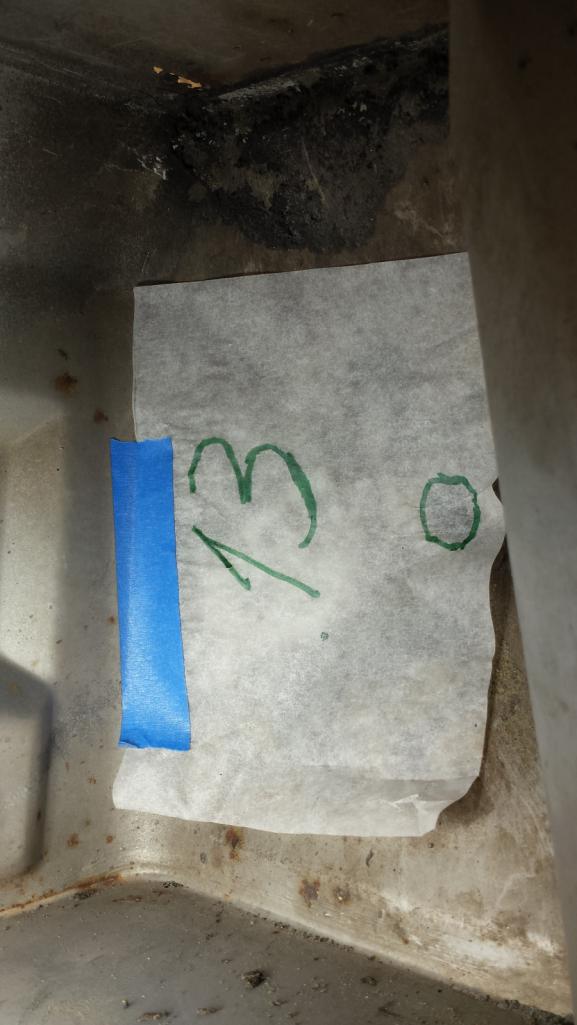 And some more nudie pics Making progress ... 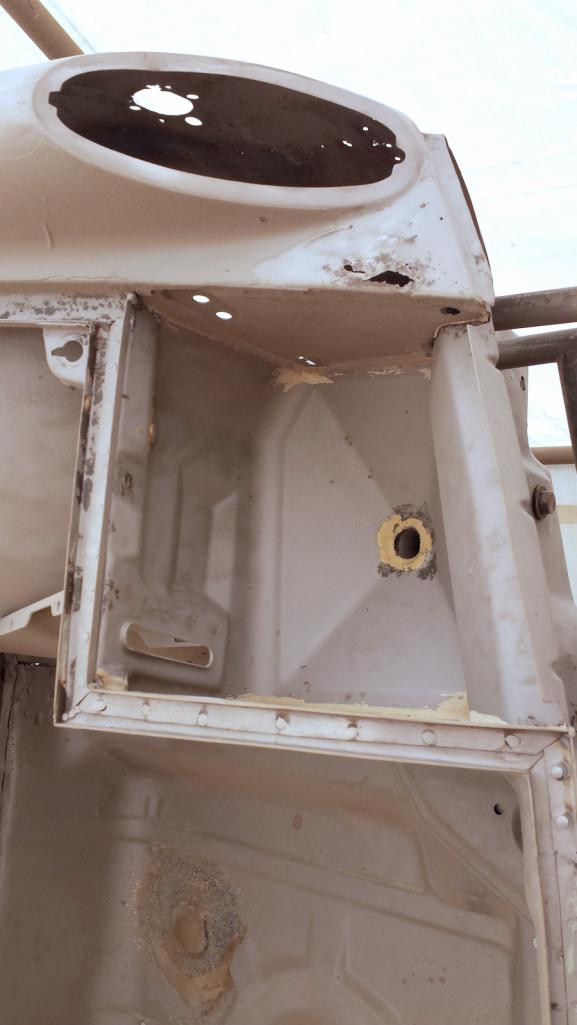  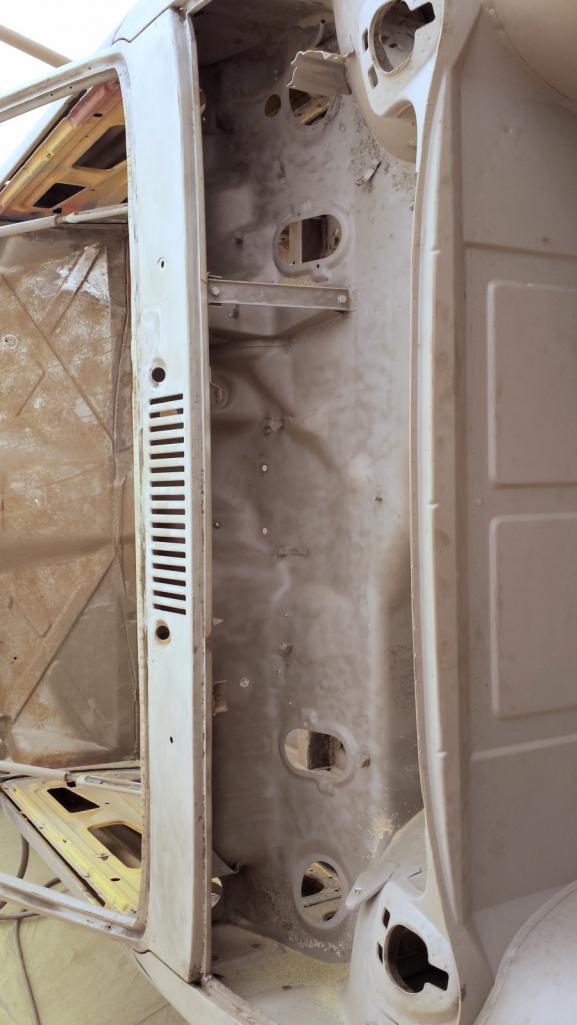 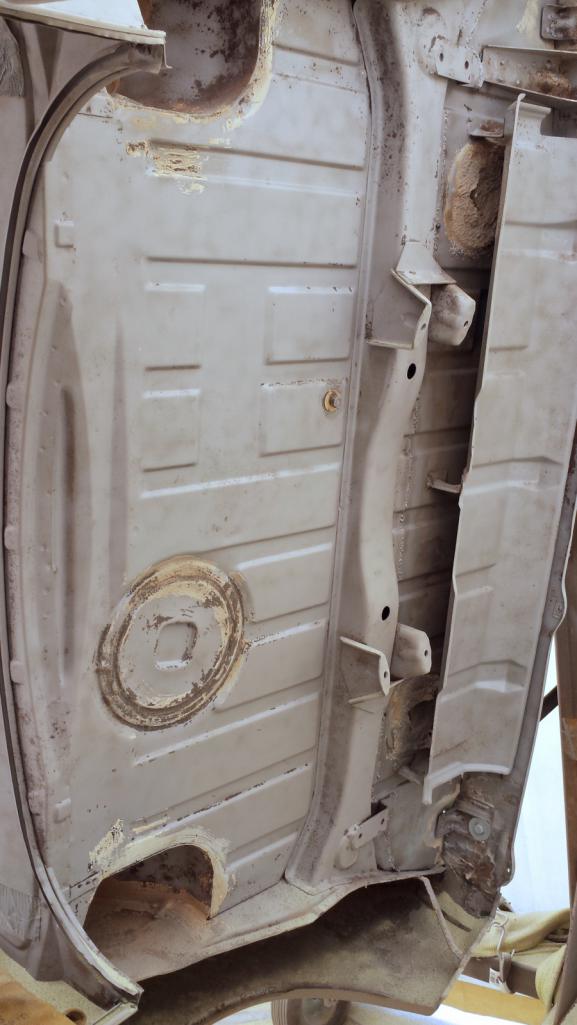 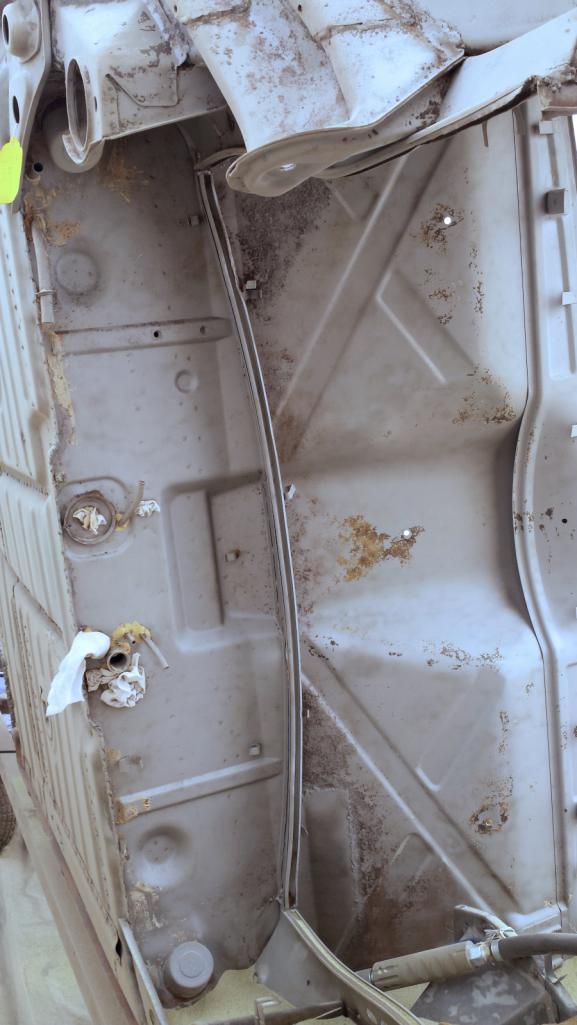 |
|
|
|
|
3 User(s) are reading this topic (3 Guests and 0 Anonymous Users)
0 Members:

|
Lo-Fi Version | Time is now: 19th April 2026 - 04:16 AM |
Invision Power Board
v9.1.4 © 2026 IPS, Inc.