|
|
|
Porsche, and the Porsche crest are registered trademarks of Dr. Ing. h.c. F. Porsche AG.
This site is not affiliated with Porsche in any way. Its only purpose is to provide an online forum for car enthusiasts. All other trademarks are property of their respective owners. |
|
|

  |

| bbrock |
 Oct 6 2018, 09:46 AM Oct 6 2018, 09:46 AM
Post
#561
|
|
914 Guru  Group: Members Posts: 5,269 Joined: 17-February 17 From: Montana Member No.: 20,845 Region Association: Rocky Mountains |
Last weekend I ordered a 6 liter tintable Raptor kit from TCP Global through Amazon. I just now received an email (a week later) saying that item is unavailable and my order has been cancelled. The email also said the item was available from another seller and provided a link. I clicked on the link and who is this "other" seller? That's right. TCP Global. Same seller, same supplier, but $40 more. I'm in a hurry so went ahead and reordered but will be giving them an earful. Somebody fucked up and listed the wrong price, but instead of being stand-up about it, I get screwed. Not honoring the price is irritating enough, but this means more delay in being ready to spray undercoat when I'm already racing against the weather. (IMG:style_emoticons/default/blowup.gif) Edit: So it turns out this was mostly Amazon's fault. They waited a week to fulfill my order and by the time they got around to it, the Raptor kits that were in stock when I ordered had sold. In the mean time, TCP Global raised the price on the kits. TCP was pretty cool about it. They shipped my replacement order very quick and refunded me the difference in price. |
   |

 
|
| worn |
Oct 6 2018, 01:47 PM
Post
#562
|
|
Winner of the Utah Twisted Joint Award Group: Members Posts: 3,564 Joined: 3-June 11 From: Madison, WI and North Bend WA Member No.: 13,152 Region Association: Upper MidWest |
QUOTE(bbrock @ Oct 5 2018, 09:59 PM)  Show off. I miss the mountains so much. Also, I have really enjoyed your work. |
|
|
|
| bbrock |
Oct 6 2018, 01:54 PM
Post
#563
|
|
914 Guru Group: Members Posts: 5,269 Joined: 17-February 17 From: Montana Member No.: 20,845 Region Association: Rocky Mountains |
QUOTE(worn @ Oct 6 2018, 01:47 PM) Show off. I miss the mountains so much. Also, I have really enjoyed your work. In the preview is the photo of your snow. But it doesn't show up when I add the post. At any rate I am jealous of your environment. LOL (IMG:style_emoticons/default/biggrin.gif) Yeah, I've been accused of gloating. I feel your pain. I grew up in the Midwest but have always felt more at home in the mountains. I haven't even mentioned the harem of elk that have been hanging out above the house, or the big bull moose that has been trimming our shrubs and crapping on our walkway. Whoops. I guess I just did. (IMG:style_emoticons/default/cool_shades.gif) |
|
|
|
| bbrock |
Oct 7 2018, 09:24 PM
Post
#564
|
|
914 Guru Group: Members Posts: 5,269 Joined: 17-February 17 From: Montana Member No.: 20,845 Region Association: Rocky Mountains |
Paint! Well... a little anyway
I couldn't put off putting in the front trunk braces any longer. In honor of the frankenmost nature of this car, even the braces had rotted at the bottoms to be patched with what was salvageable from the donor trunk. 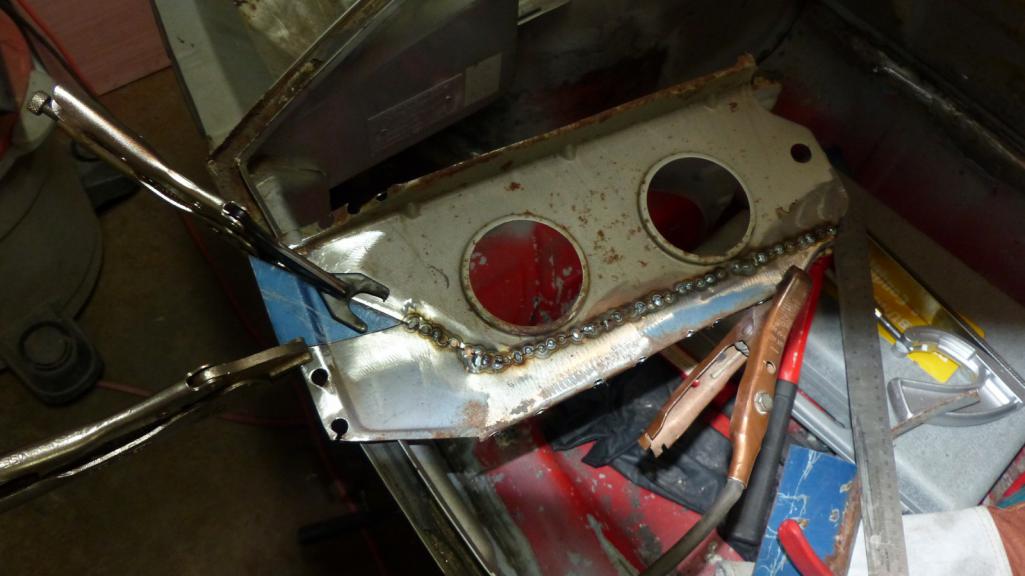 They've been welded up for a long time but welds needed to be ground and filled. Then test fit. I left the nubs from the original spot welds to help realign the parts on reinstall. It really helped and this way I just need to weld the piece back to the nubs. 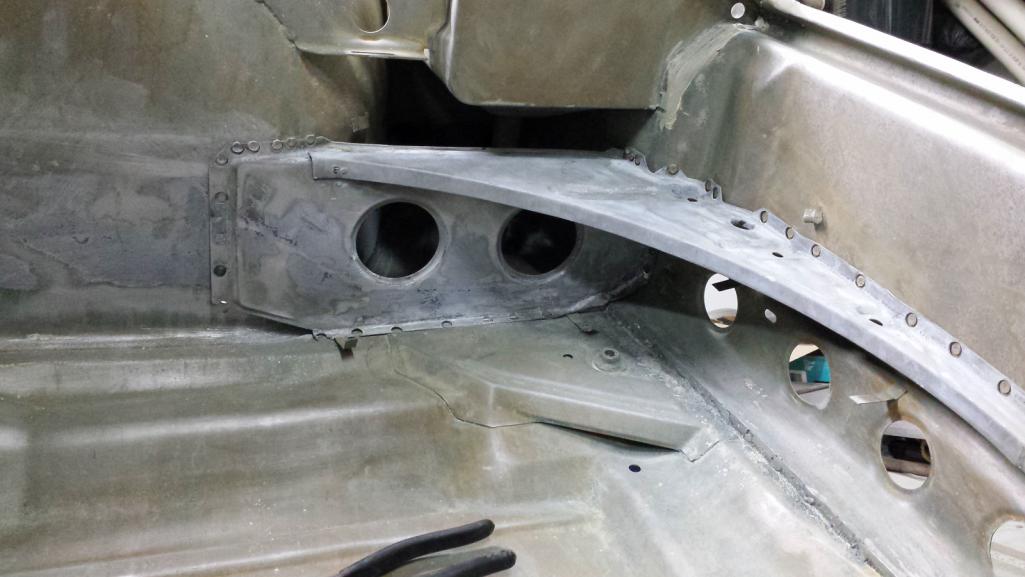 The reason I put off installing for so long is because I was trying to figure out the best way to paint under the headlight buckets and the backsides of the braces. I decided to just shoot epoxy primer. I'll try to scuff it as best I can later and shoot color the best I can. Worst case is the color won't adhere well but the area will be well-protected with the primer. I went ahead and shot the floor of the frunk too but masked off areas to be welded. 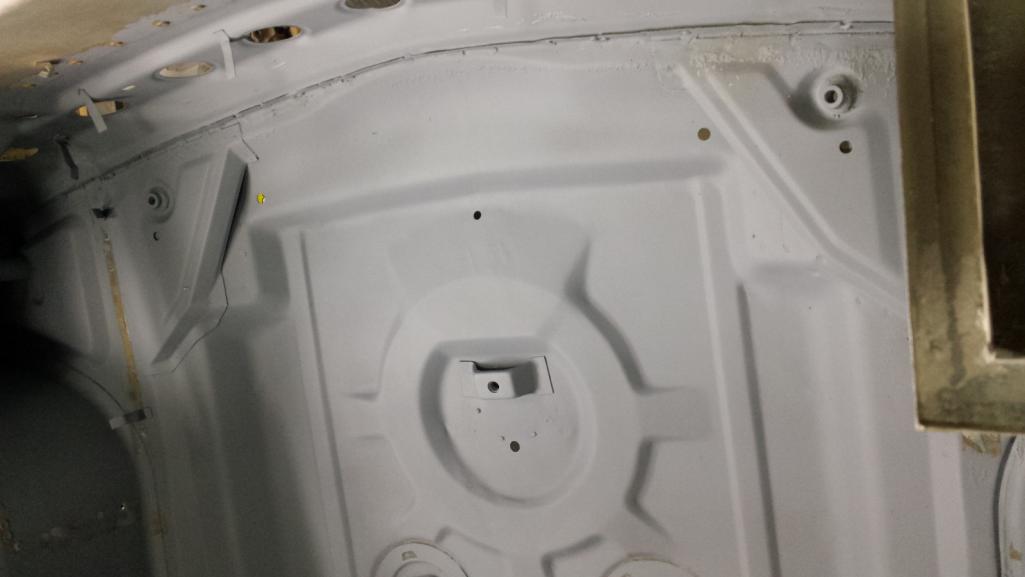 Then I applied brush-on seam sealer to the areas behind the braces. I did it the German way - nice and sloppy. It's a pretty good match to the original. 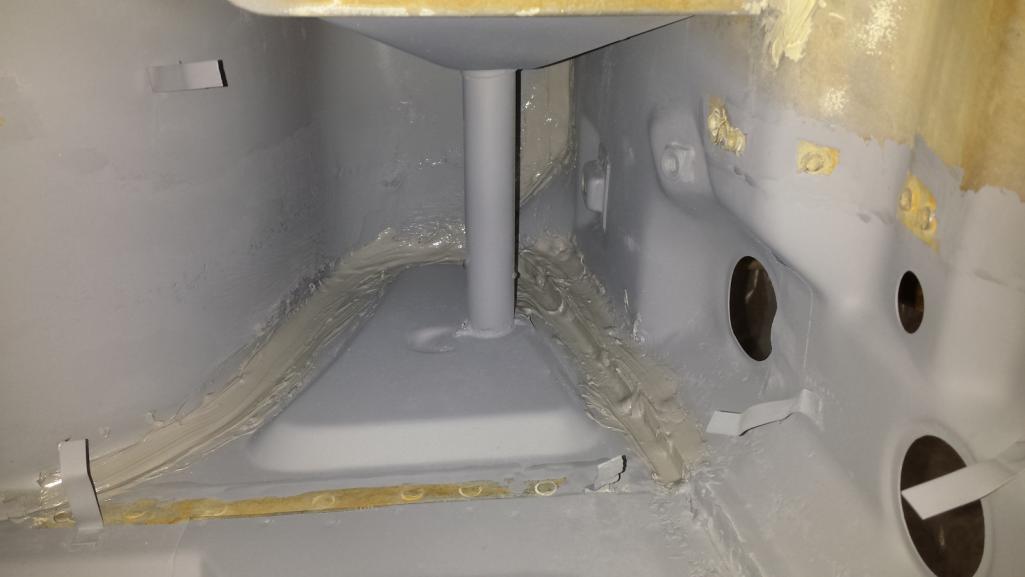 Yet to be done is convince the brace to lay flat on the wheel well. I tried pulling it in with screws, but because of the curve, it needs to move in and forward at the same time. I have a plan but thought this would be a good place to quit for the night. 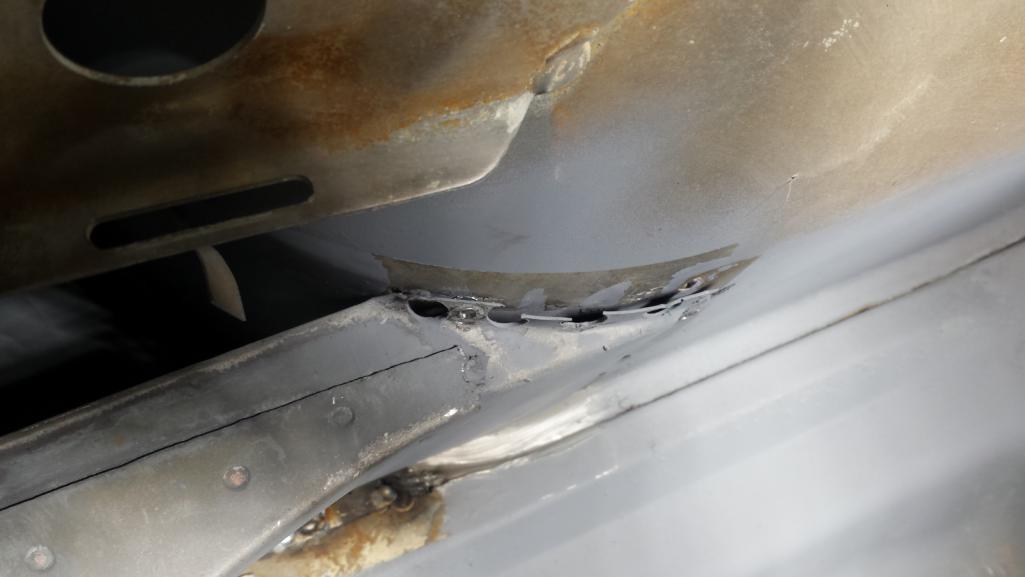 I got them mostly welded in. Still some more work on the passenger side to do and all the welds need to be ground and dressed. But looking pretty good. 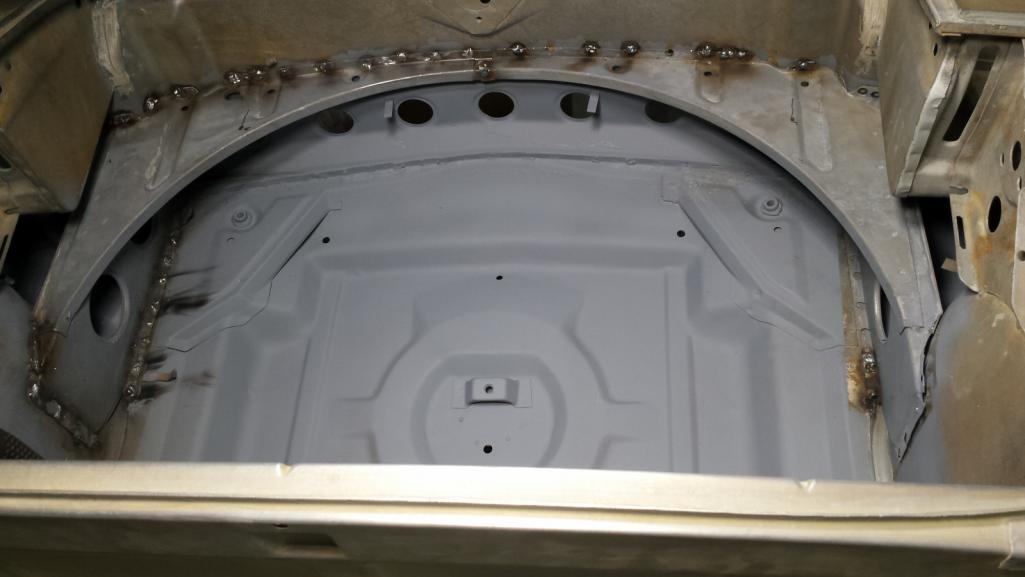 |
|
|
|
| tygaboy |
Oct 8 2018, 08:29 AM
Post
#565
|
|
914 Guru Group: Members Posts: 5,810 Joined: 6-October 15 From: Petaluma, CA Member No.: 19,241 Region Association: Northern California |
Looking good, Brent! (IMG:style_emoticons/default/aktion035.gif)
And I promise, your window will be on its way soon (ish!). Will color have to wait til nicer weather? |
|
|
|
| bbrock |
Oct 8 2018, 09:35 AM
Post
#566
|
|
914 Guru Group: Members Posts: 5,269 Joined: 17-February 17 From: Montana Member No.: 20,845 Region Association: Rocky Mountains |
QUOTE(tygaboy @ Oct 8 2018, 08:29 AM) Looking good, Brent! (IMG:style_emoticons/default/aktion035.gif) And I promise, your window will be on its way soon (ish!). Will color have to wait til nicer weather? Thanks Chris. Exterior color will have to wait for sure. I'm still hoping I get a few days above 60 here to shoot the whole car in primer, tinted Raptor on the belly, and with a little luck, maybe even interior color. Looks like maybe we'll get some sun next week and temps approaching 60 toward the end, but a lot of work to be done before I'm ready. Just getting the bed liner sprayed would be a huge help to let me turn it into a roller over the winter. I guess worst case is to hang plastic in the garage to shoot primer and maybe even interior color. Don't know if I want to shoot Raptor in there though. Everyone says it smells really bad and I believe it has isocyanates. Or maybe I just leave the tub naked for the winter and focus on refurbing all the other parts although it would sure be nice to be able to bolt suspension parts onto the car as they are finished rather than trying to find a place to restore them. It's all up in the air (IMG:style_emoticons/default/confused24.gif) Here's my solution for snugging that brace against the wheel well. It's mostly welded in now but I had to quit to work on bringing in a paycheck to pay for all this crap. 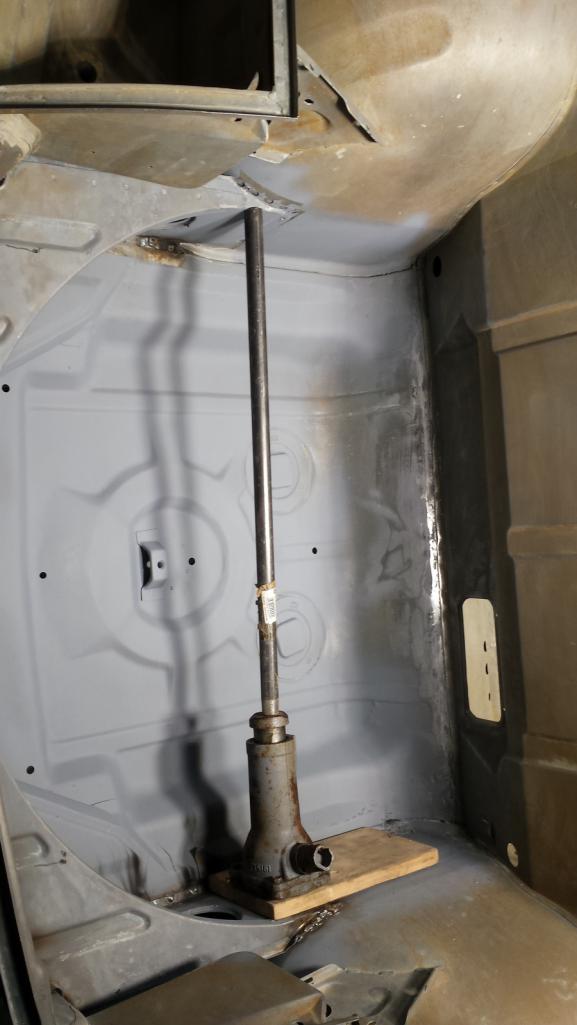 |
|
|
|
| tygaboy |
Oct 8 2018, 10:21 AM
Post
#567
|
|
914 Guru Group: Members Posts: 5,810 Joined: 6-October 15 From: Petaluma, CA Member No.: 19,241 Region Association: Northern California |
QUOTE(bbrock @ Oct 8 2018, 08:35 AM) Here's my solution for snugging that brace against the wheel well. It's mostly welded in now but I had to quit to work on bringing in a paycheck to pay for all this crap. Just keep pushing and you won't need to add flares! Widebody by "Jack"! (IMG:style_emoticons/default/aktion035.gif) |
|
|
|
| bbrock |
Oct 8 2018, 10:31 AM
Post
#568
|
|
914 Guru Group: Members Posts: 5,269 Joined: 17-February 17 From: Montana Member No.: 20,845 Region Association: Rocky Mountains |
QUOTE(tygaboy @ Oct 8 2018, 10:21 AM) QUOTE(bbrock @ Oct 8 2018, 08:35 AM) Here's my solution for snugging that brace against the wheel well. It's mostly welded in now but I had to quit to work on bringing in a paycheck to pay for all this crap. Just keep pushing and you won't need to add flares! Widebody by "Jack"! (IMG:style_emoticons/default/aktion035.gif) LOL (IMG:style_emoticons/default/lol-2.gif) That's exactly why I used a screw jack instead of hydraulic. Much easier to control GENTLE pressure. |
|
|
|
| bbrock |
Oct 10 2018, 11:14 PM
Post
#569
|
|
914 Guru Group: Members Posts: 5,269 Joined: 17-February 17 From: Montana Member No.: 20,845 Region Association: Rocky Mountains |
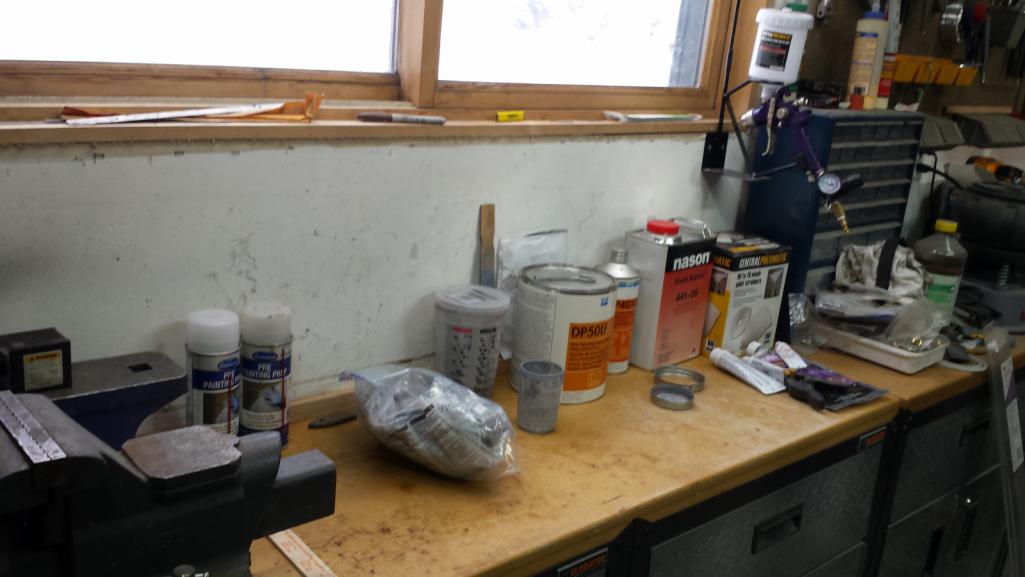
Well, I didn't do anything as exciting as retire today, but it was a pretty fun day anyway. Mountains were socked in with fog which killed our land-based wireless Internet so nothing to do but work on the car (IMG:style_emoticons/default/smile.gif) Started out by reconfiguring the shop to transition from welding/fabricating to paint and body. I cleared the pile of dead tools, hammers, shards of metal, and a quarter inch of metal filings off enough of my bench to clean it up and turn it into a paint mixing station. This really lifted my mood. No more mixing paint on a piece of cardboard while crouching on the floor (IMG:style_emoticons/default/piratenanner.gif)
 Then I made the 6 mile round trip to the mailbox to pick up a package delivery. Noico sound deadener, new paint gun, sanding and masking supplies. Raptor will be here tomorrow. It's starting to feel like this might happen (IMG:style_emoticons/default/piratenanner.gif) 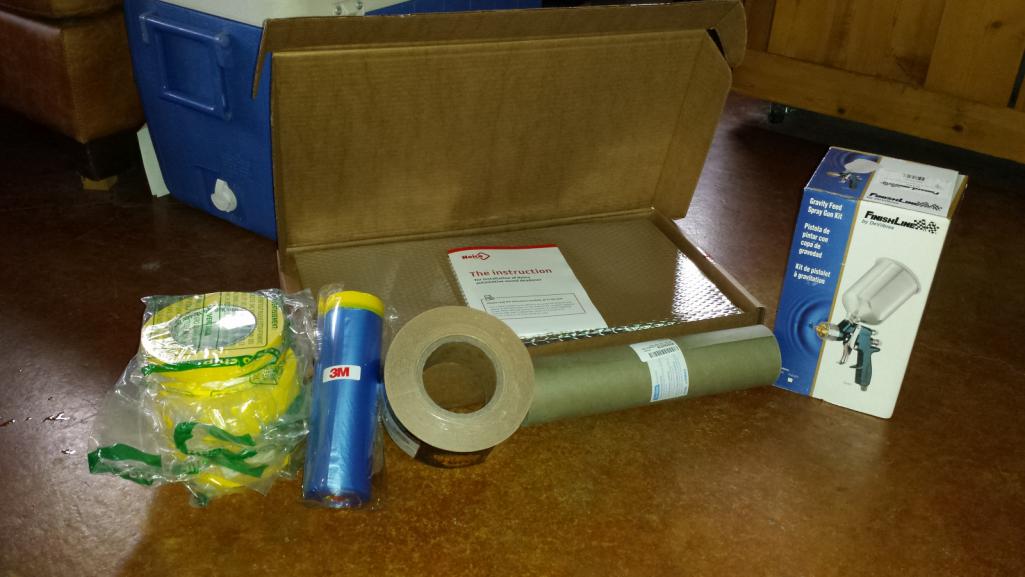 Took the POS Harbor Freight gun out of the gun stand and replaced it with this. The difference in quality was obvious the first time I pulled the trigger. Smooooth. Sure looks purty. 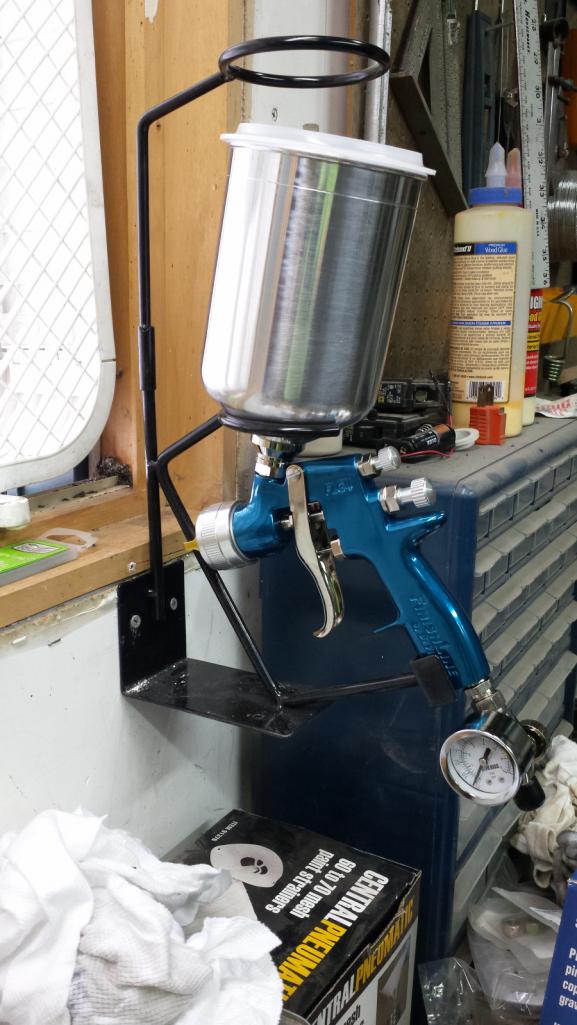 I also got a bunch of stuff done on the car but I'm too tired to post tonight. Will try to catch up tomorrow. It looks like I might get one last shot of good weather to spray undercoat. I might have to drag the electric oil-filled radiator out of the greenhouse to the tent to boost temps a little, but I'm cautiously optimistic. (IMG:style_emoticons/default/aktion035.gif) |
|
|
|
| bbrock |
Oct 11 2018, 08:51 AM
Post
#570
|
|
914 Guru Group: Members Posts: 5,269 Joined: 17-February 17 From: Montana Member No.: 20,845 Region Association: Rocky Mountains |
Paranoia
When you've seen the horrors that I have, you get a little paranoid about rust. Spent time the last two days doing a couple things to keep the tin worm at bay. First was treating seams. A word about weld-thru primer. I treated most of my welds with weld-thru, but as the project wore on, I've decided that weld-thru is a nice idea, but doesn't do much more than relieve us of our money. I was noticing that the weld-thru (regardless of whether it was crappy Eastwood or good Upol copper) burns off around welds about the same distance as good old epoxy. Granted, it does so with less stink and soot, but no matter what, you wind up with bare metal around the weld. So I started digging for actual test data on the efficacy of weld-thru. It's hard to imagine that manufacturers haven't tested this stuff, and you can bet positive test results would show up in marketing ads. I found none - ZERO. This stuff was starting to smell like snake oil, and expensive snake oil at that. The only testing I could find came from MrFireman on youtube. He tested a bunch of different primers by treating then plug welding pinch welds, then he buried the test pieces in the ground for a few weeks. What he found was that most of the primers did a good job of protecting metal where they didn't burn off, but all of them had started to rust in the HAZ where the primer had burned. The treatment that provided the best protection was dribbling epoxy primer into the pinch welds after they had cool. So that's my long-winded soap box introduction to what I did. I reduced a small amount of PPG epoxy primer with acetone and painted it on all seams with overlapping metal. 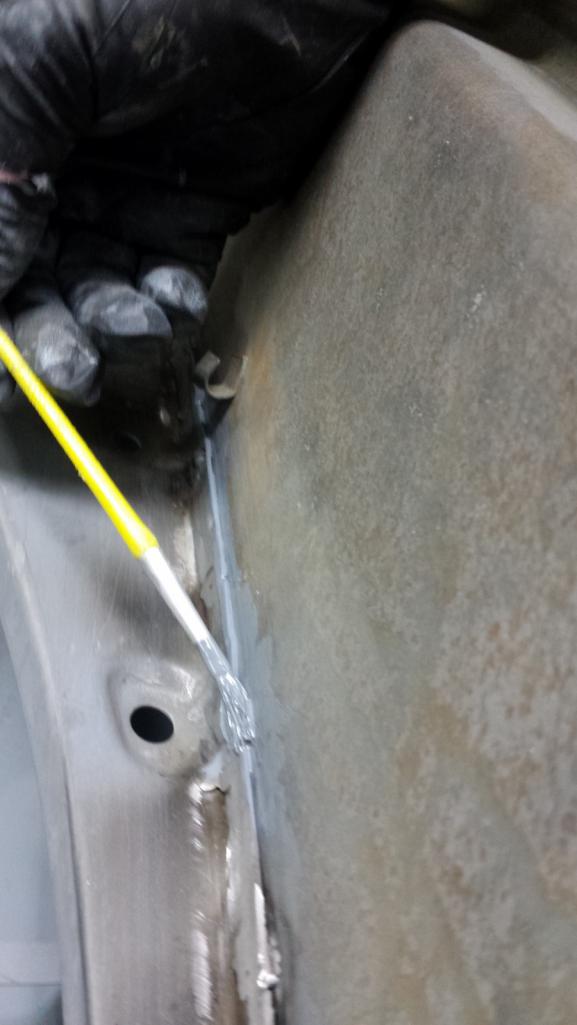 I just flooded the joint and watched with satisfaction as it was sucked into the joint. 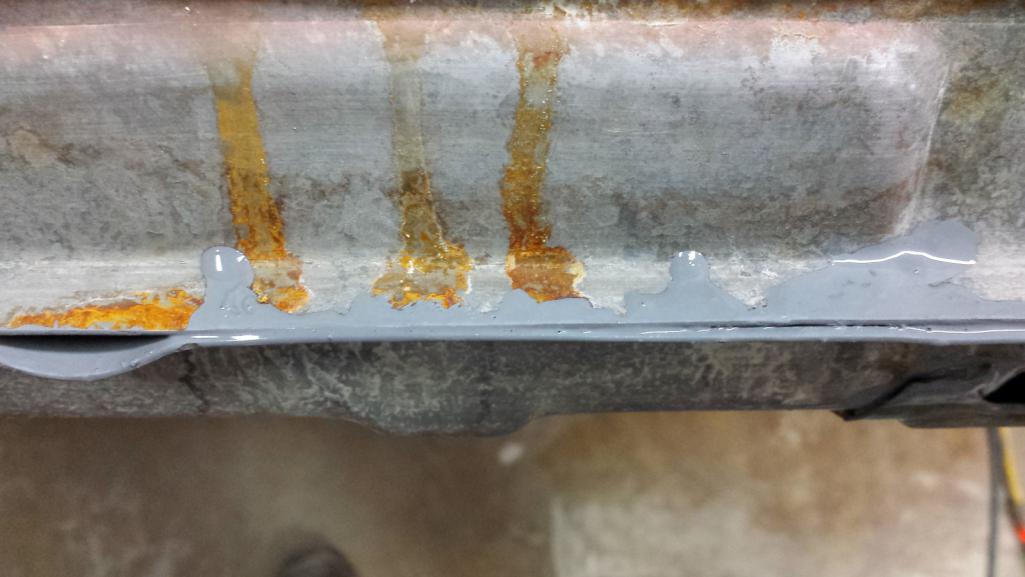 Next up was installing the bungholes. (My wife and I have a running debate whether I have the mentallity of a twelve-year-old or, as she maintains, and eight-year-old. The answer may lie in the normal age when kids stop thinking "bunghole" is a funny word. I think it's hilarious.) Anywho... I wanted to make sure those openings were protected so I cleaned off the old sealer and brushed on full bodied epoxy around each opening, and did the same for the cover plates. I should preface by saying it would have been easier to just spray the cover plates with primer when I spray the whole chassis, but with the time crunch to beat my last chance at good weather, I'm trying to tick off as many tasks as possible to save time later. I probably wouldn't have bothered removing the frunk plates but I needed to straighten a few areas where a PO of the frunk tub apparently jacked up the car. Those openings made it possible to reach through with a dolly. 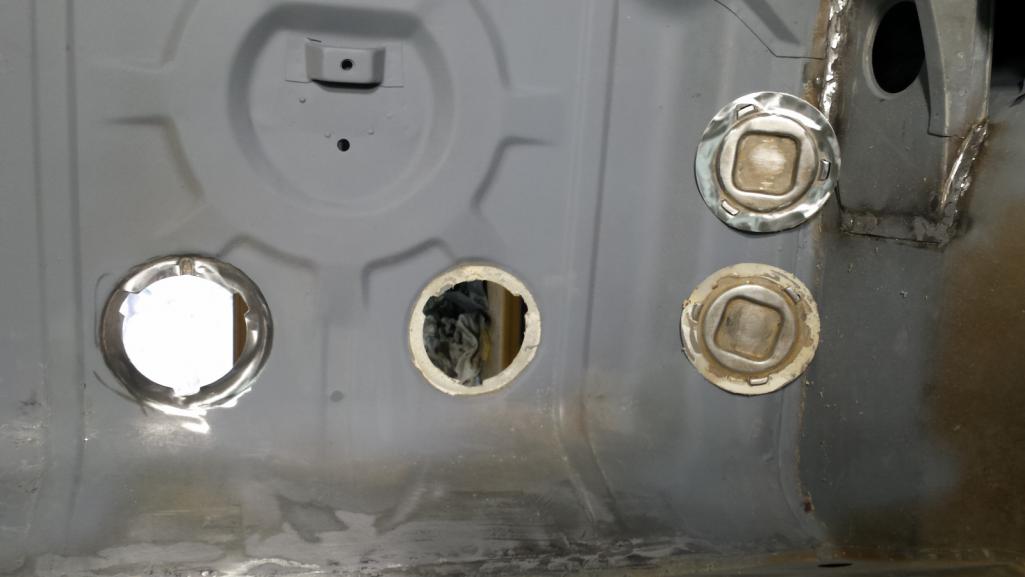 I left all the cover plates to cure for the day. Let's not forget those little discs. You may think they are unnecessary but I'm pretty sure those are the secret sauce Porsche used to get the weight distribution of our cars so perfect. Of course they had to go back in!!! (IMG:style_emoticons/default/av-943.gif) 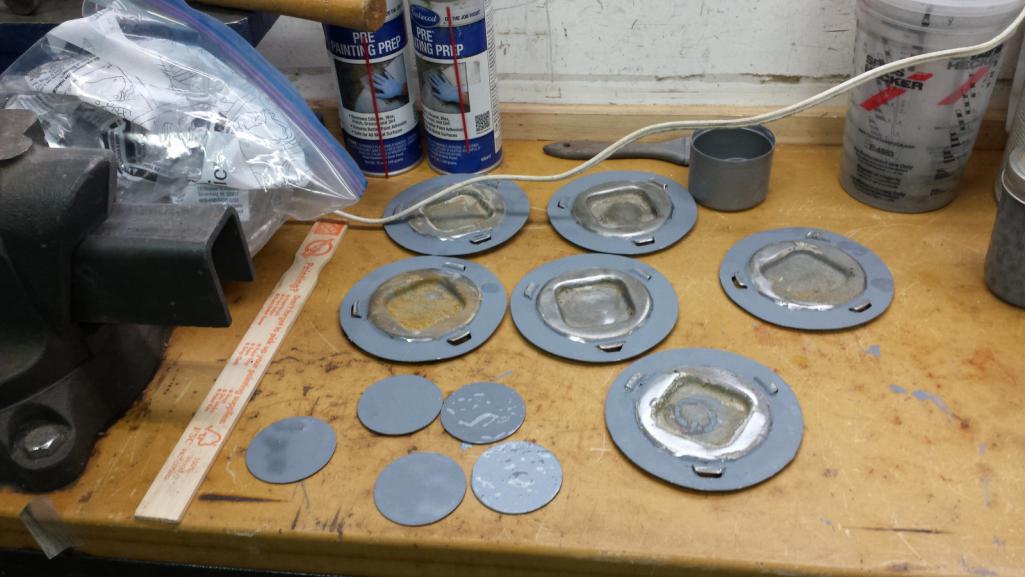 Ready for plates. 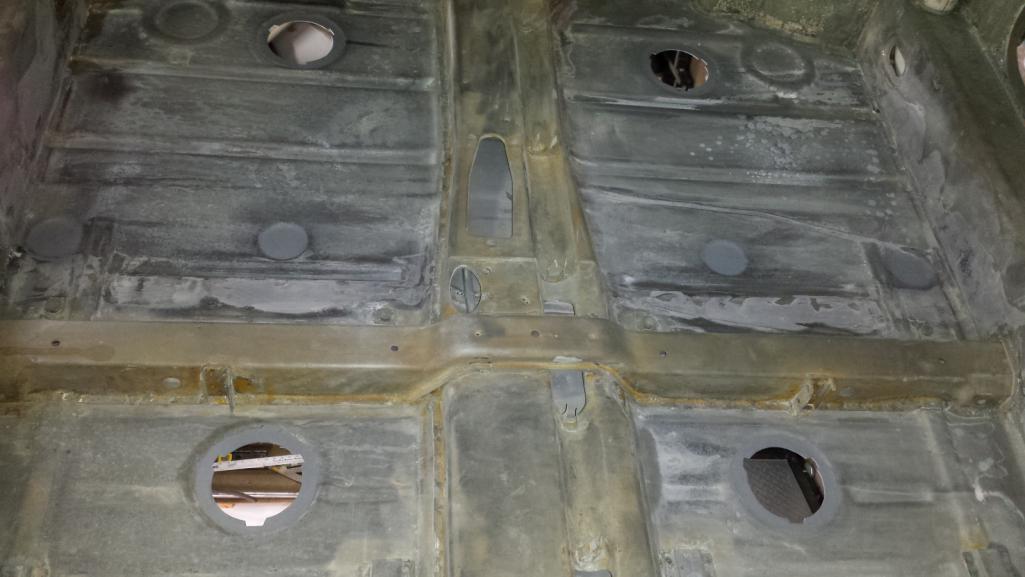 After the paint cured, I applied brush-on seam sealer. Hey, look at the pretty spray gun back there! That was coincidence. 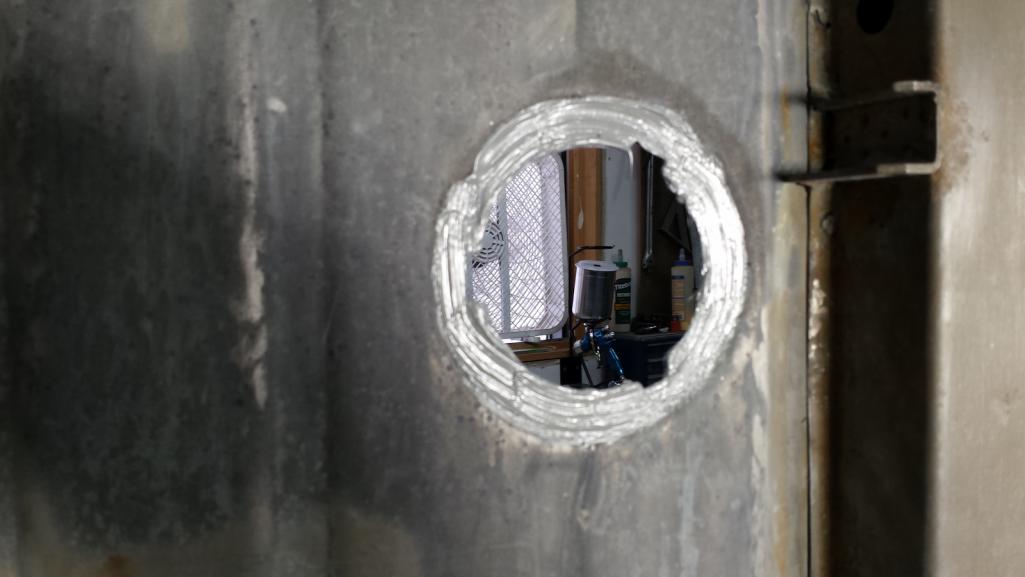 Everybody back in place. After primer, these will get another application of brush-on sealer top and bottom followed by bed liner sprayed at low pressure in appropriate spots to replicate the spray on sealer look. Thanks to Kent ( @914350 ) for taking the time to provide some details on how he did this on @Cairo94507 ' s car. 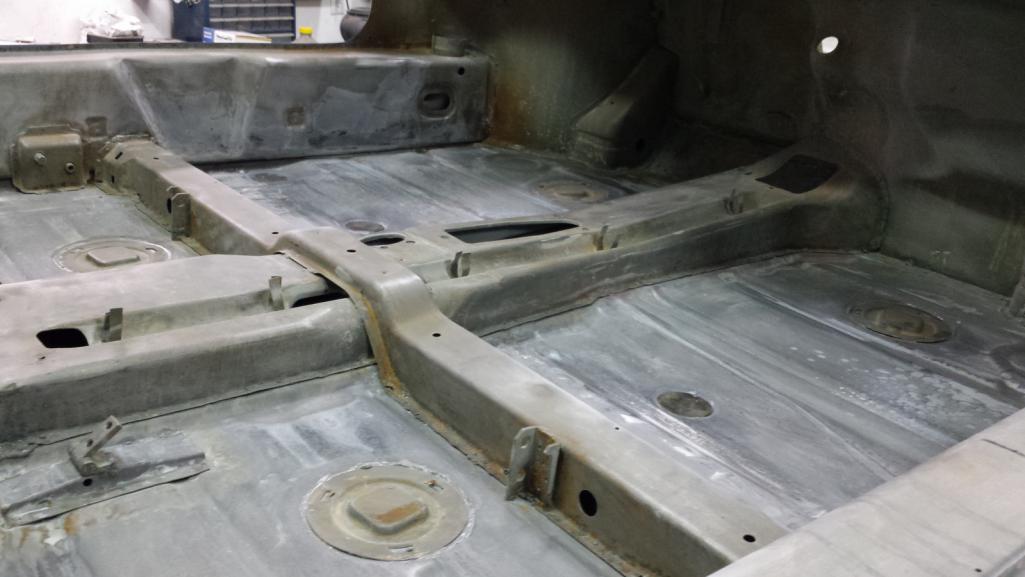 I had to take a moment to admire the pedal area complete with "balancing" disc that was completely rotted away and had to be fabricated using only photos for reference. (IMG:style_emoticons/default/cool_shades.gif) 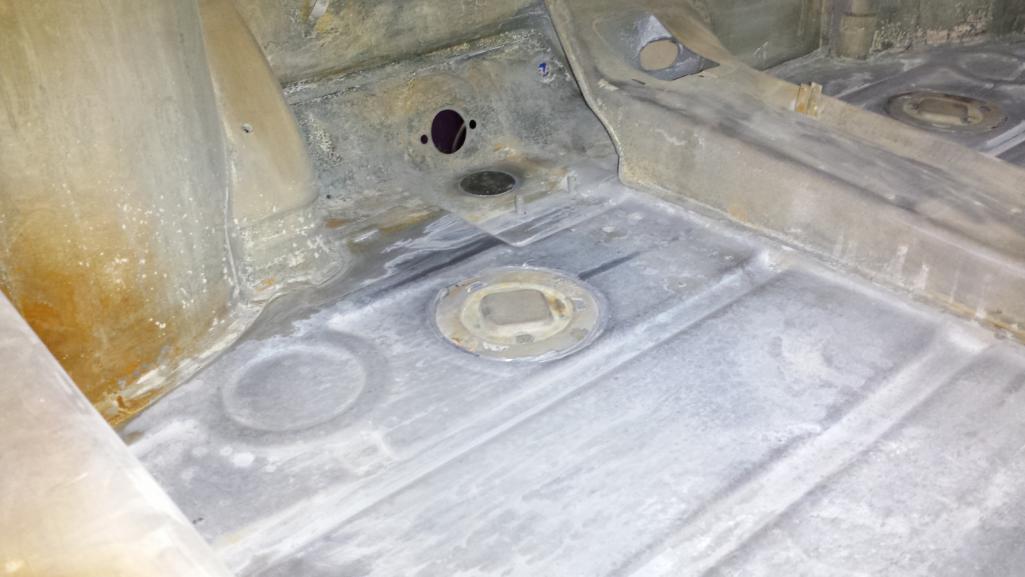 |
|
|
|
| Dion |
Oct 11 2018, 09:47 AM
Post
#571
|
|
RN Group: Members Posts: 2,926 Joined: 16-September 04 From: Audubon,PA Member No.: 2,766 Region Association: MidAtlantic Region |
You’ve been a busy lad. Epoxy primer & acetone. Was that on all your new welded seams Brent? Where you state the weld thru burned off.
It’s coming along nicely. Hope you get some warm weather for some of October. |
|
|
|
| bbrock |
Oct 11 2018, 10:10 AM
Post
#572
|
|
914 Guru Group: Members Posts: 5,269 Joined: 17-February 17 From: Montana Member No.: 20,845 Region Association: Rocky Mountains |
QUOTE(Dion @ Oct 11 2018, 09:47 AM) You’ve been a busy lad. Epoxy primer & acetone. Was that on all your new welded seams Brent? Where you state the weld thru burned off. It’s coming along nicely. Hope you get some warm weather for some of October. I'm applying it on all seams where metal overlaps. That includes all new welded seams as well as any other seams I can get to. I'll be following up with Eastwood Internal Frame Coating and after paint is finished, cavity wax. Like I said, paranoid! I should say that acetone is the correct reducer for my epoxy so I would thin with whatever the right reducer for the primer being used. To elaborate a little more, after I quit using weld-thru, I still painted the lap areas with primer, but using epoxy instead. I either left areas around welds bare or scraped the epoxy off where I needed to weld. If you scrape, you definitely need to use a respirator because you get a lot more soot and smell when the epoxy burns compared to weld-thru. I think the real benefit of weld-thru (especially good stuff like Upol copper) is that it isn't as nasty when it burns, is easier to strike a weld through, and less chance of impurities. I just don't think we are getting as much corrosion protection as we hope. I'm so close to being ready that I'm trying hard to slow down and not skip anything. Weather is looking promising! Cold and snowy at the moment. Forecast for Friday is in the 60s but returning to crap over the weekend. Next week looks good though with forecast for sunny skies and 60s most of the week and beyond! (IMG:style_emoticons/default/piratenanner.gif) |
|
|
|
| Dion |
Oct 11 2018, 10:49 AM
Post
#573
|
|
RN Group: Members Posts: 2,926 Joined: 16-September 04 From: Audubon,PA Member No.: 2,766 Region Association: MidAtlantic Region |
Ok Brent, thanks for the info. Carry on mate. (IMG:style_emoticons/default/beerchug.gif)
|
|
|
|
| bbrock |
Oct 14 2018, 02:11 PM
Post
#574
|
|
914 Guru Group: Members Posts: 5,269 Joined: 17-February 17 From: Montana Member No.: 20,845 Region Association: Rocky Mountains |
I've been working furiously to get my tub ready for primer so I can take advantage of what will likely be the best last good weather forecast for later this week. I've spent a lot of time metal bumbing to get fenders as straight as I can, and dialing in door gaps.
Metal bumping takes a LOT of time. Most of it has gone pretty well but the passenger side quarter has been a challenge. Before I owned the car, that panel had been hit, dirlled and pulled, gouged, and slathered with a thick coat of Bondo. Then I cut it and rewelded. In other words, it was a mess. After hours with hammer and dolly and the shrinking disc, I got it close, but not perfect. Low spots are quite shallow (less than 1mm) and the panel is tight with no oil canning. I'd love to keep working those low spots but I'm I'm im a race against Mother Nature so don't feel I have the luxury of spending several more hours. I may come back to it if time allows. 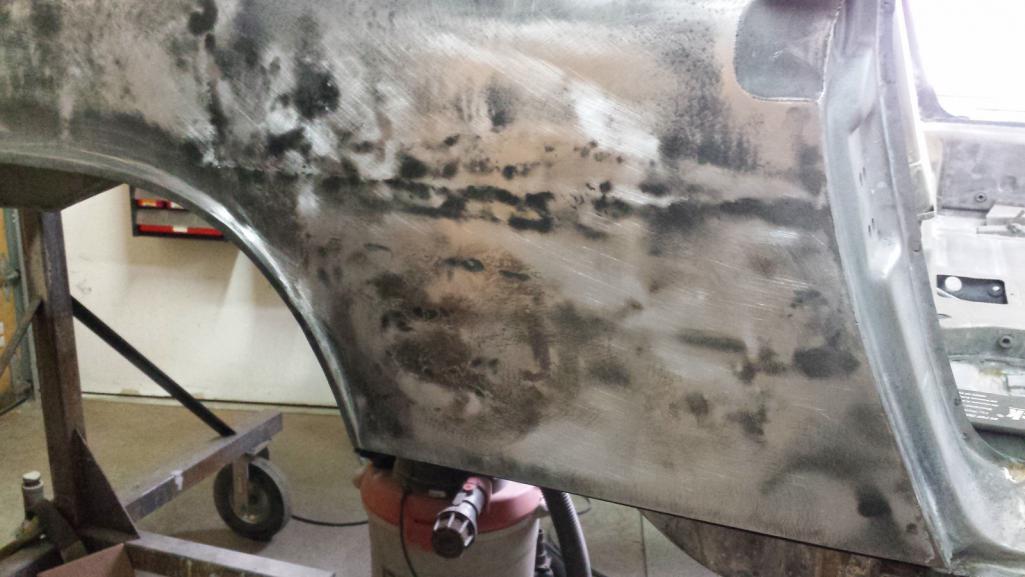 Lack of skill is definitely a limitation, but there is another that prevents this panel being perfect. There is mild pitting on the backside of the panel. In hindsight, I could have tried filling the pits with the Fiber Tech filler and smoothing before metal bumping, but I didn't so those little pits telegraphed through so will need filler on both sides to get smooth. 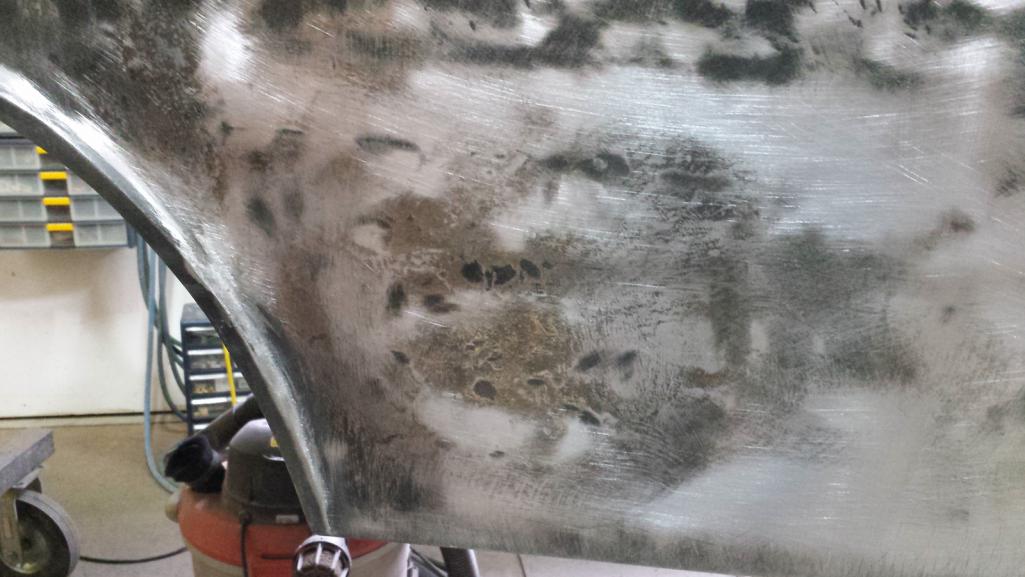 I started with the passenger side. I F'd up the gaps stupidly trying to sharpen the corners along the lock post with a hammer. I cut a piece of flat bar to let be reach inside the quarter panel and massage the metal back where it belonged. 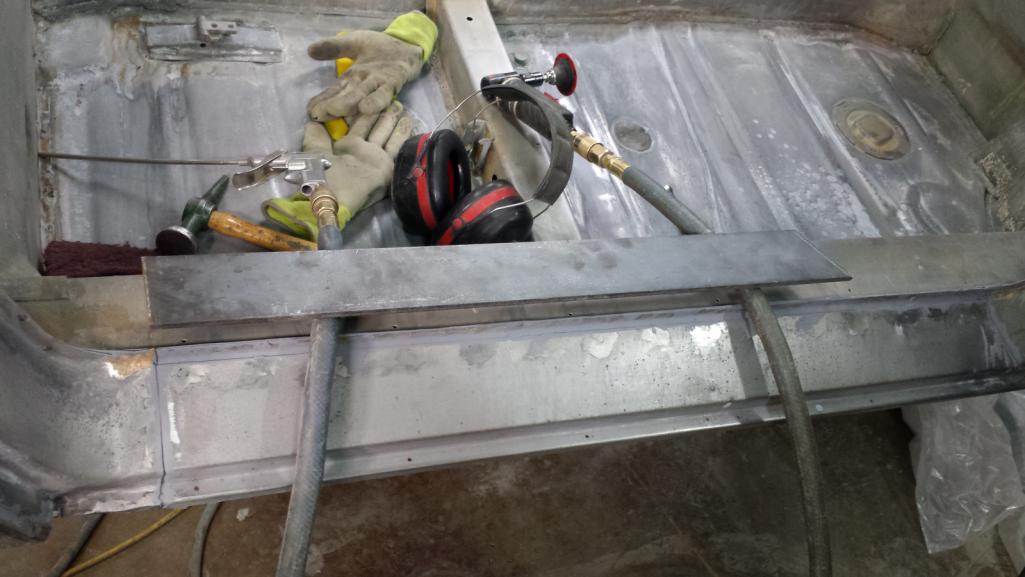 That worked pretty well. The gap averaged about 4mm which is good, but wast narrower at the bottom and a bit wider at the top. I've obsessed over any pics posted showing door gaps over the last year and a half and paid particulary attention to survivor and unrestored cars. I've noticed that gaps narrowing at the bottom is pretty typical so I decided to leave the bottom alone, but I wanted a max of 4mm at the top so started by added a bit of metal along the lock post edge. 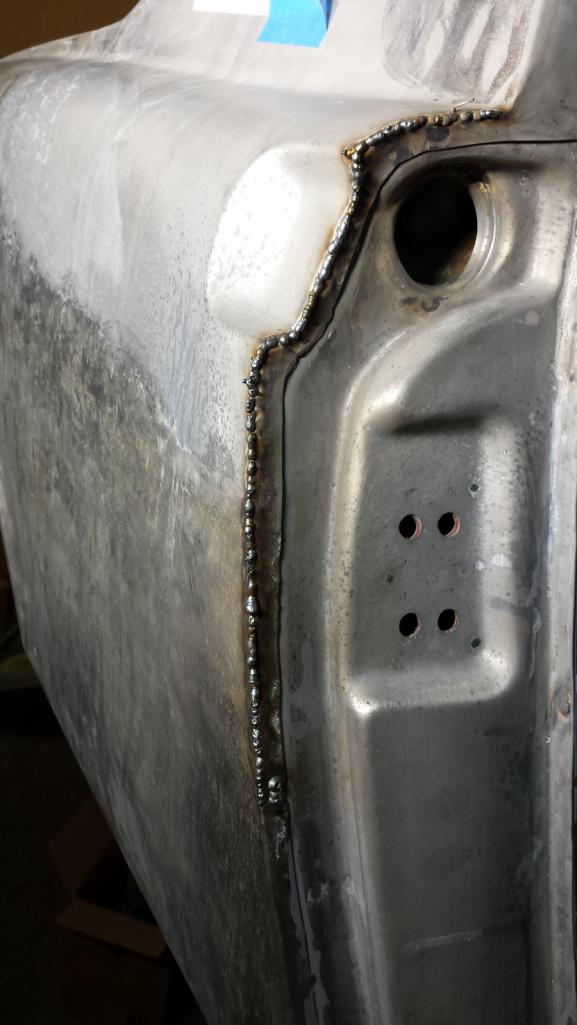 Next I sprayed the edge with gray primer and set my compass to 4mm to strike a line to grind to. 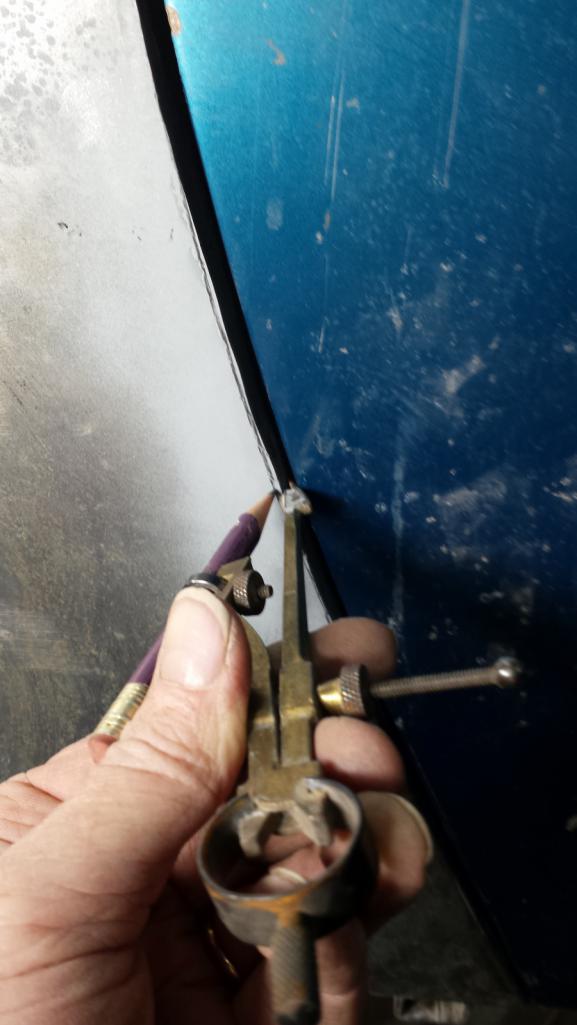 Not looking too bad after grinding.  Next was applying a bit of the Fiber Tech filler to smooth the edge and refine things a bit more. I'm pretty happy with the result. 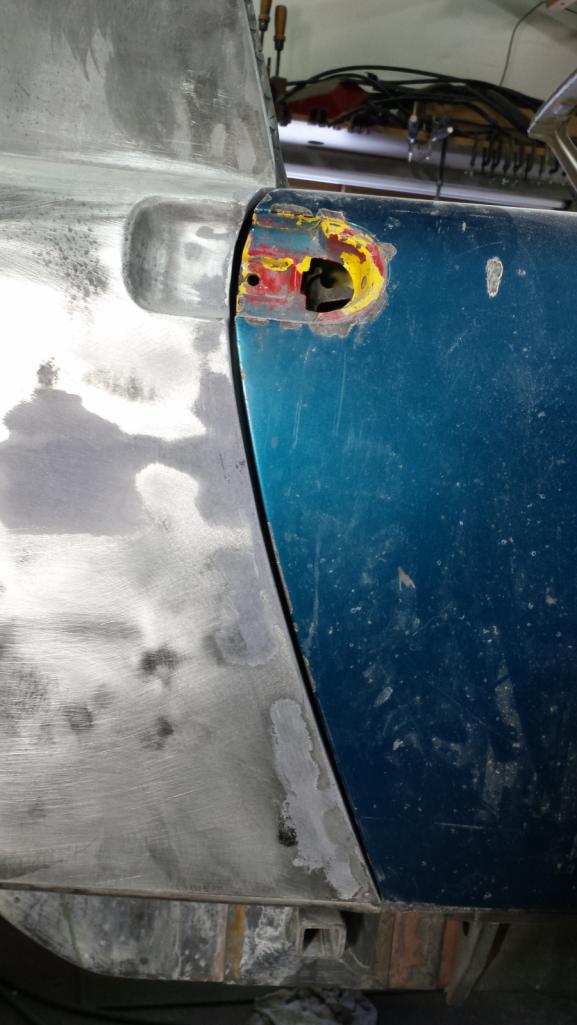 The gap a above the door lock is still a tad wide (~4.5mm - 5mm). I might revisit that later but this also seems fairly common so it isn't bothering me too much. My goal here is to have a car that looks factory fresh - no more, and no less perfect than the factory produced (but with better rust protection (IMG:style_emoticons/default/smile.gif) ). I have a couple minor dings to tap out on the extreme rear quarter and after that, I think this side is ready for final prep for primer. This is only the DTM reinforced Fiber Tech filler over welded patch, but so far, doesn't seem like an embarrassing amount of filler. There will be more conventional filler applied over the epoxy primer but I'm confident that I'll have reduced the amount of filler that was on this car by about 95%. 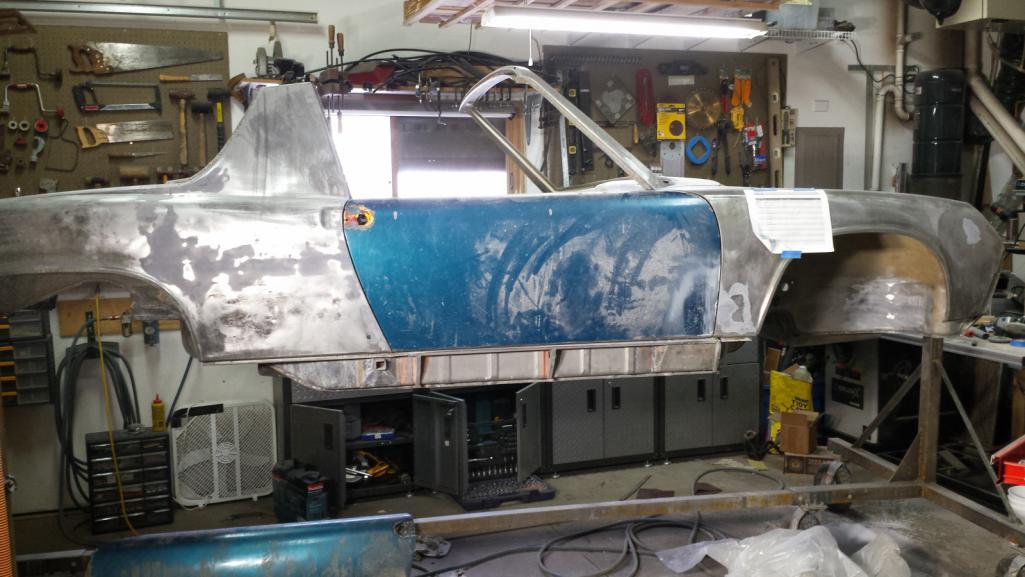 The only thing I did on the front gap was adjust the patch at the bottom of the fender for perfect alignment with the door. Again, it narrows toward the bottom but that seems typical. The gap at the top is a tad wide but the door is hung about 1mm too low so that will tighten up with final (and proper) door adjustment.  Okay, lunch break is overy, I'd best get back at it! |
|
|
|
| TravisNeff |
Oct 14 2018, 03:10 PM
Post
#575
|
|
914 Guru Group: Members Posts: 5,082 Joined: 20-March 03 From: Mesa, AZ Member No.: 447 Region Association: Southwest Region |
I am enjoying your progress Brent!
|
|
|
|
| Dion |
Oct 14 2018, 04:29 PM
Post
#576
|
|
RN Group: Members Posts: 2,926 Joined: 16-September 04 From: Audubon,PA Member No.: 2,766 Region Association: MidAtlantic Region |
Nice progress (IMG:style_emoticons/default/cheer.gif) (IMG:style_emoticons/default/popcorn[1].gif)
|
|
|
|
| FourBlades |
Oct 14 2018, 06:24 PM
Post
#577
|
|
From Wreck to Rockin Group: Members Posts: 2,056 Joined: 3-December 07 From: Brevard, FL Member No.: 8,414 Region Association: South East States |
Spent days slowly reading the whole thread. Great work man! (IMG:style_emoticons/default/first.gif) I had many similar experiences when I did my blue car almost 10 years ago now. Keep it up, it just gets better from here! John |
|
|
|
| bbrock |
Oct 14 2018, 08:54 PM
Post
#578
|
|
914 Guru Group: Members Posts: 5,269 Joined: 17-February 17 From: Montana Member No.: 20,845 Region Association: Rocky Mountains |
QUOTE(FourBlades @ Oct 14 2018, 06:24 PM) Spent days slowly reading the whole thread. Great work man! (IMG:style_emoticons/default/first.gif) I had many similar experiences when I did my blue car almost 10 years ago now. Keep it up, it just gets better from here! John Good lord! I hope it didn't trigger your PSD reliving the horror. I read that build thread when I was planning my attack on this one. I think my car would be considered "rust free" compared to what you started with on that one! I'm in awe. (IMG:style_emoticons/default/pray.gif) I love the wooden rocker. I seriously considered following your lead but shop space doesn't allow it. Thanks for the compliments and encouragement everyone. It helps to keep the motivators running. (IMG:style_emoticons/default/beerchug.gif) |
|
|
|
| bbrock |
Oct 14 2018, 09:25 PM
Post
#579
|
|
914 Guru Group: Members Posts: 5,269 Joined: 17-February 17 From: Montana Member No.: 20,845 Region Association: Rocky Mountains |
Dug in to the gaps on the driver's side. Not quite as simple as the other side Gaps suck all around. This is the third time I've fit the door on the driver's side and freaked out after seeing the wide gap up front and trying to think what I screwed up. But the front gap is set by the hinge post, hinges, and front fender fitment - none of which could be affected by anything I've done. It's not THAT bad but will definitely need about 1mm metal added to the rear eadge of the fender around the curve. I can do that AFTER Raptor is applied without worrying about melting the bed liner or setting it on fire. So I'll just set that aside until later. And since I'm doing one side, might as well do the other... (IMG:style_emoticons/default/rolleyes.gif)
On the other hand, the rear gap needs to be squared away before bed liner goes on. This is the side that I patched the bottom corner of the panel once and adjusted the gap. Didn't like the result so tore it out and patched again, and still managed to fuch it up. Gap is WAY too wide at the bottom. 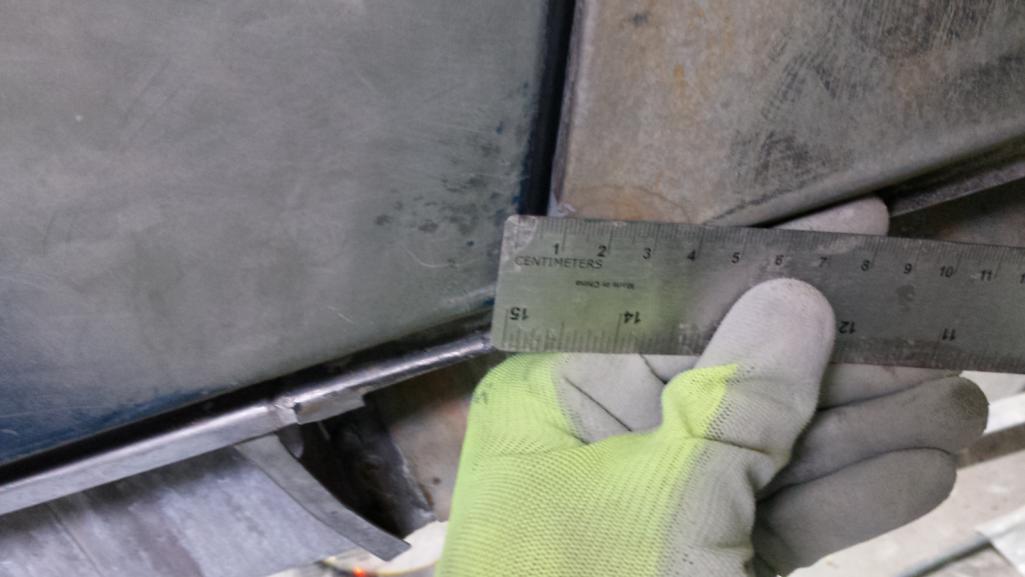 I also screwed up the alignment so it sat proud of the door which was actually lucky because that gave me a little extra metal to push around to close the gap. Otherwise I would have to split it and weld in a piece of filler. This pic is actually after I fixed it so I just pushed the door in a little too far to show what what it looked like before. 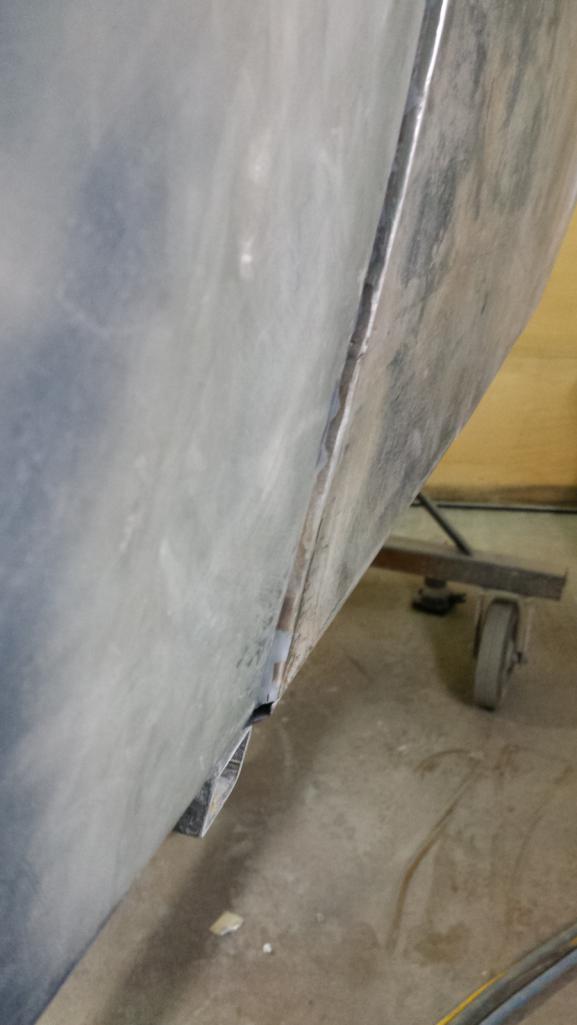 The plan was to bang that section forward with my flat bar inside the fender, alternated by hammering the side in toward the jamb to simultaneously close the gap and bring the fender flush with the door. I couldn't figure out why I wasn't getting headway with my flat bar until I realized I'd forgotten to reverse the bevel so it contacted the outside corner. (IMG:style_emoticons/default/screwy.gif) Yeah, that's snow on the ground outside the window but it should start warming up tomorrow. 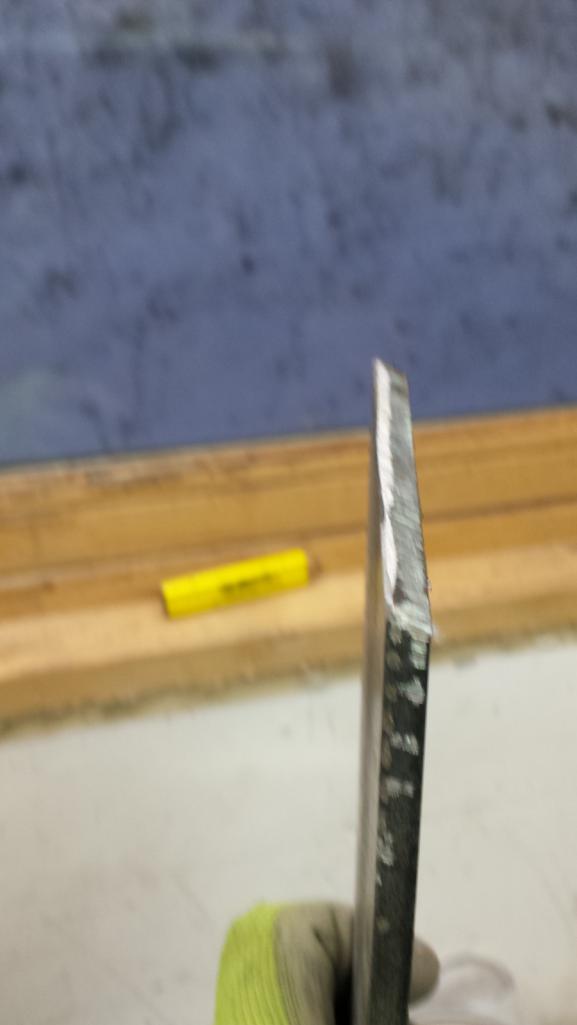 The plan actually worked. I couldn't get a good photo, but the gap is closed to near 4mm but the edge is rolled to a softer bend. That's okay because I can add metal there. I didn't say it was an elegant solution, but it's a solution. (IMG:style_emoticons/default/rolleyes.gif) AI guess I forgot to snap a pic after tacking along the edge, but you saw it on the other side. After that, it is a repeat of the other side. Scribe with compass and grind back to the line. Looking much better. The door is actually slightly ajar in this pic because I don't have the striker's mounted and it swung open a few millimeters. So the gap looks a little wider than it actually is. It's pretty much dead on at 4mm the whole way. 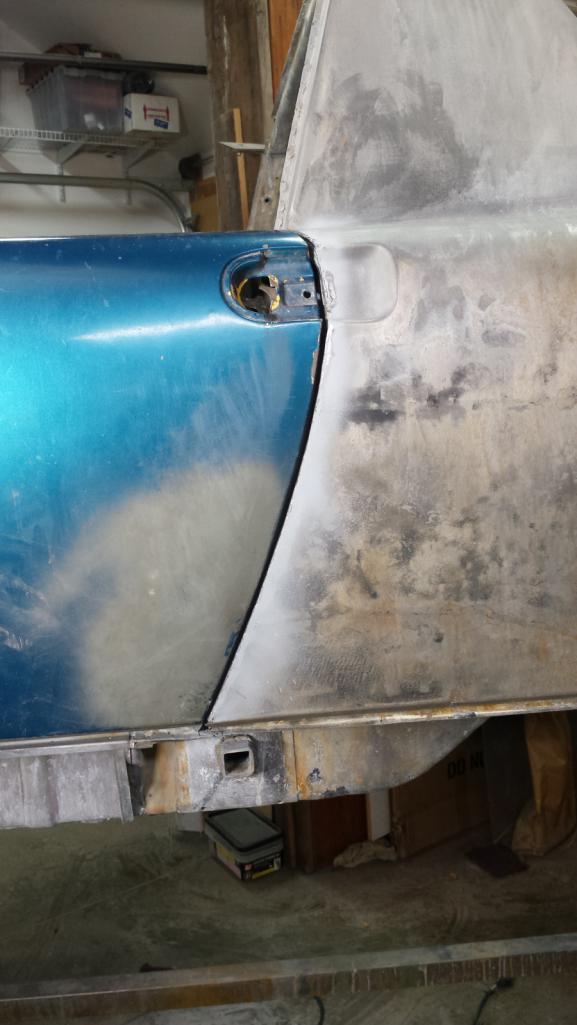 That was a good spot to quit for the night. (IMG:style_emoticons/default/beer3.gif) |
|
|
|
| bbrock |
Oct 16 2018, 03:50 PM
Post
#580
|
|
914 Guru Group: Members Posts: 5,269 Joined: 17-February 17 From: Montana Member No.: 20,845 Region Association: Rocky Mountains |
First Drive in 32 Years!!!
  |
|
|
|
|
3 User(s) are reading this topic (3 Guests and 0 Anonymous Users)
0 Members:

|
Lo-Fi Version | Time is now: 19th April 2026 - 09:12 AM |
Invision Power Board
v9.1.4 © 2026 IPS, Inc.