|
|
|
Porsche, and the Porsche crest are registered trademarks of Dr. Ing. h.c. F. Porsche AG.
This site is not affiliated with Porsche in any way. Its only purpose is to provide an online forum for car enthusiasts. All other trademarks are property of their respective owners. |
|
|

  |

| burton73 |
 May 15 2017, 01:28 PM May 15 2017, 01:28 PM
Post
#61
|
|
Senior member, and old dude  Group: Members Posts: 3,994 Joined: 2-January 07 From: Los Angeles Member No.: 7,414 Region Association: Southern California |
Pelican sells them. I had the one on my 86 Carrera go bad. 70,000 miles and it just breaks from the I guess the grease on the gear breaking down the plastic over the years. I sent mine out to fix but you can do this yourself. They can send you the small parts by mail.
Bob B |
   |

 
|
| bbrock |
May 15 2017, 11:21 PM
Post
#62
|
|
914 Guru Group: Members Posts: 5,269 Joined: 17-February 17 From: Montana Member No.: 20,845 Region Association: Rocky Mountains |
QUOTE(burton73 @ May 15 2017, 01:28 PM)  Pelican sells them. I had the one on my 86 Carrera go bad. 70,000 miles and it just breaks from the I guess the grease on the gear breaking down the plastic over the years. I sent mine out to fix but you can do this yourself. They can send you the small parts by mail. Bob B Thanks. I'm putting together a Pelican order anyway. Is the 17 tooth drive gear what I'm after? |
|
|
|
| bbrock |
May 15 2017, 11:32 PM
Post
#63
|
|
914 Guru Group: Members Posts: 5,269 Joined: 17-February 17 From: Montana Member No.: 20,845 Region Association: Rocky Mountains |
duplicate deleted
|
|
|
|
| bbrock |
Jun 5 2017, 11:54 AM
Post
#64
|
|
914 Guru Group: Members Posts: 5,269 Joined: 17-February 17 From: Montana Member No.: 20,845 Region Association: Rocky Mountains |
More Progress
Haven't updated in a couple weeks but have been busy on the project. Continued to work on some little stuff in the evenings like cleaning up the fresh air control box that had been painted (not just overspray) by the PO. Took several days of soaking in brake fluid to soften the paint to get it off without damaging the plastic. Once it was finally clean, I refurbed with a kit from 914rubber and added the screen from the same. I read that some people had to trim the screen to get the gasket to fit. The trick for me was to install the screen in the gasket with the flange angle point down. Then start installing the gasket onto the box at one of the narrow ends. Work along the long front and back until the box is seated in the gasket groove along all but the last short end. Then I used a 4" taping knife to wedge the last end of the gasket into place. Not too hard and fits perfectly. I hope installing this thing back into the car is as much fun as I have read. (IMG:style_emoticons/default/blink.gif) 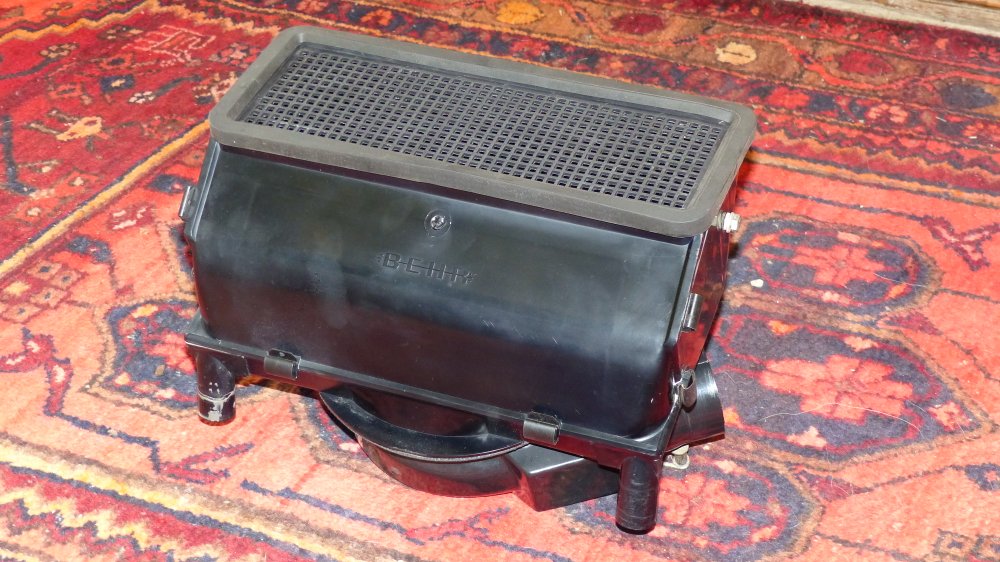 I also took a day to drive to Billings to pick up this Craigslist find. Not the screaming deal I missed out on earlier, but still a good supply of air for half the price it would have cost to buy new. 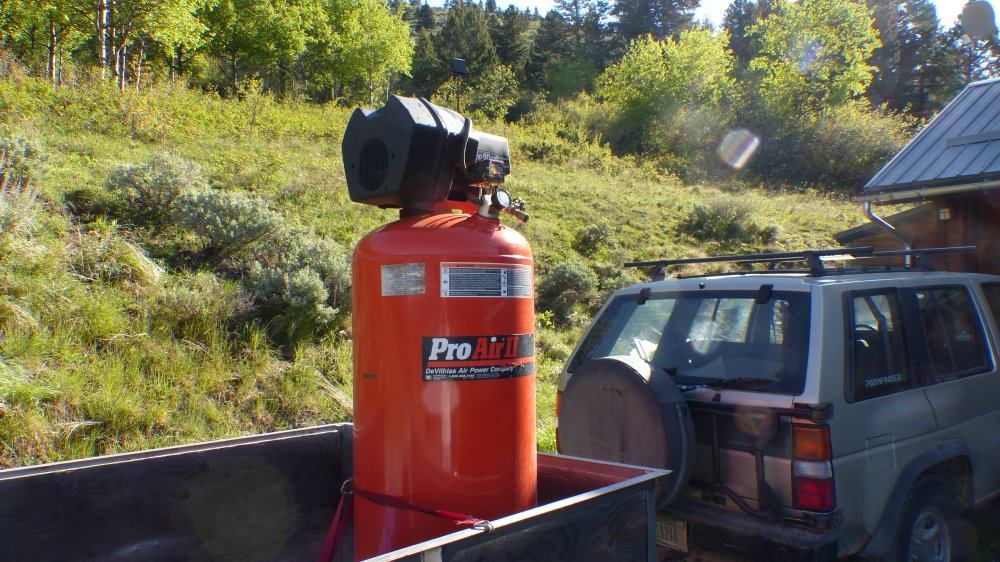 Of course I had to interrupt my work on Saturday to get it up and running. I was able to dust off my old Sharpe air separator/regulator that has been in storage since I sold my old compressor to the new owner of our last house 13 years ago. The next time I am in town, I will pick up an oil fogger and parts to plumb this so I have a clean air line, and an oiled line. I plan to use different style quick connects to prevent accidentally hooking up clean hoses and tools to the oiled line. 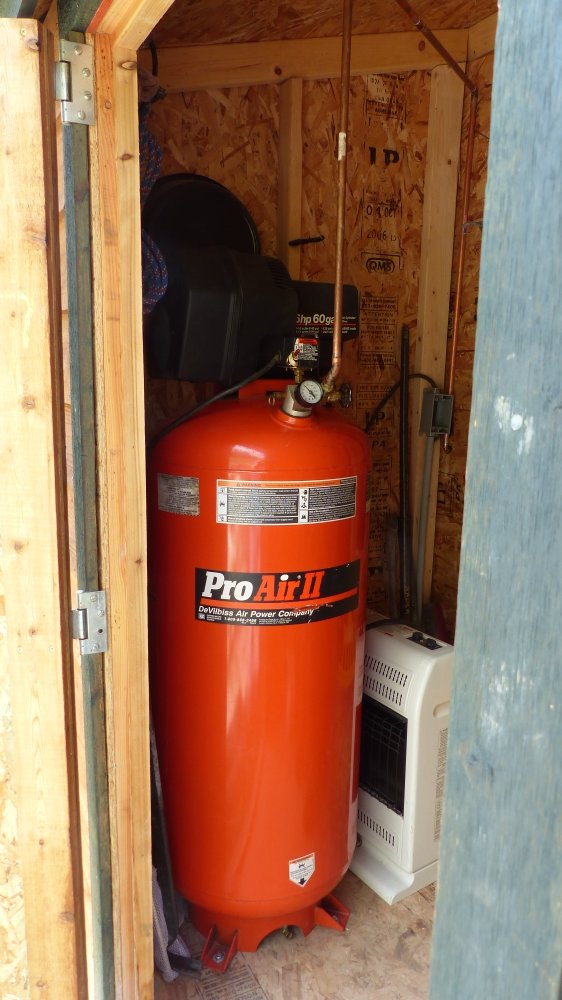 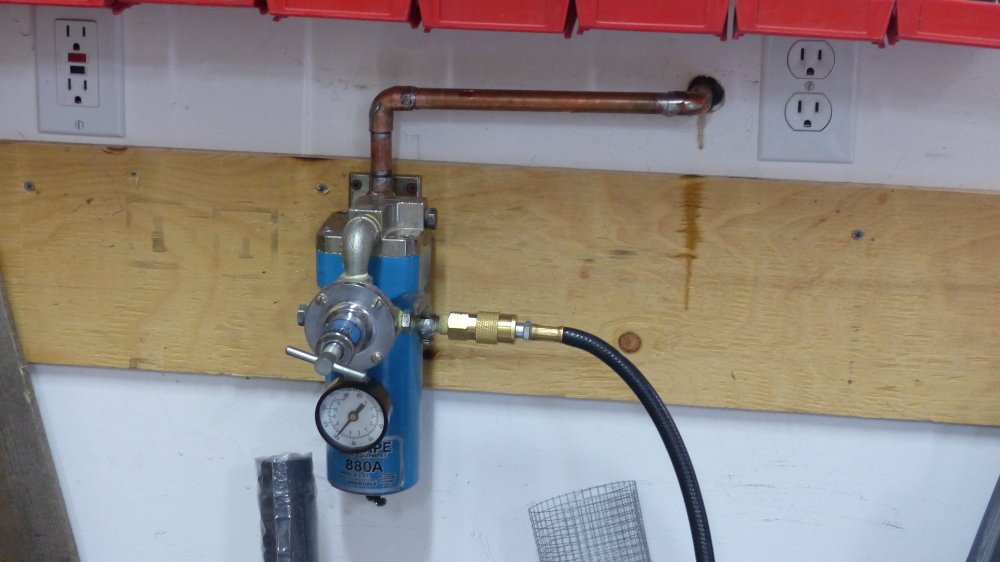 I also used my 25% off HF coupon to pick up a 40 lb. sandblaster on Memorial Day.  FINALLY - REAL PROGRESS! (IMG:style_emoticons/default/rocking nana.gif) Up until now, I have been swimming in the kiddie pool. Time to get serious and do something manly. (IMG:style_emoticons/default/sawzall-smiley.gif) After much planning, I trimmed up the donor front trunk piece. The cancer on my trunk had crept onto the lower wheel wells. My donor piece had enough material to make nice patches. On the driver's side, I cut the spot welds on the wheel well seam to separate the wheel well remnant for later use. The passenger side had less rust so I decided to just include the patch in the trim. This turned out to be a mistake. Unfortunately, the pass side ear under the headlight bucket of the donor piece was damaged beyond repair, so I had to slice it to require a butt weld. 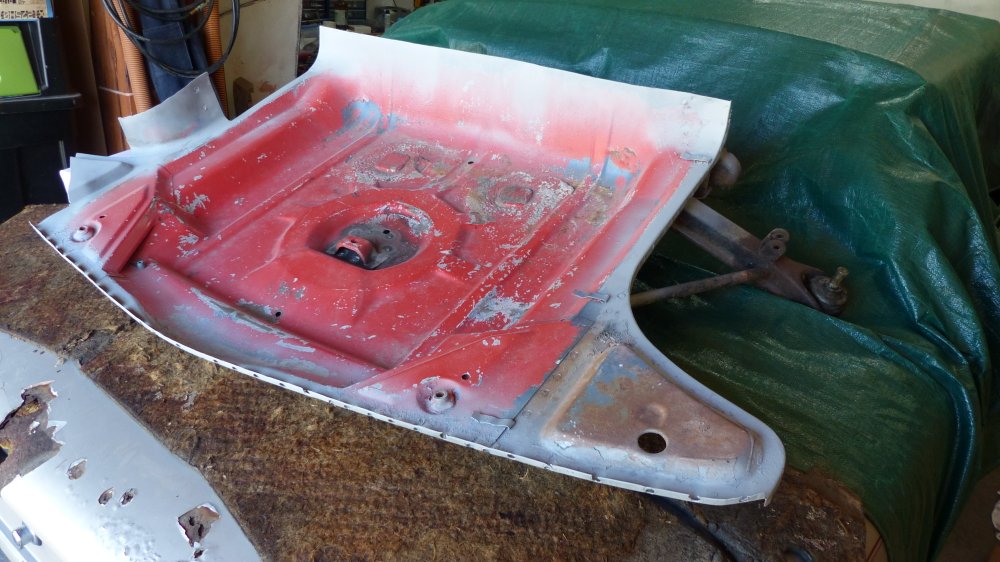 And here is the opening cut out, ready to receive the donor. 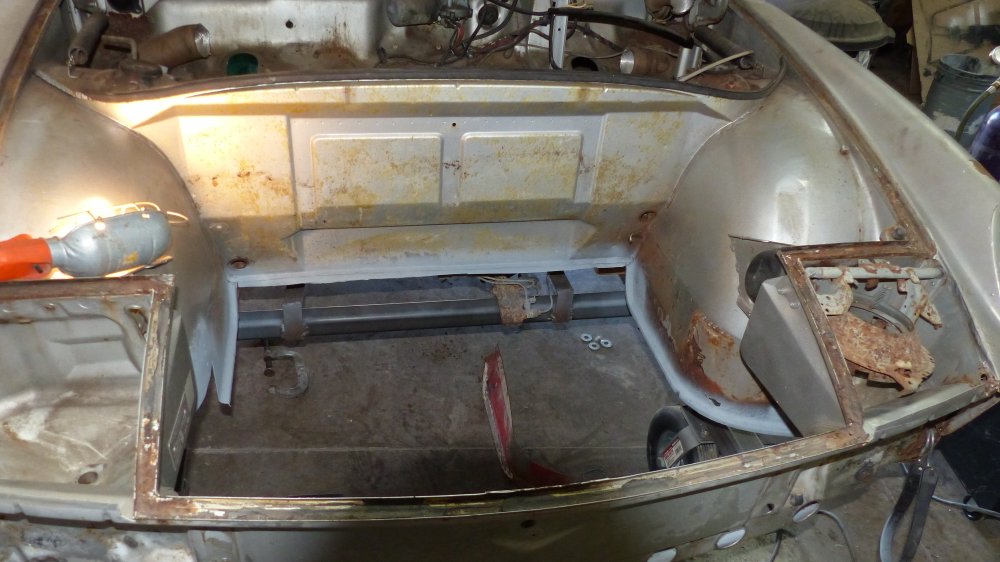 You can see the driver's wheel well patch laying on the floor. I decided to do this in stages to allow aligning the new trunk with the original pinch weld seam before cutting it out. 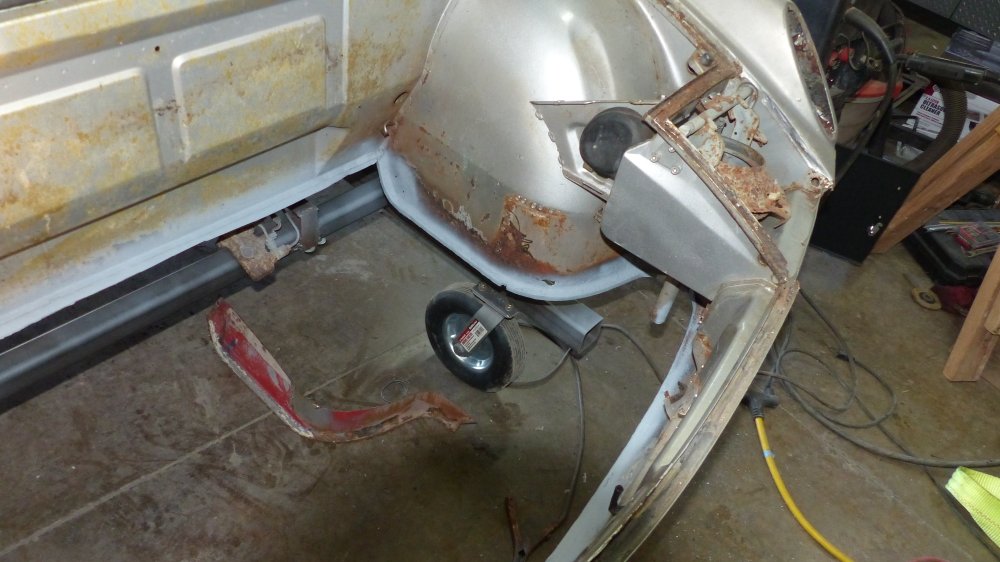 And here you can see the patch cuts for the pass side. 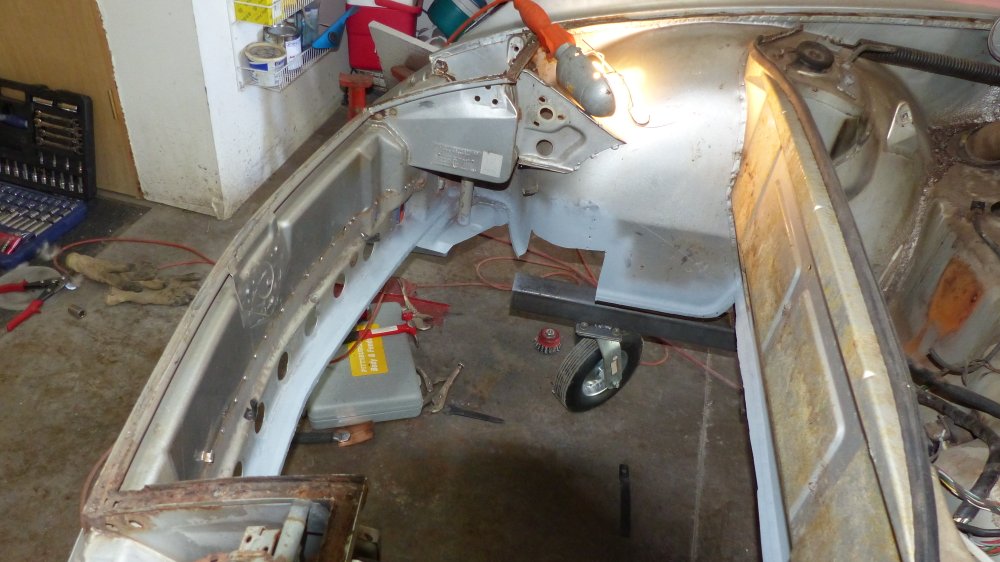 About the biggest PIA was getting the front suspension assembly bolted into place prior to welding to make sure all the mounting points stayed properly aligned. The problem was that the chassis is bolted to the rolling dolly via these same mounting points. So I jacked the front of the car up on a beam of doubled 2x4s to get the necessary clearance (and forgot to take a picture). Despite trying to be very careful, the butt weld gap under the firewall wound up just a little wider than I was shooting for, so I rigged up a copper backing jig to hold things straight and help with blow through using a 1 inch copper pipe attached with washers and self-tapping screws. The copper wires were just to let me hook the jig on from underneath, and then pull it tight from the front to screw into place. 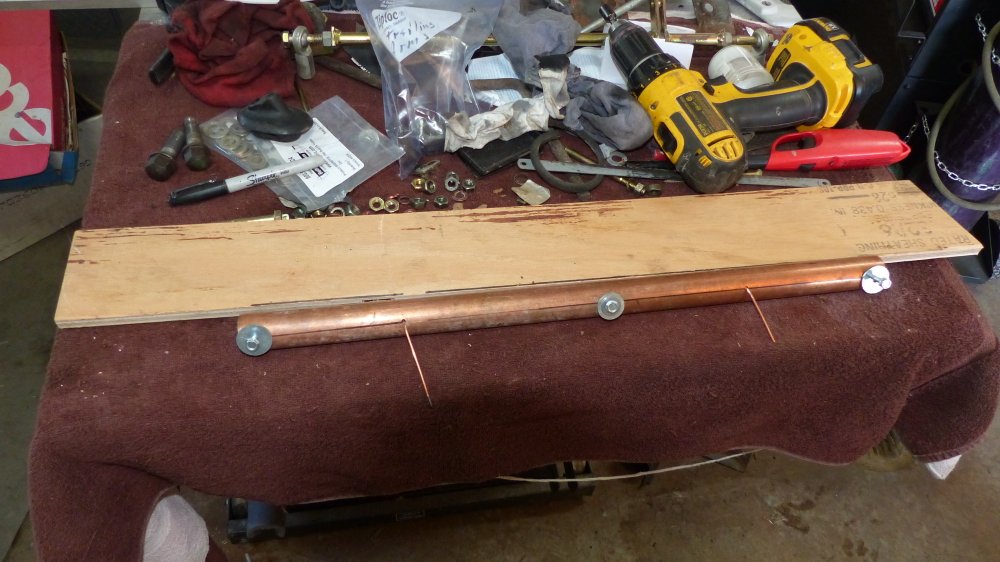 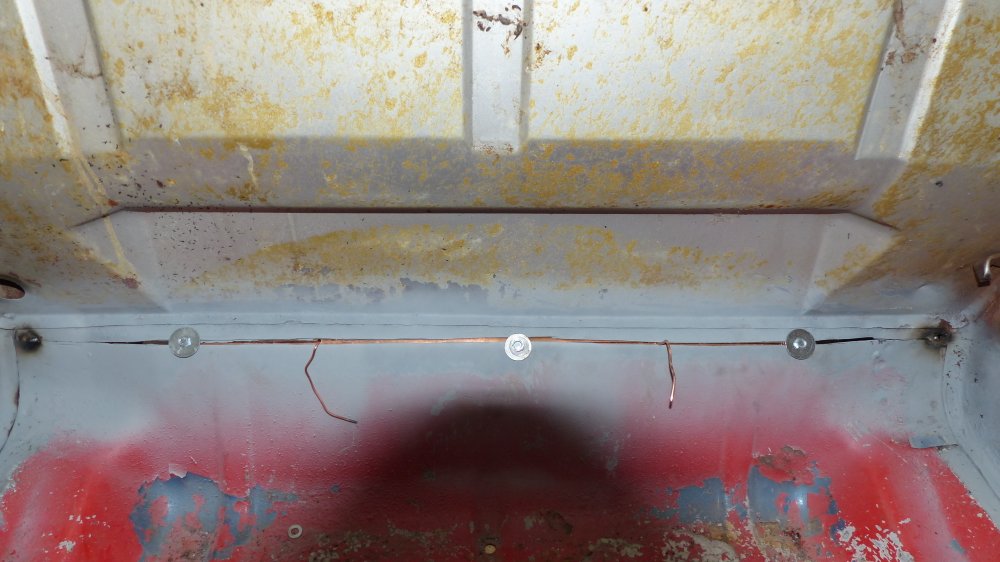 I didn't notice until seeing this picture that I forgot to strip the undercoating off the bottom before welding (IMG:style_emoticons/default/headbang.gif) It didn't seem to affect the welds and I had a fire extinguisher within arms reach at least. 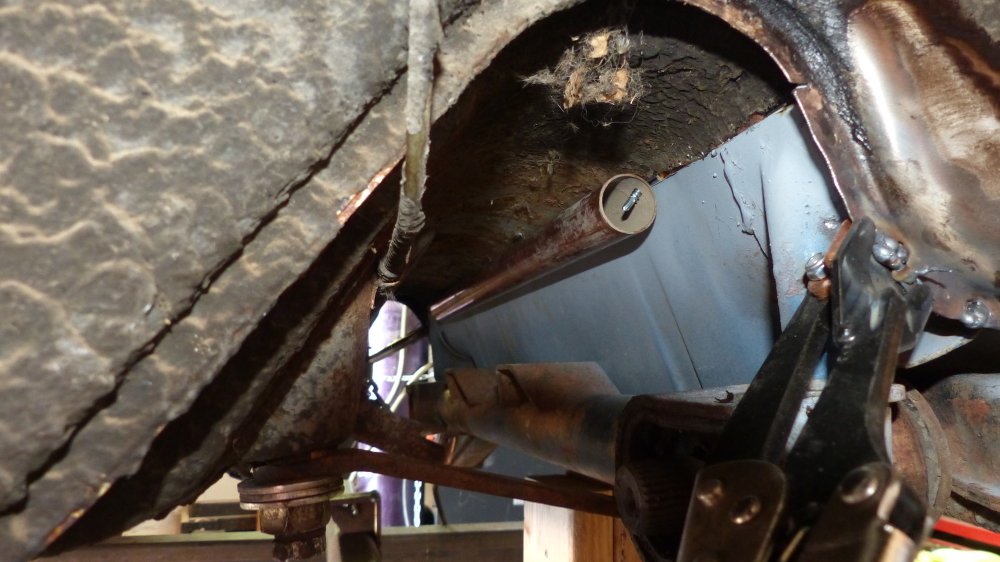 And here it is about half way through tacking. 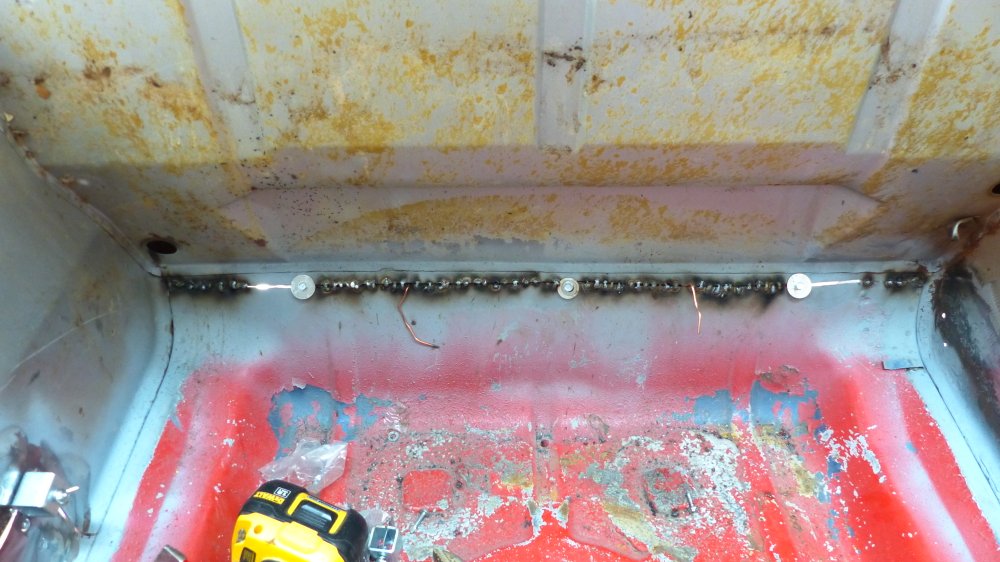 And here it is in place. It will need some metal finishing. The butt weld on the ear turned out great, but the little wheel well patch will need more work. The top of the patch butted against some slightly pitted, but seemingly solid metal which blew out like a mofo when welded. I was able to gap the divide but am not happy with the result and worried it will be too brittle. So I'll be cutting that out and redoing to make sure I get into good, clean metal. When I get the car on a rotisserie, I'll also weld in a reinforcement strip behind that firewall seam. I hate to do it, but that seems like it could be a flex point and I worry about the brittleness of the weld. I did try to minimize heat in doing those tacks, and let things cool down slowly between tack runs. But still... better safe than sorry I think. 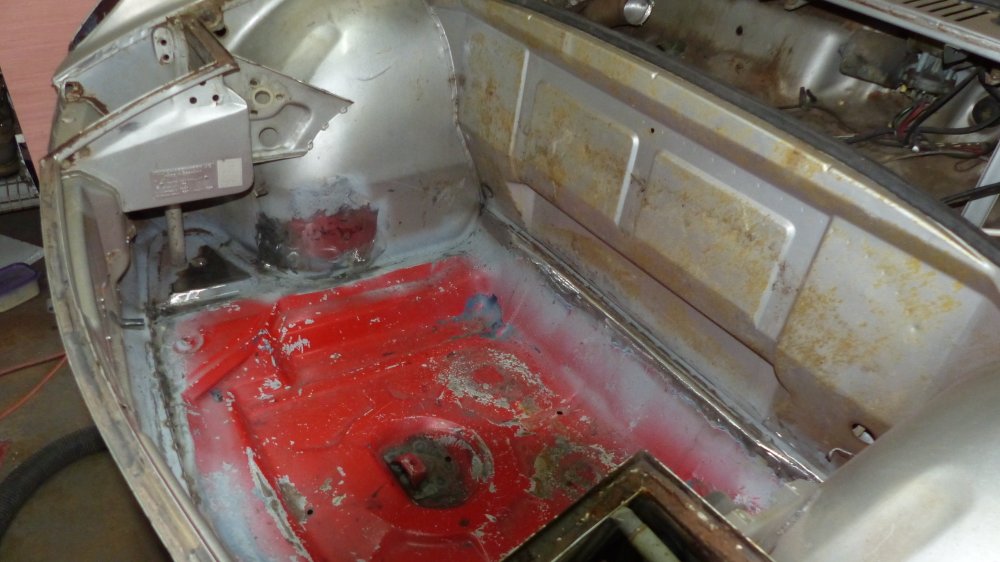 The pinch weld on the driver's side was clamped only, and not welded. 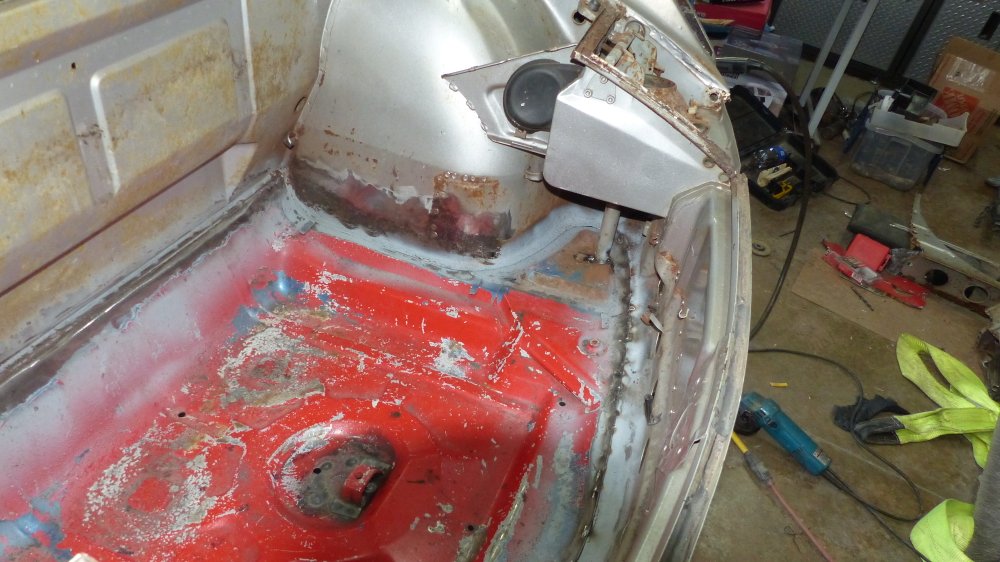 So as soon as I had things in place, I gut another big hole out. 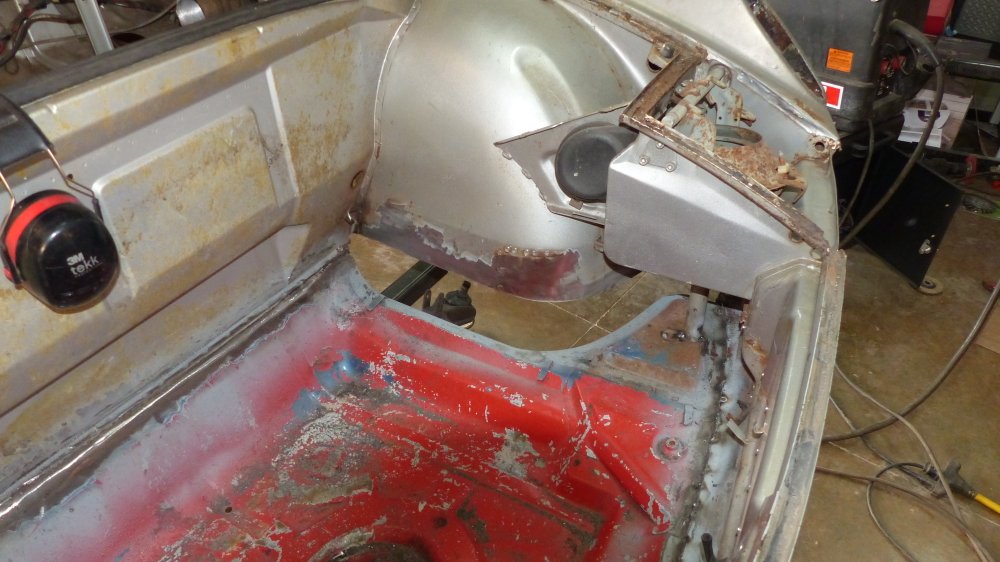 And patched it up. 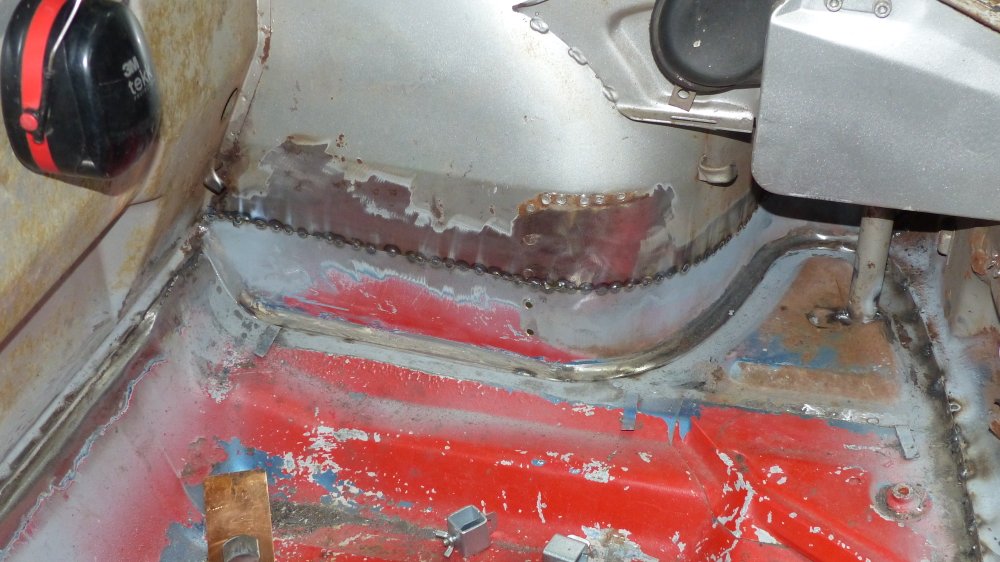 That's where I stopped for the night. My welding was definitely rusty but by the time I got to this last patch, I had my 30 year old Hobart dialed in pretty good and was back in the groove. I should be able to finish tacking this in today and get it ground. It looks like the backside of seam will only require minimal sanding. That's nice. |
|
|
|
| bbrock |
Jun 5 2017, 11:59 AM
Post
#65
|
|
914 Guru Group: Members Posts: 5,269 Joined: 17-February 17 From: Montana Member No.: 20,845 Region Association: Rocky Mountains |
I forgot to mention that the trunk bracing was removed carefully so it can be reinstalled after sandblasting and primer. Figured I'd take advantage of the extra access to that area as long as I can.
|
|
|
|
| bbrock |
Jun 9 2017, 07:17 AM
Post
#66
|
|
914 Guru Group: Members Posts: 5,269 Joined: 17-February 17 From: Montana Member No.: 20,845 Region Association: Rocky Mountains |
QUOTE(Dave_Darling @ Apr 3 2017, 04:07 PM) Sorry, but I gotta ask... Are you gonna be a dental floss tycoon? https://www.youtube.com/watch?v=pSsCU1Dym-Y --DD OT, but I was at my local cedar outlet today to pick up some siding for a garden shed. I had to get a pic of the road sign. 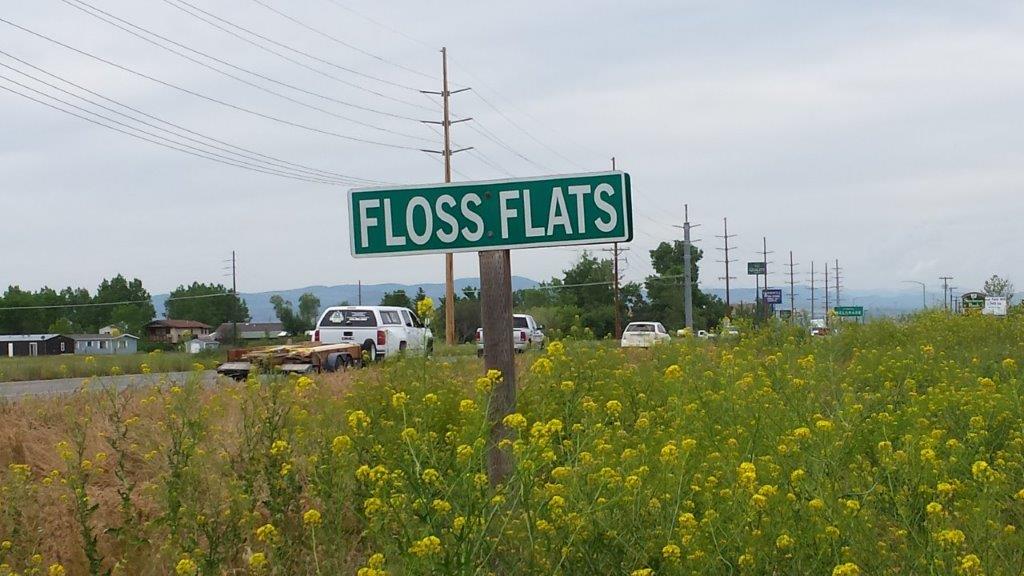 |
|
|
|
| Dave_Darling |
Jun 9 2017, 01:44 PM
Post
#67
|
|
914 Idiot Group: Members Posts: 15,338 Joined: 9-January 03 From: Silicon Valley / Kailua-Kona Member No.: 121 Region Association: Northern California |
Awesome! I wonder if that is a reference to the song at all?
--DD |
|
|
|
| bbrock |
Jun 9 2017, 02:16 PM
Post
#68
|
|
914 Guru Group: Members Posts: 5,269 Joined: 17-February 17 From: Montana Member No.: 20,845 Region Association: Rocky Mountains |
QUOTE(Dave_Darling @ Jun 9 2017, 01:44 PM) Awesome! I wonder if that is a reference to the song at all? --DD Probably a happy coincidence with the name of an early homesteader. But in my mind, this marks the exact spot Frank started his empire. But we have some colorful place names in these parts. Here is my personal favorite: 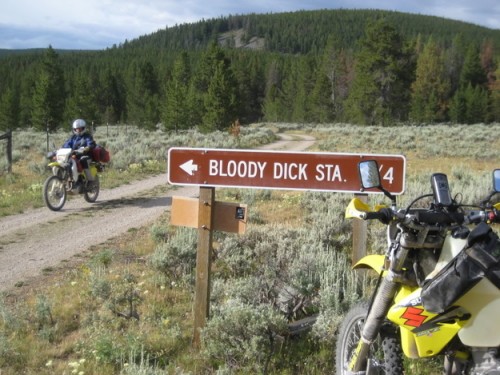 And if you are brave enough, you can stay at the Bloody Dick Cabin. |
|
|
|
| bbrock |
Jul 3 2017, 07:32 PM
Post
#69
|
|
914 Guru Group: Members Posts: 5,269 Joined: 17-February 17 From: Montana Member No.: 20,845 Region Association: Rocky Mountains |
I'm overdue for an update here. There has been more work than progress but things are moving forward. First, I finished up the front trunk for now. There is still some metal finish work to do (I just received my new shrinking disc today), and I won't weld the braces back in until I can blast the areas under the headlamps out and get some epoxy primer on. Might as well take advantage of access to that area while I have it. Overall, I'm pleased with the result.
 Then I lost almost a full weekend of work to finish up our little potting shed that is a hold over project from last fall. 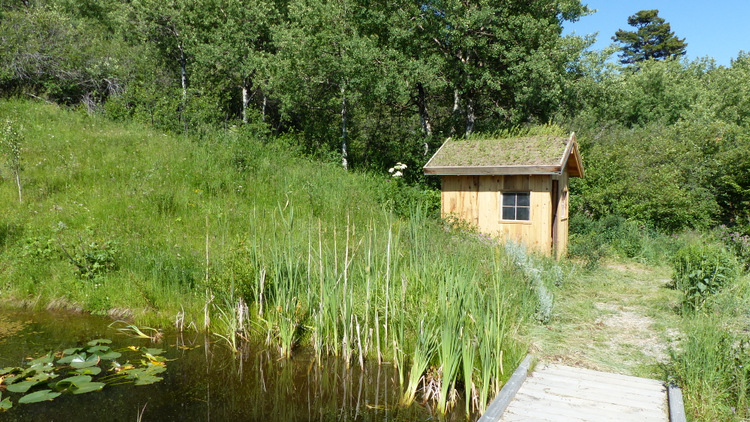 Then it was back to the Porsche. But I knew my shop situation was going to be a challenge when I started this. I needed to make some improvements. So I devised a plan I think will get me through this project, and leave me with a garage bay to park the car when it is done. I did a massive cleaning and reconfiguration of my woodshop space to make room for rolling the Porsche into that side of the garage. Then I used an HF coupon to purchase a 10' x 17' portable garage and assembled it just outside my woodshop garage bay. I left the end at the garage door open so I can roll the Porsche in and out of the garage or tent as the need arises. I'd like to add a second door on that end, but so far I've gotten no response from HF about buying just the door end. I will also have to reinforce this structure before the snows come, or else it will collapse for sure. 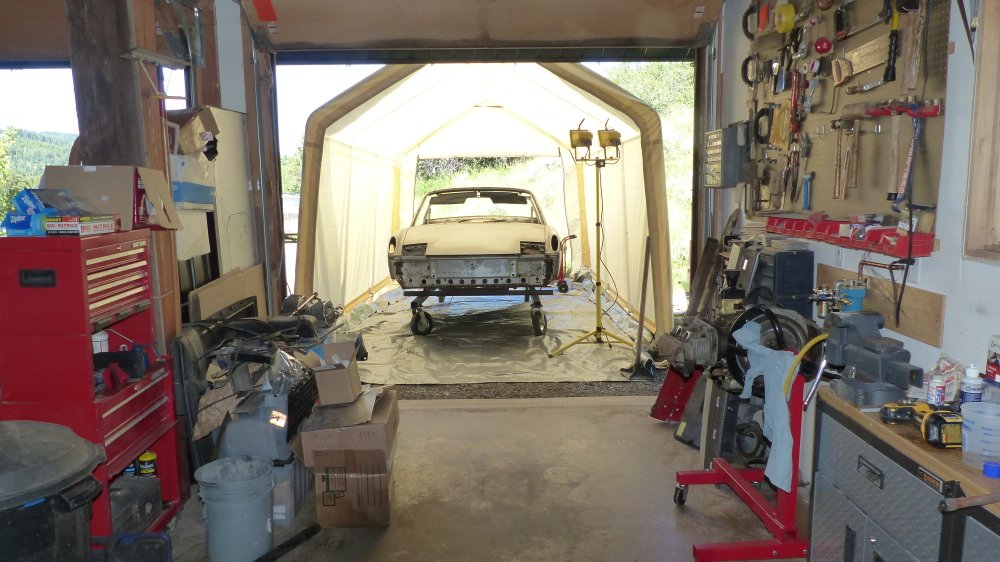 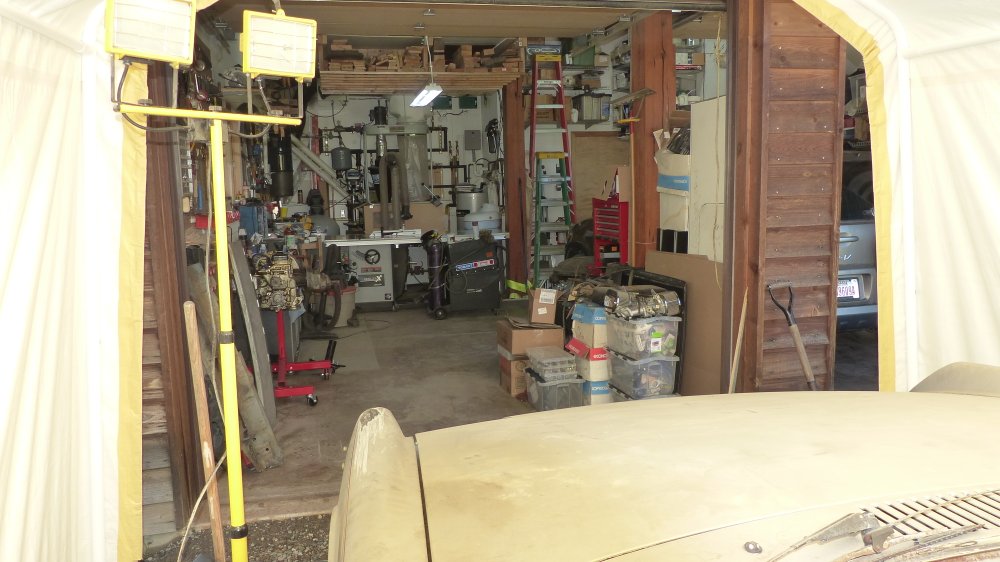 The idea is that the tent will make a makeshift blasting and painting booth. To facilitate rolling the chassis, I had to bring in a yard of road mix to tamp in the driveway to level the transition between driveway and garage floor. Then I covered the gravel with cheap, 1/4" plywood to keep the dolly castors from digging into the fresh gravel. Thicker plywood would be better, but I'm cheap and this does the trick. I can easily pull the car in and push it out by myself. Finally, I covered the tent floor with thick tarp. The tarp catches blasting media for recovery and should help keep dust down when painting time comes. I tested the media recovering by blasting part of the rear trunk area with crushed glass. Then I rolled the chassis into the garage, lifted the edges of the tarp, and was able to shopvac up at least 80% of what I had blasted. A bonus is that I can have the Porsche AND the wife's DD in the garage at the same time. That scored some bonus points. (IMG:style_emoticons/default/cheer.gif) 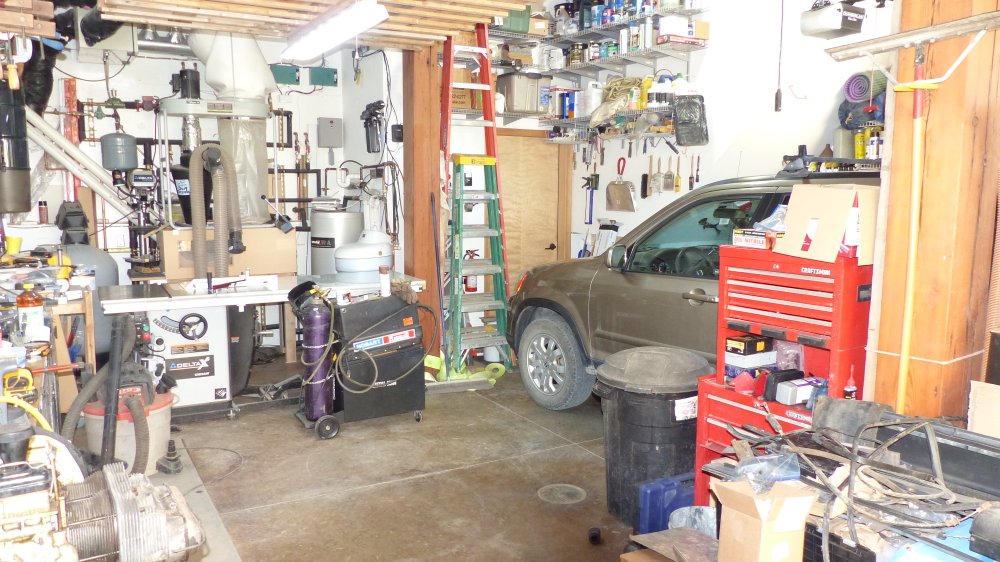 Of course part of the challenge is figuring out how to get the tubs of car parts off the garage floor. So on Saturday, I reclaimed some space from a high shelf in the garage and loaded it with tubs and boxes. I found another spot of unused wall high on another wall, and added another shelf. It was just enough to get everything off the floor. The garage/shop never looked so clean and spacious. Then Saturday evening, there was a rumble and crash and I got (IMG:style_emoticons/default/sheeplove.gif) 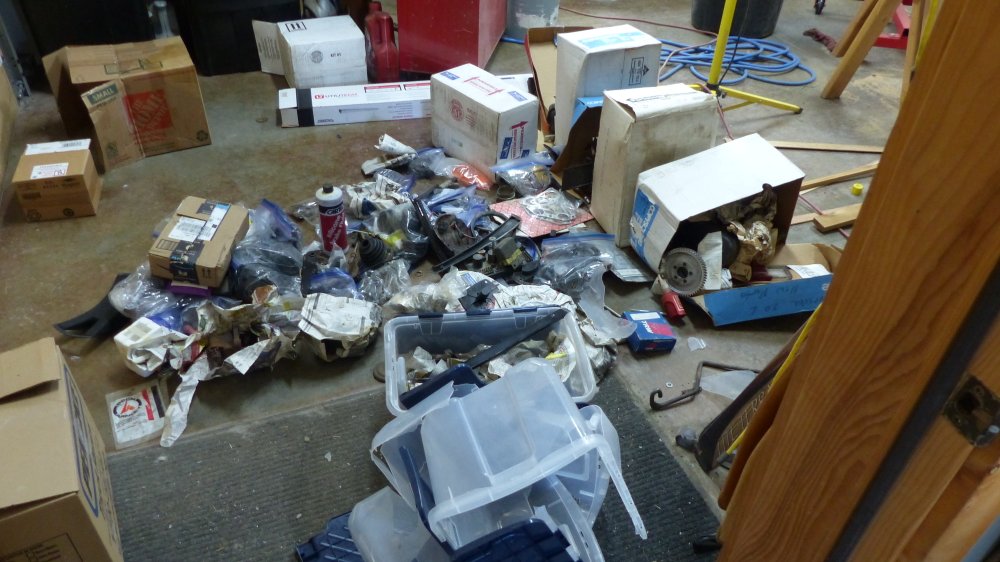 That is what it looks like when you just assume the shelf you installed 10 years ago had heavy duty hardware (IMG:style_emoticons/default/headbang.gif) Overall, I got off lucky. The only damage was two OEM Hella taillight lenses. One was a Euro lens I planned to use. The other was a perfect condition US original that I planned to sell. The euro lens broke cleanly at the glue line between the amber and red sections so is salvageable. Anyone have suggestions on the best glue to use? The US lens is trash. Despite the setback, I had been chipping away at cutting, cleaning, and prepping my donor pieces for the rear trunk during the odd hour here and there. By Saturday evening, I was ready to tack in the tail patch. 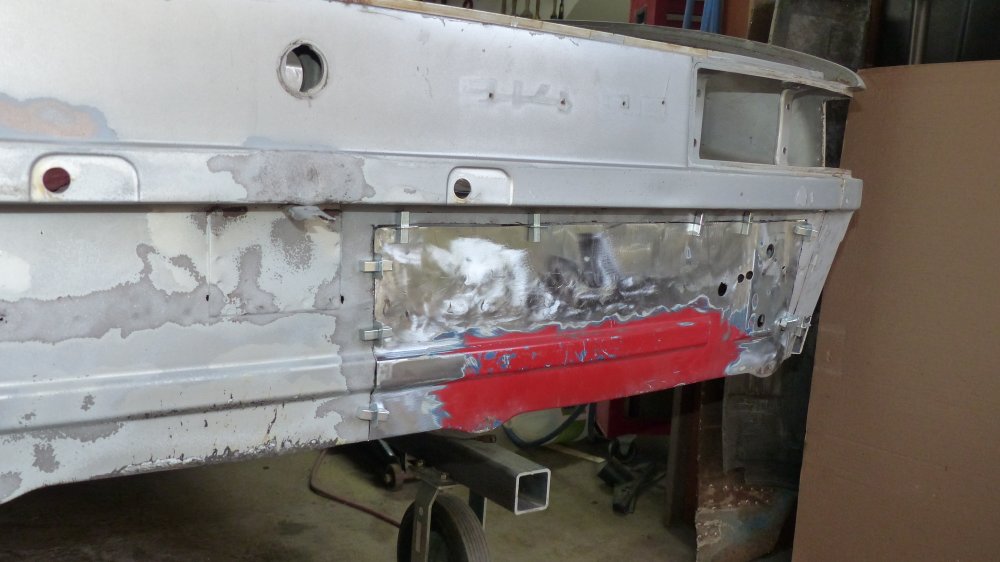 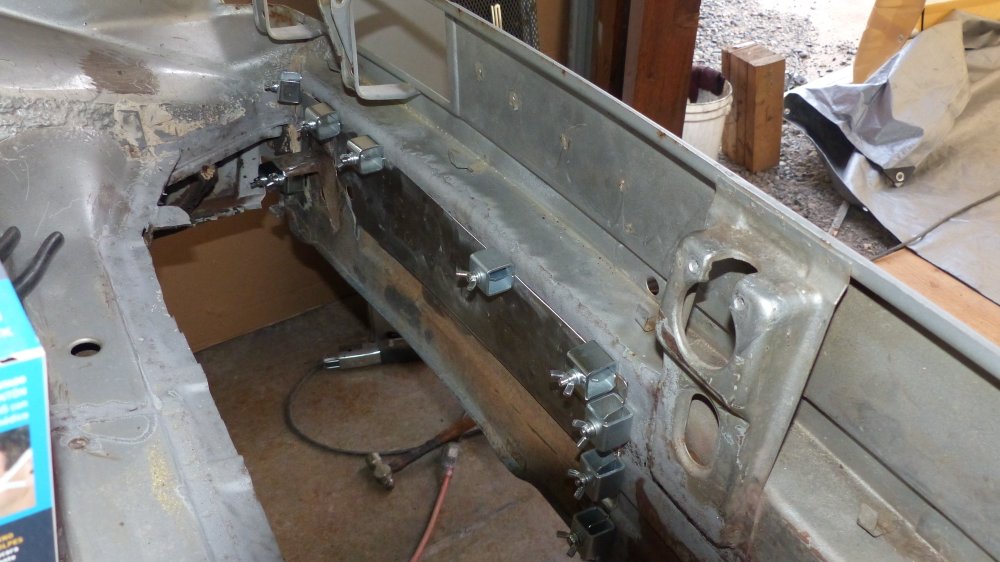 So I did 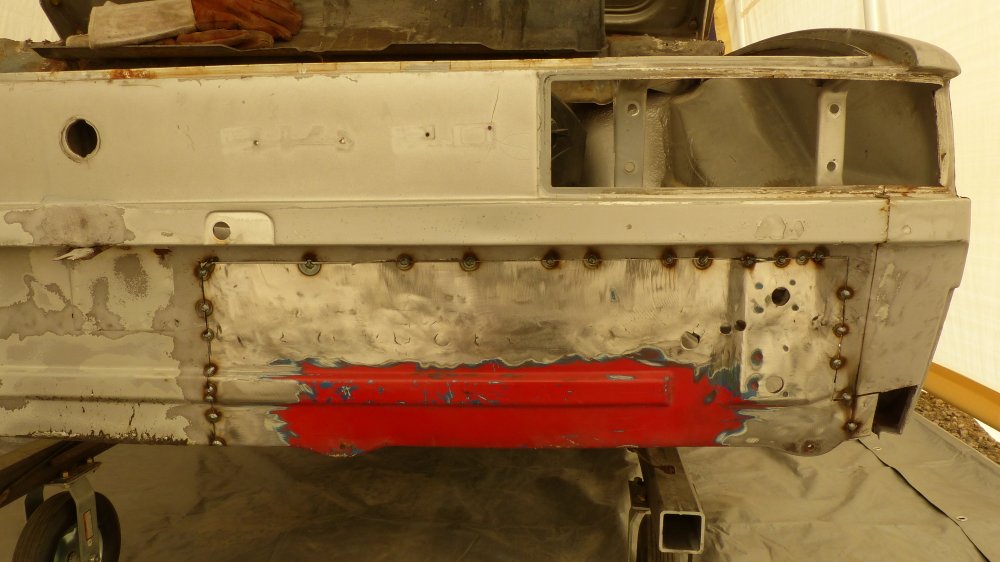 The patch is slightly lumpy along the spot weld line from having to weld up all the spot weld cutter holes. But it isn't too bad and I'm hoping my new shrinking disc with some hammer and dolly work will smooth it out. But first I need to finish welding in the patch. So that's where things stand now. Next will be patching the rear trunk floor which should go pretty quick. Then the fun stuff with the outer longs. (IMG:style_emoticons/default/sawzall-smiley.gif) (IMG:style_emoticons/default/smash.gif) |
|
|
|
| bbrock |
Jul 10 2017, 06:17 PM
Post
#70
|
|
914 Guru Group: Members Posts: 5,269 Joined: 17-February 17 From: Montana Member No.: 20,845 Region Association: Rocky Mountains |
This weeks update is a short one. I got the tail patch welded and ground...
 and welded in the rear trunk floor patch. 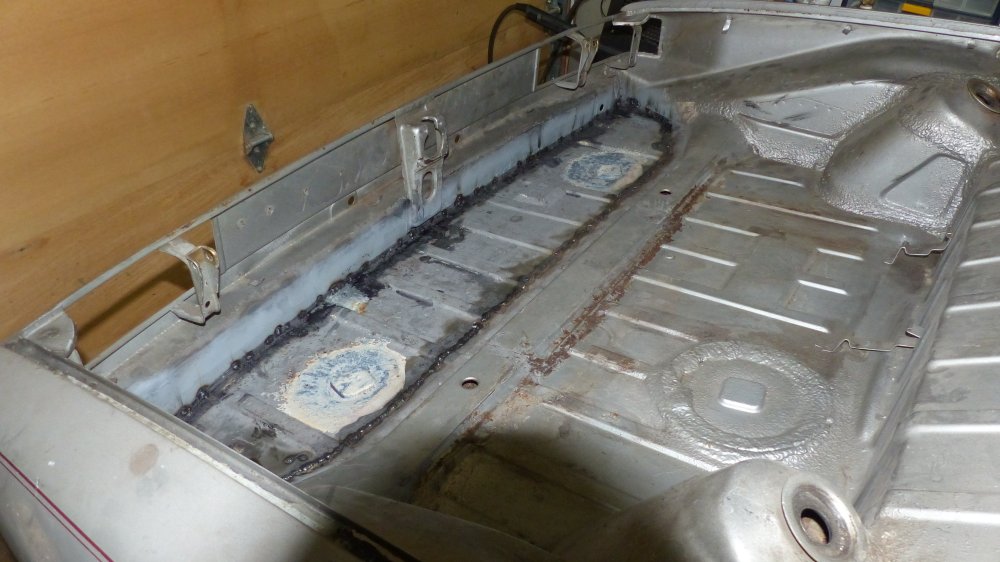  Got to use my new shrinking disc on the tail to smooth out the lumps created from welding the spot weld cutter holes shut. It worked great. The surface is within about 1/32" of smooth. I think I could get it to perfection with a lot more time and effort, but 1/32" of filler seems a fair price to pay for gaining time for other work. I still have a small patch to fabricate on the lower right corner of the tail. Donor patch didn't quite cover that area. The donor patch for the floor had some pitting at the rear edge under the seam sealer. It's still solid metal but caused a bit of bubbling on some of the plug welds. But it is attached solidly and the welds will be ground down and buried under seam sealer when all is done anyway. After applying epoxy primer, I'll smooth the pitted areas with a thin layer of FG reinforced filler. For now, I brushed on a coat of Jasco to convert any lingering rust left after blasting with crushed glass. Unfortunately, I have to leave town for a week so won't be able to grind the butt weld to see the final project until I return. But it feels good to having the junk in the trunks almost taken care of. Getting closer to ordering some RD steel and diving into those longs. |
|
|
|
| tygaboy |
Jul 10 2017, 06:33 PM
Post
#71
|
|
914 Guru Group: Members Posts: 5,810 Joined: 6-October 15 From: Petaluma, CA Member No.: 19,241 Region Association: Northern California |
Man, that's a lot of inches of seam welding you've done on your car. Looks really good! (IMG:style_emoticons/default/aktion035.gif)
I've been holding off on a similar repair I need to do to my rear panel and you're motivating me to get after it! Keep up the great work (and the pics) and continued success on your build. (IMG:style_emoticons/default/smilie_pokal.gif) |
 |
|
| bbrock |
Jul 10 2017, 07:36 PM
Post
#72
|
|
914 Guru Group: Members Posts: 5,269 Joined: 17-February 17 From: Montana Member No.: 20,845 Region Association: Rocky Mountains |
QUOTE(tygaboy @ Jul 10 2017, 06:33 PM) Man, that's a lot of inches of seam welding you've done on your car. Looks really good! (IMG:style_emoticons/default/aktion035.gif) I've been holding off on a similar repair I need to do to my rear panel and you're motivating me to get after it! Keep up the great work (and the pics) and continued success on your build. (IMG:style_emoticons/default/smilie_pokal.gif) Thanks. I think we are inspiring each other because I've been following your build. When I have to fab pieces for my longs and floor, I hope they turn out half as good as yours. (IMG:style_emoticons/default/beer.gif) A better picture would reveal that there are a few spots on that seam that look like a bird took a (IMG:style_emoticons/default/post-2-1117899824.gif), but not too many. I really struggled over where to make that seam. I wanted to hide it under the center support channel but that looked like it would get involved with the transmission mounts and other stuff. In the end, I'm happy with where things sit. But I was nervous as hell about it. The nice thing about a monster butt joint like this is that there is a lot of real estate to move your tack welds around in and keep things cool. It still took a couple hours of "tack - tack - tack - wait...." though. |
|
|
|
| bbrock |
Aug 10 2017, 12:59 PM
Post
#73
|
|
914 Guru Group: Members Posts: 5,269 Joined: 17-February 17 From: Montana Member No.: 20,845 Region Association: Rocky Mountains |
Overdue for an update again.
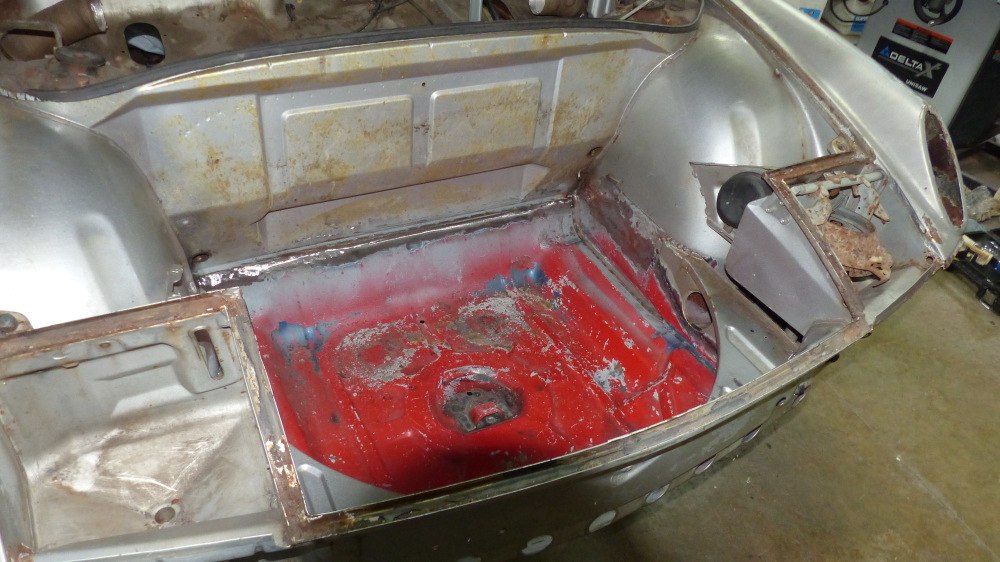
As usual, I like to divide time between rustoring the chassis and a more fiddly task I can do while relaxing on the couch, staring at the idiot box. This time, it was re-keying the door locks. I ran into a problem with the pass side door handle when the outer stud just spun free and detailed in another thread. Probably as a result of trying to get that handle off, I found a hairline crack where the hinge arch meets the mounting tab. (IMG:http://www.914world.com/bbs2/uploads/post-20845-1501039695.jpg) I knew that would bite me in the butt eventually so decided to attempt a solder repair with a propane torch to reinforce the crack to maybe by some time. I figured the handle was toast otherwise so nothing to lose. The repair actually went well and I think I had it... But then I decided to touch it up just a little better... (IMG:style_emoticons/default/headbang.gif) I wound up blowing out a chunk of the hinge arch with the torch. It didn't blow all the way through, but enough to weaken the piece. Undeterred, I decided to experiment with the limits of cheap pot metal repair. So I melted on a big glob of silver solder and then ground and shaped it back to it original form. (IMG:http://www.914world.com/bbs2/uploads/post-20845-1501207880.jpg) Amazingly, that seemed to actually work! I reassembled the handle with spring and reefed on it a bit to see if it would hold. It did! And then I noticed that the hole on the repaired side was ever so slightly misaligned so the gap with the flapper tapered a tiny bit... like maybe 1/64". I stewed on it awhile and decided I couldn't live with that. So I decided to touch it up to make it perfect. (IMG:style_emoticons/default/headbang.gif) (IMG:style_emoticons/default/headbang.gif) (IMG:style_emoticons/default/headbang.gif) (IMG:style_emoticons/default/fyou1.gif) And here is the result:  I cry Uncle! If anyone has a handle with a busted flapper but good base they would like to sell.... (IMG:style_emoticons/default/pray.gif) Anyway, rekeying the locks was a piece of cake. Dan (a.k.a. Tweet) set me up with new tumblers. He actually went way beyond what I expected to get this done with minimum cost. Dan also sold me a nice ignition lock to replace the VW part that I had on the car, and a new key blank that I will have cut to code. Now I have all of my locks working with the original key for this car (glove box lock not shown because it already fit the key so I didn't mess with it). The frunk handle was also refreshed with a new coat of paint. 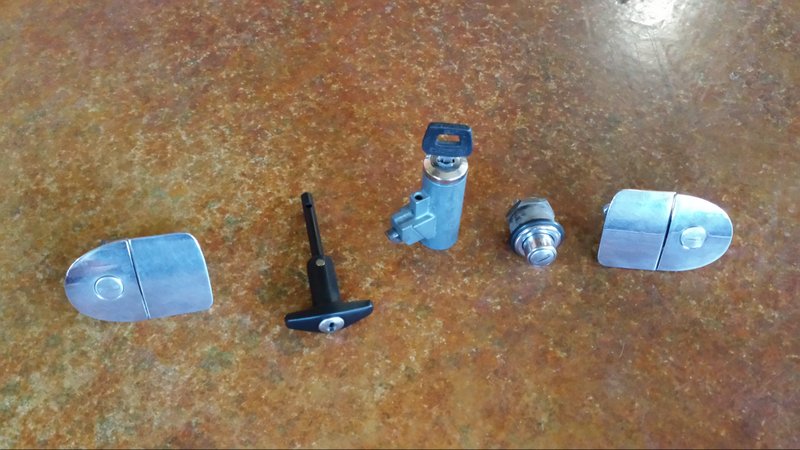 Going to hell. Back on the car, it was time to dig into the hell hole. This is the make or break moment for the project. I had peeked inside with a fiber optic scope before, so there were no real surprises when I opened up the long. It's bad. 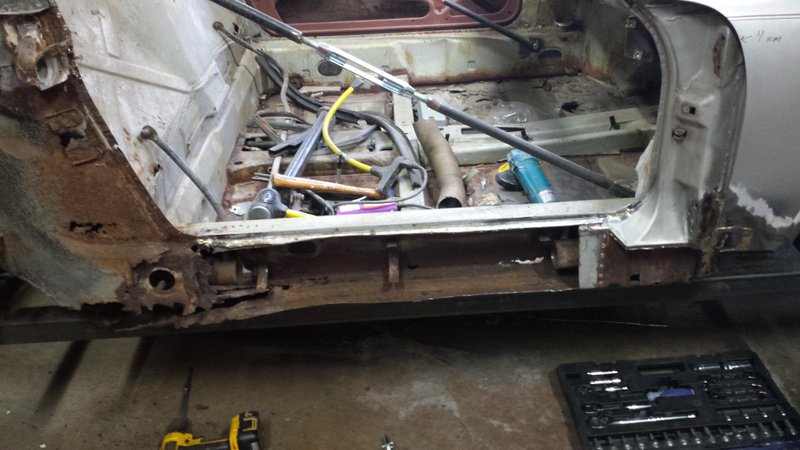 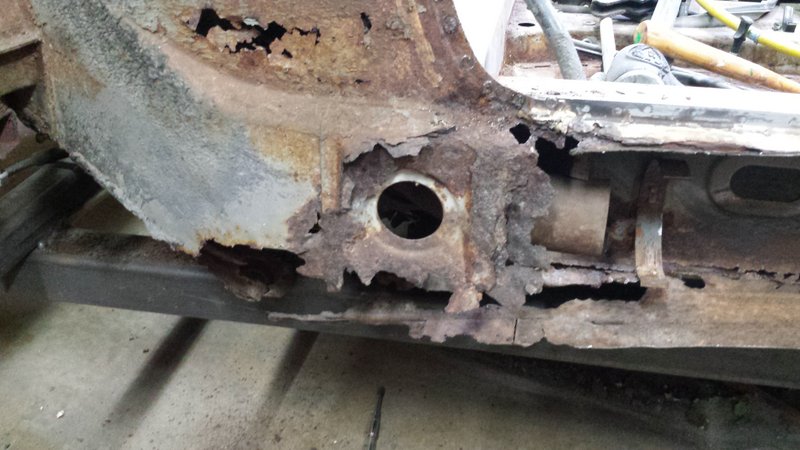 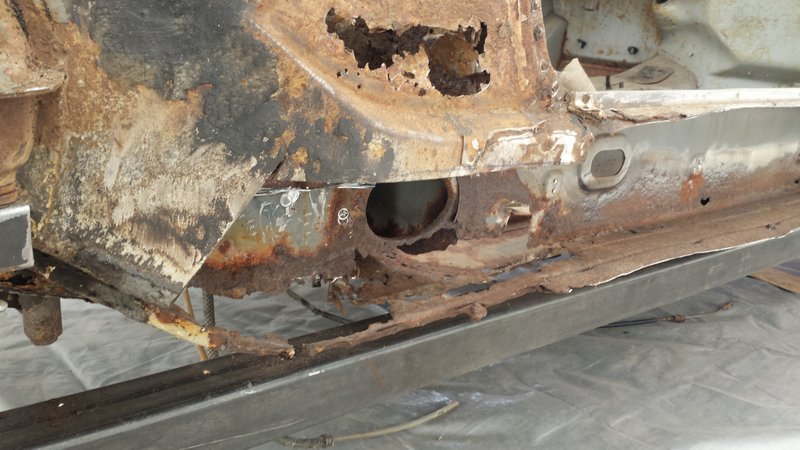 And still bad after a bit of cleanup. 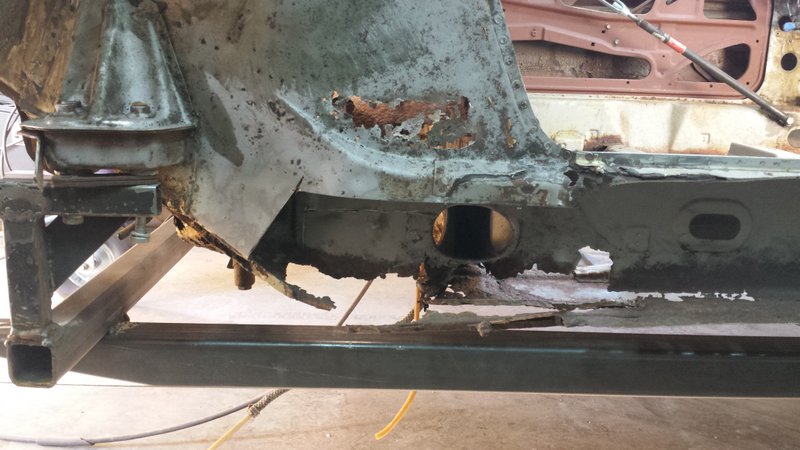 After gaining insight and inspiration from many previous build threads, my plan is to rebuild the inner wheel well and lower section of inner long with fabbed parts and button up the outside with RD pieces. I believe I can do this without removing that outer suspension console. I started with the top of the inner long in the wheel well by fabbing a patch made out of one of the sail panels I previously removed for replacement. Before this project, I didn't even know what a metal shrinker and stretcher was. This was my first attempt using one. I like these tools!  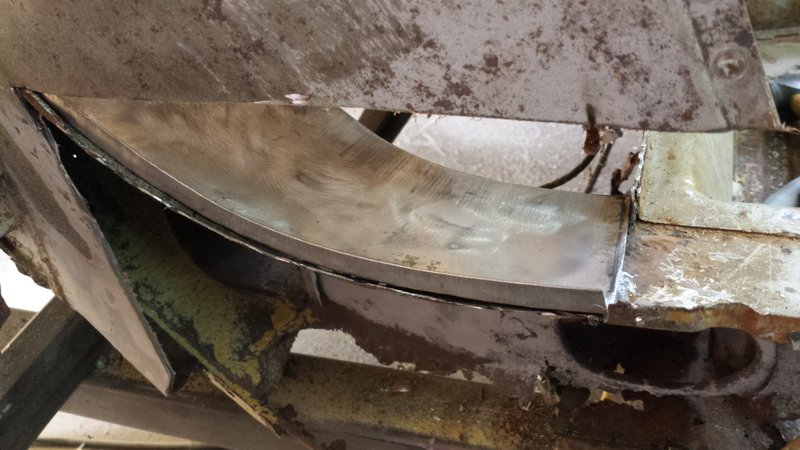 I carefully gut away just the top layer to keep the inner double layer intact. After cutting around the perimeter with a dremel and cutoff wheel, the layers were easily separated with an air chisel. I drilled the inner wall for rosette welding to the new patch. This should provide a strong reinforcement to the patch. Many thanks to Cary for pointing out the U-Pol copper rich weld through primer! (IMG:style_emoticons/default/smilie_pokal.gif) I had been using Eastwood's self-etching weld-thru and hate it. This copper stuff is fantastic.   Then it was just a matter of clamping the patch in place and welding it up. 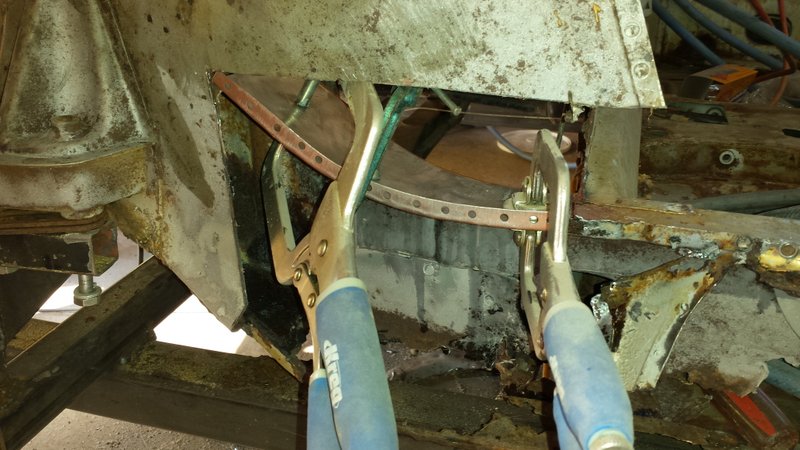 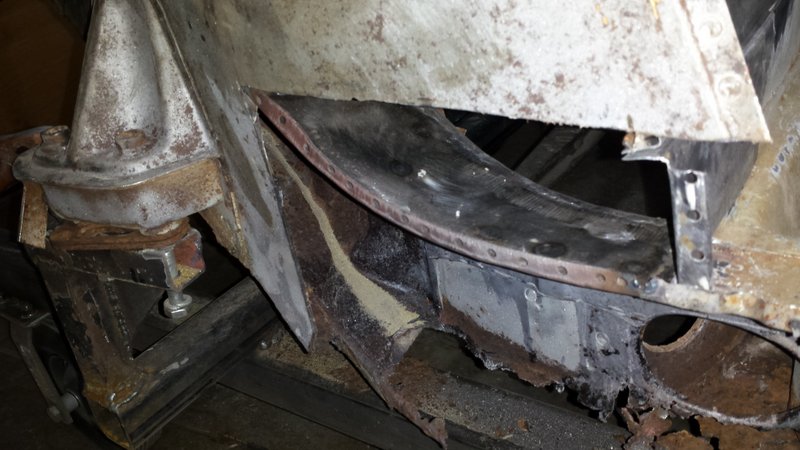 While I was there, I decided to patch the rust on the firewall. 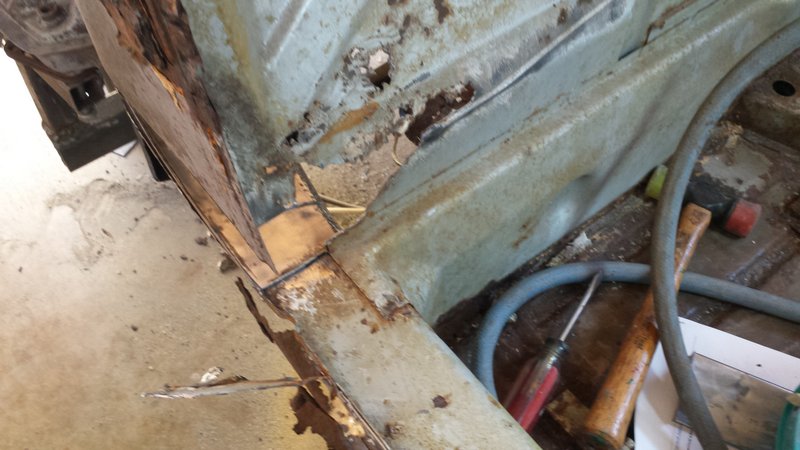 I fabbed a couple patches from the other sail panel. So far, all the patches in this car have been made either from metal removed elsewhere on the car, or from unused portions of donor parts from other 914s. For some reason, I think that's kind of cool. The upper piece was my first complex bend on this project. I'm happy with how it turned out and this gave me confidence going forward. Here are the patches loose before cutting out the rust. 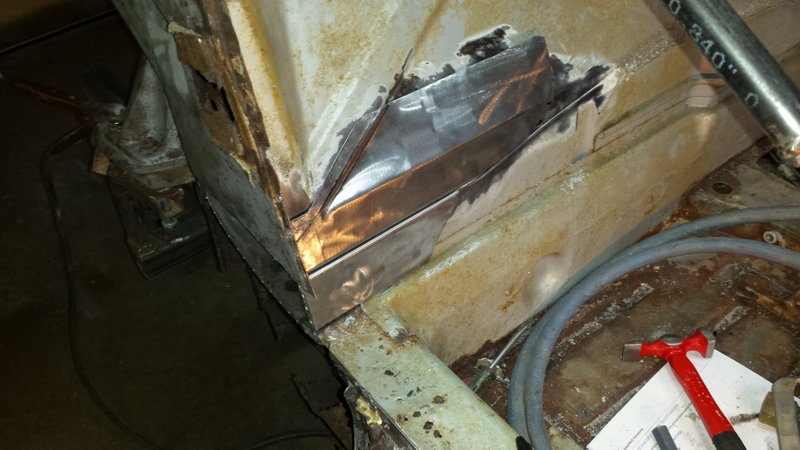 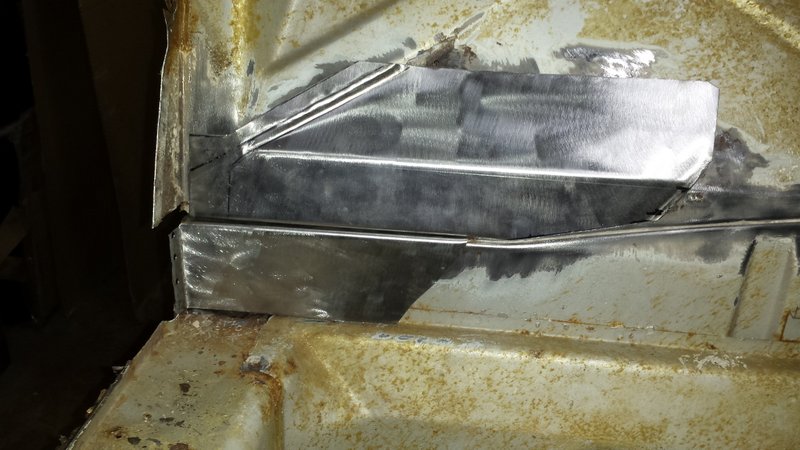 And here they are, welded in with just a little more grinding to go. I had one spot that blew through over the bend at the lower right of the upper section. I lost the definition of that bend repairing the blowout and the location of the rear engine shelf made it impossible to get a dolly behind to bump the crease back in. So I tried my hand at using body solder. My hat is off to anyone who has the skill to use this stuff (IMG:style_emoticons/default/pray.gif) I don't! In the end, I did get the bend somewhat redefined but couldn't get the solder to feather out the way I'd like. You can see my botched solder job just above where the pinch seam runs diagonal. 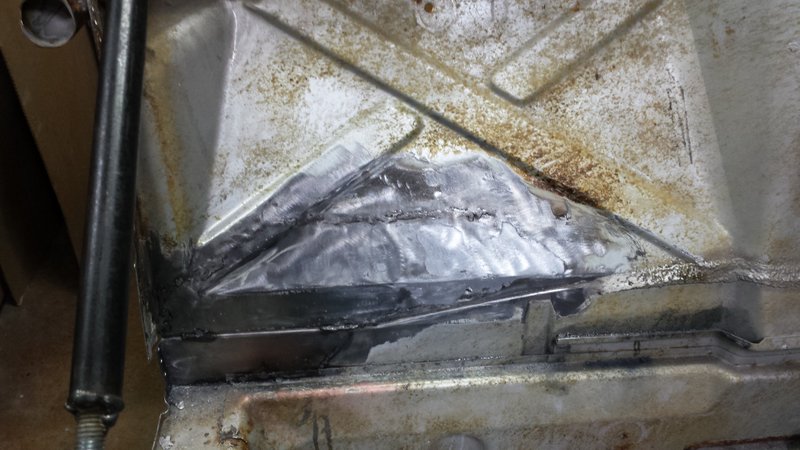 I'm still having trouble with that sunken edge around the welds preventing me from being able to grind the weld smooth without grinding away parent material. Do I need to increase my wire speed to get more fill in there? Structurally, it is sound, but it would be nice for all those welds to disappear without using filler. 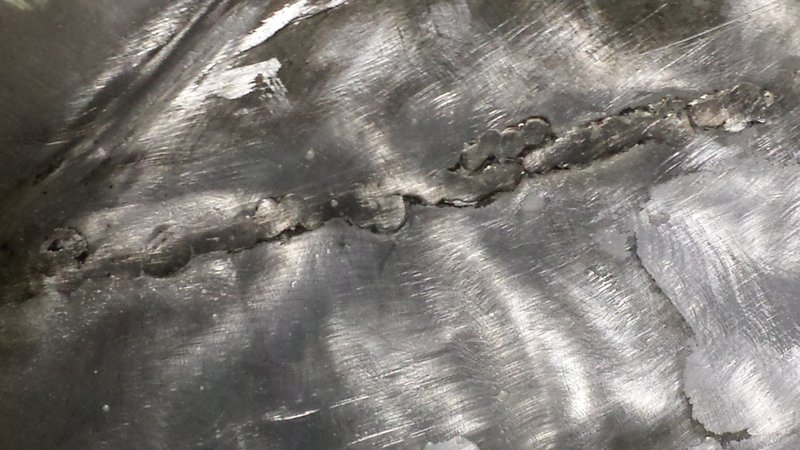 And here it is with a temporary coat of primer. Not perfect, but not bad. I think it will look perfect with a very thin skim of FG reinforced filler. The dark spot is wet paint - not a dent. That weld bead in the pinch seam looks worse in these pics. But I think I'll hit it with the grinder anyway. 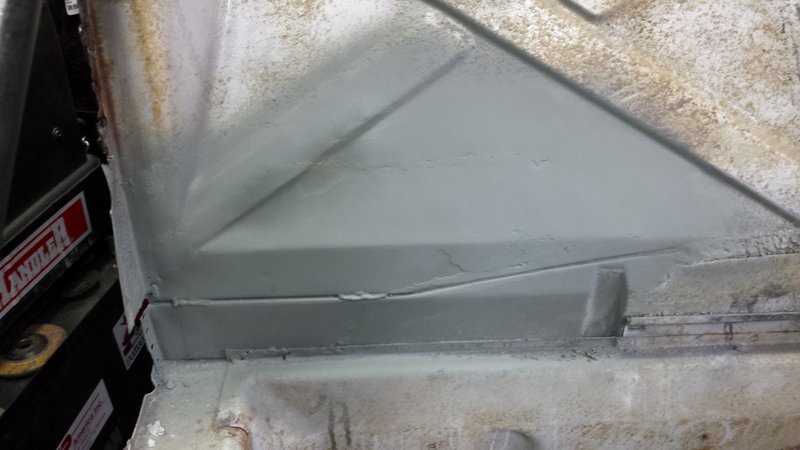 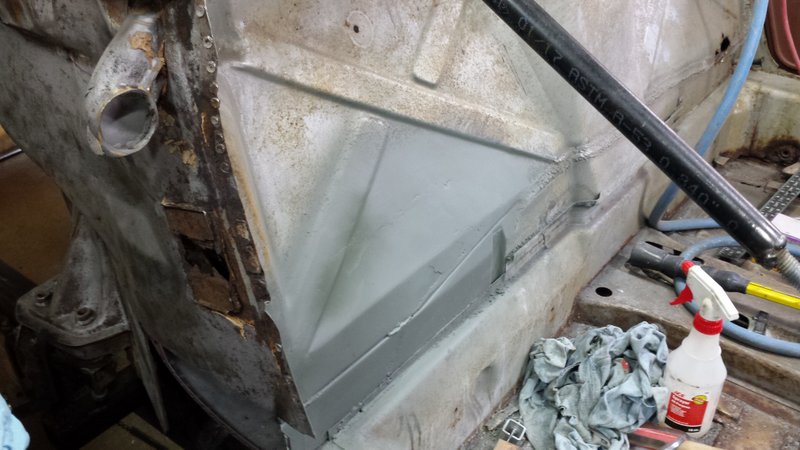 That's how it looks today. Next up is rebuilding the lower part of both layers of that inner wheel well. Attached image(s) 
|
|
|
|
| tygaboy |
Aug 10 2017, 01:29 PM
Post
#74
|
|
914 Guru Group: Members Posts: 5,810 Joined: 6-October 15 From: Petaluma, CA Member No.: 19,241 Region Association: Northern California |
QUOTE(bbrock @ Aug 10 2017, 11:59 AM) I'm still having trouble with that sunken edge around the welds preventing me from being able to grind the weld smooth without grinding away parent material. Do I need to increase my wire speed to get more fill in there? Structurally, it is sound, but it would be nice for all those welds to disappear without using filler. I think you're running into the heat shrinkage causing the "dip" that prevents you getting at the entire weld bead. If you were gas welding or even TIG, you could hammer and dolly to stretch it back to flat. With MIG, about all I found that works better is going REALLY slowly. Like: one tack, hit it with compressed air until it's cool, next tack, cool, repeat until you're ready to kill yourself... or accept the fact that it's going to be under the back pad and no one will ever see it. That said, I have the same "but I'll know it's there" problem and I agonize over every bit where you can tell it's been repaired. BTW, that complex patch piece you made looks fantastic! Nice fab work. Chris |
|
|
|
| burton73 |
Aug 10 2017, 01:42 PM
Post
#75
|
|
Senior member, and old dude Group: Members Posts: 3,994 Joined: 2-January 07 From: Los Angeles Member No.: 7,414 Region Association: Southern California |
Brock,
You really are doing a great job on restoring you car. I have fear that a lot of people do bad jobs on welding their cars and that there are a lot of cars that the owners say they are restored but in fact they really are crap. You should be very proud of bringing back you car that has great memories for you. Bob B (IMG:style_emoticons/default/welder.gif) |
|
|
|
| bbrock |
Aug 10 2017, 02:50 PM
Post
#76
|
|
914 Guru Group: Members Posts: 5,269 Joined: 17-February 17 From: Montana Member No.: 20,845 Region Association: Rocky Mountains |
QUOTE(tygaboy @ Aug 10 2017, 01:29 PM) QUOTE(bbrock @ Aug 10 2017, 11:59 AM) I'm still having trouble with that sunken edge around the welds preventing me from being able to grind the weld smooth without grinding away parent material. Do I need to increase my wire speed to get more fill in there? Structurally, it is sound, but it would be nice for all those welds to disappear without using filler. I think you're running into the heat shrinkage causing the "dip" that prevents you getting at the entire weld bead. If you were gas welding or even TIG, you could hammer and dolly to stretch it back to flat. With MIG, about all I found that works better is going REALLY slowly. Like: one tack, hit it with compressed air until it's cool, next tack, cool, repeat until you're ready to kill yourself... or accept the fact that it's going to be under the back pad and no one will ever see it. That said, I have the same "but I'll know it's there" problem and I agonize over every bit where you can tell it's been repaired. BTW, that complex patch piece you made looks fantastic! Nice fab work. Chris Thanks for the tips Chris. I think you are exactly right about what happened on the welds here. My usual method is even more painful. I typically put in just a few tacks spread out around the patch and then walk away and let things cool down slowly thinking that a slow cool will be less brittle than if I rush it. I have no idea if there is any truth to that. But because of all the bends in this panel, I wasn't quite as worried about warping so I got cocky and tried throwing down three or four tacks in a row and then let it cool. Looking back, where I did that is exactly the spot I showed. Your post helped me think it through. I have yet to grind the long seam in the rear trunk and that one was tacked very slowly. It will be interesting to see how it finishes. QUOTE(burton73 @ Aug 10 2017, 01:42 PM) Brock, You really are doing a great job on restoring you car. I have fear that a lot of people do bad jobs on welding their cars and that there are a lot of cars that the owners say they are restored but in fact they really are crap. You should be very proud of bringing back you car that has great memories for you. Bob B (IMG:style_emoticons/default/welder.gif) Thanks Bob, you have no idea how good that is to hear. I know what you mean about crappy welding on restorations. The engine compartment side of the hell hole has a bunch of really bad welding that needs to be cut out and redone. But the thing is, that crappy welder was me 30+ years ago. (IMG:style_emoticons/default/yikes.gif) |
|
|
|
| bbrock |
Aug 10 2017, 09:25 PM
Post
#77
|
|
914 Guru Group: Members Posts: 5,269 Joined: 17-February 17 From: Montana Member No.: 20,845 Region Association: Rocky Mountains |
Well Bummer.
Since my rear trunk lid is not repairable, I decided to salvage the skin off of it thinking I could use it to fabricate patches for elsewhere on the car. I thought I had read that all the sheet metal on a 914 is 19 gauge but I must be mistaken. I cleaned up the nice sheet I got from my deck lid and threw a thickness gauge on it. 20 ga. dammit! (IMG:style_emoticons/default/mad.gif) I checked around the car to make sure my gauge was correct and discovered that all of the structural stuff is 19ga. but the body skins are 20. I think that's too thin for fabbing inner long patches so I guess I'm off to buy a sheet of 18ga tomorrow. And here I was feeling smug about the idea of creating all my patches from metal salvaged elsewhere on the car. Oh well, I can still use the lid for some door skin patches at least. 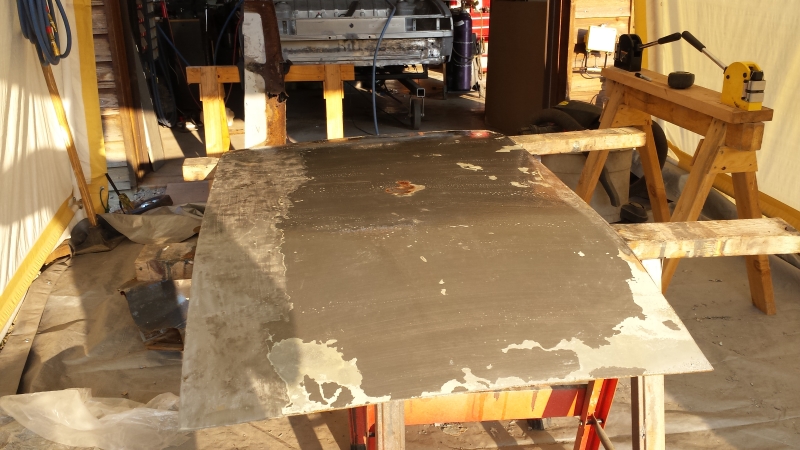 |
|
|
|
| xperu |
Aug 10 2017, 09:33 PM
Post
#78
|
|
TEXAS Group: Members Posts: 597 Joined: 13-June 06 From: League City Texas Member No.: 6,213 Region Association: None |
QUOTE(bbrock @ Mar 29 2017, 12:10 AM) QUOTE(cary @ Mar 28 2017, 07:59 PM) By chance is Kelly Seevers one of your neighbors? He lives up one of those canyons. Old friend from Albertsons. Amazing! Yes he is. Just around the bend. I don't really know him, but neighbors speak highly of the whole family. They are tucked up in "the holler" on Goes Nowhere Road which is aptly named. You'd probably be able to see their house in some of the photos I posted if you cut down the trees. The roller problem is the whole reason I've put this off for so long. Winds can be wicked in this canyon so awnings would have to be built hell for stout. And my MIG is worthless outside because it is rarely calm enough not to blow the shielding gas away. I picked up a set of these casters at HF to handle rolling on gravel. Snooping the Web, it seems others have made these work. I will know soon enough as I plan to pick up tubing for the jig this week. I can leave the car in the garage for the time it takes to complete the long work. I think the rest can go in and out as needed. Worst case, I may have to throw up a temporary shed around he car in the drive. But I'll try this first. Ideally I would wait on this project until I had built another garage/shop. But the longer I let this car sit, the more expensive the project gets. So I will muddle forward as best I can. Are you near Noxen, my brother lives there. He is into model A Fords |
|
|
|
| xperu |
Aug 10 2017, 09:33 PM
Post
#79
|
|
TEXAS Group: Members Posts: 597 Joined: 13-June 06 From: League City Texas Member No.: 6,213 Region Association: None |
QUOTE(bbrock @ Mar 29 2017, 12:10 AM) QUOTE(cary @ Mar 28 2017, 07:59 PM) By chance is Kelly Seevers one of your neighbors? He lives up one of those canyons. Old friend from Albertsons. Amazing! Yes he is. Just around the bend. I don't really know him, but neighbors speak highly of the whole family. They are tucked up in "the holler" on Goes Nowhere Road which is aptly named. You'd probably be able to see their house in some of the photos I posted if you cut down the trees. The roller problem is the whole reason I've put this off for so long. Winds can be wicked in this canyon so awnings would have to be built hell for stout. And my MIG is worthless outside because it is rarely calm enough not to blow the shielding gas away. I picked up a set of these casters at HF to handle rolling on gravel. Snooping the Web, it seems others have made these work. I will know soon enough as I plan to pick up tubing for the jig this week. I can leave the car in the garage for the time it takes to complete the long work. I think the rest can go in and out as needed. Worst case, I may have to throw up a temporary shed around he car in the drive. But I'll try this first. Ideally I would wait on this project until I had built another garage/shop. But the longer I let this car sit, the more expensive the project gets. So I will muddle forward as best I can. Are you near Noxon, my brother lives there. He is into model A Fords |
|
|
|
| bbrock |
Aug 10 2017, 09:44 PM
Post
#80
|
|
914 Guru Group: Members Posts: 5,269 Joined: 17-February 17 From: Montana Member No.: 20,845 Region Association: Rocky Mountains |
QUOTE(xperu @ Aug 10 2017, 09:33 PM) Are you near Noxon, my brother lives there. He is into model A Fords Nice country up there. But no, I'm way down south in Bozeman. |
|
|
|
|
4 User(s) are reading this topic (4 Guests and 0 Anonymous Users)
0 Members:

|
Lo-Fi Version | Time is now: 18th April 2026 - 09:53 AM |
Invision Power Board
v9.1.4 © 2026 IPS, Inc.