|
|
|
Porsche, and the Porsche crest are registered trademarks of Dr. Ing. h.c. F. Porsche AG.
This site is not affiliated with Porsche in any way. Its only purpose is to provide an online forum for car enthusiasts. All other trademarks are property of their respective owners. |
|
|

  |

| TravisNeff |
 Nov 15 2018, 08:56 PM Nov 15 2018, 08:56 PM
Post
#621
|
|
914 Guru  Group: Members Posts: 5,082 Joined: 20-March 03 From: Mesa, AZ Member No.: 447 Region Association: Southwest Region |
Holy crap! I wasn't expecting to see this until next year. Looks good Brent, real good.
|
   |

 
|
| altitude411 |
Nov 15 2018, 09:25 PM
Post
#622
|
|
I drove my 6 into a tree Group: Members Posts: 1,306 Joined: 21-September 14 From: montana Member No.: 17,932 Region Association: Rocky Mountains |
(IMG:style_emoticons/default/shades.gif) That looks be-utiful. Nice work! You should be very proud of all your accomplishments and dedication. Now go fuel up the snow blower... (IMG:style_emoticons/default/beerchug.gif) ( I drove over the pass today... looks white at your house) * with a nice silver over spray (IMG:style_emoticons/default/thumb3d.gif)
|
|
|
|
| bbrock |
Nov 15 2018, 09:30 PM
Post
#623
|
|
914 Guru Group: Members Posts: 5,269 Joined: 17-February 17 From: Montana Member No.: 20,845 Region Association: Rocky Mountains |
Thanks guys. I just wish I could figure out how to take better pics. I even broke out the good camera but it still looks more like shiny primer. It's pretty sweet in person. We had quite a bit of snow but most has melted off or our south-facing side.
|
|
|
|
| mepstein |
Nov 15 2018, 09:31 PM
Post
#624
|
|
914-6 GT in waiting Group: Members Posts: 20,639 Joined: 19-September 09 From: Landenberg, PA/Wilmington, DE Member No.: 10,825 Region Association: MidAtlantic Region |
QUOTE(bbrock @ Nov 15 2018, 10:30 PM)  Thanks guys. I just wish I could figure out how to take better pics. I even broke out the good camera but it still looks more like shiny primer. It's pretty sweet in person. We had quite a bit of snow but most has melted off or our south-facing side. Garage lights play hell with the camera sensors. Looks great. |
 |
|
| bbrock |
Nov 15 2018, 09:35 PM
Post
#625
|
|
914 Guru Group: Members Posts: 5,269 Joined: 17-February 17 From: Montana Member No.: 20,845 Region Association: Rocky Mountains |
QUOTE(mepstein @ Nov 15 2018, 08:31 PM) QUOTE(bbrock @ Nov 15 2018, 10:30 PM) Thanks guys. I just wish I could figure out how to take better pics. I even broke out the good camera but it still looks more like shiny primer. It's pretty sweet in person. We had quite a bit of snow but most has melted off or our south-facing side. Garage lights play hell with the camera sensors. Looks great. Yeah, I think the first pic I posted is the best one and for that, I shut off all the lights and took the pic in the dark with the flash. |
|
|
|
| Dion |
Nov 15 2018, 09:41 PM
Post
#626
|
|
RN Group: Members Posts: 2,926 Joined: 16-September 04 From: Audubon,PA Member No.: 2,766 Region Association: MidAtlantic Region |
Nice! Laying down colour in stealth mode. (IMG:style_emoticons/default/shades.gif)
That looks great Brent. Glad Mother Nature gave ya some slack. Good luck with that airbox. That bugger tests your patience. Fluorescents & LED are tough on car pics. I actually try use the iPhone with lites off when I can. Relying on its sensors to pick up colour and shades. Keep at it! |
|
|
|
| bbrock |
Nov 15 2018, 10:09 PM
Post
#627
|
|
914 Guru Group: Members Posts: 5,269 Joined: 17-February 17 From: Montana Member No.: 20,845 Region Association: Rocky Mountains |
I suppose I should say a little about the painting. I did this in the garage. I just laid a big tarp on the floor and covered my table saw with plastic. Using HVLP with the car on its side really limits the overspray to make it doable. No way could I spray the exterior like this, but I wanted to get the interior sprayed so I can start putting some parts back on the car so we stop tripping over them every time we open a shed.
To recap, I wanted to spray PPG DBC but it isn't available in this color. I had to spray PPG Omni MTK. I don't have anything to compare it to yet but it was pretty tricky to spray. It actually covered surprisingly well although spraying silver over gray primer probably helped with that. The issue was the metallics. I know silver metallic is notoriously difficult but this seemed worse. It is cheap paint so low solids. The issue I had was if I laid on the paint in a heavy wet coat, the metallic particles would float around and cluster. The result was like wave washed sand. (IMG:http://www.914world.com/bbs2/uploads_offsite/jamiepatersonphotography.files.wordpress.com-20845-1542341371.1.jpg) It was easy enough to fix by letting if flash and respraying a lighter coat followed by a drop coat. Took a little practice to get laying down a wet enough coat for the paint to lay down but not so much that the flakes went flaky. I bought 2 quarts of paint which is mixed 4:1:1 s 3/4 gallon of sprayable. This was plenty of paint. I sprayed 3 coats (4 in some areas) and have almost a half quart of paint left. I did get a couple of runs but in hidden PITA pockets. One in the bottom of a headlight bucket and one under the top lip of the headlight motor mount that will be under the plastic cover. I'm not going to sweat either of those. There's also a drip on top of the left side long near the firewall. That's going to get sprayed with adhesive and covered by carpet so not worth fussing with. I'm sure I'll find some other spots after the paint dries and I really poke around. Overall, not bad for someone who doesn't know what he's doing. (IMG:style_emoticons/default/beerchug.gif) |
|
|
|
| TravisNeff |
Nov 15 2018, 10:34 PM
Post
#628
|
|
914 Guru Group: Members Posts: 5,082 Joined: 20-March 03 From: Mesa, AZ Member No.: 447 Region Association: Southwest Region |
Can you explain what a drop coat is? I assume its where you hold your gun a bit farther back and dust the top. I saw that trick to fix if you get tiger stripes on a youtube vid.
|
|
|
|
| bbrock |
Nov 15 2018, 10:47 PM
Post
#629
|
|
914 Guru Group: Members Posts: 5,269 Joined: 17-February 17 From: Montana Member No.: 20,845 Region Association: Rocky Mountains |
QUOTE(TravisNeff @ Nov 15 2018, 09:34 PM) Can you explain what a drop coat is? I assume its where you hold your gun a bit farther back and dust the top. I saw that trick to fix if you get tiger stripes on a youtube vid. Yep, that's it. I think Kevin Tetz explained it best on a vid. Supposedly it allows the droplets to be a little larger which allows the metallic flakes to spread out and "relax" as he calls it. He recommended doing it just to get uniform metallic cover rather than as a fix. The trick seems to be to do it fairly quick after laying down the last coat soe the drops melt in and spread out. He also claimed that tiger striping was caused by not enough overlap. I did 50% overlap as best I could with all the nooks and crannies you have to hit spraying trunks and engine bay and such. Overall, I thought the paint was fairly forgiving. I think in a spray booth with excellent light, I could have done better, but I'm really pleased with how it turned out. |
|
|
|
| TravisNeff |
Nov 15 2018, 11:01 PM
Post
#630
|
|
914 Guru Group: Members Posts: 5,082 Joined: 20-March 03 From: Mesa, AZ Member No.: 447 Region Association: Southwest Region |
HA! Yeah, it was the Tetz video i watched. The reality that I will have to get some paint on mine is fast approaching. I appreciate you sharing the details and challenges. This kind of stuff makes this site great.
|
|
|
|
| defianty |
Nov 16 2018, 05:33 AM
Post
#631
|
|
Senior Member Group: Members Posts: 659 Joined: 9-August 06 From: Essex, UK Member No.: 6,621 Region Association: None |
Great work Brent, a huge step in the right direction. Car is looking fantastic.
|
|
|
|
| tygaboy |
Nov 16 2018, 08:42 AM
Post
#632
|
|
914 Guru Group: Members Posts: 5,810 Joined: 6-October 15 From: Petaluma, CA Member No.: 19,241 Region Association: Northern California |
DUDE! (IMG:style_emoticons/default/piratenanner.gif) (IMG:style_emoticons/default/cheer.gif) (IMG:style_emoticons/default/aktion035.gif)
That looks awesome! (IMG:style_emoticons/default/smilie_pokal.gif) |
|
|
|
| 76-914 |
Nov 16 2018, 09:06 AM
Post
#633
|
|
Repeat Offender & Resident Subaru Antagonist Group: Members Posts: 13,878 Joined: 23-January 09 From: Temecula, CA Member No.: 9,964 Region Association: Southern California |
Well done. What was the garage temp when you sprayed? (IMG:style_emoticons/default/beerchug.gif)
|
|
|
|
| bbrock |
Nov 16 2018, 09:42 AM
Post
#634
|
|
914 Guru Group: Members Posts: 5,269 Joined: 17-February 17 From: Montana Member No.: 20,845 Region Association: Rocky Mountains |
QUOTE(76-914 @ Nov 16 2018, 08:06 AM) Thanks again guys. Garage temp was 64-65F during the spray. I wanted it a tad on the cool side because I was using a fast hardener and wanted a little more time. After I was finished with the spray, I cranked the heat up to 70F for curing. I'll leave it that high through tonight and then will return to the normally scheduled heating program. (IMG:style_emoticons/default/beerchug.gif) |
|
|
|
| bbrock |
Nov 16 2018, 10:14 AM
Post
#635
|
|
914 Guru Group: Members Posts: 5,269 Joined: 17-February 17 From: Montana Member No.: 20,845 Region Association: Rocky Mountains |
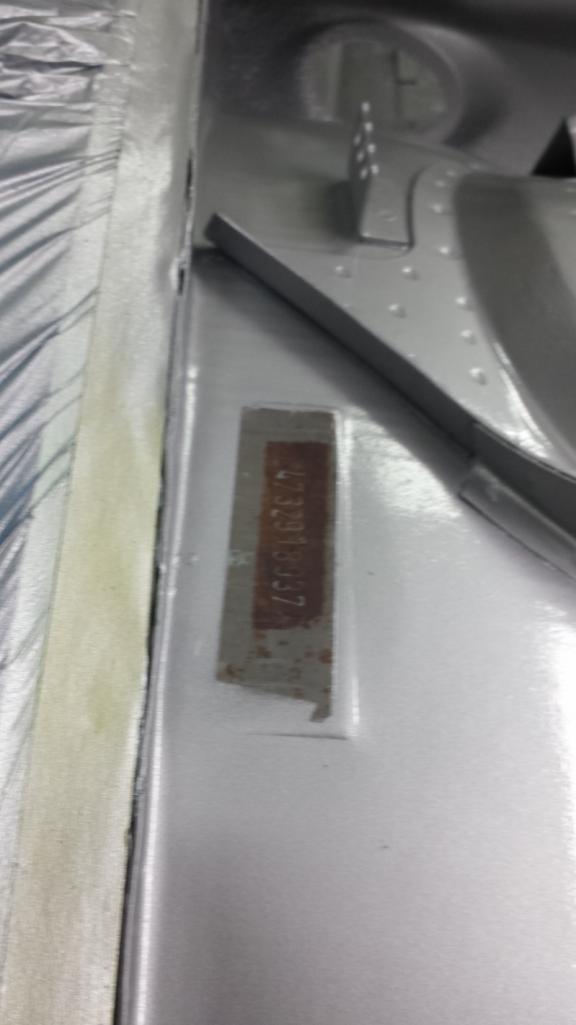
A little post-operative examination and some things to fix. I intended to adjust the mask over the serial number stamp before painting but forgot. (IMG:style_emoticons/default/headbang.gif) The unpainted area around the stamp is too large. I can't possibly drive the car like that, it would be too embarrassing. I doubt the car will even run with it like that. That will have to be fixed.
 Here's the worst mess of the paint job. These bucket are a pain because paint just blows back in your face when you point a gun at them. Kind of shooting blind and I wound up with way too much paint in there which ran badly. I grabbed a shop towel soaked with reducer and wiped the run out but left a bunch of trash from the towel. It's in the bottom of the bucket so I don't really care, but since I'll be shooting more of this single stage paint anyway, I might as well fix it. 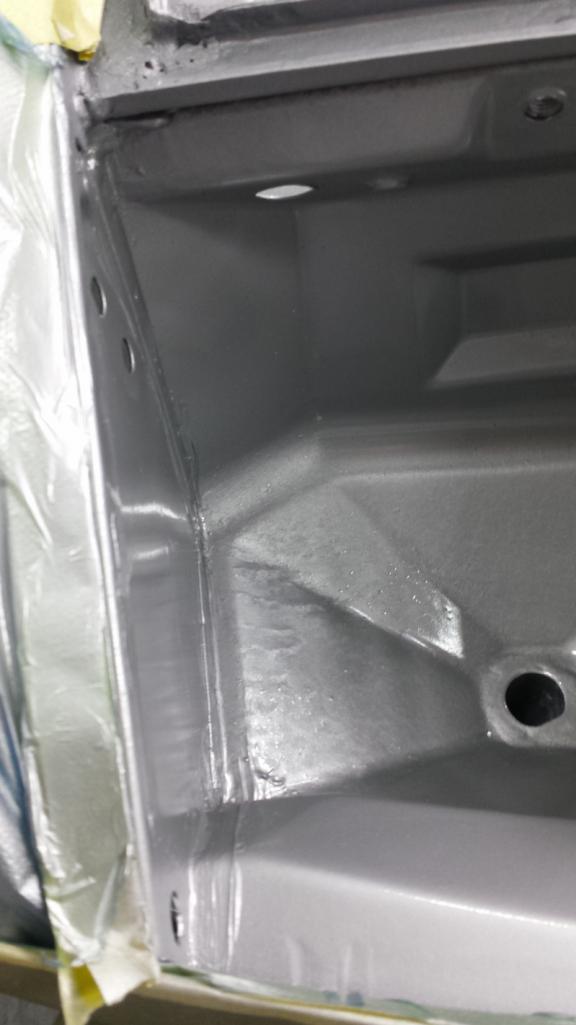 There are a few other googes with small runs or trash in the paint that don't bother me because they will be covered, but I'll fix a number of them just for practice. Better to screw up these hidden spots than a fender. Huge Mile Stone! Yesterday was an important day but this morning was when the real milestone of this car was crossed. It started with applying cavity wax to the longs. 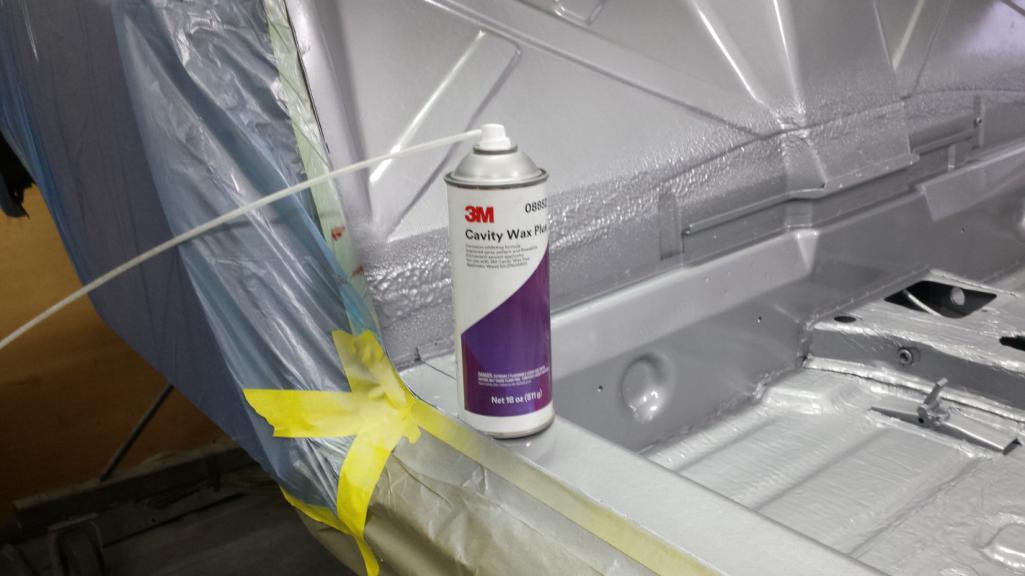 The longs have now been treated with epoxy primer, Eastwood Internal Frame Coating, and 3M Cavity Wax Plus. Some of the primer got burned off by later welding. Although I think the internal frame coat is good stuff, I consider it experimental because I have yet to see long term results. Cavity wax has a proven record and I've seen firsthand how well it protects even bare metal. 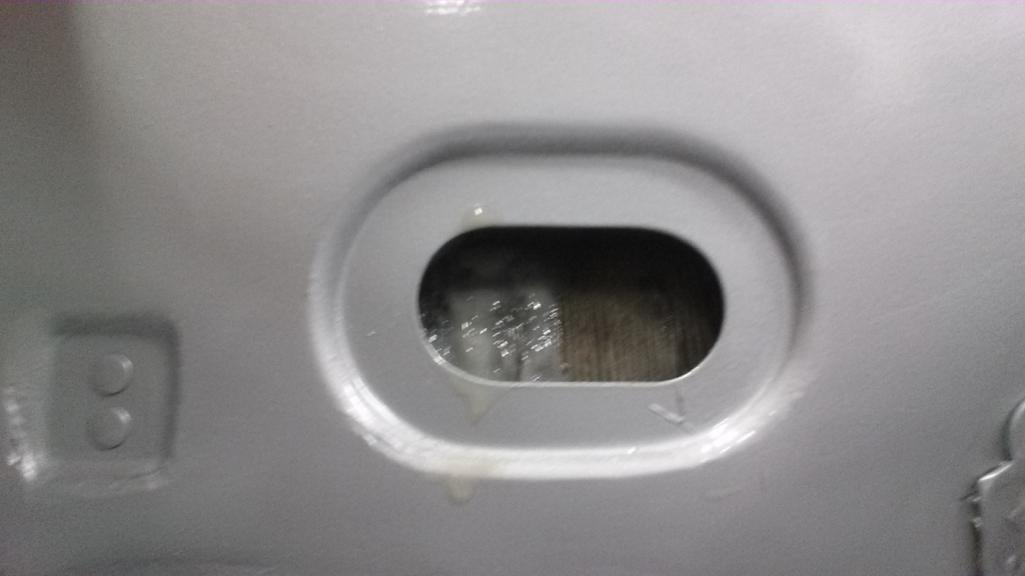 Now for the big moment....... 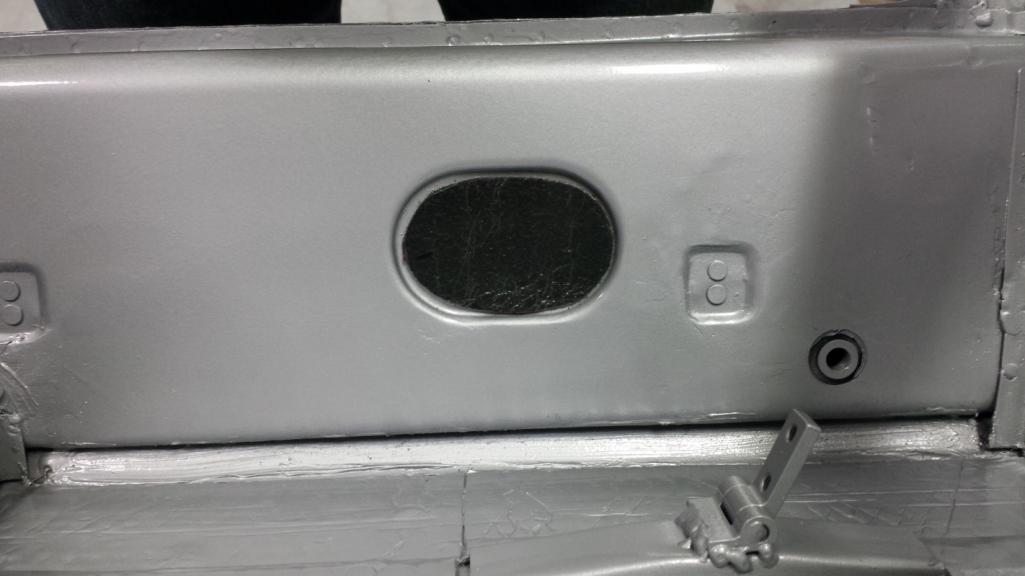 The first non-welded part to go BACK on the car!!!! (IMG:style_emoticons/default/cheer.gif) (IMG:style_emoticons/default/monkeydance.gif) (IMG:style_emoticons/default/mueba.gif) (IMG:style_emoticons/default/cheer.gif) And here's a shot across to the other side with both of these critical parts installed. 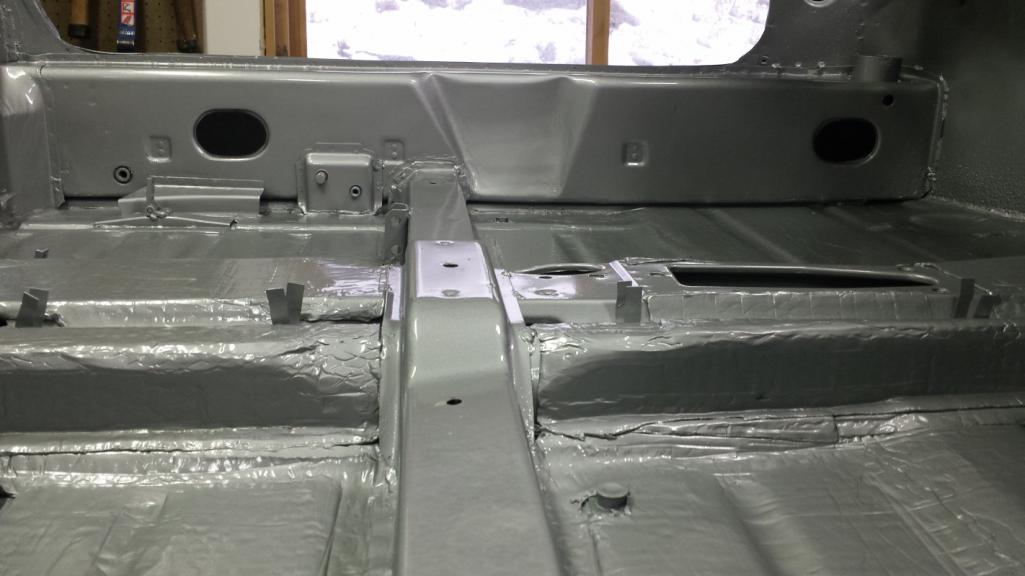 |
|
|
|
| tygaboy |
Nov 16 2018, 10:30 AM
Post
#636
|
|
914 Guru Group: Members Posts: 5,810 Joined: 6-October 15 From: Petaluma, CA Member No.: 19,241 Region Association: Northern California |
Waxed and plugged! That's gotta feel good.
(Wait... That sounds a little bit dirty... (IMG:style_emoticons/default/lol-2.gif) ) |
|
|
|
| bbrock |
Nov 16 2018, 10:53 AM
Post
#637
|
|
914 Guru Group: Members Posts: 5,269 Joined: 17-February 17 From: Montana Member No.: 20,845 Region Association: Rocky Mountains |
QUOTE(tygaboy @ Nov 16 2018, 09:30 AM) Waxed and plugged! That's gotta feel good. (Wait... That sounds a little bit dirty... (IMG:style_emoticons/default/lol-2.gif) ) (IMG:style_emoticons/default/av-943.gif) You really get me! |
|
|
|
| KELTY360 |
Nov 16 2018, 11:33 AM
Post
#638
|
|
914 Neferati Group: Members Posts: 5,186 Joined: 31-December 05 From: Pt. Townsend, WA Member No.: 5,344 Region Association: Pacific Northwest |
So you reconstruct the entire body of the car with one hand while fighting off invading bears and moose with the other.....and you're intimidated by a bucket of semi-crusty parts?? (IMG:style_emoticons/default/confused24.gif)
|
|
|
|
| bbrock |
Nov 16 2018, 11:51 AM
Post
#639
|
|
914 Guru Group: Members Posts: 5,269 Joined: 17-February 17 From: Montana Member No.: 20,845 Region Association: Rocky Mountains |
QUOTE(KELTY360 @ Nov 16 2018, 10:33 AM) So you reconstruct the entire body of the car with one hand while fighting off invading bears and moose with the other.....and you're intimidated by a bucket of semi-crusty parts?? (IMG:style_emoticons/default/confused24.gif) (IMG:style_emoticons/default/lol-2.gif) Organization is not my strong suit. (IMG:style_emoticons/default/biggrin.gif) |
|
|
|
| dan10101 |
Nov 16 2018, 01:00 PM
Post
#640
|
|
TORQUE-o-holic Group: Members Posts: 1,140 Joined: 29-April 03 From: Eagle Point, Or Member No.: 626 Region Association: Pacific Northwest |
Very nice.
I would have guessed you were a pro doing your own job. You're actually a few steps ahead of me on my project though I'm only doing the front end, not the complete overhaul. I will probably end up painting the whole car, but right now (yesterday) I primed the same areas you painted. I really need to go back and see how you did some of the repair work and especially welding. Thanks for posting. I'll be following.. |
|
|
|
|
4 User(s) are reading this topic (4 Guests and 0 Anonymous Users)
0 Members:

|
Lo-Fi Version | Time is now: 19th April 2026 - 10:45 AM |
Invision Power Board
v9.1.4 © 2026 IPS, Inc.