|
|
|
Porsche, and the Porsche crest are registered trademarks of Dr. Ing. h.c. F. Porsche AG.
This site is not affiliated with Porsche in any way. Its only purpose is to provide an online forum for car enthusiasts. All other trademarks are property of their respective owners. |
|
|

  |

| 76-914 |
 Dec 10 2018, 02:29 PM Dec 10 2018, 02:29 PM
Post
#701
|
|
Repeat Offender & Resident Subaru Antagonist  Group: Members Posts: 13,878 Joined: 23-January 09 From: Temecula, CA Member No.: 9,964 Region Association: Southern California |
QUOTE(bbrock @ Dec 8 2018, 10:21 PM)  QUOTE(76-914 @ Dec 8 2018, 08:42 PM) I replaced them on my 68 Karmann Ghia in 2001. IIRC, there are a few aftermarket kits available. Just trace the lines with a marks-a-lot on the back side before you scrape them off then cover the back side of the glass with white paper. It will show your lines better and protect the glass when it's laying on your bench. (IMG:style_emoticons/default/beerchug.gif) So did you repaint the grid? The only full grid replacement kits I've found are these from frostfighter The wires are pre-spaced on a plastic sheet which you stick on and then peel off the plastic to leave only the conducters attached to the glass. Looks pretty slick but being pre-spaced means the are straight and can't be curved. Interested to know about other options. Hopefully I won't need them but nice to know. The problem with the rag in hand method here is that rear glass tends to ice rather than fog, and typically on the outside of the glass. That happens year round too. It keeps us from getting soft up here. (IMG:style_emoticons/default/biggrin.gif) I don't remember the brand and I sold that car 2-3 yr's ago with all the receipts. Each wire was backed with tinted tape and rolled out off the roll. Each strand was very flexible and required effort to get them straight and not wavy. The wires are also fragile. It was a job for an Octopus! Yours looks like it has a backing which should yield a nice placement pattern. Thinking back I should have sprayed some soapy water before attempting to install it. IIRC, my source was Ebay. (IMG:style_emoticons/default/beerchug.gif) |
   |

 
|
| bbrock |
Dec 11 2018, 12:17 PM
Post
#702
|
|
914 Guru Group: Members Posts: 5,269 Joined: 17-February 17 From: Montana Member No.: 20,845 Region Association: Rocky Mountains |
I made some decent progress on cleaning parts for plating yesterday evening. I got the last (for now) of the larger parts to be plated blasted. The "cleaned" bucket is getting more full and the rust bucket is empty although I still have a pile of small parts in the vibrator and in front of the wire wheel to do. The clean stuff will get another inspections and more cleaning as needed.
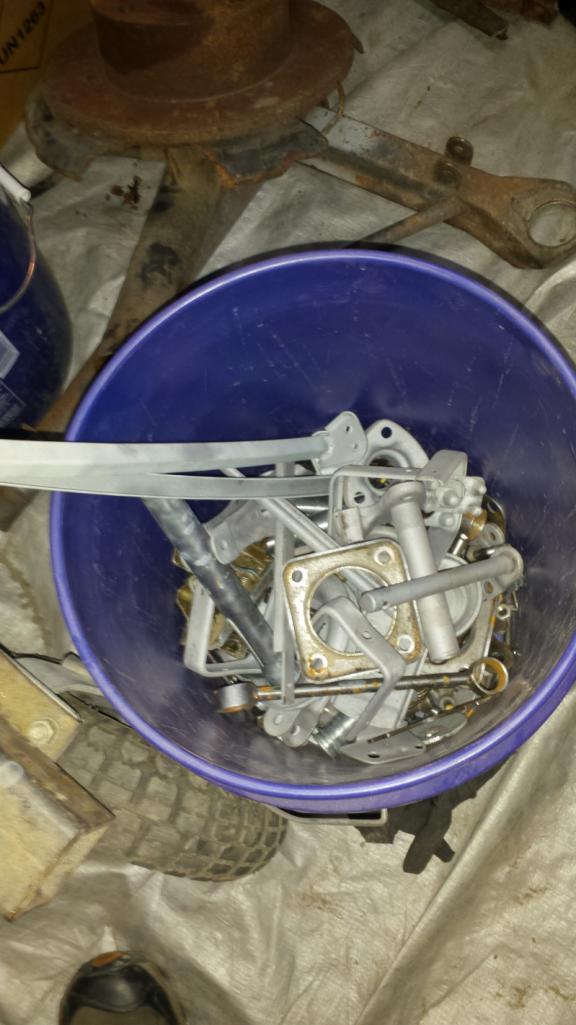 I even moved on to start media blasting some of the parts that will be painted rather than plated. A before and after here. 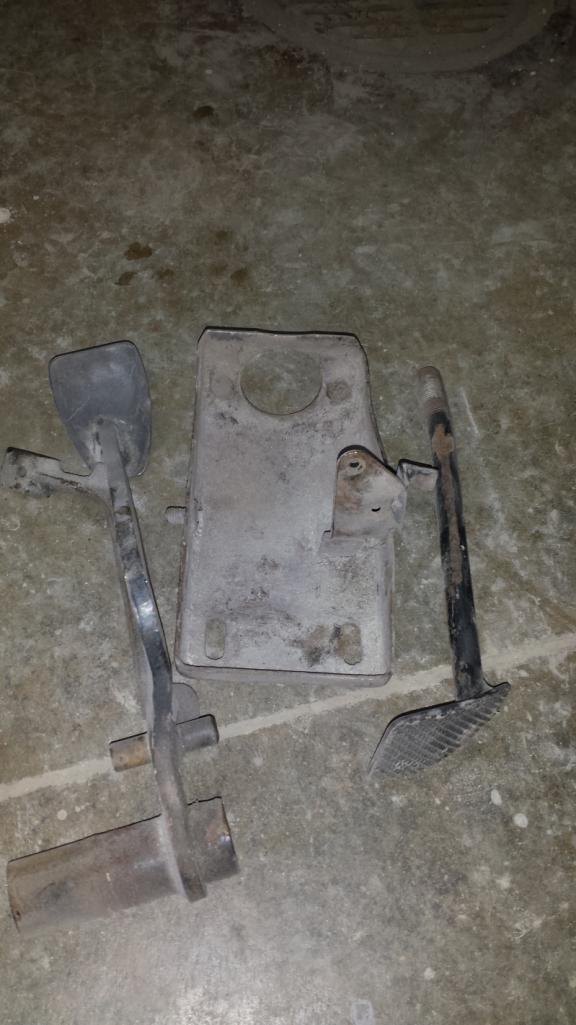  I still need to strip some hardware off the steering rack, trailing arms, roof, and seats. Once those are prepped, I think it will be time to send for plating. This prepping hardware is almost as much fun as media blasting the chassis. (IMG:style_emoticons/default/headbang.gif) |
 |
|
| bbrock |
Dec 13 2018, 01:02 PM
Post
#703
|
|
914 Guru Group: Members Posts: 5,269 Joined: 17-February 17 From: Montana Member No.: 20,845 Region Association: Rocky Mountains |
A Good Flocking
As soon as @raynekat mentioned re-flocking the glove box, I knew I had to do it. Not only is this the sort of detail that makes me smile, "flocking" sounds quite dirty so of course I had to give it a go. (IMG:style_emoticons/default/happy11.gif) Even better, I reached out to Doug with a couple questions about supplies to buy and he just boxed up his kit and mailed it for me to use what I needed and return the rest. So, it was time to revisit the glove box. I was ignoring a few splits in the corners of the box because repairing them would destroy the flocking and as they were, they weren't visible when the box was installed. But now there was no reason not to fix them. I used Titebond III wood glue which is the waterproof version of basic aliphatic resin wood glue. For some reason, I've noticed car guys tend to scoff at this stuff but really, when it comes to bonding any form of cellulosic fiber, you can't find a stronger bond. The form had deformed at the splits so I dampened them with water and heated them with a heat gun until they became pliable. Then it is just a matter of holding them in the desired shape while the material cools. Here it is partially through the repair showing the condition of the box, and the staining that results from the wood glue. 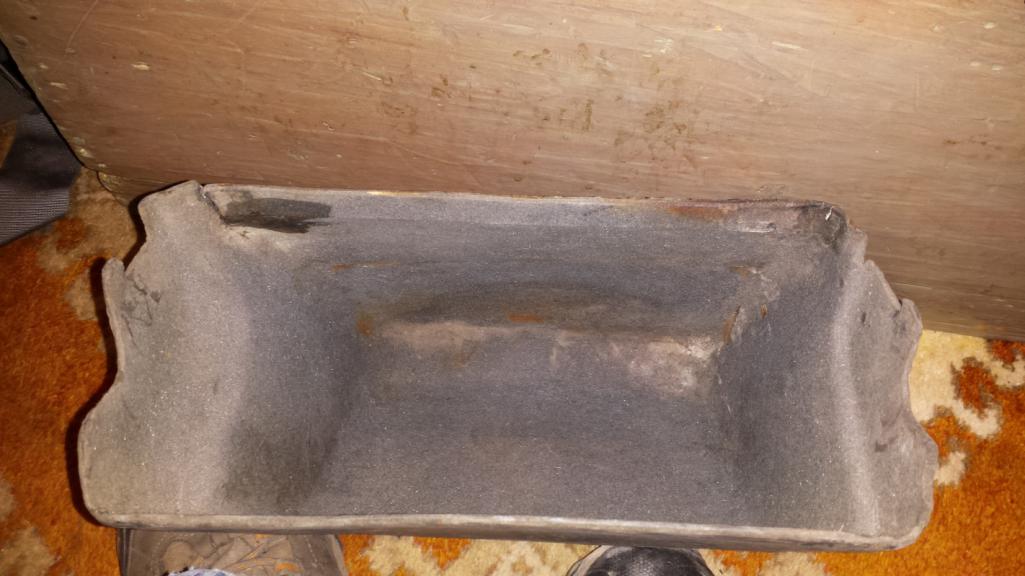 After a stimulating flocking, it looks good as new. Thank you Doug! 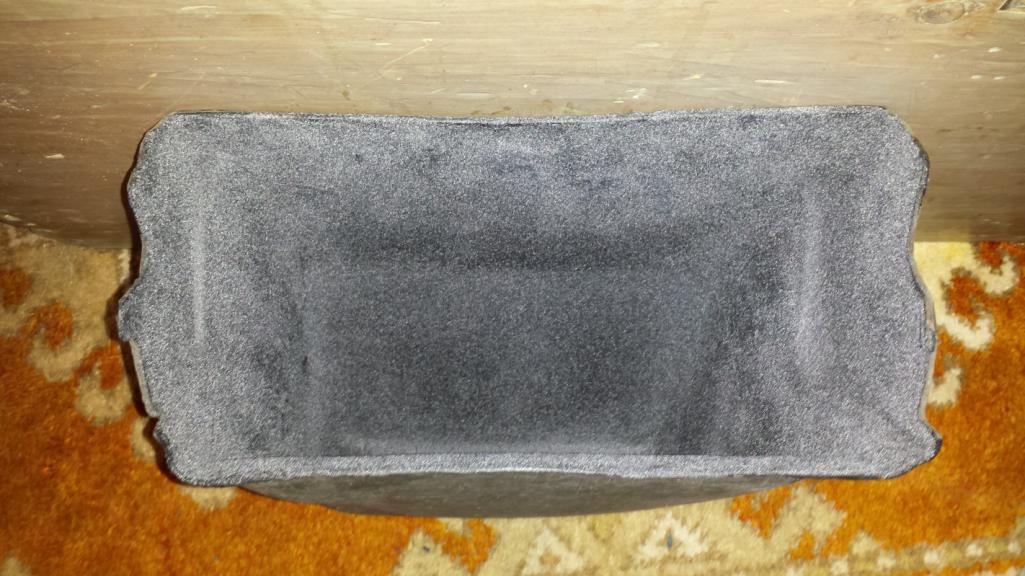 And here it is back in the dash with a pair of Montana driving gloves. (IMG:style_emoticons/default/shades.gif) 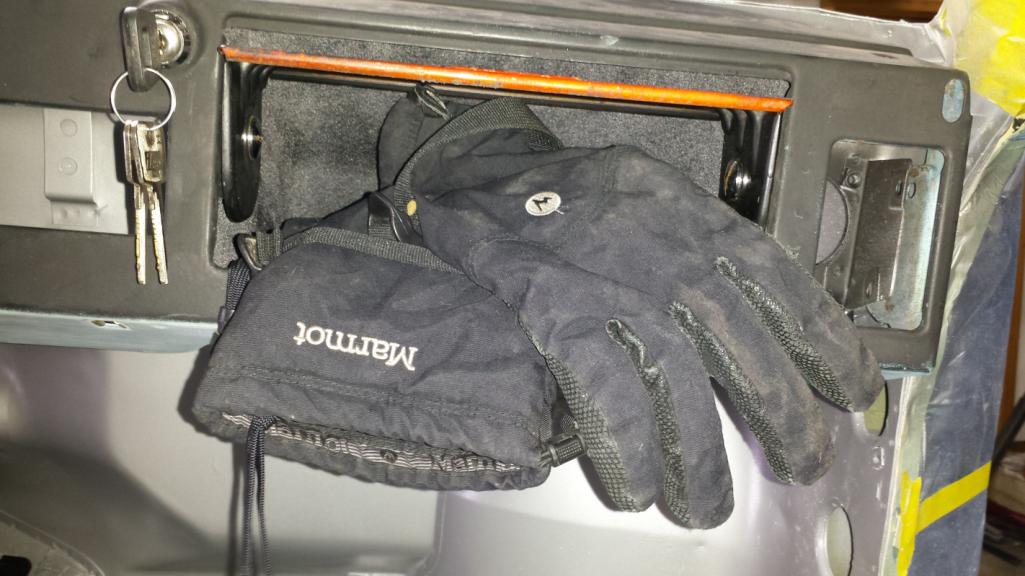 BTW, I never noticed before that the glove box isn't wide enough to fit the owner's manual packet without scrunching up the cover vinyl. I guess back in the day, I was worried about scrunching that cover.  In other news, I'm startng to get panicked over some missing parts. I'm missing the short e-brake cable and equalizer bar that attaches to the e-brake handle. Also missing is the piston rod that pushes into the master cylinder from the pedal. I've pretty much exhausted my search but am heading out to the woods where our main storage shed is this afternoon for one more search. |
|
|
|
| raynekat |
Dec 13 2018, 01:43 PM
Post
#704
|
|
Advanced Member Group: Members Posts: 2,171 Joined: 30-December 14 From: Coeur d'Alene, Idaho Member No.: 18,263 Region Association: Pacific Northwest |
That's a "flocked" glove box that even a Moose could love. Well done! That stuff flies everywhere, eh what?
|
|
|
|
| burton73 |
Dec 13 2018, 01:47 PM
Post
#705
|
|
Senior member, and old dude Group: Members Posts: 3,994 Joined: 2-January 07 From: Los Angeles Member No.: 7,414 Region Association: Southern California |
Hi Brent,
On my 74 CA car, I have the brake part I can loan you if you cannot come up with one and I have the brake master rod you need as I changed to a Tilton Pedal set up on my V8 car and will not use it. Happy to give that part to you. Easy for me but the emergency brake part is more work and it will be dirty for me. Just let me know my 914 Brother Bob B  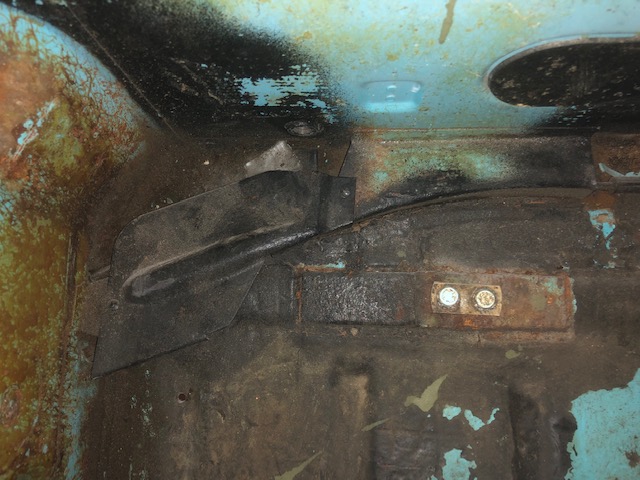 |
|
|
|
| bbrock |
Dec 13 2018, 03:29 PM
Post
#706
|
|
914 Guru Group: Members Posts: 5,269 Joined: 17-February 17 From: Montana Member No.: 20,845 Region Association: Rocky Mountains |
Hey Bob, That's very generous. I'll keep you posted. A very cold search in the shed turned up nothing. I'm going to give the garage a thorough cleaning and reorganizing this weeked so hopefully they'll turn up. There's a chance they fell behind one of my work counters that has a gap between the back and walls and where I tend to pile crap.
The only reason I want to find them now is in case I need to include any associated bits in the plating batch. There's also a chance I tossed the cable on the scrap heap as that was an area of some pretty horrendous rust. I've also confirmed from reviewing photos that the pedal cluster was removed before I started the restoration, which means it could have fallen through a hole in the floor somewhere along the 1,200 mile route the car was hauled getting it to Montana. It all just adds more texture to the journey, right? (IMG:style_emoticons/default/beerchug.gif) |
|
|
|
| euro911 |
Dec 13 2018, 04:46 PM
Post
#707
|
|
Retired & living the dream. God help me if I wake up! Group: Members Posts: 8,937 Joined: 2-December 06 From: So.Cal. & No.AZ (USA) Member No.: 7,300 Region Association: Southern California |
Bruce Stone and/or Garrold Shaffer probably have those spare parts (IMG:style_emoticons/default/idea.gif)
|
|
|
|
| bbrock |
Dec 15 2018, 08:34 PM
Post
#708
|
|
914 Guru Group: Members Posts: 5,269 Joined: 17-February 17 From: Montana Member No.: 20,845 Region Association: Rocky Mountains |
I picked up a grease fitting and a better set of picks yesterday to take a stab at finishing the brake disassembly. We left off on that story with two front calipers successfully disassembled, a late rear caliper disassembled except for the inner adjuster screw, and an early rear caliper with a stubborn inner caliper that didn't want to screw out. Following Eric's advice, I screwed on the grease zerk and pumped her full of grease to blow the piston top off of the adjuster. Within seconds it was done and I could finally see what the trouble was. The adjuster was just spinning inside the piston which seemed like a good thing since it meant no broken gear teeth. But how to get the adjuster off? (IMG:style_emoticons/default/confused24.gif) That turned into a 3 hour puzzle that first required tearing the adjuster from the other piston apart just so I could figure out how the damn thing was put together.
There is considerable difference between the early and late adjuster mechanisms. While the late adjusters are typical German with simple efficiency and only the necessary parts, the early adjusters are a Rube Goldberg sort of affair that is positively idiotic. The hub for the screw floats inside a series of gadgets interconnected by springs. Once the piston is removed, there is no pressure that locks the hub that the screw goes in with the rest of the mechanism so it just spins free. This was a BIG problem since the reason the piston wouldn't screw out was because the screw was seized inside the hub, hence the spinning without pushing the piston out. I tried all sorts of bad ideas to try to get enough leverage to break the screw free from inside the hub. What finally worked was pushing down onto the spring loaded top in one of several holes with a scratch awl and gently tapping with a small hammer. This simultaneously put downward pressure to lock the apparatus with the hub and spun the hub off the screw. Finally, success! Here's the complete assembly of brake bits to be cleaned and restored. 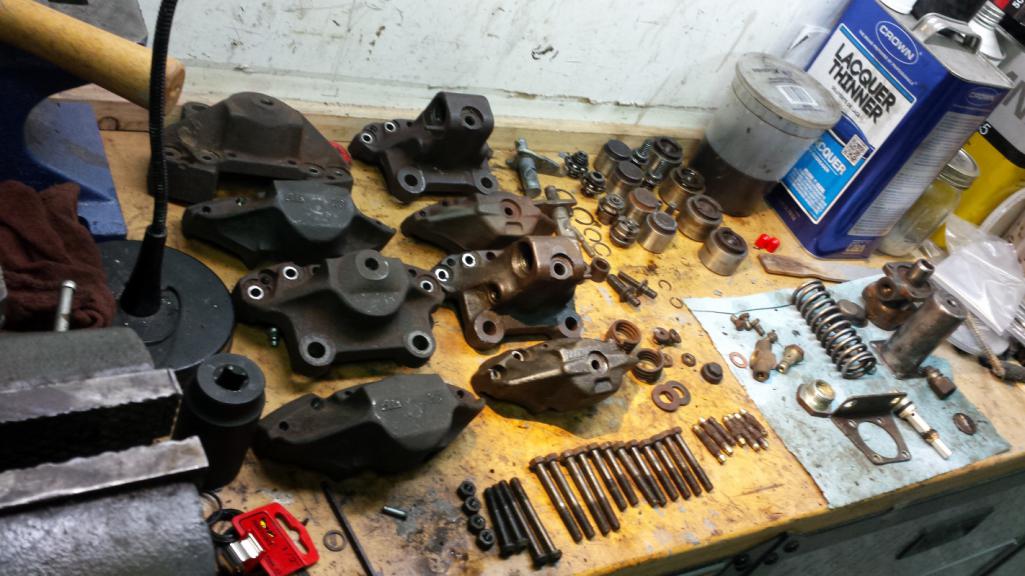 And here's both late (rear 2) and early (front) adjusters. The late ones are German simplicity. The early ones are complicated pieces of shit. 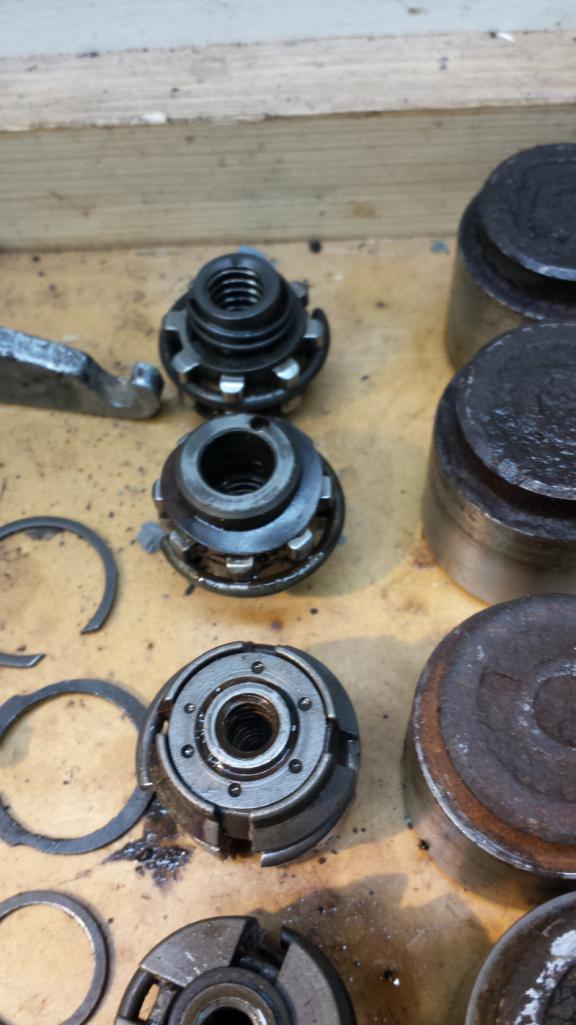 Here's a close up of that trouble making little fucher. I wonder if I can find a tap to match the threads of that hub. I'd like to chase those threads clean up some slight roughness from the rust. 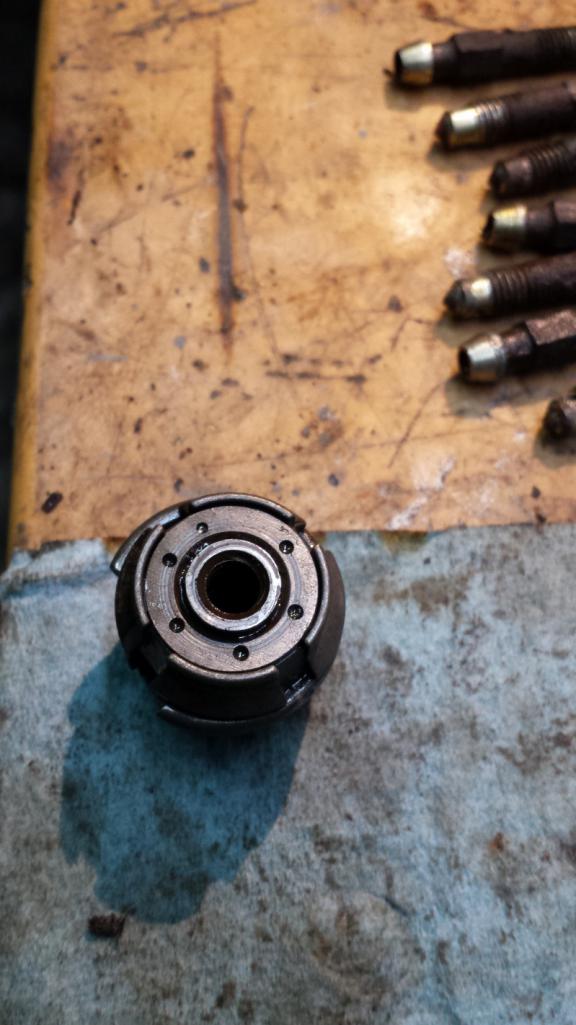 That's it for now. Got another project I've been working on that I'll report on tomorrow. (IMG:style_emoticons/default/beerchug.gif) |
|
|
|
| KELTY360 |
Dec 15 2018, 11:15 PM
Post
#709
|
|
914 Neferati Group: Members Posts: 5,186 Joined: 31-December 05 From: Pt. Townsend, WA Member No.: 5,344 Region Association: Pacific Northwest |
(IMG:style_emoticons/default/smilie_pokal.gif)
I'm impressed! Not many people would spend that much time documenting that they've got a screw loose. (IMG:style_emoticons/default/shades.gif) |
|
|
|
| bbrock |
Dec 16 2018, 02:57 PM
Post
#710
|
|
914 Guru Group: Members Posts: 5,269 Joined: 17-February 17 From: Montana Member No.: 20,845 Region Association: Rocky Mountains |
As the late Jim Morrison might say, "Come On Baby Hush my Firewall..."
The plan was to haul that heavy and bulky firewall pad out of the shed and put it in the car, but it didn't pass inspection. The lead-weighted rubber looked fine and only needed a cleaning, but larger areas of fiber (does this stuff contain asbestos?) were missing. 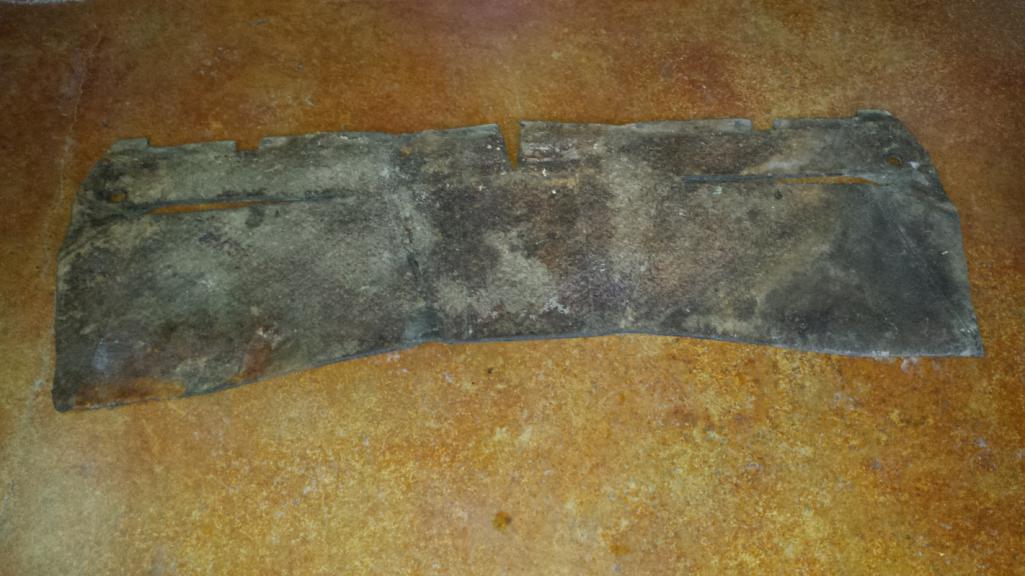 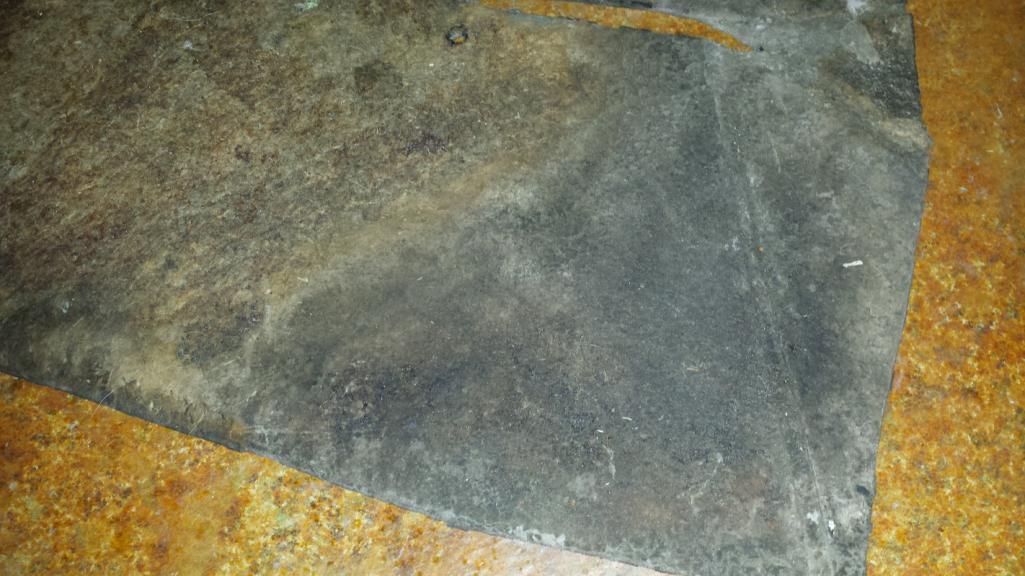 Looking at alternatives, I strongly considered the 914Rubber option for replacement pad but quiet is very important to me and I thought this would be an opportunity to upgrade to more modern materials. Searching the many options and weighing them against my tight-ass CSOB criteria, I took the hint from @76-914 and ordered some of this on ebay for $34 shipped: (IMG:http://www.914world.com/bbs2/uploads_offsite/i.ebayimg.com-20845-1544993845.1.jpg) It is very similar to the sample of H-Liner from B-Quiet that I have. The foam on this stuff is more dense, which seems like might be a good thing, but the foil face on the B-Quiet product is more durable as this stuff seems a little on the fragile side. The other difference is that the stuff I bought is 1/3 the price of B-Quiet and got really good reviews on Amazon. Since I wasn't going bone stock, I decided to up the ante and put some of my unused Noico sound deadener to use as a base layer for extra sound absorption. Using the original pad as a template, I cut the materials to match. 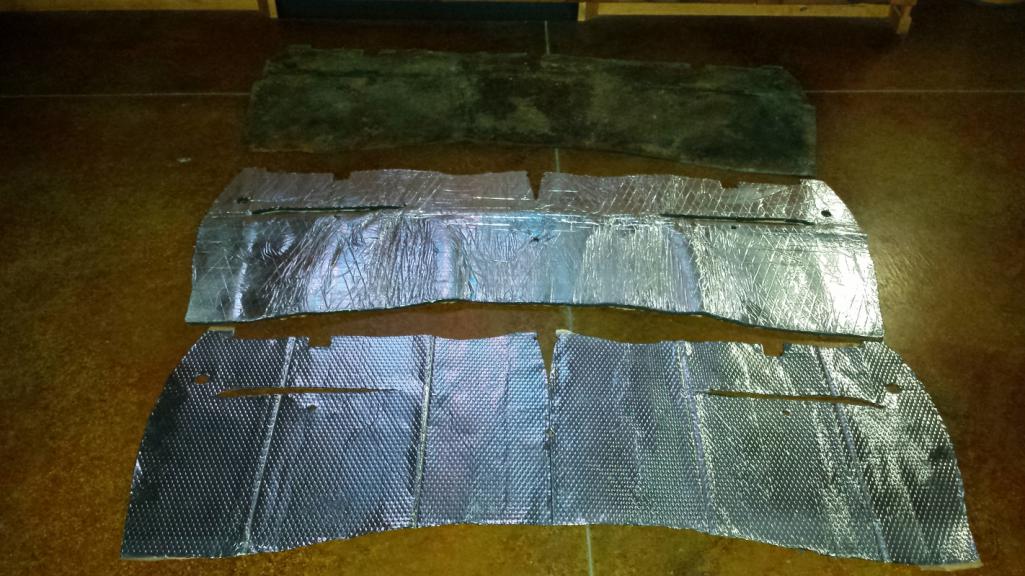 Next step was to install the Noico. 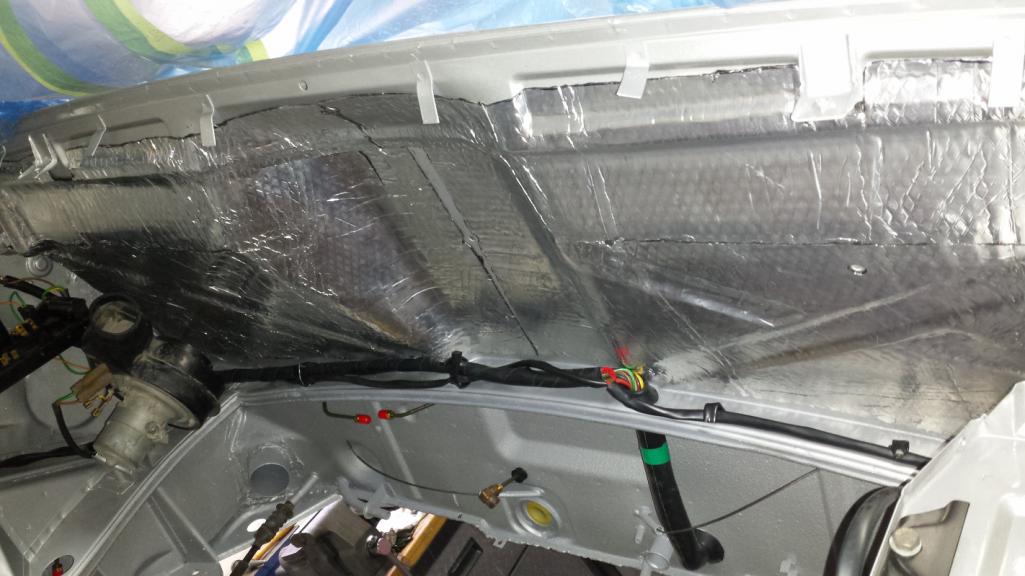 I've already stated my policy on the Mercury spaceman look. There were seven childhood heros who could rock that look but that's about it. I don't want my engine bay looking like a pot grow room so the open cell liner needed an extra treatment. 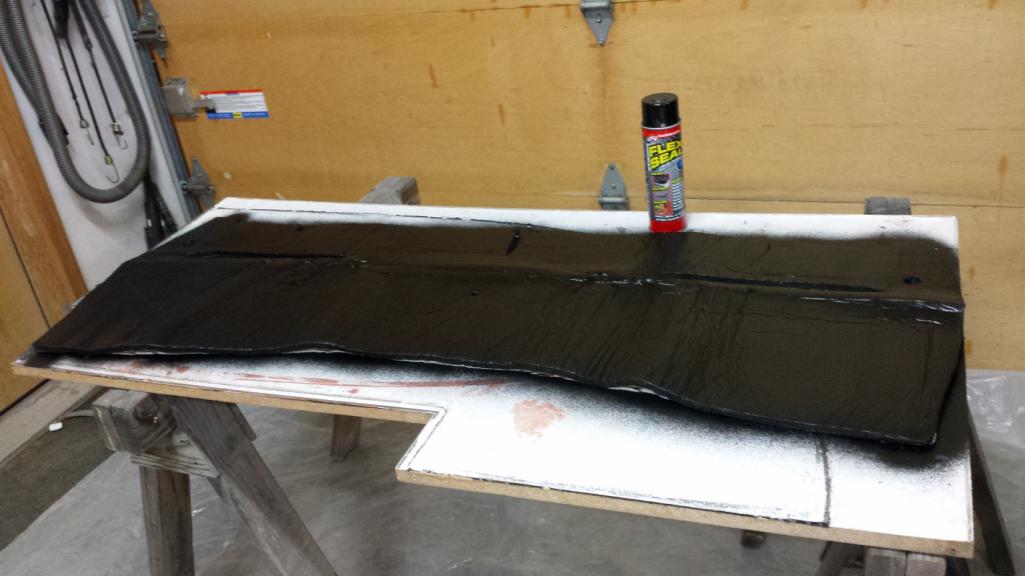 Okay, here's where I screwed up. Despite the cheesy commercials, I've used Flex-Seal to waterproof planters to grow carnivorous plants (have we established that I'm weird?) and knew that it creates a finish texture that is a good match to the original sound pad. But don't use Flex-Seal! Actually, it worked well but it wasn't until it was too late that I realized that rubberized undercoat or body schutz would work just as well and be more cost effective. To match the texture of the original pad, you really need to build up 3-5 coats. Flex-Seal is $13/can and it took a full can just to spray one coat. The CSOB in me decided the one coat was enough even though you can still see the wrinkles of the foil face but looks original-ish. George (dr914) was nice enough to post the NAPA part # for the correct panel fasteners for installing the pad. The adhesive backing on the pad worked pretty well but I did have to supplement with just a littler contact adhesive in a couple spots where the pad makes sharp bends. 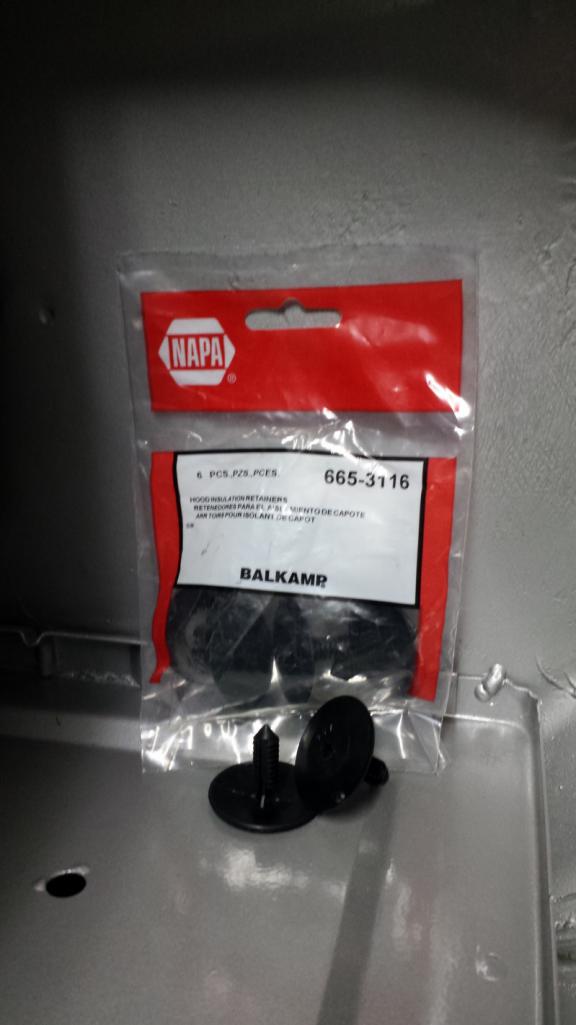 If I'd had my epiphany BEFORE sticking the pad in place, I would have spent more time building up layers to create a thicker coating and match the original more closely. I still think it looks good. Time will tell how durable it is. 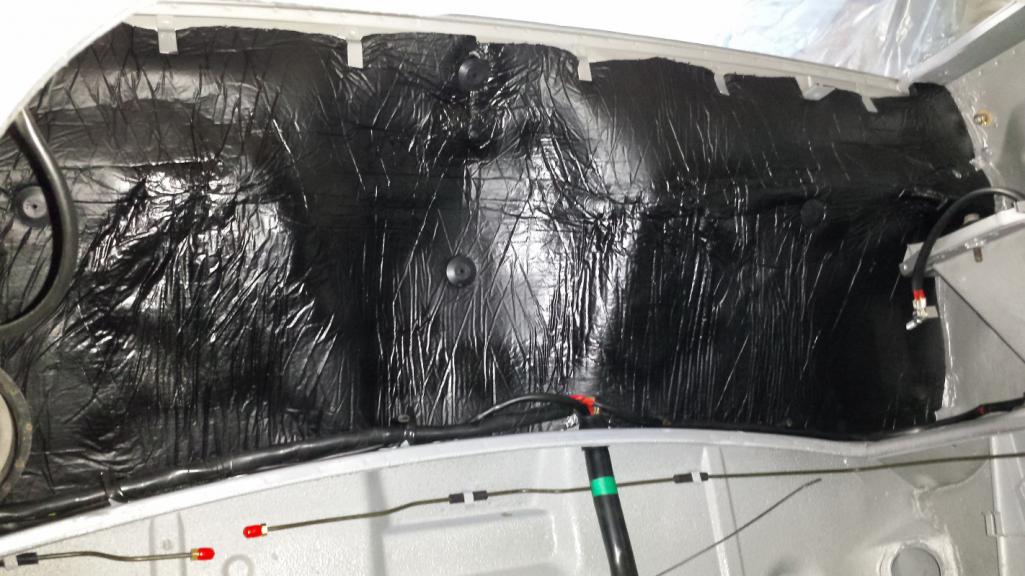 A major complaint of the original pad is the weight. I've read it is 11 lbs. but honestly, it feels heavier. All I know is that it bottomed out the 7 lb. max on the postal scale I had available to measure, but I'll bet it is closer to 15 lbs. So anyway, how does my new version compare? Well, the Noico weighed in at 4.6 lbs. and the open cell pad added a whopping 0.9 lbs for a grand total of about 5.5 lbs. That's a decent weight savings. Of course I don't know yet how it will perform but I can tell you that standing inside the engine bay, the difference was immediately noticeable. The space instantly took on that hushed atmosphere of an insulated space. I'm pretty sure the cabin will be as quiet as a Lexus (IMG:style_emoticons/default/lol-2.gif) |
|
|
|
| bbrock |
Dec 18 2018, 02:57 PM
Post
#711
|
|
914 Guru Group: Members Posts: 5,269 Joined: 17-February 17 From: Montana Member No.: 20,845 Region Association: Rocky Mountains |
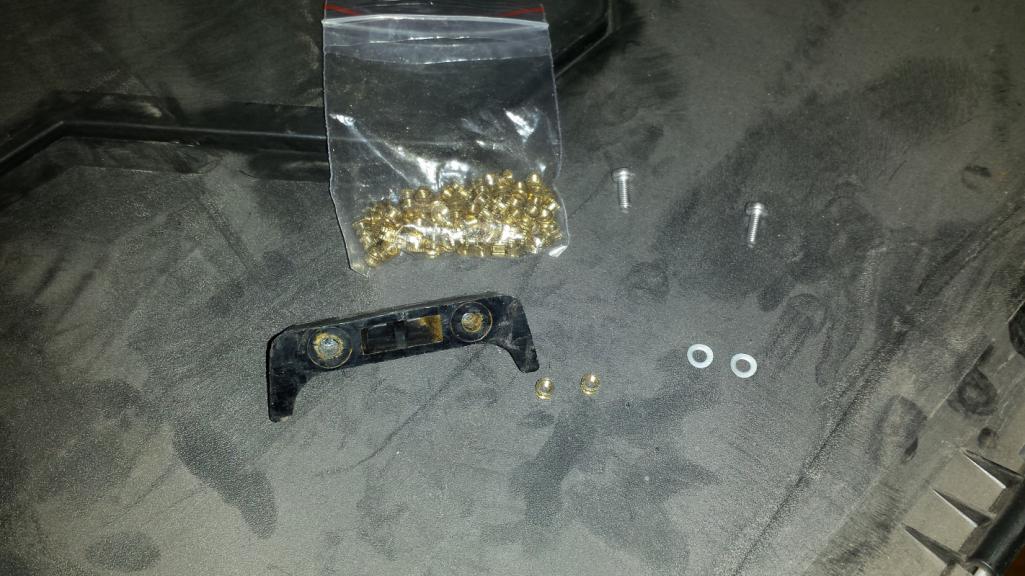
Checked a small project off the list during lunch today. When I took the glove box apart, the little screws attaching the door pull were corroded into the threaded nutserts embedded in the plastic pull. The only way to get them out was to yank the inserts out of the pull. Belmetric didn't have the right size (3mm) inserts, but I found them on Amazon. Only catch was they come in a bag of like a hundred or so. If anyone needs tiny inserts, I'll send you as many as you need.
 I smeared the insides of the bores with a tiny bit of E6000 adhesive just to provide extra encouragement for the inserts to stay in place. It wasn't really necessary as the inserts fit tight enough they had to be tapped in with a tack hammer. 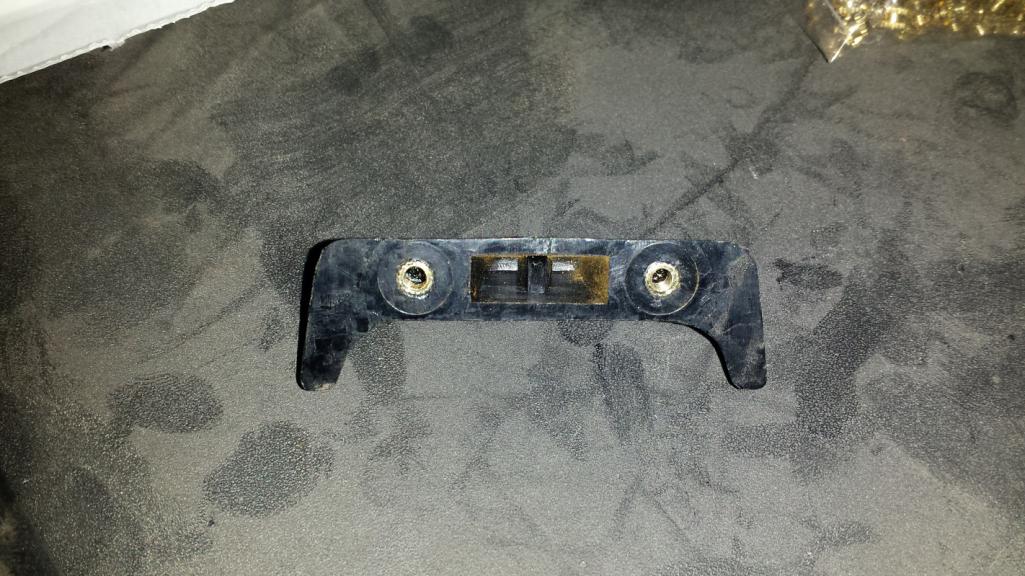 Good as new. I just put it on finger tight since it will have to come back off.  Okay, should I be worried? Do I need an intervention? (IMG:style_emoticons/default/huh.gif) Yesterday I noticed that the rubber bellows on my NOS brake cable wasn't folding neatly along the pleats. For some reason that bugged the shit out of me so I forced it to fold right and clamped it in place hoping it will develop correct memory. I hope so because I'd hate to have to abandon the project after getting this far. 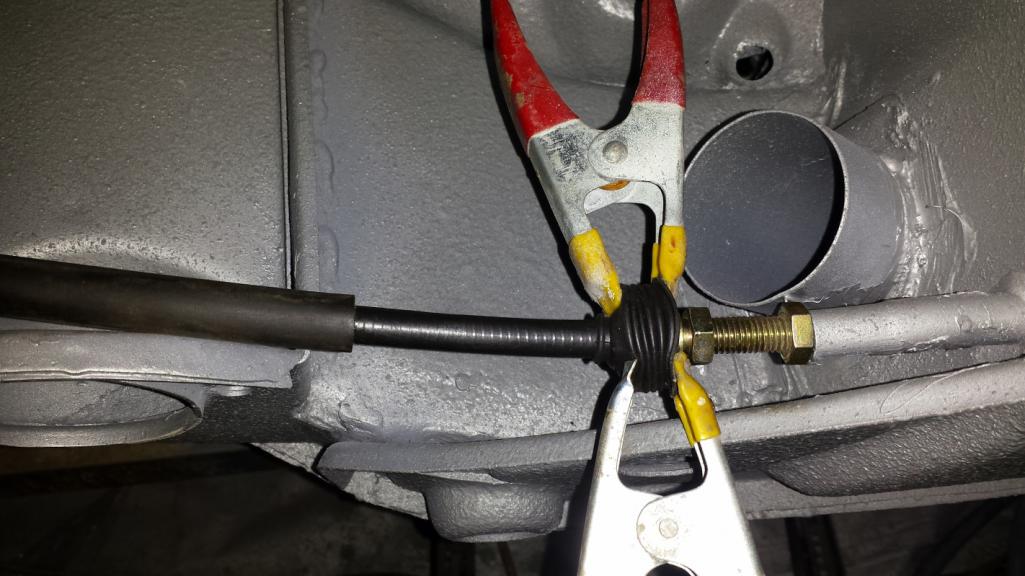 |
|
|
|
| 914_7T3 |
Dec 18 2018, 03:02 PM
Post
#712
|
|
Please forgive me, I'm new to all of this! Group: Members Posts: 1,894 Joined: 3-April 17 From: Los Angeles, CA Member No.: 20,991 Region Association: Southern California |
QUOTE(bbrock @ Dec 18 2018, 12:57 PM) Checked a small project off the list during lunch today. When I took the glove box apart, the little screws attaching the door pull were corroded into the threaded nutserts embedded in the plastic pull. The only way to get them out was to yank the inserts out of the pull. Belmetric didn't have the right size (3mm) inserts, but I found them on Amazon. Only catch was they come in a bag of like a hundred or so. If anyone needs tiny inserts, I'll send you as many as you need. I smeared the insides of the bores with a tiny bit of E6000 adhesive just to provide extra encouragement for the inserts to stay in place. It wasn't really necessary as the inserts fit tight enough they had to be tapped in with a tack hammer. Good as new. I just put it on finger tight since it will have to come back off. Okay, should I be worried? Do I need an intervention? (IMG:style_emoticons/default/huh.gif) Yesterday I noticed that the rubber bellows on my NOS brake cable wasn't folding neatly along the pleats. For some reason that bugged the shit out of me so I forced it to fold right and clamped it in place hoping it will develop correct memory. I hope so because I'd hate to have to abandon the project after getting this far. Oh My (IMG:style_emoticons/default/blink.gif) |
|
|
|
| worn |
Dec 18 2018, 07:29 PM
Post
#713
|
|
Winner of the Utah Twisted Joint Award Group: Members Posts: 3,564 Joined: 3-June 11 From: Madison, WI and North Bend WA Member No.: 13,152 Region Association: Upper MidWest |
Just drove through Montana on the way home from Seattle. Nicer in a 914.
|
|
|
|
| bbrock |
Dec 18 2018, 07:39 PM
Post
#714
|
|
914 Guru Group: Members Posts: 5,269 Joined: 17-February 17 From: Montana Member No.: 20,845 Region Association: Rocky Mountains |
QUOTE(worn @ Dec 18 2018, 06:29 PM) Just drove through Montana on the way home from Seattle. Nicer in a 914. Should've stopped by. I'm just 3 miles off I-90. (IMG:style_emoticons/default/beerchug.gif) |
|
|
|
| KELTY360 |
Dec 18 2018, 08:28 PM
Post
#715
|
|
914 Neferati Group: Members Posts: 5,186 Joined: 31-December 05 From: Pt. Townsend, WA Member No.: 5,344 Region Association: Pacific Northwest |
QUOTE(bbrock @ Dec 18 2018, 06:39 PM) QUOTE(worn @ Dec 18 2018, 06:29 PM) Just drove through Montana on the way home from Seattle. Nicer in a 914. Should've stopped by. I'm just 3 miles off I-90. (IMG:style_emoticons/default/beerchug.gif) (IMG:style_emoticons/default/agree.gif) And, if you'd been in a 914, it would have been the first one to drive up that road. (IMG:style_emoticons/default/poke.gif) |
|
|
|
| tygaboy |
Dec 19 2018, 09:30 AM
Post
#716
|
|
914 Guru Group: Members Posts: 5,810 Joined: 6-October 15 From: Petaluma, CA Member No.: 19,241 Region Association: Northern California |
QUOTE(bbrock @ Dec 18 2018, 12:57 PM) Okay, should I be worried? Do I need an intervention? (IMG:style_emoticons/default/huh.gif) Yesterday I noticed that the rubber bellows on my NOS brake cable wasn't folding neatly along the pleats. For some reason that bugged the shit out of me so I forced it to fold right and clamped it in place hoping it will develop correct memory. I hope so because I'd hate to have to abandon the project after getting this far. Thanks Brent! I was begining to worry my OCD was getting the best of me. It's now clear to me I still have a ways to go... |
|
|
|
| bbrock |
Dec 22 2018, 06:55 PM
Post
#717
|
|
914 Guru Group: Members Posts: 5,269 Joined: 17-February 17 From: Montana Member No.: 20,845 Region Association: Rocky Mountains |
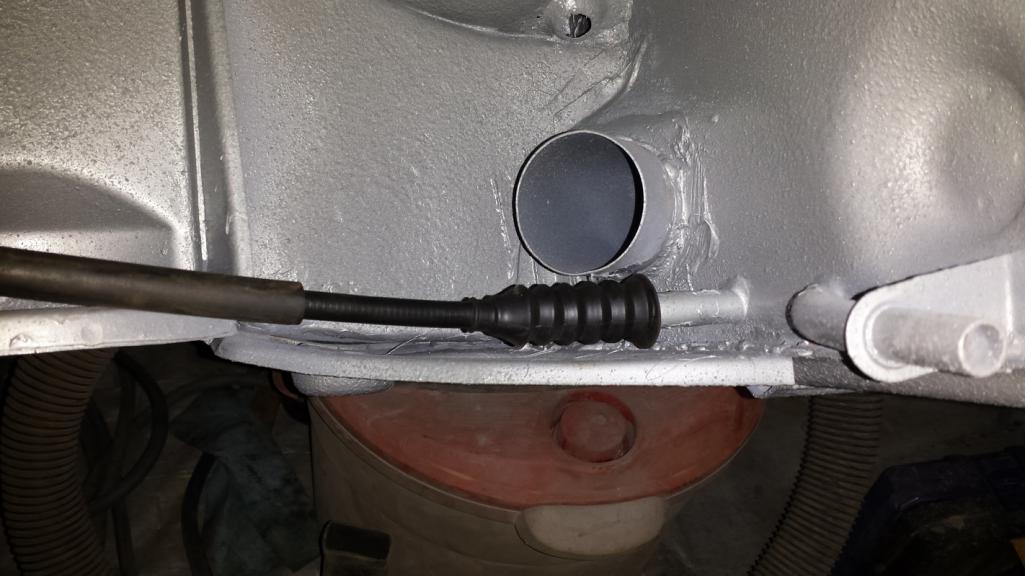
Well, I was on pins and needles but the bellows clamp worked so I guess I'll go ahead with this project. (IMG:style_emoticons/default/biggrin.gif)
 Good thing too because either Santa arrived early today, or 914rubber took a huge dump on my floor. This should keep me busy for awhile. 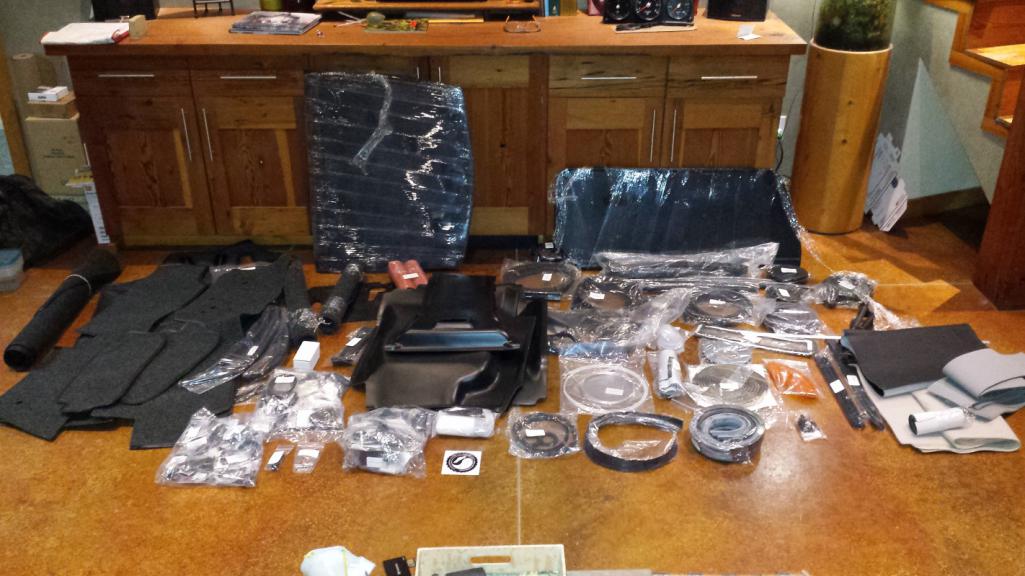 I'm trying hard not to let these goodies distract me too much. I really need to finish up prepping hardware to send for plating. |
|
|
|
| Cairo94507 |
Dec 23 2018, 06:59 AM
Post
#718
|
|
Michael Group: Members Posts: 10,613 Joined: 1-November 08 From: Auburn, CA Member No.: 9,712 Region Association: Northern California |
That a lot of nice stuff sitting there. (IMG:style_emoticons/default/beerchug.gif)
|
|
|
|
| bbrock |
Dec 23 2018, 08:19 PM
Post
#719
|
|
914 Guru Group: Members Posts: 5,269 Joined: 17-February 17 From: Montana Member No.: 20,845 Region Association: Rocky Mountains |
Okay, I had to play with some of the new goodies a little bit. (IMG:style_emoticons/default/wacko.gif) I installed the front trunk cable. I have to be honest, I'm not wowed by this piece. The sheath is spot on but the wire cable is soft mild steel compared to the original which is smaller gauge but a very stiff spring steel. To make it work, you have to flood the tube with lubricant. Seems like a stiffer wire would be a better option here. Based on this, I'm not going to use the engine release cable that came in my kit as the original is still in good shape. Important thing is that this cable looks like it will work and it is in sans latch.
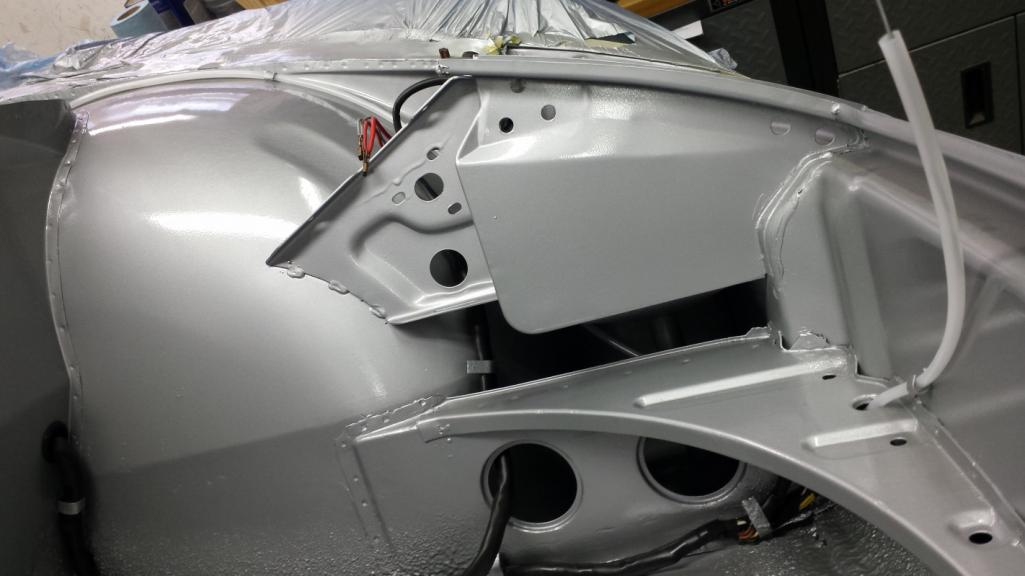 Another shot of the cable with a new heater hose grommet down there. 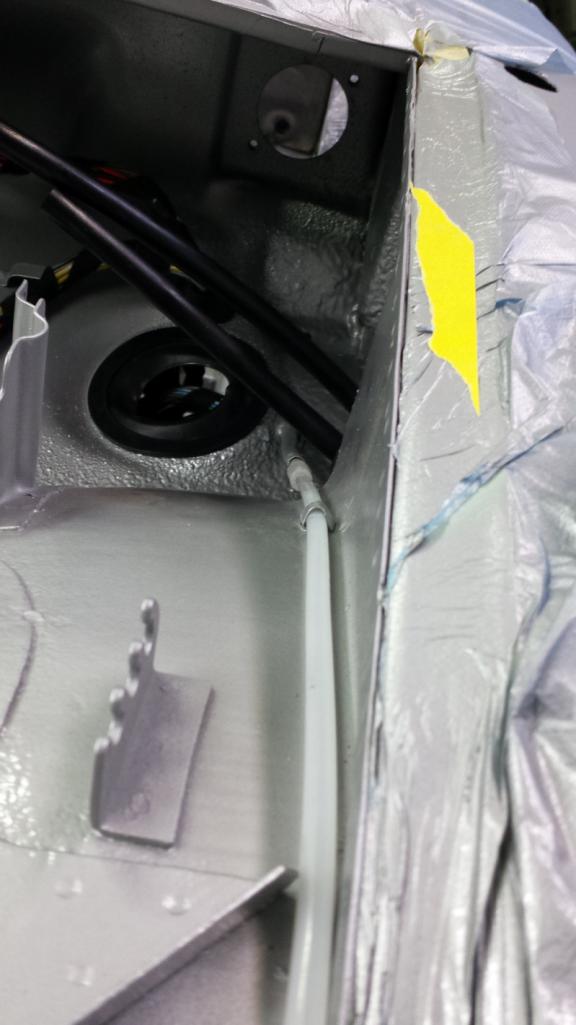 I also installed the 3-hole grommet for the Bowden cables. I hope to hell that is in the right hole because it was a little bastard to get in. Foreshadowing of what is in store when I install the air box? (IMG:style_emoticons/default/blink.gif) 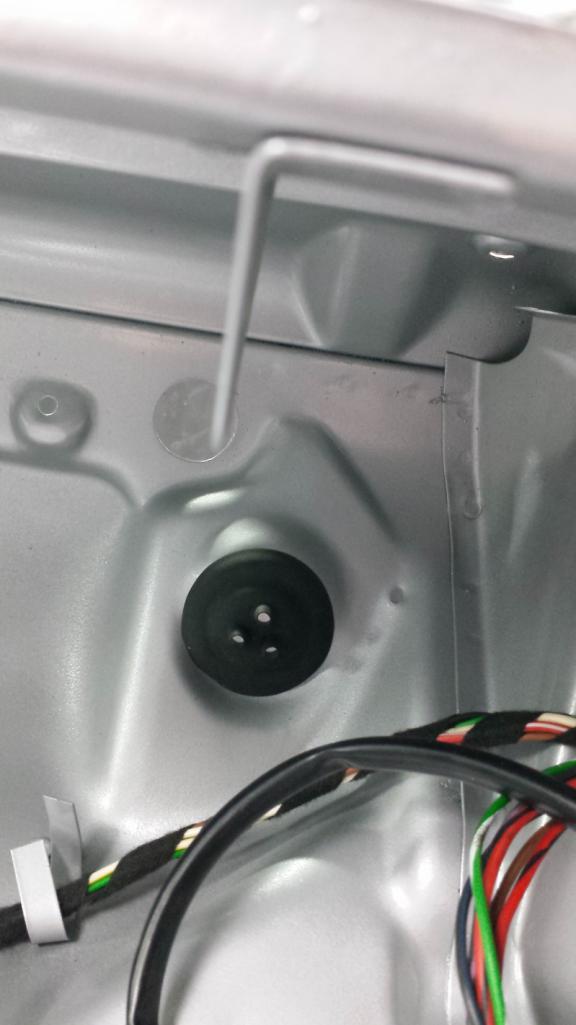 Another shot of that heater hose grommet with some spiffy harness showing through. 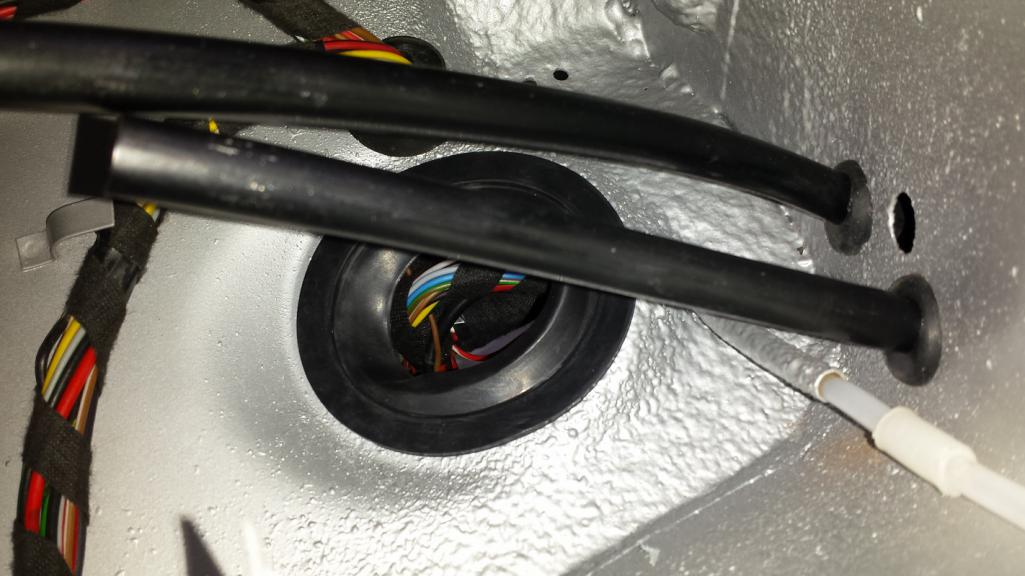 Then it was around to the back side to play with my nipples... heater cable nipples that is. You can see the NOS OEM shift bushing there too. 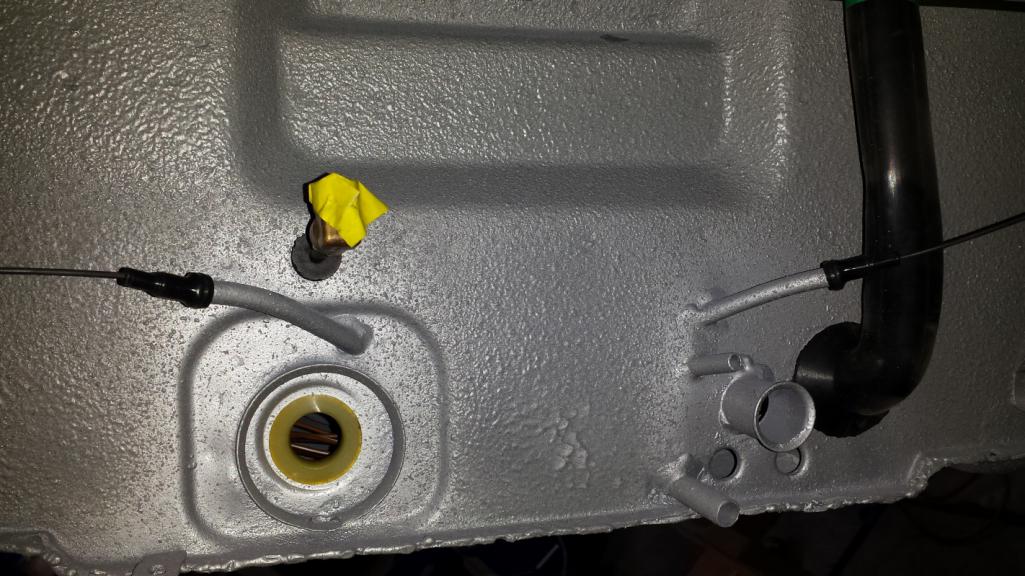 I also installed the engine shelf seals. Hard to photograph but I cut them a little long to leave some extra for when they shrink. 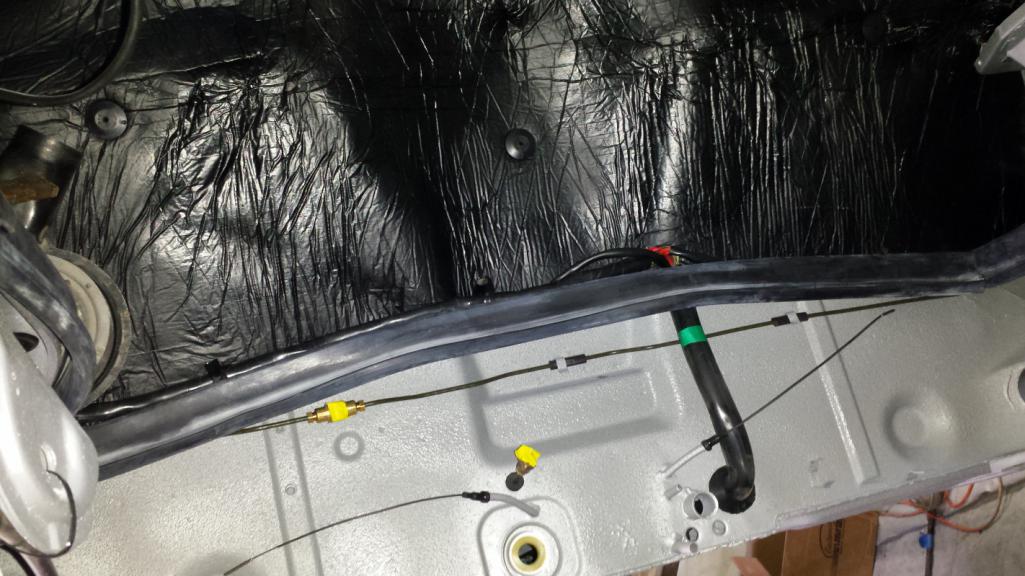 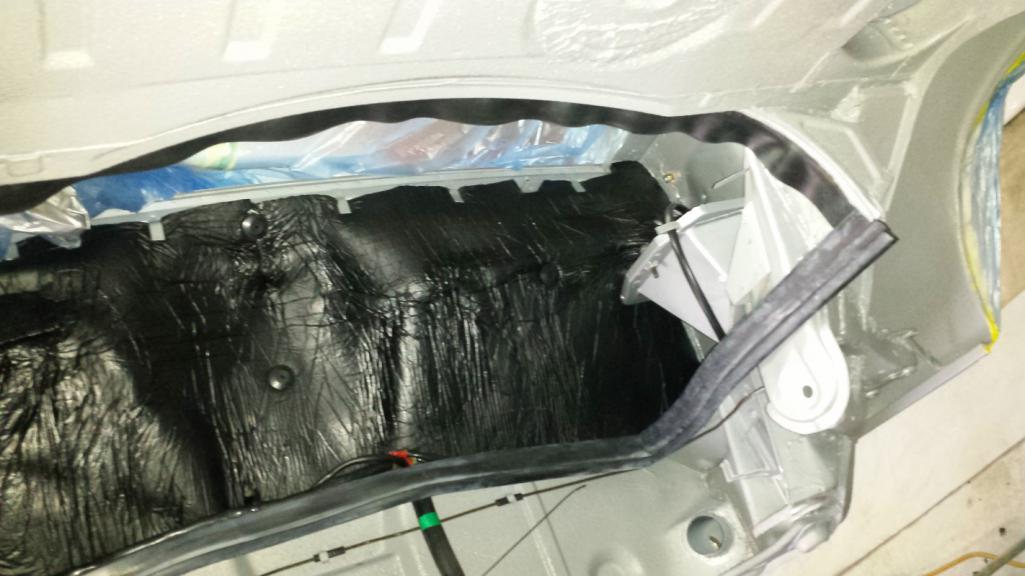 You can see one of the new roof latch cups in this one.  I installed a couple other things too but that's enough screwing around, time to get to work. Attached thumbnail(s) 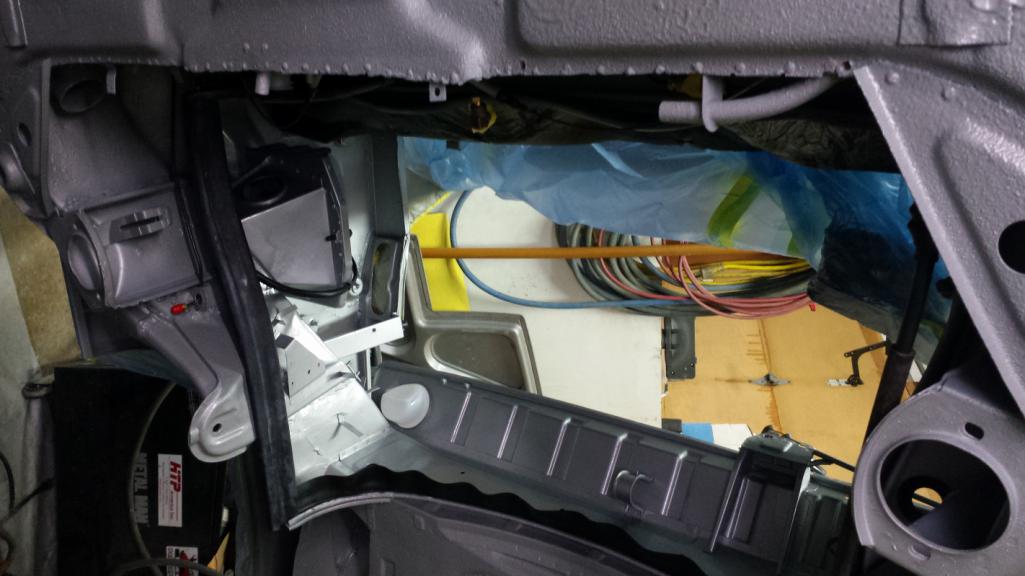
|
|
|
|
| bbrock |
Dec 23 2018, 08:44 PM
Post
#720
|
|
914 Guru Group: Members Posts: 5,269 Joined: 17-February 17 From: Montana Member No.: 20,845 Region Association: Rocky Mountains |
Okay, back to serious work of harvesting hardware to send for plating. I tore down the steering rack. That thing was a little bitch. The oil seal had bare metal outer ring that had fused itself but good to the magnesium housing. Had to invent a couple new curse words to get the pinion gear out, but I prevailed.
I think I'll walnut blast the housing before reassembly. I might have a replacement bearing in the mail tomorrow compliments of @mb911 and ordered a second and the seal. Ben, I confirmed your bearing is the right one - THANKS (IMG:style_emoticons/default/beerchug.gif) In the end, that was a lot of work to scavenge those three bolts above the retainer springs for plating, but sooner or later, it had to be done. Oh, I'm installing turbo tie rods. To refurb the old ones would require new rod ends, bushings, and bellows. Kind of a no-brainer to go turbo. 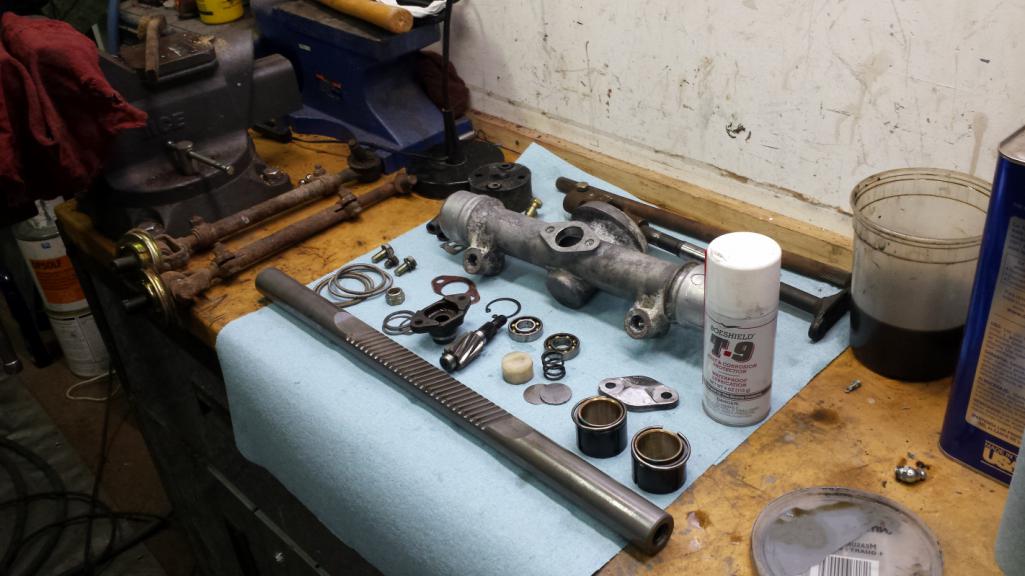 Next up was finishing off the brake pistons just to get them off the bench. A few hours in the vibratory tumbler and then some high temperature gray paint. 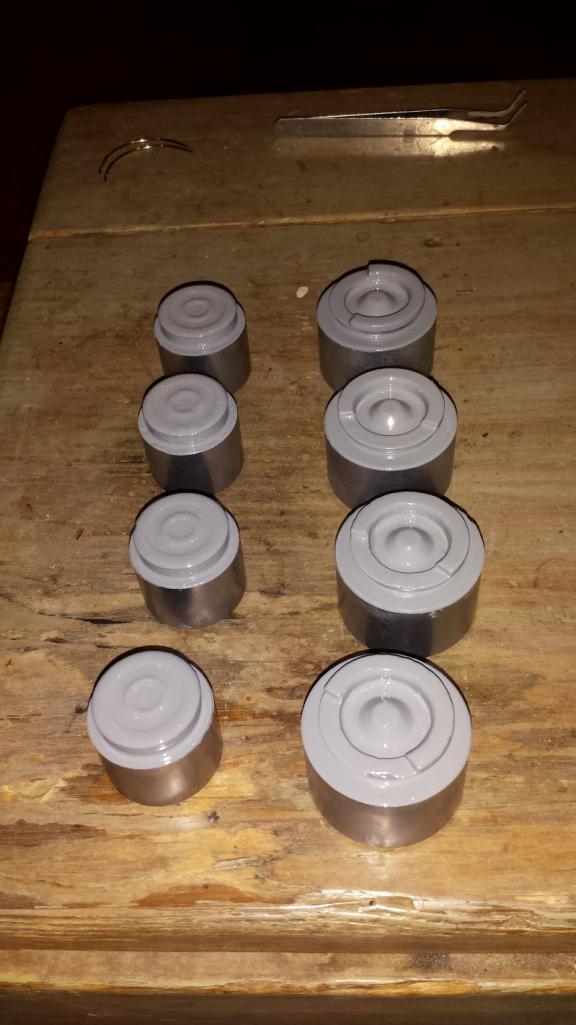 So what's the opinion on this one? No, I didn't grab hold of it with vice grips (IMG:style_emoticons/default/slap.gif) That chip was actually corrosion. I think it will be okay but curious what you smart people think. (IMG:style_emoticons/default/confused24.gif) 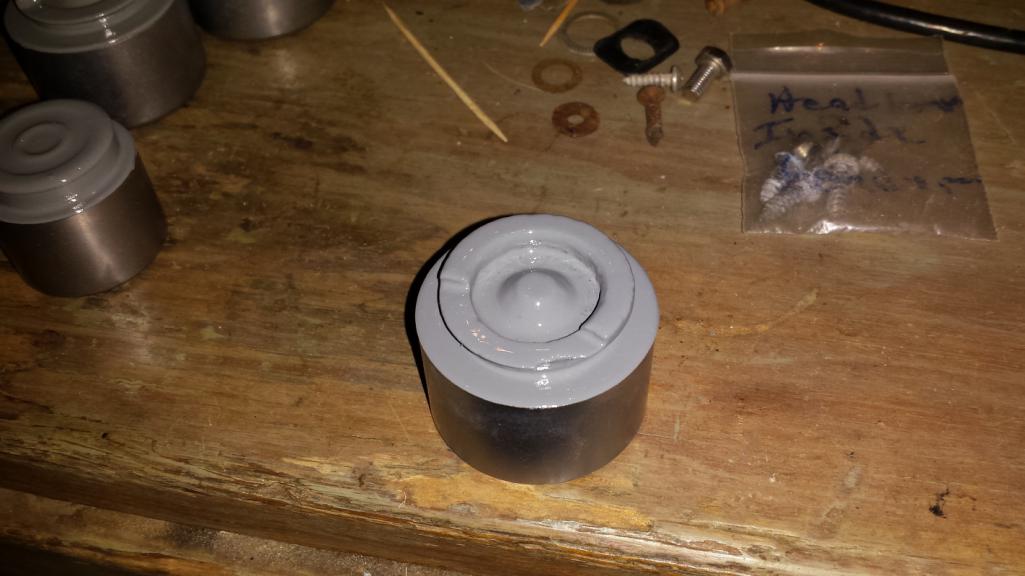 Finally, I tore down the rear shock towers to harvest bits for the platers. 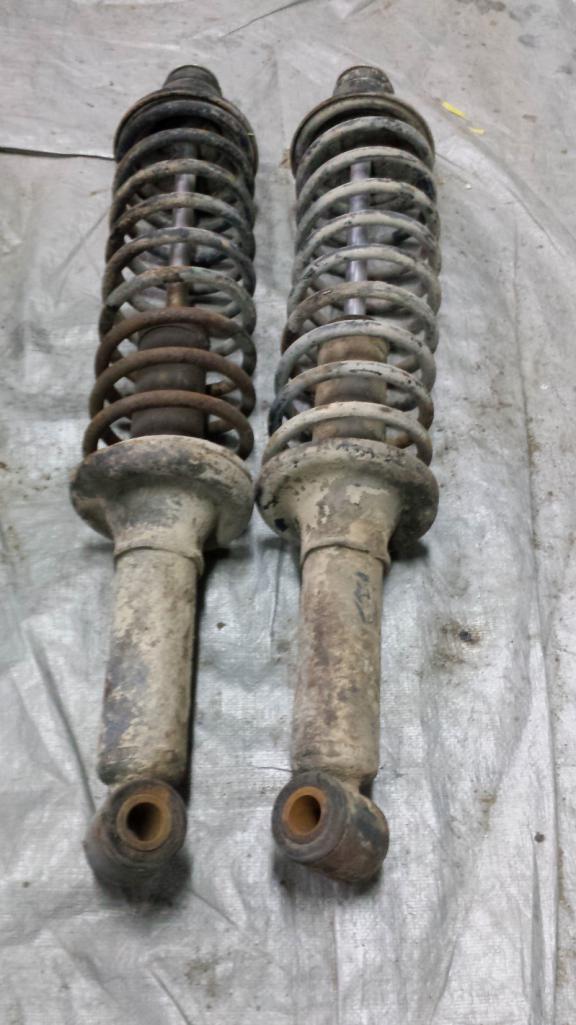 Those shocks no son buenos. Anyone no where to find Boge/Sachs rear shocks anymore? I'd like to keep the ride as close to stock as possible. I'm going to test the rate on the springs. Not sure where to find stock springs anymore either. (IMG:style_emoticons/default/confused24.gif) 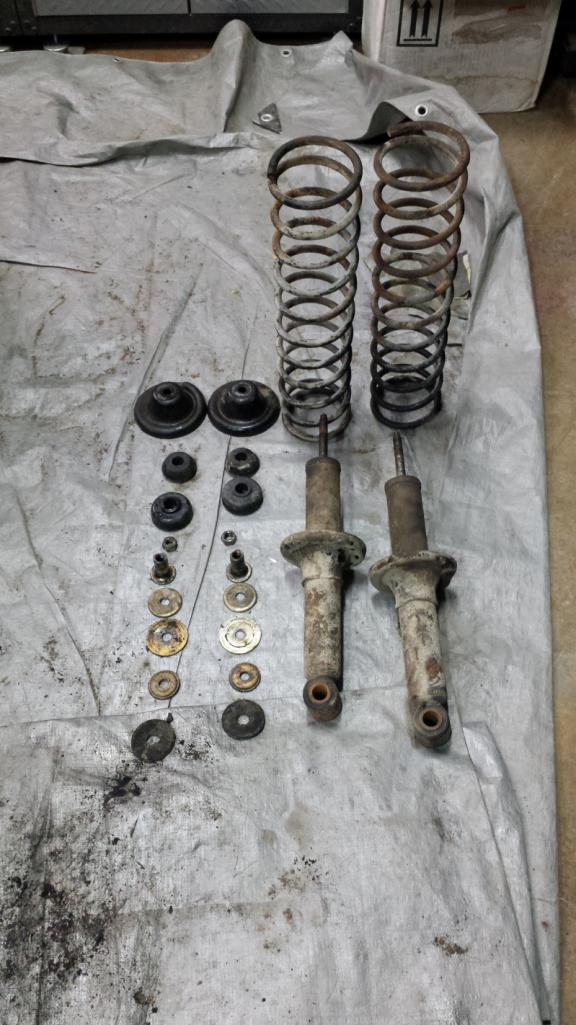 That's it for now. |
|
|
|
|
2 User(s) are reading this topic (2 Guests and 0 Anonymous Users)
0 Members:

|
Lo-Fi Version | Time is now: 19th April 2026 - 05:09 PM |
Invision Power Board
v9.1.4 © 2026 IPS, Inc.