|
|
|
Porsche, and the Porsche crest are registered trademarks of Dr. Ing. h.c. F. Porsche AG.
This site is not affiliated with Porsche in any way. Its only purpose is to provide an online forum for car enthusiasts. All other trademarks are property of their respective owners. |
|
|

  |

| mepstein |
 Dec 23 2018, 09:42 PM Dec 23 2018, 09:42 PM
Post
#721
|
|
914-6 GT in waiting  Group: Members Posts: 20,639 Joined: 19-September 09 From: Landenberg, PA/Wilmington, DE Member No.: 10,825 Region Association: MidAtlantic Region |
AA has stock springs and I think 914rubber is also having them made. The shocks are a bit harder. Put out a WTB in all the usual places. Someone might have a set in their stash.
|
   |

 
|
| bbrock |
Jan 5 2019, 02:53 PM
Post
#722
|
|
914 Guru Group: Members Posts: 5,269 Joined: 17-February 17 From: Montana Member No.: 20,845 Region Association: Rocky Mountains |
Simply Dashing
Progress on the car has been a tad frustrating lately. Nothing major, I've just had completion of a number of tasks delayed for various reasons which has me with lots of irons on the fire but none are hot. I needed a win to feel some sense of accomplishment. You may recall that the dash top was slightly grungy when I started this project and fell just a little shy of concours quality. (IMG:http://www.914world.com/bbs2/uploads/post-20845-1513794112.jpg) Time to break out the 303 Protectant and see if we can spruce that up a little. Yes, I believe that is better. This 303 is an amazing product. (IMG:style_emoticons/default/rolleyes.gif) 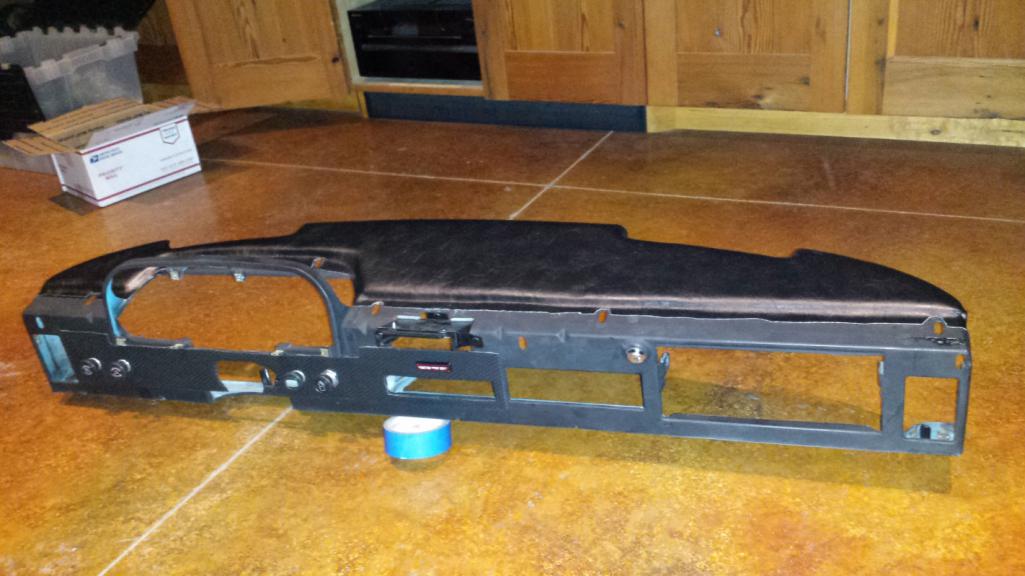 Oh don't get your undies in a twist. Yes, it is a 914Rubber vinyl kit. 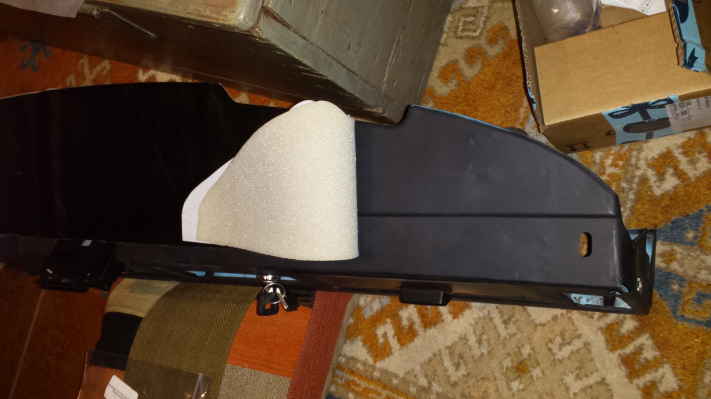 I also gave the dash a facelift with new vinyl and half-ass installed the dash cap and knee pad. The fit is loosy goosey because most of the hardware is in the plating bucket or missing and those pieces were really warped from being stored in an unheated shed for two years. Of course, both the padded pieces look typical for originals, cracked to pieces but new pads are not in the budget. Here is the result hanging loose in the car for easy removal again. The air control panel bezel in in a box for replating. I didn't recover the radio plate yet because I'm not sure what radio will be installed. I might have to make a plate for a modern single DIN opening and the 914Rubber kit only gives me enough basket weave vinyl to cover one plate. All in all, this feels like accomplishment. 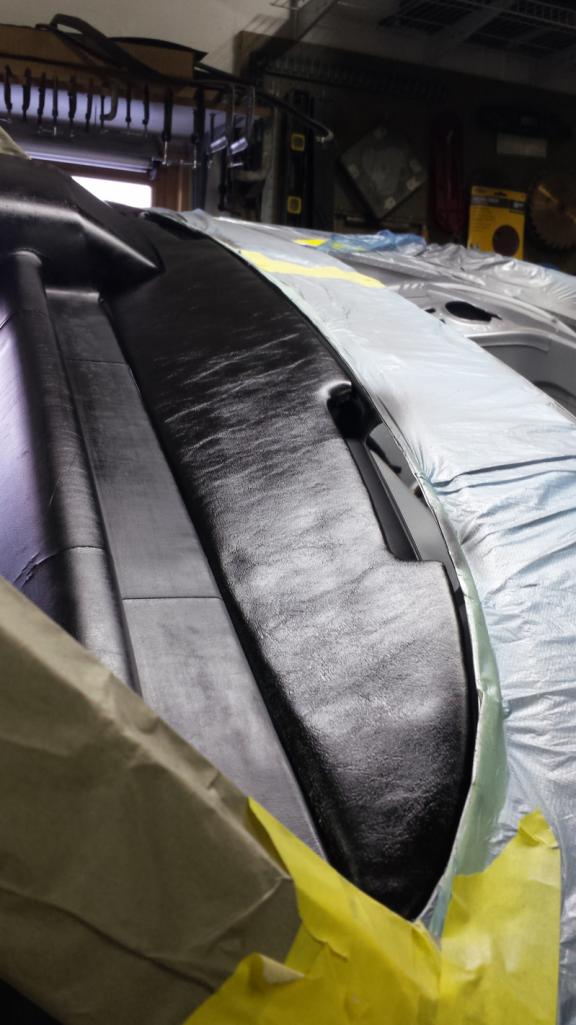 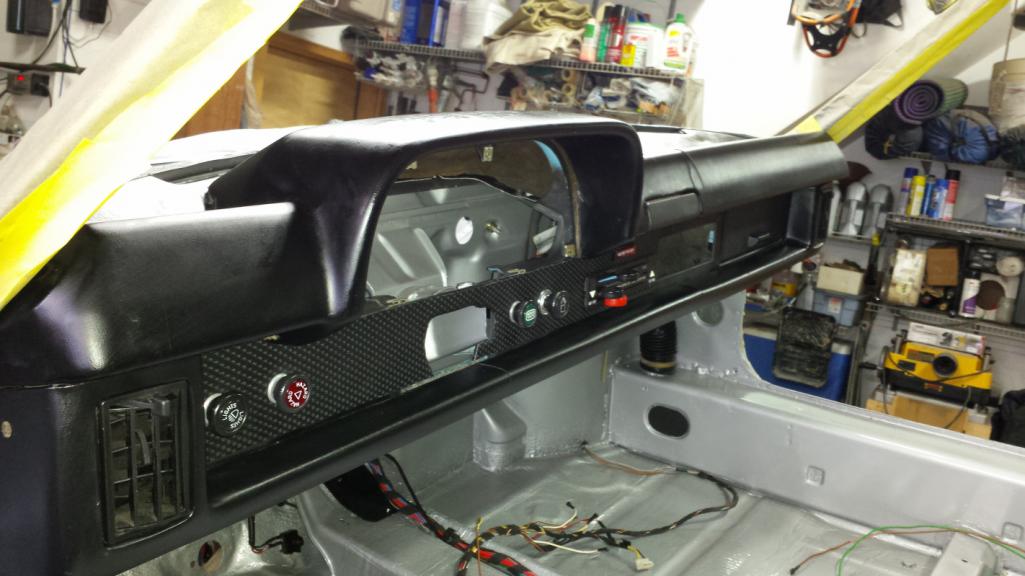 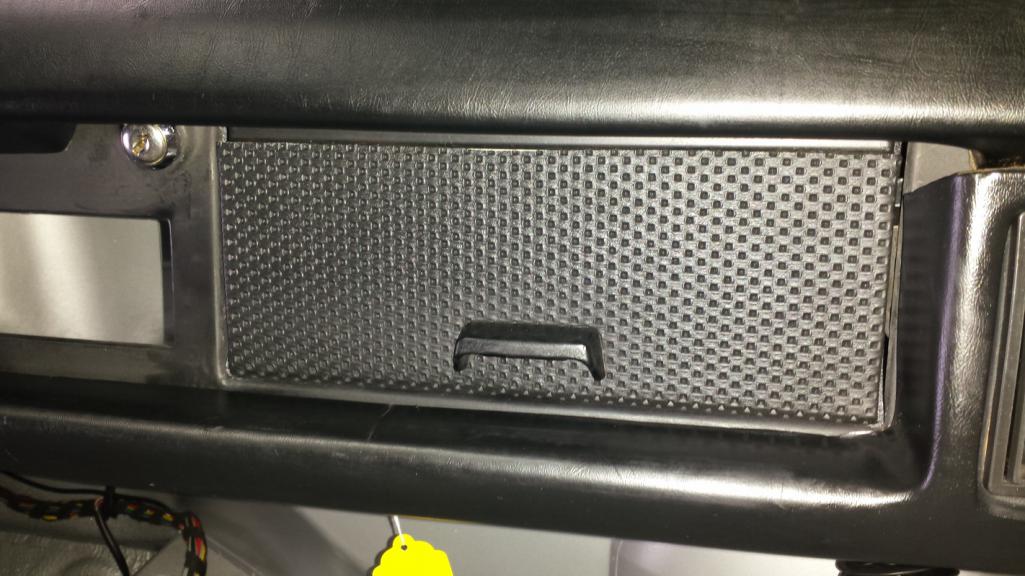 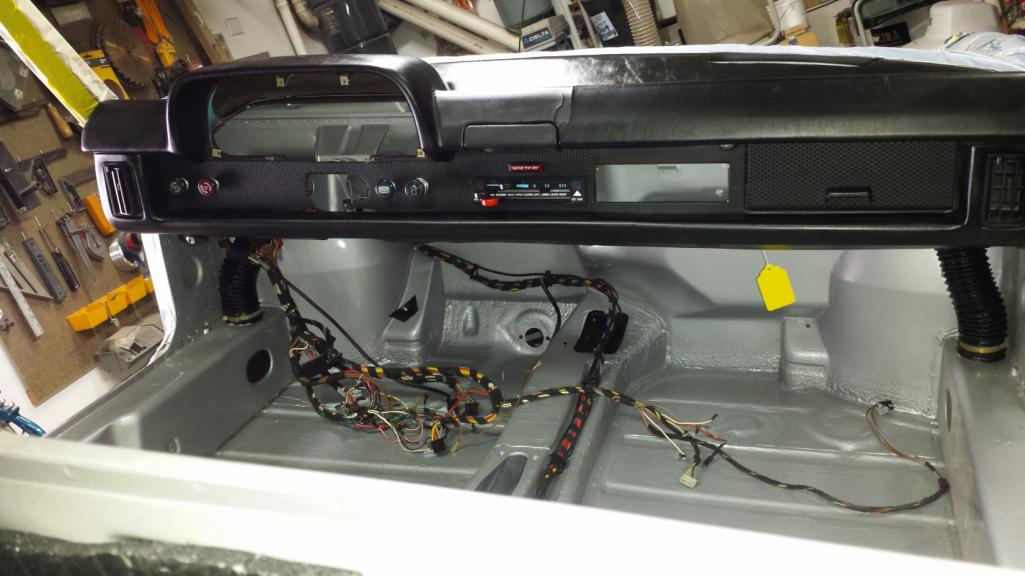 Attached thumbnail(s) 
|
 |
|
| TravisNeff |
Jan 5 2019, 03:09 PM
Post
#723
|
|
914 Guru Group: Members Posts: 5,082 Joined: 20-March 03 From: Mesa, AZ Member No.: 447 Region Association: Southwest Region |
ooh that's lookin purdy!
|
|
|
|
| Superhawk996 |
Jan 5 2019, 06:21 PM
Post
#724
|
|
914 Guru Group: Members Posts: 7,788 Joined: 25-August 18 From: Woods of N. Idaho Member No.: 22,428 Region Association: Galt's Gulch |
This is looking great! I will need to do same with mine to freshen it.
You've started this car from a really dark place. Glad to see it getting treated so well and revitalized. (IMG:style_emoticons/default/biggrin.gif) I wonder if anyone has done the dash in leather rather than using one of the aftermarket toppers? |
|
|
|
| Dion |
Jan 5 2019, 06:24 PM
Post
#725
|
|
RN Group: Members Posts: 2,926 Joined: 16-September 04 From: Audubon,PA Member No.: 2,766 Region Association: MidAtlantic Region |
Lookin mighty fine there Brent. That is a quality trimmer type job!
|
|
|
|
| bbrock |
Jan 5 2019, 10:24 PM
Post
#726
|
|
914 Guru Group: Members Posts: 5,269 Joined: 17-February 17 From: Montana Member No.: 20,845 Region Association: Rocky Mountains |
Thanks guys.
I pissed away the rest of the day changing the hydraulic fluid on my snow plow. About as much fun as a colonoscopy. No way to do it without a huge mess. Tomorrow should be fun though. I got an unexpected package today that will let me finish up one of those unfinished projects. (IMG:style_emoticons/default/beerchug.gif) |
|
|
|
| tygaboy |
Jan 6 2019, 10:04 AM
Post
#727
|
|
914 Guru Group: Members Posts: 5,810 Joined: 6-October 15 From: Petaluma, CA Member No.: 19,241 Region Association: Northern California |
The recent pics can't possibly be of the same car... (IMG:style_emoticons/default/poke.gif)
Brent, you're doing a stellar job on your baby! |
|
|
|
| bbrock |
Jan 6 2019, 11:40 AM
Post
#728
|
|
914 Guru Group: Members Posts: 5,269 Joined: 17-February 17 From: Montana Member No.: 20,845 Region Association: Rocky Mountains |
QUOTE(tygaboy @ Jan 6 2019, 09:04 AM)  The recent pics can't possibly be of the same car... (IMG:style_emoticons/default/poke.gif) Brent, you're doing a stellar job on your baby! The only thing changed from the before and after is the addition of that defroster switch you gave me. It really spruces the whole thing up! |
|
|
|
| bbrock |
Jan 6 2019, 03:49 PM
Post
#729
|
|
914 Guru Group: Members Posts: 5,269 Joined: 17-February 17 From: Montana Member No.: 20,845 Region Association: Rocky Mountains |
Nice Rack!
The steering rack reassembly got stalled a little while I waited for a second bearing to arrive. It was delivered yesterday so I drove the 3 miles out to the mailbox and was surprised to also find a box full of goodies from PMB Performance. Included in that box was a shiny new turbo tie rod kit. So this morning the steering rack finally went from this: 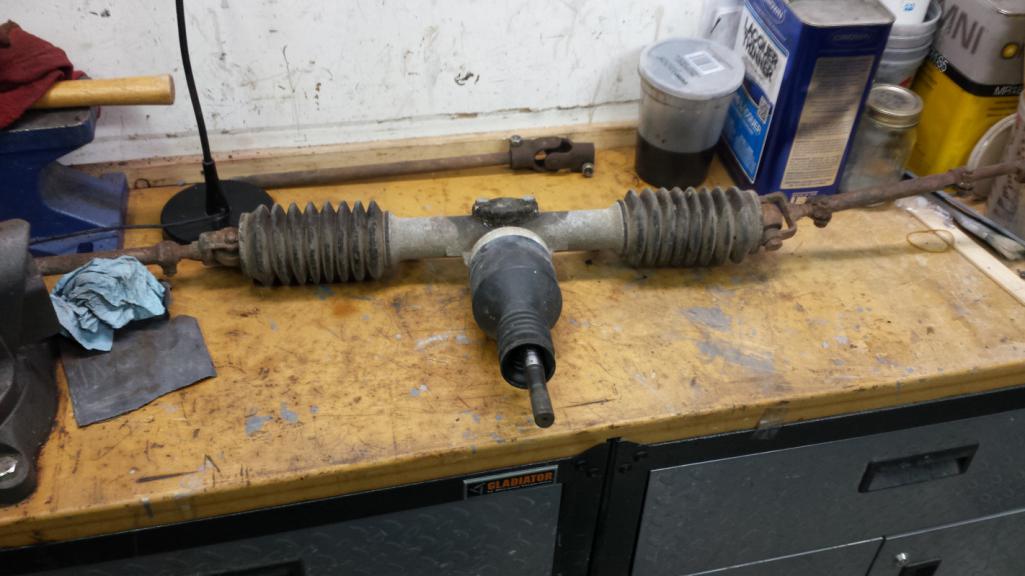 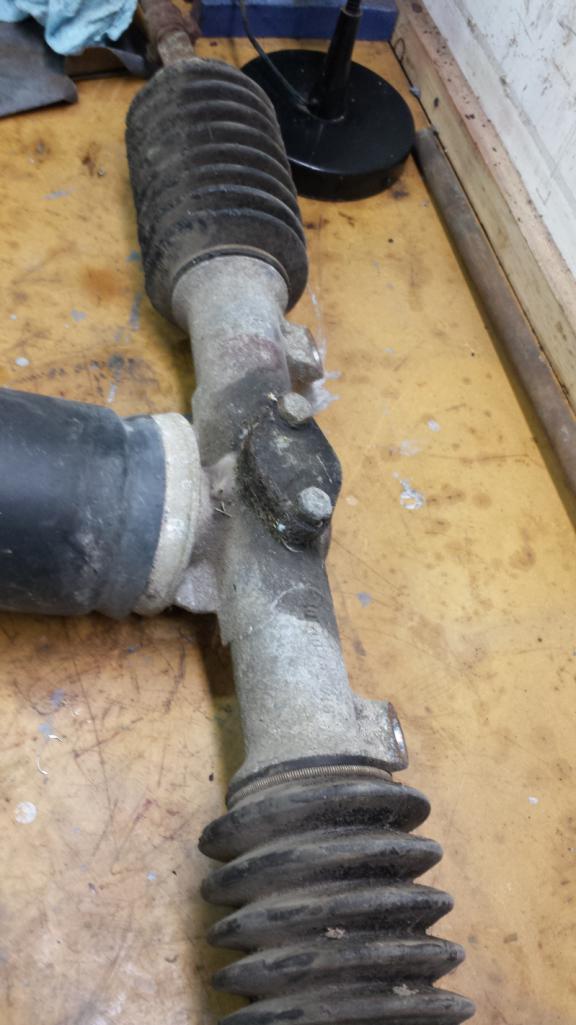 to this: 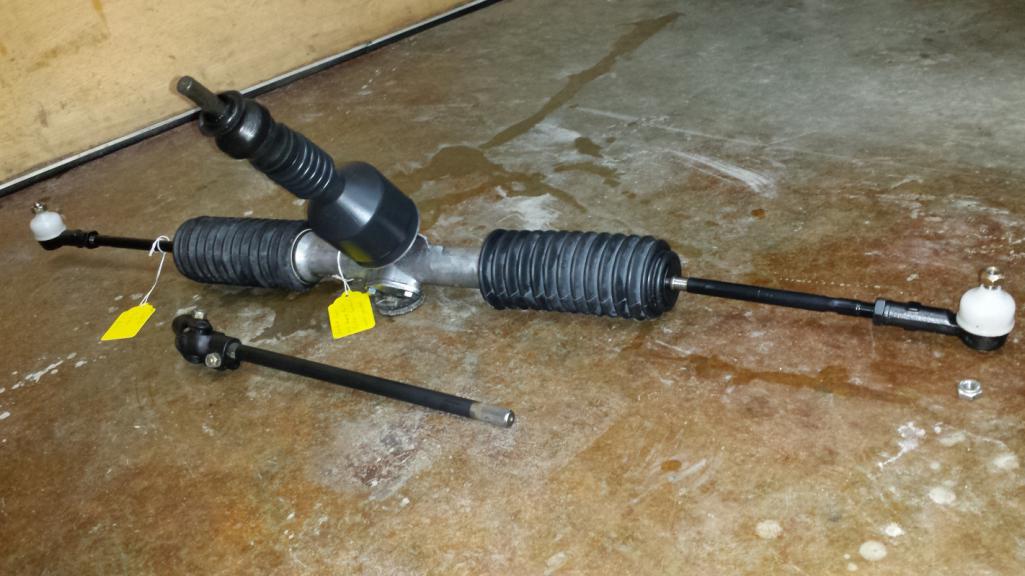 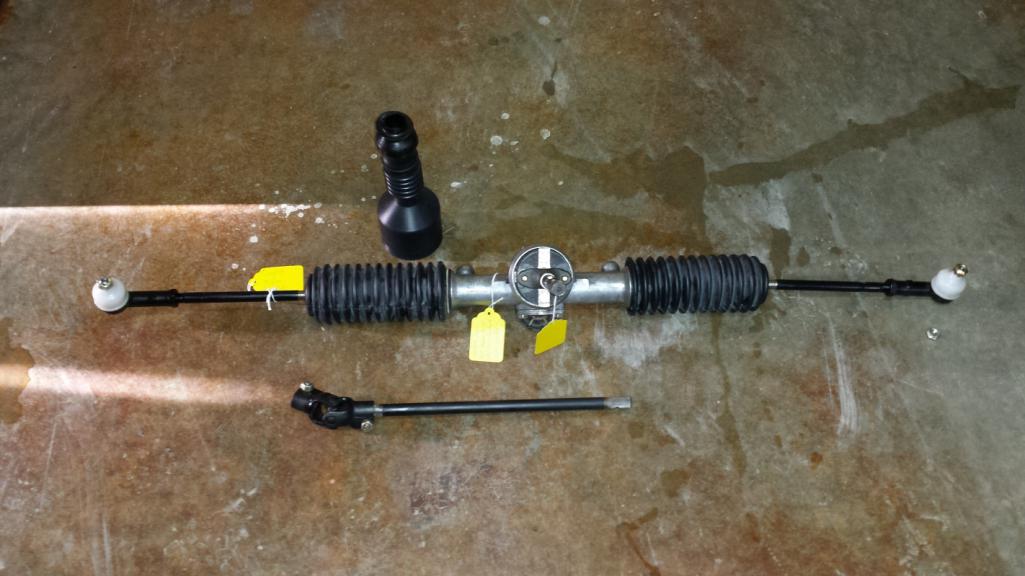 A word about those retaining springs. Several posts on turbo tie rods on the Internet mention that the original retaining springs don't fit the turbo tie rods. I was curious what was supposed to go there so looked up the 930 parts in the PET. The PET shows the same springs as for the 914 on the 911 racks, but no retainers at all for the turbos on either side of the boots. Bottom line, you don't need retainer springs (or a substitute) for these boots. I went ahead and reinstalled springs on the inners but didn't bother with the outers. If you really want retainers, you can twist the old springs apart at the joint, clip them to length by cutting the NON-tapered end, and twisting them back together. It isn't necessary though. You might notice several yellow tags there reminding me that I'm not finished yet. One reminds me to replace the pressure plate cover bolts with freshly replated bolts because, well, you know... (IMG:style_emoticons/default/screwy.gif) Another tag reminds me to apply locktite to the tie rod threads and tighten them. I'm waiting on the special spanner to arrive after our wonderful postal service lost the first one that should have arrived two weeks ago. (IMG:style_emoticons/default/mad.gif) The last one reminds me to torque the rubber puck bolts and bend the lock tabs over the bolts. I didn't do that because I'm still undecided about the puck. I have a brand new one that came in my 914Rubber kit, but my original looks in perfect condition. I'm inclined to keep the original and sell the original at a bargain. What would you all do? (IMG:style_emoticons/default/confused24.gif) 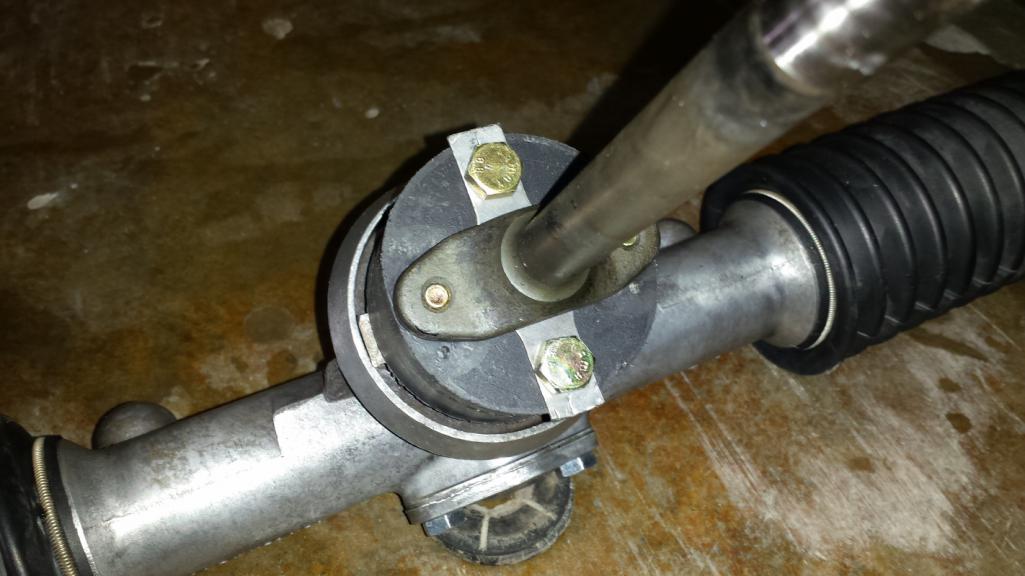 A couple other notes. The steering shaft looks like it might have been anodized originally but my upper shaft was badly rusted (that sounds dirty). I bead blasted it and shot it with a coat of flat black paint. I think it looks acceptable. 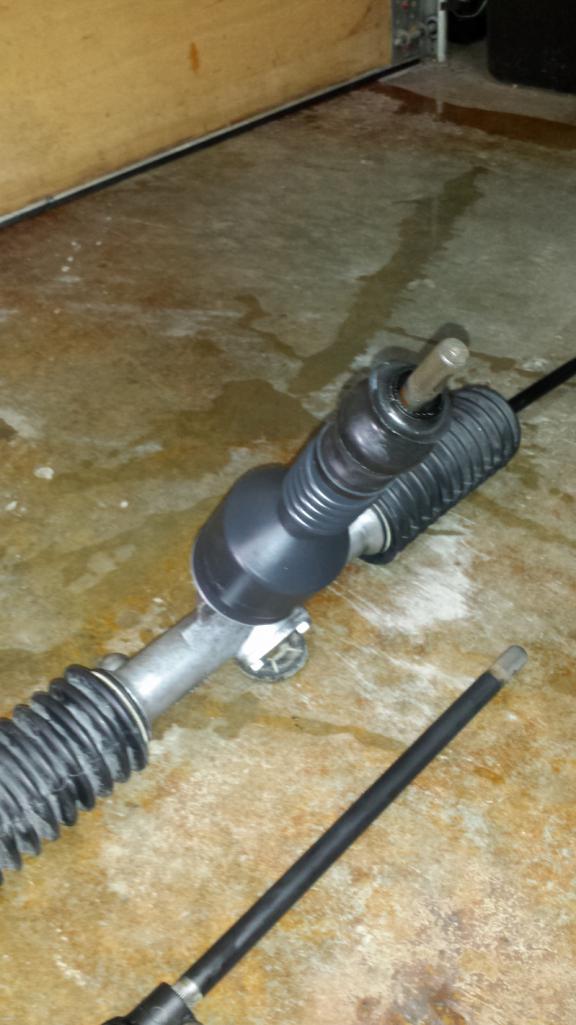 Finally, and interesting note about the new tie rod ends. One came with the standard castle nut and the spindle cross-drilled for a cotter pin. The other came with self-locking cone nut loosely threaded on the spindle and a second self-locking ring nut in the package. The spindle is not cross-drilled. I'm guessing this is just an alternative mounting version and the choice of nuts is an either/or thing. Anyone have better insight? The alternative could be that they want it double-nutted. (IMG:style_emoticons/default/confused24.gif) 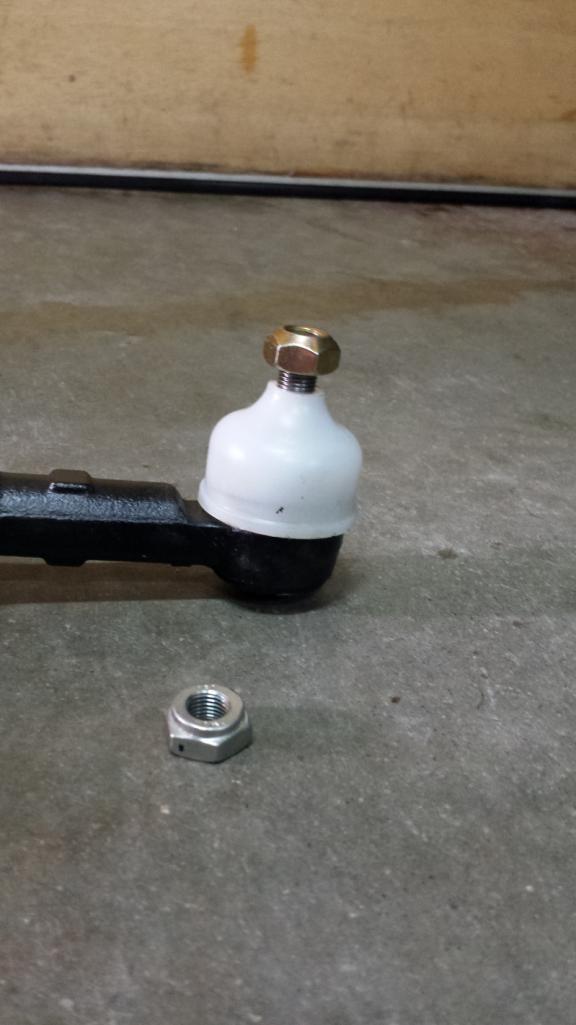 Well, I best get back to it. I have some unfinished business with the snow plow to take care of first though. (IMG:style_emoticons/default/barf.gif) |
|
|
|
| bbrock |
Jan 6 2019, 07:23 PM
Post
#730
|
|
914 Guru Group: Members Posts: 5,269 Joined: 17-February 17 From: Montana Member No.: 20,845 Region Association: Rocky Mountains |
One more little project completed today. Also in my box of PMB goodies was a new pair of rear wheel bearings and a pair of ball joints. The joints have nothing to do with this project. I just wanted to show off my new balls.
 Of course the first thing to do with a new set of sealed bearings is to tear them apart. Wait... what? 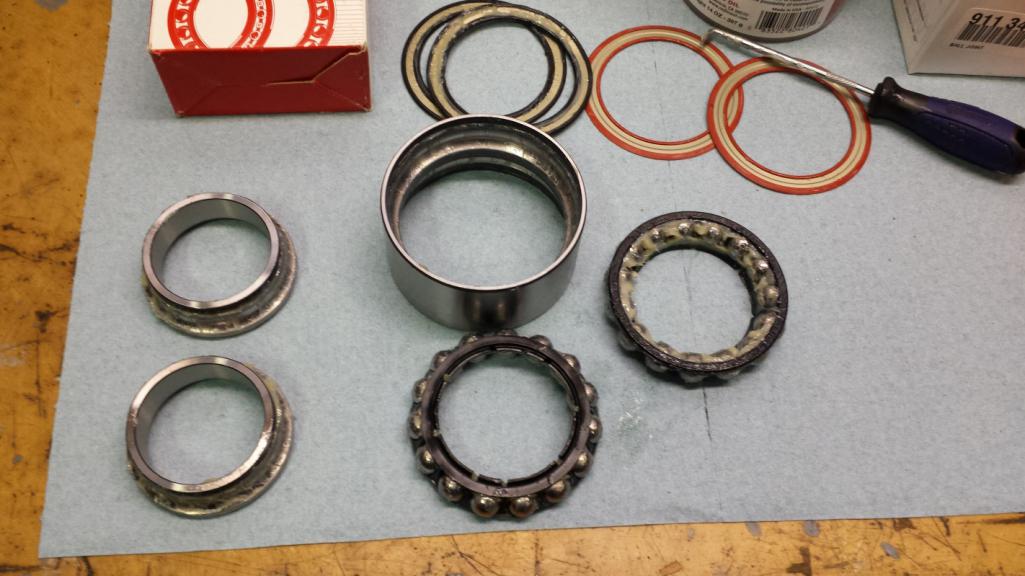 But why? I've been reading a lot about premature bearing failure and it turns out these Slovakian bearings are coming out of the factory improperly greased. There are a couple good Youtube videos on this. I wasn't taking any chances. The first bearing I popped open actually wasn't too bad. The grease on the outer race sides of the bearing cages was on the skimpy side but it might have been okay. 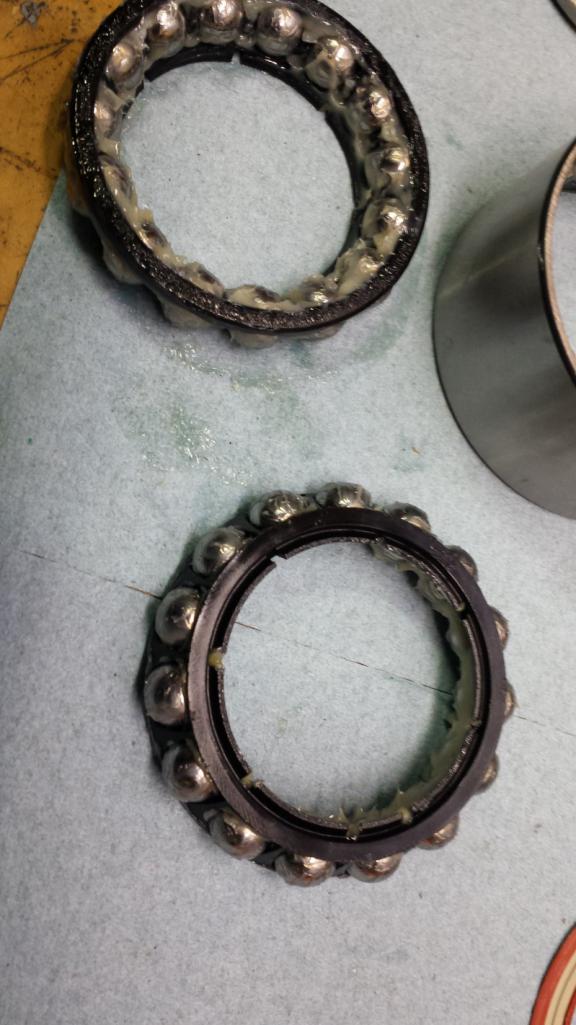 However, one vid claims the factory grease is only rated to around 250F. I don't know what typical wheel bearing temps run, but that seems a little close. This redline stuff is rated for something like 800F so seems like cheap insurance. Here's the first bearing greased and ready for reassembly. 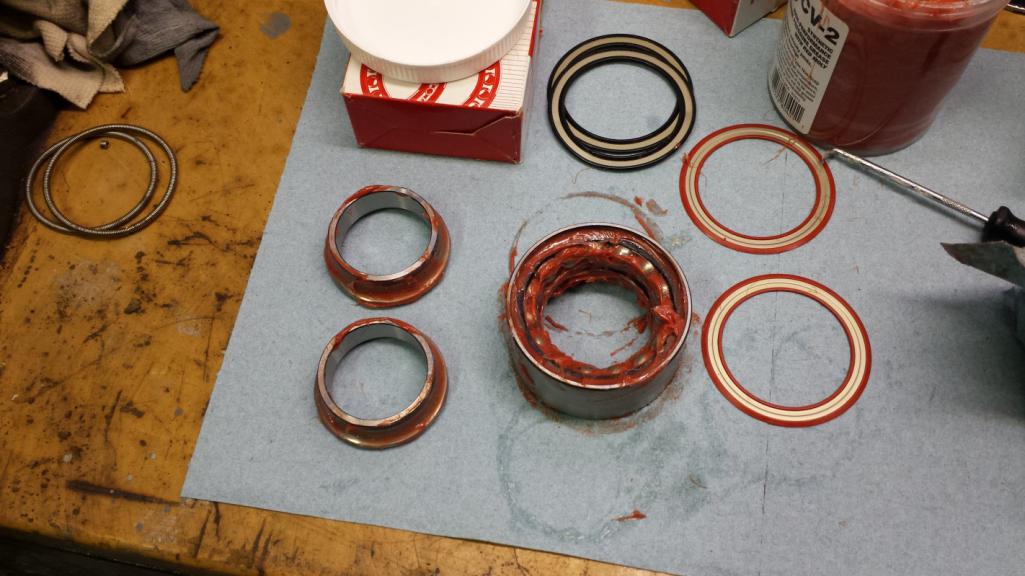 I popped open the second bearing and it was downright scary. It doesn't show well in this pic, but there is no fuching grease in there! (IMG:style_emoticons/default/yikes.gif) There is a smear of grease on the inner race side of the cage but the outer race side is bone dry. I mean DRY! How the fuch are they getting away with this? (IMG:style_emoticons/default/blink.gif) 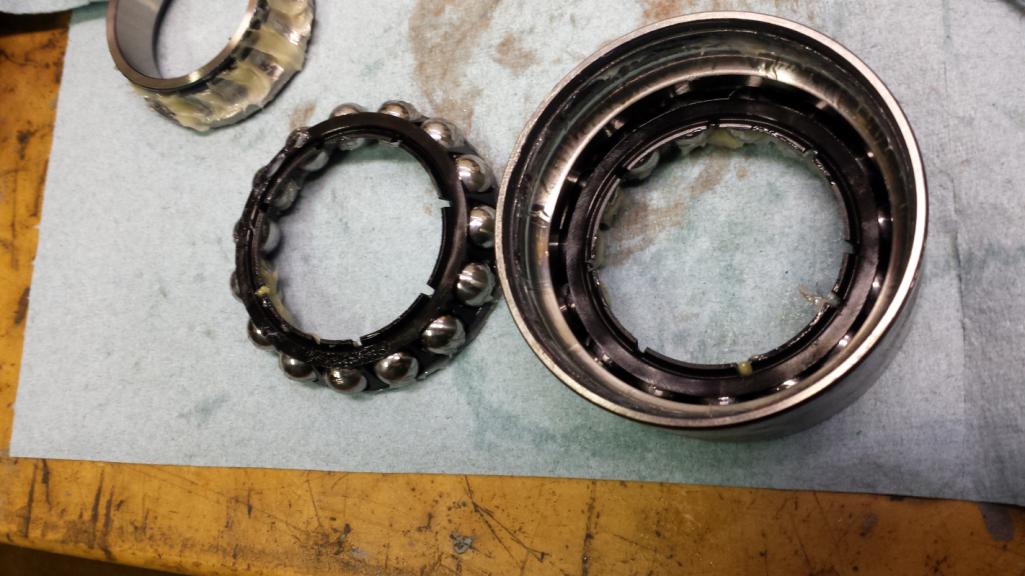 Anyway, takes maybe 20-30 minutes per bearing and they are all back together with a good pack of quality grease. Time well spent. (IMG:style_emoticons/default/beerchug.gif) 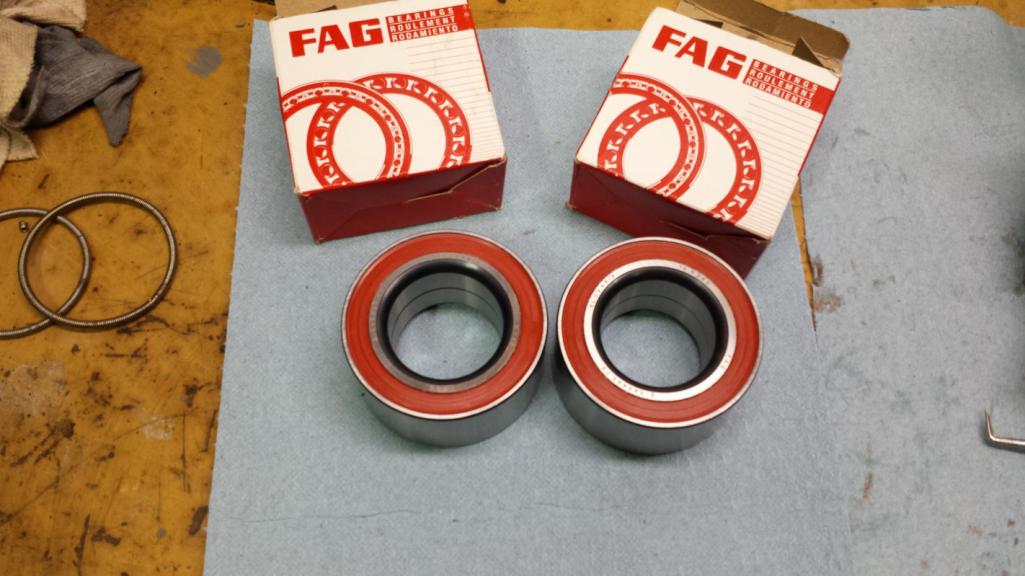 One last pic just to show off what else I got from PMB. New soft brake lines, new bronze pedal bushings, and those pretty yellow tubes. I'll probably wind up buying a pair for the front too. I just need to let the sticker shock wear off a little first. 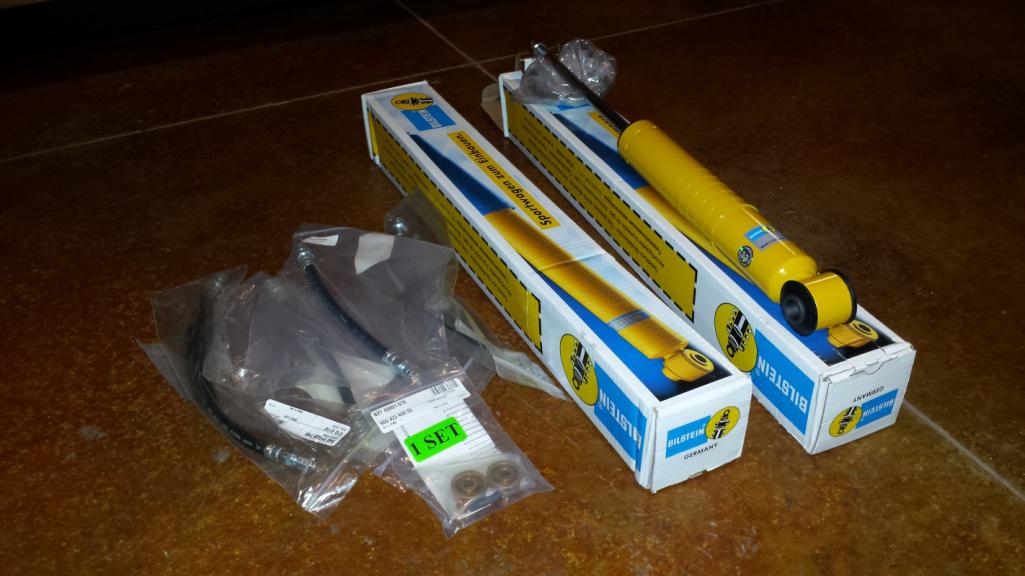 |
|
|
|
| tygaboy |
Jan 6 2019, 07:30 PM
Post
#731
|
|
914 Guru Group: Members Posts: 5,810 Joined: 6-October 15 From: Petaluma, CA Member No.: 19,241 Region Association: Northern California |
A useless post, but then which of mine aren't:
You said sticker "shock"... (IMG:style_emoticons/default/lol-2.gif) (But hey, at least I read what you write and don't just look at the pictures. That outta get me a little credit.) |
|
|
|
| bbrock |
Jan 6 2019, 07:42 PM
Post
#732
|
|
914 Guru Group: Members Posts: 5,269 Joined: 17-February 17 From: Montana Member No.: 20,845 Region Association: Rocky Mountains |
QUOTE(tygaboy @ Jan 6 2019, 06:30 PM) A useless post, but then which of mine aren't: You said sticker "shock"... (IMG:style_emoticons/default/lol-2.gif) (But hey, at least I read what you write and don't just look at the pictures. That outta get me a little credit.) Wish I could say the pun was intended, but nope. You get the credit for that one. (IMG:style_emoticons/default/laugh.gif) |
|
|
|
| euro911 |
Jan 7 2019, 08:59 AM
Post
#733
|
|
Retired & living the dream. God help me if I wake up! Group: Members Posts: 8,937 Joined: 2-December 06 From: So.Cal. & No.AZ (USA) Member No.: 7,300 Region Association: Southern California |
Good call on the bearing grease. Downright piss-poor QC - or maybe they ship them like that on purpose, so you'd have to buy new ones in the not-to-distant future (IMG:style_emoticons/default/confused24.gif)
FAG isn't the only game in town ... are SKF bearings suffering from the same QC process? |
|
|
|
| bbrock |
Jan 7 2019, 09:18 AM
Post
#734
|
|
914 Guru Group: Members Posts: 5,269 Joined: 17-February 17 From: Montana Member No.: 20,845 Region Association: Rocky Mountains |
QUOTE(euro911 @ Jan 7 2019, 07:59 AM) Good call on the bearing grease. Downright piss-poor QC - or maybe they ship them like that on purpose, so you'd have to buy new ones in the not-to-distant future (IMG:style_emoticons/default/confused24.gif) FAG isn't the only game in town ... are SKF bearings suffering from the same QC process? I wondered the same thing about SKF. I just ordered my bearings from Eric/PMB. I think he sells both FAG and SKF depending on availability. I used SKF bearings in my rack rebuild. One bearing was new and stamped "Made in France" and the other was NOS made in Germany. Maybe the French have better QC (IMG:style_emoticons/default/confused24.gif) BTW, I forgot to mention that I wound up with a couple extra bearings from the rack rebuild if anyone is planning to do a rebuild. One is a NOS made in Germany SKF 16002 which fits my 1973 rack. The other is an FAG 6202. Not sure what that fits but if anyone can use one or both, I'll send them to you free. 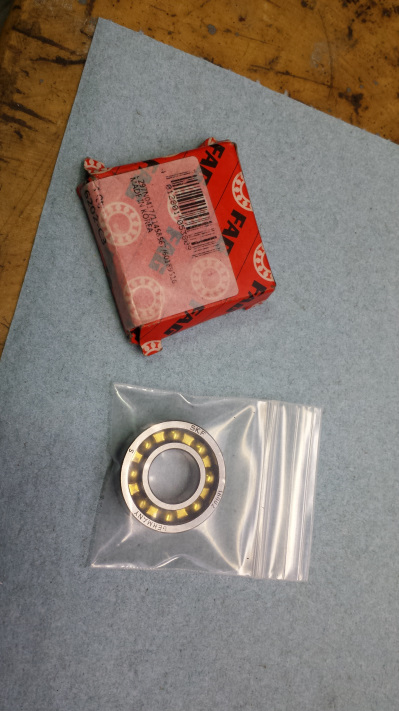 |
|
|
|
| bbrock |
Jan 7 2019, 11:29 PM
Post
#735
|
|
914 Guru Group: Members Posts: 5,269 Joined: 17-February 17 From: Montana Member No.: 20,845 Region Association: Rocky Mountains |
A new set of fuel lines from @Rotary'14 came in the mail today.
 The immediately went in the car. 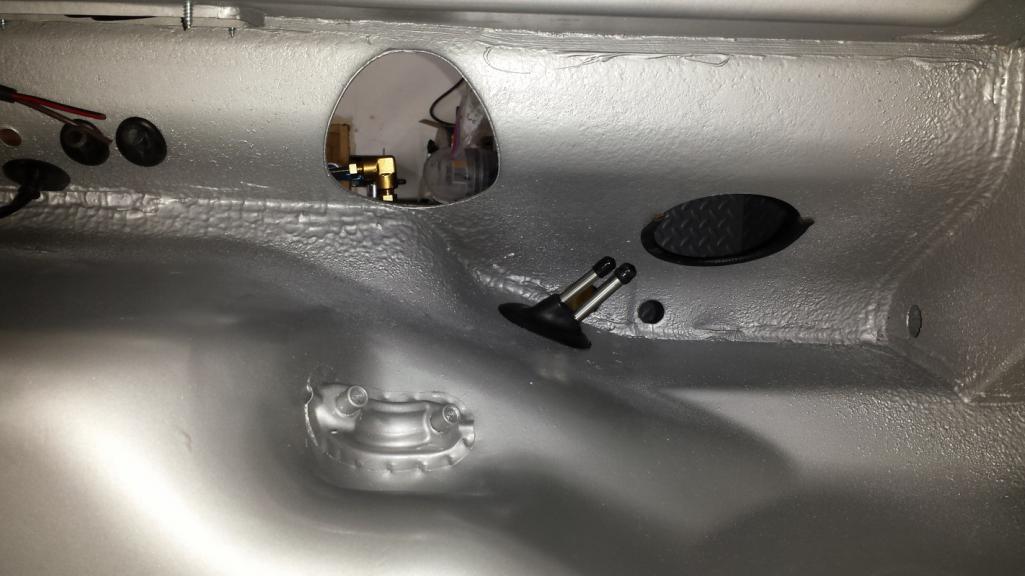 I need to get some 30R14 hose to connect them together as well as some small pieces of hose to wrap the lines at the metal hold downs. 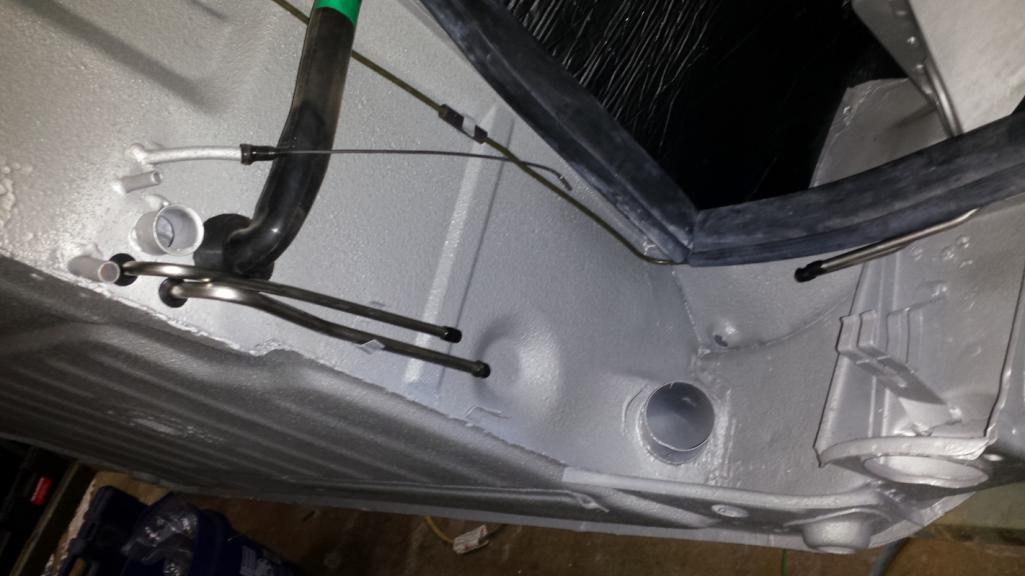 I think I'll mount the bypass fuel regulator for the carbs on the MPS bracket. Should make for clean routing of fuel hoses for the supply and return. 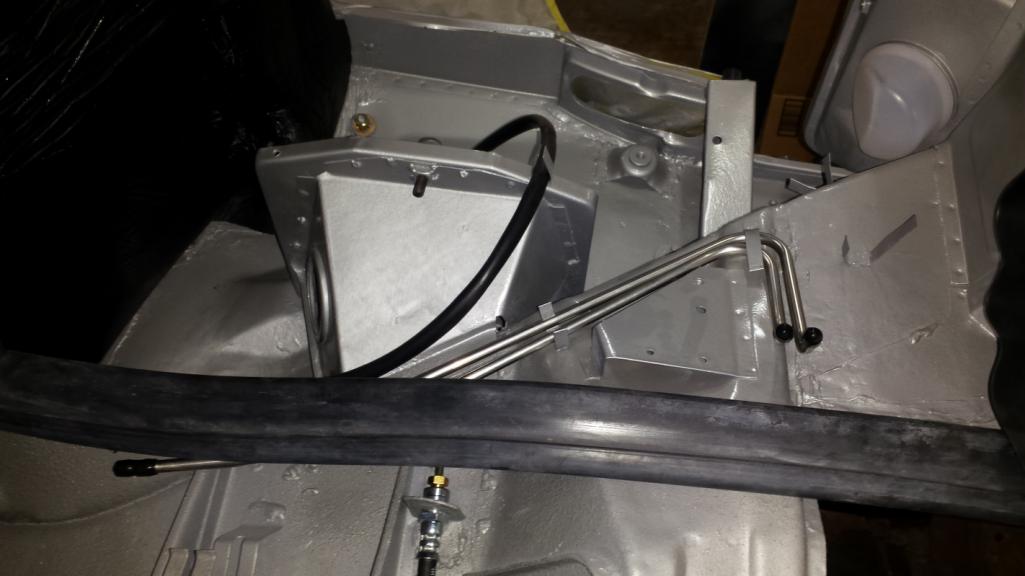 I also recieved a package from @KevinW . The missing brake part problem is solved as well as a nice pair of rubber springs for the rear struts. Thanks Kevin. (IMG:style_emoticons/default/beerchug.gif) 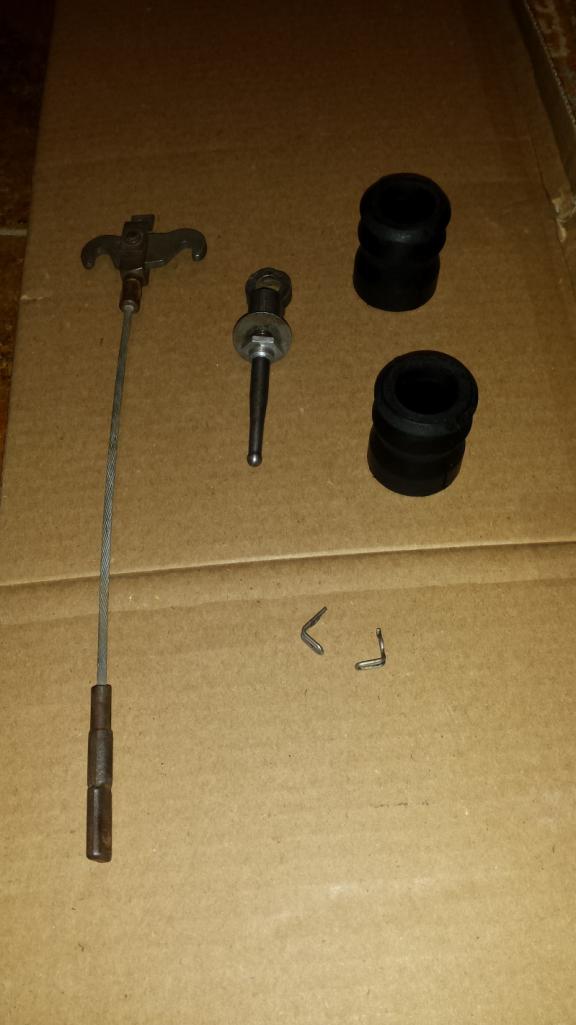 |
|
|
|
| Superhawk996 |
Jan 12 2019, 08:37 AM
Post
#736
|
|
914 Guru Group: Members Posts: 7,788 Joined: 25-August 18 From: Woods of N. Idaho Member No.: 22,428 Region Association: Galt's Gulch |
I popped open the second bearing and it was downright scary. It doesn't show well in this pic, but there is no fuching grease in there! (IMG:style_emoticons/default/yikes.gif) There is a smear of grease on the inner race side of the cage but the outer race side is bone dry. I mean DRY! How the fuch are they getting away with this? (IMG:style_emoticons/default/blink.gif)
Brent, I'm an automotive engineer with background that includes development of hubs and bearings. I've worked with both SKF and FAG directly. Both make great bearings. Too much grease is as bad as too little. There is an optimal grease load for bearings. Believe it or not, there is a lot of lab testing to figure out what is optimal. Too much grease will: Cause more parasitic drag- just like oil windage sucks HP from an engine. Cause more heat buildup within the bearing that leads to actually thinning the grease and the thin film that is between the bearing and the race. Lead to grease leakage over time out of the seal which attracts dust & debris that then abrades the lip seals, leading to dirt and water ingress which shortens bearing life. Grease expands when hot -- you need space in the bearing for that expansion otherwise - it goes out of the bearing as it expands. Too much grease is also wasted $$ to the bearing manufacturer. It costs more $ than necessary, degrades bearing life, etc. No sense spending $ to degrade a product. On the flip side -- now that you have re-greased, don't worry about that either. The $ wasted for "extra" grease is by far the biggest piece of the equation above. For your project, the "extra" isn't going to hurt a thing. |
|
|
|
| Superhawk996 |
Jan 12 2019, 08:40 AM
Post
#737
|
|
914 Guru Group: Members Posts: 7,788 Joined: 25-August 18 From: Woods of N. Idaho Member No.: 22,428 Region Association: Galt's Gulch |
Great to see how far your project has come. Awesome workmanship.
Paint looks great and I'm Jealous that you are at the reassembly stage of the project! (IMG:style_emoticons/default/beerchug.gif) |
|
|
|
| bbrock |
Jan 12 2019, 09:59 AM
Post
#738
|
|
914 Guru Group: Members Posts: 5,269 Joined: 17-February 17 From: Montana Member No.: 20,845 Region Association: Rocky Mountains |
QUOTE(Superhawk996 @ Jan 12 2019, 07:37 AM) I popped open the second bearing and it was downright scary. It doesn't show well in this pic, but there is no fuching grease in there! (IMG:style_emoticons/default/yikes.gif) There is a smear of grease on the inner race side of the cage but the outer race side is bone dry. I mean DRY! How the fuch are they getting away with this? (IMG:style_emoticons/default/blink.gif) Brent, I'm an automotive engineer with background that includes development of hubs and bearings. I've worked with both SKF and FAG directly. Both make great bearings. Too much grease is as bad as too little. There is an optimal grease load for bearings. Believe it or not, there is a lot of lab testing to figure out what is optimal. Too much grease will: Cause more parasitic drag- just like oil windage sucks HP from an engine. Cause more heat buildup within the bearing that leads to actually thinning the grease and the thin film that is between the bearing and the race. Lead to grease leakage over time out of the seal which attracts dust & debris that then abrades the lip seals, leading to dirt and water ingress which shortens bearing life. Grease expands when hot -- you need space in the bearing for that expansion otherwise - it goes out of the bearing as it expands. Too much grease is also wasted $$ to the bearing manufacturer. It costs more $ than necessary, degrades bearing life, etc. No sense spending $ to degrade a product. On the flip side -- now that you have re-greased, don't worry about that either. The $ wasted for "extra" grease is by far the biggest piece of the equation above. For your project, the "extra" isn't going to hurt a thing. @Superhawk996 , thanks for posting this. I thought when I did that first bearing (the one i the pics) that I was probably overpacking it. That has been nagging at me and I've been thinking I should pop it back open and remove some grease. Your post affirms my gut was correct. Even a dummy like me could figure out that too much grease would cause drag. Worst case, I could see it causing pressure to build up inside the bearing when it heats and possibly pop the seals. That said, I still believe there may be a QC problem with these bearings. The first clue was several reports of premature failures of recently purchased bearings. I first read about it on this forum which led to learning this is a known problem in the Boxster world too. That was the only reason I decided to pop my bearings open in the first place. Second is what I found on the two bearings I opened. One had noticeably less grease than the other, so one of them didn't have an optimal amount. I think the first one I opened would have been okay. I could see they weren't wasting any money on extra grease, but it looked like an adequate amount to keep the bearing lubricated. the second one was a different story. I don't know how quickly grease applied to the inner side of the ball cage would migrate to the outer, but at a minimum, the bearing with less grease would have run dry on the outer race until that happened. But it also looked to me like even after the grease was evenly distributed, there would only be a very thin film of grease coating the bearings and races. I just wouldn't have been comfortable with that one. Overall, I'm glad I spent the time and grease to do this, but I'm even more glad there are smart people like you to help me correct my mistakes. It's not the first time, nor will it be the last, and my car is much better because of it. Now out to the garage to scrape some grease out. Thanks! (IMG:style_emoticons/default/beerchug.gif) |
|
|
|
| Superhawk996 |
Jan 12 2019, 10:12 AM
Post
#739
|
|
914 Guru Group: Members Posts: 7,788 Joined: 25-August 18 From: Woods of N. Idaho Member No.: 22,428 Region Association: Galt's Gulch |
Now out to the garage to scrape some grease out. Thanks! (IMG:style_emoticons/default/beerchug.gif)
[/quote] Seriously, I wouldn't sweat it. I mentioned it more so to point out that you would be amazed how little grease it really takes to make a bearing happy. Most of us tend to over pack them. My younger self included. Much of the bearing discussion is based on trying to get ideal life (10 years / 100,000 miles) out of a bearing. Not likely to be a real concern for our "toy" cars. With respect to early failures of bearings reported on the web, I'd be willing to bet a lot of those involve flawed installations. Beating on bearings with hammers or pressing in using the wrong race to apply pressure accounts for a lot of premature failure. Likewise a "cocked" bearing will wear very quickly. I know this from having done it myself back in the day (IMG:style_emoticons/default/lol-2.gif) |
|
|
|
| Superhawk996 |
Jan 12 2019, 10:20 AM
Post
#740
|
|
914 Guru Group: Members Posts: 7,788 Joined: 25-August 18 From: Woods of N. Idaho Member No.: 22,428 Region Association: Galt's Gulch |
A couple of points w.r.t. the difference in grease pack between bearings.
All things have manufacturing tolerances. Since grease load isn't massively sensitive to variation I'd expect rather generous tolerances. Biggest risk to off the shelf service bearings would be "waxed" grease that is simply dry itself and has lost its lubricity from sitting on a shelf somewhere for the last 10 years. |
|
|
|
|
3 User(s) are reading this topic (3 Guests and 0 Anonymous Users)
0 Members:

|
Lo-Fi Version | Time is now: 19th April 2026 - 03:31 PM |
Invision Power Board
v9.1.4 © 2026 IPS, Inc.