|
|
|
Porsche, and the Porsche crest are registered trademarks of Dr. Ing. h.c. F. Porsche AG.
This site is not affiliated with Porsche in any way. Its only purpose is to provide an online forum for car enthusiasts. All other trademarks are property of their respective owners. |
|
|

  |

| mbseto |
 Aug 11 2017, 06:36 AM Aug 11 2017, 06:36 AM
Post
#81
|
|
Senior Member  Group: Members Posts: 1,257 Joined: 6-August 14 From: Cincy Member No.: 17,743 Region Association: North East States |
Nice fab work, and great progress. This is a fun project to watch.
|
   |

 
|
| 76-914 |
Aug 11 2017, 08:12 AM
Post
#82
|
|
Repeat Offender & Resident Subaru Antagonist Group: Members Posts: 13,878 Joined: 23-January 09 From: Temecula, CA Member No.: 9,964 Region Association: Southern California |
I really enjoy reading this thread but hadn't kept up to date. Today I chuckled while reading your experience with HF tires/swivel rollers. BTDT. Wish I could have waved you off that experience. If you load up one of those hard rubber tires the wheel will separate because there is no carry thru sleeve/bushing. Liked your space solution. Rolling her in and out is a perfect solution. (IMG:style_emoticons/default/beerchug.gif)
|
|
|
|
| bbrock |
Aug 11 2017, 09:12 AM
Post
#83
|
|
914 Guru Group: Members Posts: 5,269 Joined: 17-February 17 From: Montana Member No.: 20,845 Region Association: Rocky Mountains |
QUOTE(76-914 @ Aug 11 2017, 08:12 AM)  Today I chuckled while reading your experience with HF tires/swivel rollers. BTDT. Wish I could have waved you off that experience. (IMG:style_emoticons/default/lol-2.gif) Someone did try to wave me off but I was already in it. Actually, now that I have some plywood down over the gravel under the tent, they are working pretty well. As long as the car stays fairly level without side loading, they seem to do their job. But I learned that lesson when the left front solid tire tore clean off as I tried to wheel the car around on the gravel. I swapped a pneumatic tire back in on that corner which, on the smoother surface, rolls just as well as the solid tires. So if I sheer any more rubber off, I'll just continue to swap back the pneumatics. Cheap is cheap, but they are getting the job done so far. (IMG:style_emoticons/default/cheer.gif) Wheeling the car in and out is a simple one-man operation. Brent |
|
|
|
| Fatboy007 |
Aug 11 2017, 09:35 AM
Post
#84
|
|
Member Group: Members Posts: 62 Joined: 23-May 17 From: San Diego, ca. Member No.: 21,124 Region Association: Southern California |
What an inspiration. Take your time and enjoy the process. And here i am complaining about my emergency brake cable (IMG:style_emoticons/default/sunglasses.gif)
|
|
|
|
| cary |
Aug 11 2017, 03:03 PM
Post
#85
|
|
Advanced Member Group: Members Posts: 3,900 Joined: 26-January 04 From: Sherwood Oregon Member No.: 1,608 Region Association: Pacific Northwest |
I've been too busy to keep up.
I'm with Chris, thems are some nice fabrication skills. Beautiful pieces. 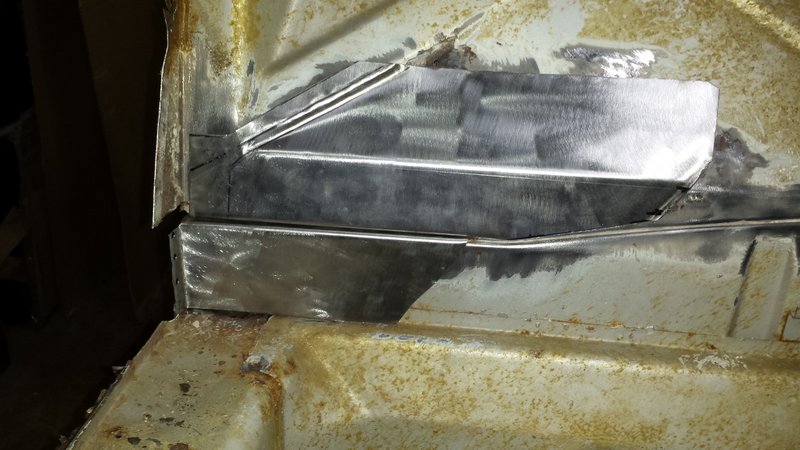 Ditto on the tip Chris gave you. Slow and steady wins the race. I'm actually using an IR temp gun to check the metal before the next weld. On a stitch like that, 3 blips. Stop and let it cool. I know its hard to stop ................ Keep up the good work |
|
|
|
| bbrock |
Aug 14 2017, 02:42 PM
Post
#86
|
|
914 Guru Group: Members Posts: 5,269 Joined: 17-February 17 From: Montana Member No.: 20,845 Region Association: Rocky Mountains |
Saturday Aug. 12, 2017
Spent the day cleaning up the mess from my previous inner suspension console repair over 30 years ago. Boy did I not know what I was doing. (IMG:style_emoticons/default/barf.gif) I didn't completely remove the flanges of the original console and welded the new one over the top with globs of filler. Then I slathered a pound of bondo around to pretend that the welding (it was my first welding project) didn't look like (IMG:style_emoticons/default/stromberg.gif) Terrible workmanship. But I can't be too hard on myself. Crappy or not, for less than $150 and two weekends, I was able to turn my $500 car purchase into an acceptable looking, and very driveable '73 2.0L that gave me many, many, pleasurable miles of driving. Given the crappy workmanship, I wasn't too surprised to find a nest of tinworms lurking under the console that looks like had migrated to the outer console. 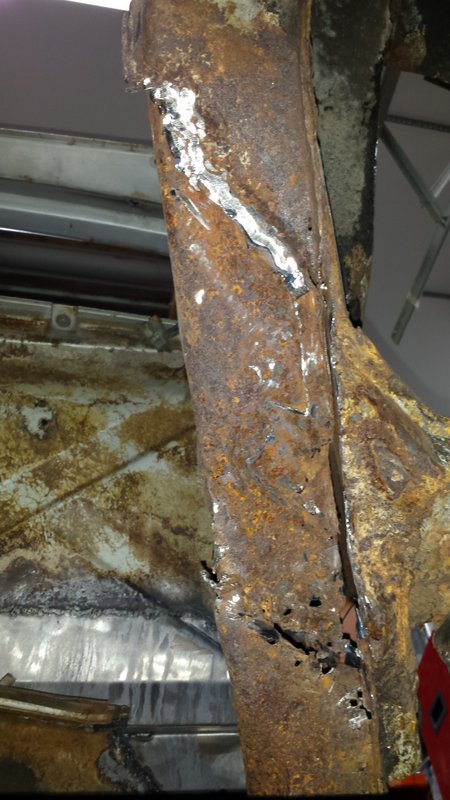 I already knew the engine mount was toast, so purchased a donor part from KevinW and he was generous enough to include both inner and outer suspension consoles with the part. I was hoping to not have to mess with the outer console but it is a mixed bag. I was already planning on getting an RD inner wheel house piece to patch that area and using the full patch makes some sense. So it doesn't affect the project budge which is always a plus. (IMG:style_emoticons/default/piratenanner.gif) But it complicates the project because I'll have to figure out an alternative way to support the car while I do the repair and make sure the console goes back in the right spot. Anyway, I got the inner long mostly cleaned off. 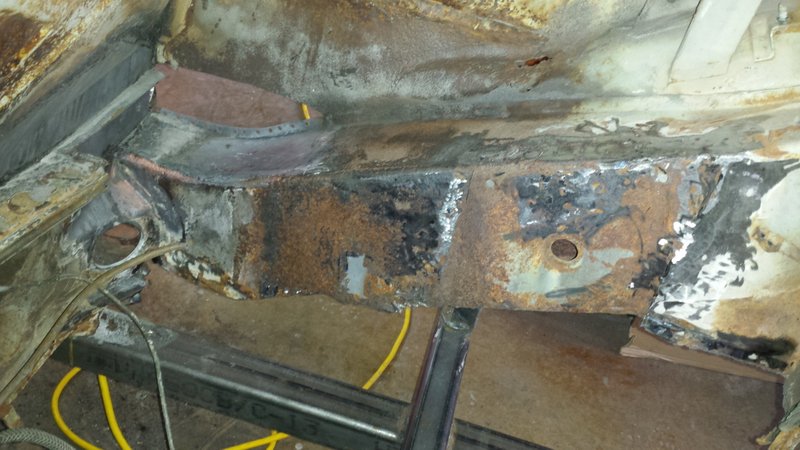 Then decided I had better stop because the amount of steel left for structure on that side of the car was starting to make me nervous. I added an additional support under the rear shock tower just for extra measure. That's a copy of Jeff Hail's suspension dimensions taped to the quarter panel. 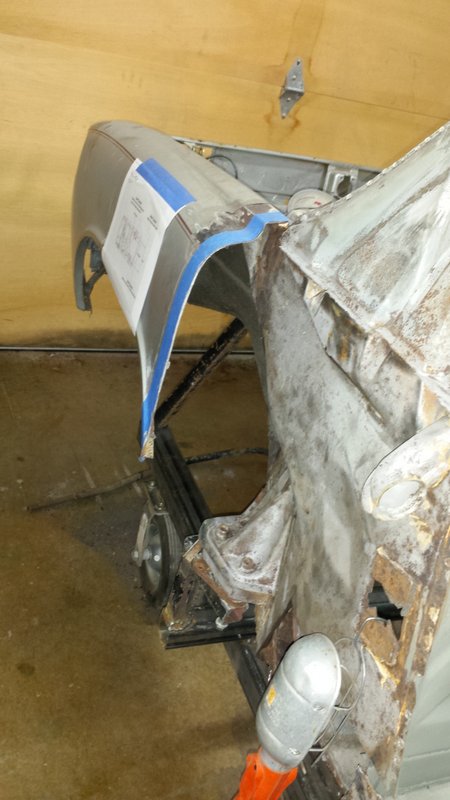 The Hell Hole My pleasure cruise inside the engine compartment gave me plenty of time to ponder the origin of the name "Hell Hole." It seems obvious. This is the part that rots to either send 914s to their grave, or drain the wallets of poor suckers who try to save them. But a day in the pit got me thinking of some alternative reasons:
Sunday Aug. 13, 2017 Now things are getting interesting I decided it would be wise to start putting some metal back in before taking more out so I spent the last of Saturday night and most of Sunday experimenting with ways to fabricate new lower sections for the inner long. My last act of Saturday night was to attempt bending a 30" section of 18g sheet in my cheap HF bending brake. It worked well with lighter stuff or small pieces, but this pushed it to its limit and there was a "pop" as one of the crappy welds broke on the bar reinforcement that allowed the movable back piece to flex and ruin the bend. No biggie, I knew it was a cheap POS and it was easy to start Sunday by grinding off the bad weld and redoing it. The bottoms of the inner longs are not simple bends. There is a radius bend from the sidewall to bottom and a half channel bead that runs lengthwise along the inner edge to stiffing the part and form a recess the floor is spot welded into. There are also channel beads spaced along the outer edge running perpendicular from the inner bead to the outer welding flange. Just to make things interesting, the depth of the beads are about twice as deep in the front third of the long as they in the rest, and there is a ramp transition between the two depths along the inner half channel. It would be a perfect job for a bead roller with offset tipping wheel (or so it appears from my Google research). But I don't have those and can't justify the expense. Luckily, Rich Casto made a nearly identical repair with limited tools so I stole ideas from him. Here's what I came up with. Bending the radius was pretty straightforward using Rich's method of welding a piece of round stock to a bar of metal and sandwiching it in the brake for a bending form.  Likewise, I used Rich's hammer form method for banging in the channels but used a little different form design. I just welded 1" wide bars of flat stock of two different depths (1/8" and 1/4") to a strip of 6" wide x 3/16" flat stock to create a form to hammer the channel. 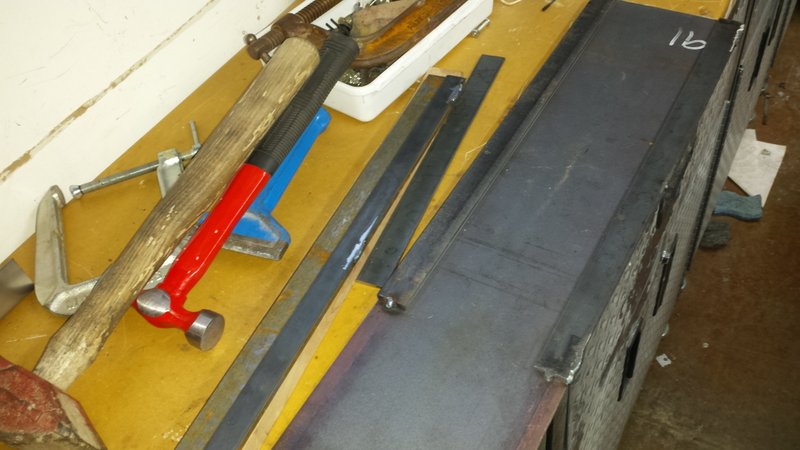 For the side stub channels, I just welded a couple of tees of the same bar stock to create forms for each depth. I then ground.... and ground.... and ground to tapper the stub form down as it approaches the welding flange. This matches the factory piece. 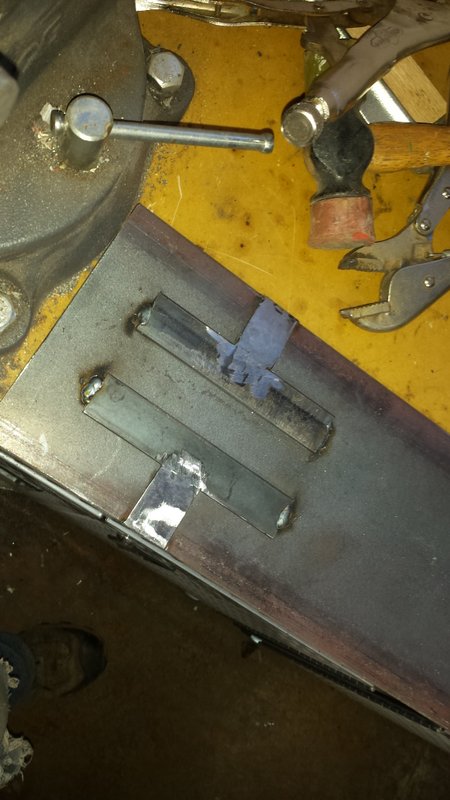 There was a lot of trial and error figuring out the right sequence and hammer form technique. I tried a number of things on the channel, including creating negative mirror image forms for pressing the metal with clamps. But that didn't work, 18g is too stubborn for that. In the end, I found a BFH with brick set chisel as corking tool worked best. The chisel leaves more tool marks than I would like but I tried a piece of oak which didn't work, and I didn't have any rock maple on hand to make a corking tool with. Next time I'm in town, I'll pick some up and try it. The method I settled on is this:
 Here are the test pieces I made. These are a bit rough because they have been bent, flattened, and re-bent a few times as I worked out my technique. 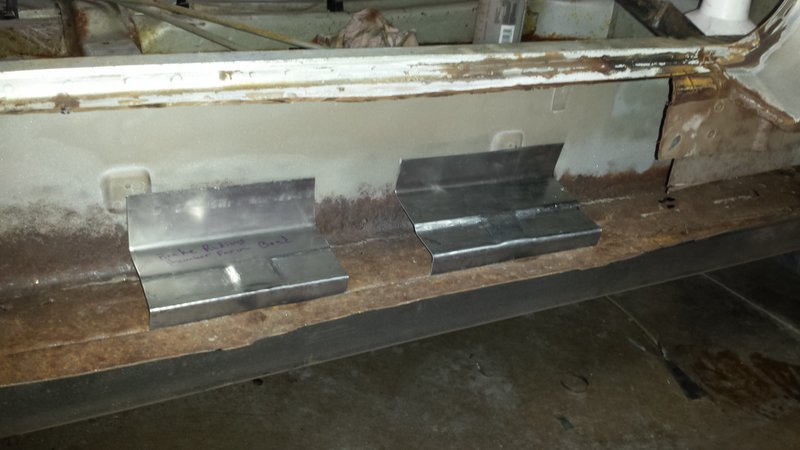 I had just enough time left in the day to start working on an actual piece. I started with the more difficult front piece that includes channels of both depths and the transition in between. I got as far as forming the welding flange. Tonight I will work on the stub channels. Here is the result so far. It will need a bit of hammer and dolly to smooth out those dings, but I'm not sure how much effort it will be worth since one side will be inside the long, hopefully never to be seen again at least until after I am dead, and the other side will be covered with undercoating. I didn't roll the flange all the way to the front because I'll need to do a final trim and hammer the flange to match the curve where the long meets the wheel well. 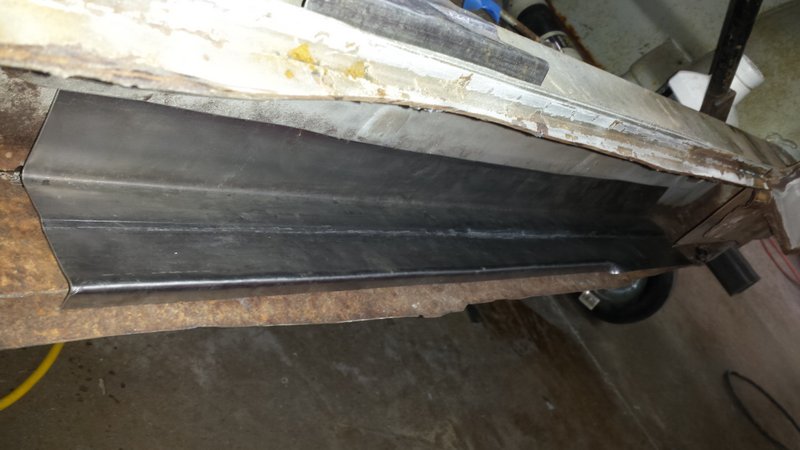 And here is the bottom. 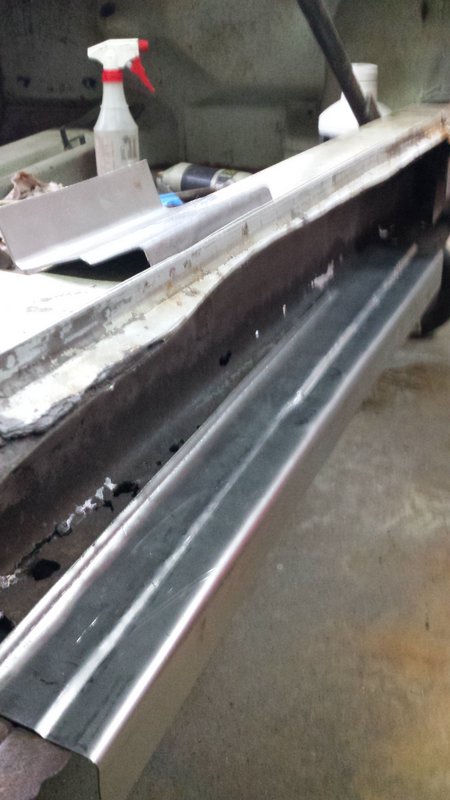 |
|
|
|
| euro911 |
Aug 14 2017, 03:42 PM
Post
#87
|
|
Retired & living the dream. God help me if I wake up! Group: Members Posts: 8,937 Joined: 2-December 06 From: So.Cal. & No.AZ (USA) Member No.: 7,300 Region Association: Southern California |
My fist time seeing your thread, Brent (?) - read it from start to current status this afternoon (when I should have been working on my car - lol)
Awesome undertaking and total dedication to achieving your dream car. Truly inspirational (IMG:style_emoticons/default/beerchug.gif) Subscribed |
|
|
|
| tygaboy |
Aug 14 2017, 04:18 PM
Post
#88
|
|
914 Guru Group: Members Posts: 5,810 Joined: 6-October 15 From: Petaluma, CA Member No.: 19,241 Region Association: Northern California |
Fab-iddy, fab, fabulous fabbing! (IMG:style_emoticons/default/smash.gif) Looks great.
I'm sure you've seen and heard it all before but it bears repeating: Brace the bejeezus out of the chassis and go slow when you install all that long bracing. Following closely so keep the great work coming! (IMG:style_emoticons/default/aktion035.gif) |
 |
|
| euro911 |
Aug 14 2017, 04:47 PM
Post
#89
|
|
Retired & living the dream. God help me if I wake up! Group: Members Posts: 8,937 Joined: 2-December 06 From: So.Cal. & No.AZ (USA) Member No.: 7,300 Region Association: Southern California |
QUOTE(bbrock @ May 15 2017, 10:21 PM) QUOTE(burton73 @ May 15 2017, 01:28 PM) Pelican sells them. I had the one on my 86 Carrera go bad. 70,000 miles and it just breaks from the I guess the grease on the gear breaking down the plastic over the years. I sent mine out to fix but you can do this yourself. They can send you the small parts by mail. Thanks. I'm putting together a Pelican order anyway. Is the 17 tooth drive gear what I'm after?Bob B I recently posted how I fixed some years ago ... here's the link: http://www.914world.com/bbs2/index.php?sho...p;#entry2500537 |
|
|
|
| bbrock |
Aug 14 2017, 04:54 PM
Post
#90
|
|
914 Guru Group: Members Posts: 5,269 Joined: 17-February 17 From: Montana Member No.: 20,845 Region Association: Rocky Mountains |
QUOTE(euro911 @ Aug 14 2017, 04:47 PM) ]On the speedos I've torn apart, there's a fixed-wheel on the right hand side on the ODO cluster shaft that starts to spin. It needs to be modified to fit back on the shaft tightly so it doesn't spin. The gear shown in your Pelican link is on the left hand side of the ODO shaft. You can check it, but I think the right hand side is where you'll find the problem. I recently posted how I fixed some years ago ... here's the link: http://www.914world.com/bbs2/index.php?sho...p;#entry2500537 Thanks Mark. Yeah, we figured out that the 911 gear didn't apply here. I wound up using the pinch method on the pot metal gear and all seems to be working now. But now I wish I had gone farther and put loktite on that gear. We'll see how long it lasts. May have to go in there again some day. At least it is an easy part to get out of the car! (IMG:style_emoticons/default/beer.gif) Brent |
|
|
|
| bbrock |
Aug 14 2017, 05:23 PM
Post
#91
|
|
914 Guru Group: Members Posts: 5,269 Joined: 17-February 17 From: Montana Member No.: 20,845 Region Association: Rocky Mountains |
QUOTE(tygaboy @ Aug 14 2017, 04:18 PM) Fab-iddy, fab, fabulous fabbing! (IMG:style_emoticons/default/smash.gif) Looks great. I'm sure you've seen and heard it all before but it bears repeating: Brace the bejeezus out of the chassis and go slow when you install all that long bracing. Following closely so keep the great work coming! (IMG:style_emoticons/default/aktion035.gif) Yes! And this is a good opportunity to revisit this. Early in the thread, I asked for some input on my bracing: http://www.914world.com/bbs2/index.php?s=&...t&p=2476431 but didn't get any response. In the pre-Internet days, I replaced an outer long on my wife's '73 1.7L. I didn't have much guidance except a VW-Porsche article just mentioning to weld in a brace across the door opening. So I welded a half inch iron pipe horizontally across the door opening and called it good. I didn't understand anything about shrinking and probably pre-loaded the door opening to close a little as soon as I cut out the old long. Then I installed the outer long using WAY too much heat - just pile drove my way through. (IMG:style_emoticons/default/screwy.gif) Surprise, surprise, the door wouldn't shut when I was done. I had to grind the striker to make it work. (IMG:style_emoticons/default/headbang.gif) So not only am I aware, but I've actually made that mistake! So for the bracing... I followed Cary's lead to do the doors-on bracing so I can watch my gaps as I work. I've got the adjustable braces running from upper seat belt mount to under the speaker area. With the door on, I can easily adjust the door gaps with the turnbuckle. But that mostly affects the top part of the gap. I'm wondering if I should run another adjustable brace from the lower mount of the diagonal to back in the vicinity of where the lower seat belt mount would be if I still had one. Seems like that would allow me to pre-load that inner long with a bit of outward (stretching) force to fight any shrinkage as the welds cool. Also, my preference would be to get a long 4x4 or similar pushed up under that long to provide even support from the bottom to help keep things straight. But there is nothing left there to support. I'm thinking I just need to watch my measurements and door gaps as I work and let that guide me. Thoughts? One nice thing is that I work at home so it is easy for me to run downstairs every couple hours and throw a few tack welds in. I'm thinking on that length, four spaced out tacks and walk away. I plan to spend a good week of that before the seam is closed. (IMG:style_emoticons/default/welder.gif) |
|
|
|
| burton73 |
Aug 14 2017, 05:36 PM
Post
#92
|
|
Senior member, and old dude Group: Members Posts: 3,994 Joined: 2-January 07 From: Los Angeles Member No.: 7,414 Region Association: Southern California |
QUOTE(bbrock @ Aug 14 2017, 04:23 PM) QUOTE(tygaboy @ Aug 14 2017, 04:18 PM) Fab-iddy, fab, fabulous fabbing! (IMG:style_emoticons/default/smash.gif) Looks great. I'm sure you've seen and heard it all before but it bears repeating: Brace the bejeezus out of the chassis and go slow when you install all that long bracing. Following closely so keep the great work coming! (IMG:style_emoticons/default/aktion035.gif) Yes! And this is a good opportunity to revisit this. Early in the thread, I asked for some input on my bracing: http://www.914world.com/bbs2/index.php?s=&...t&p=2476431 but didn't get any response. In the pre-Internet days, I replaced an outer long on my wife's '73 1.7L. I didn't have much guidance except a VW-Porsche article just mentioning to weld in a brace across the door opening. So I welded a half inch iron pipe horizontally across the door opening and called it good. I didn't understand anything about shrinking and probably pre-loaded the door opening to close a little as soon as I cut out the old long. Then I installed the outer long using WAY too much heat - just pile drove my way through. (IMG:style_emoticons/default/screwy.gif) Surprise, surprise, the door wouldn't shut when I was done. I had to grind the striker to make it work. (IMG:style_emoticons/default/headbang.gif) So not only am I aware, but I've actually made that mistake! So for the bracing... I followed Cary's lead to do the doors-on bracing so I can watch my gaps as I work. I've got the adjustable braces running from upper seat belt mount to under the speaker area. With the door on, I can easily adjust the door gaps with the turnbuckle. But that mostly affects the top part of the gap. I'm wondering if I should run another adjustable brace from the lower mount of the diagonal to back in the vicinity of where the lower seat belt mount would be if I still had one. Seems like that would allow me to pre-load that inner long with a bit of outward (stretching) force to fight any shrinkage as the welds cool. Also, my preference would be to get a long 4x4 or similar pushed up under that long to provide even support from the bottom to help keep things straight. But there is nothing left there to support. I'm thinking I just need to watch my measurements and door gaps as I work and let that guide me. Thoughts? One nice thing is that I work at home so it is easy for me to run downstairs every couple hours and throw a few tack welds in. I'm thinking on that length, four spaced out tacks and walk away. I plan to spend a good week of that before the seam is closed. (IMG:style_emoticons/default/welder.gif) As long as you do it very slow. (Butt slow) like you say you are, will. You have a good chance it will be fine. You are doing great on your baby so far. Bob B |
|
|
|
| bbrock |
Aug 16 2017, 11:05 AM
Post
#93
|
|
914 Guru Group: Members Posts: 5,269 Joined: 17-February 17 From: Montana Member No.: 20,845 Region Association: Rocky Mountains |
August 16, 2017 - More fabbing
Not much progress the last couple of days. I realized that before I finish up that front lower long piece, I should fab the patch where the lower front wheel well wraps around to extend into the long. 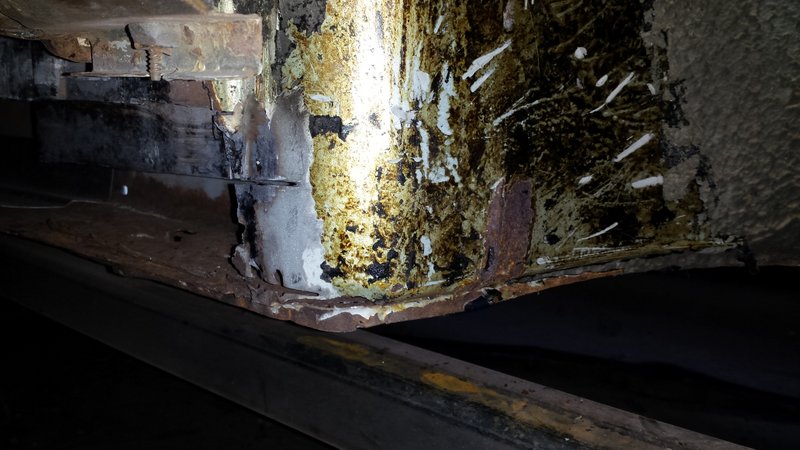 Rich Casto also made this piece but didn't provide details on how it was done. Last night I took my first stab at it on a piece of scrap. I made another radius bending form using a larger diameter rod to match the bottom radius of the fender and bent the piece in the brake. That worked pretty well. 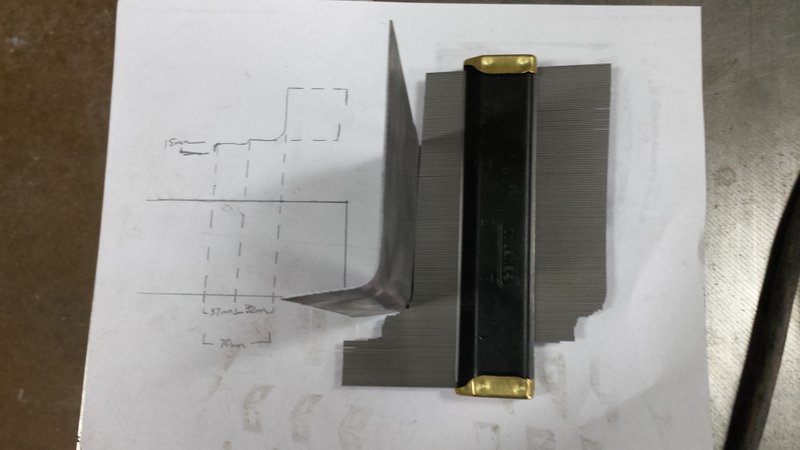 Next I spent an hour wearing my arm out on the shrinker to form the vertical radius. This really tested the limits of that little shrinker but kind of worked. As you shrink, the material widens on the flange side so I had to stop and grind that back a couple times so the piece would still fit in the throat of the shrinker. 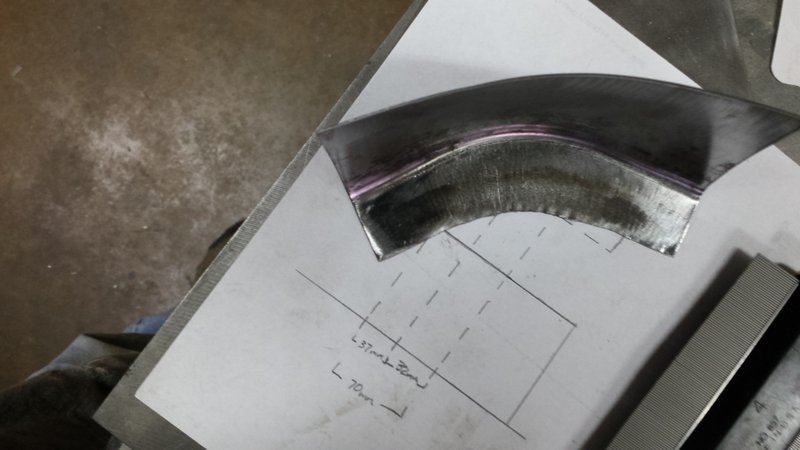 I actually overdid it and had to stretch it back a little. I wasn't surprised that the edge that would become the weld flange split when I did that. The biggest problem here is that as the piece was shrunk to bend, the bottom radius narrowed and became more crisp at the bend. 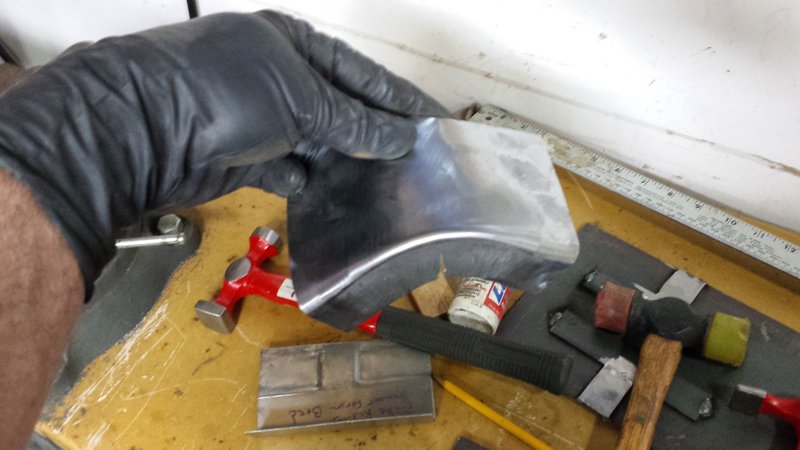 I experimented with using the radius brake form as a stake dolly and banging the more gentle radus back out. This will work, but I need a better stake dolly to get a smooth finish. Sorry about the blurry pic. 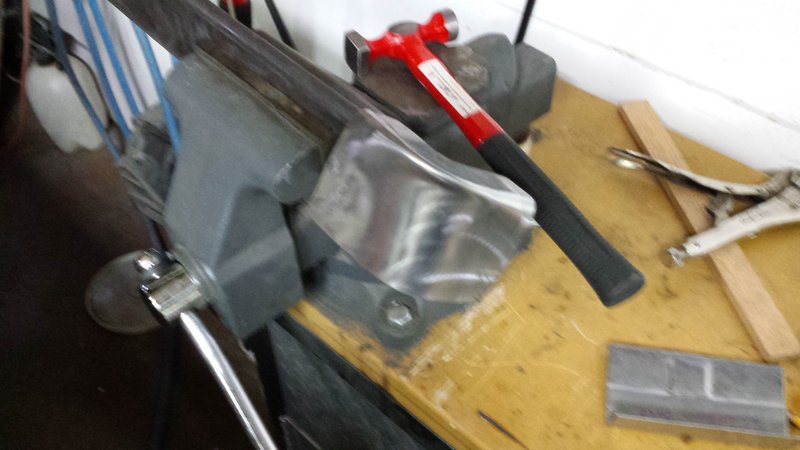 I went ahead and bent the flange down to see how it would fit. Not bad for just eyeballing the curve. 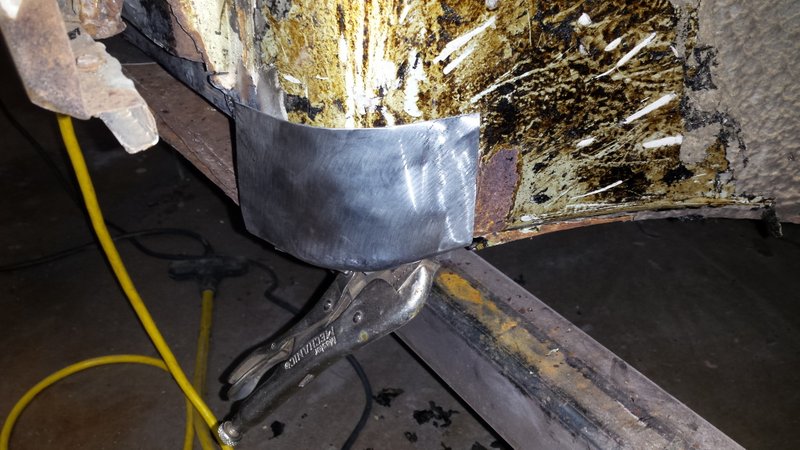 But I don't like that split and am not sure this is the right way to go. 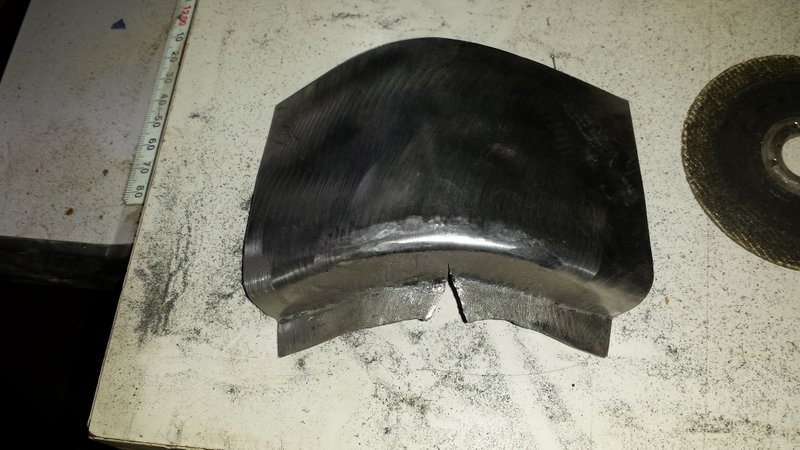 I could patch the split up, but maybe there is a better way. Anyone have ideas? (IMG:style_emoticons/default/confused24.gif) What I really need is a better selection of dollies, I think. |
|
|
|
| tygaboy |
Aug 16 2017, 11:20 AM
Post
#94
|
|
914 Guru Group: Members Posts: 5,810 Joined: 6-October 15 From: Petaluma, CA Member No.: 19,241 Region Association: Northern California |
I think the way to avoid that is to make that part in 2 pieces:
- the "top" part with the lip tipped in - the "bottom" part with its lip tipped out - weld them together along the line Or give a go to hammer forming it? I just worked up a piece via hammer forming that included an inside corner and was surprised how well it turned out. Hope this helps... Chris Attached image(s) 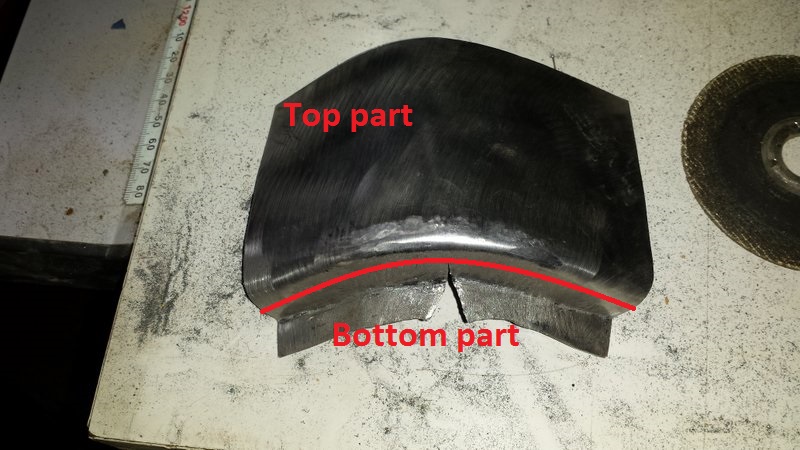
|
|
|
|
| bbrock |
Aug 16 2017, 11:37 AM
Post
#95
|
|
914 Guru Group: Members Posts: 5,269 Joined: 17-February 17 From: Montana Member No.: 20,845 Region Association: Rocky Mountains |
QUOTE(tygaboy @ Aug 16 2017, 11:20 AM) I think the way to avoid that is to make that part in 2 pieces: - the "top" part with the lip tipped in - the "bottom" part with its lip tipped out - weld them together along the line Or give a go to hammer forming it? I just worked up a piece via hammer forming that included an inside corner and was surprised how well it turned out. Hope this helps... Chris Thanks. I thought about the 2-piece solution but wanted to try it in one first. I think hammer forming is the way to go but not sure what to use for a form. Thinking maybe bending a piece of that round stock and welding to a stake to clamp in the vice. If I go 2-piece, I think I could move the weld line down to just where the radius goes flat before the flange bend. It should be easy to use the shrinker for smooth, match curves without that radius pulling in. Edit: I just looked again and that is exactly what you suggested! (IMG:style_emoticons/default/beer.gif) I might play with that tonight. (IMG:style_emoticons/default/smash.gif) |
|
|
|
| bbrock |
Aug 22 2017, 10:39 AM
Post
#96
|
|
914 Guru Group: Members Posts: 5,269 Joined: 17-February 17 From: Montana Member No.: 20,845 Region Association: Rocky Mountains |
August 19, 2017 - No Progress
I had to work on Saturday so didn't get anything done on the car. Work consisted of hiking through places like this: 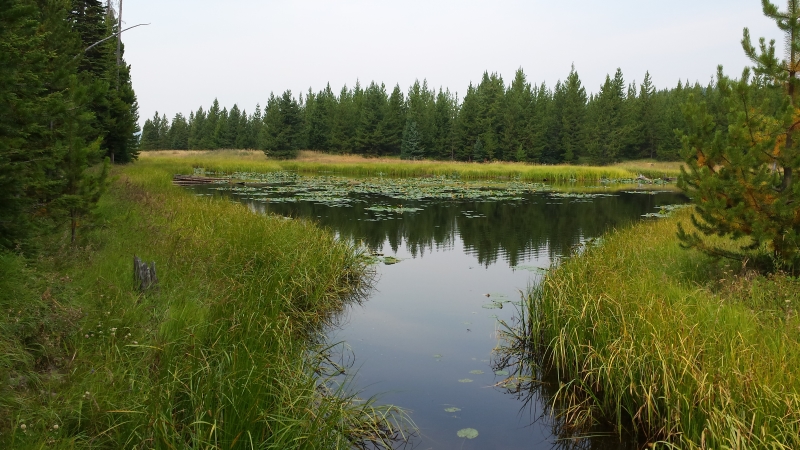 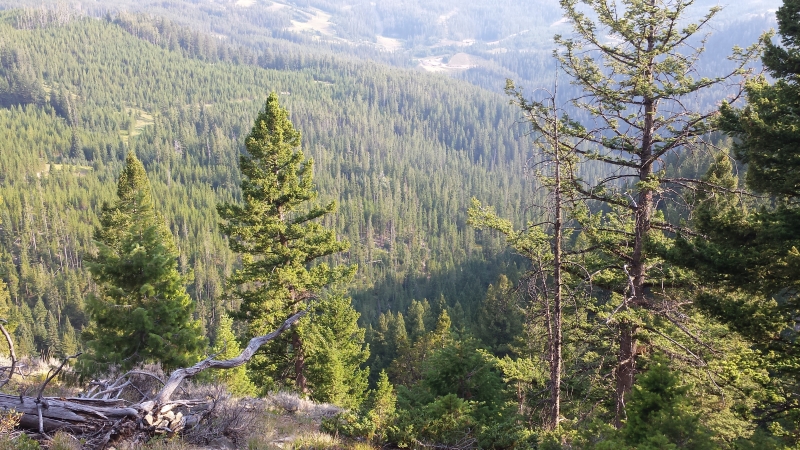 And looking for things like this: 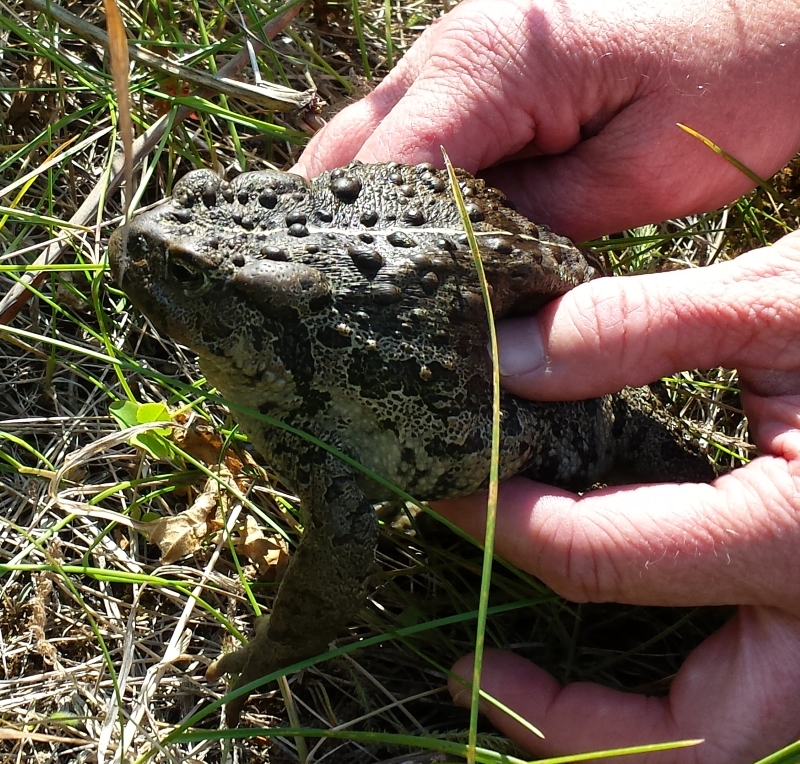 It's a rough job but somebody has to do it (IMG:style_emoticons/default/biggrin.gif) August 20, 2017 - Back in the shop First I cut out the old lower section of the inner long. 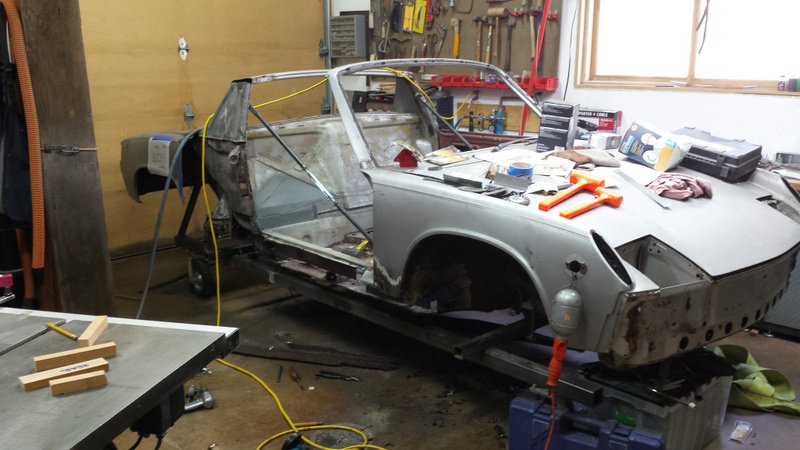 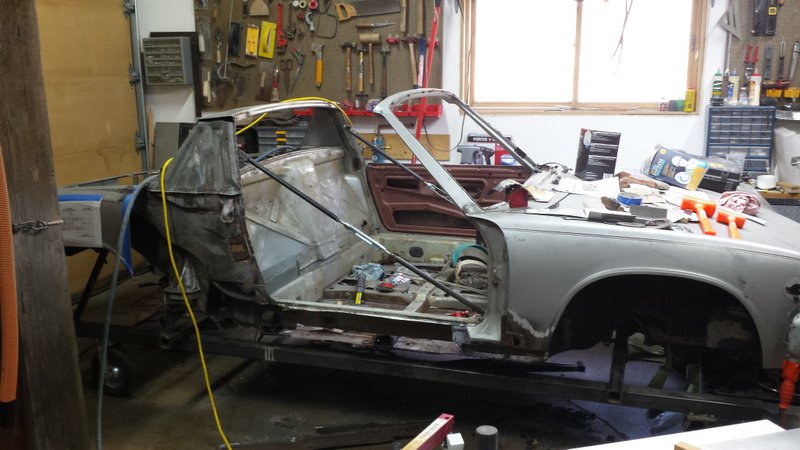 Finished up the front lower section of the inner rocker. I picked up a hunk of maple to make this corking tool which also is good protection against vampires, and a cheap anvil from HF to provide something better to hammer on. 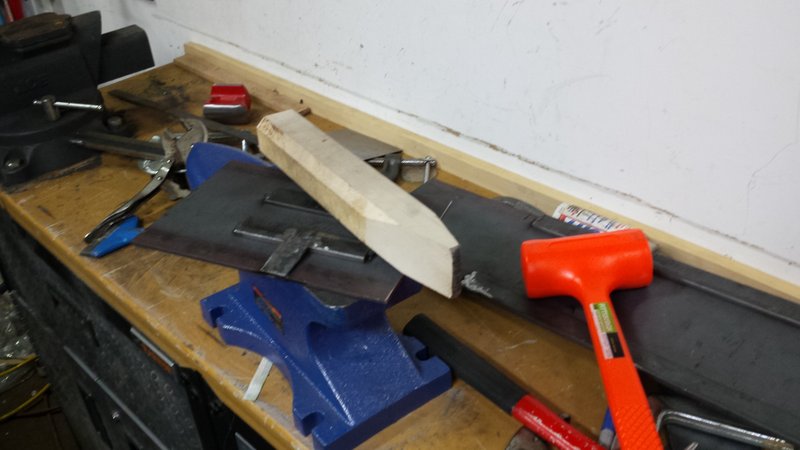 The maple with a BFH does a pretty good job of forming without leaving as many tool marks. My forms for the stub bead channels are a bit fiddly for getting the metal aligned and clamped properly. Luckily, precise location of these channels isn't important so one is off by as much as 1/8" from the original. If I did this again, I'd make the forms as negatives like Rich Casto did. That might be easier. It took a full day, but I managed to get the job done. 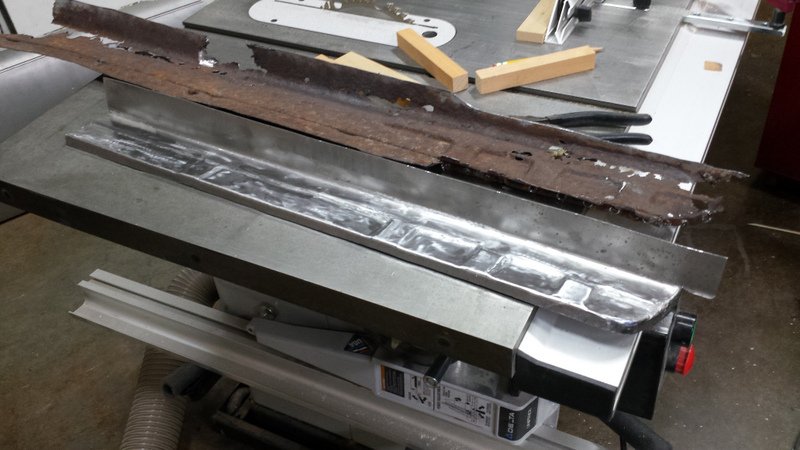 The hardest part was trimming and forming that curved flange at the front. There wasn't enough left of my original to provide a good template, so I had to flip the piece over and match it to the driver's side to create a mirror image. I hit it lightly with an 80 grit disc on a 3" angel grinder to knock off some of the tool marks. That also made it too shiny to get a good picture. Before removing the old, rusted section, I made a couple of witness blocks to make sure I could install the new piece at the right height. 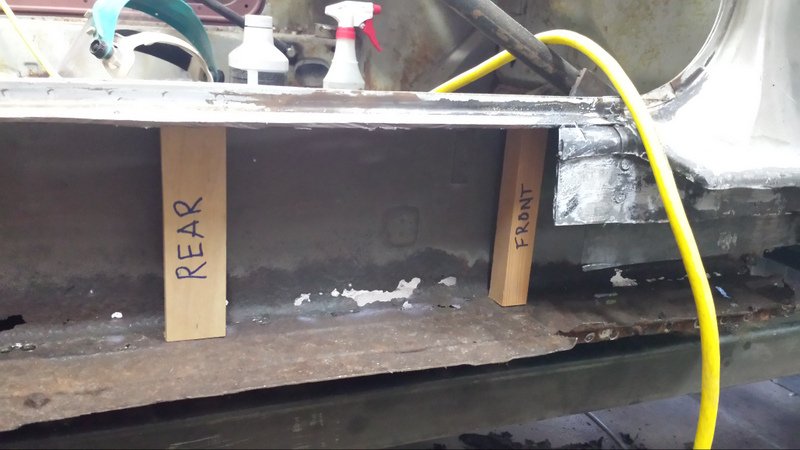 This made trimming and fitting the piece much easier. 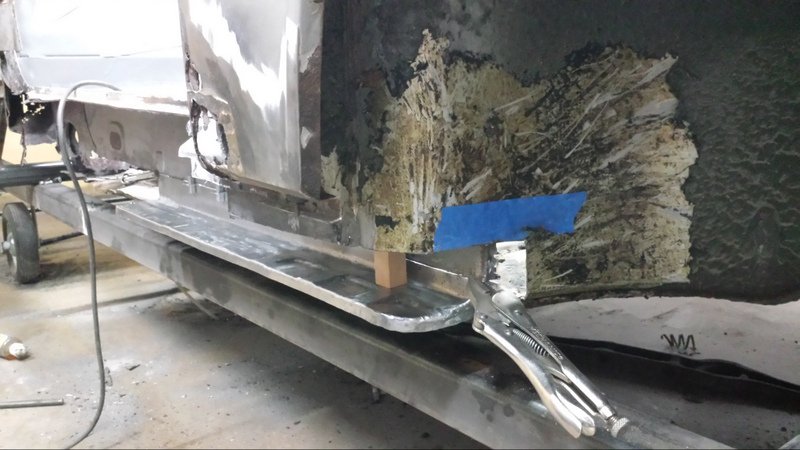 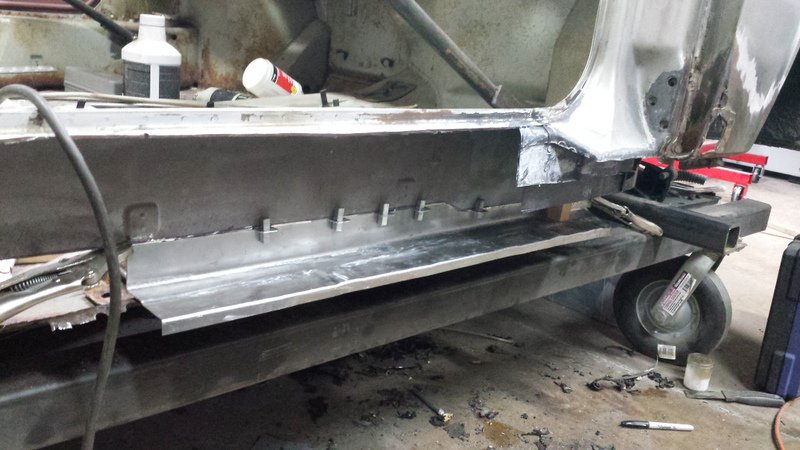 August 21, 2017 - Made rear section of inner long Last night I was able to bang out the rear section of the lower inner long. It only took about an hour and a half thanks to a combination of experience from the first piece, not having to deal with two channel depths, and not having a curved flange section to hammer out. I didn't have enough left of the original to know how many, or where, the stub channels were located along the rear. I just assumed they were evenly spaced along the length. It looks like the piece will be trimmed in front of the last one, so that was a bit of wasted effort. I even had time to weld it to the front piece. Here it is, loose laid in place. 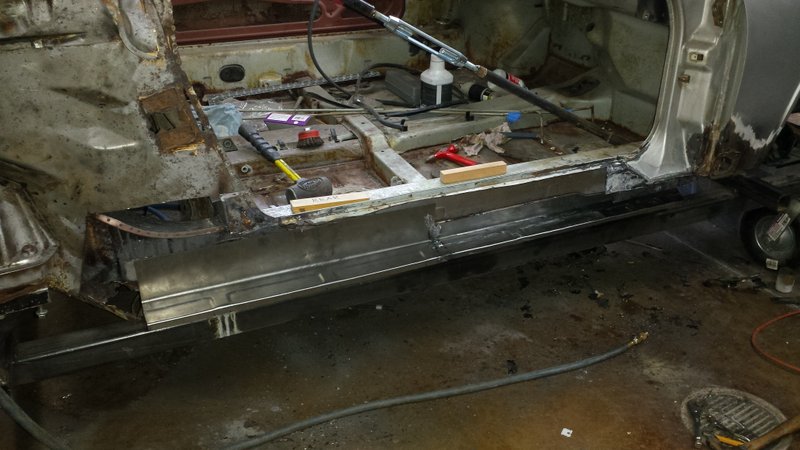 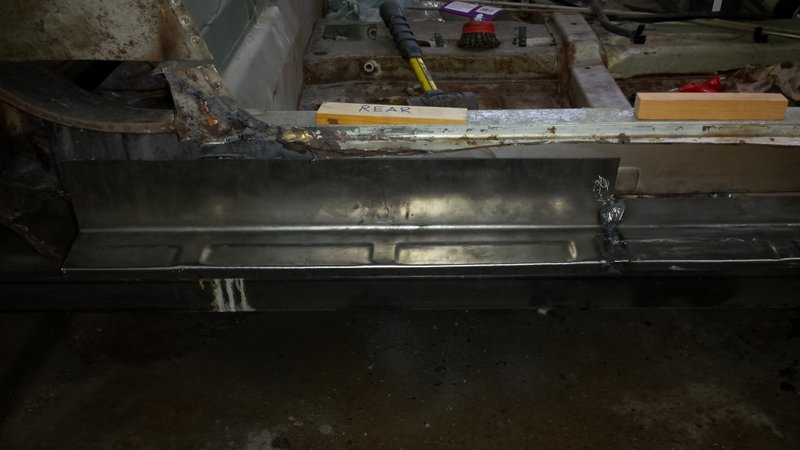 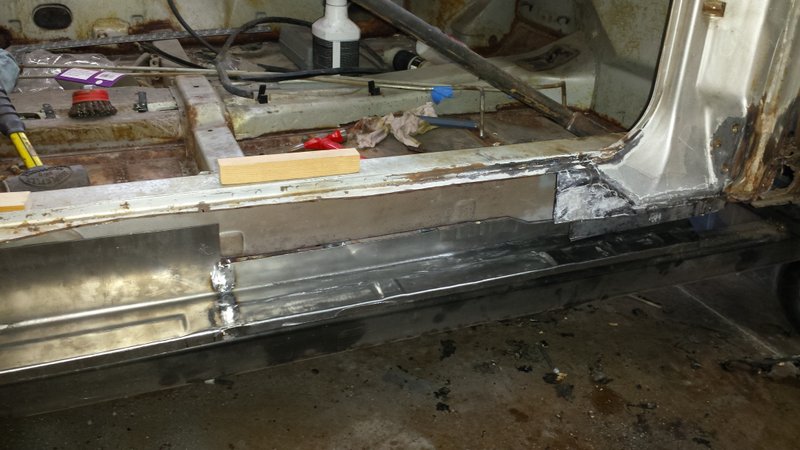 Hopefully tonight, I'll have to make the final trim and fitment, and get the first few tacks in place. |
|
|
|
| tygaboy |
Aug 22 2017, 12:22 PM
Post
#97
|
|
914 Guru Group: Members Posts: 5,810 Joined: 6-October 15 From: Petaluma, CA Member No.: 19,241 Region Association: Northern California |
Man, I'm in awe of you guys who cut out such major sections of your cars!
Nothing but (IMG:style_emoticons/default/w00t.gif) and (IMG:style_emoticons/default/pray.gif) Great work, love the metal shaping you're doing. I'd be interested to hear your thoughts on how hard/not hard it's been for you to get the results you're happy with. Maybe I'm getting lucky but so far (knock wood/I'll take it!) but, I'm finding the fabrication goes pretty well. Some forethought and maybe a practice piece or two. When I started my project just over a year ago, I happily confess I was a bit intimidated by the thought of trying to fit even a preformed replacement panel. Sorry for the hijack, just curious to hear others' experiences. Again, great stuff and keep it coming. (IMG:style_emoticons/default/smilie_pokal.gif) |
|
|
|
| mb911 |
Aug 22 2017, 01:30 PM
Post
#98
|
|
914 Guru Group: Members Posts: 7,742 Joined: 2-January 09 From: Burlington wi Member No.: 9,892 Region Association: Upper MidWest |
QUOTE(tygaboy @ Aug 22 2017, 10:22 AM) Man, I'm in awe of you guys who cut out such major sections of your cars! Nothing but (IMG:style_emoticons/default/w00t.gif) and (IMG:style_emoticons/default/pray.gif) Great work, love the metal shaping you're doing. I'd be interested to hear your thoughts on how hard/not hard it's been for you to get the results you're happy with. Maybe I'm getting lucky but so far (knock wood/I'll take it!) but, I'm finding the fabrication goes pretty well. Some forethought and maybe a practice piece or two. When I started my project just over a year ago, I happily confess I was a bit intimidated by the thought of trying to fit even a preformed replacement panel. Sorry for the hijack, just curious to hear others' experiences. Again, great stuff and keep it coming. (IMG:style_emoticons/default/smilie_pokal.gif) (IMG:style_emoticons/default/agree.gif) But I also do those kind of projects as it becomes very rewarding..  Here is Chris donation to my project .. Keep up the great work. |
|
|
|
| bbrock |
Aug 22 2017, 02:09 PM
Post
#99
|
|
914 Guru Group: Members Posts: 5,269 Joined: 17-February 17 From: Montana Member No.: 20,845 Region Association: Rocky Mountains |
QUOTE(tygaboy @ Aug 22 2017, 12:22 PM) Man, I'm in awe of you guys who cut out such major sections of your cars! Nothing but (IMG:style_emoticons/default/w00t.gif) and (IMG:style_emoticons/default/pray.gif) Great work, love the metal shaping you're doing. I'd be interested to hear your thoughts on how hard/not hard it's been for you to get the results you're happy with. Maybe I'm getting lucky but so far (knock wood/I'll take it!) but, I'm finding the fabrication goes pretty well. Some forethought and maybe a practice piece or two. When I started my project just over a year ago, I happily confess I was a bit intimidated by the thought of trying to fit even a preformed replacement panel. Sorry for the hijack, just curious to hear others' experiences. Again, great stuff and keep it coming. (IMG:style_emoticons/default/smilie_pokal.gif) Ha! Great minds. Amazing to hear this from you because your fabrication has been a real inspiration. It looks like you've been doing it for years. I've thought about this a lot the past few days and almost added a paragraph in my update, but decided to spare everyone my philosophizing. But since you ask... I've been a woodworker since I was a kid and have always been somewhat intimidated by metal work. I've done a few small projects with good results, but always kept them simple. This project has been a bit of an eye opener. I don't want to offend anyone, but in many respects, I'm finding metal working much easier than wood. Not that I don't think metalworking requires insane skills that I still don't possess, but metal, as a material, is more forgiving than wood in some important ways. Wood has to be cut and dimensioned with great precision, and good joinery requires relatively complex lock and key type configurations (dovetails, mortise and tenon, finger joints, what have you). 1/64" can make or break the work. Metal can be bent, stretched, and shrunk within limits and the welder is a marvel for joinery. Again, I'm not pretending I possess the skills of the real pros, but as a neophyte novice metal shaper, I feel I'm producing far more satisfactory results than I was at a similar level of experience woodworking. Of course, I'm also bringing some of that woodworking experience over to metal so it isn't completely a fair comparison. But you get the point, and it has been a real pleasure to discover that the story on a piece of steel isn't dictated so much by the cutting. So, overall, I'm very surprised how accessible metal fabrication is, even for someone with a cramped shop and rather paltry assortment of tools. Is it worth it? That's a pretty easy one that I have also ruminated on. Inner longs run about $300 per side new and I need to do both sides. I have about $10 worth of sheet metal in my passenger side so just in terms of $, it is well worth several days building forms, wracking the brain to figure out the steps to make the piece, and wearing your arm out with a hammer. Maybe more important, completely removing and replacing those longs would be a LOT more complicated and fraught with danger than leaving the top of the structure in place while the rusty bits are repaired. |
|
|
|
| bbrock |
Aug 22 2017, 02:12 PM
Post
#100
|
|
914 Guru Group: Members Posts: 5,269 Joined: 17-February 17 From: Montana Member No.: 20,845 Region Association: Rocky Mountains |
QUOTE(mb911 @ Aug 22 2017, 01:30 PM) (IMG:style_emoticons/default/agree.gif) But I also do those kind of projects as it becomes very rewarding.. Here is Chris donation to my project .. Keep up the great work. Awesome! I'll be tackling that in the future. Nice work! (IMG:style_emoticons/default/smash.gif) |
|
|
|
|
2 User(s) are reading this topic (2 Guests and 0 Anonymous Users)
0 Members:

|
Lo-Fi Version | Time is now: 18th April 2026 - 01:30 PM |
Invision Power Board
v9.1.4 © 2026 IPS, Inc.