|
|
|
Porsche, and the Porsche crest are registered trademarks of Dr. Ing. h.c. F. Porsche AG.
This site is not affiliated with Porsche in any way. Its only purpose is to provide an online forum for car enthusiasts. All other trademarks are property of their respective owners. |
|
|

  |

| bbrock |
 Mar 12 2019, 07:33 PM Mar 12 2019, 07:33 PM
Post
#901
|
|
914 Guru  Group: Members Posts: 5,269 Joined: 17-February 17 From: Montana Member No.: 20,845 Region Association: Rocky Mountains |
Made some progress on the rear axle. This morning I got the rear sway bar painted. It's just finger tight mounted for storage until I get a consensus on what to grease the rubber bushings with since "glycerine paste" doesn't seem to exist. I thought I had a set of drop link bushings but apparently not. I'll have to order some.
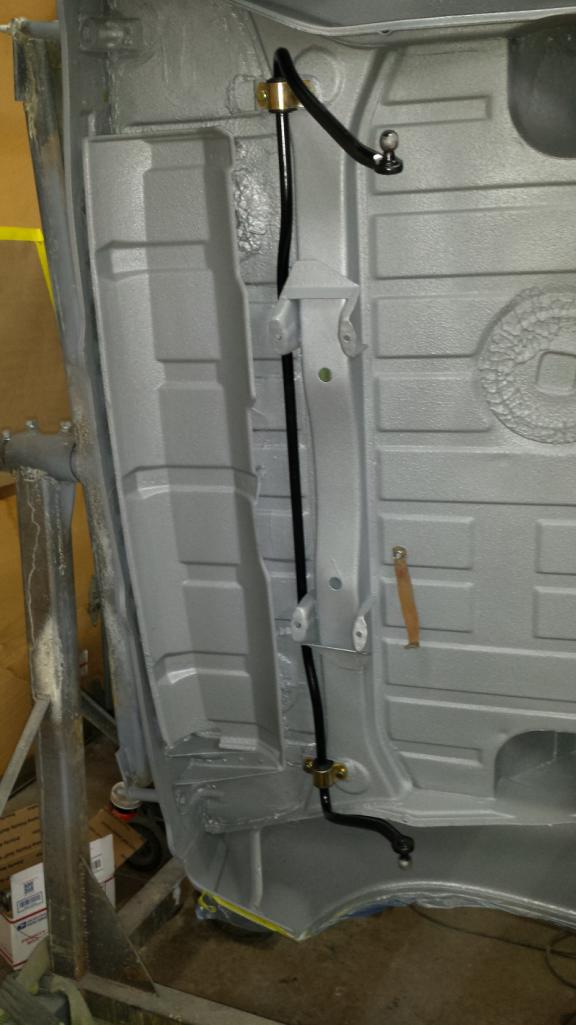 After work, I put the trailing arms together. Installed new SS pivot rods from 914Rubber and their hard bushings. Nothing exciting about the install so I didn't take any pics. I'm hopeful they'll offer OEM style rubber bushing soon so I can swap these out. They fit well though. After that, I moved to the hub. The HF Front Wheel Bearing kit makes installing the bearings and hubs easy work. 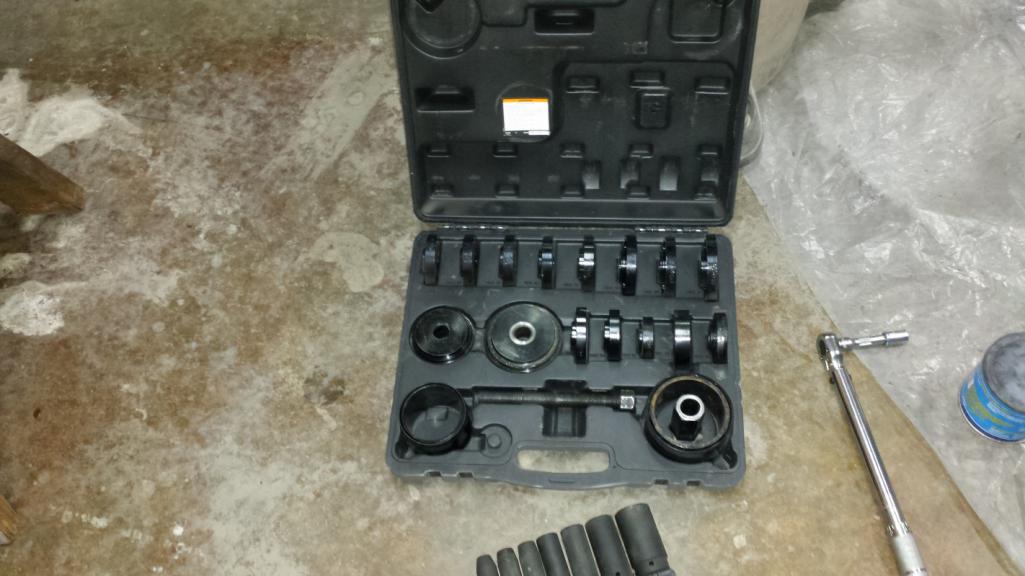 Sorry I didn't take a pic of the bearing going in, but here's the setup. Pretty simple. Choose the correct sized discs to pull the bearing in without pressing on the fragile parts, and suck it in with an impact driver. With frozen bearings and a thin smear of grease in the polished hub, it takes less than a minute. 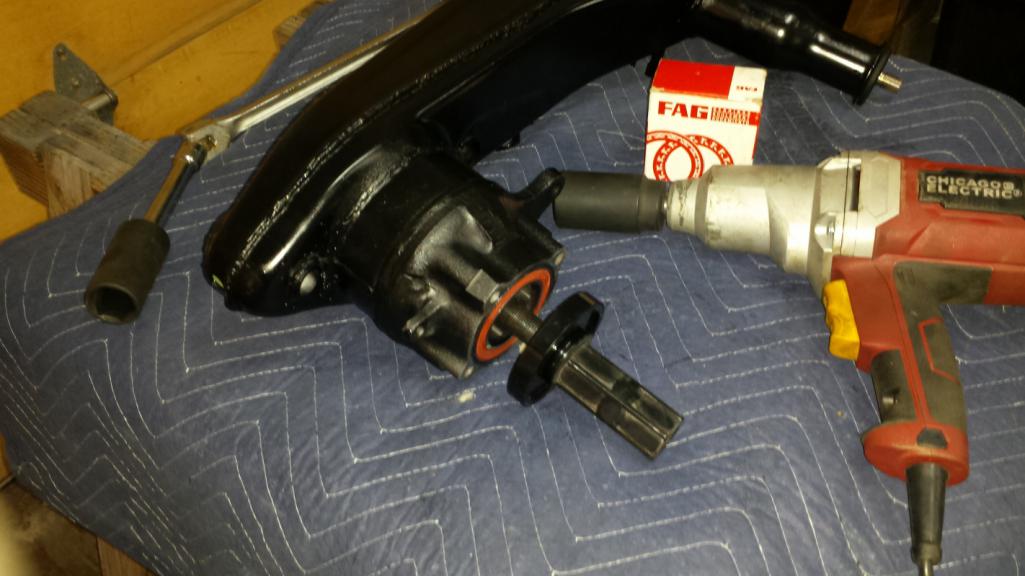 Bearing is in nice and flush. 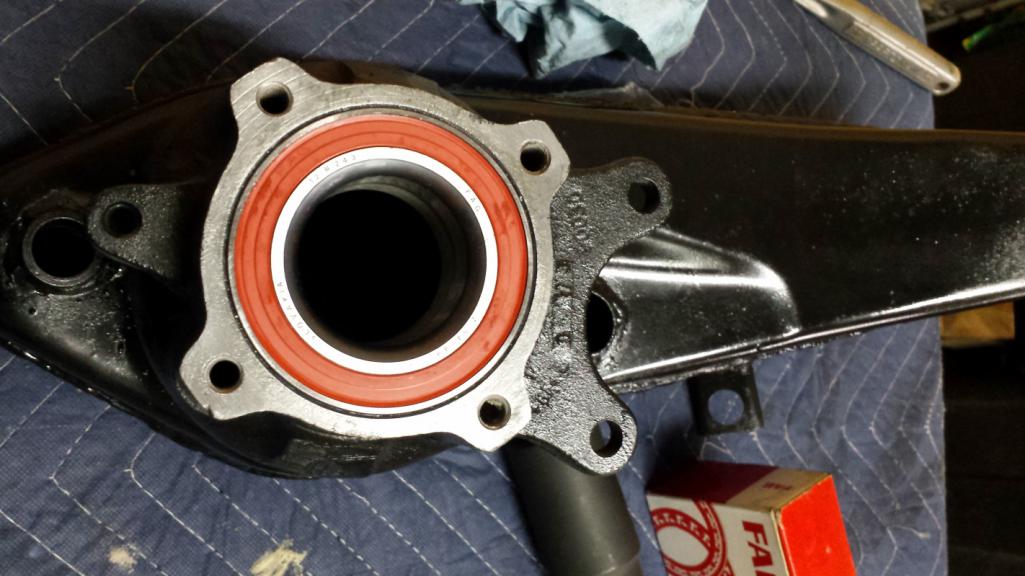 I put a very thin smear of anti-seize compound on the bare metal flange before bolting on the replated cover and torquing to 18 ft-lbs. 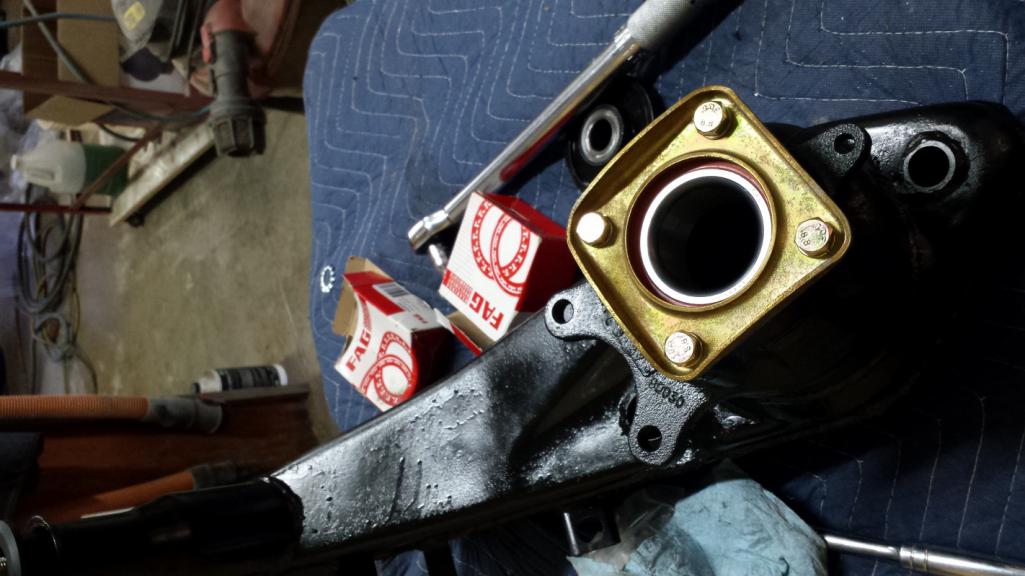 The procedure for installing the hub is a repeat of the bearing except with different sized discs. Most important is to choose a disc that fits inside the bearing housing and rests on the bearing itself. That way you don't put pressure on the bearings as the hub pulls in. I stopped with the hub a millimeter or two of being seated so the final seating will be done when I torque the stub axle down. I'm still waiting to hear from Porsche about the CV joints so I can't install stub axles or make the car a roller until I have that taken care of. Here's the hub in place. 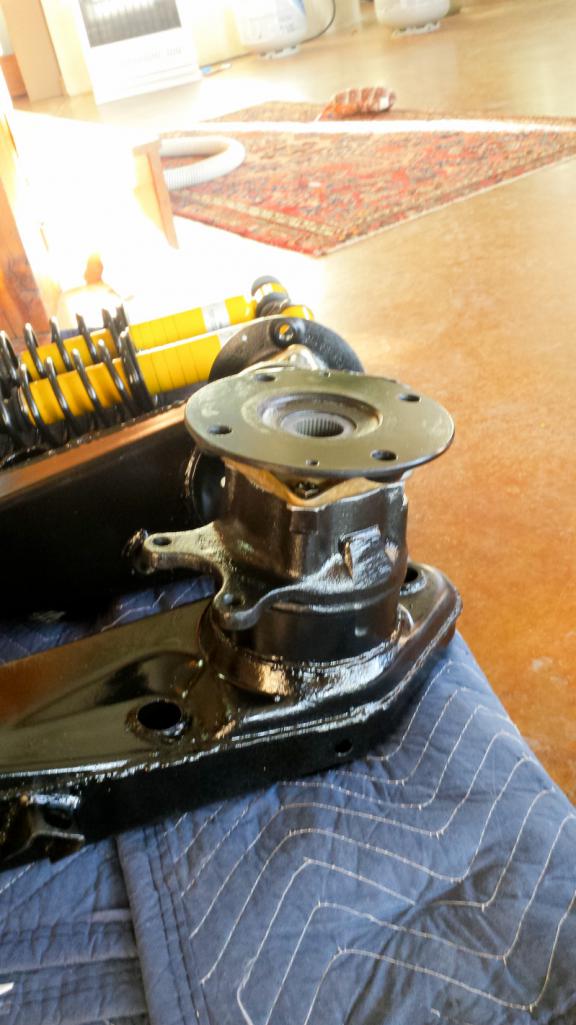 Two rebuilt trailing arms. Took less than an hour including dicking around just admiring them. I guess I should plate up some hardware so I can bolt all this on the car. 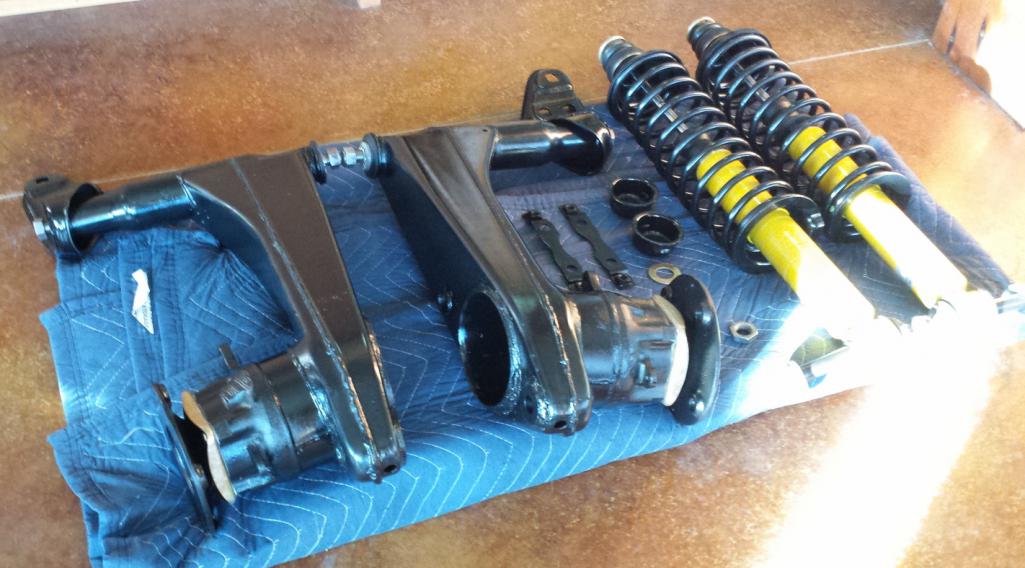 |
   |

 
|
| bbrock |
Mar 14 2019, 06:42 PM
Post
#902
|
|
914 Guru Group: Members Posts: 5,269 Joined: 17-February 17 From: Montana Member No.: 20,845 Region Association: Rocky Mountains |
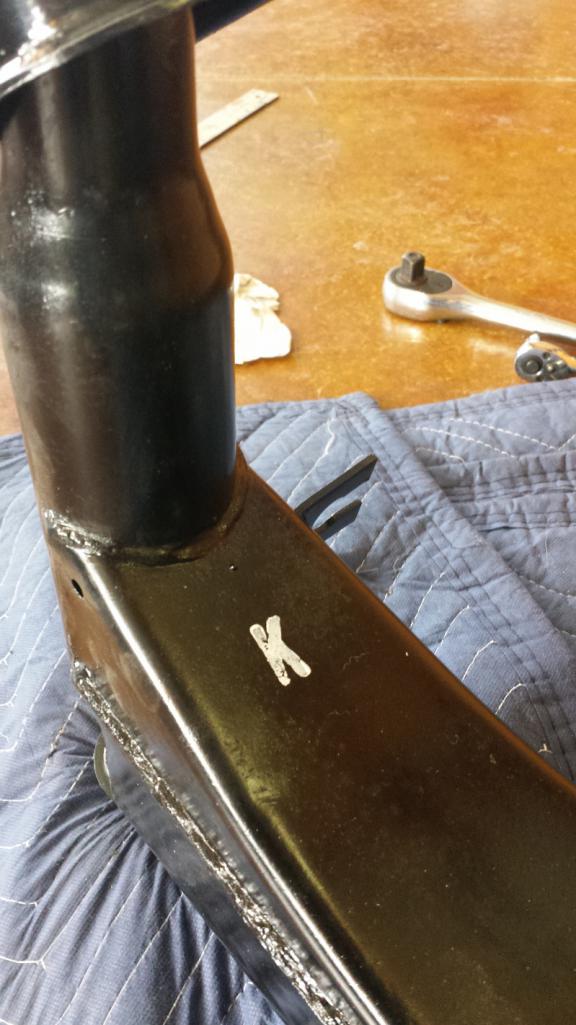
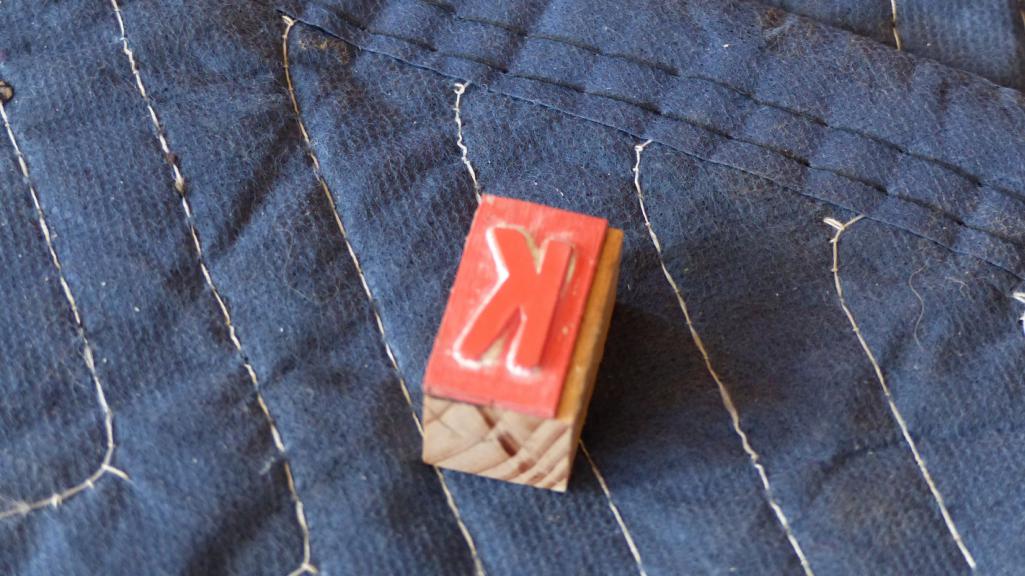
The trailing arm inspector stopped by today with his special little stamps. He rated my trailing arms Special K, just like they were originally. (IMG:style_emoticons/default/shades.gif)
  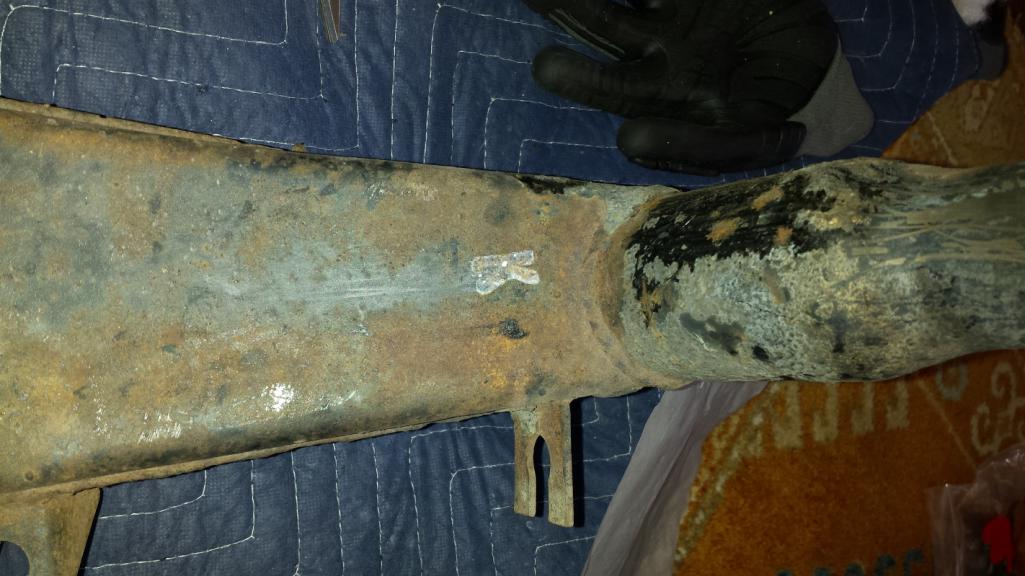 With the trailing arms certified, there was nothing to do but bolt them on. 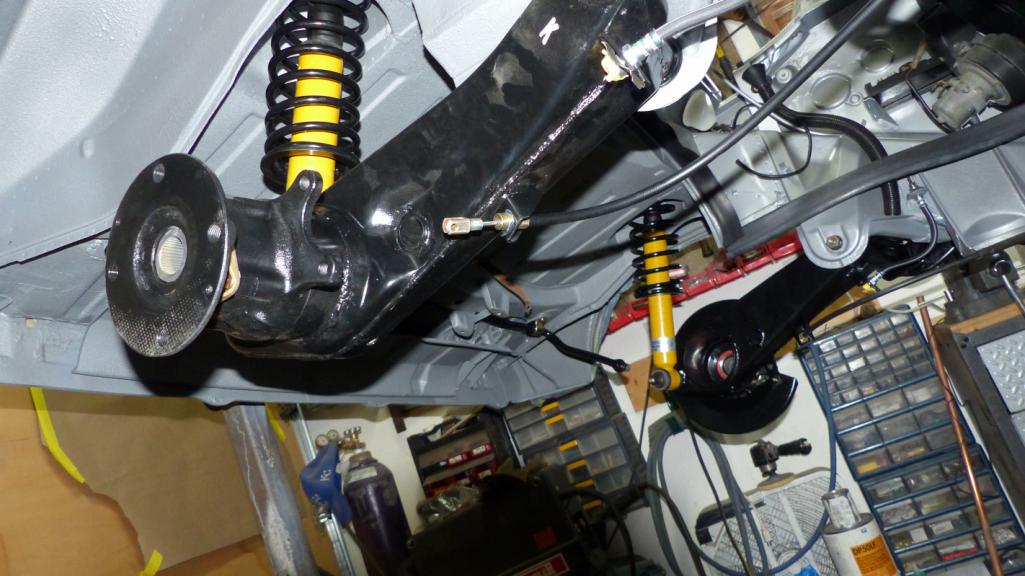 This did not come without some drama though. My worst fear has been that somehow I didn't get the suspension parts back in the right spot. When I went to bolt the passenger side arm on, I couldn't get it to go into place. I discovered there wasn't enough clearance between the outer pivot end and the quarter panel. I had to cut the little brace when I pulled that off during the rust repair and just had to guess about position when I welded it back. I knew that would bite me in the ass. I had to cut the brace again so I could pull the fender out. Hate to do that after there is paint on the car, but had no choice. I laid a wet towel down to protect against sparks. 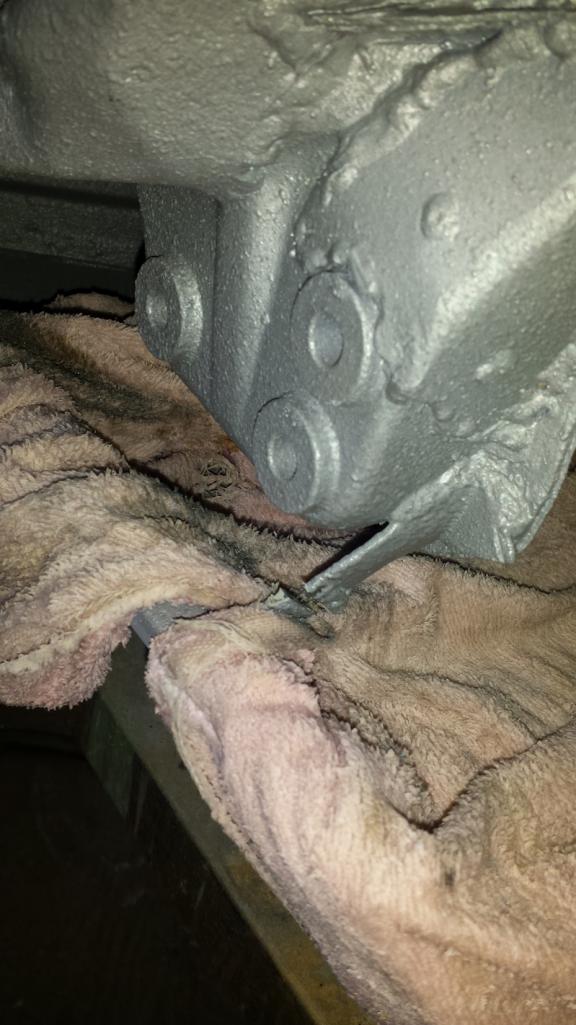 I'll have to go back and reweld that, but want to see if I can get a better sense of what that clearance should be. Might need to adjust the other side too. That let me get the outer control arm bearing in there, but my troubles weren't quite over. The arm was a little long and overshooting the holes. Oh shit! That's the worst fear (IMG:style_emoticons/default/yikes.gif) It was off by about 3/16". Part of it was not having the pivot nuts torqued down to compress the bushings. I tightened those up but I was still off by a little less than 3/32". This was not good at all. I had bolted the trailing arm up when I tacked the inner console ear in place so I know they aligned at that time. Only thing I can think is the metal must have shrunk some when I welded in the reinforcement gussets. Where was McMark's suspension ear jig when I needed it? But what to do.... (IMG:style_emoticons/default/headbang.gif) Well, the 914Rubber SS pivot rods come with a couple toothed washers for each rod. They don't provide instructions but I assumed these were to compensate for the lack of locking serrations on the ends of the pivots that the factory pieces had.  They are pretty thick and with both installed, push the outer bearing out about 1/8". So my solution was pretty simple, take those out. I'm not sure how critical they are, but I think Schnorr washers would be a closer match to the original rods and would be much thinner. Anyway, with the toothed washers removed, the trailing arm bolted in and I was still able to move the arm through the full range of toe adjustment. We'll see if I have problems getting a good alignment. Anyway, here's a little more eye candy. Another big pile of rusty crap restored and bolted back onto the car. (IMG:style_emoticons/default/aktion035.gif) 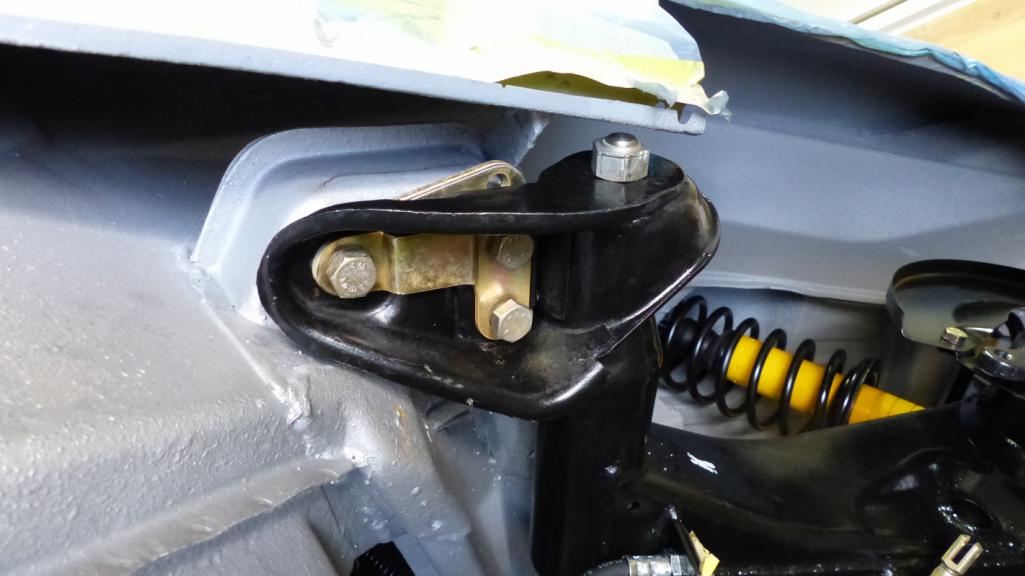 I wasn't sure what the proper finish on that bearing bracket. The yellow chromate adds some bling, but I wonder if I should do like the Stones and paint it black. 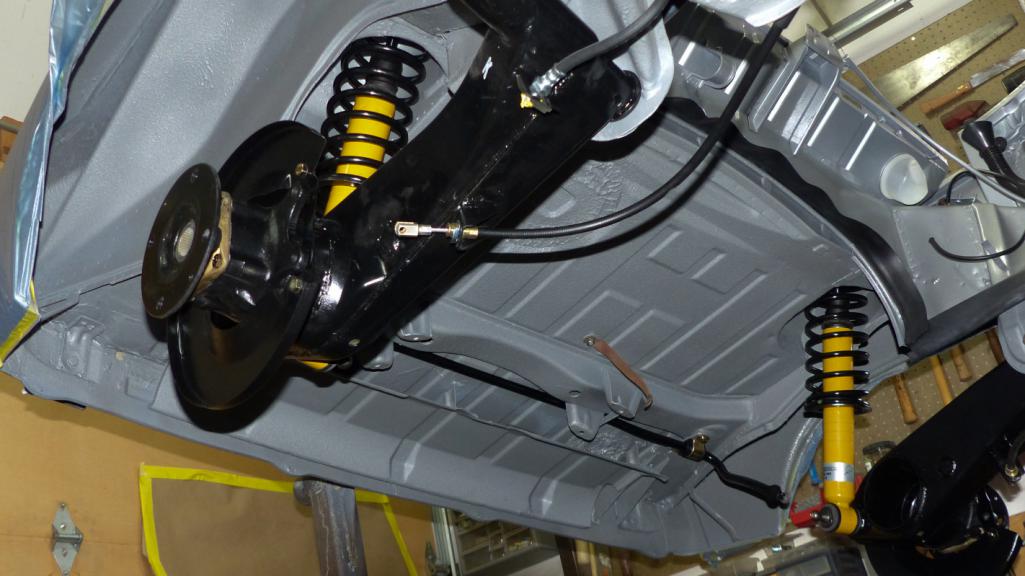 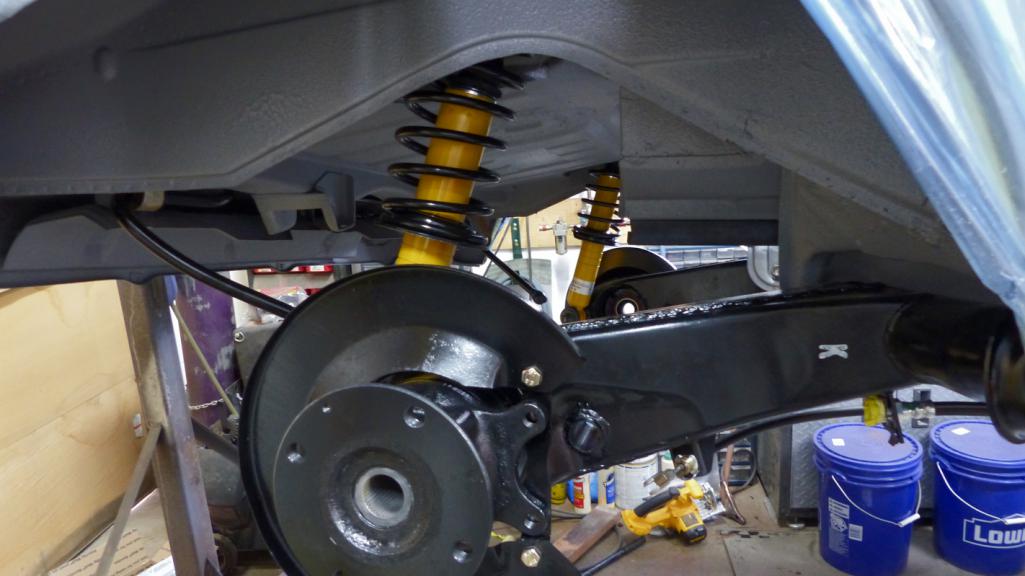 |
|
|
|
| euro911 |
Mar 14 2019, 07:57 PM
Post
#903
|
|
Retired & living the dream. God help me if I wake up! Group: Members Posts: 8,937 Joined: 2-December 06 From: So.Cal. & No.AZ (USA) Member No.: 7,300 Region Association: Southern California |
|
|
|
|
| bbrock |
Mar 17 2019, 09:43 PM
Post
#904
|
|
914 Guru Group: Members Posts: 5,269 Joined: 17-February 17 From: Montana Member No.: 20,845 Region Association: Rocky Mountains |
Got several things done, or at least made progress over the weekend, but the main focus was a final push to get the hardware ready to ship for plating. I'm spending way too much time plating parts and the temptation to "just do a short run" is too great. Those "short runs" always stretch into several hours. Also, I've been frustrated by inconsistent results on the yellow chromate finish and haven't been able to figure out the problem. Sometimes, even within the same run, I get beautiful finishes on some parts while the chromate just rubs off of others even after several days curing. Plain zinc and black chromate is no problem but that yellow is a bitch. What I have learned is that I'm not alone and even commercial platers can have trouble with it.
I'm waiting on some price estimates from a plater in Salt Lake City but I need to decide whether to ship my wheel bolts for clear cad plating, which I'm told was the original finish. I did a small test today to see what I could do with zinc. I wish I was a better photographer, but from left to right is: before cleaning, how it comes out of the zinc bath after drying, and finally, after a light polish with Mother's. 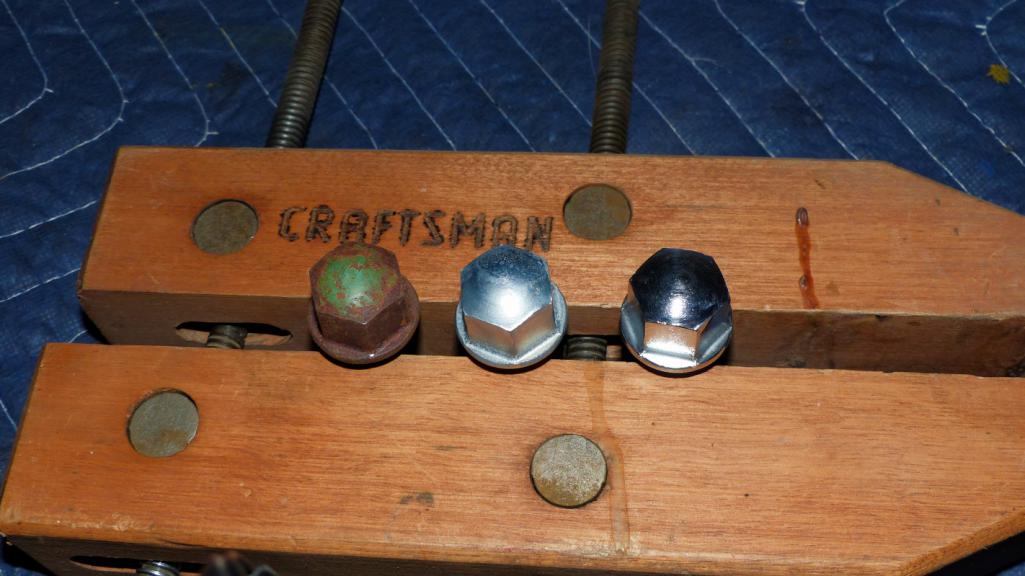 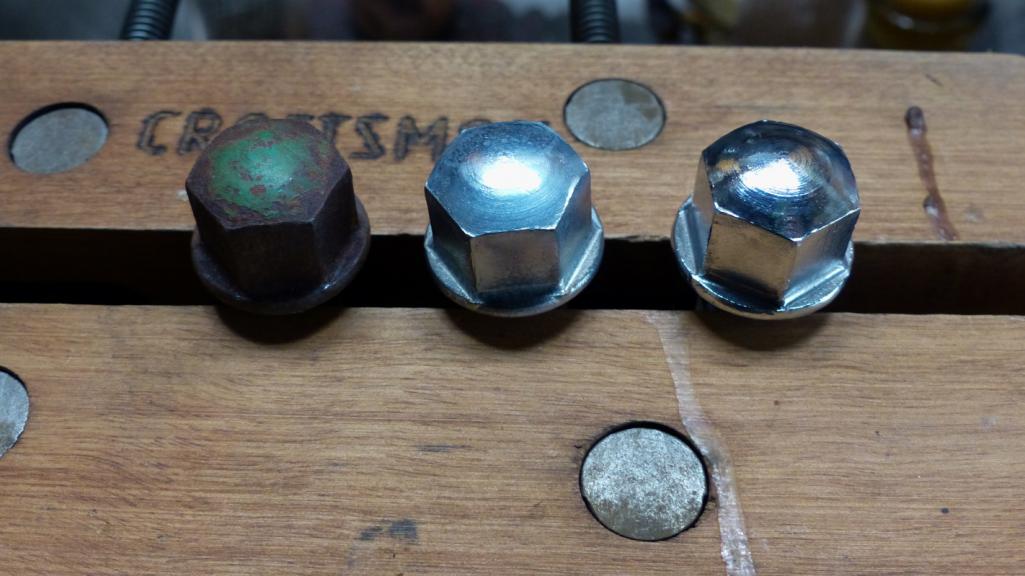 Looks pretty good but I don't know how it would compare to a clear cad piece. What do you think? (IMG:style_emoticons/default/confused24.gif) |
|
|
|
| euro911 |
Mar 17 2019, 10:55 PM
Post
#905
|
|
Retired & living the dream. God help me if I wake up! Group: Members Posts: 8,937 Joined: 2-December 06 From: So.Cal. & No.AZ (USA) Member No.: 7,300 Region Association: Southern California |
Looks great (IMG:style_emoticons/default/drooley.gif)
Maybe you can leave one sit out in the elements for a while to see how the finish holds up? |
|
|
|
| bbrock |
Mar 17 2019, 11:17 PM
Post
#906
|
|
914 Guru Group: Members Posts: 5,269 Joined: 17-February 17 From: Montana Member No.: 20,845 Region Association: Rocky Mountains |
QUOTE(euro911 @ Mar 17 2019, 10:55 PM)  Looks great (IMG:style_emoticons/default/drooley.gif) Maybe you can leave one sit out in the elements for a while to see how the finish holds up? Good idea. I think if I go this route, I'll plate a little longer than I did on this test to make sure there is a good coat of zinc. These are probably okay, but a thicker layer would be better. Main thing is I'm not sure what they are supposed to look like. The pic of original Porsche bolts looks even a little duller than the plated but not polished bolt. Maybe I should skip the Mother's. (IMG:http://www.914world.com/bbs2/uploads_offsite/cdn4.pelicanparts.com-20845-1552886245.1.jpg) |
|
|
|
| defianty |
Mar 18 2019, 05:58 AM
Post
#907
|
|
Senior Member Group: Members Posts: 659 Joined: 9-August 06 From: Essex, UK Member No.: 6,621 Region Association: None |
Coming together nicely Brent. Love the 'K' stamp.
|
|
|
|
| bbrock |
Mar 18 2019, 07:55 AM
Post
#908
|
|
914 Guru Group: Members Posts: 5,269 Joined: 17-February 17 From: Montana Member No.: 20,845 Region Association: Rocky Mountains |
QUOTE(defianty @ Mar 18 2019, 05:58 AM) Coming together nicely Brent. Love the 'K' stamp. About that... Yesterday the wife took a rare interest in the car project and for the second time commented that she thought I needed to replace the cracked dash. I explained what they cost and that it wasn't in the budget for now. Then I took her over to show her "something really cool" and showed her the 'K'. She said, and this is a direct quote, "I knew it would be something I don't give a shit about." Women! (IMG:style_emoticons/default/confused24.gif) (IMG:style_emoticons/default/screwy.gif) |
|
|
|
| defianty |
Mar 18 2019, 08:04 AM
Post
#909
|
|
Senior Member Group: Members Posts: 659 Joined: 9-August 06 From: Essex, UK Member No.: 6,621 Region Association: None |
QUOTE(bbrock @ Mar 18 2019, 01:55 PM) She said, and this is a direct quote, "I knew it would be something I don't give a shit about." Women! (IMG:style_emoticons/default/confused24.gif) (IMG:style_emoticons/default/screwy.gif) (IMG:style_emoticons/default/av-943.gif) My wife would have said exactly the same after she had raised her eyebrows in disbelief. I think you should go and order a new dash as she doesn't give a shit about it (IMG:style_emoticons/default/laugh.gif) |
|
|
|
| altitude411 |
Mar 18 2019, 08:06 AM
Post
#910
|
|
I drove my 6 into a tree Group: Members Posts: 1,306 Joined: 21-September 14 From: montana Member No.: 17,932 Region Association: Rocky Mountains |
|
|
|
|
| Dion |
Mar 18 2019, 08:36 AM
Post
#911
|
|
RN Group: Members Posts: 2,926 Joined: 16-September 04 From: Audubon,PA Member No.: 2,766 Region Association: MidAtlantic Region |
QUOTE(bbrock @ Mar 18 2019, 05:55 AM) QUOTE(defianty @ Mar 18 2019, 05:58 AM) Coming together nicely Brent. Love the 'K' stamp. About that... Yesterday the wife took a rare interest in the car project and for the second time commented that she thought I needed to replace the cracked dash. I explained what they cost and that it wasn't in the budget for now. Then I took her over to show her "something really cool" and showed her the 'K'. She said, and this is a direct quote, "I knew it would be something I don't give a shit about." Women! (IMG:style_emoticons/default/confused24.gif) (IMG:style_emoticons/default/screwy.gif) Pm sent |
|
|
|
| 76-914 |
Mar 18 2019, 09:54 AM
Post
#912
|
|
Repeat Offender & Resident Subaru Antagonist Group: Members Posts: 13,882 Joined: 23-January 09 From: Temecula, CA Member No.: 9,964 Region Association: Southern California |
QUOTE(bbrock @ Mar 18 2019, 06:55 AM) QUOTE(defianty @ Mar 18 2019, 05:58 AM) Coming together nicely Brent. Love the 'K' stamp. About that... Yesterday the wife took a rare interest in the car project and for the second time commented that she thought I needed to replace the cracked dash. I explained what they cost and that it wasn't in the budget for now. Then I took her over to show her "something really cool" and showed her the 'K'. She said, and this is a direct quote, "I knew it would be something I don't give a shit about." Women! (IMG:style_emoticons/default/confused24.gif) (IMG:style_emoticons/default/screwy.gif) LOL. And I thought it was only my wife that did that. (IMG:style_emoticons/default/shades.gif) When I was 21 I was |
|
|
|
| BPic |
Mar 18 2019, 10:00 AM
Post
#913
|
|
Member Group: Members Posts: 343 Joined: 5-February 18 From: Miami, Florida Member No.: 21,864 Region Association: South East States |
Brent - If you used the correct font (logo) she may have been impressed. Mine would have at least looked longer. (IMG:style_emoticons/default/av-943.gif)
 |
|
|
|
| bbrock |
Mar 18 2019, 10:26 AM
Post
#914
|
|
914 Guru Group: Members Posts: 5,269 Joined: 17-February 17 From: Montana Member No.: 20,845 Region Association: Rocky Mountains |
You guys are too funny. Maybe I should have stamped them with a Jackie Treehorn logo (only the cool kids will get that joke).
BTW, I'm done with the 'K' stamp. Let me know if anyone else wants to try to impress their wife and I'll send it. Or I can send the artwork and where to have one made for $3 plus postage. |
|
|
|
| bbrock |
Mar 18 2019, 11:45 AM
Post
#915
|
|
914 Guru Group: Members Posts: 5,269 Joined: 17-February 17 From: Montana Member No.: 20,845 Region Association: Rocky Mountains |
A few more progress pics from the weekend.
First, my attempt at an artsy-fartsy pic proving that I'm not very artsy-fartsy. 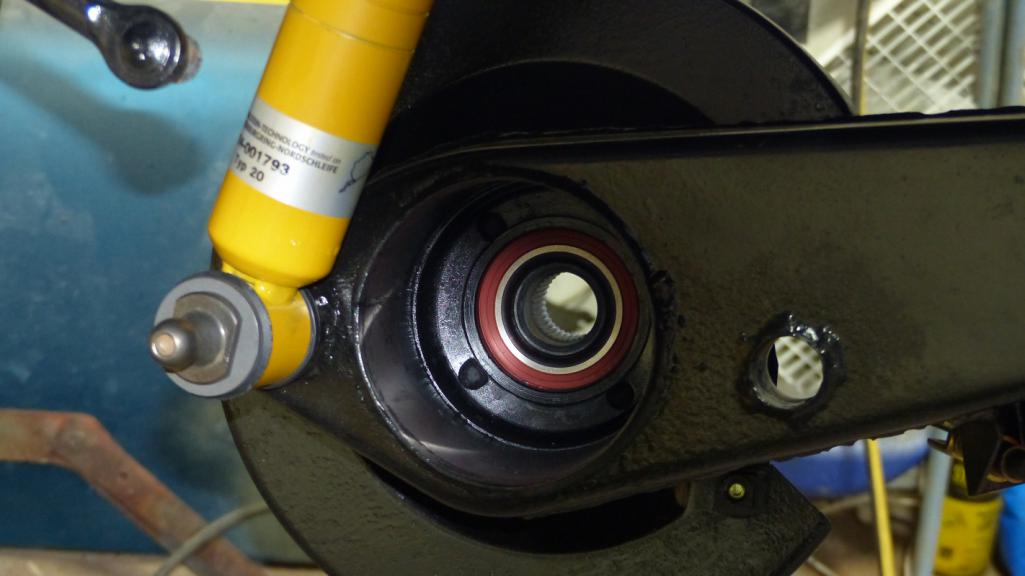 For my "watchin TV project" I'm refreshing the headlight motors.  One just needed a good scrubbing. The other has scars from the plague de rodentia that needs repaired. 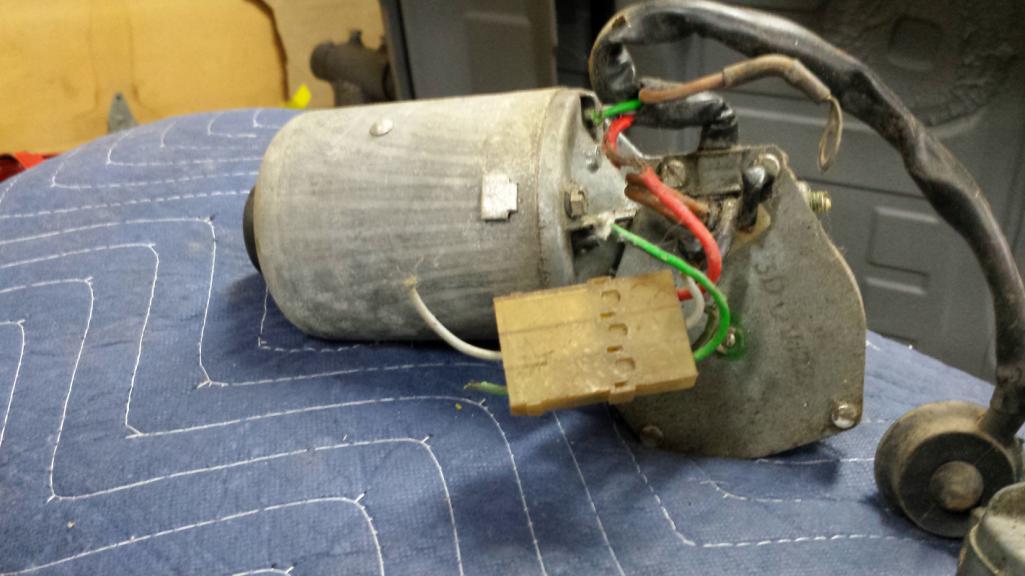 After scrubbing the easy one, repainting the mounting discs last weekend, and replating the cap screw fastener TWICE because the #$%@ing yellow chromate didn't stick the first time, I mounted it up. You can see my reminder that I'm not quite done there. 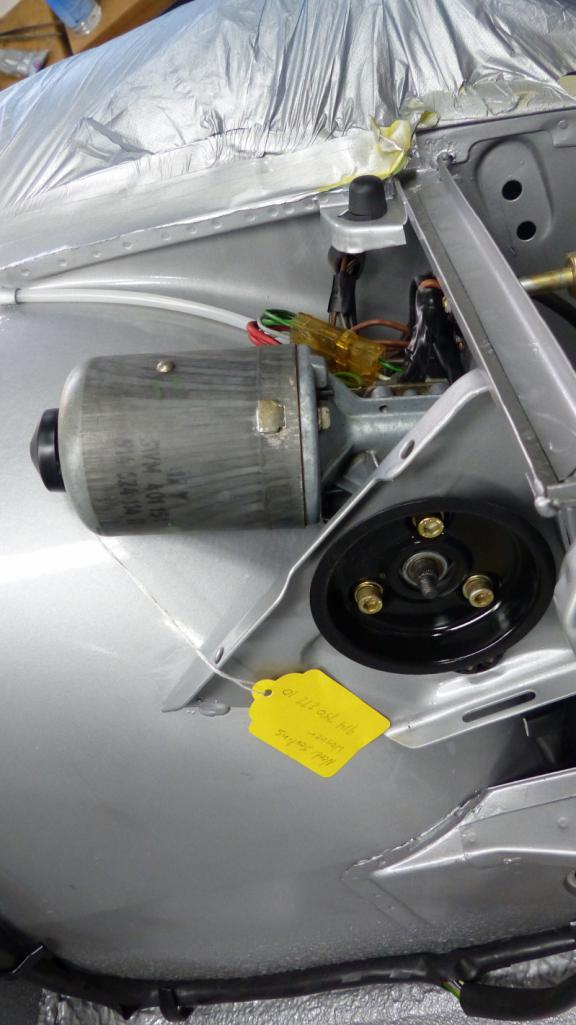 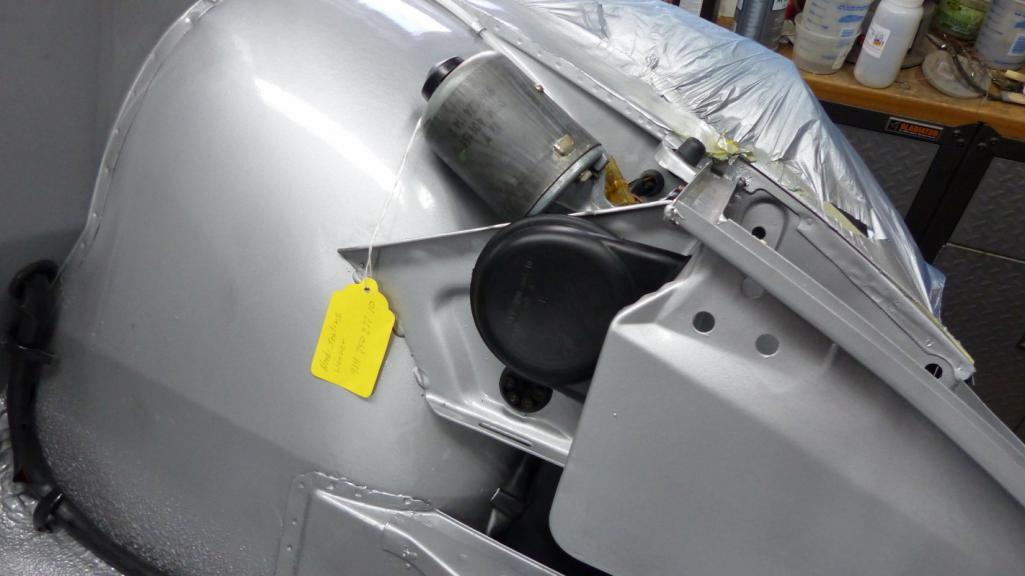 Yesterday was long, hard shaft day (IMG:style_emoticons/default/blush.gif) These were the last major trip hazard laying on the shop floor. Forgot to snap a before - my shafts were rough and rusty. Now a sleek shiny black. 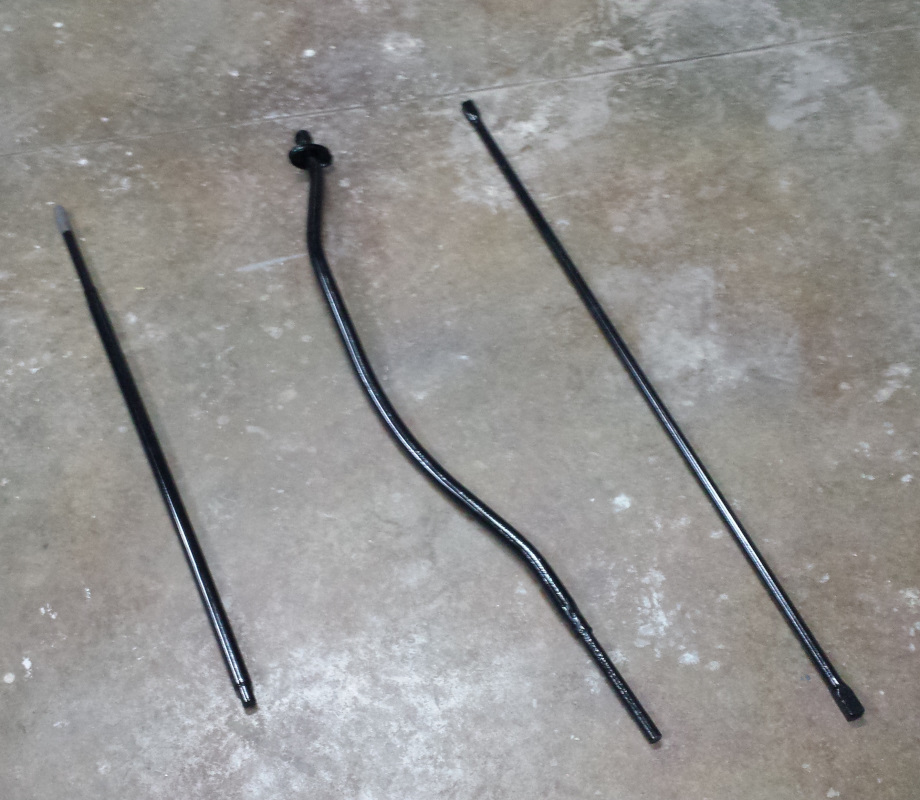 Now where to store them? Best place is on the car. I've made several attempts to plate the bushing holder for the front sway bar but can't get a satisfactory result. Too many crevices creating "shadows" for the electric field. My stop gap was to wrap the bar ends in bubble wrap to prevent rubbing against the chassis, and snap the new 914Rubber bushings on to keep them from sliding out when I rotate the car on the rotisserie. 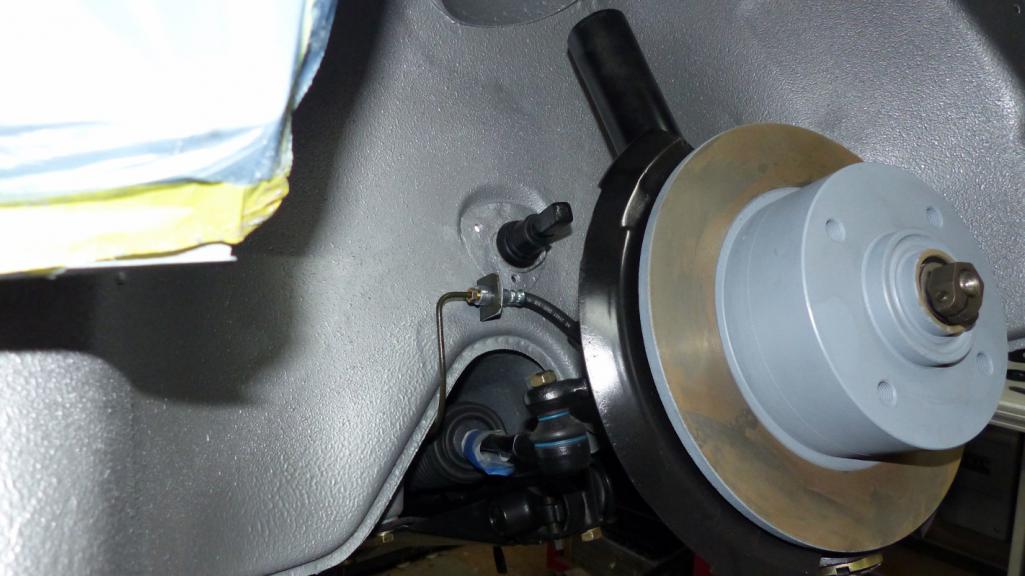 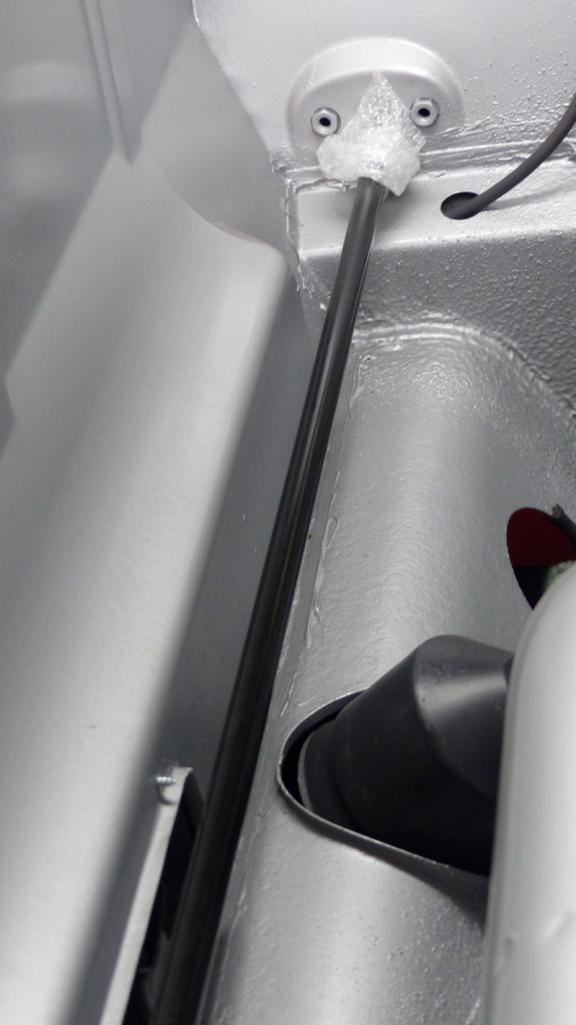 For the other, I first lubed up the bushing and slid the rod slowly in from the rear. The rubber is for protection. 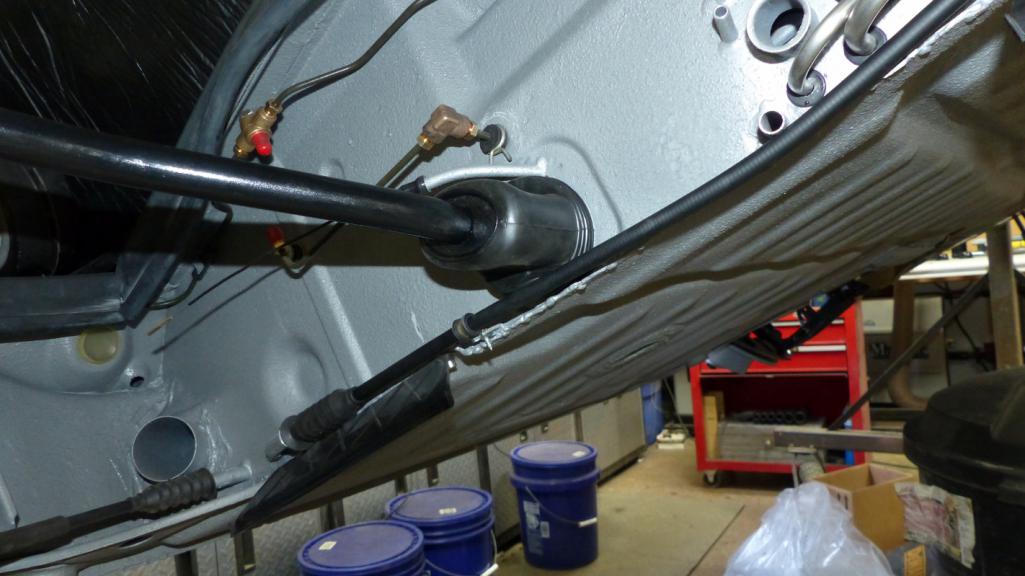 A bungee to prevent the rod from dangling down. 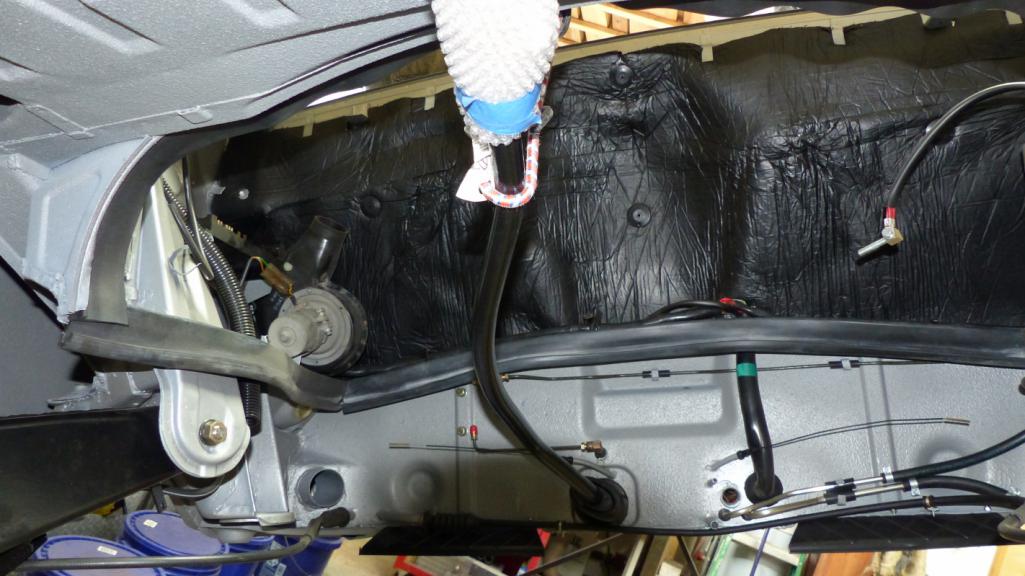 Just the tip. 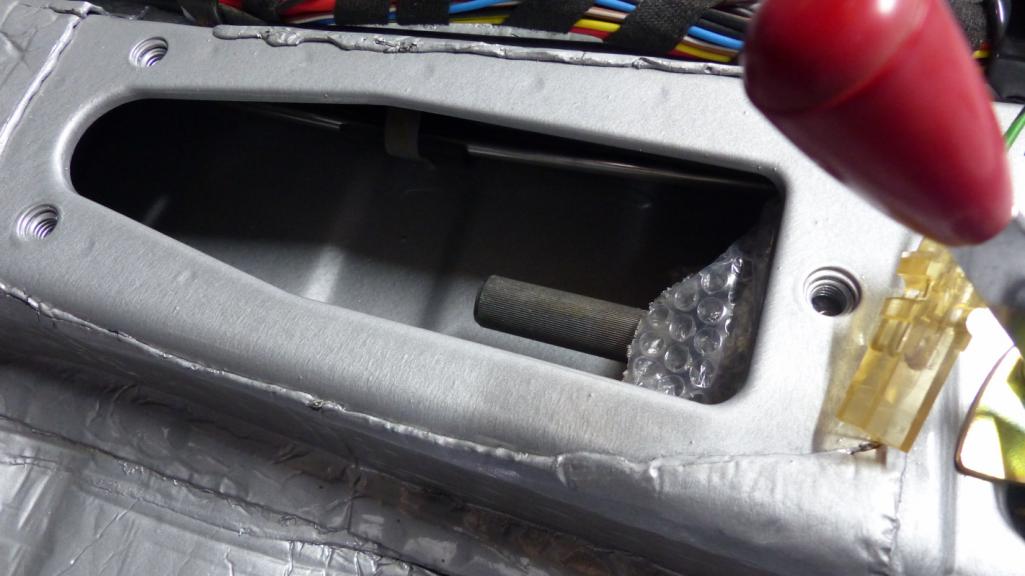 |
|
|
|
| altitude411 |
Mar 18 2019, 12:00 PM
Post
#916
|
|
I drove my 6 into a tree Group: Members Posts: 1,306 Joined: 21-September 14 From: montana Member No.: 17,932 Region Association: Rocky Mountains |
QUOTE(bbrock @ Mar 18 2019, 11:45 AM) One just needed a good scrubbing. The other has scars from the plague de rodentia After scrubbing the easy one, I mounted it up. You can see my reminder that I'm not quite done there. Yesterday was long, hard shaft day (IMG:style_emoticons/default/blush.gif) my shafts were rough and rusty. Now a sleek shiny black. For the other, I first lubed up the bushing and slid the rod slowly in from the rear. The rubber is for protection. A bungee to prevent the rod from dangling down. Just the tip. (IMG:style_emoticons/default/av-943.gif) (IMG:style_emoticons/default/hissyfit.gif) (IMG:style_emoticons/default/lol-2.gif) ....and spring fever has hit its peek here in Montana... (IMG:style_emoticons/default/blink.gif) |
|
|
|
| euro911 |
Mar 18 2019, 01:45 PM
Post
#917
|
|
Retired & living the dream. God help me if I wake up! Group: Members Posts: 8,937 Joined: 2-December 06 From: So.Cal. & No.AZ (USA) Member No.: 7,300 Region Association: Southern California |
QUOTE(76-914 @ Mar 18 2019, 08:54 AM) QUOTE(bbrock @ Mar 18 2019, 06:55 AM) QUOTE(defianty @ Mar 18 2019, 05:58 AM) coming together nicely Brent. Love the 'K' stamp. About that... Yesterday the wife took a rare interest in the car project and for the second time commented that she thought I needed to replace the cracked dash. I explained what they cost and that it wasn't in the budget for now. Then I took her over to show her "something really cool" and showed her the 'K'. She said, and this is a direct quote, "I knew it would be something I don't give a shit about." Women! (IMG:style_emoticons/default/confused24.gif) (IMG:style_emoticons/default/screwy.gif)Reminded me of that old joke: "A young man was walking along one of Southern California's sandy beaches with his surf board. He suddenly spots this bottle which has recently washed up on the beach. It's obvious it's been tossed around for a long time. He picks up the bottle and notices that it still has the cork intact. So, being curious as to what may be inside, he manages to get the cork out and out pops a Genie. After expressing profound appreciation for having been let out of the bottle, the Genie grants his benefactor the classic, "one wish" and it will be yours. Being an avid surfer, it doesn't take him long to say, "I've always wanted to surf Hawaii, but I get seasick on ships and I'm afraid to fly. Would you build me a bridge to Hawaii?" The Genie replies: "Do you know what you are asking for? Do you know how long the bridge would have to be? Think of the enormous challenges for that kind of undertaking. The supports required to reach the bottom of the Pacific! The concrete and steel it would take! It will nearly exhaust several natural resources. And the maintenance of that bridge! No, think of another wish." The man said OK and tried to think of a really good wish. Finally, he said, "I've been married and divorced four times. My wives always said that I don't care and that I'm insensitive. So, I wish that I could understand women ... know how they feel inside and what they're thinking when they give me the silent treatment ... know why they're crying, know what they really want when they say nothing ... know how to make them truly happy ... I really want to understand women and how they think!" After a long sigh, the Genie responds: "Would you like that bridge with two lanes or four?" |
|
|
|
| Dave_Darling |
Mar 18 2019, 02:19 PM
Post
#918
|
|
914 Idiot Group: Members Posts: 15,339 Joined: 9-January 03 From: Silicon Valley / Kailua-Kona Member No.: 121 Region Association: Northern California |
QUOTE(bbrock @ Mar 17 2019, 10:17 PM) The pic of original Porsche bolts looks even a little duller than the plated but not polished bolt. I bought some lugs at the dealer in the 90s, and they looked somewhere between your "plated" and "after Mother's" pictures. The 17mm-head (aftermarket) bolts had a finish more like the dull one in the dealer pic that you posted. I think the current ones are a different specification than the original parts. --DD |
|
|
|
| bbrock |
Mar 18 2019, 03:35 PM
Post
#919
|
|
914 Guru Group: Members Posts: 5,269 Joined: 17-February 17 From: Montana Member No.: 20,845 Region Association: Rocky Mountains |
QUOTE(Dave_Darling @ Mar 18 2019, 02:19 PM) QUOTE(bbrock @ Mar 17 2019, 10:17 PM) The pic of original Porsche bolts looks even a little duller than the plated but not polished bolt. I bought some lugs at the dealer in the 90s, and they looked somewhere between your "plated" and "after Mother's" pictures. The 17mm-head (aftermarket) bolts had a finish more like the dull one in the dealer pic that you posted. I think the current ones are a different specification than the original parts. --DD Wonderful! (IMG:style_emoticons/default/cheer.gif) So zinc and then just a little polish to add sort of a satiny sheen it sounds. That's what I was thinking would look the best anyway. The one I polished with Mother's is way too shiny for my taste. |
|
|
|
| bbrock |
Mar 19 2019, 10:49 AM
Post
#920
|
|
914 Guru Group: Members Posts: 5,269 Joined: 17-February 17 From: Montana Member No.: 20,845 Region Association: Rocky Mountains |
Last night I tackled this literal rat's nest (well... mouse nest anyway).
(IMG:http://www.914world.com/bbs2/uploads/post-20845-1552930156_thumb.jpg) I was able to completely replace three of the chewed wires so only the red wire that runs to the relay plug had to be spliced. I had to be a little careful because two of the wires have to be soldered to diodes, and the one that runs into the motor housing solders to the brush housing. Came out pretty good I think. 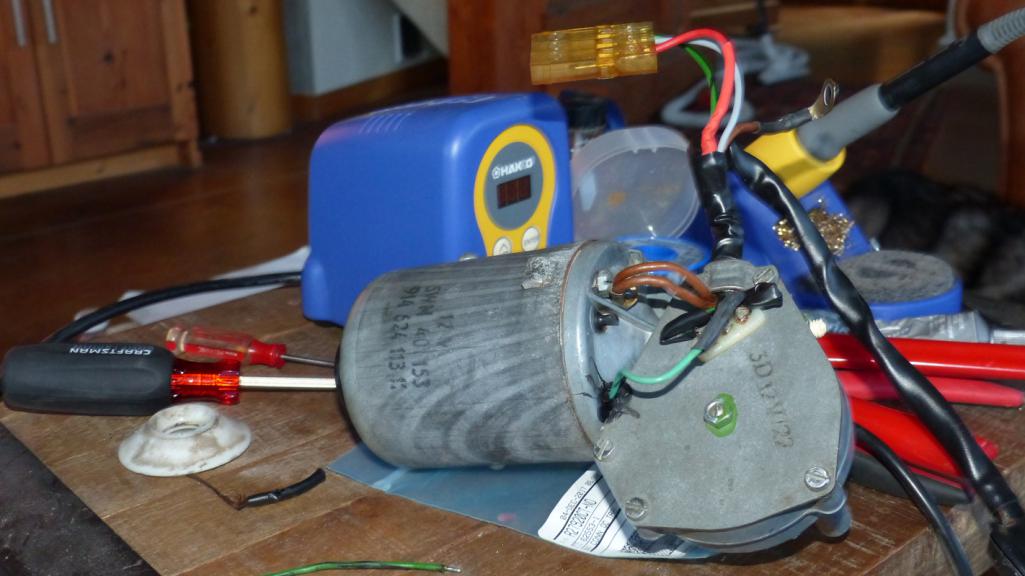 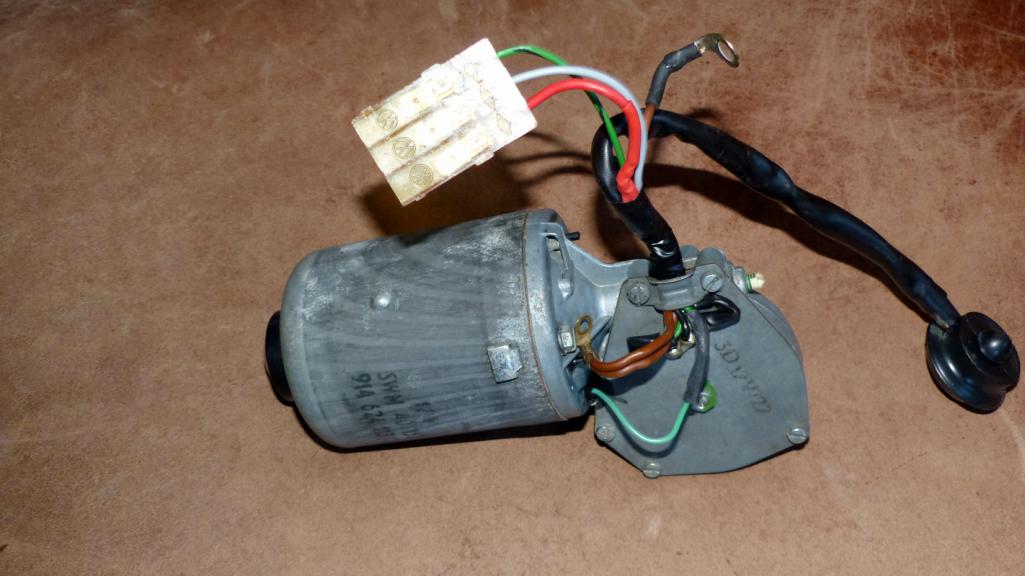 This morning I bolted it (finger tight) onto the car. Nice to see both motors back in place. 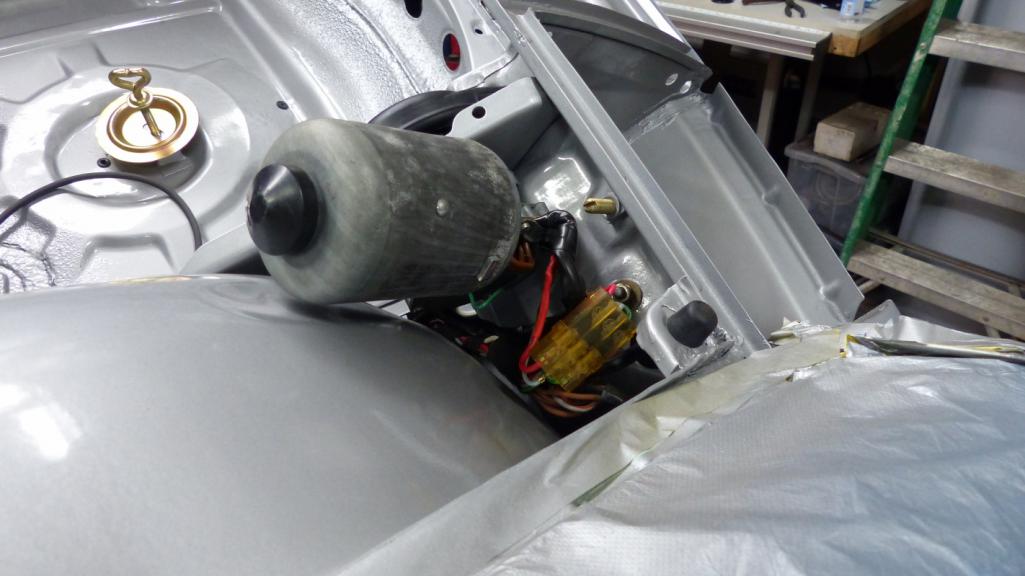 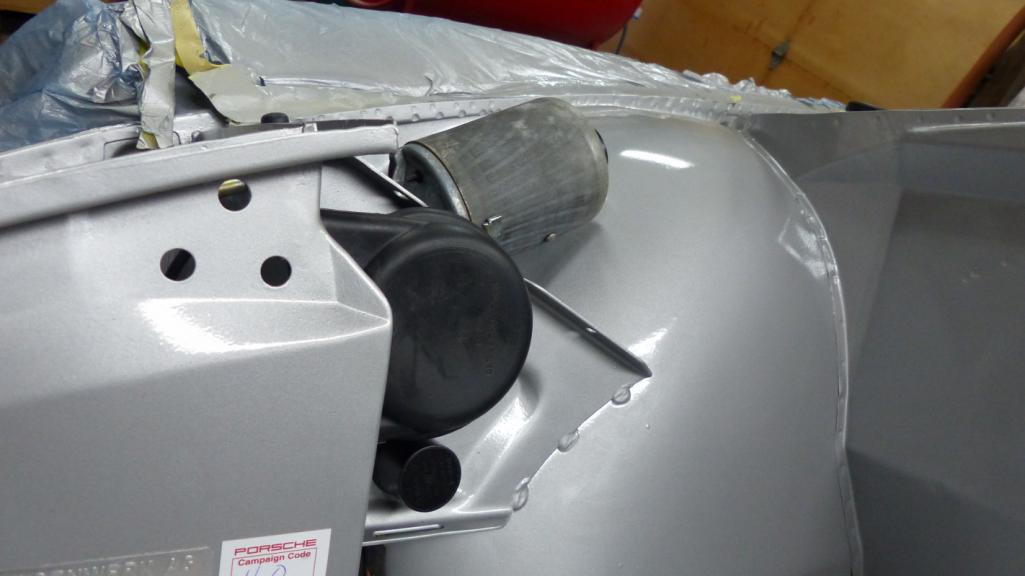 Okay, it's time to talk about the elephant in the room. I'm quite embarrassed by what I posted yesterday. I'm talking, of course, about this pic of a headlight motor mounted int he car with a pee-tarnished housing clamp and screw. Shameful! (IMG:style_emoticons/default/sad2.gif) 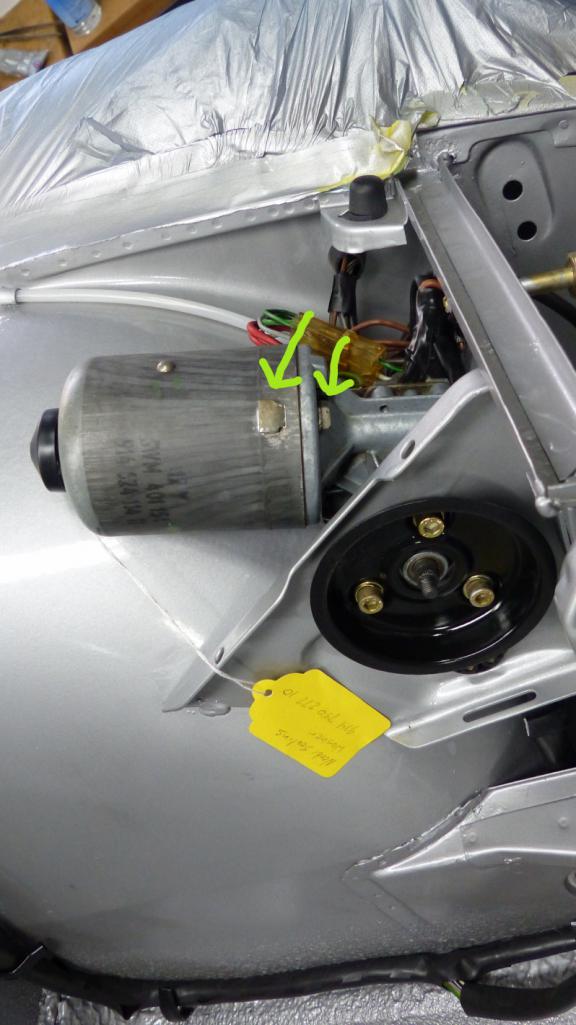 This morning I fired up the Zinc-O-Matic machine and fixed this for both motors. This is much better. (IMG:style_emoticons/default/shades.gif) 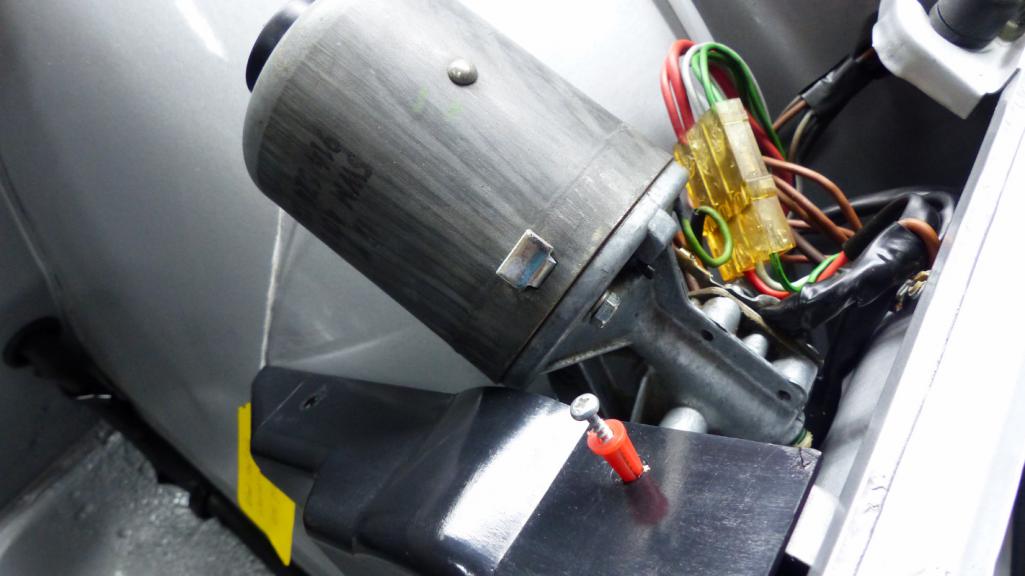 My apologies if that disturbed anyone. |
|
|
|
|
2 User(s) are reading this topic (2 Guests and 0 Anonymous Users)
0 Members:

|
Lo-Fi Version | Time is now: 12th May 2026 - 05:01 PM |
Invision Power Board
v9.1.4 © 2026 IPS, Inc.