|
|
|
Porsche, and the Porsche crest are registered trademarks of Dr. Ing. h.c. F. Porsche AG.
This site is not affiliated with Porsche in any way. Its only purpose is to provide an online forum for car enthusiasts. All other trademarks are property of their respective owners. |
|
|

  |

| BPic |
 Mar 30 2019, 04:11 PM Mar 30 2019, 04:11 PM
Post
#961
|
|
Member  Group: Members Posts: 343 Joined: 5-February 18 From: Miami, Florida Member No.: 21,864 Region Association: South East States |
Looks awesome Brent. Your detail is remarkable. Like Tygaboy said about documentation, I have been following this build religiously and get a lot of info from it. Your ahead of me in your build and is fantastic because I have you doing exactly what I’ll be doing soon. Thank you for the great documentation. (IMG:style_emoticons/default/beerchug.gif)
|
   |

 
|
| bbrock |
Mar 30 2019, 05:16 PM
Post
#962
|
|
914 Guru Group: Members Posts: 5,269 Joined: 17-February 17 From: Montana Member No.: 20,845 Region Association: Rocky Mountains |
QUOTE(BPic @ Mar 30 2019, 04:11 PM)  Looks awesome Brent. Your detail is remarkable. Like Tygaboy said about documentation, I have been following this build religiously and get a lot of info from it. Your ahead of me in your build and is fantastic because I have you doing exactly what I’ll be doing soon. Thank you for the great documentation. (IMG:style_emoticons/default/beerchug.gif) Well, if anything, it is a good tutorial on what NOT to do (IMG:style_emoticons/default/lol-2.gif) Maybe that's why you do the same things only better. I have thought a lot about how much great information is buried in these build threads but can be hard to find unless you happen to be following along a step or two behind. I've done the same thing with other great builds. Lesson for do day is DON'T trust a cheapass Chinese pipe fitting!! Maybe more on that later after my blood pressure comes back down. (IMG:style_emoticons/default/beerchug.gif) |
|
|
|
| bbrock |
Apr 2 2019, 12:02 PM
Post
#963
|
|
914 Guru Group: Members Posts: 5,269 Joined: 17-February 17 From: Montana Member No.: 20,845 Region Association: Rocky Mountains |
I'll try to catch up on a couple tasks done over the weekend, but the big news is that my car is now insured for the first time in over 30 years. I've been meaning to do this ever since spraying color on the interior last fall, but kept putting it off. Got a comprehensive only policy from Hagerty for quite reasonable I think. I'm covered if I trip and knock over a can of paint thinner into a pile of dirty rags and make a spark when the steel plate in my head hits the concrete floor.
 |
|
|
|
| altitude411 |
Apr 2 2019, 01:52 PM
Post
#964
|
|
I drove my 6 into a tree Group: Members Posts: 1,306 Joined: 21-September 14 From: montana Member No.: 17,932 Region Association: Rocky Mountains |
QUOTE(bbrock @ Apr 2 2019, 12:02 PM) I'm covered if I trip and knock over a can of paint thinner into a pile of dirty rags and make a spark when the steel plate in my head hits the concrete floor. (IMG:style_emoticons/default/huh.gif) It's all now starting to make perfect sense... |
|
|
|
| mepstein |
Apr 2 2019, 02:01 PM
Post
#965
|
|
914-6 GT in waiting Group: Members Posts: 20,685 Joined: 19-September 09 From: Landenberg, PA/Wilmington, DE Member No.: 10,825 Region Association: MidAtlantic Region |
Good move. Things happen in people's garages all the time. It's just stuff but for what it cost to insure, it's worth it.
|
|
|
|
| bbrock |
Apr 4 2019, 12:33 PM
Post
#966
|
|
914 Guru Group: Members Posts: 5,269 Joined: 17-February 17 From: Montana Member No.: 20,845 Region Association: Rocky Mountains |
I've been busy but nothing too exciting to report. I'll get us caught up anyway.
Last Saturday was wheel day. I wound up have to graduate to Simple Green and #0000 steel wool for the initial scrub to get 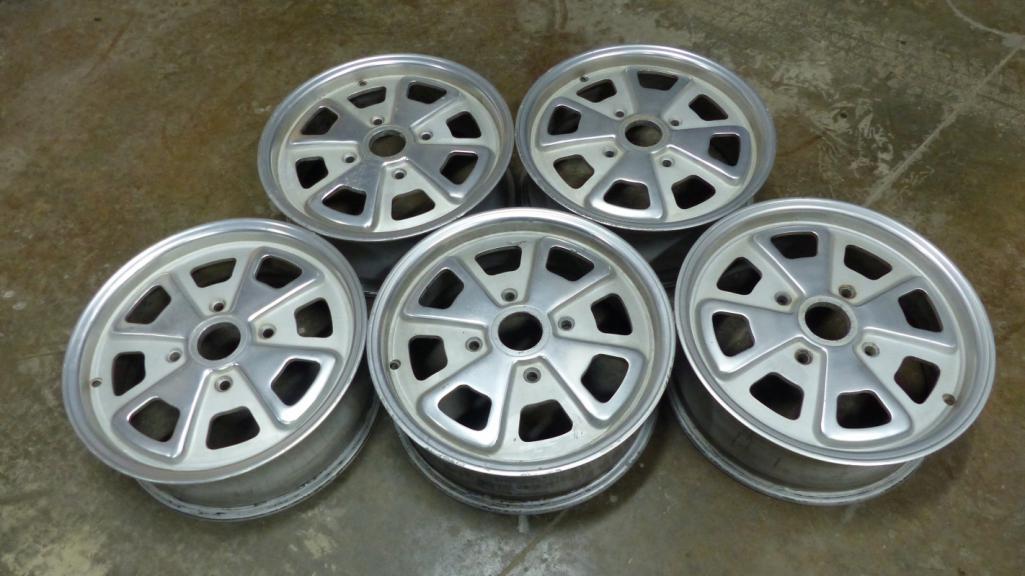 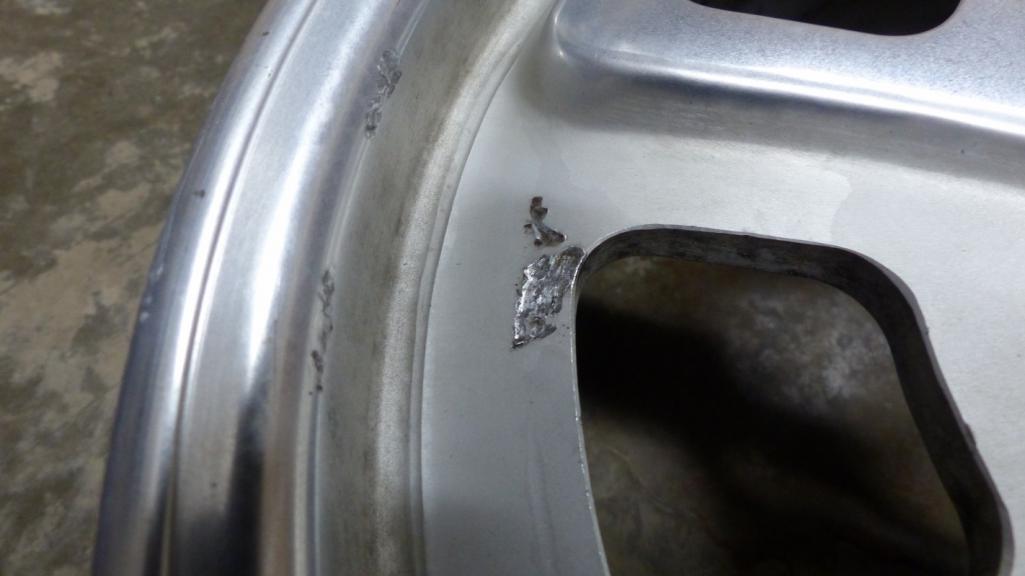  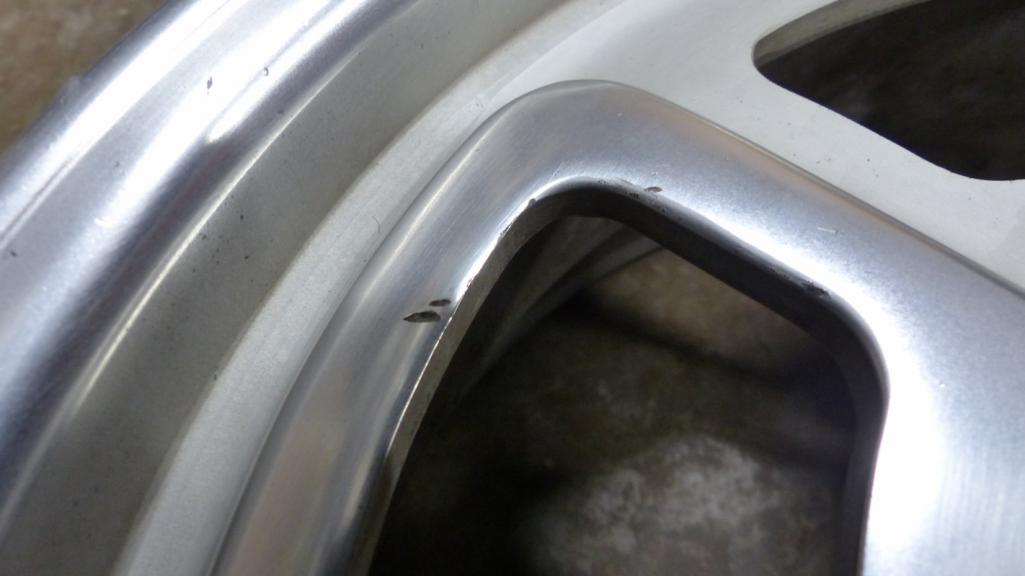 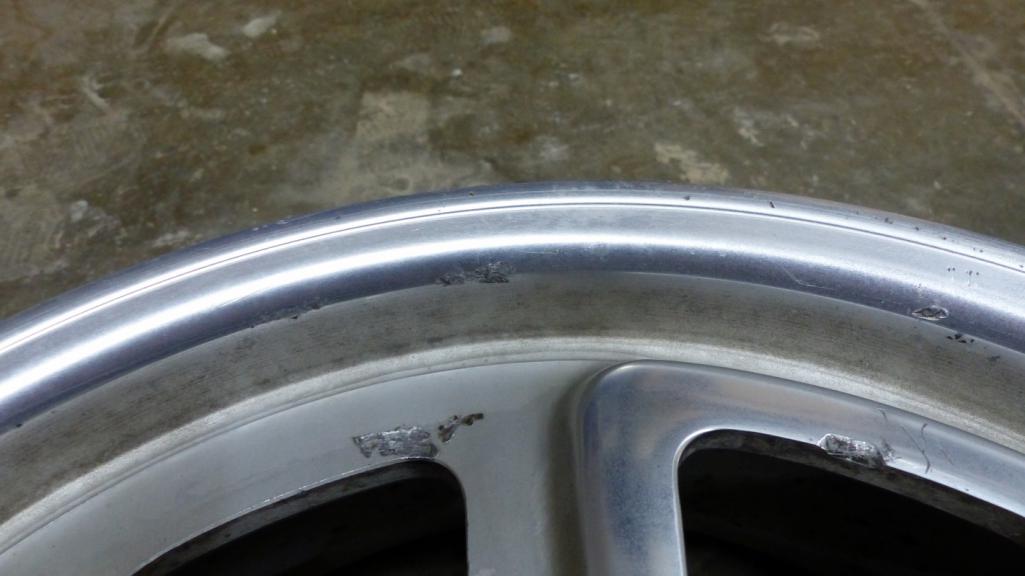 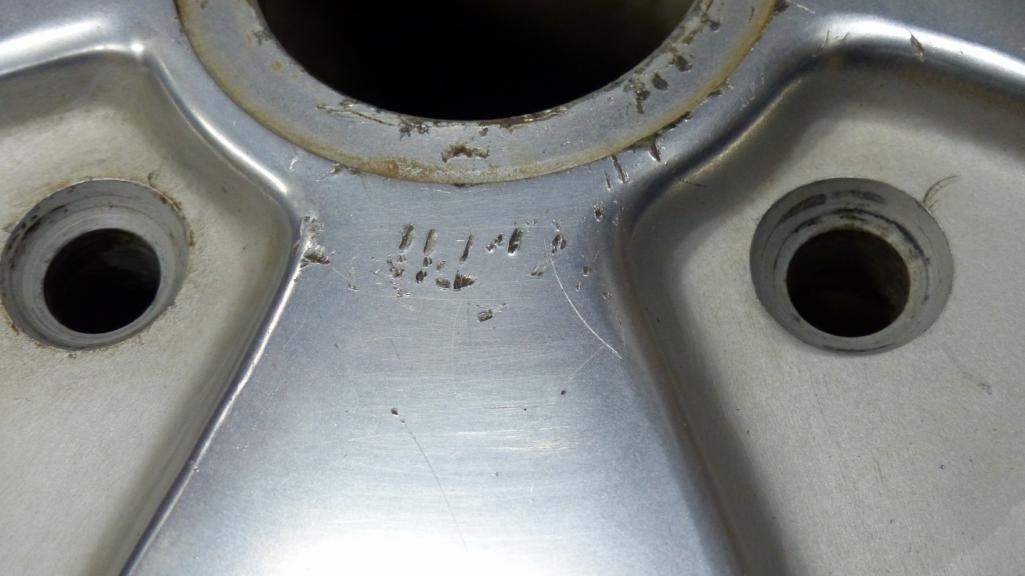 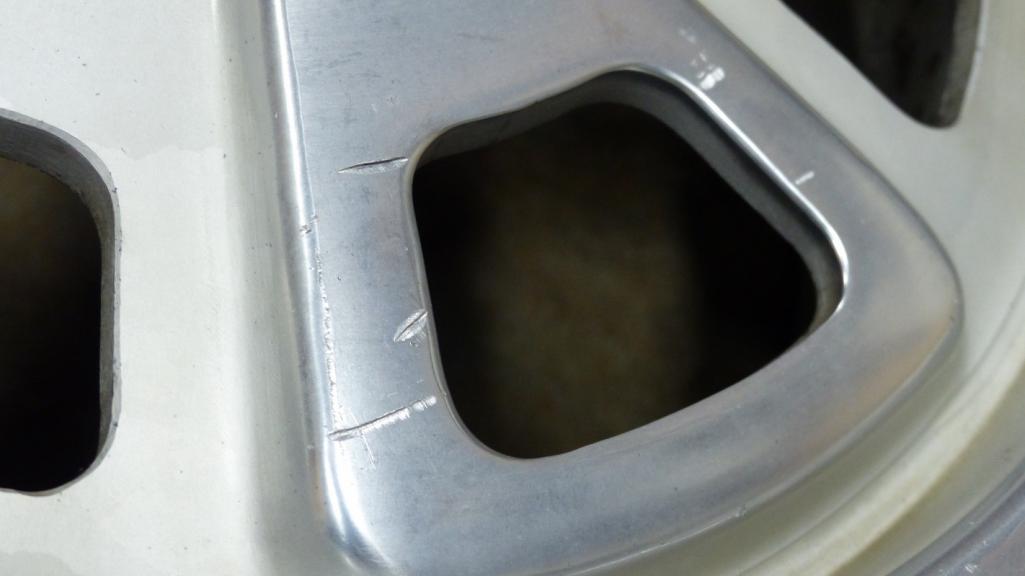 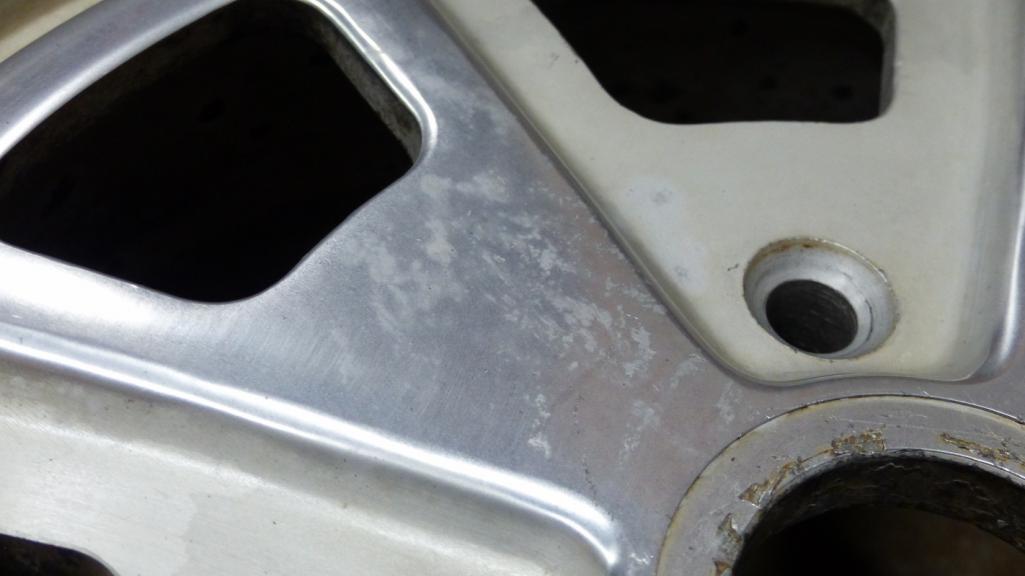 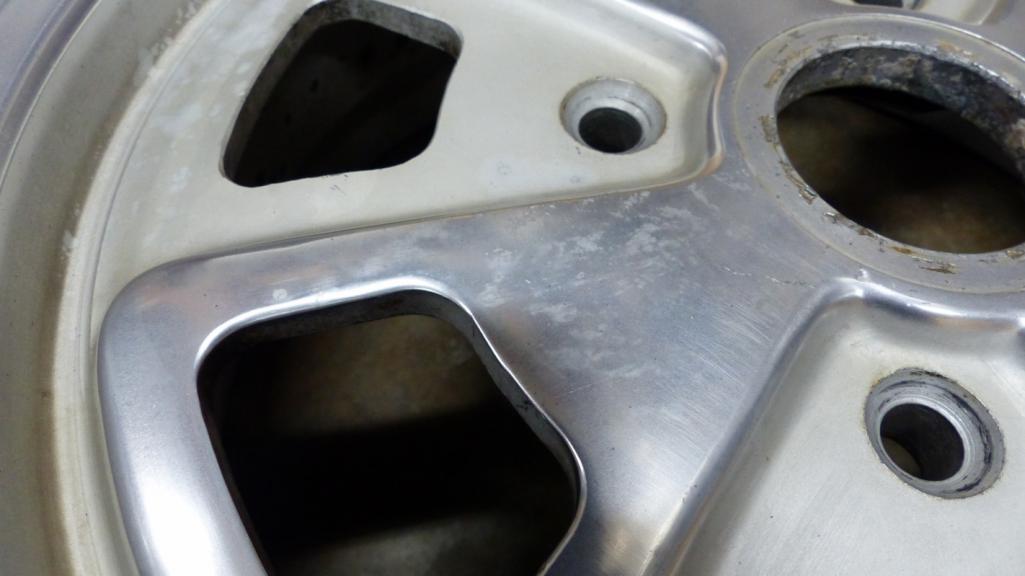 |
|
|
|
| bbrock |
Apr 4 2019, 01:13 PM
Post
#967
|
|
914 Guru Group: Members Posts: 5,269 Joined: 17-February 17 From: Montana Member No.: 20,845 Region Association: Rocky Mountains |
Now for a little restoration, but if you are expecting an inspirational post of how I miraculously brought these back to former glory, you won't find it here. This is way beyond my rudimentary skill. If I had access to a good anodizing service nearby, I would have considered stripping the anodizing and attacking some of these issues a bit more aggressively. I think with the coating gone, I could do a decent job of removing 75% of the damage, but would need to get them recoated. And after months of searching, I just within the last hour, found an anodizer not 30 miles away. It's too late though and for the best. Eventually, I'll send these off to one of the top guys for proper restoration. For now, I decided to put just enough lipstick on the pig to make her dateable.
Okay, the curb rash was what you noticed at a distance, so just getting rid of that made a huge difference and was pretty easy. Some was pretty bad so I started with 80g sandpaper on a random orbit palm sander and took the scratches out. It flattened out the outer rim profile a little but unless you know what the original was, you'd never know. Other than a nick in the rim that needs to be welded and reground, and a couple deep scratches that would require sanding deeper than they were worth, the rash was eliminated. I worked through the grades up to 320grit with the palm sander. Then I switched to wet sanding and worked up to 2000g. By the time I got there, the sheen on the rim was a dead match for the original so I stopped. I failed to take a good pic of the result, but you can see it in some later shots. For the other damage, I decided to only address the two worst gouges and save the rest for later. (IMG:http://www.914world.com/bbs2/uploads/post-20845-1554402454_thumb.jpg) (IMG:http://www.914world.com/bbs2/uploads/post-20845-1554402496_thumb.jpg) I just buffed those out with a coarse conditioning disc on a 2" grinder. 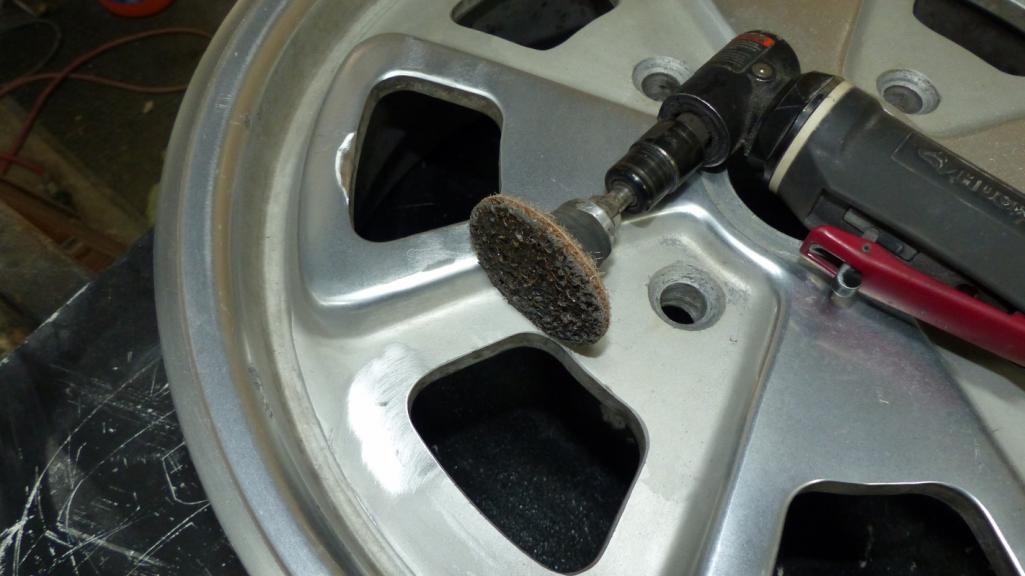 Then I masked all the shiny stuff and spot blasted the buffed areas with glass bead to try to match the surrounding finish as best I could. And yes, that's what a nice spring day at our house looks like. 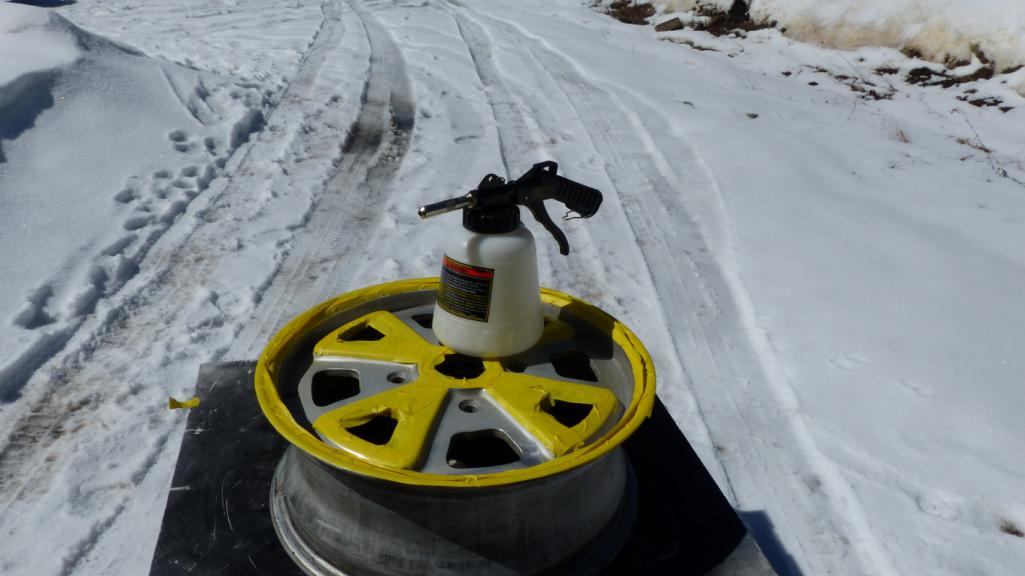 Man am I impressed with the hardness of that anodizing! Glass just bounces off it without leaving a mark. That's good from a protection standpoint, but also prevented me from feathering out the blasting to try to blend my repair into the surrounding finish. It's not great, but an improvement I think. This wheel will be the spare. These pics also show the result of the curb rash repair. Also note that I just eased the edges of that missing chunk by the opening with the conditioning disc. It needs more polishing, but it's a little less noticeable. On the blasted areas, I might experiment with some clear wheel paint to see if that helps blend the edges a little. They'll never be showroom quality until proper resto though. 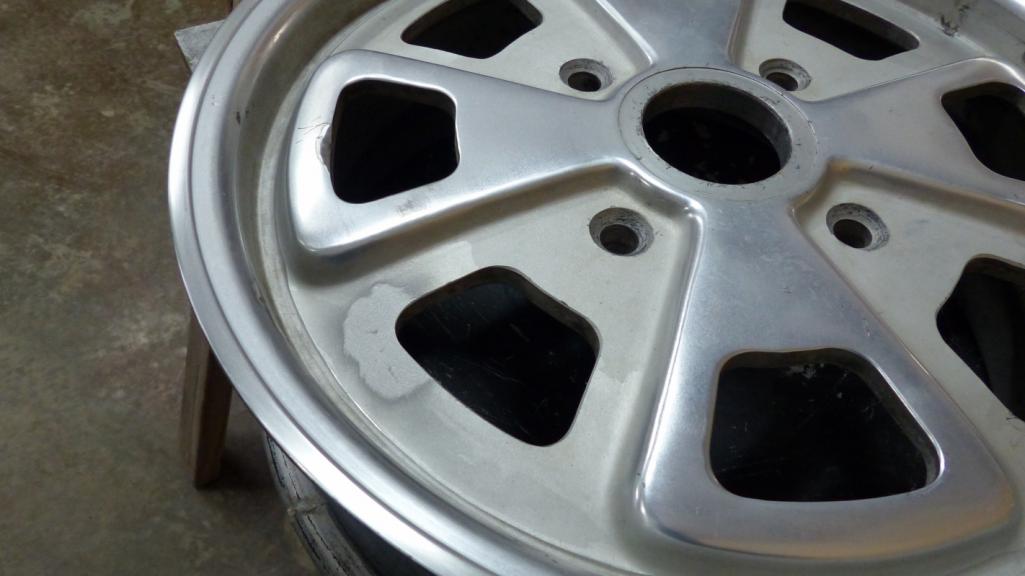 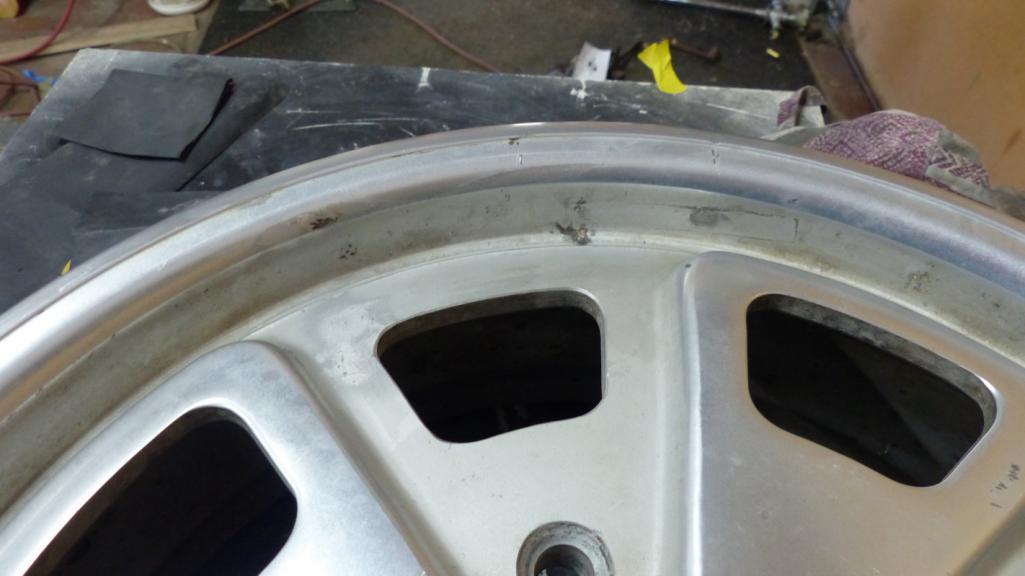 The final thing for Saturday was to give all the rims an additional cleaning. First I had a little repair to make. This is what happens when the plumbers don't slope a frost-free hose bib correctly and you run out of propane in minus 26 weather.  After only 30 minutes, I had the replacement installed with proper slope. I knew something was amiss though because the entire task was accomplished without a single curse word. That's when I noticed the cheap-ass Chinese POS PEX adapter that came with the bib had already split. THAT's when the cussing started and boy was it a hum-dinger of a fit! Glad I noticed the split then though. That could have been really bad, but there is no way that shitty fitting is designed to handle household water pressure. Anyway, with outside water restored, it was on to wheel cleaning. I tried Chemical Guys wheel cleaner but it wasn't up to the task. I think it would be good for maintaining regularly cleaned wheels, but not up to the task here. I'm going to try some Jay Leno's Garage cleaner as reviews say it it good at pulling out iron stains. No pics, just reporting the result of that. I had accomplished my main objective of prepping the wheels for tires. Any additional cleaning and repair can be done with tires on now that the curb rash is gone. |
|
|
|
| bbrock |
Apr 4 2019, 01:17 PM
Post
#968
|
|
914 Guru Group: Members Posts: 5,269 Joined: 17-February 17 From: Montana Member No.: 20,845 Region Association: Rocky Mountains |
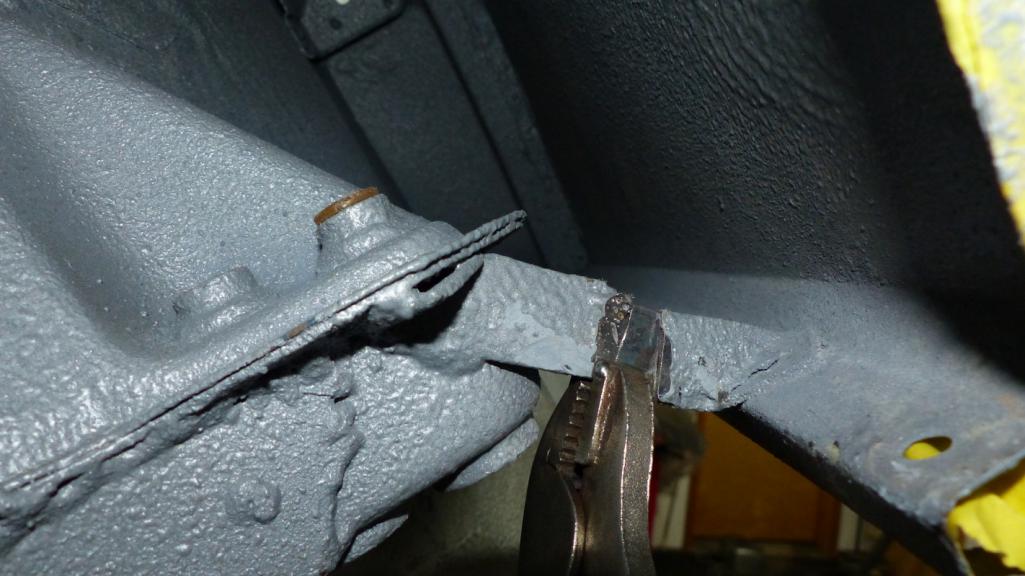
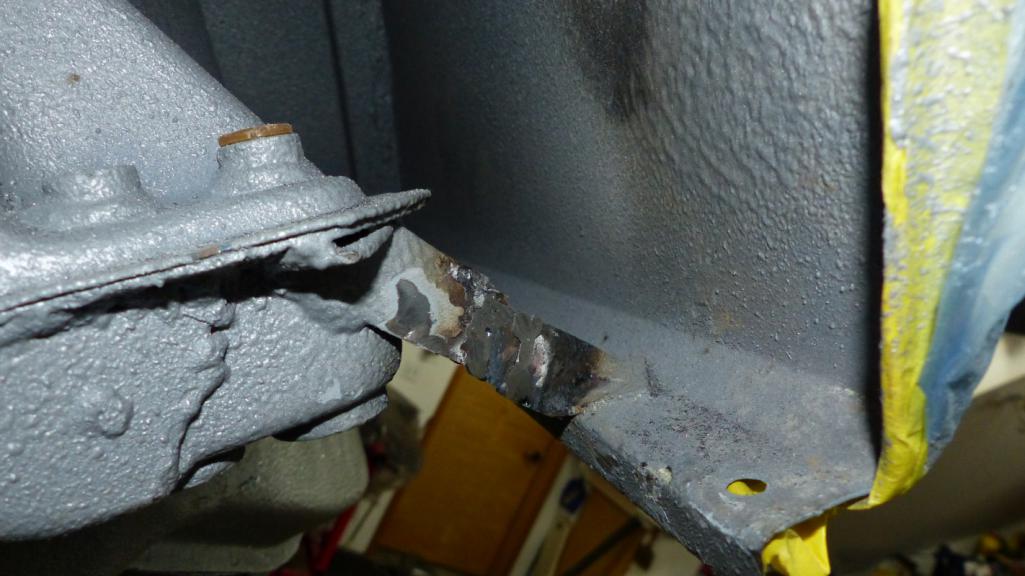
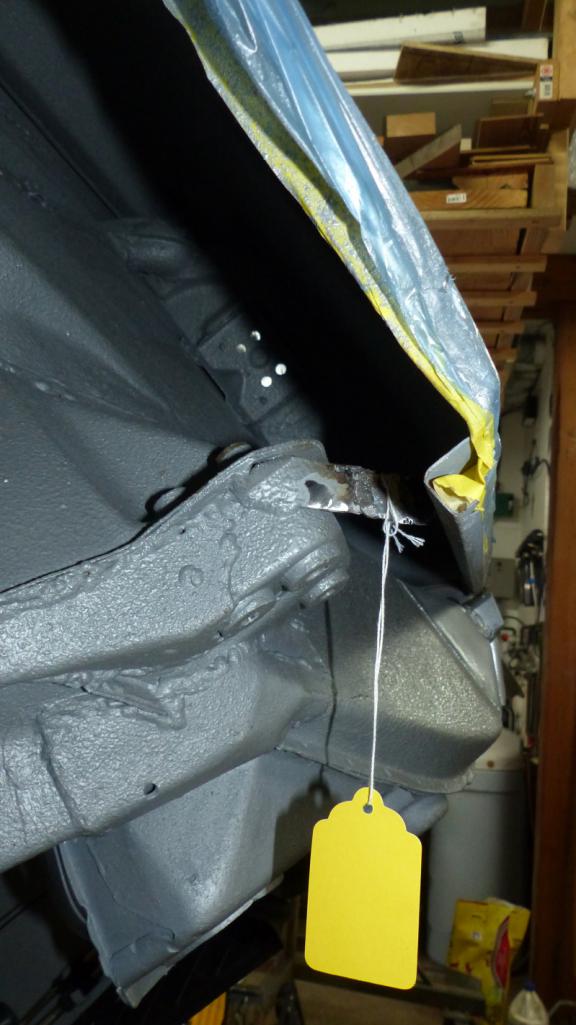
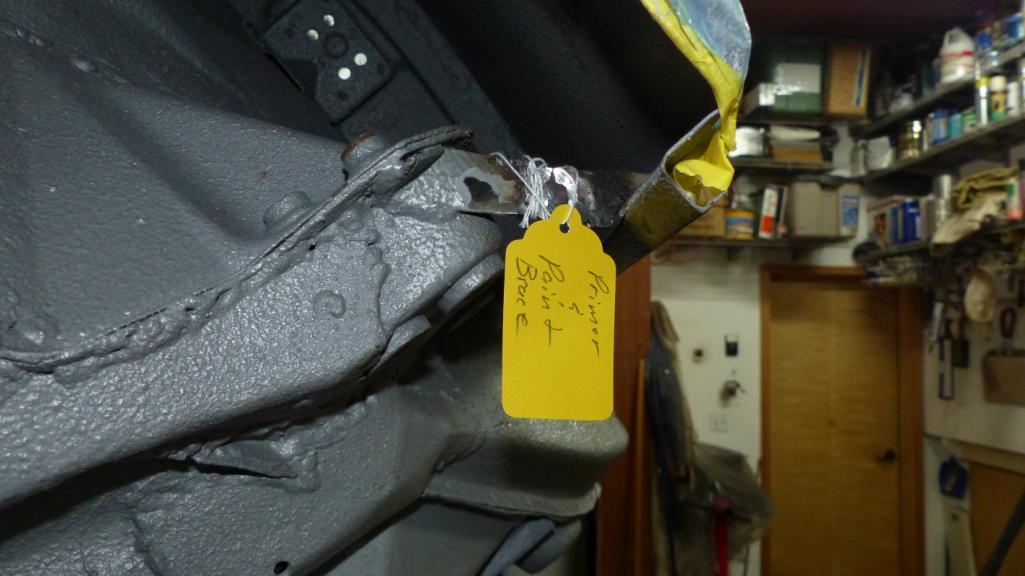
Sunday I knocked off a little task I had been dreading. Remember that rear quarter brace I had to cut to install the trailing arm? I fixed that. I really limited my grinding in there to avoid really F'ing something up. That meant I got some contamination in the weld which I don't care about, and I didn't grind the weld completely off which I also don't care about.
    |
|
|
|
| bbrock |
Apr 4 2019, 01:25 PM
Post
#969
|
|
914 Guru Group: Members Posts: 5,269 Joined: 17-February 17 From: Montana Member No.: 20,845 Region Association: Rocky Mountains |
Last one. Yesterday I got a few goodies via Mr. Shea.
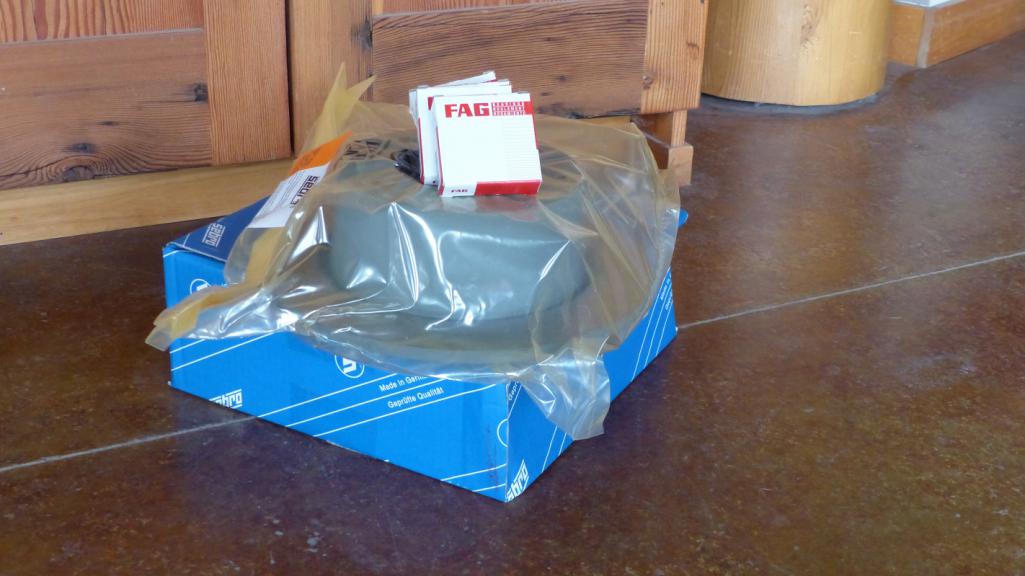 I finally got to use this wheel bearing driver set I bought on sale for a different project but never used. Ironically, the large HF "Front Wheel Bearing Set" I have works great for the rear bearings but doesn't have the right sizes for the front.  Anyway, Less than an hour to drive out the old front bearing races and drive in the new, pack with the fancy red grease, and install. 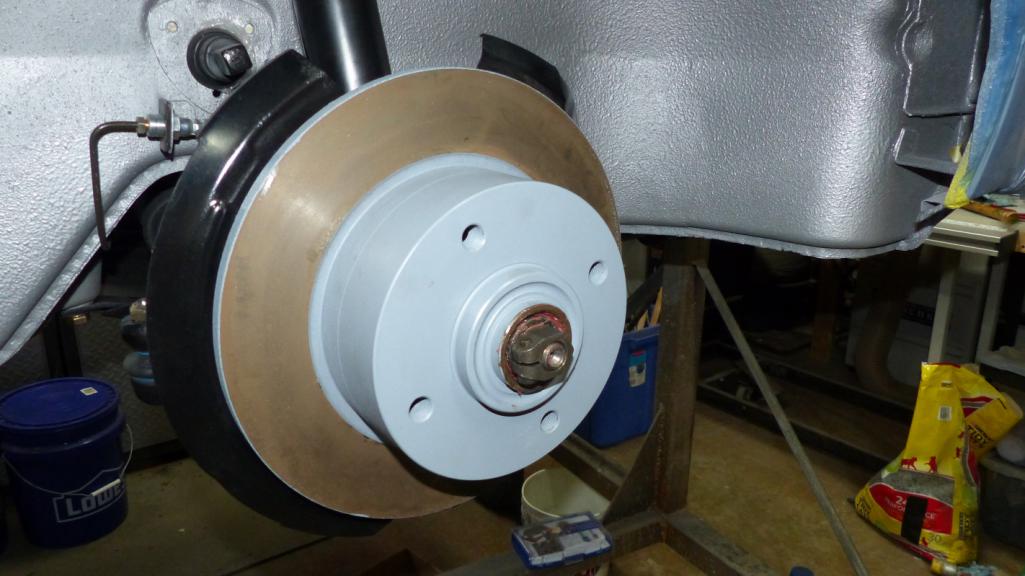 Let's get the cap on to see how it looks. 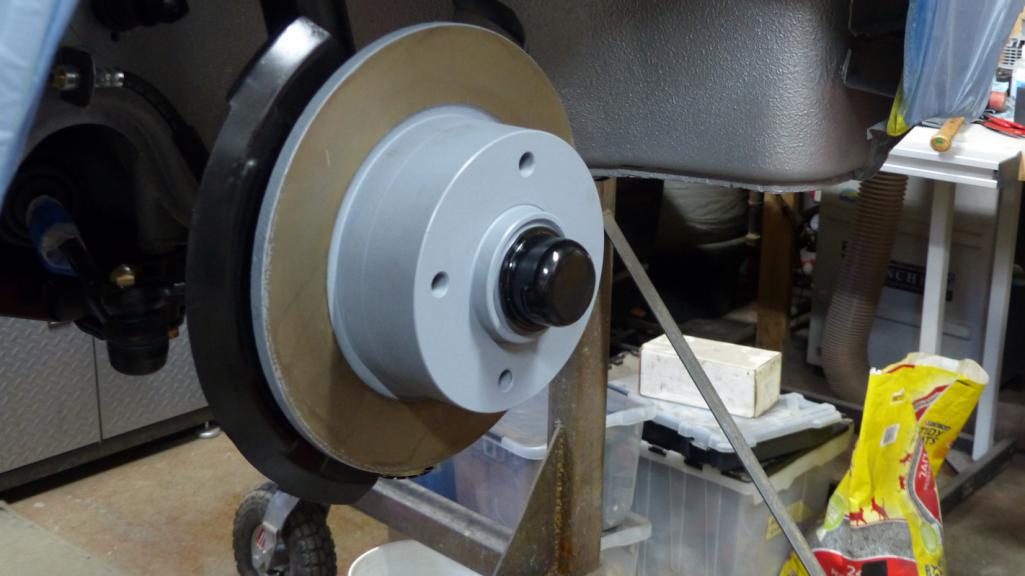 And how about those nice, new rear rotors? (IMG:style_emoticons/default/piratenanner.gif) 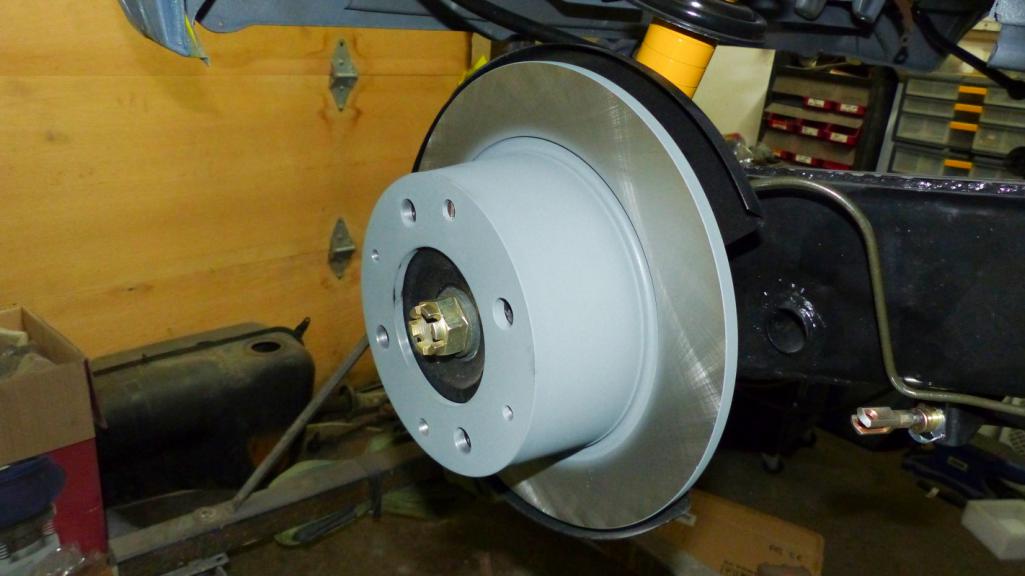 Tomorrow is a big day for the car... (IMG:style_emoticons/default/popcorn[1].gif) |
|
|
|
| bbrock |
Apr 5 2019, 08:08 PM
Post
#970
|
|
914 Guru Group: Members Posts: 5,269 Joined: 17-February 17 From: Montana Member No.: 20,845 Region Association: Rocky Mountains |
Safe Sex
So this happened today. 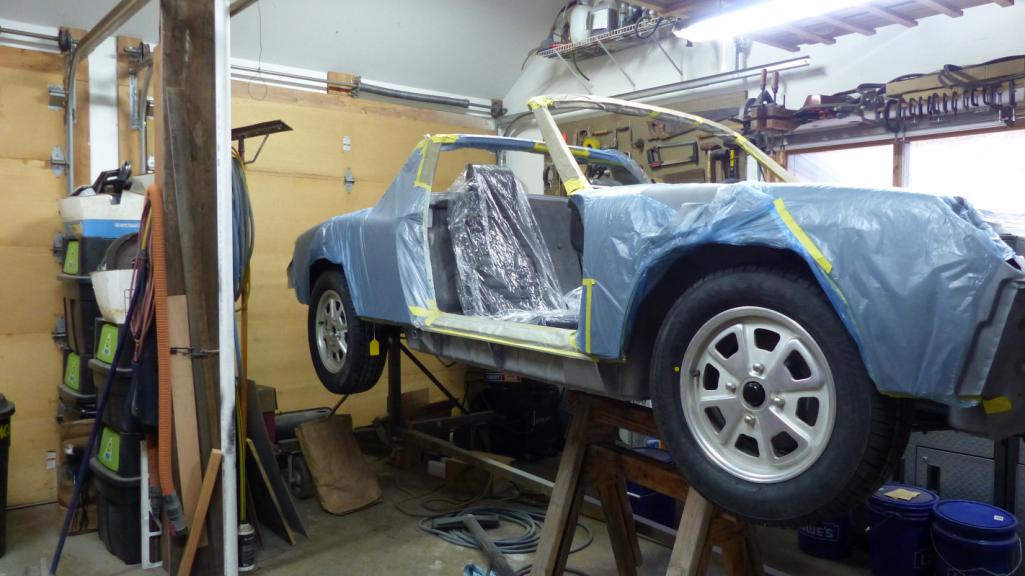 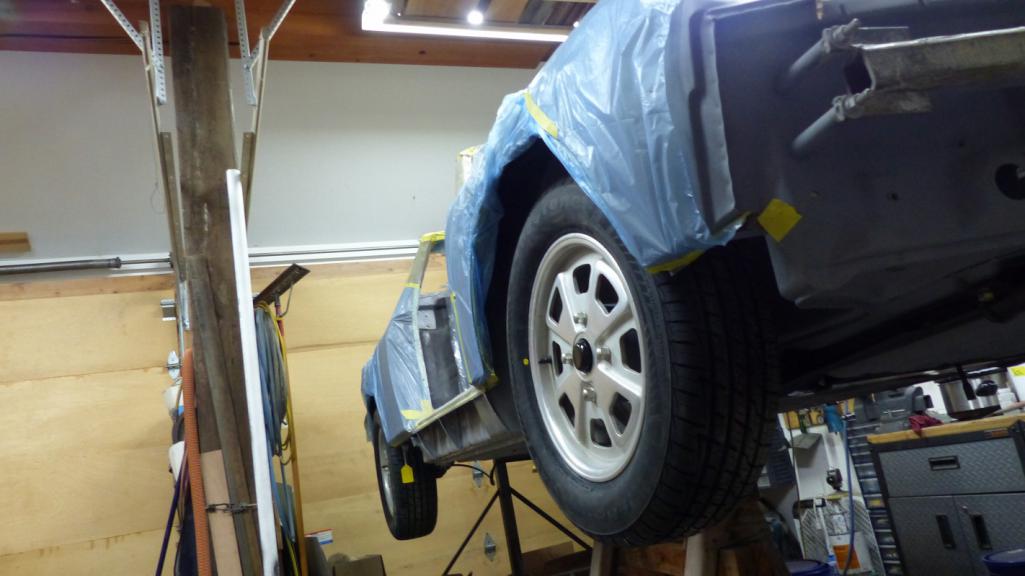 These are 195/65R15 Firehawk AS. To be honest, I would have prefered a 185 tire but I couldn't find any all season tires available. Summer tires where I live wouldn't make much sense. Similar poor selection in 165 and I always thought those were just a tad too skinny anyway. I like the way they look on the car. Hopefully they won't rub. I already have a significant regret though. 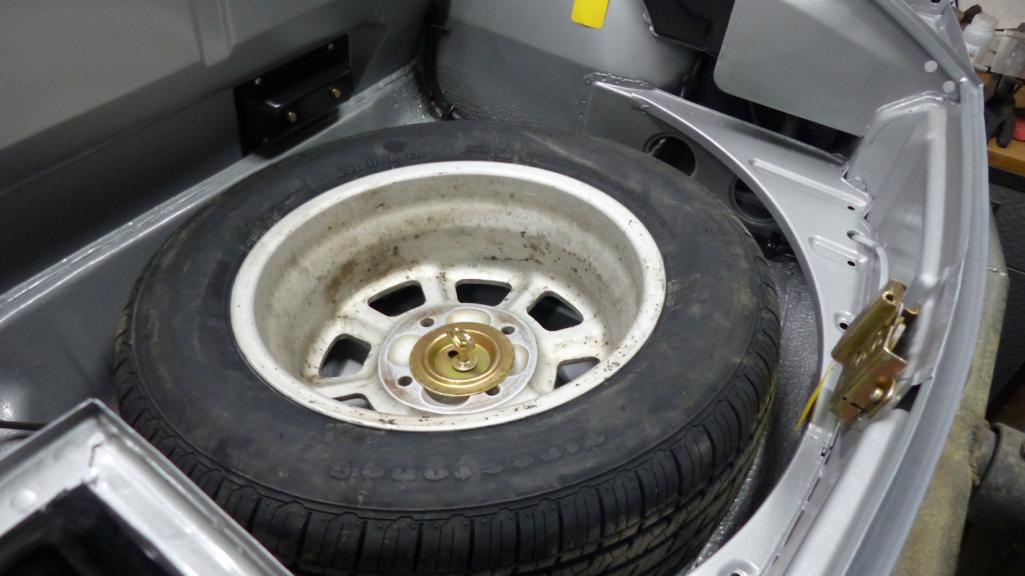 I bought 5 tires and now which I hadn't. It's a little hard to see in the above pic, but these tires are way too fat for the spare tire area. I grabbed the trunk board to test. 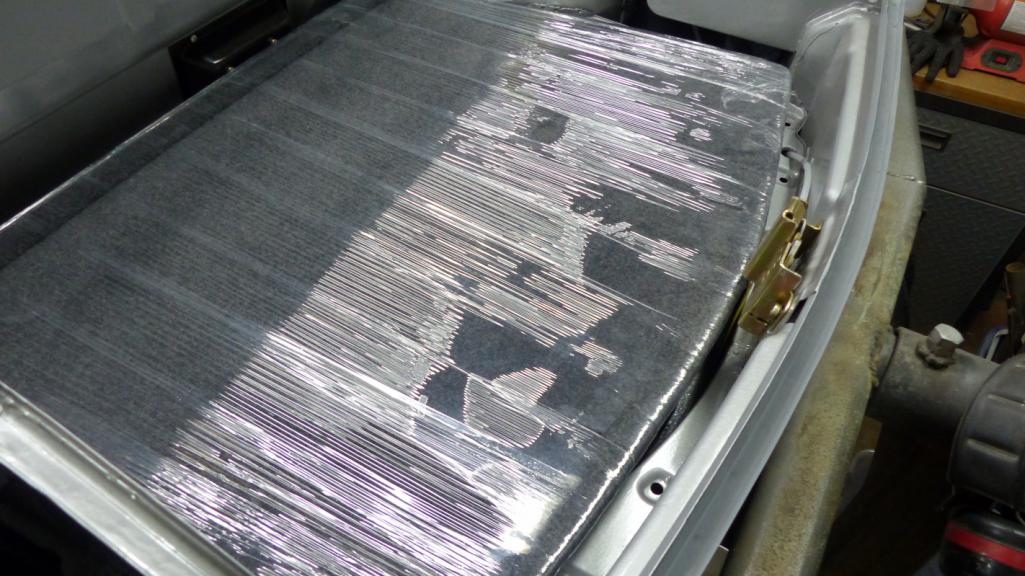 The tire pushes the board up about six inches. That's about 2.25 cubic feet of lost cargo space and a front trunk compartment that looks like ass. I've never tried to return a tire. I wonder what the policy is. I'd rather have a skinny dedicated spare than this. I received these yesterday. They should stop these tires when the need arises. 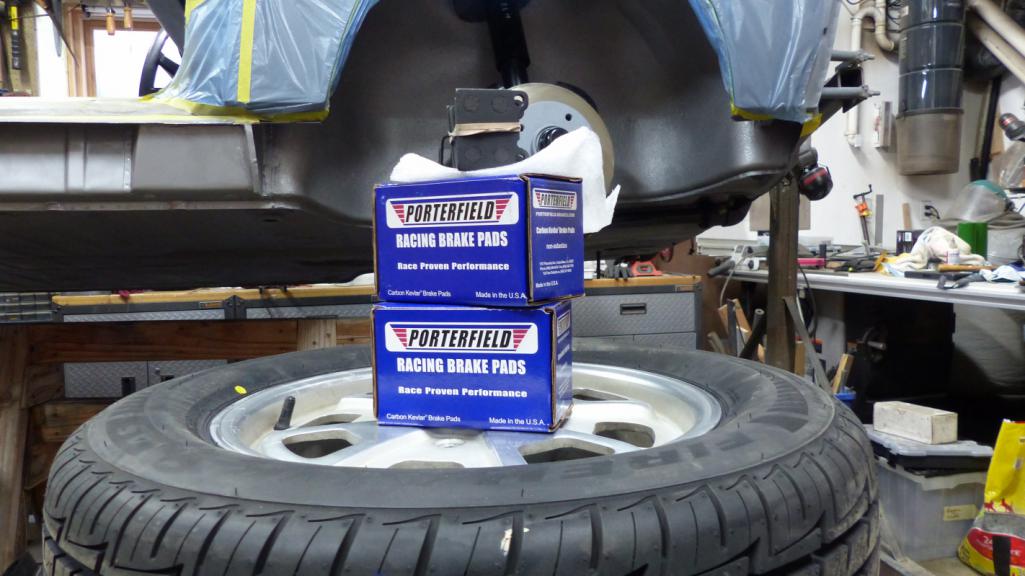 Finally, I found a very simple way to make my wheels look like new. Keep 'em spinning. (IMG:style_emoticons/default/aktion035.gif) 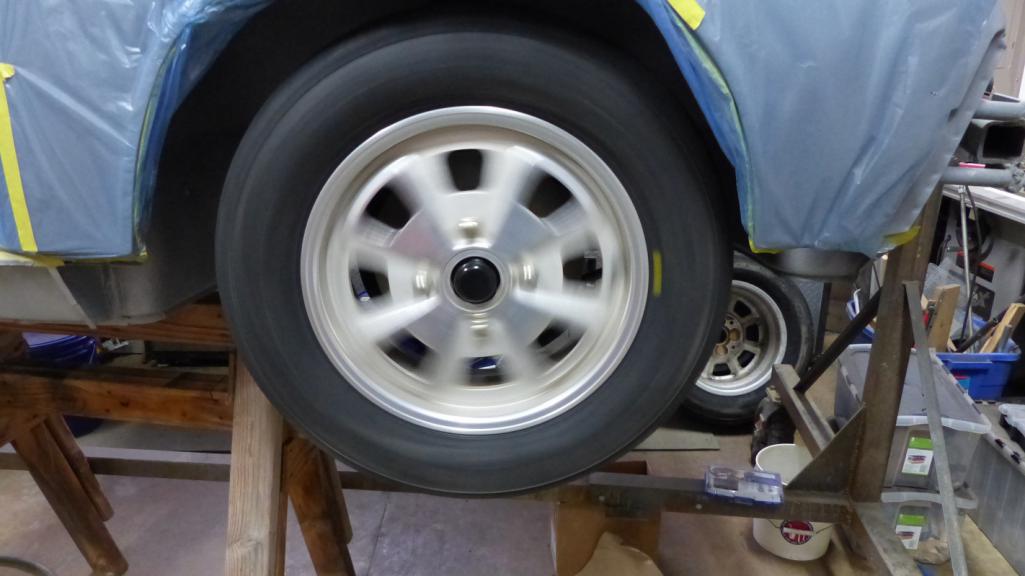 |
|
|
|
| jim911E |
Apr 5 2019, 08:48 PM
Post
#971
|
|
Newbie Group: Members Posts: 2 Joined: 13-December 18 From: modesto ca Member No.: 22,721 Region Association: Northern California |
great work man i have enjoyed reading your blog...won't be long now and you will be back on the road again... enjoy.....jim
 |
|
|
|
| 914_7T3 |
Apr 5 2019, 11:20 PM
Post
#972
|
|
Please forgive me, I'm new to all of this! Group: Members Posts: 1,898 Joined: 3-April 17 From: Los Angeles, CA Member No.: 20,991 Region Association: Southern California |
QUOTE(bbrock @ Apr 5 2019, 07:08 PM) Safe Sex So this happened today. These are 195/65R15 Firehawk AS. To be honest, I would have prefered a 185 tire but I couldn't find any all season tires available. Summer tires where I live wouldn't make much sense. Similar poor selection in 165 and I always thought those were just a tad too skinny anyway. I like the way they look on the car. Hopefully they won't rub. I already have a significant regret though. I bought 5 tires and now which I hadn't. It's a little hard to see in the above pic, but these tires are way too fat for the spare tire area. I grabbed the trunk board to test. The tire pushes the board up about six inches. That's about 2.25 cubic feet of lost cargo space and a front trunk compartment that looks like ass. I've never tried to return a tire. I wonder what the policy is. I'd rather have a skinny dedicated spare than this. I received these yesterday. They should stop these tires when the need arises. Finally, I found a very simple way to make my wheels look like new. Keep 'em spinning. (IMG:style_emoticons/default/aktion035.gif) I made the same mistake once I mounted the 195 for the spare. Ended up dismounting the tire to keep in the garage as a replacement and bought a 165 Michelin XZX with vintage tread pattern from Lucas Tire to live in the frunk. Gives me an "Originalist" warm and fuzzy feeling! (IMG:style_emoticons/default/smile.gif) 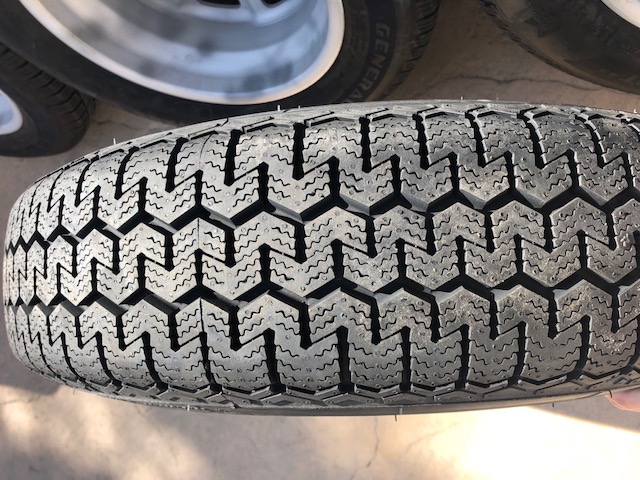 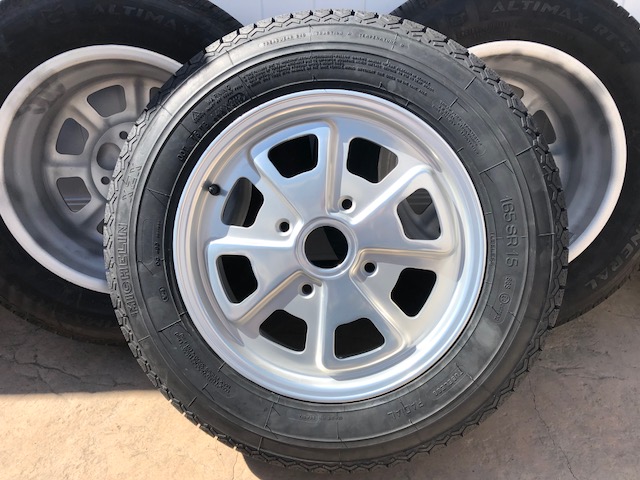 |
|
|
|
| raynekat |
Apr 6 2019, 12:33 AM
Post
#973
|
|
Advanced Member Group: Members Posts: 2,171 Joined: 30-December 14 From: Coeur d'Alene, Idaho Member No.: 18,263 Region Association: Pacific Northwest |
I've got a 185/70VR15 tire for a spare on my car, and it fits like a champ. Sorry to hear you've lost so much luggage space. Less room for kegs or moose I guess....
|
|
|
|
| bbrock |
Apr 6 2019, 08:06 AM
Post
#974
|
|
914 Guru Group: Members Posts: 5,269 Joined: 17-February 17 From: Montana Member No.: 20,845 Region Association: Rocky Mountains |
Good to know that a 185 will fit. I looked at that Michelin and like it. Funny thing is it is almost 2X what I paid for my main tires. Walmart has a couple 165/80R15 tires for 50 bucks. Not the cool vintage look but I like the price for a spare.
I'm hoping Firestone will work with me on this. Their policy is you can return full sets of 4 or more tires within 90 of purchase for a full refund, but they specifically state that returns of less than the full set are not accepted. I'm hoping they'll see how stupid it would be for me to return 5 tires and then turn around and buy a set of 4. |
|
|
|
| SteveL |
Apr 6 2019, 08:29 AM
Post
#975
|
|
Senior Member Group: Members Posts: 666 Joined: 7-August 03 From: Andover, MN Member No.: 991 Region Association: None |
Brent - what tires did you go with? Are those Firestones?
Asking because I have to get a new set this spring, looking for recommendations. |
|
|
|
| David Billo |
Apr 6 2019, 08:41 AM
Post
#976
|
|
Member Group: Members Posts: 64 Joined: 23-November 17 From: Plainfield, Ontario Member No.: 21,625 Region Association: Canada |
I'm honestly a bit mystified why a 185 would "fit like a champ", but a 195, which is only one centimeter wider, would look that bad.
|
|
|
|
| bbrock |
Apr 6 2019, 08:47 AM
Post
#977
|
|
914 Guru Group: Members Posts: 5,269 Joined: 17-February 17 From: Montana Member No.: 20,845 Region Association: Rocky Mountains |
QUOTE(jim911E @ Apr 5 2019, 08:48 PM) great work man i have enjoyed reading your blog...won't be long now and you will be back on the road again... enjoy.....jim That is one sweet ride! (IMG:style_emoticons/default/beerchug.gif) |
|
|
|
| bbrock |
Apr 6 2019, 09:11 AM
Post
#978
|
|
914 Guru Group: Members Posts: 5,269 Joined: 17-February 17 From: Montana Member No.: 20,845 Region Association: Rocky Mountains |
QUOTE(SteveL @ Apr 6 2019, 08:29 AM) Brent - what tires did you go with? Are those Firestones? Asking because I have to get a new set this spring, looking for recommendations. I went with Firestone Firehawk AS tires. I needed an all season tire which pretty much dictated the size. These are considered "performance all season" tires. Tire Rack has some good videos comparing them with a few other performance all season tires. Based on those, these seemed to fit my particular needs a little better than the others but YMMV. Also, I found one online review and also a recent review here of them on 914s and both were very positive. It will be some time before I can test them out of course. QUOTE(David Billo @ Apr 6 2019, 08:41 AM) I'm honestly a bit mystified why a 185 would "fit like a champ", but a 195, which is only one centimeter wider, would look that bad. I was curious about that too but after looking, seems possible. First, I said it sits about 6 inches high before but I meant 6 cm. I just measured and it is actually 5cm. I suspect most of the difference is in the sidewall bulge. It looks to me that the bulge is contributing about 2 cm to the board height. It's a little harder to tell how changing the shape might allow the tire to settle farther down in the front profile of the trunk. This tire rides high on the front lip and doesn't touch the rubber bumpers on the trunk floor. I wonder if a 185 settles a little lower in the compartment. 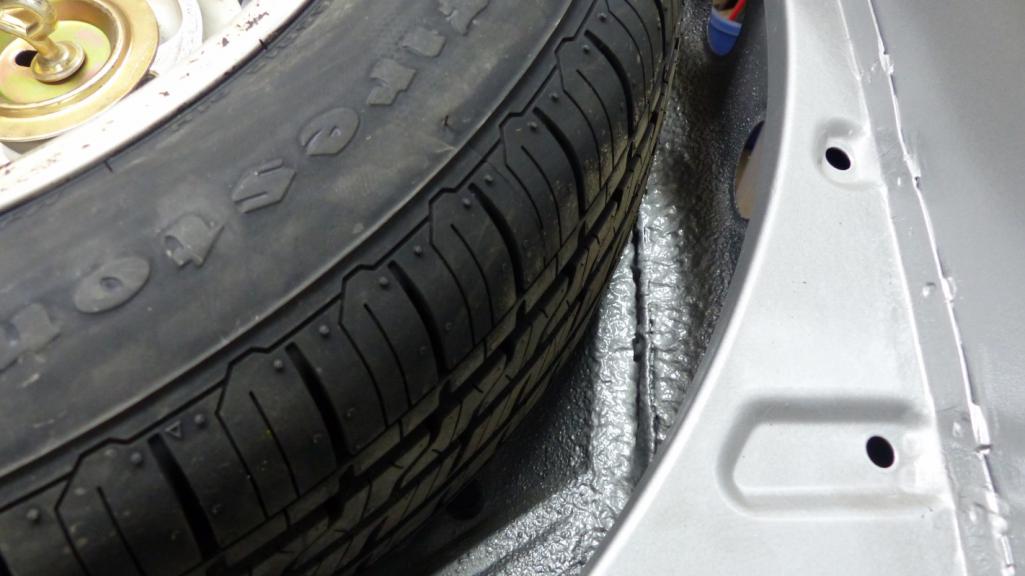 |
|
|
|
| bbrock |
Apr 8 2019, 07:15 PM
Post
#979
|
|
914 Guru Group: Members Posts: 5,269 Joined: 17-February 17 From: Montana Member No.: 20,845 Region Association: Rocky Mountains |
(IMG:http://www.914world.com/bbs2/uploads_offsite/spainvskorearecipes.files.wordpress.com-20845-1554772535.1.png)
Well, the car is ready to become a roller but I would like to get brakes and rear axles on before I do that. I'm stuck until I figure out how to get hardware plated, so I turned m attention to the engine. First, a quick recap on the engine. I tore it down in 1989 and rebuilt the short block. I bought new OEM Mahle 8:1 euro spec P&Cs, a new Sachs clutch package, and had the cam ground for the Weber 40IDF carbs I bought at the time (the good Italian jobbies). The crank journals were turned 1 under and the flywheel was resurfaced. The reciprocating and rotating masses were balanced. I reassembled the case and sealed it up before the project stalled when I started grad school. At the time, the EFI was a deteriorating pile of shit that made the car unreliable. Carb conversion was the solution of choice back then as it was pre-Internet so DIY info for D-Jet wasn't readily available. So if anyone is wondering why I'm putting carbs on the car, that's why. I don't want to tear the case apart and it would take probably another year to go through my EFI parts and refurbish. I'm really looking forward to trying these carbs but once this tub is back on the road, I'll start restoring the EFI, then I'll decide if I want to split the case and swap the cam. My first task was to re-check the axial play. I set it with a feeler gauge when I first built the engine but wanted to check my work. I wound up yanking the flywheel seal and O-ring and replacing with new in the process. Axial play was right at 0.004. Perfect. 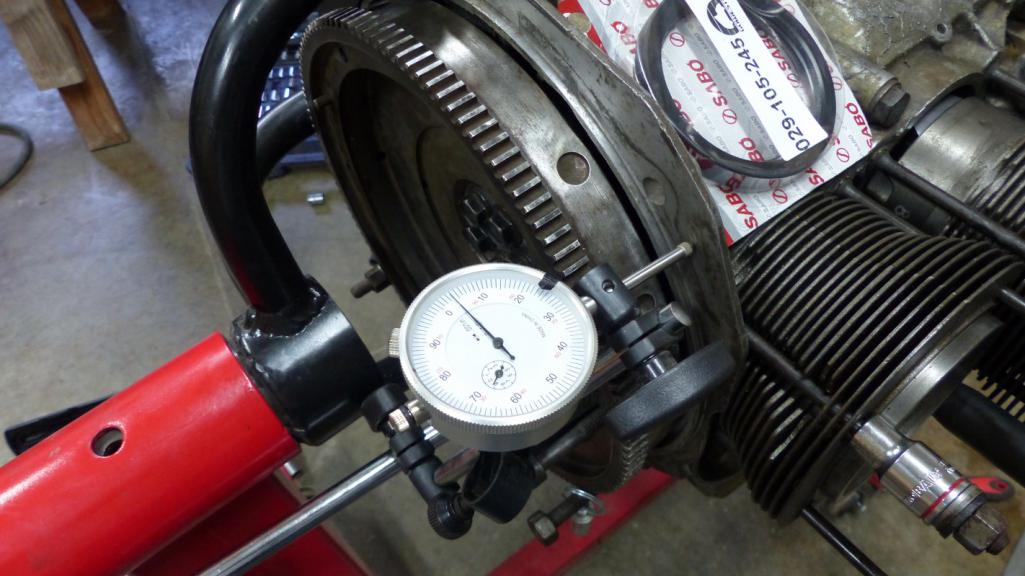 The shop that resurfaced my flywheel ignored my instructions to remove the same thickness from the center to maintain clearance for the flywheel bolts. Even so, the friction plate cleared the bolts but to be safe, I ground off most of the ridges from the bolts. 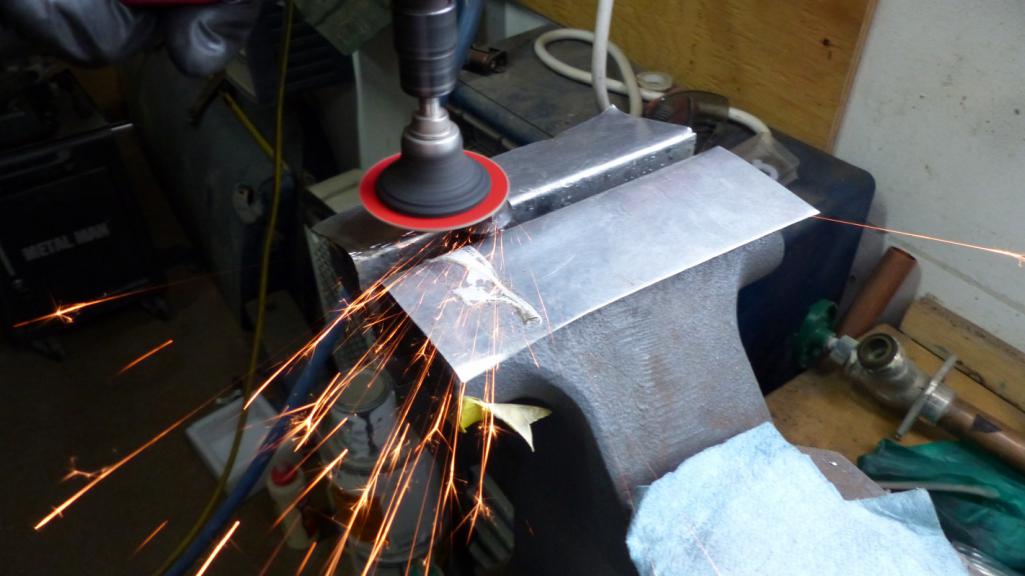 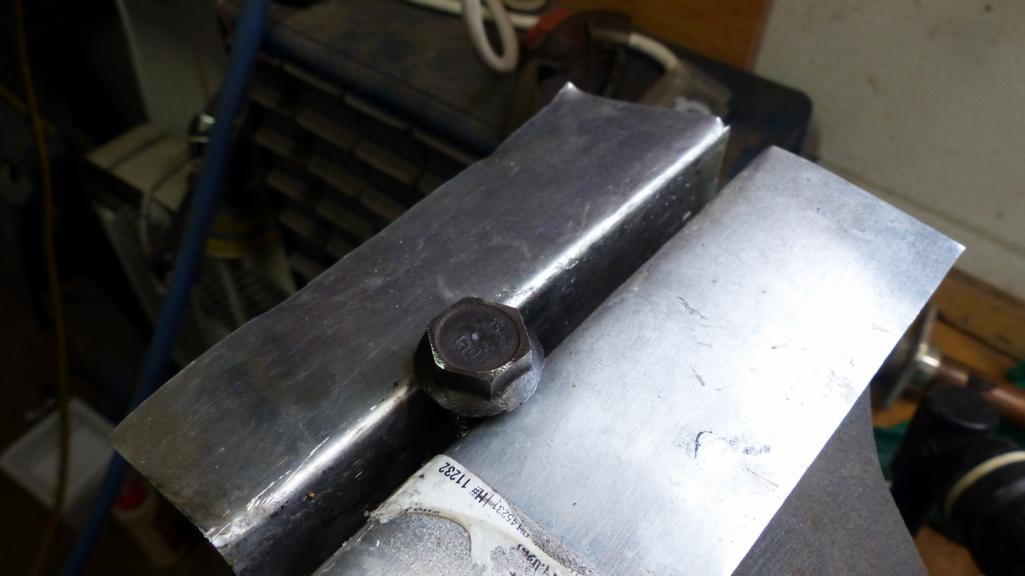 Flywheel was installed with new lock washer and then the clutch. Important to make sure the pressure plate is aligned with the balancing marks. 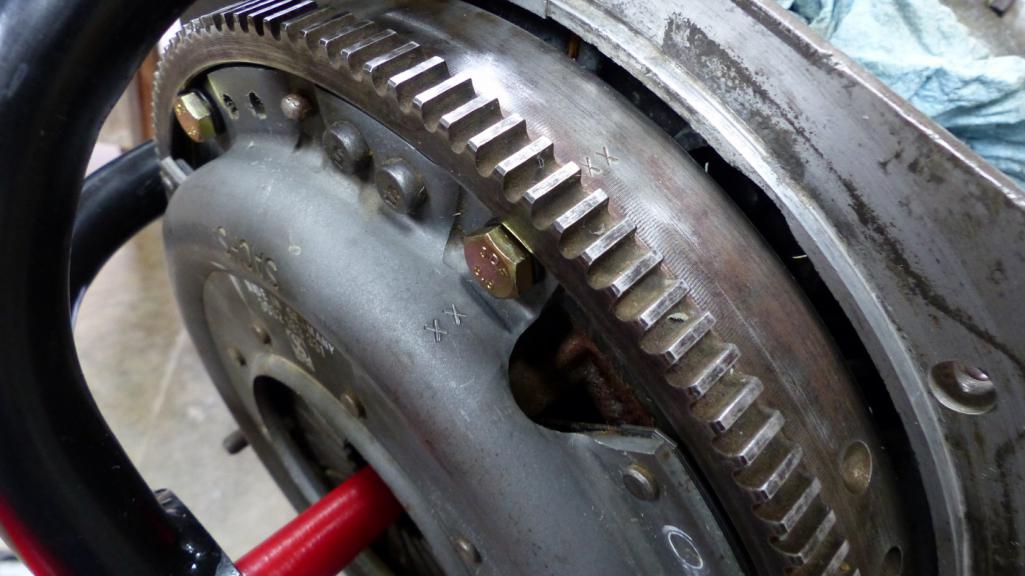 Maybe it's because a clutch replacement was the first major repair I did on a Porsche or any car, but I think clutches, particularly Sachs clutches, look really cool. 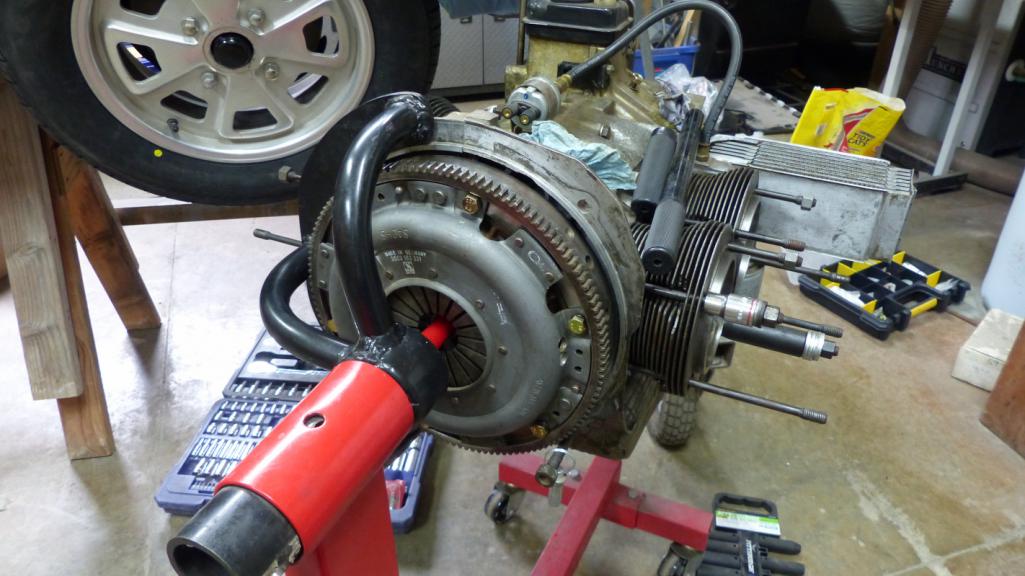 I got talked into buying a Mehling oil pump when I first rebuilt the engine but decided to switch back to the OEM pump. I know there is a lot of controversy over oil pump choices. This is my decision and I'm sticking to it. I'm glad I made the swap because it let me solve my mystery of what my cam grind. Elgin 8408 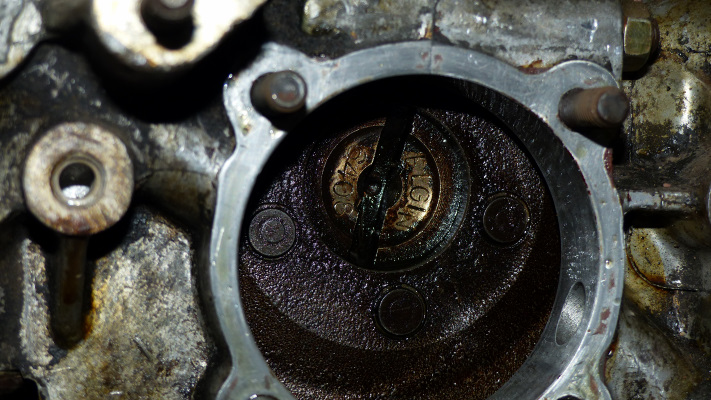 I also measured the deck height. Three of the cylinders were within .0025 of each other but the register on #3 had sunk about 0.01". The correct thing to do would be tear everything apart an have the case decked but that isn't going to happen. I'll probably be shunned by the master rebuilders, but I'm just going to add an extra 0.01" shim to #3 which will bring the cylinder top up for a 0.013" which is spot on with the other slugs. I also cc'd the heads and got exactly 60cc which is right on for a stock 2L head. 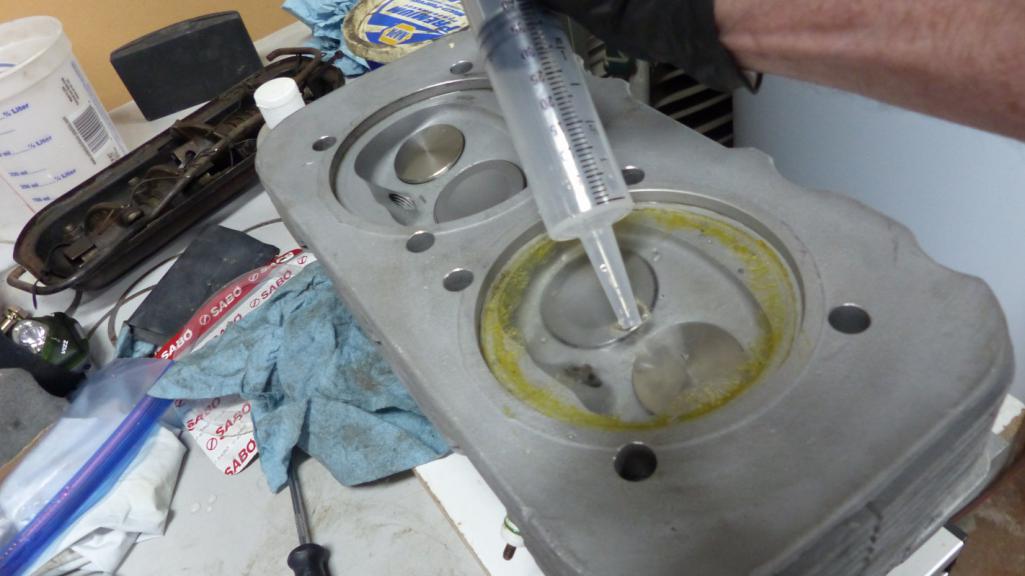 I also cc'd the very subtle dish in the euro piston tops but they only hold six drops so insignificant. I ordered a set of 0.03" shims to bring total deck height to 0.043 which will yield about 8.3:1 compression ratio. That doesn't seem too bad. I'm going to just lap the slugs into the heads and skip the gaskets. The rest of the weekend was spent prepping engine parts for paint. Nothing picture worthy. |
|
|
|
| Dave_Darling |
Apr 8 2019, 09:14 PM
Post
#980
|
|
914 Idiot Group: Members Posts: 15,339 Joined: 9-January 03 From: Silicon Valley / Kailua-Kona Member No.: 121 Region Association: Northern California |
QUOTE(bbrock @ Apr 8 2019, 06:15 PM) I also measured the deck height. Three of the cylinders were within .0025 of each other but the register on #3 had sunk about 0.01". Did it sink evenly, or at an angle? You probably want to correct any angle present so that the cylinder really is perpendicular to the crank. --DD |
|
|
|
|
2 User(s) are reading this topic (2 Guests and 0 Anonymous Users)
0 Members:

|
Lo-Fi Version | Time is now: 12th May 2026 - 04:51 PM |
Invision Power Board
v9.1.4 © 2026 IPS, Inc.