|
|
|
Porsche, and the Porsche crest are registered trademarks of Dr. Ing. h.c. F. Porsche AG.
This site is not affiliated with Porsche in any way. Its only purpose is to provide an online forum for car enthusiasts. All other trademarks are property of their respective owners. |
|
|

  |

| TravisNeff |
 May 6 2005, 08:04 PM May 6 2005, 08:04 PM
Post
#1
|
|
914 Guru  Group: Members Posts: 5,082 Joined: 20-March 03 From: Mesa, AZ Member No.: 447 Region Association: Southwest Region |
After some removal of the gravy train nuggets, I fitted up my engman inner long kit. Not much fitting to do, had to enlarge the holes for the seat belt mounts and cut a section out for my early E-brake stop. Welded it all in and around the e-brake recess and used all-metal filler to smooth it all out after a day of grinding. I still have the firewall to grind down, but that is covered by the backpad so I may just leave it as is. After a thorough cleaning I will epoxy prime with a brush and call it gud.
Attached image(s) 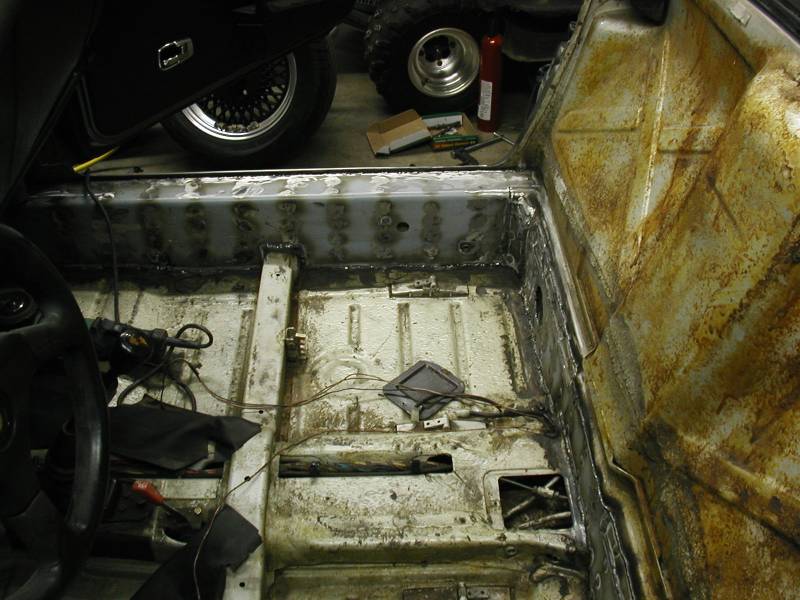
|
   |

 
|
| McMark |
May 6 2005, 08:05 PM
Post
#2
|
|
914 Freak! Group: Retired Admin Posts: 20,179 Joined: 13-March 03 From: Grand Rapids, MI Member No.: 419 Region Association: None |
AWESOME! (IMG:http://www.914world.com/bbs2/html/emoticons/smilie_pokal.gif)
I can't wait put a kit in my car. |
|
|
|
| TravisNeff |
May 6 2005, 08:09 PM
Post
#3
|
|
914 Guru Group: Members Posts: 5,082 Joined: 20-March 03 From: Mesa, AZ Member No.: 447 Region Association: Southwest Region |
asdfa
Attached image(s) 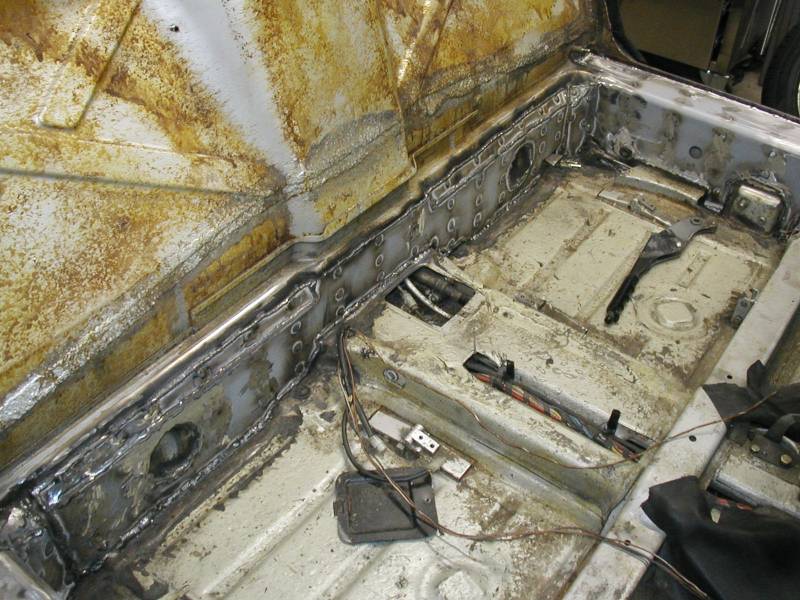
|
|
|
|
| TravisNeff |
May 6 2005, 08:10 PM
Post
#4
|
|
914 Guru Group: Members Posts: 5,082 Joined: 20-March 03 From: Mesa, AZ Member No.: 447 Region Association: Southwest Region |
asdf
Attached image(s) 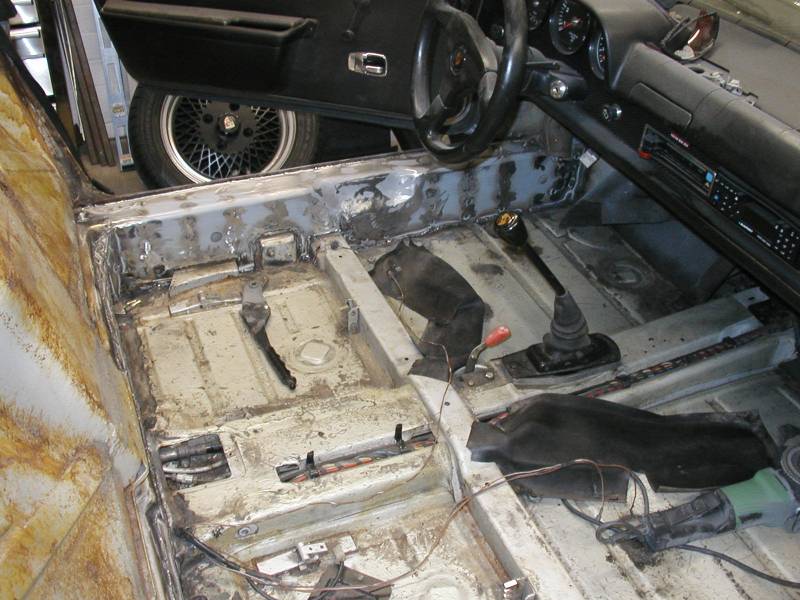
|
|
|
|
| Verruckt |
May 6 2005, 08:10 PM
Post
#5
|
|
Senior Member Group: Members Posts: 716 Joined: 14-July 04 From: Midwest Member No.: 2,348 |
Looks good (IMG:http://www.914world.com/bbs2/html/emoticons/smilie_pokal.gif)
Going to be purchasing one of Engman's kits once I get my floors in. |
|
|
|
| TravisNeff |
May 6 2005, 08:13 PM
Post
#6
|
|
914 Guru Group: Members Posts: 5,082 Joined: 20-March 03 From: Mesa, AZ Member No.: 447 Region Association: Southwest Region |
There's still dog food in the passenger heater duct. The aroma of cooking kibble was all around me.
McMark, I haven't got the car on the ground so I can't say how much better it is, but the way the door closes now (still on jackstands) you can feel a difference. More of a thud. Fun project, about 3 hours in interior removal and prep the chassis, another hour or two in fitting the pieces. I had to beat my floorboards with a dead blow hammer to flatten out where it had been jacked up in the wrong spot, and also trim up the bottom of the kit in a few spots to get it to fit flush. Take your time here, and it will payoff later. And a couple-few hours welding it up. |
|
|
|
| Trekkor |
May 6 2005, 08:47 PM
Post
#7
|
|
I do things... Group: Members Posts: 7,809 Joined: 2-December 03 From: Napa, Ca Member No.: 1,413 Region Association: Northern California |
Nicely done. I think it looks better than mine... (IMG:http://www.914world.com/bbs2/html/emoticons/dry.gif)
You'll will feel the differance as soon as you sit in the seat. Your favorite twisty tour will also be "new". KT |
|
|
|
| Rand |
May 6 2005, 09:29 PM
Post
#8
|
|
Cross Member Group: Members Posts: 7,409 Joined: 8-February 05 From: OR Member No.: 3,573 Region Association: None |
Nice work Travis! I'm right behind you.
No wait... I'll be doing this soon too. (IMG:http://www.914world.com/bbs2/html/emoticons/smilie_pokal.gif) |
|
|
|
| TravisNeff |
May 6 2005, 10:24 PM
Post
#9
|
|
914 Guru Group: Members Posts: 5,082 Joined: 20-March 03 From: Mesa, AZ Member No.: 447 Region Association: Southwest Region |
Thanks for the kind words all.
Trekkor, I cheated and found some online install guide someplace that might have put me a few steps ahead (IMG:http://www.914world.com/bbs2/html/emoticons/cool_shades.gif) |
|
|
|
| i love porsche |
May 6 2005, 11:22 PM
Post
#10
|
|
Senior Member Group: Members Posts: 1,547 Joined: 6-May 04 From: Nutley, NJ Member No.: 2,030 Region Association: North East States |
i need to get this kit installed this summer
how much, and where do i buy it? |
|
|
|
| Verruckt |
May 7 2005, 06:15 AM
Post
#11
|
||
|
Senior Member Group: Members Posts: 716 Joined: 14-July 04 From: Midwest Member No.: 2,348 |
There is man named Engman... (IMG:http://www.914world.com/bbs2/html/emoticons/biggrin.gif) http://www.914world.com/bbs2/index.php?act=...=ST&f=4&t=12376 |
||
|
|
|
||
| Engman |
May 7 2005, 08:59 AM
Post
#12
|
|
Zoisite Group: Benefactors Posts: 1,349 Joined: 25-March 03 From: New Albany, IN Member No.: 475 |
Yep - I have them in - pm or email me.
Engman Inner Long Kit I *hope* to offer an improvement in the GT scab plate kit here soon....................... M |
|
|
|
| pete-stevers |
May 8 2005, 03:27 PM
Post
#13
|
|
saved from fire! Group: Members Posts: 2,641 Joined: 10-October 04 From: Abbotsford,BC, Canada Member No.: 2,914 Region Association: Pacific Northwest |
looks like a really neat kit.... (IMG:http://www.914world.com/bbs2/html/emoticons/smilie_pokal.gif)
|
|
|
|
| maf914 |
May 9 2005, 11:56 AM
Post
#14
|
|
Not a Guru! Group: Members Posts: 3,049 Joined: 30-April 03 From: Central Florida Member No.: 632 Region Association: None |
Great looking installation, Travis! (IMG:http://www.914world.com/bbs2/html/emoticons/smilie_pokal.gif)
When doing this with a car that has not been completely stripped of wiring, fuel lines, etc., are there any areas that require real attention to avoid heat damage from the welding? Or does the spot/rosette welding through the holes and stich welding the perimeter keep the heat low enough to prevent damage? |
|
|
|
| TravisNeff |
May 9 2005, 12:36 PM
Post
#15
|
|
914 Guru Group: Members Posts: 5,082 Joined: 20-March 03 From: Mesa, AZ Member No.: 447 Region Association: Southwest Region |
I pulled my gas tank, for other reasons (crud in the tank), then welded in some swaybar reinforcements and welded up a couple cracks in the tub where NOT having a reinforcement caused the problem.
So for the inner long kit, my gas tank was out, but my fuel lines were still there. I took a hand towel and got it real wet and stuffed in in the rear tunnel over the fuel lines. I had a fire extuinguisher right next to me too. When I was welding, I EXPECTED to have something catch fire that wasn't supposed to - keeps you on your toes - although I didn't have any trouble. When I was welding right next to and right above the tunnel I resoaked the rag with water. I didn't pull any wiring, just moved it out of the way as best I could and was really careful when I was close to them. I also left the roof on not that it probably did a whole lot - extra insurance. Door gaps didn't change as far as I can see (it is still on jackstands though). You can warp sheet metal fairly easily, but I don't think I had any problems (the kit is pretty thick, as well as your longs) . I needed to be sure I had a good penetration weld, so each rosette was between 5-10 seconds each. Burn a hole in the middle and hold it there (you will have to feel out when it is too much) till you can take it no more, then run a circle around the perimeter to ensure you have good fusion with the long kit. If you burn through, no problemo' just hit the edge of the hole, bzz, bzz, bzz until you fill the gap, then put the spurs to it. When I first stated a couple of welds hardly held on the long and I had to drill out a new hole and try again. I just drilled a hole next to the one I just welded. You know when you have a good weld when it (obviously) holds to the long and when you grind down the weld bead into the long kit - and you cannot see where you welded. I didn't have my outer rockers off so I couldn't clamp the kit in place. I used a long screwdriver to press the kit firmly against the long and with the other hand weld up the hole. I welded the top of the sill first, then worked on the veriticle portions. Lastly was the seam welds on the edges of the kit. I am not good at doing a continuous bead with consistent results, so I hold the welder in one spot and burn a weld, move over a touch and burn another - this also gives a little cool down time between welds which will help avoid warpage. Also I when I move over and start a new weld I weld about a 1/4 to a 1/2 of the last weld to make sure I have a seam without voids. Move around the kit when welding to spread the heat out and give time for your last welds to cool. On spots where the edges of the kit meet the long or the floor they may not be flush - this is where fitting will help a ton. But what I did in these areas was burn into the base metal and let the puddle pool up until it hit the long kit for fusion. Don't try to weld the long kit and hope it makes it down to the base metal, because you will most likely have inconsistent results. If you have a big gap you will probably need to build up your puddle a few times to get the weld to fill the void. You probably don't need a full seam around the perimeter a stitch about 3" or so and about 2" gap is probably more than enough - I got carried away and did all of the top, and most all of the bottom (didn't do the recesses in the floor). It gets pretty hot, you will burn off any undercoating under the car (if not, you probably have some cold welds). Have a hammer to beat down the kit for a tight fit as you go, the kit will want to cup out a little at the edges from the heat in the center. You will burn off the paint along the bottom of your doorsill stub, but your door seal will cover that (take the seals off first). I didn't have any trouble from sparks with my door panels or dash that I can see so far. It will be smokey and stinky and if you are lucky it might smell like hot dog food - heh. open the garage door and use a fan. Keep an eye out for the next couple hours to make sure you didn't light something on fire. Don't forget to take your wet rag out when your are done. As for cleanup, an angle grinder with a couple sanding flap wheels (60grit) makes quick cleanup - I wouldn't want to see my results if I used a grinding stone. |
|
|
|
| SirAndy |
May 9 2005, 01:17 PM
Post
#16
|
|
Resident German Group: Admin Posts: 41,607 Joined: 21-January 03 From: Oakland, Kalifornia Member No.: 179 Region Association: Northern California |
not to be a killjoy or anything, but i hope you had a brace on there somewhere (doors or top) when you were welding in that kit ...
looks nice, just hope the door gaps are still gud ... (IMG:http://www.914world.com/bbs2/html/emoticons/wink.gif) Andy |
 |
|
| TravisNeff |
May 9 2005, 01:30 PM
Post
#17
|
|
914 Guru Group: Members Posts: 5,082 Joined: 20-March 03 From: Mesa, AZ Member No.: 447 Region Association: Southwest Region |
Nope just the top on the car. Gaps appear to be the same as far as I can tell. I tried to spread out the heat while I was doing it. We shall see once I get it back on the ground.
|
|
|
|
| TravisNeff |
May 10 2005, 09:55 PM
Post
#18
|
|
914 Guru Group: Members Posts: 5,082 Joined: 20-March 03 From: Mesa, AZ Member No.: 447 Region Association: Southwest Region |
Done.. Need me to paint your car? (IMG:http://www.914world.com/bbs2/html/emoticons/laugh.gif)
I would have done rattle can etch primer, but this was what I had, good enough. Attached image(s) 
|
|
|
|
| TravisNeff |
May 10 2005, 09:56 PM
Post
#19
|
|
914 Guru Group: Members Posts: 5,082 Joined: 20-March 03 From: Mesa, AZ Member No.: 447 Region Association: Southwest Region |
welding the pieces I cut out was no fun, hard to see and get at while I was welding. Oh well, you'll never see it.
Attached image(s) 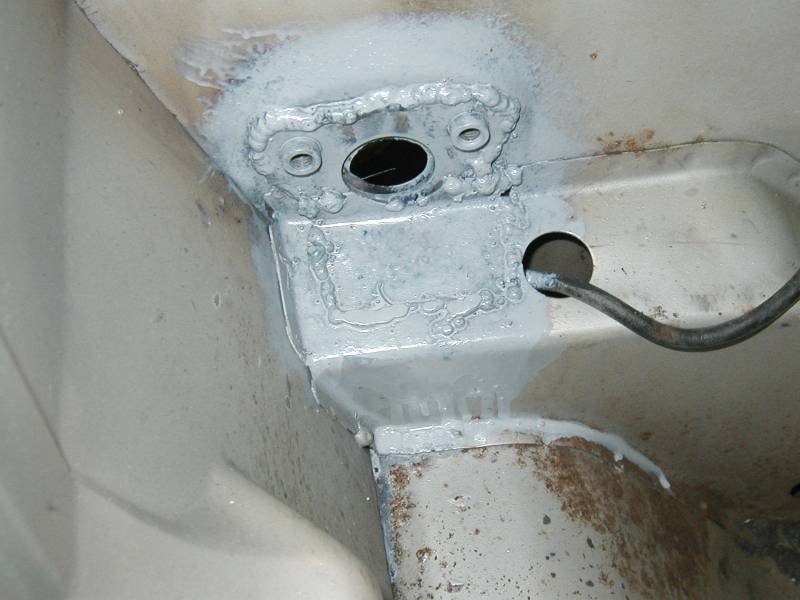
|
|
|
|
| TravisNeff |
May 10 2005, 09:57 PM
Post
#20
|
|
914 Guru Group: Members Posts: 5,082 Joined: 20-March 03 From: Mesa, AZ Member No.: 447 Region Association: Southwest Region |
Outer mount, I may need to grind a little more - we'll see what it is like when I get the bushings in.
Attached image(s) 
|
|
|
|
|
1 User(s) are reading this topic (1 Guests and 0 Anonymous Users)
0 Members:

|
Lo-Fi Version | Time is now: 29th April 2024 - 03:38 PM |
Invision Power Board
v9.1.4 © 2024 IPS, Inc.