|
|
|
Porsche, and the Porsche crest are registered trademarks of Dr. Ing. h.c. F. Porsche AG.
This site is not affiliated with Porsche in any way. Its only purpose is to provide an online forum for car enthusiasts. All other trademarks are property of their respective owners. |
|
|

  |

| Spoke |
 May 8 2005, 07:32 PM May 8 2005, 07:32 PM
Post
#1
|
|
Jerry  Group: Members Posts: 6,978 Joined: 29-October 04 From: Allentown, PA Member No.: 3,031 Region Association: None |
When I purchased my 914, the interior door panel was in excellent shape but the top upholstery trim was missing as was the metal hanger. The PO had removed the top upholstery trim and original metal hanger. 2 extra screws were used to secure the panel to the door. At the window, the excess panel material was tucked under the window wiper, and for the wing window, the material was cut off even with the window and cemented in place. I didn't like the door panel and wanted the original top upholstery trim back.
Short of buying new door panels, I decided to fabricate top caps and figure out a new attachement scheme. I could make the top cap out of wood, and attach to a new metal hanger. The door is fairly straight and a properly contoured piece of wood should fit nicely. At Home Depot, I found a 3 foot section of metal bracing that was about 1 1/4 inches wide, just the right size. The door has 3 metal tabs for the hanger to hang on. I marked the hanger where the tabs were and cut slots with a dremel cut-off wheel. Placing the bracing in a vice, I pounded out the hangers so they would accept the tabs on the door. The bracing sits very nicely on the door. 1/8 inch holes are drilled in the bracing to attach to the door panel. Attached thumbnail(s) 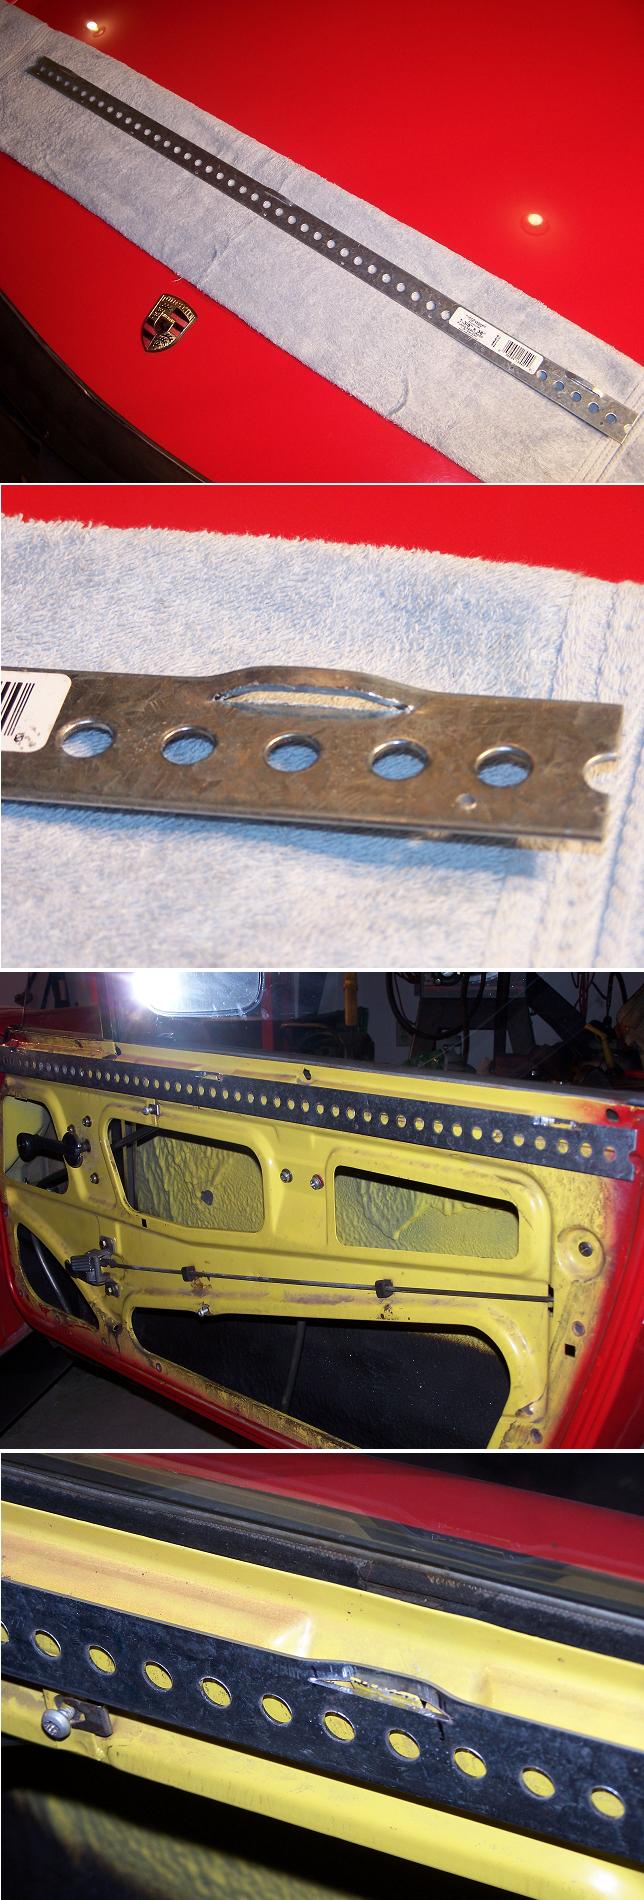
|
   |

 
|
| Spoke |
May 8 2005, 07:38 PM
Post
#2
|
|
Jerry Group: Members Posts: 6,978 Joined: 29-October 04 From: Allentown, PA Member No.: 3,031 Region Association: None |
To attach the door panel to its new bracing, I mounted the panel on the door, put the brace in place, and drilled a couple of 1/8 inch holes through the panel and bracing to align the bracing to the panel. I removed the panel and bracing and used 1/4 inch long rivets with backing plates to attach the bracing to the door.
Next step is to contact cement the panel cover to the bracing. Once glued, excess material was trimmed off with a razor knife. Now the panel with its new metal hanger fits very good on the door. Next is to manufacture the top cap. Attached thumbnail(s) 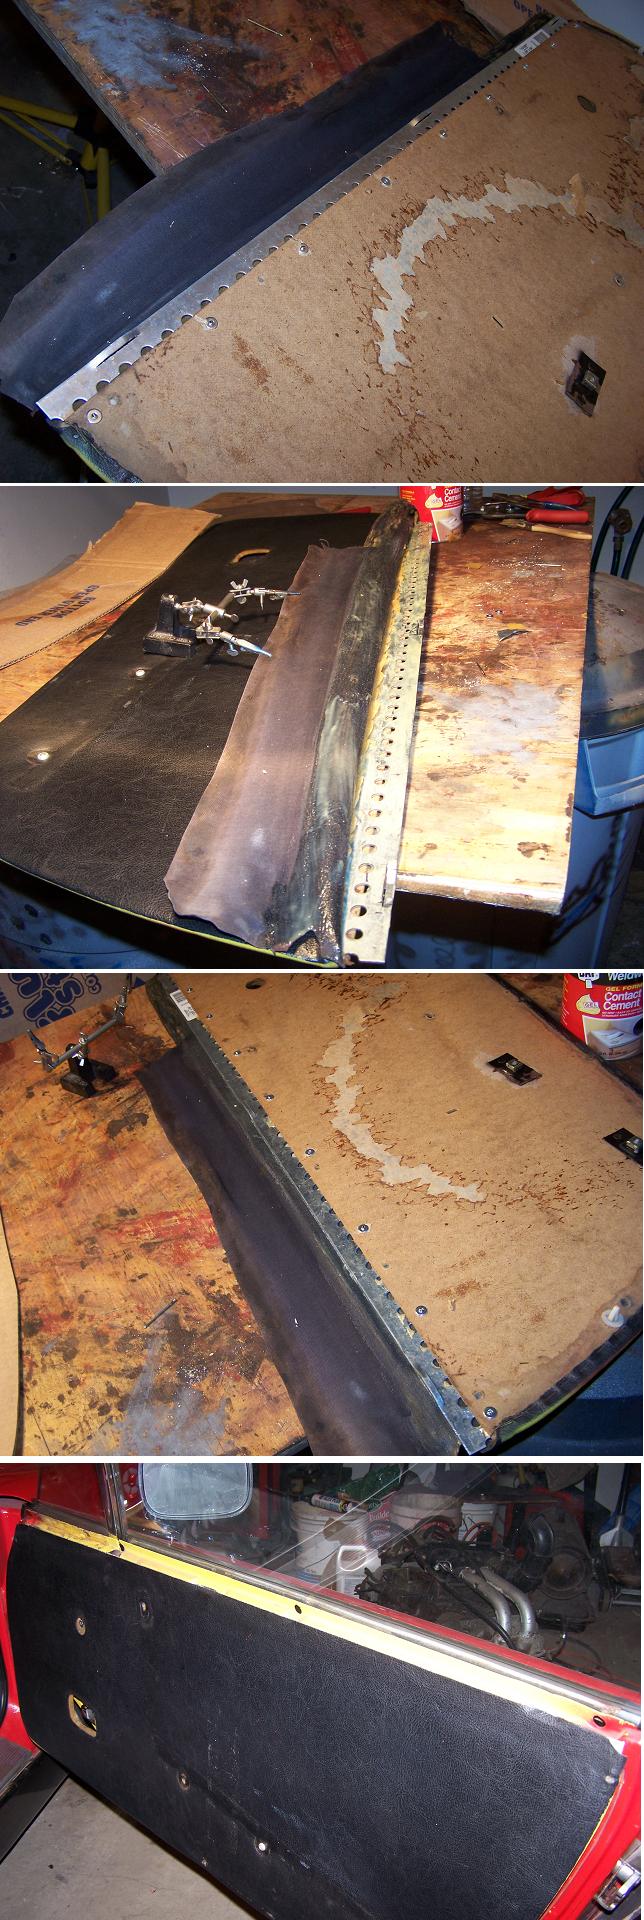
|
|
|
|
| tat2dphreak |
May 8 2005, 07:40 PM
Post
#3
|
|
stoya, stoya, stoya Group: Benefactors Posts: 8,797 Joined: 6-June 03 From: Wylie, TX Member No.: 792 Region Association: Southwest Region |
too much work, I bought morphenspectra door panels, amazing service, product, and worth every penny! (IMG:http://www.914world.com/bbs2/html/emoticons/smile.gif)
this is good info though... thanks for sharing! |
|
|
|
| Spoke |
May 8 2005, 07:44 PM
Post
#4
|
|
Jerry Group: Members Posts: 6,978 Joined: 29-October 04 From: Allentown, PA Member No.: 3,031 Region Association: None |
For the top cap, I used a 2 1/4 x 1 1/4 x 40 inch piece of birch stock. Birch is hard yet easy to work with. In this case, having a bud who does custom cabinetry really comes in handy.
The profile needed for the top cap was arrived at by trial and error. Once the profile was determined, I cut 2 pieces, one for each door. The top of the top cap will cover the window wiper and give a very nice appearance at the window. The trickiest part of this is to make a cut out for the window pillar. This I did with a razor knife until the top cap fit perfectly. Once the pillar is cleared, the top cap is positioned and is cut to length matching the width of the door panel. Attached thumbnail(s) 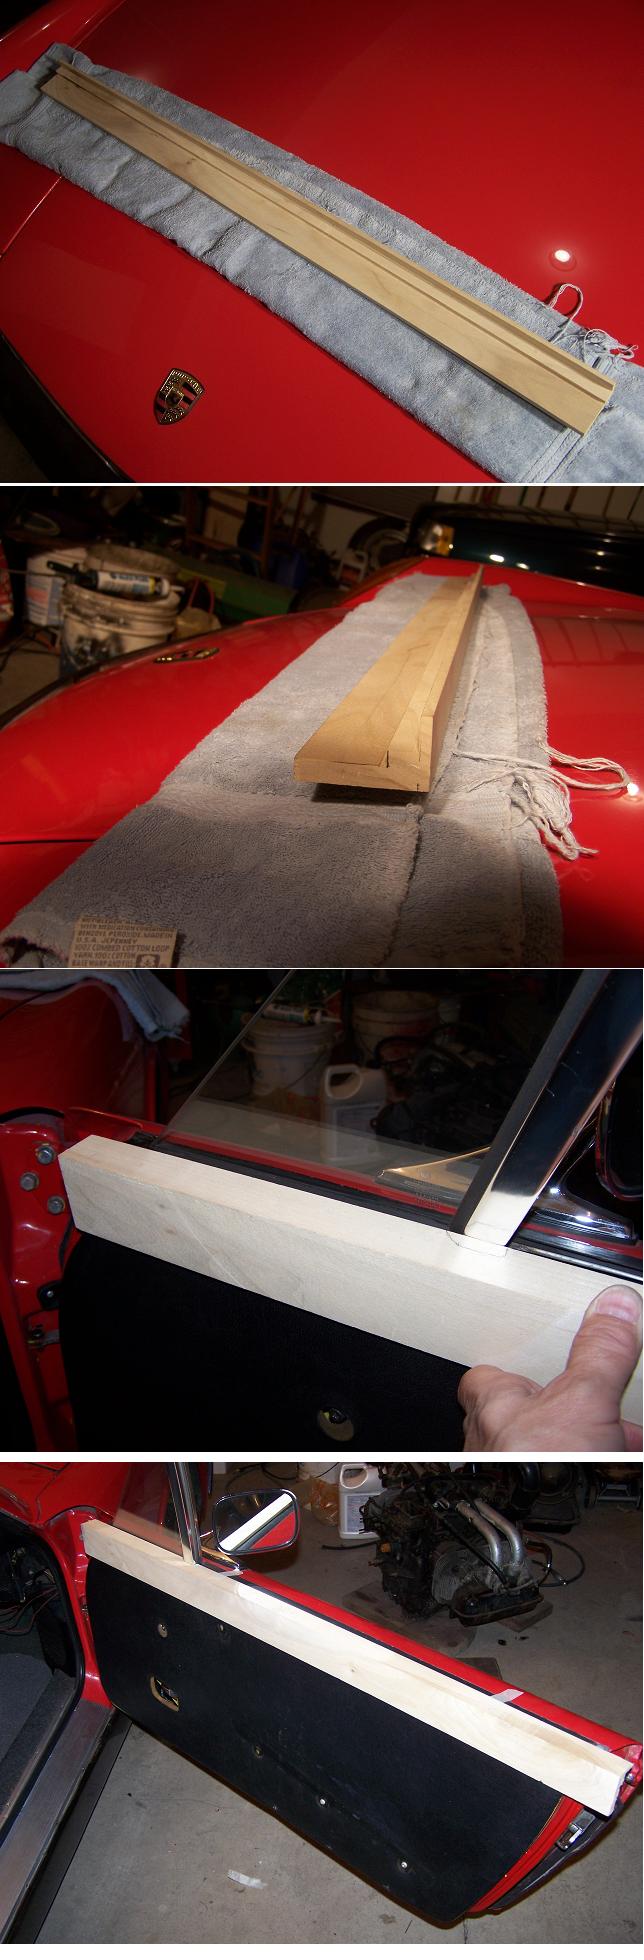
|
|
|
|
| Spoke |
May 8 2005, 07:53 PM
Post
#5
|
|
Jerry Group: Members Posts: 6,978 Joined: 29-October 04 From: Allentown, PA Member No.: 3,031 Region Association: None |
Once the top cap is trimmed to size, I used a 6 foot belt sander to provide the profile of the finished top cap. On the ends, I just rounded the edges and sanded smooth.
The panel is mounted on the door and the trim set in place. With masking tape the position of the trim is marked. 3 screws hold the trim to the brace. The screws to hold the trim on are placed very close to the hanger tabs since there is clearance around the hanger tab to clear the screw head. After prime - sand - prime - sand - prime - sand - paint -sand - paint - sand - paint - sand - paint, the top cap is ready for mounting onto the door panel. Attached thumbnail(s) 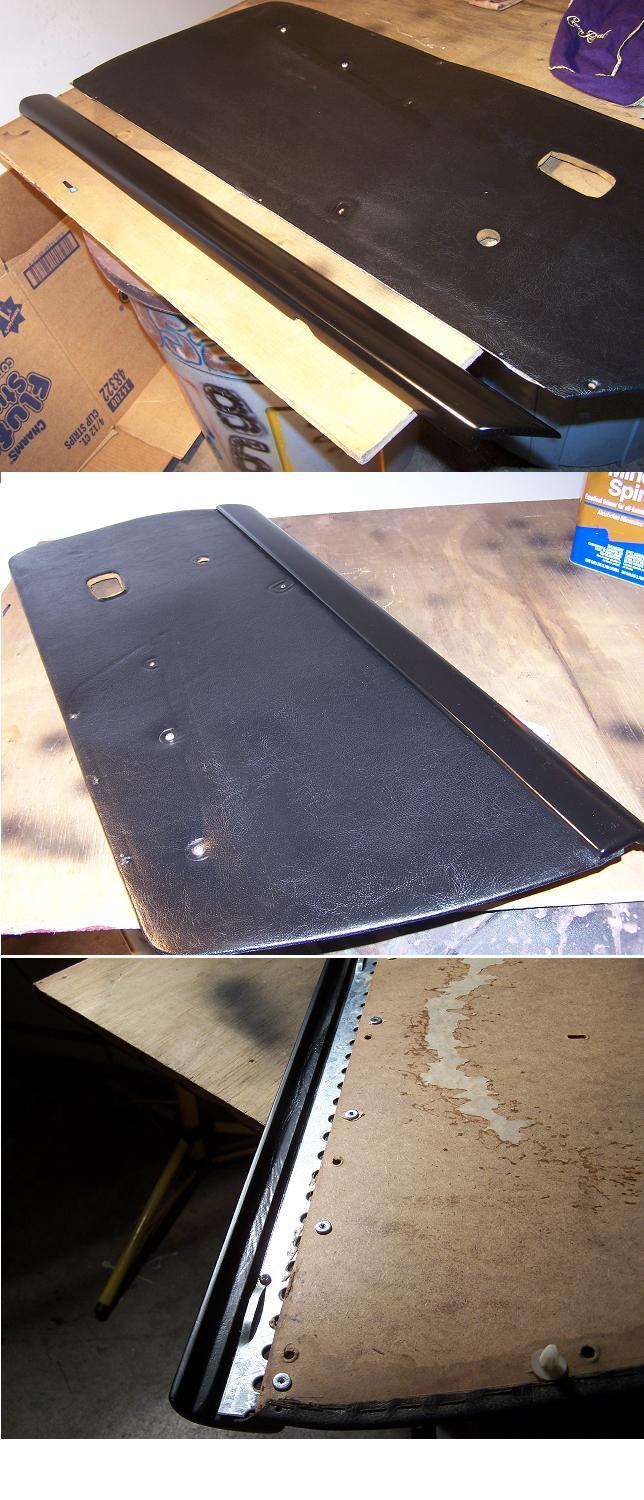
|
|
|
|
| Spoke |
May 8 2005, 07:58 PM
Post
#6
|
|
Jerry Group: Members Posts: 6,978 Joined: 29-October 04 From: Allentown, PA Member No.: 3,031 Region Association: None |
The door panels are ready for final mounting. The window cranks just overlap the top caps by about 1/4 inch so a slight bend on the cranks allows clearance without the crank hitting the cap.
I was surprised that the view of the end of the cap blended in with the 70's era upholstery quite nicely without further work. Attached thumbnail(s) 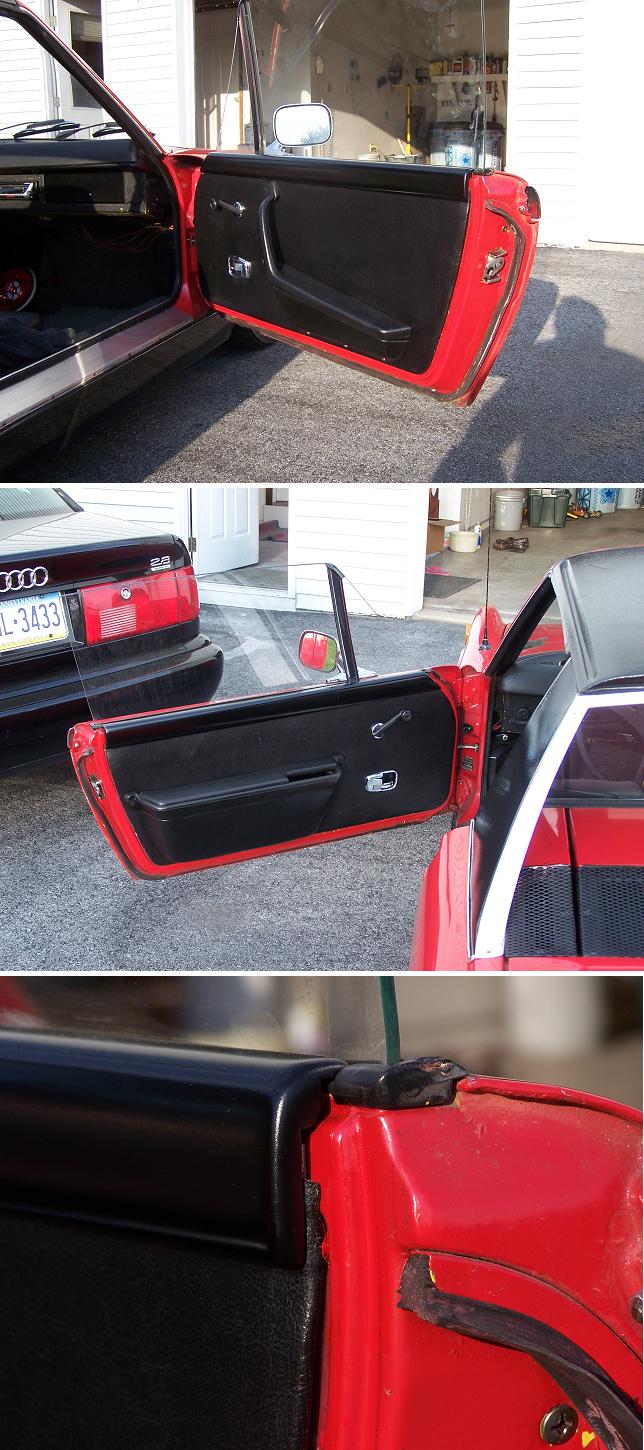
|
|
|
|
| TravisNeff |
May 8 2005, 08:05 PM
Post
#7
|
|
914 Guru Group: Members Posts: 5,082 Joined: 20-March 03 From: Mesa, AZ Member No.: 447 Region Association: Southwest Region |
Looks like a fun project, gud job
|
|
|
|
| tat2dphreak |
May 8 2005, 08:08 PM
Post
#8
|
|
stoya, stoya, stoya Group: Benefactors Posts: 8,797 Joined: 6-June 03 From: Wylie, TX Member No.: 792 Region Association: Southwest Region |
yes, it turned out very cool looking!
|
|
|
|
| firstknight13 |
May 8 2005, 08:23 PM
Post
#9
|
|
Senior Member Group: Members Posts: 652 Joined: 25-March 05 From: manchester,ct. Member No.: 3,817 |
you did a GREAT job!! i had my mine done over with black vinal came out good too. less time and effort. hey its your baby!!! (IMG:http://www.914world.com/bbs2/html/emoticons/smilie_pokal.gif)
|
|
|
|
| 914Timo |
May 9 2005, 12:50 AM
Post
#10
|
|
******* Group: Members Posts: 743 Joined: 13-January 03 From: Finland Member No.: 137 Region Association: Europe |
(IMG:http://www.914world.com/bbs2/html/emoticons/smilie_pokal.gif) (IMG:http://www.914world.com/bbs2/html/emoticons/clap.gif) (IMG:http://www.914world.com/bbs2/html/emoticons/aktion035.gif)
Looks really good. Well done. |
|
|
|
| tat2dphreak |
May 9 2005, 07:46 AM
Post
#11
|
|
stoya, stoya, stoya Group: Benefactors Posts: 8,797 Joined: 6-June 03 From: Wylie, TX Member No.: 792 Region Association: Southwest Region |
this should go to the classics for "how-to"
|
|
|
|
| Eric_Shea |
May 9 2005, 09:44 AM
Post
#12
|
|
PMB Performance Group: Admin Posts: 19,274 Joined: 3-September 03 From: Salt Lake City, UT Member No.: 1,110 Region Association: Rocky Mountains |
Excellent Job. (IMG:http://www.914world.com/bbs2/html/emoticons/smilie_pokal.gif)
I'd like to know who the guy is that parked that black Audi in the picture? Man if I get my hands on him. I've got a few thing's I'd like to say to him!! (IMG:http://www.914world.com/bbs2/html/emoticons/laugh.gif) (sorry for the off topic humor, you'll have to go here to catch the drift) |
|
|
|
|
1 User(s) are reading this topic (1 Guests and 0 Anonymous Users)
0 Members:

|
Lo-Fi Version | Time is now: 2nd May 2024 - 12:48 AM |
Invision Power Board
v9.1.4 © 2024 IPS, Inc.