|
|
|
Porsche, and the Porsche crest are registered trademarks of Dr. Ing. h.c. F. Porsche AG.
This site is not affiliated with Porsche in any way. Its only purpose is to provide an online forum for car enthusiasts. All other trademarks are property of their respective owners. |
|
|

  |

| PanelBilly |
 Jun 15 2019, 08:41 PM Jun 15 2019, 08:41 PM
Post
#221
|
|
914 Guru  Group: Members Posts: 5,962 Joined: 23-July 06 From: Kent, Wa Member No.: 6,488 Region Association: Pacific Northwest |
QUOTE(rgalla9146 @ Jun 15 2019, 03:17 PM)  QUOTE(Luke M @ Jun 15 2019, 03:10 PM) Hi Rory, The GT is looking great.. (IMG:style_emoticons/default/drooley.gif) Did you roll the flare lip at all ends or trim it like the later cars? Is 225 the largest tire you think will fit under the flares or do you have them spaced out? Hi Luke The flange is turned up, not trimmed. I traced the curve of the wheel opening and cut a piece of 1/4" plywood to conform to that shape. We then clamped it to the inside of the fender and shaped it (body hammer) as you might find on a standard fender. This adds strength and doesn't take away too much tire clearance. As for the wheel/tires in the rear .... no spacers. I have about 3/4" space on the outside on either side. Add 21mm spacers ? at that point it would be TIGHT. On the inside each has about 1/2" clearance. I don't think 9" wheels will fit. Can I size up from a 225 to a ? 235 , 245 ? on my 8" sixteens ? don't know. Something I might explore when there is more power. The 21s will be too tight. You can check MySpace’s thread from last week and see how tight it gets. I didn’t try moving the car with them on |
   |

 
|
| rgalla9146 |
Jul 6 2019, 04:58 PM
Post
#222
|
|
Advanced Member Group: Members Posts: 4,962 Joined: 23-November 05 From: Paramus NJ Member No.: 5,176 Region Association: None |
repeat
|
|
|
|
| rgalla9146 |
Jul 6 2019, 04:58 PM
Post
#223
|
|
Advanced Member Group: Members Posts: 4,962 Joined: 23-November 05 From: Paramus NJ Member No.: 5,176 Region Association: None |
I've got about three hundred miles on my car now.
Time to get it up for an oil change and look around. First had to deal with the CV boot flanges spewing grease everywhere. The available boot flanges with the extra holes.....not good. Big clean up followed by fitting 8mm ATE plastic plugs slathered with Curil T Problem solved ? fingers crossed. Next, evaluate approach to adjust valves. I've done it many times in the past on the lift. It's been a while. This time on the floor at a height that allows access to the intakes above and the exhausts below. The bottom is tight. Check the view of the 4,5,6 exhausts. No elbow room, no hand space. 5 was OK, 6 (the worst) needed adjustment....got it done. Check the area of the installed thermostat plumbing. All the OE heat parts and hoses fit as normal. The thermo is not in use yet. When the 3.0 goes in the line from the block to the tank will be changed out and the cooler will see oil for the first time. Attached thumbnail(s) 
|
|
|
|
| rgalla9146 |
Jul 6 2019, 05:00 PM
Post
#224
|
|
Advanced Member Group: Members Posts: 4,962 Joined: 23-November 05 From: Paramus NJ Member No.: 5,176 Region Association: None |
2 more
Attached thumbnail(s) 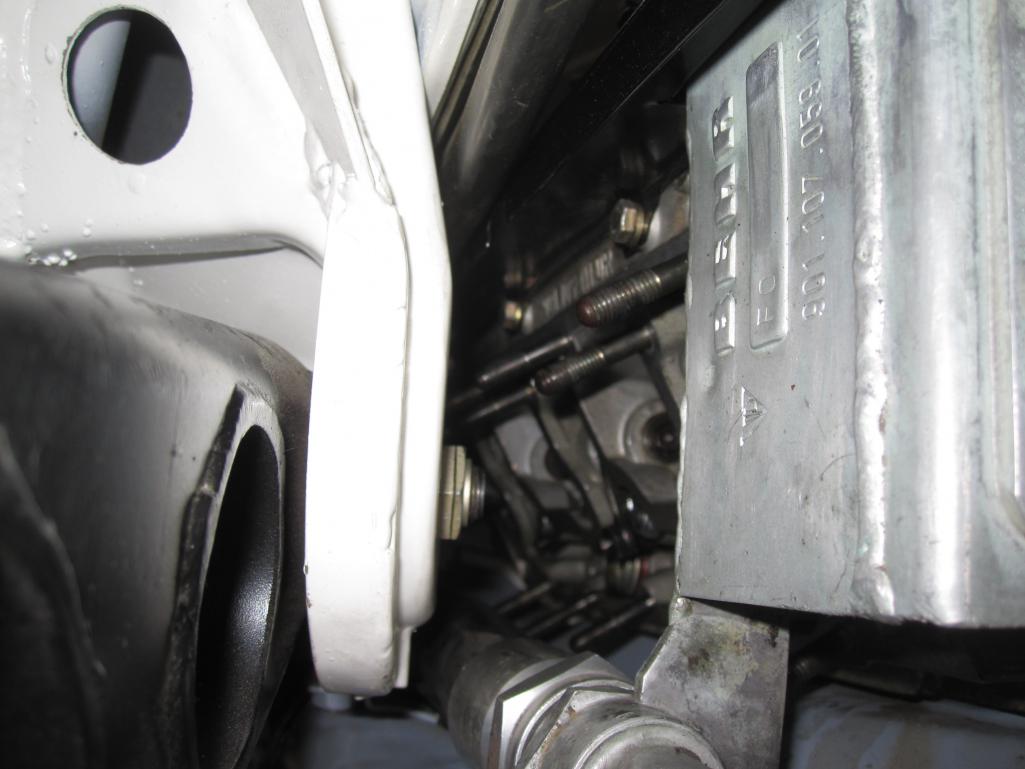 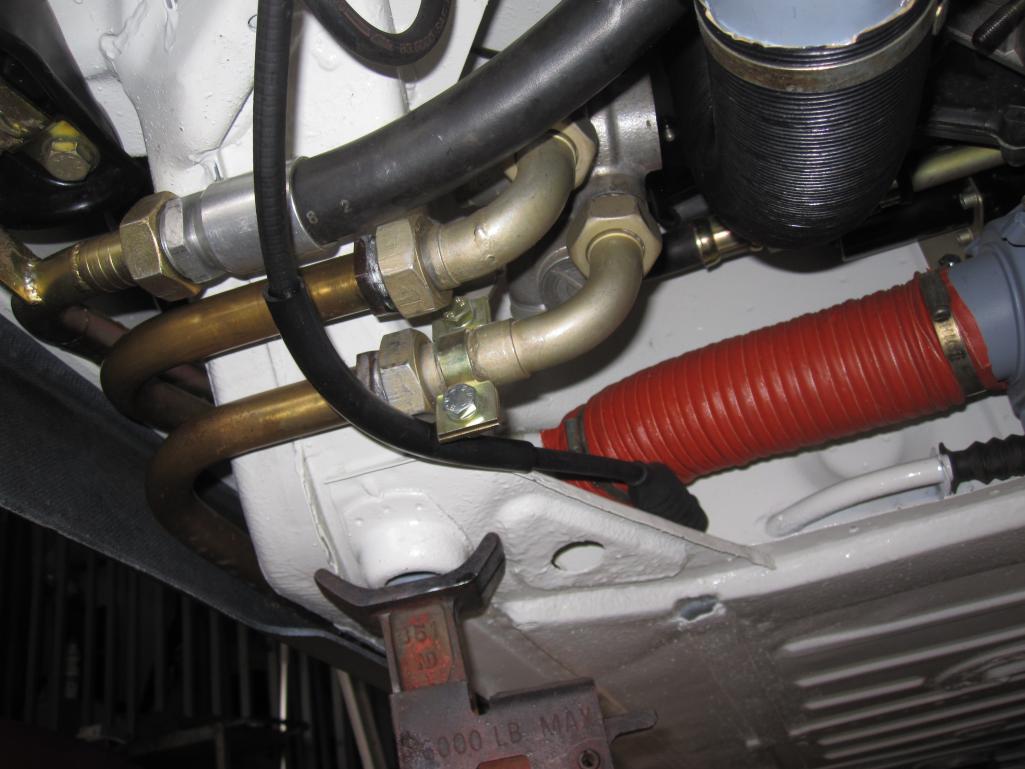
|
|
|
|
| mepstein |
Jul 6 2019, 05:21 PM
Post
#225
|
|
914-6 GT in waiting Group: Members Posts: 20,696 Joined: 19-September 09 From: Landenberg, PA/Wilmington, DE Member No.: 10,825 Region Association: MidAtlantic Region |
QUOTE(rgalla9146 @ Jun 15 2019, 06:17 PM) QUOTE(Luke M @ Jun 15 2019, 03:10 PM) Hi Rory, The GT is looking great.. (IMG:style_emoticons/default/drooley.gif) Did you roll the flare lip at all ends or trim it like the later cars? Is 225 the largest tire you think will fit under the flares or do you have them spaced out? Hi Luke The flange is turned up, not trimmed. I traced the curve of the wheel opening and cut a piece of 1/4" plywood to conform to that shape. We then clamped it to the inside of the fender and shaped it (body hammer) as you might find on a standard fender. This adds strength and doesn't take away too much tire clearance. As for the wheel/tires in the rear .... no spacers. I have about 3/4" space on the outside on either side. Add 21mm spacers ? at that point it would be TIGHT. On the inside each has about 1/2" clearance. I don't think 9" wheels will fit. Can I size up from a 225 to a ? 235 , 245 ? on my 8" sixteens ? don't know. Something I might explore when there is more power. I like the plywood idea. There's a lot of extra metal on the lip of the flare so I either want to trim it or shape it like you did. I'll let my metal guy decide. |
|
|
|
| Larmo63 |
Jul 6 2019, 07:10 PM
Post
#226
|
|
Advanced Member Group: Members Posts: 4,267 Joined: 3-March 14 From: San Clemente, Ca Member No.: 17,068 Region Association: Southern California |
I'm weird. I never get sick of checking out a nice clean and new GT build.
Looks great Rory!!! |
|
|
|
| burton73 |
Jul 9 2019, 11:46 AM
Post
#227
|
|
Senior member, and old dude Group: Members Posts: 4,013 Joined: 2-January 07 From: Los Angeles Member No.: 7,414 Region Association: Southern California |
Rory,
You did a super job on your car. Clean is what I am talking about! Beautiful car. Bob B (IMG:style_emoticons/default/smilie_pokal.gif) |
|
|
|
| rgalla9146 |
Jul 10 2019, 10:30 AM
Post
#228
|
|
Advanced Member Group: Members Posts: 4,962 Joined: 23-November 05 From: Paramus NJ Member No.: 5,176 Region Association: None |
Thank you ......to my California compatriots
Bob I don't know if I've mentioned it in the past but I've known Peter Dawe for close to forty years. He must have done your car when he lived in California and worked for Andial. I see him at Porsche gatherings every so often. What a talented guy, he's done it all. Thanks again Rory You too Larmo ! another pic Attached thumbnail(s) 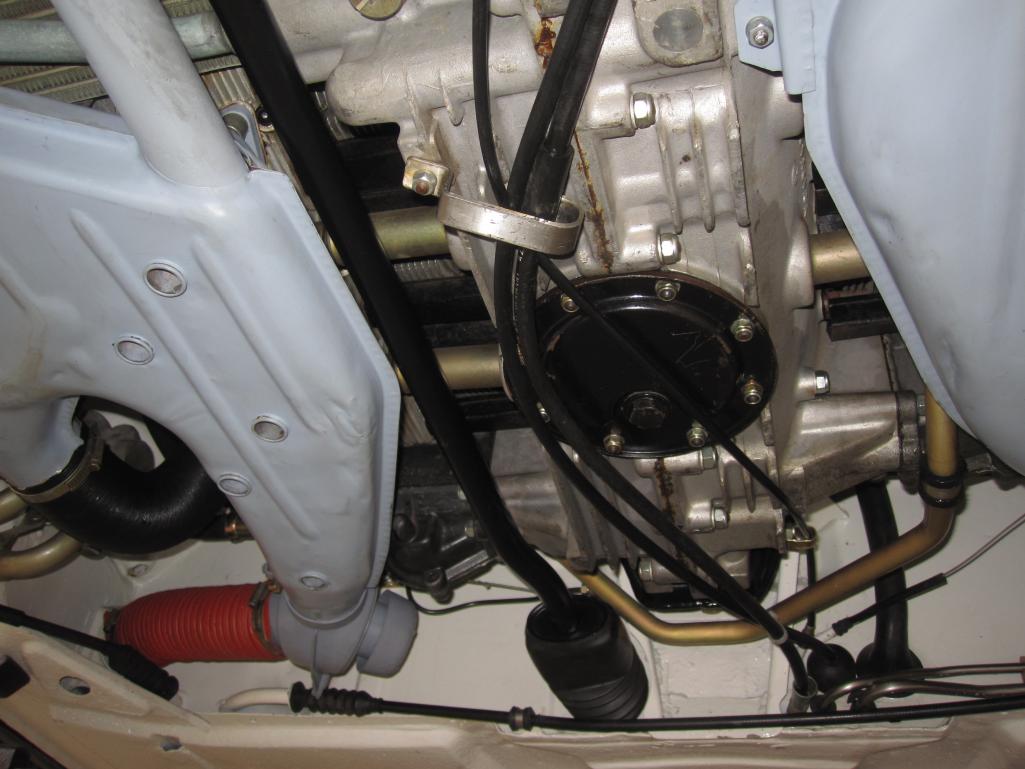
|
|
|
|
| rgalla9146 |
Jul 12 2019, 09:01 AM
Post
#229
|
|
Advanced Member Group: Members Posts: 4,962 Joined: 23-November 05 From: Paramus NJ Member No.: 5,176 Region Association: None |
QUOTE(mepstein @ Jul 6 2019, 07:21 PM) QUOTE(rgalla9146 @ Jun 15 2019, 06:17 PM) QUOTE(Luke M @ Jun 15 2019, 03:10 PM) Hi Rory, The GT is looking great.. (IMG:style_emoticons/default/drooley.gif) Did you roll the flare lip at all ends or trim it like the later cars? Is 225 the largest tire you think will fit under the flares or do you have them spaced out? Hi Luke The flange is turned up, not trimmed. I traced the curve of the wheel opening and cut a piece of 1/4" plywood to conform to that shape. We then clamped it to the inside of the fender and shaped it (body hammer) as you might find on a standard fender. This adds strength and doesn't take away too much tire clearance. As for the wheel/tires in the rear .... no spacers. I have about 3/4" space on the outside on either side. Add 21mm spacers ? at that point it would be TIGHT. On the inside each has about 1/2" clearance. I don't think 9" wheels will fit. Can I size up from a 225 to a ? 235 , 245 ? on my 8" sixteens ? don't know. Something I might explore when there is more power. I like the plywood idea. There's a lot of extra metal on the lip of the flare so I either want to trim it or shape it like you did. I'll let my metal guy decide. This is how it was done. Clamped the plywood profile against the flange with five or six C clamps. Used an additional piece of plywood on the outside to protect the flare. Slowly hammered the flange flush against the flat of the plywood. Used care to shape the transition from the rolled area to the untouched flange Attached thumbnail(s) 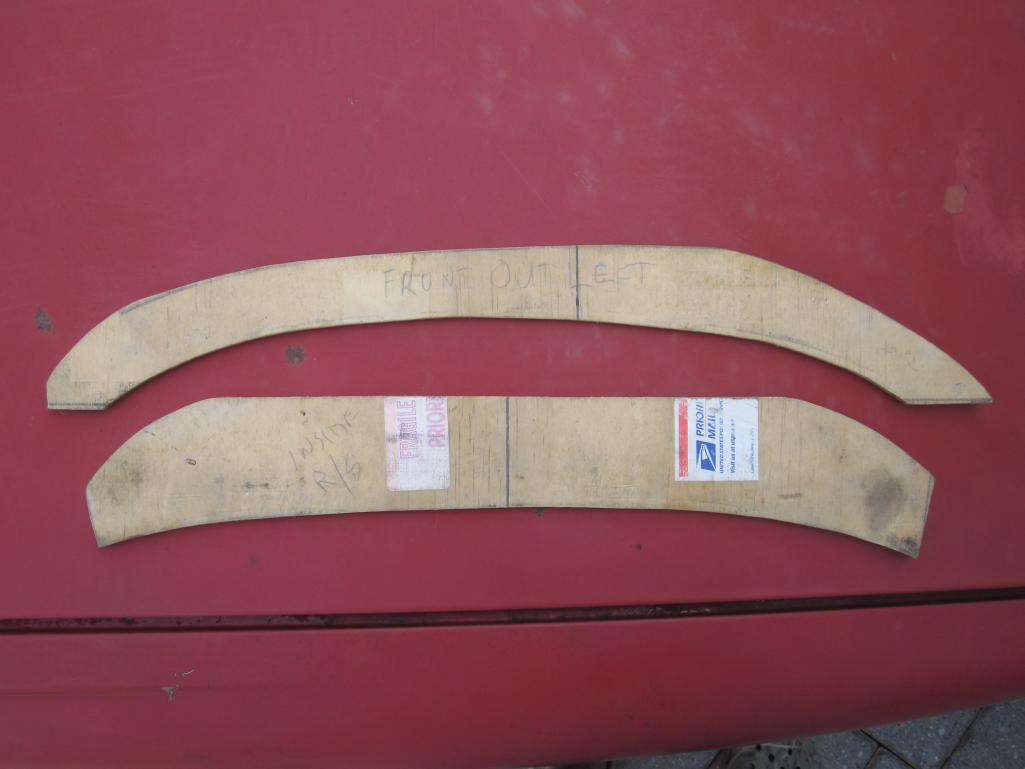 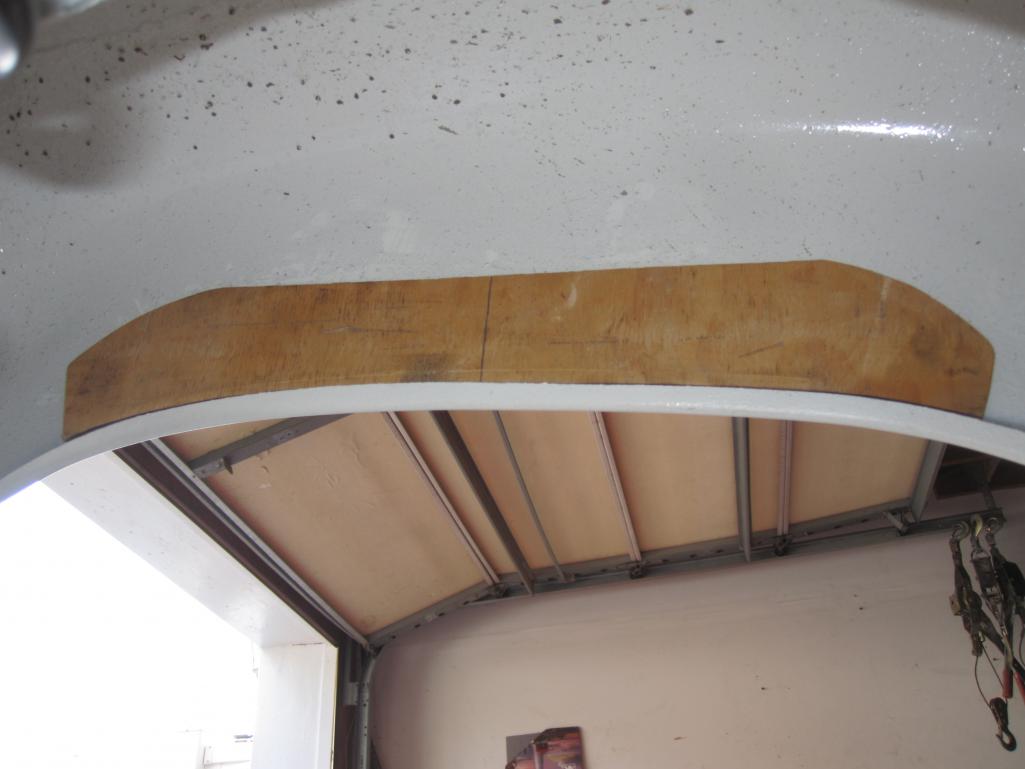
|
|
|
|
| rgalla9146 |
Jul 12 2019, 09:03 AM
Post
#230
|
|
Advanced Member Group: Members Posts: 4,962 Joined: 23-November 05 From: Paramus NJ Member No.: 5,176 Region Association: None |
QUOTE(rgalla9146 @ Jul 12 2019, 11:01 AM) QUOTE(mepstein @ Jul 6 2019, 07:21 PM) QUOTE(rgalla9146 @ Jun 15 2019, 06:17 PM) QUOTE(Luke M @ Jun 15 2019, 03:10 PM) Hi Rory, The GT is looking great.. (IMG:style_emoticons/default/drooley.gif) Did you roll the flare lip at all ends or trim it like the later cars? Is 225 the largest tire you think will fit under the flares or do you have them spaced out? Hi Luke The flange is turned up, not trimmed. I traced the curve of the wheel opening and cut a piece of 1/4" plywood to conform to that shape. We then clamped it to the inside of the fender and shaped it (body hammer) as you might find on a standard fender. This adds strength and doesn't take away too much tire clearance. As for the wheel/tires in the rear .... no spacers. I have about 3/4" space on the outside on either side. Add 21mm spacers ? at that point it would be TIGHT. On the inside each has about 1/2" clearance. I don't think 9" wheels will fit. Can I size up from a 225 to a ? 235 , 245 ? on my 8" sixteens ? don't know. Something I might explore when there is more power. I like the plywood idea. There's a lot of extra metal on the lip of the flare so I either want to trim it or shape it like you did. I'll let my metal guy decide. This is how it was done. Clamped the plywood profile against the flange with five or six C clamps. Used an additional piece of plywood on the outside to protect the flare. Slowly hammered the flange flush against the flat of the plywood. Used care to shape the transition from the rolled area to the untouched flange one more Attached thumbnail(s) 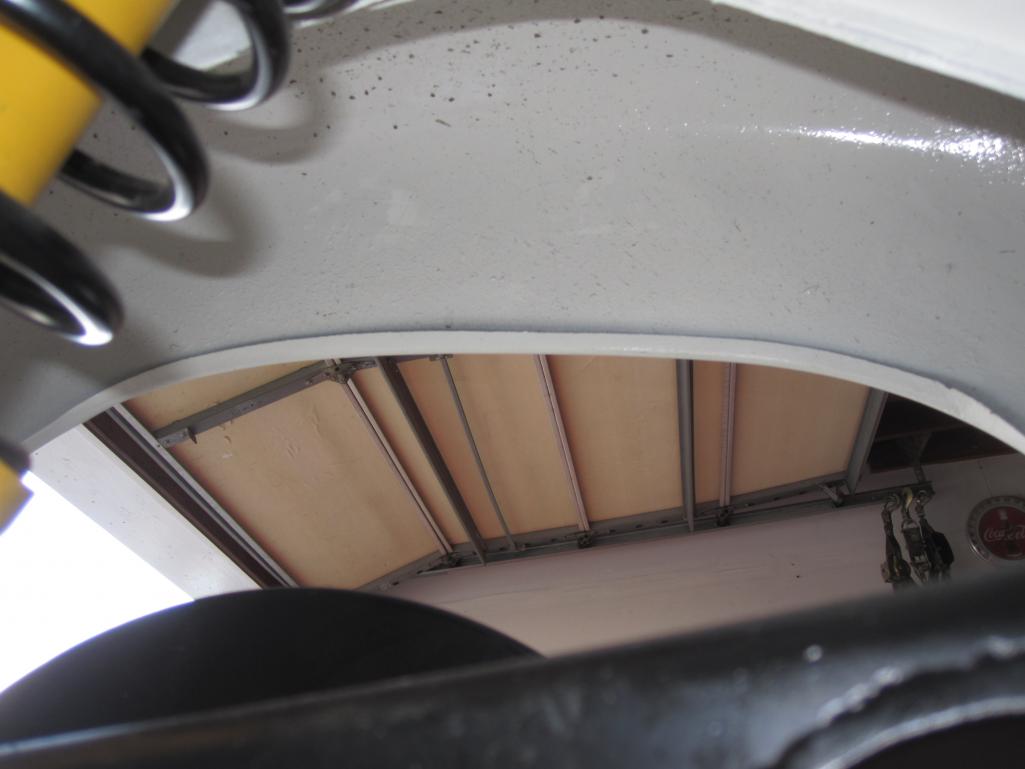
|
|
|
|
| rgalla9146 |
Jul 12 2019, 09:04 AM
Post
#231
|
|
Advanced Member Group: Members Posts: 4,962 Joined: 23-November 05 From: Paramus NJ Member No.: 5,176 Region Association: None |
QUOTE(rgalla9146 @ Jul 12 2019, 11:03 AM) QUOTE(rgalla9146 @ Jul 12 2019, 11:01 AM) QUOTE(mepstein @ Jul 6 2019, 07:21 PM) QUOTE(rgalla9146 @ Jun 15 2019, 06:17 PM) QUOTE(Luke M @ Jun 15 2019, 03:10 PM) Hi Rory, The GT is looking great.. (IMG:style_emoticons/default/drooley.gif) Did you roll the flare lip at all ends or trim it like the later cars? Is 225 the largest tire you think will fit under the flares or do you have them spaced out? Hi Luke The flange is turned up, not trimmed. I traced the curve of the wheel opening and cut a piece of 1/4" plywood to conform to that shape. We then clamped it to the inside of the fender and shaped it (body hammer) as you might find on a standard fender. This adds strength and doesn't take away too much tire clearance. As for the wheel/tires in the rear .... no spacers. I have about 3/4" space on the outside on either side. Add 21mm spacers ? at that point it would be TIGHT. On the inside each has about 1/2" clearance. I don't think 9" wheels will fit. Can I size up from a 225 to a ? 235 , 245 ? on my 8" sixteens ? don't know. Something I might explore when there is more power. I like the plywood idea. There's a lot of extra metal on the lip of the flare so I either want to trim it or shape it like you did. I'll let my metal guy decide. This is how it was done. Clamped the plywood profile against the flange with five or six C clamps. Used an additional piece of plywood on the outside to protect the flare. Slowly hammered the flange flush against the flat of the plywood. Used care to shape the transition from the rolled area to the untouched flange one more Attached thumbnail(s) 
|
|
|
|
| maf914 |
Jul 12 2019, 11:41 AM
Post
#232
|
|
Not a Guru! Group: Members Posts: 3,049 Joined: 30-April 03 From: Central Florida Member No.: 632 Region Association: None |
Rory,
Your car looks great! Impressive work. Did you turn up the flange (with the plywood forms) before or after paint? |
|
|
|
| mepstein |
Jul 12 2019, 01:45 PM
Post
#233
|
|
914-6 GT in waiting Group: Members Posts: 20,696 Joined: 19-September 09 From: Landenberg, PA/Wilmington, DE Member No.: 10,825 Region Association: MidAtlantic Region |
QUOTE(maf914 @ Jul 12 2019, 01:41 PM) Rory, Your car looks great! Impressive work. Did you turn up the flange (with the plywood forms) before or after paint? I’m sure he did this before paint. What a great way to shape the lip. |
|
|
|
| rgalla9146 |
Sep 22 2019, 10:29 AM
Post
#234
|
|
Advanced Member Group: Members Posts: 4,962 Joined: 23-November 05 From: Paramus NJ Member No.: 5,176 Region Association: None |
Entered the PCA Zone 1 Concours
Placed 3rd in "Street Class" ...... 3 cars entered. Could have been worse. If Len had entered I'd have garnered a solid 4th. Attached thumbnail(s) 
|
|
|
|
| rgalla9146 |
Mar 27 2020, 09:48 AM
Post
#235
|
|
Advanced Member Group: Members Posts: 4,962 Joined: 23-November 05 From: Paramus NJ Member No.: 5,176 Region Association: None |
I recently fabricated a hand throttle.
I used a heat flap handle and mechanism as the starting point and copied the rest of an original 6 throttle mechanism. I changed the shape of the handle by cutting it, rotating the top and making it straight. Added a wing to the gas pedal bellcrank for rod to push against. The rod is fabed from brake tubing. The pictures tell the story. I've had the NOS throttle knob for eons. I hated taking it out of the package. Starting a no-choke carbureted engine with the hand throttle is very easy. Attached thumbnail(s) 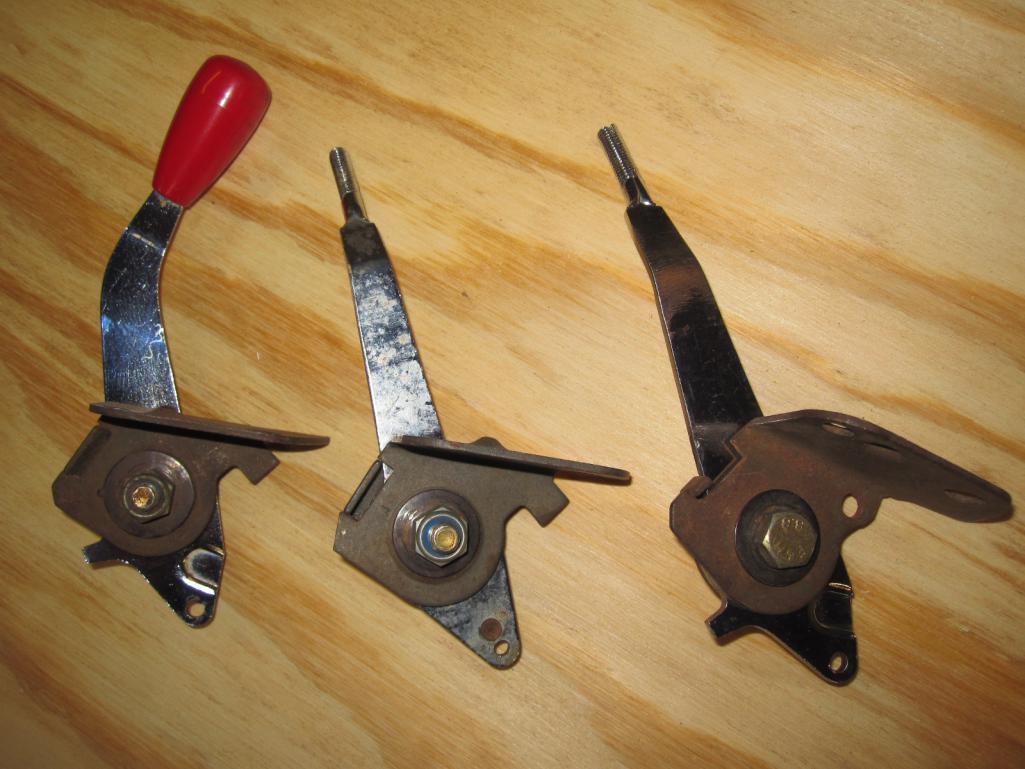 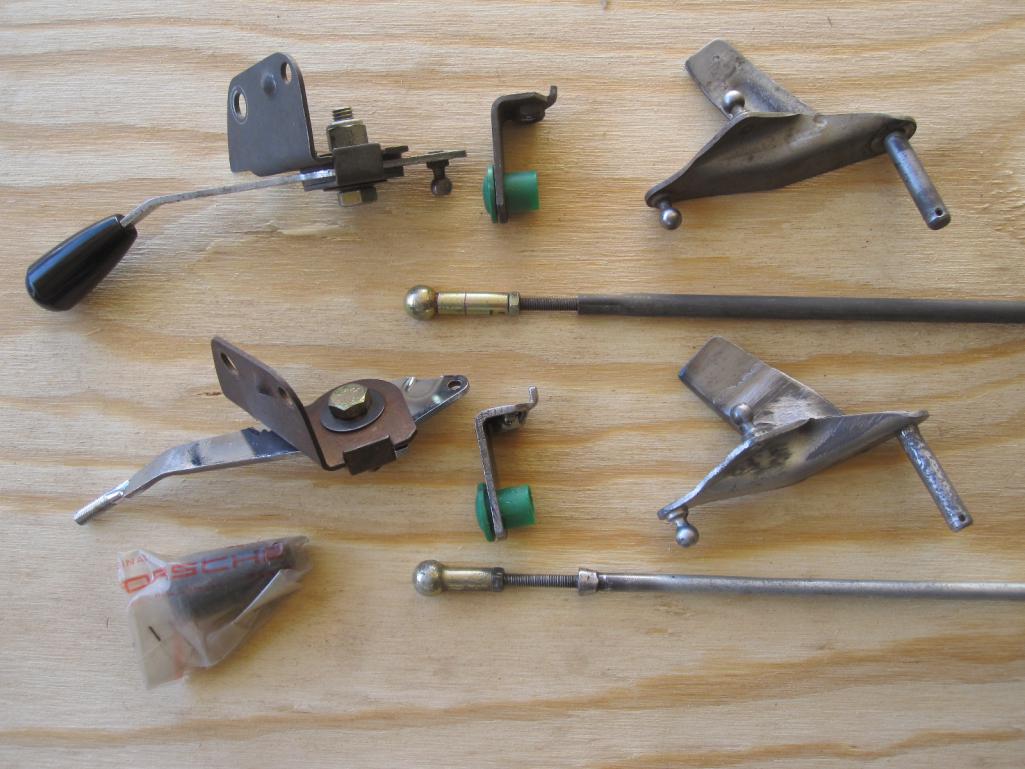 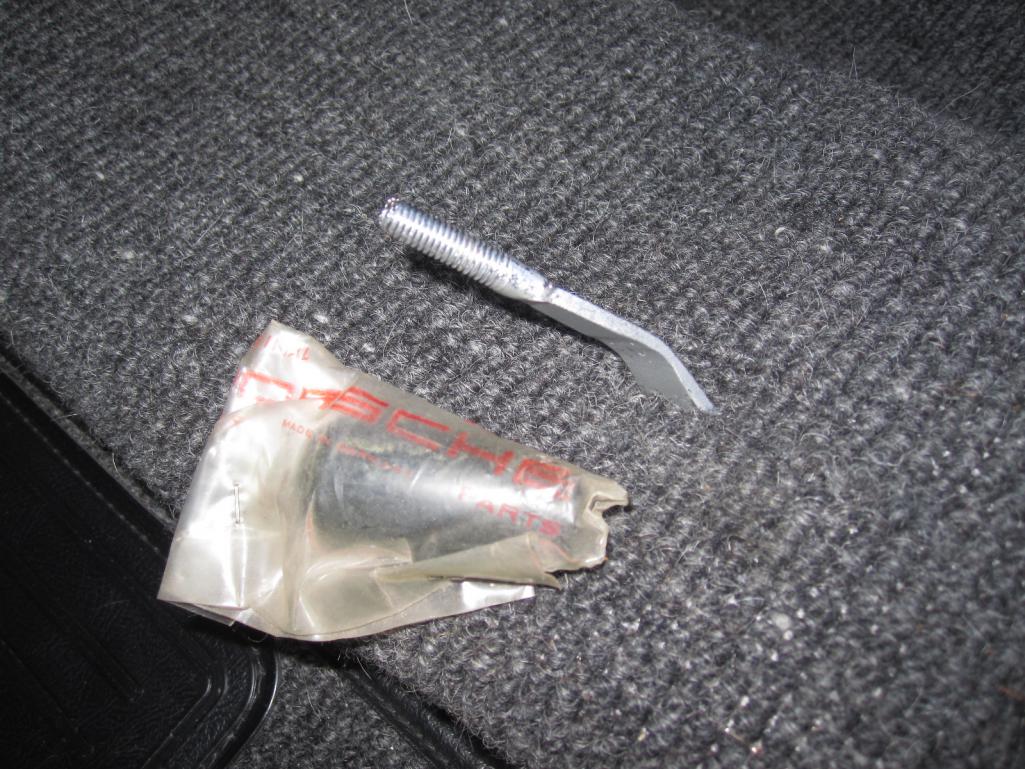 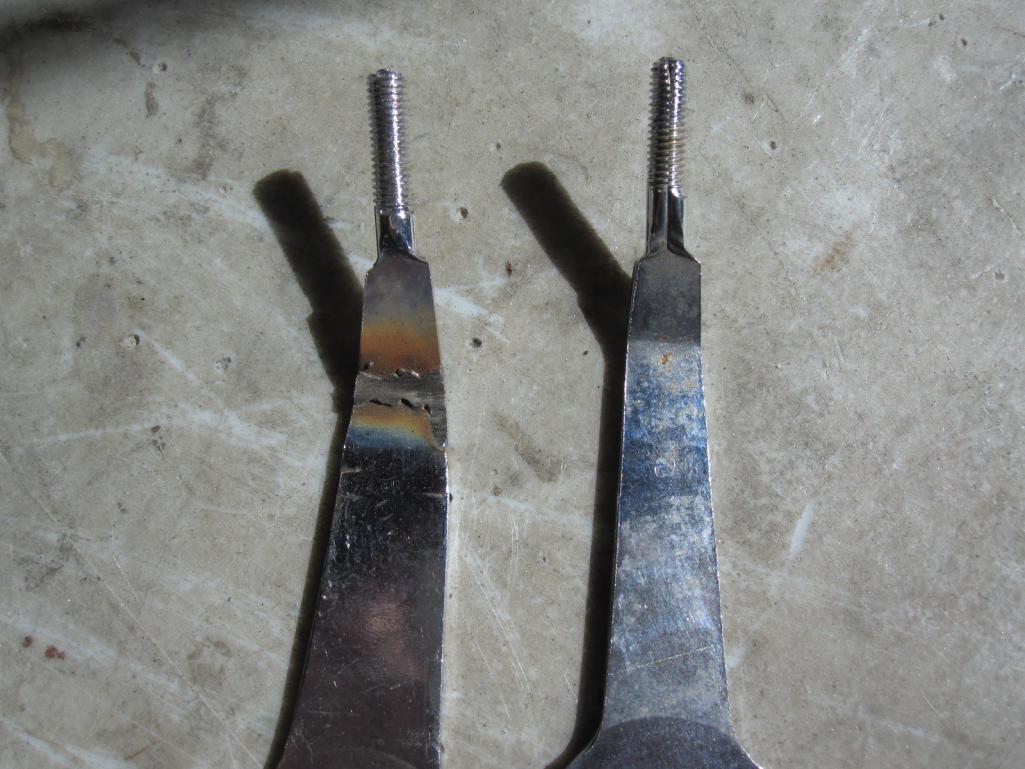 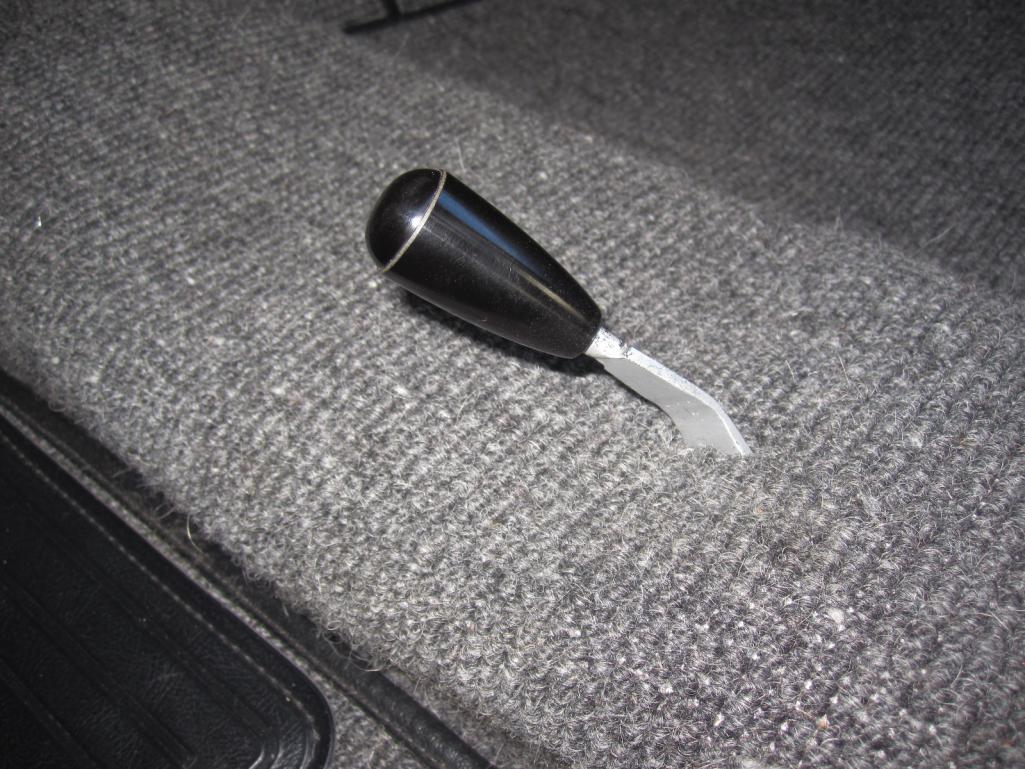
|
|
|
|
| rgalla9146 |
Apr 17 2020, 10:19 AM
Post
#236
|
|
Advanced Member Group: Members Posts: 4,962 Joined: 23-November 05 From: Paramus NJ Member No.: 5,176 Region Association: None |
Here's a pic of the hand brake recess part after it was finished and installed.
I'm getting to drive the car more now that the roads are free of salt Also free of traffic due to the virus. Attached thumbnail(s) 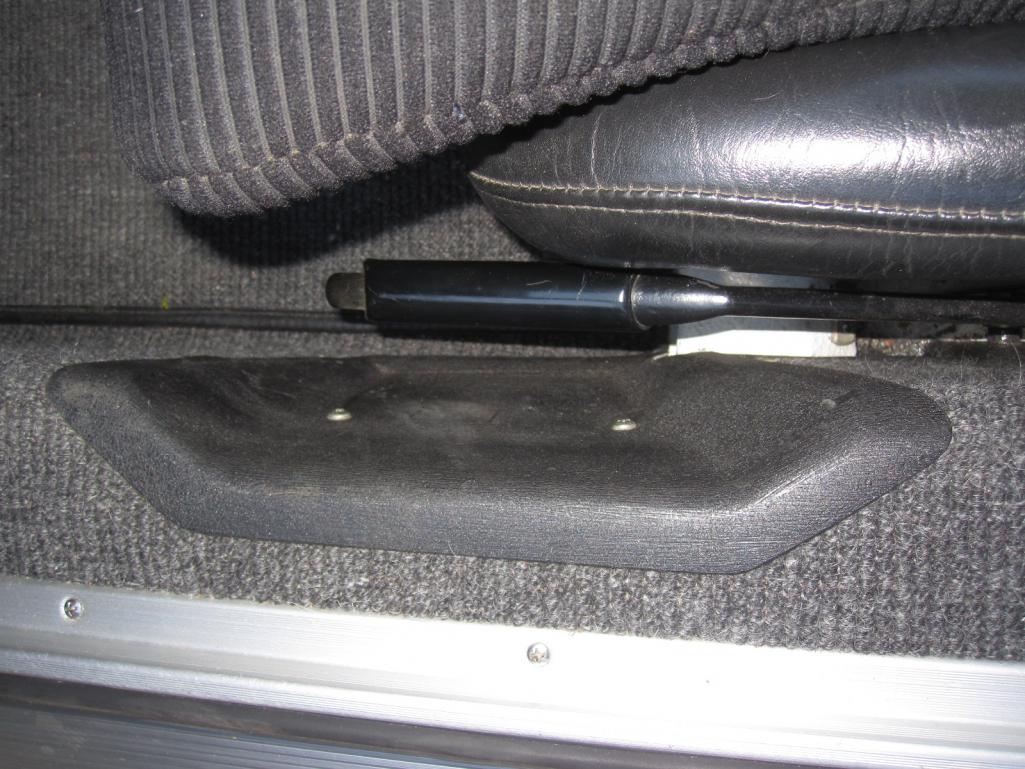
|
|
|
|
| Cairo94507 |
Apr 17 2020, 10:45 AM
Post
#237
|
|
Michael Group: Members Posts: 10,638 Joined: 1-November 08 From: Auburn, CA Member No.: 9,712 Region Association: Northern California |
I can't think of a better stress reliever. Enjoy the miles of smiles. (IMG:style_emoticons/default/beerchug.gif)
|
|
|
|
| Luke M |
Apr 17 2020, 04:46 PM
Post
#238
|
|
Senior Member Group: Members Posts: 1,518 Joined: 8-February 05 From: WNY Member No.: 3,574 Region Association: North East States |
|
|
|
|
| Mueller |
Apr 17 2020, 04:54 PM
Post
#239
|
|
914 Freak! Group: Members Posts: 17,155 Joined: 4-January 03 From: Antioch, CA Member No.: 87 Region Association: None |
QUOTE(Larmo63 @ Jul 6 2019, 06:10 PM) I'm weird. I never get sick of checking out a nice clean and new GT build. Looks great Rory!!! Not the only one.. I keep looking at how clean and perfect it is, then he adds cool touches like the hand throttle, too cool. Great looking car and I dig the use of the plywood forms. |
|
|
|
| Dion |
Apr 17 2020, 08:20 PM
Post
#240
|
|
RN Group: Members Posts: 2,926 Joined: 16-September 04 From: Audubon,PA Member No.: 2,766 Region Association: MidAtlantic Region |
QUOTE(rgalla9146 @ Apr 17 2020, 08:19 AM) Here's a pic of the hand brake recess part after it was finished and installed. I'm getting to drive the car more now that the roads are free of salt Also free of traffic due to the virus. @rgalla9146 Ok Rory, I’ll be glad to pay you to make me one of those! That’s a very cool detail. Enjoy the drives. |
|
|
|
|
1 User(s) are reading this topic (1 Guests and 0 Anonymous Users)
0 Members:

|
Lo-Fi Version | Time is now: 21st May 2026 - 06:59 PM |
Invision Power Board
v9.1.4 © 2026 IPS, Inc.