|
|
|
Porsche, and the Porsche crest are registered trademarks of Dr. Ing. h.c. F. Porsche AG.
This site is not affiliated with Porsche in any way. Its only purpose is to provide an online forum for car enthusiasts. All other trademarks are property of their respective owners. |
|
|

  |

| 1adam12 |
 Jul 13 2017, 03:26 PM Jul 13 2017, 03:26 PM
Post
#1
|
|
Member  Group: Members Posts: 209 Joined: 25-May 17 From: Chino Hills, CA Member No.: 21,132 Region Association: Southern California |
Hi everyone! I'm trying to install a new set of outer door fuzzies I recently purchased from 914rubber but I'm having a hell of a time removing the old fuzzy. I was able to locate and remove the 3 screws that hold the original fuzzy in place but it's been difficult trying to get the old decrepit fuzzy strip out of the retaining bracket?
Does this bracket come off somehow because it's a pain trying to pick and break up the old strip through the top of the door. Even if I was able to break up most of the old strip, the top metal portion would still be lodged within the top of the bracket. Attached thumbnail(s) 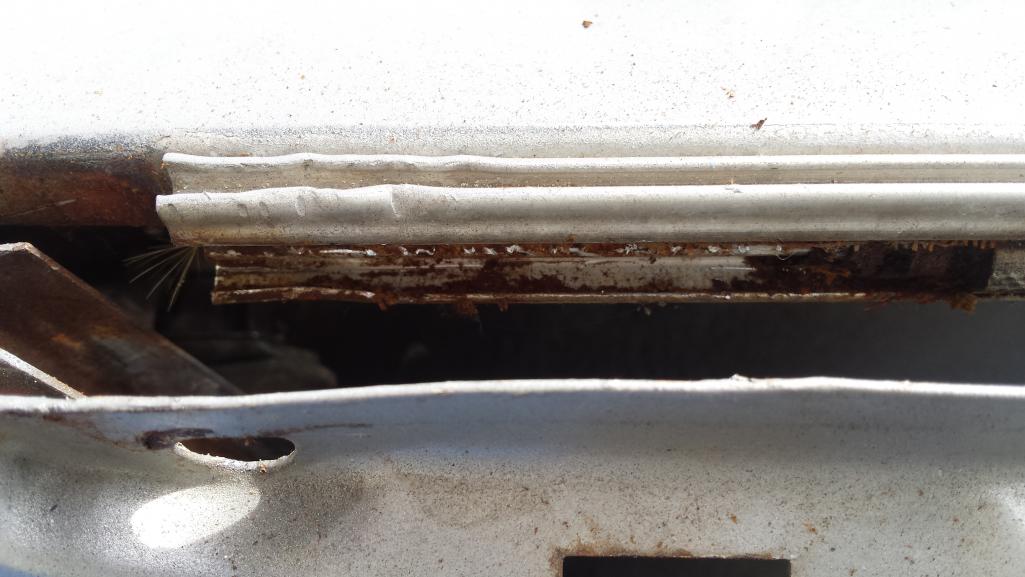
|
   |

 
|
| toolguy |
Jul 13 2017, 04:32 PM
Post
#2
|
|
Senior Member Group: Members Posts: 1,267 Joined: 2-April 11 From: San Diego / El Cajon Member No.: 12,889 Region Association: Southern California |
see the hole with the light shining through. . Isn't that the access hole to the screw that hold the strip on. . IIRC there are 3 of them
|
|
|
|
| 1adam12 |
Jul 13 2017, 04:37 PM
Post
#3
|
|
Member Group: Members Posts: 209 Joined: 25-May 17 From: Chino Hills, CA Member No.: 21,132 Region Association: Southern California |
QUOTE(toolguy @ Jul 13 2017, 03:32 PM)  see the hole with the light shining through. . Isn't that the access hole to the screw that hold the strip on. . IIRC there are 3 of them I did use the holes to access the screws which have been removed already. Problem is removing the old strip now. |
|
|
|
| 1adam12 |
Jul 13 2017, 04:57 PM
Post
#4
|
|
Member Group: Members Posts: 209 Joined: 25-May 17 From: Chino Hills, CA Member No.: 21,132 Region Association: Southern California |
I guess my question is does the entire piece of aluminum strip that holds the fuzzy and scraper come off once you've removed the 3 small screws? It doesn't seem like I can pry it off without damaging the track or the door but I'm being cautious.
|
|
|
|
| arne |
Jul 13 2017, 05:50 PM
Post
#5
|
|
Serial Rescuer of old vehicles... Group: Members Posts: 731 Joined: 31-January 17 From: Eugene, Oregon Member No.: 20,799 Region Association: None |
Push it down into the door. I did mine last week.
|
|
|
|
| 914_teener |
Jul 13 2017, 05:53 PM
Post
#6
|
|
914 Guru Group: Members Posts: 5,193 Joined: 31-August 08 From: So. Cal Member No.: 9,489 Region Association: Southern California |
QUOTE(1adam12 @ Jul 13 2017, 03:57 PM) I guess my question is does the entire piece of aluminum strip that holds the fuzzy and scraper come off once you've removed the 3 small screws? It doesn't seem like I can pry it off without damaging the track or the door but I'm being cautious. Did you actually unscrew the whole screw or did they break off? I had to drill the screws out in my car cause they broke off and couldn.t pull the channel off without effing it up. |
|
|
|
| PanelBilly |
Jul 13 2017, 06:00 PM
Post
#7
|
|
914 Guru Group: Members Posts: 5,796 Joined: 23-July 06 From: Kent, Wa Member No.: 6,488 Region Association: Pacific Northwest |
I spent several, yes several long nights replacing that fuzzy strip. The steel backer in the original ones had rusted and I needed to scrap the crap out carefully. Themn putting them back in was another loooong project. just one of those jobs that tests you
|
|
|
|
| mgphoto |
Jul 13 2017, 06:00 PM
Post
#8
|
|
"If there is a mistake it will find me" Group: Members Posts: 1,335 Joined: 1-April 09 From: Los Angeles, CA Member No.: 10,225 Region Association: Southern California |
The screws tend to bend the metal in the holes preventing the strip from being removed.
A few good taps with a hammer and long screwdriver downward. |
 |
|
| Mikey914 |
Jul 13 2017, 06:07 PM
Post
#9
|
|
The rubber man Group: Members Posts: 12,638 Joined: 27-December 04 From: Hillsboro, OR Member No.: 3,348 Region Association: None |
We do make replacement aluminum strips if you need them, but you shohld be able to push down. Hopefully not a broken screw, but if you look st the ones you removed you can tell. Take a wood shim and tap down on it as not to damage the old track but if you need them we do have new ones.
Mark http://shop.914rubber.com/91453195910-Door...m?categoryId=-1 |
|
|
|
| barefoot |
Jul 13 2017, 06:47 PM
Post
#10
|
|
Senior Member Group: Members Posts: 1,268 Joined: 19-March 13 From: Charleston SC Member No.: 15,673 Region Association: South East States |
Those 3 little screws were the only ones on the entire car that I could not remove, I finally gave up.
|
|
|
|
| mgphoto |
Jul 13 2017, 06:53 PM
Post
#11
|
|
"If there is a mistake it will find me" Group: Members Posts: 1,335 Joined: 1-April 09 From: Los Angeles, CA Member No.: 10,225 Region Association: Southern California |
QUOTE(barefoot @ Jul 13 2017, 05:47 PM) Those 3 little screws were the only ones on the entire car that I could not remove, I finally gave up. Drill them out and use stainless steel replacements. |
|
|
|
| banananose914 |
Jul 13 2017, 10:51 PM
Post
#12
|
|
Member Group: Members Posts: 235 Joined: 20-November 13 From: california Member No.: 16,681 Region Association: None |
For removing the screws I used Map gas. You just have to be careful you don't apply too much heat and screw up the door itself. Once the channels are off, you can soak them in water to loosen things up. I used a putty knife to scrape out what was still left in the channel. I then sandblasted them, and sprayed them with Krylon dull aluminum paint. Make sure that when you install them, the screws sit flush with the channel and they don't protrude into the fuzzy itself. If they do, you stand the chance of scratching your window. As stated above, use stainless steel screws. I live in Orange County, if you need some help restoring them let me know. I'll do what I can to help you. Jim.
|
|
|
|
| 1adam12 |
Jul 14 2017, 12:30 AM
Post
#13
|
|
Member Group: Members Posts: 209 Joined: 25-May 17 From: Chino Hills, CA Member No.: 21,132 Region Association: Southern California |
Did you actually unscrew the whole screw or did they break off? I had to drill the screws out in my car cause they broke off and couldn.t pull the channel off without effing it up. [/quote] I was able to get 2 out of 3 screws out with no problem. I stripped the head on the last one but was able to carefully twist it out with angled needle-nose pliers. |
|
|
|
| 1adam12 |
Jul 14 2017, 12:42 AM
Post
#14
|
|
Member Group: Members Posts: 209 Joined: 25-May 17 From: Chino Hills, CA Member No.: 21,132 Region Association: Southern California |
Thank you everyone for your replies and knowledge on this topic. I made sure to do a search on the web, here and on the other public forums first before posting here. It seems that most write-ups didn't go over how to remove the actual aluminum track to get better access to getting the old fuzzy strip out. The scrape out method while everything is still inside the door would be insane sorry PanelBilly
I'll try the methods that you all have mentioned tomorrow. A weekend project it seems now smh! (IMG:style_emoticons/default/headbang.gif) |
|
|
|
| 1adam12 |
Jul 14 2017, 12:49 AM
Post
#15
|
|
Member Group: Members Posts: 209 Joined: 25-May 17 From: Chino Hills, CA Member No.: 21,132 Region Association: Southern California |
QUOTE(banananose914 @ Jul 13 2017, 09:51 PM) For removing the screws I used Map gas. You just have to be careful you don't apply too much heat and screw up the door itself. Once the channels are off, you can soak them in water to loosen things up. I used a putty knife to scrape out what was still left in the channel. I then sandblasted them, and sprayed them with Krylon dull aluminum paint. Make sure that when you install them, the screws sit flush with the channel and they don't protrude into the fuzzy itself. If they do, you stand the chance of scratching your window. As stated above, use stainless steel screws. I live in Orange County, if you need some help restoring them let me know. I'll do what I can to help you. Jim. Awesome Jim! Great step by step explanation. I can definitely get a visual on how to finish the job now and thank you for the tips on the reinstallation. My neighbor has a sandblaster which I've been using every weekend so far trying to restore bits and pieces. My channels need it as they were over-sprayed from the previous owner's paint job. I'll try and find that dull aluminum paint. |
|
|
|
| Mikey914 |
Jul 14 2017, 12:43 PM
Post
#16
|
|
The rubber man Group: Members Posts: 12,638 Joined: 27-December 04 From: Hillsboro, OR Member No.: 3,348 Region Association: None |
No need to paint. Use acetone and some scotchbrite to remove paint and youcan polish id you wish (no one really sees this part).
Mark |
|
|
|
| jim_hoyland |
Jul 14 2017, 01:17 PM
Post
#17
|
|
Get that VIN ? Group: Members Posts: 9,258 Joined: 1-May 03 From: Sunset Beach, CA Member No.: 643 Region Association: Southern California |
Does the older fuzzy cause the window to become harder to crank up?
|
|
|
|
| 1adam12 |
Jul 14 2017, 04:00 PM
Post
#18
|
|
Member Group: Members Posts: 209 Joined: 25-May 17 From: Chino Hills, CA Member No.: 21,132 Region Association: Southern California |
Well, I was able to remove the aluminum track. I used a flat head screwdriver, hammer and thick microfiber towel so I wouldn't damage the aluminum. I just punched down the center-top track that holds the scrapper and off it went.
I sprayed some Lucas Tool Box buddy on the old rubber and now soaking it in soapy water before my next attempt to scrape out the old fuzzy. I added picks for reference. Attached thumbnail(s) 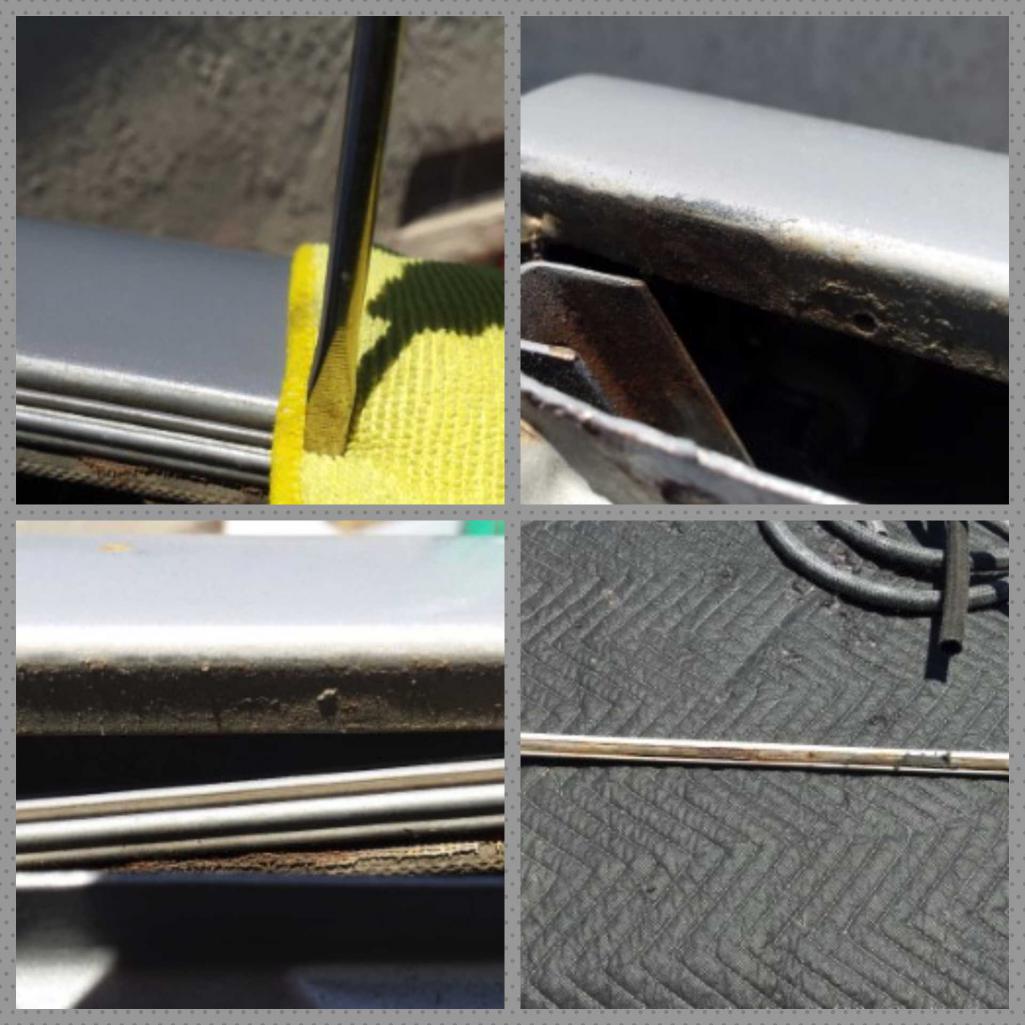
|
|
|
|
| whitetwinturbo |
Jul 15 2017, 08:53 AM
Post
#19
|
|
Honey, does this wing make my ass look fat? Group: Members Posts: 1,391 Joined: 22-October 11 From: Newport Beach/Kalefornya/USA Member No.: 13,704 Region Association: Southern California |
|
|
|
|
| 1adam12 |
Jul 15 2017, 10:23 PM
Post
#20
|
|
Member Group: Members Posts: 209 Joined: 25-May 17 From: Chino Hills, CA Member No.: 21,132 Region Association: Southern California |
Thanks to everyone on this thread and 914rubber. My fuzzies have gone from Ratchet to Respectible (IMG:style_emoticons/default/biggrin.gif) I also installed the new scrappers and inner fuzzies..what a difference!
Attached thumbnail(s) 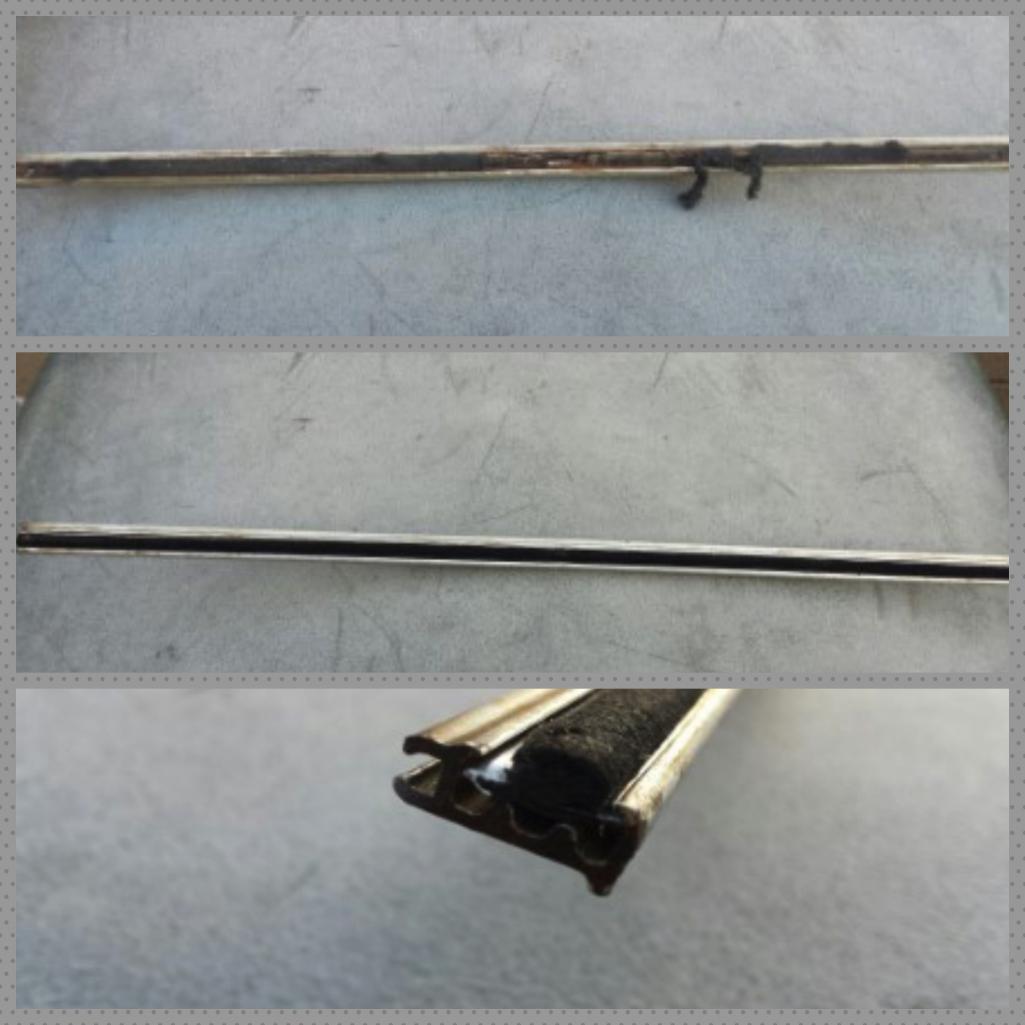
|
|
|
|
|
1 User(s) are reading this topic (1 Guests and 0 Anonymous Users)
0 Members:

|
Lo-Fi Version | Time is now: 20th April 2024 - 08:10 AM |
Invision Power Board
v9.1.4 © 2024 IPS, Inc.