|
|
|
Porsche, and the Porsche crest are registered trademarks of Dr. Ing. h.c. F. Porsche AG.
This site is not affiliated with Porsche in any way. Its only purpose is to provide an online forum for car enthusiasts. All other trademarks are property of their respective owners. |
|
|

  |

| TonyAKAVW |
 Oct 9 2005, 11:23 PM Oct 9 2005, 11:23 PM
Post
#141
|
|
That's my ride.  Group: Members Posts: 2,151 Joined: 17-January 03 From: Redondo Beach, CA Member No.: 166 Region Association: None |
Inside the oven...
Attached image(s) 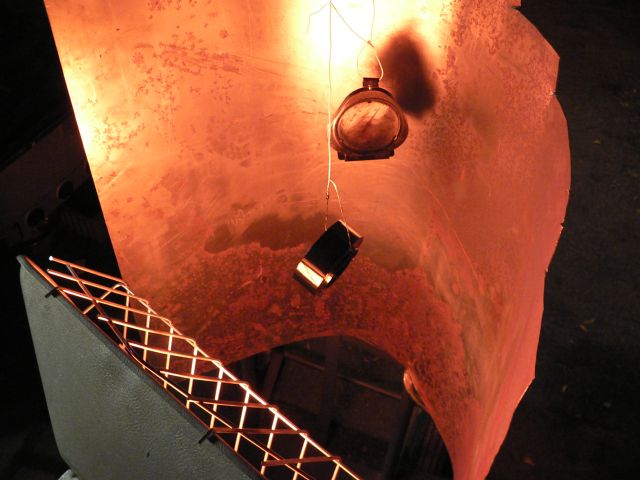
|
   |

 
|
| TonyAKAVW |
Oct 9 2005, 11:35 PM
Post
#142
|
|
That's my ride. Group: Members Posts: 2,151 Joined: 17-January 03 From: Redondo Beach, CA Member No.: 166 Region Association: None |
So here's what I was powder coating.
Andrew (Phantom914) gave me a steering wheel and a couple other pieces. One piece was a standard Momo-type adapter and the other was a spacer that he made from billet aluminum to adapt the "cheap 5 bolt Pep Boys type steering wheels" to the Momo adapter. Well the momo adapter was powder coated with some kind of black crinkle finish and had a big spot that was abraded. The spacer was plain aluminum and the bolt ring was some very dull powder. Further, the horn button had a little "Auto Tecnica" emblem behind it. I decided this was lame, and printed up my own custom emblem. After putting it all together (powder coated the bolts to match too) it looks like this. Clearly this is not something that is getting me closer to having my car on the road, but it was fun and will look pretty slick. -Tony Attached image(s) 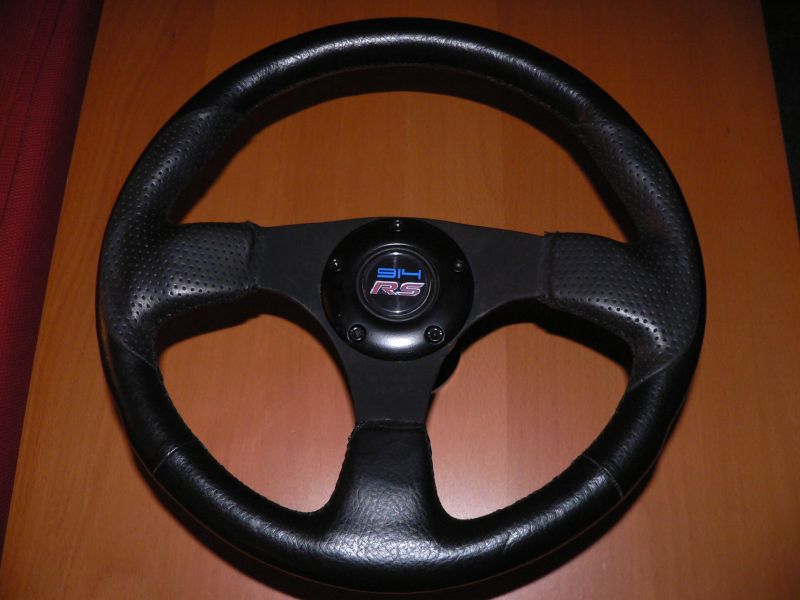
|
|
|
|
| TonyAKAVW |
Oct 9 2005, 11:38 PM
Post
#143
|
|
That's my ride. Group: Members Posts: 2,151 Joined: 17-January 03 From: Redondo Beach, CA Member No.: 166 Region Association: None |
and the adapters...
Attached image(s) 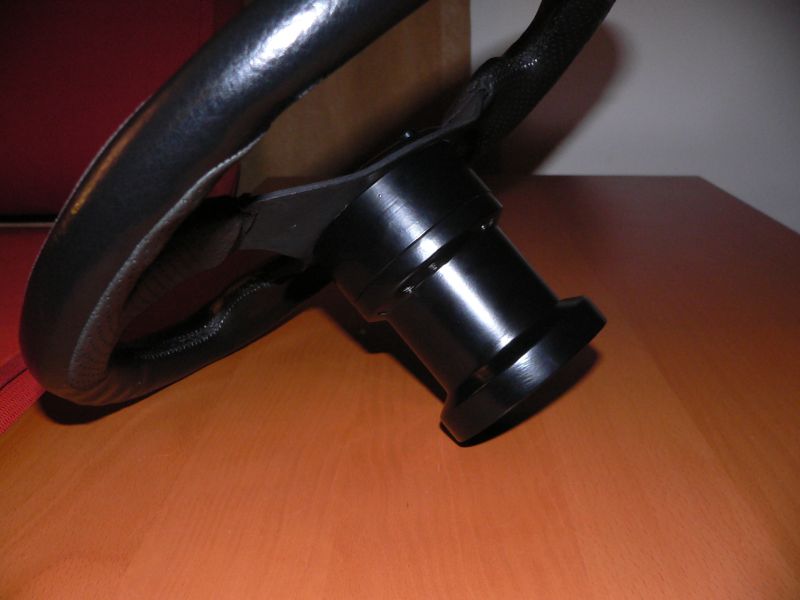
|
|
|
|
| sixnotfour |
Oct 9 2005, 11:50 PM
Post
#144
|
|
914 Wizard Group: Members Posts: 11,274 Joined: 12-September 04 Member No.: 2,744 Region Association: NineFourteenerVille |
Cool Horn Button (IMG:http://www.914world.com/bbs2/html/emoticons/burnout.gif)
|
|
|
|
| TonyAKAVW |
Oct 21 2005, 01:27 AM
Post
#145
|
|
That's my ride. Group: Members Posts: 2,151 Joined: 17-January 03 From: Redondo Beach, CA Member No.: 166 Region Association: None |
I was under the car tonight putting the engine into place and heard some weird noises. I got up and heard more noises from the shelves above me. There was some kind of animal up there but I had no idea what it was. Then all of a sudden this little bird appears and starts flying around. Because it was so bright in the garage he couldn't figure out how to escape. I eventually just shut off the lights and he flew right out.
Attached image(s) 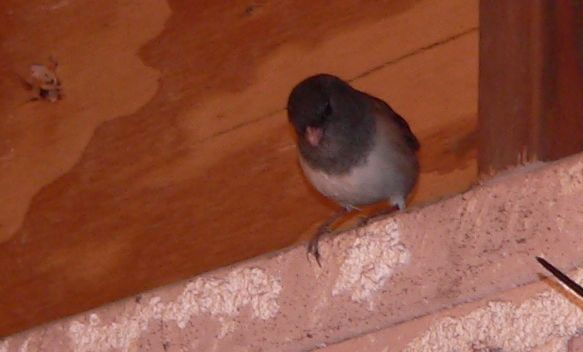
|
|
|
|
| TonyAKAVW |
Oct 21 2005, 01:30 AM
Post
#146
|
|
That's my ride. Group: Members Posts: 2,151 Joined: 17-January 03 From: Redondo Beach, CA Member No.: 166 Region Association: None |
So tonight I managed to get the engine and transmission into the car, aligned and ready for making measurements for the engine support bar.
I used a transmission jack that I bought for repairing my wife's car to move the transmission/engine assembly into the correct position. Attached image(s) 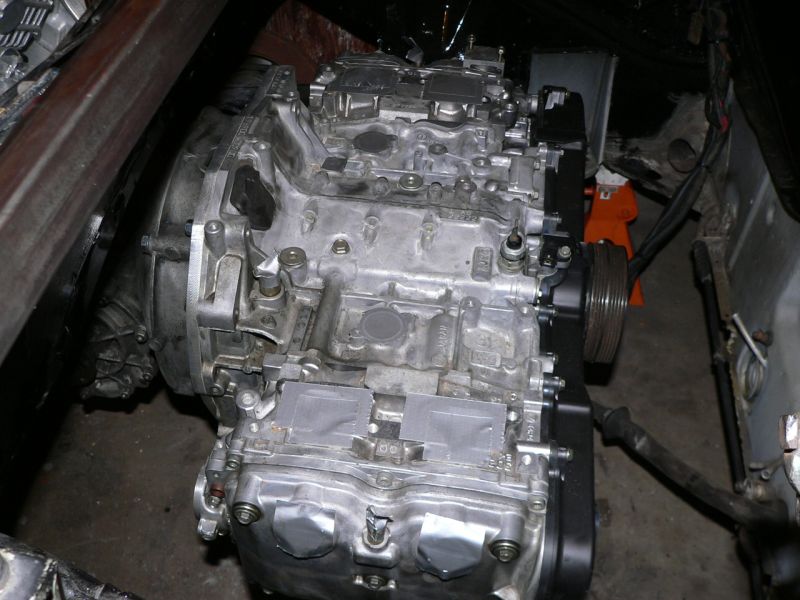
|
|
|
|
| TonyAKAVW |
Oct 21 2005, 01:31 AM
Post
#147
|
|
That's my ride. Group: Members Posts: 2,151 Joined: 17-January 03 From: Redondo Beach, CA Member No.: 166 Region Association: None |
Here's the engine/transmission from beneath. You may notice that the oil pan is missing. That is currently undergoing a geometry adjustment. (making it shorter ro I can keep the engine low.
Attached thumbnail(s) 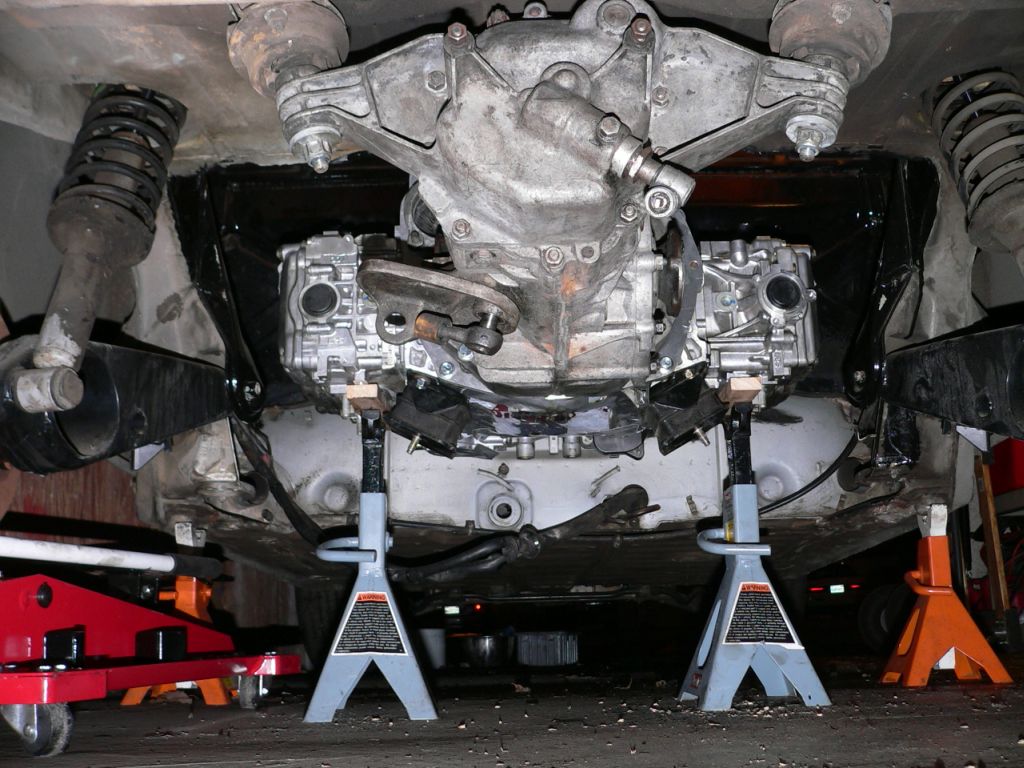
|
|
|
|
| banksyinoz |
Oct 23 2005, 02:17 AM
Post
#148
|
|
finally getting back into it Group: Members Posts: 223 Joined: 17-June 05 From: queensland, aus Member No.: 4,293 Region Association: Australia and New Zealand |
nice work tony keep up the good work (IMG:http://www.914world.com/bbs2/html/emoticons/wink.gif)
and thanks for keepin me motivated (IMG:http://www.914world.com/bbs2/html/emoticons/smilie_pokal.gif) the more i get motivated the more i fall in (IMG:http://www.914world.com/bbs2/html/emoticons/wub.gif) with my 914 |
|
|
|
| TonyAKAVW |
Oct 27 2005, 02:28 PM
Post
#149
|
|
That's my ride. Group: Members Posts: 2,151 Joined: 17-January 03 From: Redondo Beach, CA Member No.: 166 Region Association: None |
Okay, so I got my engine support bar back today from the welder. This engine support bar is made from 1.5 inch square steel tubing with a wall thickness of 0.075. The plates that the engine mounts bolt to are 1/2 inch thick and comprise a substantial fraction of the overall weight. However, these have a fair amount of stress on them, so I figured I'd make sure they aren't going to have problems.
I'll post measurements later, but the entire thing was made from a just under 5 foot length of tubing. I cut out 30 degree wedges at each of the bends. The 4th side of the tubing was left in place and I just bent the thing together. When I put it in the car to check out the mating, it fit very well on the first try. I held it in shape with some wooden struts that I bolted to the bar. The welding cost $40, but I also took several other pieces, so I figure at most $30 to have this thing welded up, and another $10 or so in materials. Cutting was done with a hacksaw. I made a template for the angled cuts using some clear plastic acrylic pieces on which I scribed the angles with a knife. I used a few metal files to clean up the cuts and even them out. -Tony Attached image(s) 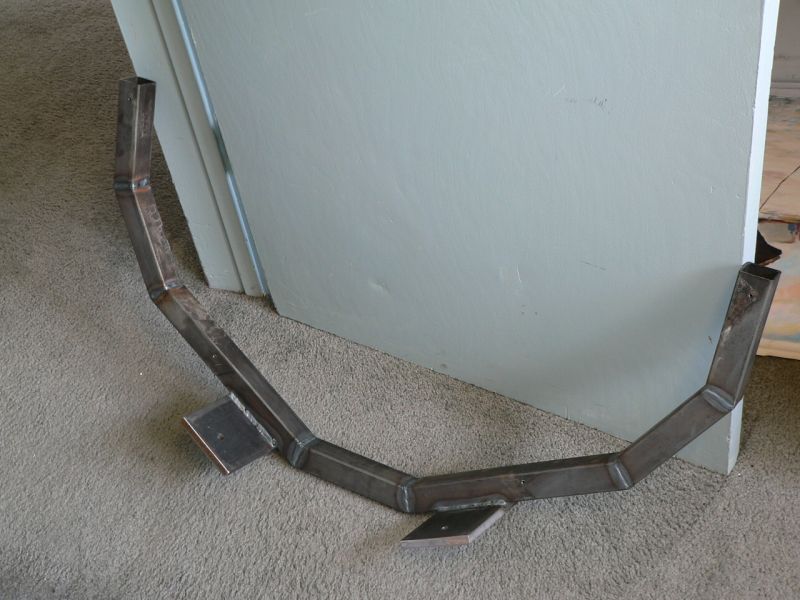
|
|
|
|
| banksyinoz |
Oct 29 2005, 04:24 PM
Post
#150
|
|
finally getting back into it Group: Members Posts: 223 Joined: 17-June 05 From: queensland, aus Member No.: 4,293 Region Association: Australia and New Zealand |
tony when you mget ur bar in can u post it as i am not quite undestanding (IMG:http://www.914world.com/bbs2/html/emoticons/051103-stupid4.gif) i guess but looks like the way that my engine was previously mounted (IMG:http://www.914world.com/bbs2/html/emoticons/confused24.gif)
with the mount welded to theside of the car, where the yellow strip is in this pic, your bar certainly looks the part though good work (IMG:http://www.914world.com/bbs2/html/emoticons/smilie_pokal.gif) Attached image(s) 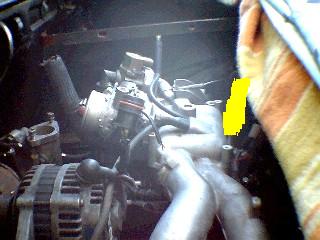
|
|
|
|
| TonyAKAVW |
Oct 30 2005, 09:25 PM
Post
#151
|
|
That's my ride. Group: Members Posts: 2,151 Joined: 17-January 03 From: Redondo Beach, CA Member No.: 166 Region Association: None |
Hopefully the following pictures help clear it up...
Friday night I finally got the engine bolted into the car! The engine mount bar bolts into 1/4 inch thick steel plates on either side of the engine bay, at the point where the longitudinals finally reach the trunk firewall. The following diagram shows the engine bar and the longitudinals and mounting locations. So yes, the bar mounts in the section colored yellow in your picture... Attached image(s) 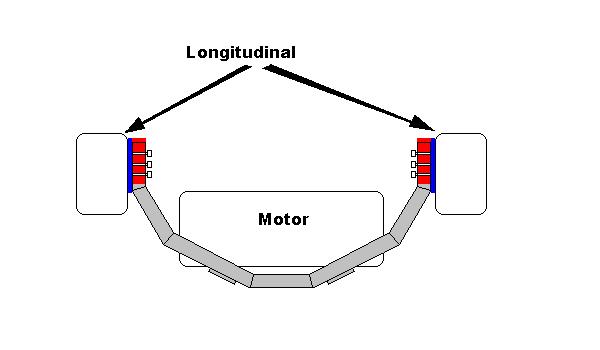
|
|
|
|
| TonyAKAVW |
Oct 30 2005, 09:28 PM
Post
#152
|
|
That's my ride. Group: Members Posts: 2,151 Joined: 17-January 03 From: Redondo Beach, CA Member No.: 166 Region Association: None |
Okay, so the engine is now bolted into the car. At some point (hopefully) before I drive much) the plates need to be welded in and the 8 sheetmetal screws on each side removed and filled in with weld. For now though its good enough to roll the car around while I'm working on other things.
Also pictured is the super ricey AEM intake. I suppose I could just put the air filter right on the throttle body, but then there's no bright blue obnoxious tube in the engine bay (IMG:http://www.914world.com/bbs2/html/emoticons/wink.gif) Attached thumbnail(s) 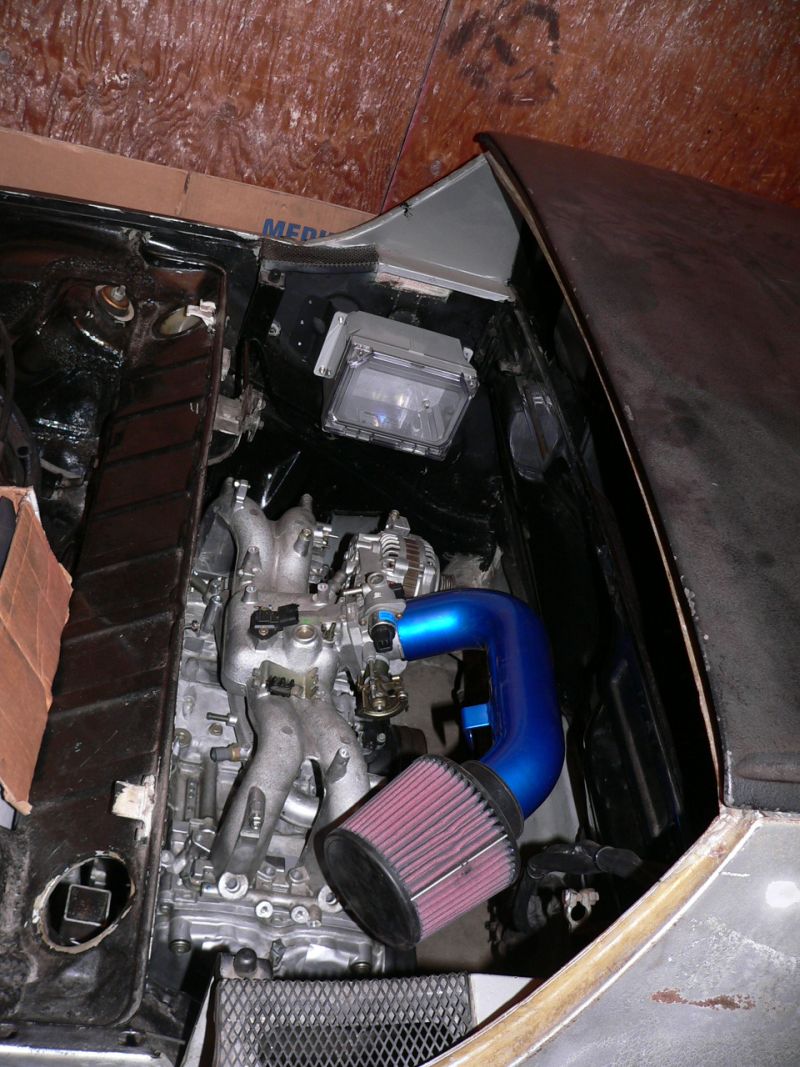
|
|
|
|
| TonyAKAVW |
Oct 30 2005, 09:29 PM
Post
#153
|
|
That's my ride. Group: Members Posts: 2,151 Joined: 17-January 03 From: Redondo Beach, CA Member No.: 166 Region Association: None |
A view from beneath. The white stuff is excess metal ready that hasn't been cleaned off yet.
Attached image(s) 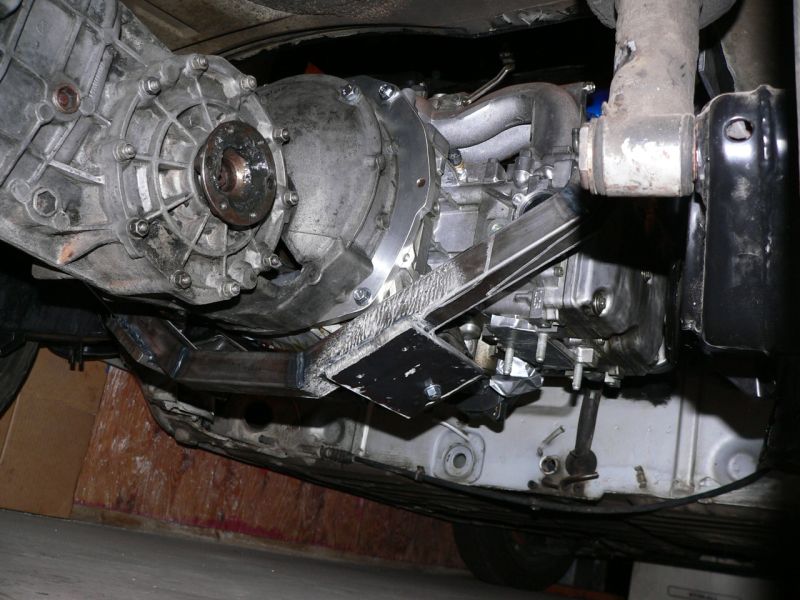
|
|
|
|
| TonyAKAVW |
Oct 30 2005, 09:31 PM
Post
#154
|
|
That's my ride. Group: Members Posts: 2,151 Joined: 17-January 03 From: Redondo Beach, CA Member No.: 166 Region Association: None |
Detail of where the engine bar bolts to the plate. For now, the large bolts don't go all the way through. The firewall needs three large holes drilled out. Before the plates get welded on this will be done.
Attached image(s) 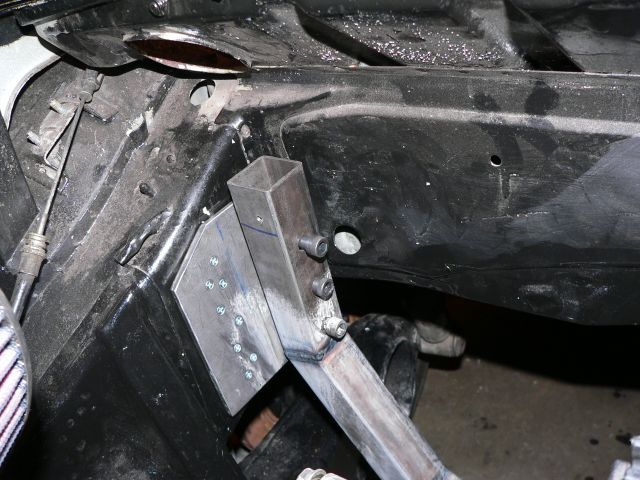
|
|
|
|
| TonyAKAVW |
Oct 30 2005, 09:34 PM
Post
#155
|
|
That's my ride. Group: Members Posts: 2,151 Joined: 17-January 03 From: Redondo Beach, CA Member No.: 166 Region Association: None |
When I took the engine bar to the welder I held it in shape with wooden braces. Unfortunately they didn't hold perfectly, and the bar is out of alignment a little. On the driver's side its just a slight angle between the plate and the bar. On the passenger side there's a 1/2 inch gap which ahs temporarily been filled by a block of aluminum. Eventually I will get a half inch piece of steel in there and have it welded to the bar. Trying to fix the bar wouldn't be too much fun and would weaken it, so I'm going to live with it being slightly off, and the spacers that are needed.
Attached image(s) 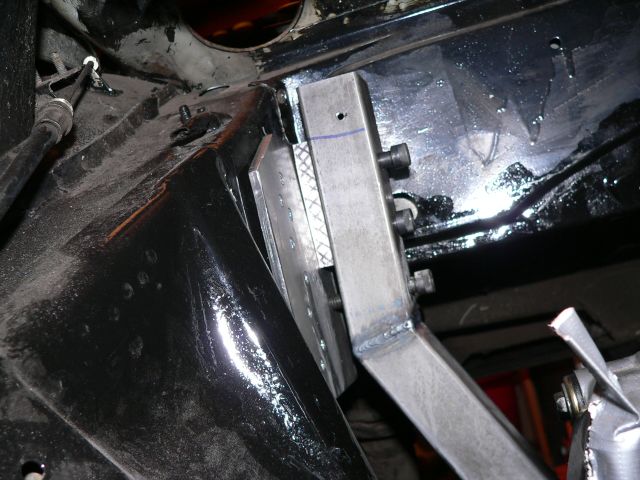
|
|
|
|
| TonyAKAVW |
Oct 30 2005, 09:35 PM
Post
#156
|
|
That's my ride. Group: Members Posts: 2,151 Joined: 17-January 03 From: Redondo Beach, CA Member No.: 166 Region Association: None |
I also got the engine bay relay box installed. The electronics have been removed until I start wiring things up.
Attached image(s) 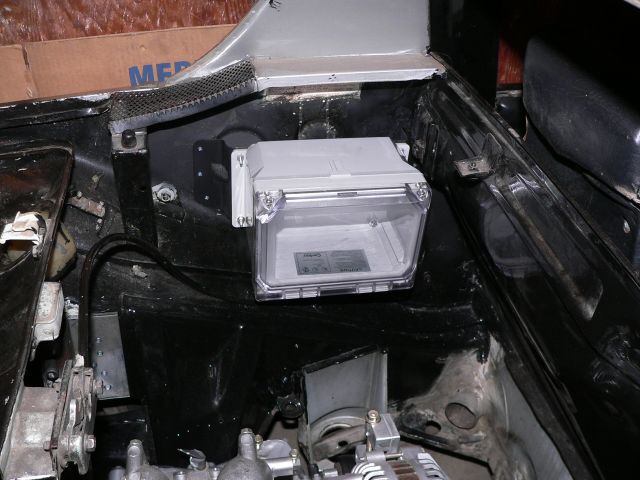
|
|
|
|
| TonyAKAVW |
Oct 30 2005, 09:38 PM
Post
#157
|
|
That's my ride. Group: Members Posts: 2,151 Joined: 17-January 03 From: Redondo Beach, CA Member No.: 166 Region Association: None |
The last thing I got done this weekend was the oil pan lobotomy. I measured that I need the oil pan to be 4 inches tall based on the floorpan of the car and the engine support bar. This way the pan doesn't stick below the line and will be less likely to hit the ground in the event of a speed bump.
Pre-lobotomy, marked for incision. Attached image(s) 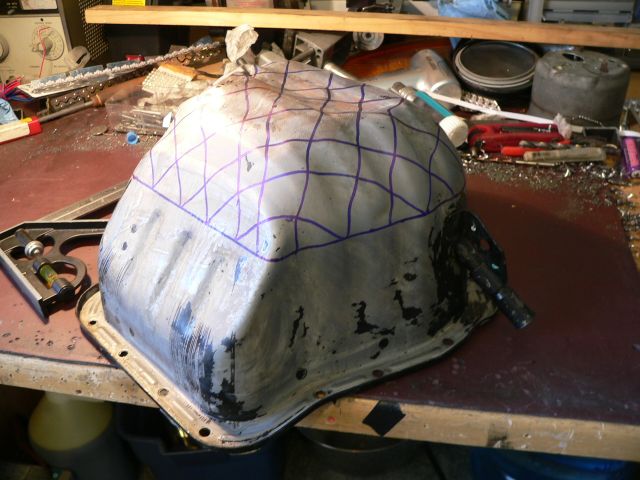
|
|
|
|
| TonyAKAVW |
Oct 30 2005, 09:40 PM
Post
#158
|
|
That's my ride. Group: Members Posts: 2,151 Joined: 17-January 03 From: Redondo Beach, CA Member No.: 166 Region Association: None |
Post-lobotomy. Next thing to do is fill up the leftover piece with water and measure how much extra volume I need to add. I've been thinking about different ways to do it, including the use of tubes running through the new volume for screw access. I suppose this depends on how good a welder this guy is...
-Tony Attached image(s) 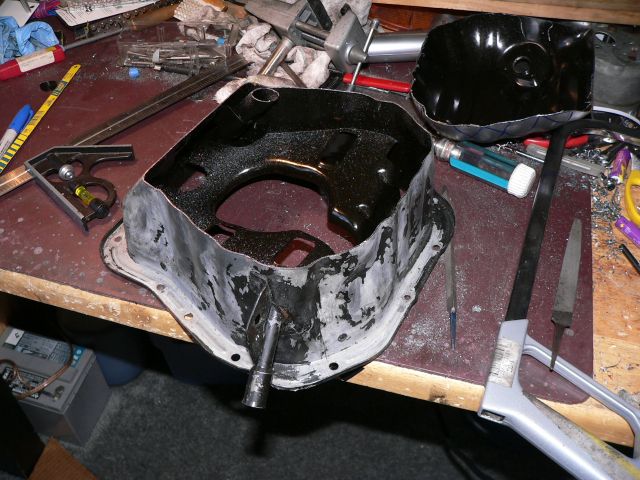
|
|
|
|
| mightyohm |
Oct 31 2005, 01:30 AM
Post
#159
|
|
Advanced Member Group: Benefactors Posts: 2,279 Joined: 16-January 03 From: Seattle, WA Member No.: 162 Region Association: Pacific Northwest |
A few comments from the peanut gallery (for discussion):
1. Why make the bar a segmented U instead of a rectangular shape? Is there a strength benefit? 2. Is it really necessary to use 1/2" steel plate at the points where the bar hits the engine? If you had welded the bar forward a little, are the plates even necessary at all? 3. Is it safe to hang the engine from those tiny sheet metal screws? 4. Instead of drilling lots of holes in the longs for the thru bolts, why not weld the bar to the side plates? 5. Why use a spacer on one side when you could heat the bar up with a torch and bend it into shape? Otherwise it looks great but you might want to consider #4 and #5 while it is easy to change things? Do it right the first time. I would rather have a weld supporting the engine than the sheer strength of a few bolts. |
|
|
|
| banksyinoz |
Oct 31 2005, 01:51 AM
Post
#160
|
|
finally getting back into it Group: Members Posts: 223 Joined: 17-June 05 From: queensland, aus Member No.: 4,293 Region Association: Australia and New Zealand |
thanks tony its appreciated (IMG:http://www.914world.com/bbs2/html/emoticons/smilie_pokal.gif)
my engine is currently mounted in a simillar fashion but i will be changing it as i have the suby box your work looks great keep it up, could you please post the volume of the removed section of the sump just as an example of the approx ammount to be replaced, i have considered extending my sump volume forward as this will mave the turbo brain more simple for the ej20t yes plate size good yes bar thickness ample welding in bar would obviously be thoughtless for engine removal what sheet metal screws ,there not sheet metal screws officer (IMG:http://www.914world.com/bbs2/html/emoticons/laugh.gif) Attached image(s) 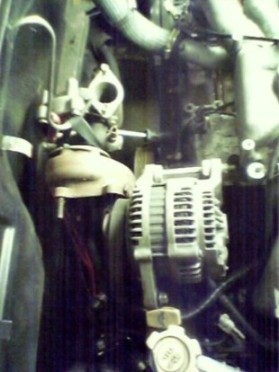
|
|
|
|
|
1 User(s) are reading this topic (1 Guests and 0 Anonymous Users)
0 Members:

|
Lo-Fi Version | Time is now: 24th June 2026 - 05:08 PM |
Invision Power Board
v9.1.4 © 2026 IPS, Inc.