|
|
|
Porsche, and the Porsche crest are registered trademarks of Dr. Ing. h.c. F. Porsche AG.
This site is not affiliated with Porsche in any way. Its only purpose is to provide an online forum for car enthusiasts. All other trademarks are property of their respective owners. |
|
|

  |

| TonyAKAVW |
 Jul 28 2006, 11:09 AM Jul 28 2006, 11:09 AM
Post
#321
|
|
That's my ride.  Group: Members Posts: 2,151 Joined: 17-January 03 From: Redondo Beach, CA Member No.: 166 Region Association: None |
For connectors I ended up going with something other than Weatherpack connectors. I used something fairly similar made by Molex called a mate-n-lok conenctor. They are really cheap, water proof and well made.
I ordered them through Digikey, got a few spares for stuff I still need to do like the O2 sensor and VSS. Speaking of VSS, I also ordered a few Hall effect sensors from Digikey. These are made by Melexis semiconductor and are self-contained 3-pin Hall sensors, made for the automotive environment. At $1.87 each they are a bargain compared to an OEM sensor at as much as $80-$90. Even packaged hall sensors tend to be in the $30-$40 range. I'm packaging these in small glass vials potted with epoxy. Hopefully this weekend I'll finish them up and post pictures. -Tony |
   |

 
|
| phantom914 |
Jul 28 2006, 11:25 AM
Post
#322
|
|
non-914-owner non-club member Group: Benefactors Posts: 1,013 Joined: 24-February 04 From: Covina,CA(North ofWest Covina) Member No.: 1,708 |
QUOTE(TonyAKAVW @ Jul 28 2006, 10:09 AM)  For connectors I ended up going with something other than Weatherpack connectors. I used something fairly similar made by Molex called a mate-n-lok conenctor. They are really cheap, water proof and well made. I ordered them through Digikey, got a few spares for stuff I still need to do like the O2 sensor and VSS. Speaking of VSS, I also ordered a few Hall effect sensors from Digikey. These are made by Melexis semiconductor and are self-contained 3-pin Hall sensors, made for the automotive environment. At $1.87 each they are a bargain compared to an OEM sensor at as much as $80-$90. Even packaged hall sensors tend to be in the $30-$40 range. I'm packaging these in small glass vials potted with epoxy. Hopefully this weekend I'll finish them up and post pictures. -Tony Digikey rocks! (IMG:style_emoticons/default/mueba.gif) Which connectors? The mate-n-locks I saw were not sealed, although they were made by AMP I believe. Did you consider the "waterproof automotive type connectors" on pg 263? Did you notice the "ASSMANN" computer cables (pg 44) (IMG:style_emoticons/default/blink.gif) I heard the LEGGMANN stuff is better. Andrew |
|
|
|
| TonyAKAVW |
Jul 30 2006, 11:21 PM
Post
#323
|
|
That's my ride. Group: Members Posts: 2,151 Joined: 17-January 03 From: Redondo Beach, CA Member No.: 166 Region Association: None |
Weekend update:
I built a Vehicle Speed Sensor (VSS) this weekend. It uses a Hall effect sensor from Melexis Semiconductor (its a German made part!) and cost me a whole $5 to build. This compares to $80-$100 for the stock Subaru VSS. I still have to figure out where to mount magnets (requires one of polarity, the sensor is a 'latch.') Today I decided to put the engine and transmission into the car to check for clearances and see that things fit. Well, things don't fit (IMG:style_emoticons/default/sad.gif) Here's a list of issues I need to take care of: 1. Alternator runs into part of the radiator. Need to lower the alternator and get a shorter belt. Easy fix. 2. Radiator fans are too close to the crank pulley and alternator. Need to put fans on the other side of the radiator. Another easy fix. 3. Intake simply doesn't fit. Need to cut some of the tubing to bring it in closer, probably need to redo the bracket I made. Not so easy fix, but not a show stopper. So thats pretty much it for fitment issutes. I still need to find a good location for my coolant reservoir. Once I have the engine in and mounted up I'll work on making up a bracket for it. Other things I noticed while the engine was in the bay... The engine cover shroud will really have to cover the whole engine. I'm thinking a large sheet of thin aluminum will do the trick. This will keep rain off the engine. Lastly, I picked up a couple more 12 inch radiator fans at an electronics swap meet yesterday for $5 a piece. These are going to go on the engine bay lid to help with cooling. Its going to be cramped, so I might only get one in. Hopefully the new flywheel and pressure plate, clutch etc. comes in early this week. Once I get those installed, the engine/trans will go together for good (until I realize I need to adjust it). Assuming all that happens and I fix these fitment issues this week I may be ready for a fire-up next weekend. Chances are though it will be two weeks. These issues will all take some time to figure out, and I've never installed a clutch before. -Tony |
|
|
|
| Dr. Roger |
Jul 31 2006, 01:48 AM
Post
#324
|
|
A bat out of hell. Group: Members Posts: 3,944 Joined: 31-January 05 From: Hercules, California Member No.: 3,533 Region Association: Northern California |
patience of a saint.
methodical like a mo fo. LOL great work.... again. =-) |
|
|
|
| TonyAKAVW |
Aug 6 2006, 09:38 PM
Post
#325
|
|
That's my ride. Group: Members Posts: 2,151 Joined: 17-January 03 From: Redondo Beach, CA Member No.: 166 Region Association: None |
Update for this weekend...
Getting closer! Yesterday I installed the new KEP flywheel, Sachs clutch disc and pressure plate. I was about to install the throwout bearing when I discovered the ball cup bushing is totally wasted (someone should make a bronze replacement) and the piece that holds the clutch arm to the ball was wasted. Additionally I found that two of the bolts I was using to hold the adapter plate on were too short, so I've got to get a couple more of those before putting this thing into the car. The radiator fans are fixed (re-arranged them) and the alternator bracket is fixed (need new belt still). Intake and coolant tank bracket fabrication began as well. First picture is my Vehicle Speed Sensor (VSS) that I made. As a troubleshooting aid, I have a green LED inside this thing. This way I can look to see if the sensor is working rather than trying to measure a signal. Still need to seal the thing with silicone. Also need to make a bracket to hold it onto the transmission. If I someday go with an electronic speedometer I wil get rid of the stock speedo drive cable and modify the right angle drive to work with this sensor, or maybe even fabricate a new sensor. I'm all for getting rid of mechanical cables. -Tony Attached image(s) 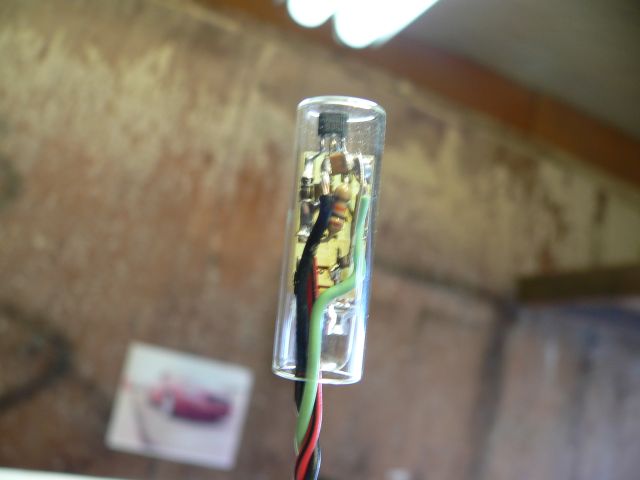 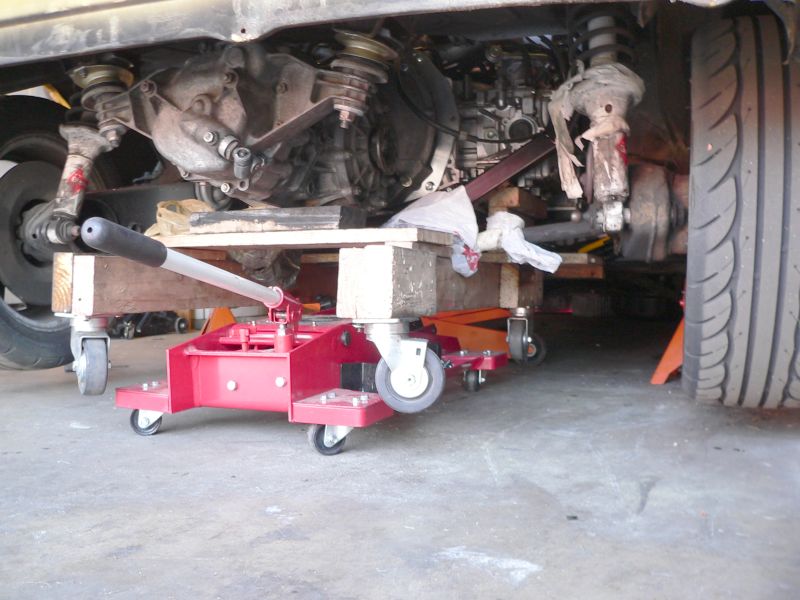 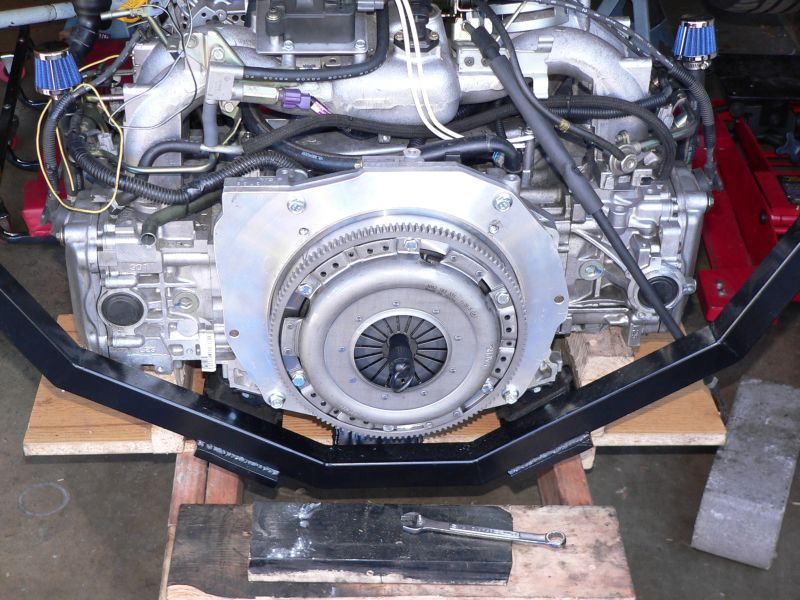
|
|
|
|
| TonyAKAVW |
Aug 14 2006, 01:00 AM
Post
#326
|
|
That's my ride. Group: Members Posts: 2,151 Joined: 17-January 03 From: Redondo Beach, CA Member No.: 166 Region Association: None |
Got a LOT done this weekend.
Installed engine and transmission - fixed the mounting plates and installed the aluminum shim. Installed the starter Bolted up the CV joints to transmission - new bolts, correct lock washers, gaskets Installed all coolant hoses except from the reservoir to the radiator. Installed speedometer drive cable Installed accelerator cable Installed coolant reservoir Connected fuel lines using high pressure fuel hose. ------- Major things left to do: Exhaust system - mandrel bends are on there way from Summit, need to order mufflers and O2 sensor still Cable shifter setup - need to order cables and machine the transmission end parts. Other than that I have a few minor things like wiring up the starter and alternator. Question.... The Subaru engine has a fuel pressure regulator with a return to the fuel tank. The fuel pump I'm using also has a return. Should I use a TEE so that both returns can go to the tank or should I just cap off the fuel pump and use the Subaru pressure regulator? -Tony Attached image(s) 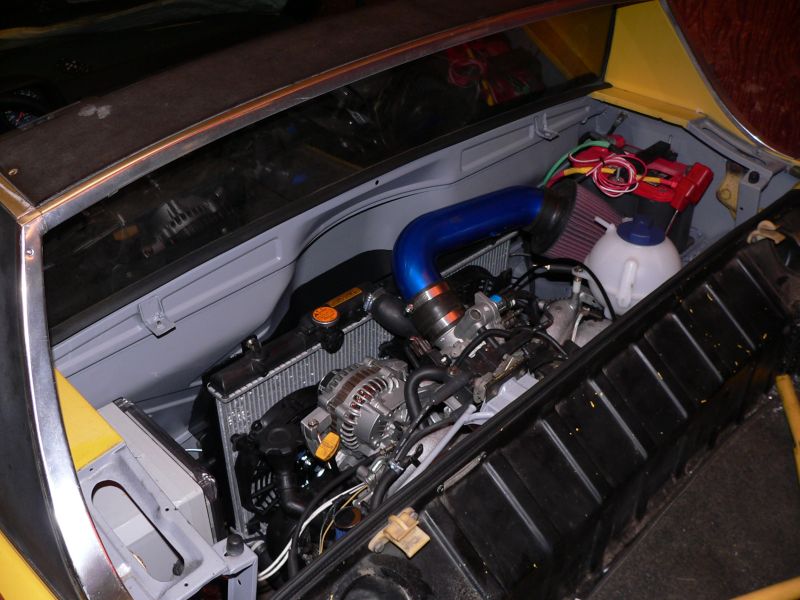 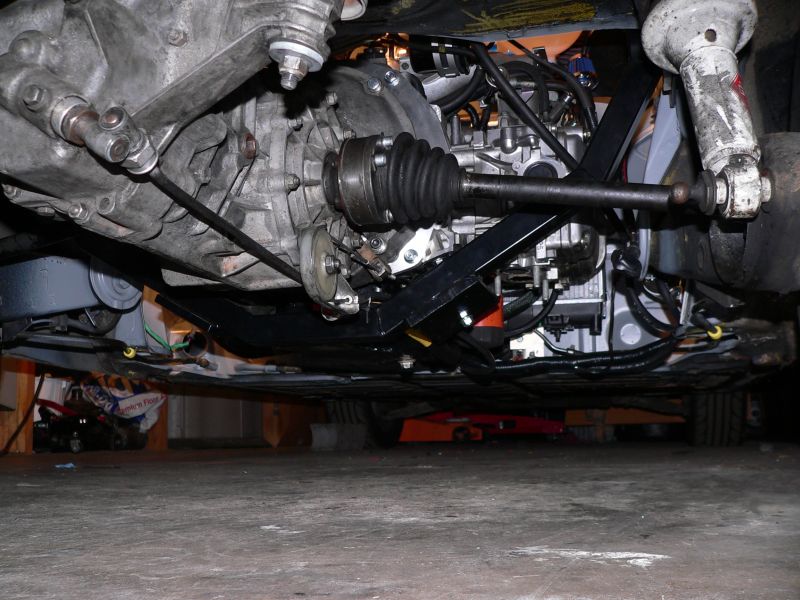 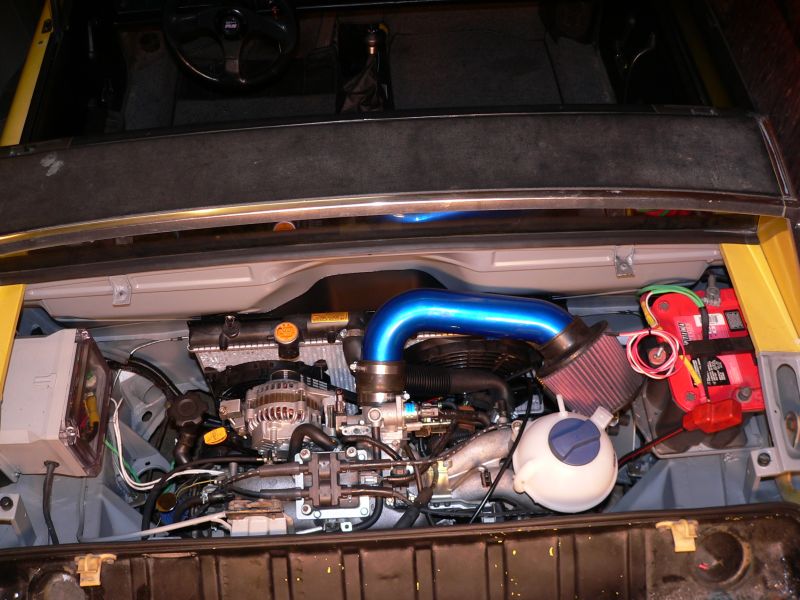
|
|
|
|
| bondo |
Aug 14 2006, 01:06 AM
Post
#327
|
|
Practicing my perpendicular parking Group: Members Posts: 4,277 Joined: 19-April 03 From: Los Osos, CA Member No.: 587 Region Association: Central California |
That's looking pretty sweet!
|
|
|
|
| fat73 |
Aug 14 2006, 06:44 AM
Post
#328
|
|
W9R1 Group: Members Posts: 244 Joined: 7-May 05 From: tampa,fl Member No.: 4,043 Region Association: South East States |
QUOTE(TonyAKAVW @ Aug 13 2006, 11:00 PM) Got a LOT done this weekend. Installed engine and transmission - fixed the mounting plates and installed the aluminum shim. Installed the starter Bolted up the CV joints to transmission - new bolts, correct lock washers, gaskets Installed all coolant hoses except from the reservoir to the radiator. Installed speedometer drive cable Installed accelerator cable Installed coolant reservoir Connected fuel lines using high pressure fuel hose. ------- Major things left to do: Exhaust system - mandrel bends are on there way from Summit, need to order mufflers and O2 sensor still Cable shifter setup - need to order cables and machine the transmission end parts. Other than that I have a few minor things like wiring up the starter and alternator. Question.... The Subaru engine has a fuel pressure regulator with a return to the fuel tank. The fuel pump I'm using also has a return. Should I use a TEE so that both returns can go to the tank or should I just cap off the fuel pump and use the Subaru pressure regulator? -Tony Tony...I haven't hooked up my fuel pump yet (928 pump) but it doesn't have a builtin return, so I'd say use what came with the engine. You might want to ask the guys on the yahoo subaru vanagon forum. btw- some new pics on http://community.webshots.com/user/fat73 Ed |
|
|
|
| fat73 |
Aug 14 2006, 07:31 AM
Post
#329
|
|
W9R1 Group: Members Posts: 244 Joined: 7-May 05 From: tampa,fl Member No.: 4,043 Region Association: South East States |
QUOTE(TonyAKAVW @ Aug 13 2006, 11:00 PM) Got a LOT done this weekend. Installed engine and transmission - fixed the mounting plates and installed the aluminum shim. Installed the starter Bolted up the CV joints to transmission - new bolts, correct lock washers, gaskets Installed all coolant hoses except from the reservoir to the radiator. Installed speedometer drive cable Installed accelerator cable Installed coolant reservoir Connected fuel lines using high pressure fuel hose. ------- Major things left to do: Exhaust system - mandrel bends are on there way from Summit, need to order mufflers and O2 sensor still Cable shifter setup - need to order cables and machine the transmission end parts. Other than that I have a few minor things like wiring up the starter and alternator. Question.... The Subaru engine has a fuel pressure regulator with a return to the fuel tank. The fuel pump I'm using also has a return. Should I use a TEE so that both returns can go to the tank or should I just cap off the fuel pump and use the Subaru pressure regulator? -Tony Tony... Where do you get the project box mounted in your engine bay you used for your electronics? Ed |
|
|
|
| fiid |
Aug 14 2006, 09:53 AM
Post
#330
|
|
Turbo Megasquirted Subaru Member Group: Members Posts: 2,827 Joined: 7-April 03 From: San Francisco, CA Member No.: 530 Region Association: Northern California |
I don't think you can use a stock pump - because it's designed to fit IN the fuel tank. I've never seen one, so I don't know if it can be adapted or not.
As for the current situation - I think I'd try T-ing the two lines together to return to the tank... perhaps run the pump and measure your fuel pressure (I have a spare Oil Pressure guage I use for this - which you can get from FLAPS for not much $$$). I upgraded my pump to a Walbro 255 l/hr pump. They have a universal model which mounts in a neoprene sleeve. Mine sits just below the battery (an optima). It's much quieter than the stock pump. I also changed to a subaru spec filter which is a little different from the 914 filter - I think mainly in terms of higher flow rate and longer lasting (bigger). The walbro pump just has input and output, so the return line is a direct hookup to the fuel pressure regulator. QUESTION: Have any of you subaru peops had problems with air getting trapped in the heater loop of the cooling circuit? |
|
|
|
| TonyAKAVW |
Aug 14 2006, 11:13 AM
Post
#331
|
|
That's my ride. Group: Members Posts: 2,151 Joined: 17-January 03 From: Redondo Beach, CA Member No.: 166 Region Association: None |
QUOTE Where do you get the project box mounted in your engine bay you used for your electronics? I bought it at a local suprlus electronics place maybe a year ago. It was the only one of the size they had. Not sure where you'd find something like that for a reasonable price. I payed maybe $10 for it (brand new). I think a T-junction will be the way to go with the fuel pump. I bought a brass T-junction at my FLAPS yesterday, so I'll hook it up and I suppose that will work. -Tony |
|
|
|
| Aaron Cox |
Aug 14 2006, 11:19 AM
Post
#332
|
|
Professional Tinkerer Group: Retired Admin Posts: 24,548 Joined: 1-February 03 From: Corona, CA Member No.: 219 Region Association: Southern California |
sick....
|
|
|
|
| GS Guy |
Aug 15 2006, 06:21 AM
Post
#333
|
|
Member Group: Members Posts: 243 Joined: 8-July 04 From: Columbia, MD Member No.: 2,325 Region Association: North East States |
Ed,
Looks like one of these: http://www.integraenclosures.com/Cat3/PremiumHT.asp I think McMaster Carr also sells some limited sizes of these boxes. Jeff Tony... Where do you get the project box mounted in your engine bay you used for your electronics? Ed |
|
|
|
| fat73 |
Aug 15 2006, 09:31 PM
Post
#334
|
|
W9R1 Group: Members Posts: 244 Joined: 7-May 05 From: tampa,fl Member No.: 4,043 Region Association: South East States |
QUOTE(GS Guy @ Aug 15 2006, 04:21 AM) Ed, Looks like one of these: http://www.integraenclosures.com/Cat3/PremiumHT.asp I think McMaster Carr also sells some limited sizes of these boxes. Jeff Tony... Where do you get the project box mounted in your engine bay you used for your electronics? Ed thx |
|
|
|
| Crazyhippy |
Aug 16 2006, 01:21 PM
Post
#335
|
|
Insert witty comment here... Group: Members Posts: 1,659 Joined: 28-July 05 From: Home of the Coyotes, AZ Member No.: 4,493 Region Association: None |
Radio shack carries a few sizes of project boxes, but you need to find a electronics store to find LOTS of sizes. Went into one the other day and they had 15 different sizes at least.
They also had the 14 pin IDP connector i needed (.75 cent project stopper....) BJH |
|
|
|
| TonyAKAVW |
Aug 16 2006, 02:49 PM
Post
#336
|
|
That's my ride. Group: Members Posts: 2,151 Joined: 17-January 03 From: Redondo Beach, CA Member No.: 166 Region Association: None |
There are a few cool features of the box I bought that you won't find in Radio Shack boxes. First, they tend to be fairly small. Second, this one is very heavy duty. The plastic is around 0.2 inches thick, and the front cover is a clear plastic hinged type. The screws that hold the lid shut use metal threaded inserts so the plastic of the box won't strip out from repeated opening and closing. There's also molded-in standoffs at the bottom of the box for mounting either a printed circuit board or other objects. This way you don't have to drill holes in the bottom for screws and standoffs.
I've built many many electronics projects and finding good cabinets/housings is always one of the hardest parts. I got lucky with this one. In other news... Went to a muffler/exhaust shop down the street from me at lunch today. Took a look at some mufflers etc. Tonight I'm going to mock them up in cardboard, place them where I want them and start figuring out how to route tubing. I received several mandrel bent tubing pieces from Summit on Monday, which I'm going to cut up to fit. -Tony |
|
|
|
| fat73 |
Aug 16 2006, 03:34 PM
Post
#337
|
|
W9R1 Group: Members Posts: 244 Joined: 7-May 05 From: tampa,fl Member No.: 4,043 Region Association: South East States |
QUOTE(TonyAKAVW @ Aug 16 2006, 12:49 PM) There are a few cool features of the box I bought that you won't find in Radio Shack boxes. First, they tend to be fairly small. Second, this one is very heavy duty. The plastic is around 0.2 inches thick, and the front cover is a clear plastic hinged type. The screws that hold the lid shut use metal threaded inserts so the plastic of the box won't strip out from repeated opening and closing. There's also molded-in standoffs at the bottom of the box for mounting either a printed circuit board or other objects. This way you don't have to drill holes in the bottom for screws and standoffs. I've built many many electronics projects and finding good cabinets/housings is always one of the hardest parts. I got lucky with this one. In other news... Went to a muffler/exhaust shop down the street from me at lunch today. Took a look at some mufflers etc. Tonight I'm going to mock them up in cardboard, place them where I want them and start figuring out how to route tubing. I received several mandrel bent tubing pieces from Summit on Monday, which I'm going to cut up to fit. -Tony Tony... I haven't figured out what I'm going to do for exhausts yet either, but I only have one to deal with coming out of the turbo. However, I want to run Duals out the back, or possibly modify the back bumper to let the pipes come out F40 or GT40 style. One thing I found out you can do to mock up the exhaust was use those foam noodles kids use in the swimming pool. You can take those and put some of the thin strip aluminum through them or heavy wire and bend them around whichever way you want to figure it out and go from there. Ed 1973 Porsche W9R1 |
|
|
|
| TonyAKAVW |
Aug 20 2006, 10:30 PM
Post
#338
|
|
That's my ride. Group: Members Posts: 2,151 Joined: 17-January 03 From: Redondo Beach, CA Member No.: 166 Region Association: None |
At long last, the moment we (or at least I ) have been waiting for....
IT LIVES!!!! (IMG:style_emoticons/default/clap56.gif) (IMG:style_emoticons/default/clap56.gif) (IMG:style_emoticons/default/clap56.gif) (IMG:style_emoticons/default/boldblue.gif) Its noisy but it runs great. Only had a few wiring issues to take care of. There was a +12v line that was connected to ground, and blew a couple fuses. Found that pretty quickly and then discovered I had another short inside my sensor simulator box. Melted teflon smells funny. So I disconnected that wire, grounded the neutral position sensor, and fired it up. Here's a video. Engine startup The sound isn't great, but you get an idea. -Tony |
|
|
|
| fat73 |
Aug 20 2006, 11:24 PM
Post
#339
|
|
W9R1 Group: Members Posts: 244 Joined: 7-May 05 From: tampa,fl Member No.: 4,043 Region Association: South East States |
QUOTE(TonyAKAVW @ Aug 20 2006, 08:30 PM) At long last, the moment we (or at least I ) have been waiting for.... IT LIVES!!!! (IMG:style_emoticons/default/clap56.gif) (IMG:style_emoticons/default/clap56.gif) (IMG:style_emoticons/default/clap56.gif) (IMG:style_emoticons/default/boldblue.gif) Its noisy but it runs great. Only had a few wiring issues to take care of. There was a +12v line that was connected to ground, and blew a couple fuses. Found that pretty quickly and then discovered I had another short inside my sensor simulator box. Melted teflon smells funny. So I disconnected that wire, grounded the neutral position sensor, and fired it up. Here's a video. Engine startup The sound isn't great, but you get an idea. -Tony That is awesome, congratulations! (IMG:style_emoticons/default/clap56.gif) Does it have any exhausts at all yet? We spent all weekend working on getting the engine clean. I'm taking a bunch of stuff to get hi-temp coated tomorrow, and going to order a bunch of new nuts/bolts to replace the rusty stuff (Michigan engine). Hope to have the engine back together by the end of the week so we can start putting it in. When's the first test drive? Ed |
|
|
|
| banksyinoz |
Aug 21 2006, 12:47 AM
Post
#340
|
|
finally getting back into it Group: Members Posts: 223 Joined: 17-June 05 From: queensland, aus Member No.: 4,293 Region Association: Australia and New Zealand |
(IMG:style_emoticons/default/aktion035.gif) (IMG:style_emoticons/default/aktion035.gif) (IMG:style_emoticons/default/clap56.gif) (IMG:style_emoticons/default/driving.gif) (IMG:style_emoticons/default/mueba.gif)
great work tony thanks for the video im sure it will inspire many of us to remove our jackstands much sooner (IMG:style_emoticons/default/beerchug.gif) |
|
|
|
|
1 User(s) are reading this topic (1 Guests and 0 Anonymous Users)
0 Members:

|
Lo-Fi Version | Time is now: 25th November 2025 - 12:10 PM |
Invision Power Board
v9.1.4 © 2025 IPS, Inc.