|
|
|
Porsche, and the Porsche crest are registered trademarks of Dr. Ing. h.c. F. Porsche AG.
This site is not affiliated with Porsche in any way. Its only purpose is to provide an online forum for car enthusiasts. All other trademarks are property of their respective owners. |
|
|

  |

| TonyAKAVW |
 Sep 7 2006, 02:49 PM Sep 7 2006, 02:49 PM
Post
#401
|
|
That's my ride.  Group: Members Posts: 2,151 Joined: 17-January 03 From: Redondo Beach, CA Member No.: 166 Region Association: None |
Aaron: THANKS!!!!!!!!!!!!!
Keith: I'm thinking that at least part of the problem is that I don't have my VSS hooked up yet. I'll do that tonight if I get a chance. Then I'll check codes. Andys: I had been thinking about using cardboard, but thanks for reminding me about that. My focus so far with respect to cooling has been all about the negative pressure side. Having a diffusor or suction vent under the car was always in my plans. Thanks for the tips! -Tony |
   |

 
|
| Dr. Roger |
Sep 7 2006, 02:58 PM
Post
#402
|
|
A bat out of hell. Group: Members Posts: 3,944 Joined: 31-January 05 From: Hercules, California Member No.: 3,533 Region Association: Northern California |
i know i'm talking about apples and oranges but this data may help....
i was having creeping temp issues and checked all the usual issues with V8 cooling systems. (no, i didn't use renegades radiator. yes, i'm a rebel) after all my little mods to bring the temps down i tried simply removing the hood so there would be zero exhaust resistance. the results were excellent. so i'm driving my bebe around without a hood till fall when she goes back into hibernation. when spring time comes she'll probably have some leading edged lip hood similar to our friend wbergtho with the LS6 powered white 914. best of luck. roger |
|
|
|
| andys |
Sep 7 2006, 03:11 PM
Post
#403
|
|
Advanced Member Group: Members Posts: 2,165 Joined: 21-May 03 From: Valencia, CA Member No.: 721 Region Association: None |
QUOTE(Dr. Roger @ Sep 7 2006, 01:58 PM)  i know i'm talking about apples and oranges but this data may help.... i was having creeping temp issues and checked all the usual issues with V8 cooling systems. (no, i didn't use renegades radiator. yes, i'm a rebel) after all my little mods to bring the temps down i tried simply removing the hood so there would be zero exhaust resistance. the results were excellent. so i'm driving my bebe around without a hood till fall when she goes back into hibernation. when spring time comes she'll probably have some leading edged lip hood similar to our friend wbergtho with the LS6 powered white 914. best of luck. roger Here's what I'm doing on my LS1 conversion, though it's unfinished and untested. Andys Attached thumbnail(s) 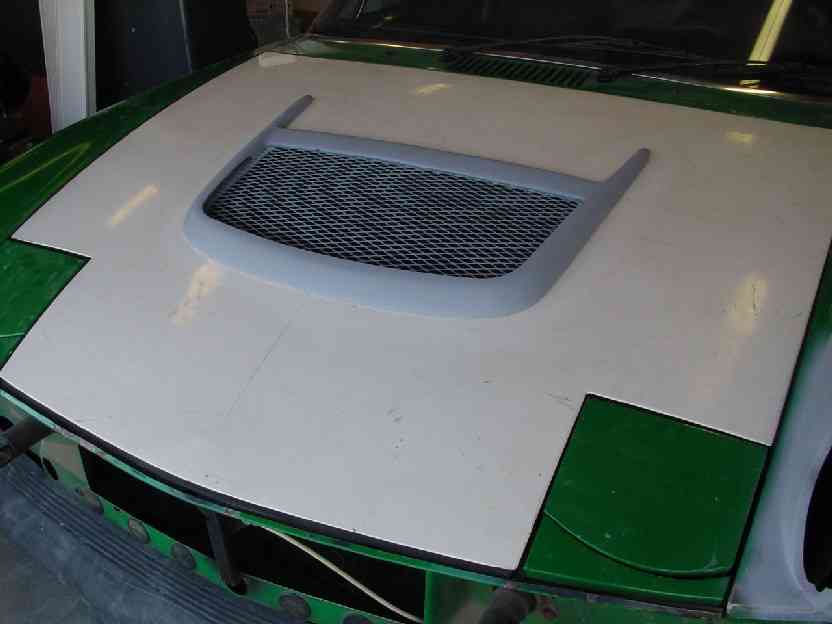 Attached image(s) 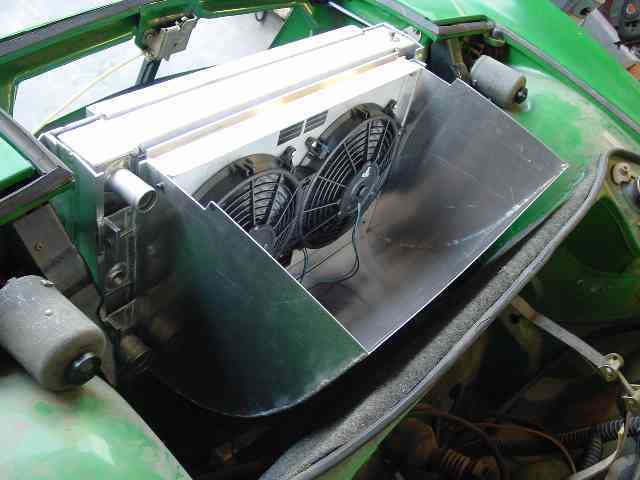
|
|
|
|
| Aaron Cox |
Sep 7 2006, 06:51 PM
Post
#404
|
|
Professional Tinkerer Group: Retired Admin Posts: 24,548 Joined: 1-February 03 From: Corona, CA Member No.: 219 Region Association: Southern California |
tony, gimme a call. bumpers are in corona....
|
|
|
|
| fat73 |
Sep 7 2006, 08:59 PM
Post
#405
|
|
W9R1 Group: Members Posts: 244 Joined: 7-May 05 From: tampa,fl Member No.: 4,043 Region Association: South East States |
QUOTE(WRX914 @ Sep 7 2006, 11:43 AM) Alright, don't worry too much. Sounds like you are going through all the same crap as I did. You are at the end of the forrest, all you have to do is step out of it (so to speak). I know it is frustrating... but aside from your cooling issues, I think it is something small like a MAP or MAF sensor that is screwed up or something small like that. Your ECU will tell you all of your issues. If you simply can not get it figured out, do what I did and call Crawford and be driving it home in a week. Bust ass on this Tony! Hopefully your cooling issues are all ironed out soon. Keith Keith...did you happen to use SmallCar's harness conversion or was it a do-it-to-youself? Ed |
|
|
|
| TonyAKAVW |
Sep 8 2006, 01:08 AM
Post
#406
|
|
That's my ride. Group: Members Posts: 2,151 Joined: 17-January 03 From: Redondo Beach, CA Member No.: 166 Region Association: None |
Tonight I picked up the bumpers at Aaron's place. Got a ride in the beast, and WOW. That's a 914!!! The suspension is awesome, the engine sounds great, hauls ass, etc. The array of headlights is truly impressive. Those rally lights are like laser beams.
Got home at 11:30, so no time to try messing with the bumpers or anything else for that matter. First off, pictures of the modified engine bay lid complete with fans. This lid and fan wiring is far from finished, but it is for the moment functional which is really the most important part as I figure out the cooling system. For instance I haven't had time to flatten out the second grill section.... Attached image(s) 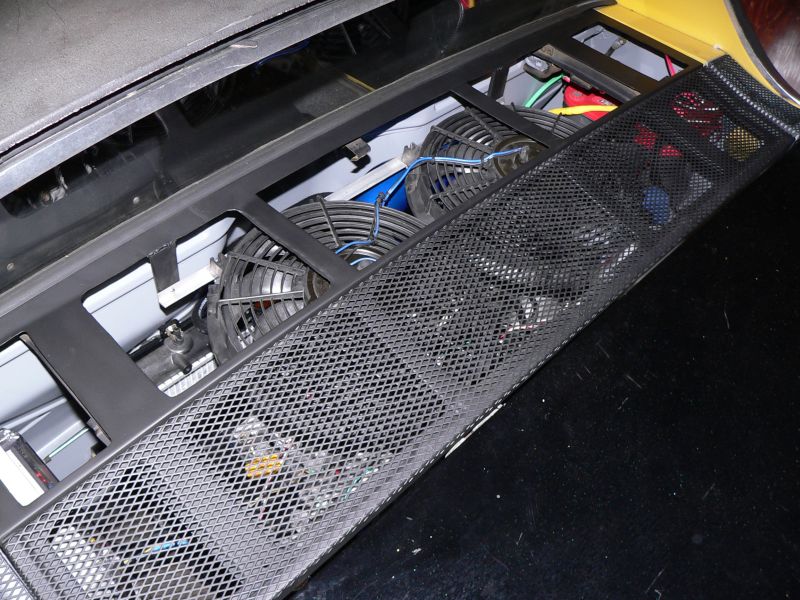 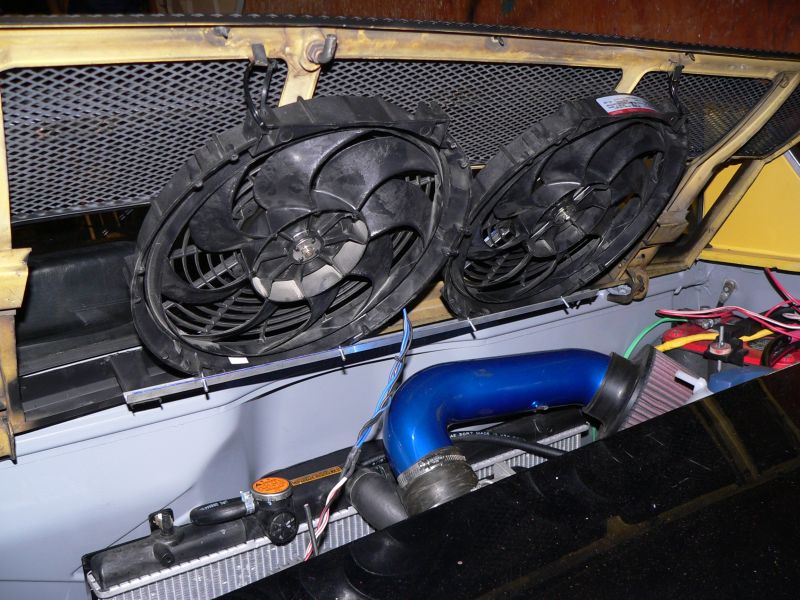
|
|
|
|
| TonyAKAVW |
Sep 8 2006, 01:12 AM
Post
#407
|
|
That's my ride. Group: Members Posts: 2,151 Joined: 17-January 03 From: Redondo Beach, CA Member No.: 166 Region Association: None |
And now the awesome Getty bumpers. These are some fine piees of work. Haven't test fitted them yet, but they are really really well made.
One issue I need to resolve quickly is how to attach the brackets to the bumpers. The bumpers each came with a pair of fiberglass pieces made for attaching to the car, but I'm not certain how to attach these to the bumper with enough stength. Any thoughts? Attached image(s) 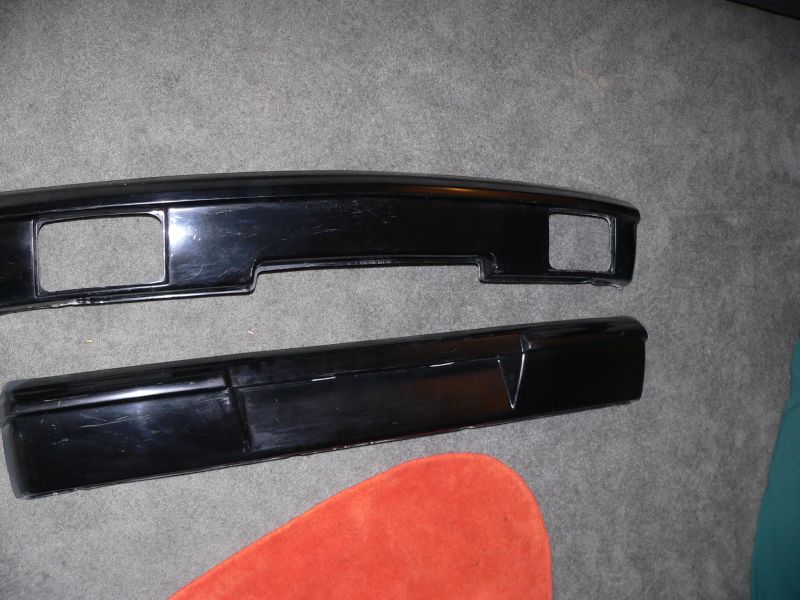 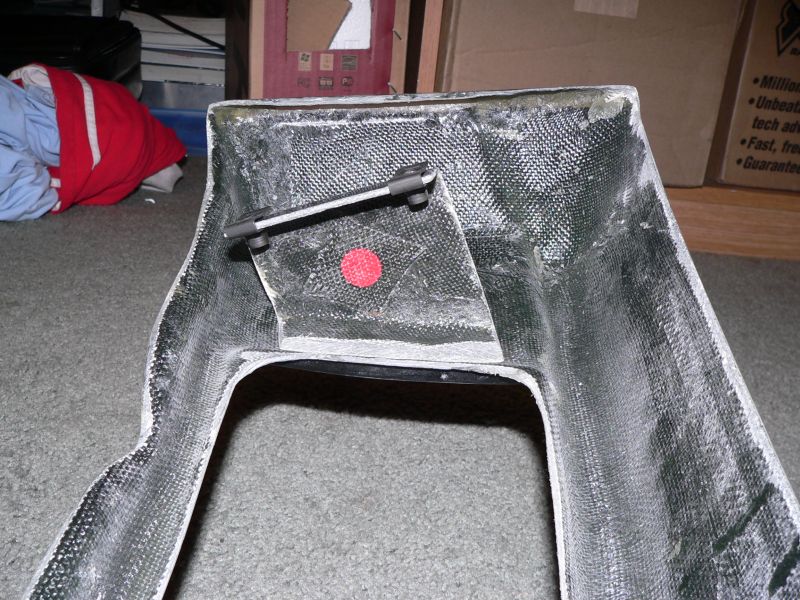
|
|
|
|
| TonyAKAVW |
Sep 8 2006, 01:13 AM
Post
#408
|
|
That's my ride. Group: Members Posts: 2,151 Joined: 17-January 03 From: Redondo Beach, CA Member No.: 166 Region Association: None |
Lastly, more detail of the part that needs attaching to the bumper.
Attached image(s) 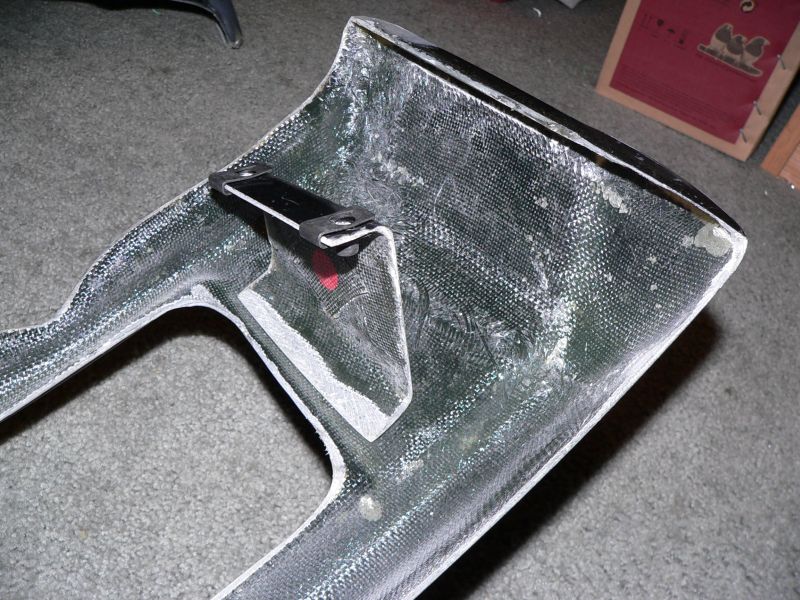
|
|
|
|
| db9146 |
Sep 8 2006, 10:43 PM
Post
#409
|
|
Senior Member Group: Members Posts: 953 Joined: 21-December 04 From: Atlanta, GA Member No.: 3,315 Region Association: None |
Here's an idea you can consider. Bolt the brackets to the car so that they are properly located. Then put some bondo (small amount) on the front of the brackets where they meet the back of the bumper and position the bumper (hold it in place with heavy tape, etc.) until the bondo sets. Then, take the brackets loose and fiberglass over the bracket/bumper joint to further strengthen it once the bondo dries.
Just a thought. |
|
|
|
| Aaron Cox |
Sep 8 2006, 11:27 PM
Post
#410
|
|
Professional Tinkerer Group: Retired Admin Posts: 24,548 Joined: 1-February 03 From: Corona, CA Member No.: 219 Region Association: Southern California |
my suggestion was do the same with JBweld and go glass it in later.....
|
|
|
|
| messix |
Sep 8 2006, 11:34 PM
Post
#411
|
|
AKA "CLUTCH KILLER"! Group: Members Posts: 6,995 Joined: 14-April 05 From: between shit kickers and pinky lifters/ puget sound wa.north of Seattle south of Canada Member No.: 3,931 Region Association: Pacific Northwest |
mount the bracket, put bumper in place then drill two holes each side through bumper and bracket, put wood screws in to hold bumper and bracket, then remove bumper and bracket together, then bond the bracket and bumper together off the car, both surface between bracket and bumper and over bracket and bumper, remove screws and fill holes.
|
|
|
|
| TonyAKAVW |
Sep 10 2006, 02:18 AM
Post
#412
|
|
That's my ride. Group: Members Posts: 2,151 Joined: 17-January 03 From: Redondo Beach, CA Member No.: 166 Region Association: None |
Big thanks to Jeff (Jkeyzer) and Royce (Bondo) who drove down today to help me finish up the car. We finished mounting the bumpers and Jeff fabricated and installed a flap in front of the radiator to attempt to create a low pressure zone at the radiator exhaust.
I gave them both noisy rides around the neighborhood and the cooling system worked fine. Jeff noted that the best part of the exhaust on this car is that at idle it purrs like any normal car, but then when you step on it, its like a racecar. Both commented that they could hear it blocks away. Hopefully it makes it tomorrow. I need to test it on 405 first, and then I'll make a decision as to whether I drive it, or not. -Tony |
|
|
|
| TonyAKAVW |
Sep 10 2006, 07:28 PM
Post
#413
|
|
That's my ride. Group: Members Posts: 2,151 Joined: 17-January 03 From: Redondo Beach, CA Member No.: 166 Region Association: None |
This morning I took the car onto the freeway for the first time. After warming up, the temperature creeped up to 225 or so and I decided to abort. It was early morning, I had gone maybe 5 miles on the freeway, and I figured it was not going to work out. So there is much work to be done yet before it it highway worthy, but think I'll be able to work it out.
Also figured out my VSS problem. First, I'm only getting 3 volts back from the sender. Second, I have two magnets on my CV joint, and this Hll sensor that I am using is a latching type, where the output goes high for one magnetic polarity, and then low when a magnetic field of opposite polarity crosses the sensor. Since I have one magnet of each polarity, I am getting just one complete pulse per revolution. Per section 2-7 of the Impreza factory service manual, the correct input to the ECU is 4 pulses per revolution of the front differential. So this means I need to unglue one of my magnets and glue on a total of eight to give me the correct number of pulses. So the question remains... is it the low voltage or the incorrect number of pulses? If the ECU gets too few pulses, will that cause it to think something is wrong because I never go fast? Or will it just think I'm going slow and not care? For the voltage issue, it could be that the logic-high threshold on the ECU input is set above 3 volts. In all electronic systems I've run across, 3 volts should be enough to trigger a logic-high in a 5 volt logic system. However it could be that for noise immunity they keep the threshold higher. Either way, experimentation of one, then the other will tell me which it is. For cooling, it is time to start going through the list of techniques previously posted. First up is a small lip behind the targa bar. According to T H O M A S, (who spoke with the owner of this car), the addition of this tiny spoiler cooled his 6 cyl Porsche engine by 30 degrees! (photo taken at 2001 German Autofest) -Tony Attached image(s) 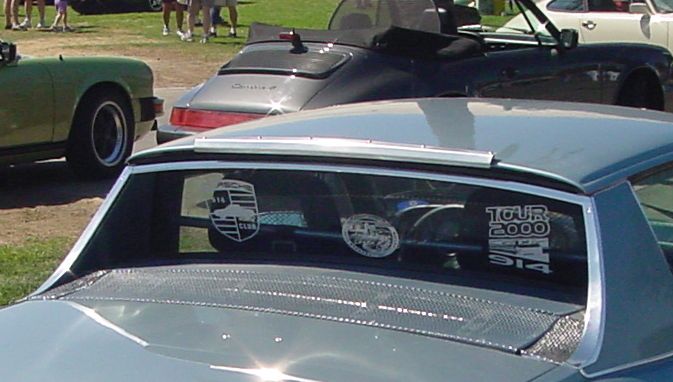
|
|
|
|
| Aaron Cox |
Sep 10 2006, 07:33 PM
Post
#414
|
|
Professional Tinkerer Group: Retired Admin Posts: 24,548 Joined: 1-February 03 From: Corona, CA Member No.: 219 Region Association: Southern California |
bummer tony....
i guess just drop the G for the renegade proven system.... and go flog the crap outta it. i musta missed you at GAF |
|
|
|
| TonyAKAVW |
Sep 10 2006, 07:38 PM
Post
#415
|
|
That's my ride. Group: Members Posts: 2,151 Joined: 17-January 03 From: Redondo Beach, CA Member No.: 166 Region Association: None |
I will tell you why later, but I will NEVER buy a single thing from Renegade Hybrids. Not after what happened today. Nor will I ever reccomend them to anyone else.
-Tony |
|
|
|
| Aaron Cox |
Sep 10 2006, 07:41 PM
Post
#416
|
|
Professional Tinkerer Group: Retired Admin Posts: 24,548 Joined: 1-February 03 From: Corona, CA Member No.: 219 Region Association: Southern California |
what???
PM me - |
|
|
|
| Sideways |
Sep 10 2006, 07:55 PM
Post
#417
|
|
Member Group: Members Posts: 119 Joined: 18-October 05 From: Calgary, AB, Canada Member No.: 4,969 |
Torny,
Apart from the mounting brackets, how was the fit and finish on the getty bumpers? |
|
|
|
| TonyAKAVW |
Sep 10 2006, 08:15 PM
Post
#418
|
|
That's my ride. Group: Members Posts: 2,151 Joined: 17-January 03 From: Redondo Beach, CA Member No.: 166 Region Association: None |
The finish of the bumpers was quite good. I haven't ever bought fiberglass parts before so I don't really have anything to compare with. The gelcoat finish was really nice, almost ready to get paint.
The rear bumper required justa tiny bit of trimming to get it on. I used a copign saw, a file and some sand paper to fix it. Royce (Bondo) shimmed the rear brackets slightly to fit, but otherwise it went together fine. I'm very pleased with the bumpers, I think they are really a good value. -Tony |
|
|
|
| Aaron Cox |
Sep 10 2006, 08:41 PM
Post
#419
|
|
Professional Tinkerer Group: Retired Admin Posts: 24,548 Joined: 1-February 03 From: Corona, CA Member No.: 219 Region Association: Southern California |
how did you glass the brackets on? pics? how did the boat style porthole exhaust workout?
AA |
|
|
|
| TonyAKAVW |
Sep 10 2006, 08:57 PM
Post
#420
|
|
That's my ride. Group: Members Posts: 2,151 Joined: 17-January 03 From: Redondo Beach, CA Member No.: 166 Region Association: None |
I didn't take any pics of the bumper process, but Royce did. He's going to post them here isn't he (IMG:style_emoticons/default/smile.gif)
To install the bumpers, we bolted the brackets to the car, sanded both mating surfaces, and used some 2-ton epoxy to hold the bumpers in place temporarily. We then taped the bumpers to the car in the correct posisiton and let the epoxy cure. After a few hours we took the bumpers off the car, and layed some pieces of fiberglass over the joints, slathered with epoxy resin. Royce noted that epoxy resin is prefered over polyester based resins, beacuse it doesn't shrink as much. Its harder to find, but one of the benefits of living in LA is that a fwe miles down the road is Plastic Depot, conveniently open on Saturday mornings. They even had carbon fiber in stock. mmmm. carbon fiber. Anyway, after the reinforcements cured, I bolted them back up to the car. The exhaust holes haven't yet been cut. Along with the cooling and electronics tweaking, thats one of the last major things to finish. -Tony |
|
|
|
|
2 User(s) are reading this topic (2 Guests and 0 Anonymous Users)
0 Members:

|
Lo-Fi Version | Time is now: 25th November 2025 - 08:23 AM |
Invision Power Board
v9.1.4 © 2025 IPS, Inc.