|
|
|
Porsche, and the Porsche crest are registered trademarks of Dr. Ing. h.c. F. Porsche AG.
This site is not affiliated with Porsche in any way. Its only purpose is to provide an online forum for car enthusiasts. All other trademarks are property of their respective owners. |
|
|


| TonyAKAVW |
 May 19 2005, 11:10 AM May 19 2005, 11:10 AM
Post
#521
|
|
That's my ride.  Group: Members Posts: 2,151 Joined: 17-January 03 From: Redondo Beach, CA Member No.: 166 Region Association: None |
Well, I figured since there has been some pickup in momentum on this project that I would start a thread on my progress. Not to mention its a good way to share whatever ideas I pick up along the way.
The project started in January 2003 when I picked up the silver roller pictured below. Its a '74 and was pretty much stripped. It had a suspension and a few other parts but was missing a lot of major things like and engine, transmission, glass, hoods, gas tank, interior, wheels, etc. etc. The story of my acquisition of this roller is in this thread: http://www.914world.com/bbs2/index.php?act=...&f=2&t=7991&hl= After arriving at home: http://www.914world.com/bbs2/index.php?act=...&f=2&t=8963&hl= This project got a bit of a slow start. I had to first part and chop up my first 914 and dispose of it. It was badly rusted and where itwasn't rusted it was bondo'd. This was going to be a replacement body for that car. Then last summer I picked up the yellow '70 roller that is now my daily driver. Since then I've spent most of my 914 time fixing it up and getting it ready for WCC. Now that its in a pretty much stable state and WCC is over I can concentrate on this car. The current plan is that it will get a Subaru 2.5L naturally aspirated engine in a conversion very similar to Scott Thacher's. The basic timeline is like this: 1. Fix up the body enough to make it roadworthy. 2. Put together the drivetrain (engine, adapter, transmission) 3. Install drivetrain and remaining parts 4. Install an exhaust system and wire up the engine, make it ready to drive 5. Install enough interior to drive it. 6. Drive it around a bit, fix whatever things don't work right 7. Flare the fenders (GT flares) 8. body and paint 9. Finish the interior 10.Performance mods - cams, etc. I'm hoping that I get it at least roadworthy within a year, and the rest of the stuff within a year after that. Its possible I could get it done faster but we'll see. This is a big project. Here's the car as it was when I brought it home: Attached image(s) 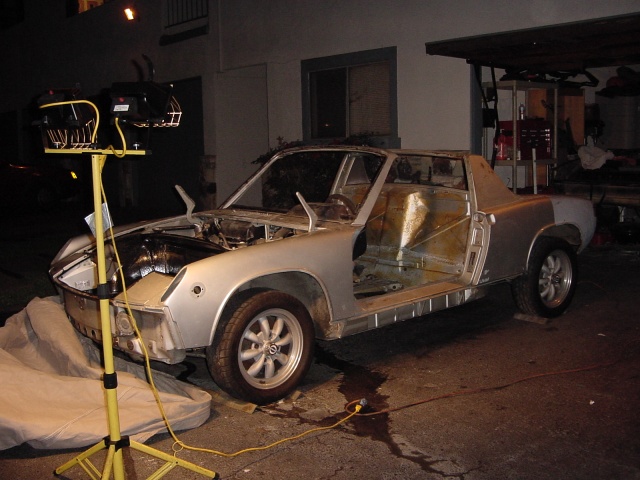
|
   |

 
|
Posts in this topic
 TonyAKAVW Tony's Subaru Conversion Thread May 19 2005, 11:10 AM
 TonyAKAVW Here's a detail picture. This is the weather ... May 19 2005, 11:12 AM TonyAKAVW First job I decided to tackle was taking the inter... May 19 2005, 11:13 AM TonyAKAVW Some more ugliness on the front fender. May 19 2005, 11:14 AM TonyAKAVW Well, the fender was junk, so I removed it. May 19 2005, 11:15 AM TonyAKAVW Heres the floor, stripped to metal. May 19 2005, 11:23 AM TonyAKAVW Another messed up fender. I have since found and ... May 19 2005, 11:24 AM TonyAKAVW The whole interior got treated with metal etch and... May 19 2005, 11:27 AM TonyAKAVW Here's the engine that is going into the car: May 19 2005, 11:31 AM Dr Evil In the first pic your cord is lying in some fluid ... May 19 2005, 11:33 AM TonyAKAVW The motor came with the ECU, wiring harness, and a... May 19 2005, 11:36 AM Rotary'14 Congratulations on getting off your ass Tony!... May 19 2005, 11:39 AM TonyAKAVW


