|
|
|
Porsche, and the Porsche crest are registered trademarks of Dr. Ing. h.c. F. Porsche AG.
This site is not affiliated with Porsche in any way. Its only purpose is to provide an online forum for car enthusiasts. All other trademarks are property of their respective owners. |
|
|

  |

| bowzer |
 Oct 17 2017, 09:00 AM Oct 17 2017, 09:00 AM
Post
#1
|
|
Newbie  Group: Members Posts: 21 Joined: 15-April 15 From: olympia wa Member No.: 18,636 Region Association: None |
hello all. so ive had this leather covered wheel sitting in a box for years and would like to recover it at some point,anyone know of a good quality rewrap kit for this ?thanks.i realize this should be in garage,how to move?
|
   |

 
|
| malcolm2 |
Oct 17 2017, 12:56 PM
Post
#2
|
|
Advanced Member Group: Members Posts: 2,749 Joined: 31-May 11 From: Nashville Member No.: 13,139 Region Association: South East States |
I found this one and saved the link. Have not purchased yet, but plan to.
http://www.automotion.com/black-steering-w...poke-wheel.html |
|
|
|
| n2j2ryan |
Oct 17 2017, 01:26 PM
Post
#3
|
|
Member Group: Members Posts: 85 Joined: 9-January 17 From: Victoria BC Member No.: 20,740 Region Association: Canada |
QUOTE(bowzer @ Oct 17 2017, 08:00 AM)  hello all. so ive had this leather covered wheel sitting in a box for years and would like to recover it at some point,anyone know of a good quality rewrap kit for this ?thanks I just brought one of the generic leather ones off of Ebay. Will let you know how it works. |
|
|
|
| mepstein |
Oct 17 2017, 04:57 PM
Post
#4
|
|
914-6 GT in waiting Group: Members Posts: 19,991 Joined: 19-September 09 From: Landenberg, PA/Wilmington, DE Member No.: 10,825 Region Association: MidAtlantic Region |
I send mine to Dallas custom steering wheel.
|
 |
|
| Cairo94507 |
Oct 17 2017, 05:07 PM
Post
#5
|
|
Michael Group: Members Posts: 10,400 Joined: 1-November 08 From: Auburn, CA Member No.: 9,712 Region Association: Northern California |
Me too - but they charge some serious coin for their work. (IMG:style_emoticons/default/bye1.gif)
|
|
|
|
| burton73 |
Oct 17 2017, 07:50 PM
Post
#6
|
|
Senior member, and old dude Group: Members Posts: 3,866 Joined: 2-January 07 From: Los Angeles Member No.: 7,414 Region Association: Southern California |
QUOTE(Cairo94507 @ Oct 17 2017, 04:07 PM) They did my 76 and it is worth it. Bob B |
|
|
|
| Montreal914 |
Oct 17 2017, 08:37 PM
Post
#7
|
|
Senior Member Group: Members Posts: 1,876 Joined: 8-August 10 From: Claremont, CA Member No.: 12,023 Region Association: Southern California |
This should probably be moved to the garage...
Did mine a few years back, bought the leather kit w/thread and felt. Installed the felt on my plastic wheel with spray contact cement. Wrap with seam inside while making sure there is no overlap. Then installed the pre holed leather using 2 needles and very long thread. 2 1/2 nights in front of the tube... (IMG:style_emoticons/default/rolleyes.gif) Once done, the key is to use a hair dryer to tighten and remove the orange peel skin of the leather. You have to be careful not to blow on the nylon thread or else you will burn it. I was warned so it didn't happen to me (IMG:style_emoticons/default/biggrin.gif) Fun project! 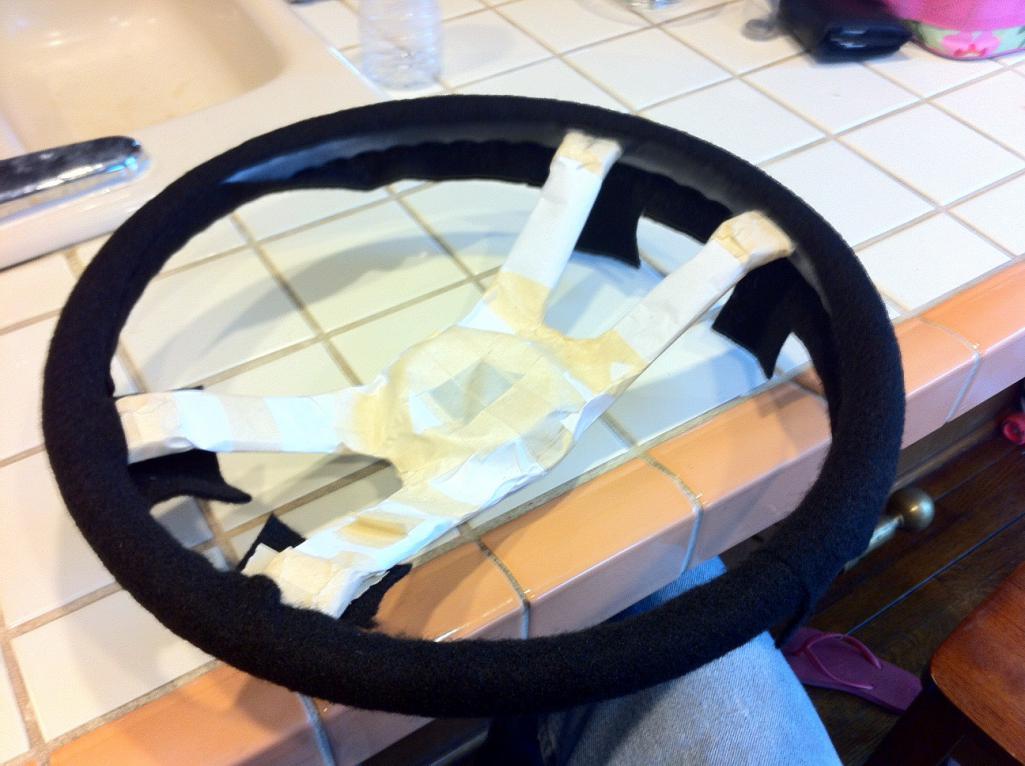 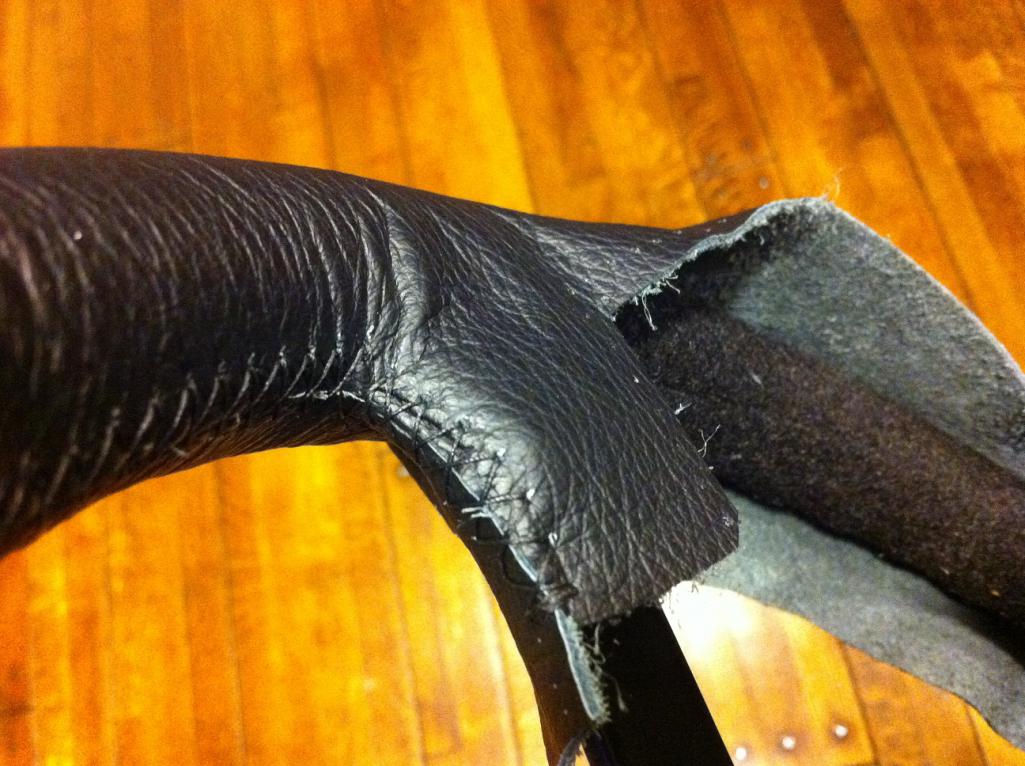 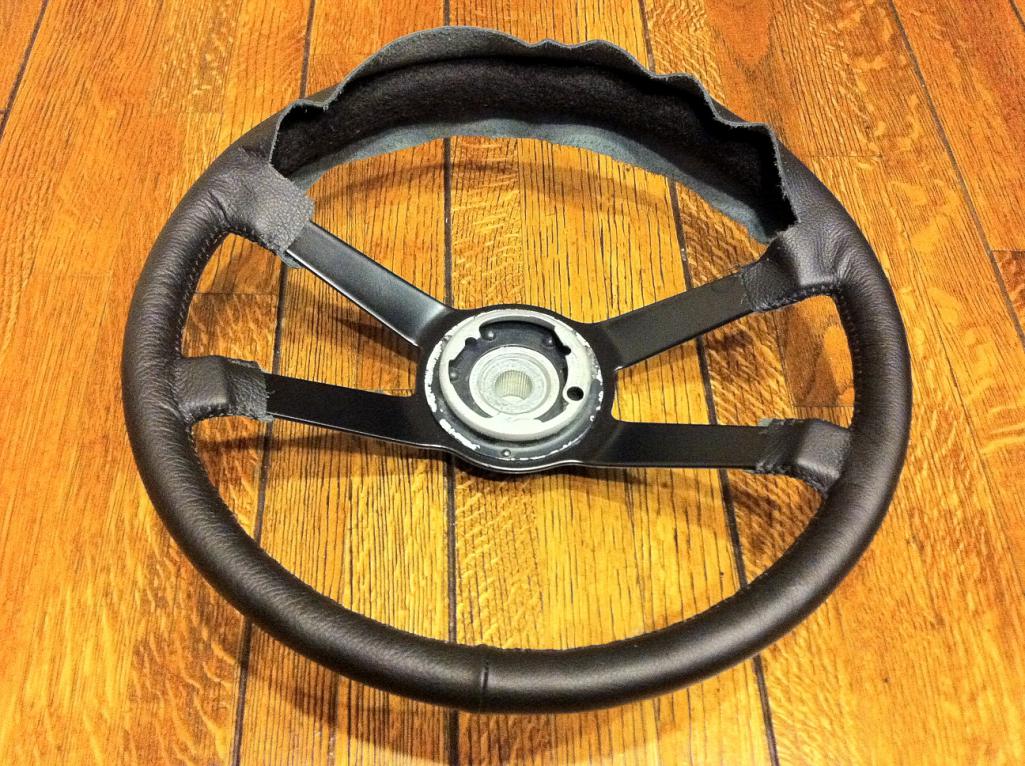 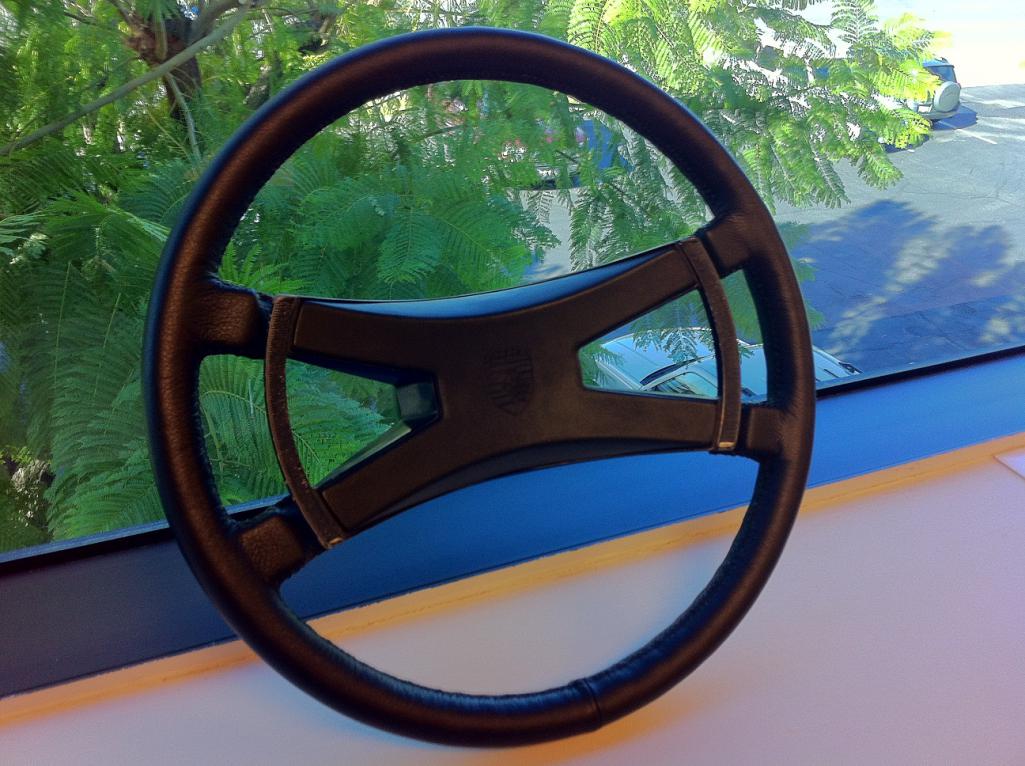 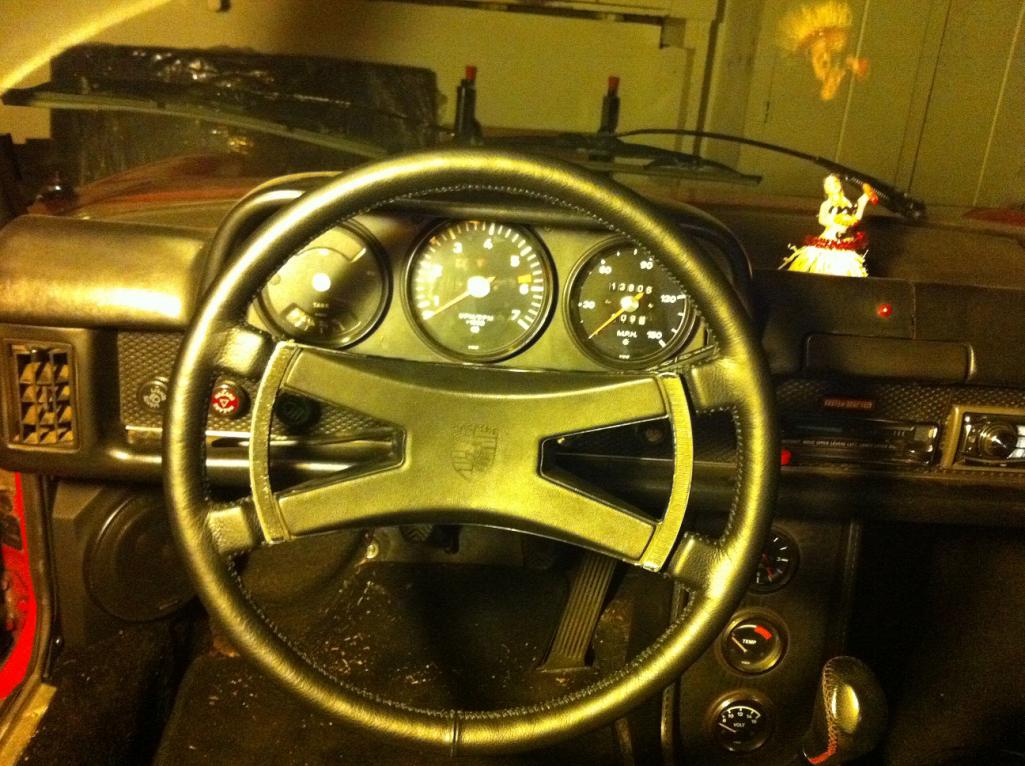 |
|
|
|
| burton73 |
Oct 17 2017, 09:28 PM
Post
#8
|
|
Senior member, and old dude Group: Members Posts: 3,866 Joined: 2-January 07 From: Los Angeles Member No.: 7,414 Region Association: Southern California |
Nice, Thanks for the tip. I bought a double wrapped what was called an RS wheel for my 6 341 from Sierra Madere around 10 years ago for $700. There ad. 914 (380mm in diameter) steering wheel wrapped with double leather, just as the 1973 911RS wheels
Curent price $1,200 with hocky puck. Doing this your way could save a lot of money. Bob B |
|
|
|
| Mueller |
Feb 13 2018, 02:45 PM
Post
#9
|
|
914 Freak! Group: Members Posts: 17,155 Joined: 4-January 03 From: Antioch, CA Member No.: 87 Region Association: None |
QUOTE(malcolm2 @ Oct 17 2017, 10:56 AM) I found this one and saved the link. Have not purchased yet, but plan to. http://www.automotion.com/black-steering-w...poke-wheel.html Just pulled the trigger on this kit, hope not disappointed with it. Will post pics in my thread when I start it. |
|
|
|
| Mike Fitton |
Feb 13 2018, 05:48 PM
Post
#10
|
|
Senior Member Group: Members Posts: 609 Joined: 13-May 11 From: Chicago Area Member No.: 13,069 Region Association: Upper MidWest |
Everyone should try this at least once. Posted over on the early911sregistry by 911T1969:
I decided to try to recover my 380mm four spoke steering wheel from my '69 911T. I love a challenge. It's probably worth the money to pay someone to do it, but if you have time on your hands and get a satisfaction of doing something yourself you should try a DIY steering wheel recover. First of all, you do not need to buy a “kit”. You can get all the necessary materials and tools yourself. The following is how I did it. You might have your own techniques and methods. Please post them here for others to use. I bought the black leather on Itsy.com. I bought half a hide for only $35. It was slightly thicker than the original steering wheel leather. I used a heavy waxed thread that I bought on mainethread.com. I also used a thinner upholstery Dacron thread to stitch the ends together. You will need the following tools: Straight edge / carpenters square Circle template Single edged razor blades X-Acto Knife Skiving tool – bought on Ebay, used to taper the ends of the leather, so when you fold the leather over, it's not too thick Scissors Fabric marking pencil Curved needles Leather hole punch Hook tool – for hooking the thread as you lace and pulling it tight. Masking/painters tape – don't use a tape that will pull the finish off the leather Digital calipers – very helpful Contact cement 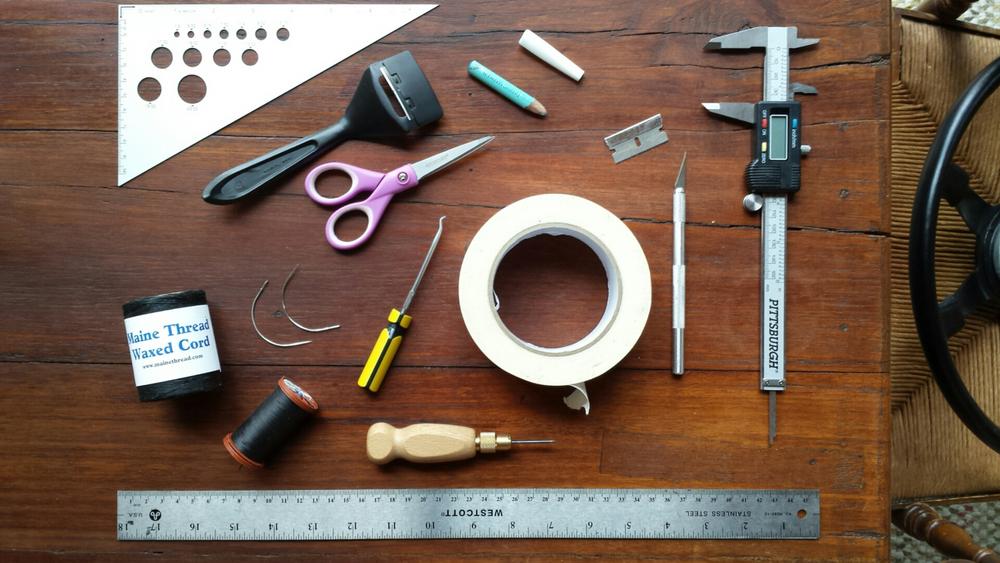 Before you remove the cover note the stitching patterns. Mine had a XXXXX pattern around the rim and a baseball >>>>> stitch on the spokes. Note the leather extends onto the metal spokes. Carefully remove the steering wheel cover. Note inside of the seam and the end of the spokes. That is where the skiving tool is use to taper the leather before it is folded over and glued. The old leather is practically useless as a pattern for making a new cover. Note that the leather tapers slightly as the ends of the spokes. I made a paper pattern only to find the spacing of the spokes. Next, I cut leather pieces to test the width that I needed to cut the cover and to practice stitching. All leather will be different thicknesses and will have different stretch properties, so you will have to determine how wide to cut your cover. My first test piece was 65mm wide and about 100mm long. I found that it took a lot of pull to close the gap on the seam, so I went with 66mm. That extra 1mm made all the difference on how the leather came together properly. I also cut a long test piece (long enough to go along a spoke on the front side around to the backside. I practiced my baseball stitch and found that 35mm was a good width for the spokes. I'll discuss how to do the stitching a little later so reference that section to practice your stitching. I next cut the leather cover. I used the fabric pencil to lightly mark my cuts. I referenced my paper pattern to mark where the spokes align. When you cut the cover, cut the spokes EXTRA wide. Why? Because you are going to make the cover about 1 to 1.25cm smaller in diameter than the steering wheel so it will stretch tight when you mount it. Your spoke measurements will shift. Also the spokes are not exactly perpendicular to the wheel rim. I cut the spokes to width after I sewed the ends together. Remember to leave some extra leather on the ends where you will sew the ends together. I used a carpenters square to make the lengthwise cuts. Cut one side, then carefully measure (I used my digital caliper) and align your straight edge so it is EXACTLY parallel to your first cut and exactly 66mm wide (or whatever width that works for your leather). After the cover has been cut out, use the skiving tool and taper each end. Next, sew the ends together. Smooth side to the inside. I used a leather punch and punched holes across the width and hand sewed this seam using the thinner Dacron upholstery thread. If you have a heavy duty sewing machine use it to sew this seam. Next take a block of wood and use the edge to run it along the back side of the seam. Doing this will help fold over the ends. Use contact cement and glue down the tapered ends. You should have a nice tight and fairly flat seam. Now we will trim the leather spokes to width. Leave the leather spoke lengths LONG at the point. Put masking tape on the backside of each of the four leather spokes. Put the cover on the steering wheel starting with your seam exactly at the bottom of the wheel. You will see the old imprint of the seam. It should be a fairly tight fit. Make sure the leather is evenly stretched on the wheel and centered side to side. Now make a few tick marks on the masking tape along the center of each leather spoke, front and back. Now take the cover off, turn it back side out. The masking tape will be to the outside and you should have the exact centers marked. Use a straight edge and connect your tick marks. You will notice that the spokes are not exactly perpendicular to the outside wheel and your marks will show this. Using the center lines, I marked my widths. (I used 35mm, your measurements might be different.) Next I trimmed the spokes to width. Again, do not cut the length. Leave them long. Note that the corners of each spoke is a radius, not a right angle. I used my Xacto knife and a circle template to cut the radius. Pull off all the masking tape. Next, turn your cover right side out. You will now pre-punch all of the holes except along the spokes. I had a straight edge with metric markings. I went with a 5mm spacing. That spacing is slightly smaller than original, but is easier to measure. I had a long board about a foot wide and laid it on the kitchen table, sticking out towards me. Lay your cover around this board and start punching holes, starting either side of the bottom seam. First do one edge, then the opposite edge. Make sure the holes line up with each other exactly from side to side. i.e. don't have 30 holes on one side and 31 on the other. Haha. I used a square to make sure the holes lined up. So now all four sections should be punched. (top, bottom, and between spokes, but not along the spokes.) Now comes the fun part – the stitching. Put some contact cement on the inside of your seam and on the bottom of your steering wheel. Line up the cover seam with the bottom of your steering wheel, centered side to side and put the cover back on the wheel. Again make sure the cover is evenly stretched and the leather cover spokes EXACTLY line up with the steering wheel spokes. You can put some contact cement along the wheel and cover. 10 and 2 o'clock and 4 and 8 o'clock positions. Don't over do it. Use masking tape at these points and at the spokes to hold the cover in position. You will use FOUR start points for the stitching: the 12, 3, 6, and 9 o'clock positions. At each position you will stitch counterclockwise and clockwise, so you will have EIGHT threads running around the steering wheel terminating along the spokes. WHAT?? Trust me on this. 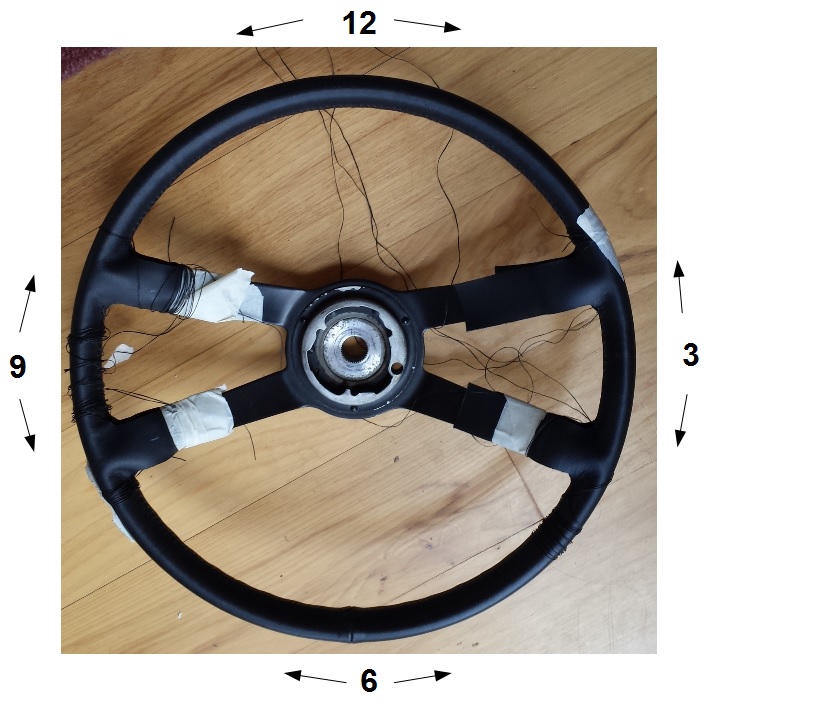 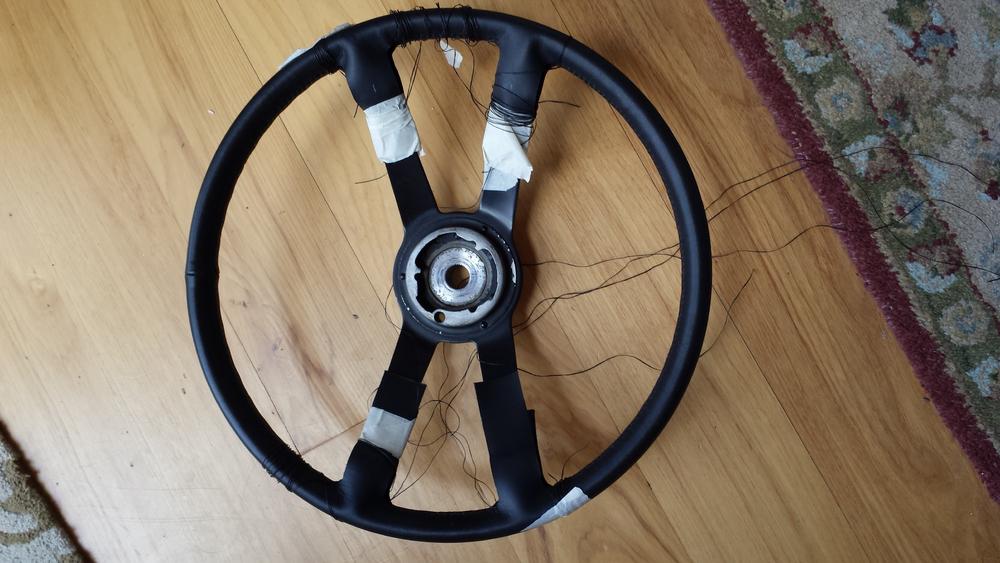 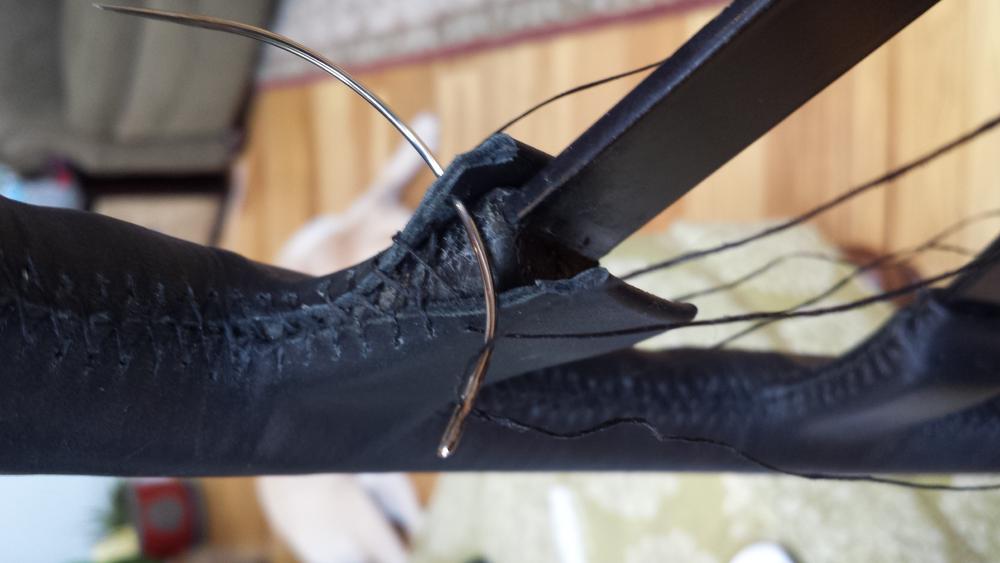 The threads for the 12 and 6 o'clock positions need to be TWO arms-stretched length long,(about 2 meters) so cut FOUR of these. The threads for the 3 and 9 o'clock positions need to be only ONE arm-stretched length long (about 1 meter) so cut FOUR of these. This is how to do a cross stitch. Take one of the long threads. Thread the curved needles on each end. Take one of the needles and go DOWN through hole 1, straight across and UP through hole 2. Now you have an end coming up out of holes 1 and 2. Take your right needle across to hole 3 and go DOWN through hole 3, across, and UP through hole 4. Take your left needle across to hole 4 and go DOWN through hole 4, across, and UP through hole 3. Now you have an ends coming up out of holes 3 and 4. Take your right needle across to hole 5 and go DOWN through hole 5, across, UP through hole 6. Take your left needle across to hole 6 and go DOWN through hole 6, across, and UP through hole 5. Now you have an ends coming up out of holes 5 and 6. Repeat over and over and over.... 5* *6 3* *4 1* *2 Starting Position Take another long thread, thread two needles on each end and thread it through the same start point holes 1 and 2. Do the exact same pattern going the opposite direction. After 4 or 5 sets of holes are laced in each direction, pull the thread snug and now use you the hook tool to pull the threads tighter. Keep working the thread tighter and tighter with the tool until the leather starts to close up. Lace some more holes in each direction away from the starting point, and again pull the thread tight and close up the seam with the hook tool. After you get a number of holes laced and pulled tight the wax on the thread will help hold the seam together. SOME TIPS: Wrap some masking tape around the wheel rim a few inches from where you are working the holes. After you lace a set of holes hand pull the ends snug back towards the starting point. This will help keep the leather cover from shifting as you stitch. You do not want to reach the spokes with the leather shifted and the spoke leather misaligned with the steering wheel spokes. Also when you cross under, and up through a hole make sure you do not thread your needle through the thread already in that hole. If you do, when you snug up the thread and pull it tight the thread will rip. Also, it is very important to ALWAYS cross the same thread over the other. i.e. the left thread always goes over the right thread. This will make a difference on how the stitching looks. I started the 6 o'clock position, where the seam is, a little differently. Picture the seam in the above diagram running between holes 1 and 3 and 2 and 4. I started one thread in holes 1 and 2 as previously described and the second thread in holes 3 and 4 going in the opposite direction. This made a doubled X stitch over the seam. I needed the doubled thread to pull the extra thick seam tight. Stitch the seam to each spoke and stop there. I wrapped the thread that I wasn't working with around the wheel and taped it out of the way. Now we cut the spoke leather to length. Push the leather along the contour of the spoke. Remember the leather goes beyond the rubber spoke on onto the metal portion of the spoke. Add a little extra length to be folded under. Mark and cut to length. Do this for all four spokes. Get someone to hold the wheel upright while you use the skiving tool to taper the leather on the spokes ends. Put contact cement on the leather spoke ends, let dry and fold over the leather ends. You will notice that where the spokes meet the rim of the wheel the contour is concave. You will have to glue that section of leather down. While you are applying cement, extend it midway down the rubber spoke. Let it get tacky and then press down and hold it in place with your fingers. Now you can continue to stitch up the spokes. The stitch changes to a baseball “>>>>” stitch. I did not pre-punch holes along the spokes. I was able to push the needle through the raw leather, but boy my fingers were hurting! These holes where closer together than the cross stitched sections. Look at the original cover. Look at the above hole diagram. If you picture the base of the spokes as the starting position holes 1 and 2. The left thread will be coming up out of hole 1 and the right thread up out of hole 2. Take your right needle across to hole 3 but come UP through the bottom of hole 3 Take your left needle across to hole 4 but come UP through the bottom of hole 4. Now take your right needle across to hole 5 and come UP through hole 5. Take your left needle across to hole 6 and come UP through hole 6. You can see in this stitch, the needle always goes UP through the holes after a crossover. Work a few sets of holes and start snugging the thread. Use the hook tool. Work both sides of the spoke at the same time, alternating one side then the other. When I get to the end of the spokes the thread ends will be coming UP through the last holes. Before you snug everything down put some contact cement on the leather ends and spokes and glue it down. Take your right needle and go directly across the the adjacent hole and go DOWN through it. Take your left needle and go directly across and go DOWN through that hole. Now the threads will be coming out of the bottom of the last holes. This is your last chance to work your threads tight and to get all your seams tight. Take your time and work it tight. Put a couple of half hitch knots in your threads. Pull the two threads to the backside of the spoke. Cut them about ¾ long and tuck them in the back. Use a took pick and some more contact cement to tuck them in. Do all the spokes and you are done! |
|
|
|
| Mueller |
Feb 13 2018, 06:09 PM
Post
#11
|
|
914 Freak! Group: Members Posts: 17,155 Joined: 4-January 03 From: Antioch, CA Member No.: 87 Region Association: None |
Thanks Mike for posting that, I have no original leather to make a copy from so I went with the kit (IMG:style_emoticons/default/smile.gif)
|
|
|
|
| mepstein |
Feb 13 2018, 06:13 PM
Post
#12
|
|
914-6 GT in waiting Group: Members Posts: 19,991 Joined: 19-September 09 From: Landenberg, PA/Wilmington, DE Member No.: 10,825 Region Association: MidAtlantic Region |
It may make it easier for you to get an old steering column and mount it to a bench.
|
|
|
|
| Larmo63 |
Feb 13 2018, 08:00 PM
Post
#13
|
|
Advanced Member Group: Members Posts: 4,267 Joined: 3-March 14 From: San Clemente, Ca Member No.: 17,068 Region Association: Southern California |
Just pay the dough and have Dallas Steering Wheel do it.
He's the best, or one of the best, in the world. I've seen some others done and I'd rather send it to Donald. 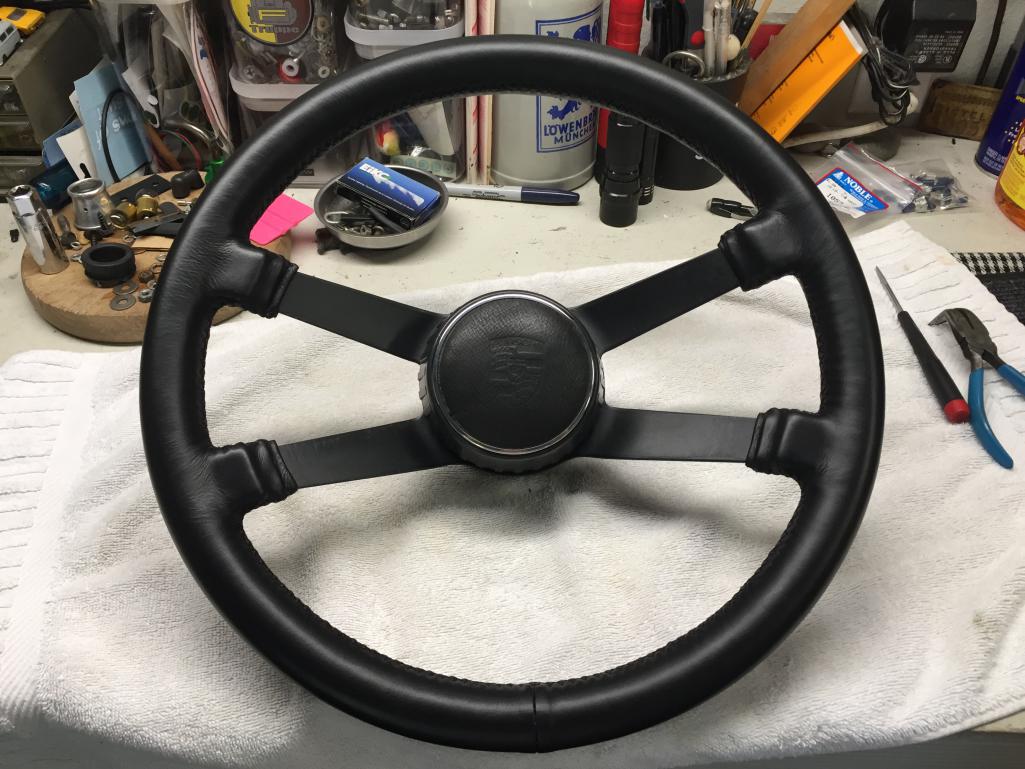 |
|
|
|
| Mueller |
Feb 14 2018, 12:09 AM
Post
#14
|
|
914 Freak! Group: Members Posts: 17,155 Joined: 4-January 03 From: Antioch, CA Member No.: 87 Region Association: None |
QUOTE(mepstein @ Feb 13 2018, 04:13 PM) It may make it easier for you to get an old steering column and mount it to a bench. Good idea, thanks. No way I am sending it off to Dallas, I already have enough money "invested" into a stupid steering wheel: $25 for used horn pad $11 for horn rubber bellows $30 for new contact pin plus the leather cover (IMG:style_emoticons/default/smile.gif) |
|
|
|
| mepstein |
Feb 14 2018, 04:53 AM
Post
#15
|
|
914-6 GT in waiting Group: Members Posts: 19,991 Joined: 19-September 09 From: Landenberg, PA/Wilmington, DE Member No.: 10,825 Region Association: MidAtlantic Region |
QUOTE(Mueller @ Feb 14 2018, 01:09 AM) QUOTE(mepstein @ Feb 13 2018, 04:13 PM) It may make it easier for you to get an old steering column and mount it to a bench. Good idea, thanks. No way I am sending it off to Dallas, I already have enough money "invested" into a stupid steering wheel: $25 for used horn pad $11 for horn rubber bellows $30 for new contact pin plus the leather cover (IMG:style_emoticons/default/smile.gif) I have an old column that I can send you if you don't have one locally. |
|
|
|
| Mueller |
Feb 23 2018, 10:59 PM
Post
#16
|
|
914 Freak! Group: Members Posts: 17,155 Joined: 4-January 03 From: Antioch, CA Member No.: 87 Region Association: None |
Do I have the wrong kit or the wrong wheel?
Doing a test fit I don't see how the leather can stretch that much to fit without damaging the cover. This is the kit from Automotion, it is an Alan Gun manufactured kit. Attached thumbnail(s) 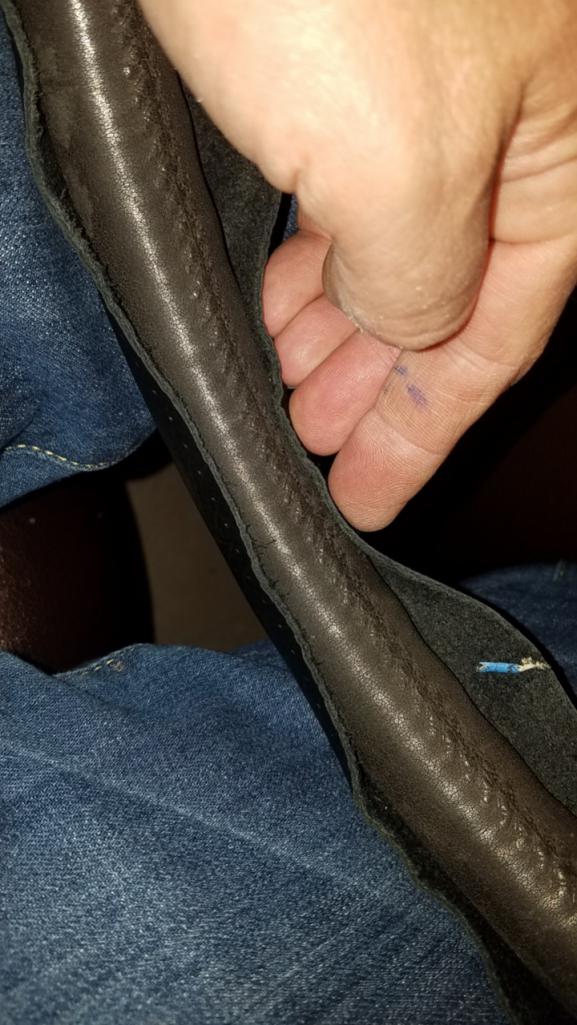
|
|
|
|
| Mueller |
Feb 23 2018, 11:04 PM
Post
#17
|
|
914 Freak! Group: Members Posts: 17,155 Joined: 4-January 03 From: Antioch, CA Member No.: 87 Region Association: None |
QUOTE(mepstein @ Feb 14 2018, 02:53 AM) I have an old column that I can send you if you don't have one locally. ^ Thanks, I'm almost done building this (now whether or not it works is a different story)  |
|
|
|
| Montreal914 |
Feb 24 2018, 12:50 AM
Post
#18
|
|
Senior Member Group: Members Posts: 1,876 Joined: 8-August 10 From: Claremont, CA Member No.: 12,023 Region Association: Southern California |
QUOTE(Mueller @ Feb 23 2018, 08:59 PM) Do I have the wrong kit or the wrong wheel? Doing a test fit I don't see how the leather can stretch that much to fit without damaging the cover. This is the kit from Automotion, it is an Alan Gun manufactured kit. When I bought my kit there were 2 options, the felt padded one (felt included) and the standard one to go directly on the steering. I think both kit were designed to go on a solid steering. That's looks like a stretch (IMG:style_emoticons/default/sad.gif) |
|
|
|
| djway |
Feb 24 2018, 02:49 AM
Post
#19
|
|
Senior Member Group: Members Posts: 787 Joined: 16-October 15 From: Riverside Member No.: 19,266 Region Association: Southern California |
QUOTE(Mueller @ Feb 23 2018, 08:59 PM) Do I have the wrong kit or the wrong wheel? Doing a test fit I don't see how the leather can stretch that much to fit without damaging the cover. This is the kit from Automotion, it is an Alan Gun manufactured kit. That looks like too much of a stretch. Looks like it was made to remove original leather. I just did a Ford Fusion wheel for my gettin older mom. It was plastic and terrible to grip in the cold especially with arthritis. I got a kit from China that wound up being awesome. It took most of an afternoon and is the best feeling leather I have ever gripped and looks darn good. I used a generic kit for a Momo wheel that I was given which also had a plastic finish and felt terrible. It was thick and so so on the grip but better than the plastic. I would check with the maker before you start stitching that. |
|
|
|
| ranger |
Feb 24 2018, 05:04 AM
Post
#20
|
|
Newbie Group: Members Posts: 18 Joined: 21-November 10 From: North Carolina Member No.: 12,409 Region Association: South East States |
Check out my web sight,Rix914parts, We do steering wheel wraps
single and double correct stiching,thats cross and baseball,the way Porsche did it they turn out perfect,thanks.. |
|
|
|
|
1 User(s) are reading this topic (1 Guests and 0 Anonymous Users)
0 Members:

|
Lo-Fi Version | Time is now: 30th July 2025 - 10:31 AM |
Invision Power Board
v9.1.4 © 2025 IPS, Inc.