|
|
|
Porsche, and the Porsche crest are registered trademarks of Dr. Ing. h.c. F. Porsche AG.
This site is not affiliated with Porsche in any way. Its only purpose is to provide an online forum for car enthusiasts. All other trademarks are property of their respective owners. |
|
|

  |

| 914_teener |
 Nov 4 2017, 03:48 PM Nov 4 2017, 03:48 PM
Post
#161
|
|
914 Guru  Group: Members Posts: 5,270 Joined: 31-August 08 From: So. Cal Member No.: 9,489 Region Association: Southern California |
Just installed mine....just now.
Almost ready to fire it up. This is on my 1.7 bone stock. Working dizzy I took out is Bosch # 0 231 174 007 which os consistant with dip switch aetting No 1 per tje installation manual. Assuming these things: No difference between 21 and 22 for the trigger points... No ground for pole 12 off the same so assume that the ecu sees a ground doesn.t matter. It will trigger fuel or it won.t . I.ll post what I did and we.ll see if there are issues....I.ll post those too. |
   |

 
|
| 914_teener |
Nov 4 2017, 03:50 PM
Post
#162
|
|
914 Guru Group: Members Posts: 5,270 Joined: 31-August 08 From: So. Cal Member No.: 9,489 Region Association: Southern California |
At the moment what vacuum hooks up to the port....retard or advance?
|
|
|
|
| 914_teener |
Nov 4 2017, 04:26 PM
Post
#163
|
|
914 Guru Group: Members Posts: 5,270 Joined: 31-August 08 From: So. Cal Member No.: 9,489 Region Association: Southern California |
It fired up no problem.....I.ll post pics later and need to road test.
|
|
|
|
| BeatNavy |
Nov 4 2017, 04:47 PM
Post
#164
|
|
Certified Professional Scapegoat Group: Members Posts: 2,966 Joined: 26-February 14 From: Easton, MD Member No.: 17,042 Region Association: MidAtlantic Region |
QUOTE(914_teener @ Nov 4 2017, 06:26 PM)  It fired up no problem.....I.ll post pics later and need to road test. Very cool, Rob. Mine fired up right away...the first time (IMG:style_emoticons/default/dry.gif) If you think you're good based on the road test, I'd love a description of how you handled those last few installation steps. They are not crystal clear (obviously translated into English), and maybe that's where I'm getting fouled up. It's dark and pouring rain here right now, and won't be able to get back at it until the morning. |
|
|
|
| Porschef |
Nov 4 2017, 06:30 PM
Post
#165
|
|
How you doin' Group: Members Posts: 2,180 Joined: 7-September 10 From: LawnGuyland Member No.: 12,152 Region Association: North East States |
|
|
|
|
| 914_teener |
Nov 4 2017, 09:29 PM
Post
#166
|
|
914 Guru Group: Members Posts: 5,270 Joined: 31-August 08 From: So. Cal Member No.: 9,489 Region Association: Southern California |
Ok. (IMG:style_emoticons/default/barf.gif) This activity got cut short this afternoon....daughter got in a car accident while I was installing this. 20 somethings...sigh (IMG:style_emoticons/default/screwy.gif) No one is huirt so all is good.
So got home around 6 and finished checking the timing and a short run. No problems firing right up and repeated starts. If anything the startup seemed smoother. AAR came off as normal and I let it warm up. Both vacuum ports plugged and checked the timing. It was spot on. Then I got involved in alot of idle issues that only happens with D-jet meaning that it always seems to be this creeping elegance to get it perfect which it never will be. So let it just sit to normalize and idle to get good and warm. No issues. They only thing that I see is the vacuum port. I hooked it up to the retard port. My thought is that the advance curve is programmed as a function of the combination of the idle side for retard and then compensates for the programmed advance curve. Static, with no load the timing is right on. On my short runs up the street I couldn't notice anything. I'll take longer runs when I come back from the G &R tomorrow and put the air cleaner back and take it for a longer drive. It revs up quickly past 4.2k quickly and smoothly like a short stroked type IV. So a few pics will follow. Here is what I did: 1. I put shrink wrap on the trigger point wires and then sheathing on the + and - wires to the coil. Just didn't look right and feel right. 2. Got the stock distributor as close as possible to TDC and then removed it by taking the entire clamp off. 3. Followed the instructions verbatim. Use the number dizzy from the manual to 1 since that matched the dizzy number I had. 4. Installed the 123 with the rotorcap in the clamped position and making sure it was orientated how the stock distributor was......meaning the No 1 spark plug. 5. I thought this was the tricky part. The new dizzy seal and shaft is a pretty tight fit and it didn't seat the first time. I had to really push down on it to get it to seat. Once I had it down I must have tweeked one of the rotor clamps which are as others have said kind of "flimsy" They appear to be made out of stainless or plated steel and not spring hardened like the stock clamps. It almost occured to me to switch them. Instead I tweeked it back by squeezing it back to make it tighter. This worked. Once it was seated right I plugged back in the respected plug wires....no issues. Checked the timing...that was it. I feel more confident when I take it for a longer drive, hopefully tomorrow. Pics: 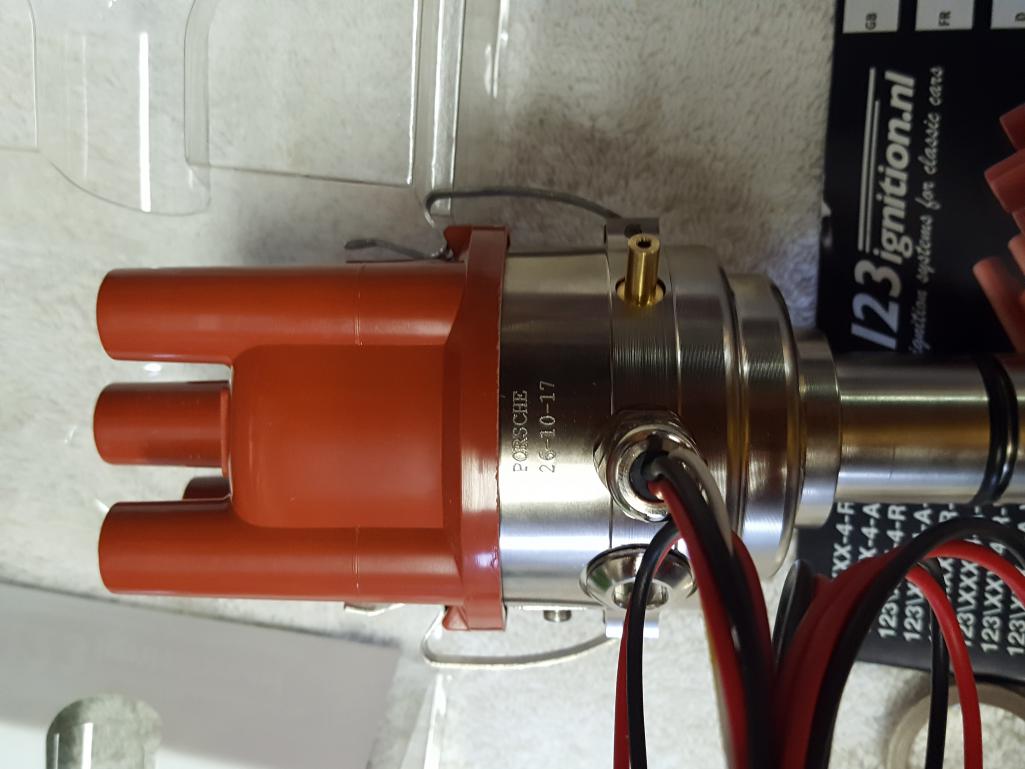 |
|
|
|
| 914_teener |
Nov 4 2017, 09:40 PM
Post
#167
|
|
914 Guru Group: Members Posts: 5,270 Joined: 31-August 08 From: So. Cal Member No.: 9,489 Region Association: Southern California |
Protected the wires....and no I don't wash my clothes in the 87 Whirlpool, only the dog blankies.
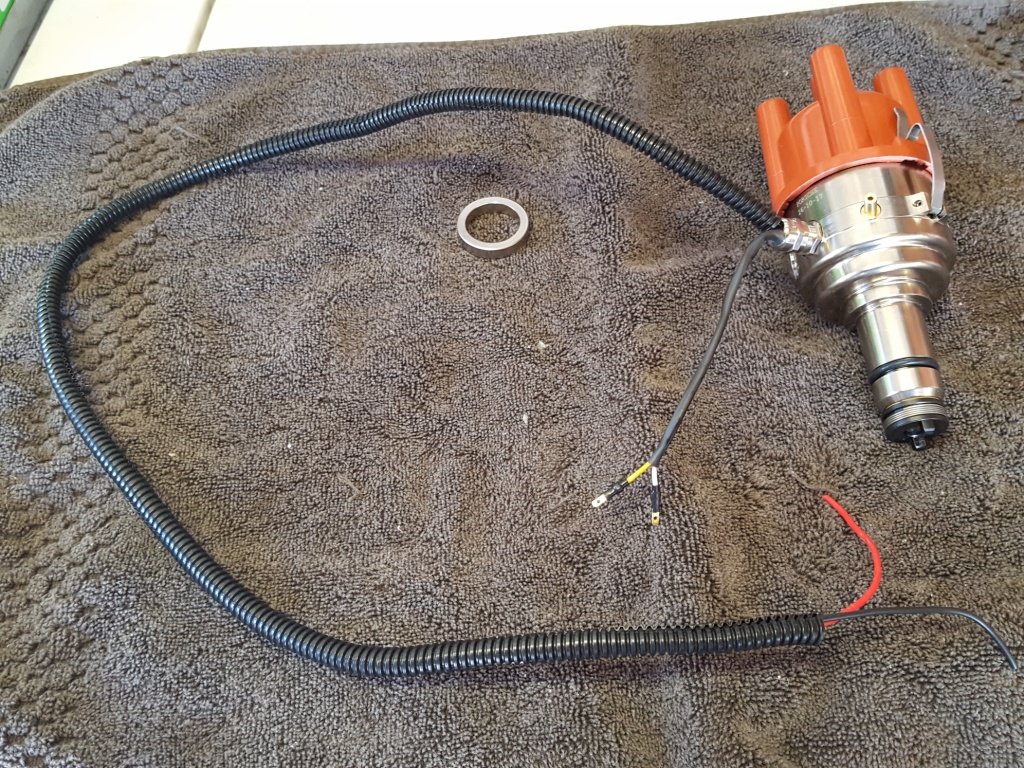 Set engince to TCD and removed the old dizzy. 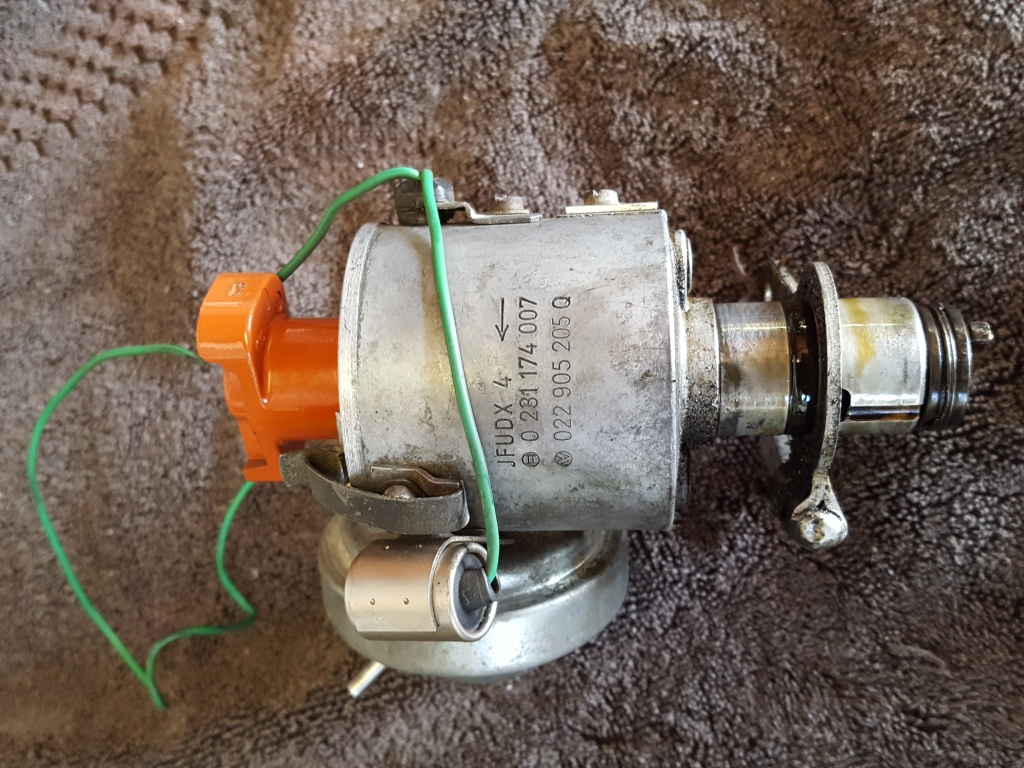 Set the dip switch from the manual to the BOSCH part No. listed in the instruction manual. 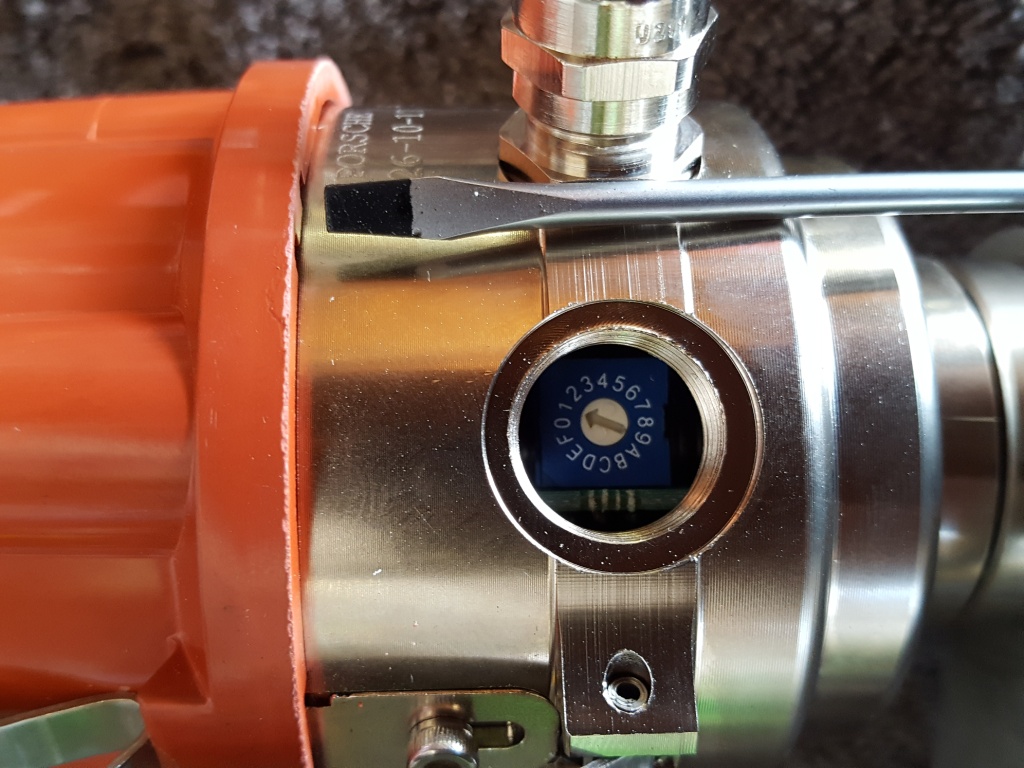 Make sure the new dizzy is installed and seated firmly. You should NOT be able to move the rotor if it is. 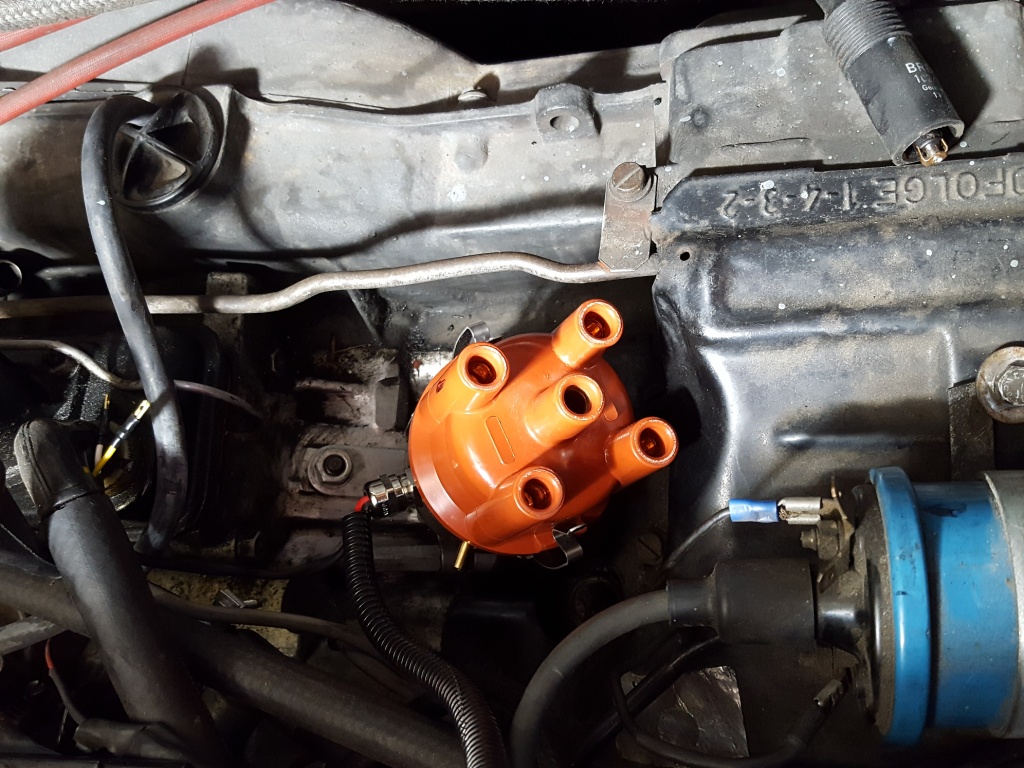 Checked the timing. 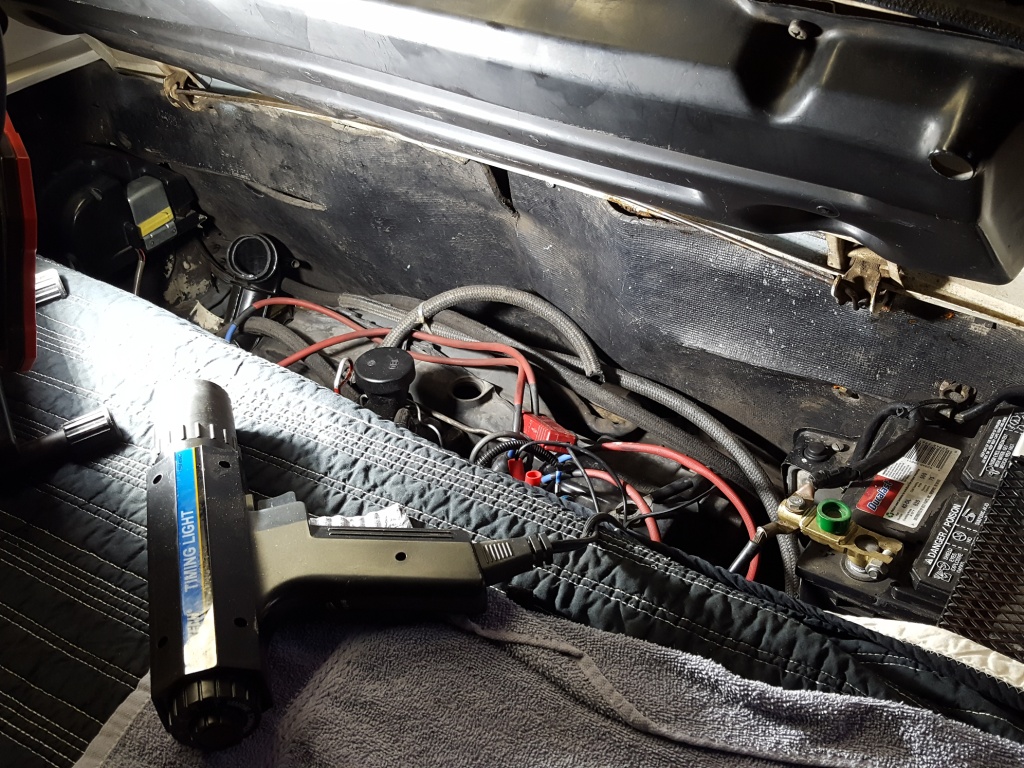 |
|
|
|
| 914_teener |
Nov 4 2017, 11:02 PM
Post
#168
|
|
914 Guru Group: Members Posts: 5,270 Joined: 31-August 08 From: So. Cal Member No.: 9,489 Region Association: Southern California |
QUOTE(914_teener @ Nov 4 2017, 02:50 PM) At the moment what vacuum hooks up to the port....retard or advance? My thinking at this time...and a glass of wine later is that I hooked up the wrong hose. I set the timing statically with the hoses plugged as normal. I was told that this port is active and has an effect on timing. In theory then if there is only one port to the dizzy then there should be a tee and then connect to the dizzy. Vacuum advance should be the highest near part load and then fade out on the curve at WOT? Think I need to test this for any effect tomorrow. Maybe is doesn't matter? |
|
|
|
| BeatNavy |
Nov 5 2017, 06:32 AM
Post
#169
|
|
Certified Professional Scapegoat Group: Members Posts: 2,966 Joined: 26-February 14 From: Easton, MD Member No.: 17,042 Region Association: MidAtlantic Region |
Rob, sorry about your daughter. I'm given to believe a father's job is never done, no matter how old your kids are. Glad nobody was hurt, though.
QUOTE(914_teener @ Nov 4 2017, 11:29 PM) 4. Installed the 123 with the rotorcap in the clamped position and making sure it was orientated how the stock distributor was......meaning the No 1 spark plug. QUOTE(914_teener @ Nov 4 2017, 11:29 PM) Once I had it down I must have tweeked one of the rotor clamps which are as others have said kind of "flimsy" They appear to be made out of stainless or plated steel and not spring hardened like the stock clamps. I'm going to get back at this morning once the neighbors can tolerate some noise and the rain lets up a bit. I'm either doing something fundamentally wrong or the unit itself (or coil, or something) is bollocksed. |
|
|
|
| McMark |
Nov 5 2017, 08:11 AM
Post
#170
|
|
914 Freak! Group: Retired Admin Posts: 20,180 Joined: 13-March 03 From: Grand Rapids, MI Member No.: 419 Region Association: None |
Sounds like there are a few minor issues going on, mostly just procedural.
1. As mentioned, new distributor seals make the distributor challenging to seat. This is true every time the seal is replaced, regardless of the distributor. A little motor oil on the seal will help, but at some point you just have to force it. 2. The center shaft has the rotor on top and the offest-keyed 'bar' on the bottom. That whole assembly will only install one way. You can't force it or convince it to line up any other way. So as you're sliding the disitributor body into place, you need to spin the rotor to find the place where that key/bar/tooth drops into place and locks. This can sometimes be challenging, but it's undoubtable when it goes in. If for some reason you need/want the rotor to point a different direction at #1 TDC, you must remove the distributor, then pull and reorient the separate drive gear. 3. The body of the distributor can be rotated to any position. It doesn't really matter which way it's pointing, so for initial setup loosen the stock clamp and rotate the distributor however you need to to make the body match up with the rotor -- so the rotor (which is still at #1 TDC) points to where spark plug wire #1 will plug in. Once you have #1 spark plug wire in place, install the rest of the wires in the firing order 1-4-3-2, going clockwise. Finally, follow the instructions to get the 'static timing' set. 4. IF you're using vacuum feature, the vacuum port should always be hooked to the advance port unless the tuning curve you choose says "DEGREES NEGATIVE VACUUM!!!!" those curves should be hooked up to the retard port. If you're unsure which port on the throttle body is which, leave it disconnected for now and once the engine is running, use a vacuum gauge to test both ports on the throttle body. With the engine running at idle and the throttle closed, the port with the LEAST amount of vacuum is the advance port. At idle the advance port should read nearly zero vacuum, where-as the retard port would show manifold vacuum. Plug any ports on the throttle body that you don't use. 5. Do NOT plug the vacuum port on the distributor if you're not using it. This goes for ALL distributors in ALL cars (at least vintage points based distributors in all cars). 6. ----If you have the Bluetooth unit, ensuring that what you see on your phone (degrees) matches what you see on the timing light is CRITICALLY important. Take extra time to make sure you're doing this right. ---- For non-bluetooth models, just make sure you're using the right curve choice. Also note/understand that the amount of advance described in the manual is the number of degrees added to the initial timing. So if the curve you select says it adds 22 degrees at 2700 rpm, then on a stock D-Jet car you still set the timing to 27 degrees just like the factory distributor -- NOT 22!! In that example, the full advance timing is 27, the distributor is adding 22 degress, so your initial/idle timing is 'automatically' set to 5 degrees. Another way to say the same thing: initial timing + distributor max advance = 27 degrees (the factory timing setting). 6. The cap-clamps are a weak point of the design, you can try and swap original units on, or you can bend them a bit to increase tension. Mostly just be careful while rotating the body because it's easy to forget to pay attention to the clamps and accidentally bend them. Once they're installed and running, I've never had a problem with the clamps popping off -- but I always ensure good tension during the install process. You wan a nice tight snap. I think that's it. But I'll keep checking in to help anyone else who needs it. |
|
|
|
| BeatNavy |
Nov 5 2017, 08:31 AM
Post
#171
|
|
Certified Professional Scapegoat Group: Members Posts: 2,966 Joined: 26-February 14 From: Easton, MD Member No.: 17,042 Region Association: MidAtlantic Region |
QUOTE(McMark @ Nov 5 2017, 10:11 AM) 6. For non-bluetooth models, just make sure you're using the right curve choice. Also note/understand that the amount of advance described in the manual is the number of degrees added to the initial timing. So if the curve you select says it adds 22 degrees at 2700 rpm, then on a stock D-Jet car you still set the timing to 27 degrees just like the factory distributor -- NOT 22!! In that example, the full advance timing is 27, the distributor is adding 22 degress, so your initial/idle timing is 'automatically' set to 5 degrees. Another way to say the same thing: initial timing + distributor max advance = 27 degrees (the factory timing setting). 6. The cap-clamps are a weak point of the design, you can try and swap original units on, or you can bend them a bit to increase tension. Mostly just be careful while rotating the body because it's easy to forget to pay attention to the clamps and accidentally bend them. Ok, thanks Mark. Both of these points are very helpful to my situation. So I was timing at 22 and should have been at 27 - that would explain the not great power I experienced on a road test. That doesn't explain the very high idle I was experiencing - advancing it more will actually aggravate that, so I need to figger' out what the heck is going on there. I would greatly appreciate a better description of how that static timing works - the part about the green LED light and then rotating it the opposite direction. I think followed it correctly, but I'm not 100% sure, and when things aren't working you start to doubt yourself. I have or may have the following issues to resolve that could be related to my no-spark issue: 1. Battery was fairly well discharged from starting attempts. I gather these things do need a pretty solid charge to even fire. 2. I probably need to retweak the clamps as the cap didn't feel like it was sitting tightly. |
|
|
|
| McMark |
Nov 5 2017, 08:57 AM
Post
#172
|
|
914 Freak! Group: Retired Admin Posts: 20,180 Joined: 13-March 03 From: Grand Rapids, MI Member No.: 419 Region Association: None |
QUOTE(BeatNavy @ Nov 5 2017, 09:31 AM) I would greatly appreciate a better description of how that static timing works - the part about the green LED light and then rotating it the opposite direction. I think followed it correctly, but I'm not 100% sure, and when things aren't working you start to doubt yourself. I have or may have the following issues to resolve that could be related to my no-spark issue: 1. Battery was fairly well discharged from starting attempts. I gather these things do need a pretty solid charge to even fire. 2. I probably need to retweak the clamps as the cap didn't feel like it was sitting tightly. When you set the initial static timing, what you're doing is really just getting things close. The engine won't fire/run outside a relatively small window of timing, so a small misalignment can make the engine not run. By including the green-LED inside, you're allowed a visual reference to indicate when the distributor would fire the coil. So maybe think of the green LED as 'spark'. So the static timing is done by setting the engine at TDC #1, then rotating the distributor body to ensure that the spark (green LED) happens when the piston is at TDC, and the rotor is pointed at #1 spark plug wire. By doing all that, you're ensuring that when you turn the key the engine will fire up and run so you can use your timing light to fine tune the timing. Static timing could also be called 'rough timing'. Since the 123Ignition distributor is an electronic circuit, there are design considerations regarding input voltage. If your battery is low, or dying/old, it may be dropping the voltage too low while cranking -- keeping the 123 from 'turning on'. If the 123 doesn't have enough power to turn on, it doesn't have enough power to fire the spark plugs. |
|
|
|
| BeatNavy |
Nov 5 2017, 11:23 AM
Post
#173
|
|
Certified Professional Scapegoat Group: Members Posts: 2,966 Joined: 26-February 14 From: Easton, MD Member No.: 17,042 Region Association: MidAtlantic Region |
Thanks, Mark. That was helpful. So I made progress. I took the unit out, tweaked the clamps to get a better seat with cap, and then did the whole reinstall process again. I also charged the battery for an hour or two. Fired right up, got it timed pretty well to 27 degrees, and took it for a spin. Ran fairly well, but there are still some issues with regard to timing or something else. It didn't pull quite as strong as I know it can, and I feel like there's almost a slight miss. I also can't get the idle below 1500. I assume a vacuum leak somewhere, but I didn't have one before as far as I know.
When I got back to the house, I shut it off for a few minutes and attempted a restart. No dice - not even a cough. (IMG:style_emoticons/default/sad.gif) . Charged the battery for a couple of minutes, and I at least got an initial fire, although it didn't take After that, nada. I'm going to let it charge for a while longer and try again. It seems like my battery may not be up to snuff here. I may not be getting a particularly strong spark if that's the case. If I have to replace battery (which I thought was good), spark plugs, and wires, I'll do it. But it's interesting that this dizzy has caused, or exposed, other possible issues. |
|
|
|
| StratPlayer |
Nov 5 2017, 11:41 AM
Post
#174
|
|
StratPlayer Group: Members Posts: 3,374 Joined: 27-December 02 From: SLC, Utah Member No.: 27 Region Association: Rocky Mountains |
Did the dizzy come with a new coil? When mine was installed I put a new coil in with the install. 123 recommends a new coil be installed with the dizzy.
|
|
|
|
| BeatNavy |
Nov 5 2017, 12:40 PM
Post
#175
|
|
Certified Professional Scapegoat Group: Members Posts: 2,966 Joined: 26-February 14 From: Easton, MD Member No.: 17,042 Region Association: MidAtlantic Region |
QUOTE(StratPlayer @ Nov 5 2017, 01:41 PM) Did the dizzy come with a new coil? When mine was installed I put a new coil in with the install. 123 recommends a new coil be installed with the dizzy. No, it did not. It wasn't the "kit" I've seen advertised that comes with a coil. I'm ready to buy one, though. Is the Blue Bosch unit good or something else recommended? Took it for another spin after advancing it a couple more degrees, and it felt pretty good, but it still doesn't want to start when the car is warm. It coughed once on attempted restart and that's about it. I'm hoping that's coil / plugs related, because I can't imagine the timing is off at this point. Also I am narrowing down the vacuum leak source. I think for some reason my decel valve decided to leak this weekend as well. I've got the idle down to 1200, sometimes hunting between 1100 and 1300, and I'm soaking that in PB. The hard starting and high idle may have misdirected me to timing being too far advanced, but it could be coil/plugs and vacuum leak. |
|
|
|
| nditiz1 |
Nov 5 2017, 01:19 PM
Post
#176
|
|
Senior Member Group: Members Posts: 1,272 Joined: 26-May 15 From: Mount Airy, Maryland Member No.: 18,763 Region Association: MidAtlantic Region |
I may have locked my motor???? (IMG:style_emoticons/default/blink.gif)
I tried starting it today and something wasn't right. I moved the dist a little to get it into correct static timing. I heard a very loud backfire out the exhaust. Now started just engages motor doesn't turn. Raised the one side with other wheel on the ground in 5th gear. Wheel stops hard (IMG:style_emoticons/default/headbang.gif) sigh...not sure how i f'd up the motor |
|
|
|
| euro911 |
Nov 5 2017, 02:13 PM
Post
#177
|
|
Retired & living the dream. God help me if I wake up! Group: Members Posts: 8,937 Joined: 2-December 06 From: So.Cal. & No.AZ (USA) Member No.: 7,300 Region Association: Southern California |
QUOTE(nditiz1 @ Nov 5 2017, 12:19 PM) I may have locked my motor???? (IMG:style_emoticons/default/blink.gif) Pull your valve covers and check to see if the issue is valve train related.I tried starting it today and something wasn't right. I moved the dist a little to get it into correct static timing. I heard a very loud backfire out the exhaust. Now started just engages motor doesn't turn. Raised the one side with other wheel on the ground in 5th gear. Wheel stops hard (IMG:style_emoticons/default/headbang.gif) sigh...not sure how i f'd up the motor |
|
|
|
| 914_teener |
Nov 5 2017, 03:15 PM
Post
#178
|
|
914 Guru Group: Members Posts: 5,270 Joined: 31-August 08 From: So. Cal Member No.: 9,489 Region Association: Southern California |
Rob....sorry you are having some issues.
My car runs like a raped ape. Even idle stability is better. No pinging, also seems....big word..like it responds better on part load. Even took a run up GMR part ways to test overun coming down hill. No backfire coming down hill and no ping going up. Thanks for the tips Mark, I know you have a lot of experience, a lot more than I. If this helps anybody, I know my D-jet FI was running in tip top shape before I made the switch. I also switched to the advance port from the TB as Mark suggested and after thinking about it last night. I was really careful, meaning procedural as Mark would coin it when I took the old dizzy out to make darn sure it was at TDC and then putting the new dizzy in. I'm pretty happy. Got a lot of parts for a 2005 Corrolla, my daughters new part stash (IMG:style_emoticons/default/headbang.gif) |
|
|
|
| 914_teener |
Nov 5 2017, 03:18 PM
Post
#179
|
|
914 Guru Group: Members Posts: 5,270 Joined: 31-August 08 From: So. Cal Member No.: 9,489 Region Association: Southern California |
Oh...and I am running a new Bosch Blue coil made sure all leads were clean and tight when I put everything together. These systems are finicky with electrical connections as everyone knows.
|
|
|
|
| Olympic 914 |
Nov 5 2017, 05:52 PM
Post
#180
|
|
Group: Members Posts: 1,789 Joined: 7-July 11 From: Pittsburgh PA Member No.: 13,287 Region Association: North East States |
Following this closely, since I don't want to install more problems than I already have tuning.
But looking at what you posted and comparing it to the advance curves listed. I see you said you had selected the "B" curve. I think this setting is only used if you want Negative vacuum advance, and I don't know why you would want that. it seems to me that the correct setting should be #2. for the 011 dizzy that would be correct for your '74 Does your throttle body have two vacuum ports or only one? ( mine has two ) on mine the port above the throttle plate goes to the advance side of the can on the dizzy and the one below the throttle plate goes to the retard side. So your setup may be retarding the timing. QUOTE(BeatNavy @ Nov 4 2017, 12:42 PM) Ok, I've got mine installed, but I'm doing something fundamentally wrong with regards to installation and/or timing on this thing. First issue I ran into: the p/n on my dizzy was 022 905 205 F, which is stock for a 1970 1.7! I bought this engine sort of turn-key, so a) not sure how I ended up with that, and b) it could explain some of the minor, slightly annoying issues I've seen over time. Not sure why I never noticed that before, but the car does run strong (even if sometimes a little inconsistently). The install itself was pretty straightforward, although the instructions (#8 through 12 for my D-Jet version) are a little confusing. I got the car to fire right up and idle, and all seemed well. I used my variable timing light to set it to max advance (22 at 2700 -- I used the "B" curve since my D-Jet parts (ECU/MPS) should be consistent with a '74 2.0). Second issue on test drive: no power at all. Hmmm, timing too retarded? Now if I reset it back based on the timing light, I get more power but can't get the idle below 2400 RPM. Timing too advanced now? I've checked to make sure I didn't accidentally leave a major vacuum hose disconnected. Nope. One thing about the install that's interesting: it seems, unless I'm mistaken, that you're #1 spark plug lead on the dizzy will (or could) change orientation. The firing order won't change, but the orientation of each can. This occurs when you pull the old dizzy with the engine set at TDC. So when you put the new dizzy in you have to line up the drive gear and also orient the body of the dizzy the way it makes sense based on wiring, vacuum hose connection, etc. I probably will go through the install sequence again to see if it becomes clear what I'm doing wrong. |
|
|
|
|
1 User(s) are reading this topic (1 Guests and 0 Anonymous Users)
0 Members:

|
Lo-Fi Version | Time is now: 23rd July 2026 - 01:04 PM |
Invision Power Board
v9.1.4 © 2026 IPS, Inc.