|
|
|
Porsche, and the Porsche crest are registered trademarks of Dr. Ing. h.c. F. Porsche AG.
This site is not affiliated with Porsche in any way. Its only purpose is to provide an online forum for car enthusiasts. All other trademarks are property of their respective owners. |
|
|

  |

| JFG |
 Oct 20 2017, 01:23 PM Oct 20 2017, 01:23 PM
Post
#1
|
|
Senior Member  Group: Members Posts: 686 Joined: 7-April 16 From: Wales Member No.: 19,869 Region Association: None |
I have no reaction at the motor when either of my 2 switches are connected.
what connections can i apply power to, to test the motor on the bench? I have the following connections 53b 53a 53 31b & earth to body. 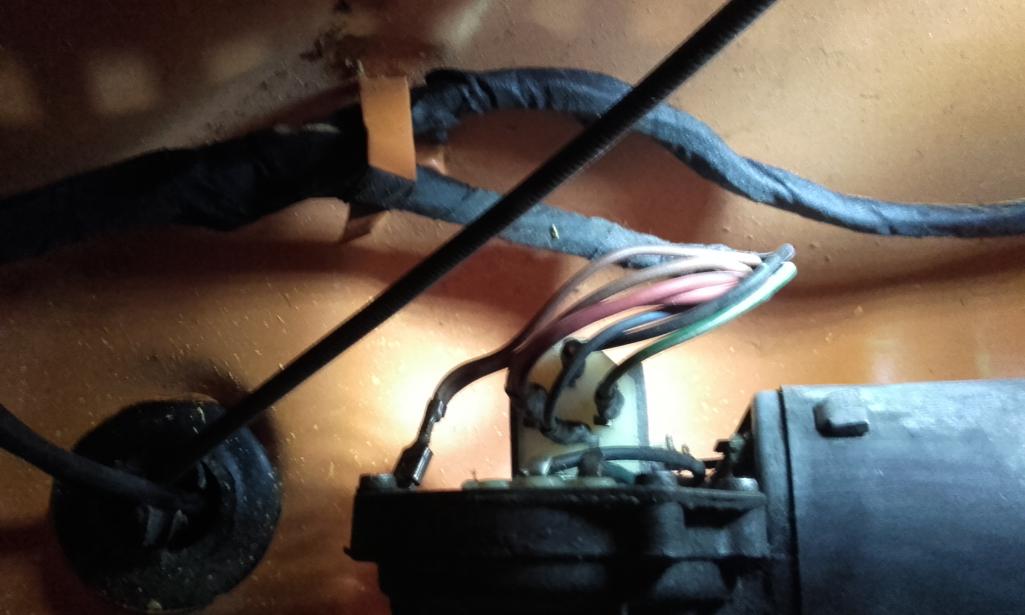 |
   |

 
|
| Olympic 914 |
Oct 20 2017, 05:50 PM
Post
#2
|
|
Group: Members Posts: 1,662 Joined: 7-July 11 From: Pittsburgh PA Member No.: 13,287 Region Association: North East States |
I went through this myself, but mine did run. This may help.
http://www.914world.com/bbs2/index.php?sho...=304921&hl= I rigged up a switch to mimic the column switch to put it in the PARK position. |
|
|
|
| JFG |
Oct 25 2017, 11:35 AM
Post
#3
|
|
Senior Member Group: Members Posts: 686 Joined: 7-April 16 From: Wales Member No.: 19,869 Region Association: None |
I stripped the assembly today and the motor works, bit of good news.
The linkage had seized around the spindle shafts, where the arms screw onto. I can clean up the shafts no problem but not sure what I'm going to use inside the 6" tunnel pieces. I'm off to look at things now but in the meantime what have people used? |
|
|
|
| McMark |
Oct 25 2017, 12:56 PM
Post
#4
|
|
914 Freak! Group: Retired Admin Posts: 20,179 Joined: 13-March 03 From: Grand Rapids, MI Member No.: 419 Region Association: None |
The whole assembly can be taken apart and cleaned/lubed. When I need to clean crud/rust-scale off the inside of a tube I usually take a drill with a bit that's about 50-75% of the size of the tube. Then grab a bit of purple Scotchbrite pad and wind it around the drill bit. Slide that into the tube and then spin the drill while moving it in and out of the tube. Follow up with a section of rag wound around the drill bit to clean out all the old grease and crap. (IMG:style_emoticons/default/thumb3d.gif)
If this doesn't make sense, I can make a video tomorrow. |
|
|
|
| JFG |
Oct 25 2017, 01:45 PM
Post
#5
|
|
Senior Member Group: Members Posts: 686 Joined: 7-April 16 From: Wales Member No.: 19,869 Region Association: None |
QUOTE(McMark @ Oct 25 2017, 07:56 PM)  The whole assembly can be taken apart and cleaned/lubed. When I need to clean crud/rust-scale off the inside of a tube I usually take a drill with a bit that's about 50-75% of the size of the tube. Then grab a bit of purple Scotchbrite pad and wind it around the drill bit. Slide that into the tube and then spin the drill while moving it in and out of the tube. Follow up with a section of rag wound around the drill bit to clean out all the old grease and crap. (IMG:style_emoticons/default/thumb3d.gif) If this doesn't make sense, I can make a video tomorrow. It makes perfect sense thanks for that. |
|
|
|
| Red76 |
Oct 29 2017, 05:12 PM
Post
#6
|
|
Newbie Group: Members Posts: 37 Joined: 28-December 16 From: East Tennessee Member No.: 20,703 Region Association: None |
QUOTE(Olympic 914 @ Oct 20 2017, 05:50 PM) I went through this myself, but mine did run. This may help. http://www.914world.com/bbs2/index.php?sho...=304921&hl= I rigged up a switch to mimic the column switch to put it in the PARK position. Hey man, I must have the same motor as you. Mine does exactly the same thing yours did when i bench test it. Can you pass along how you rigged up a switch to trick the motor into parking on the bench test? It would be greatly appreciated. |
|
|
|
| Red76 |
Nov 1 2017, 01:10 PM
Post
#7
|
|
Newbie Group: Members Posts: 37 Joined: 28-December 16 From: East Tennessee Member No.: 20,703 Region Association: None |
QUOTE(Red76 @ Oct 29 2017, 05:12 PM) QUOTE(Olympic 914 @ Oct 20 2017, 05:50 PM) I went through this myself, but mine did run. This may help. http://www.914world.com/bbs2/index.php?sho...=304921&hl= I rigged up a switch to mimic the column switch to put it in the PARK position. Hey man, I must have the same motor as you. Mine does exactly the same thing yours did when i bench test it. Can you pass along how you rigged up a switch to trick the motor into parking on the bench test? It would be greatly appreciated. It was killing me trying to figure out the wiring diagrams. I read and reread the piece in the shop manual . That just put me to sleep . But buried in the text was a nugget of wisdom that led me to the holy grail! If you look at the contact disc you can see that in park position the center contact and the middle contact will show continuity (IMG:style_emoticons/default/w00t.gif) i hooked up the wires so the motor would run then just watched my light bulb flash each time that position came around. Then just bumped the motor till the light stays on. Thats the park position! |
|
|
|
| Red76 |
Nov 1 2017, 01:16 PM
Post
#8
|
|
Newbie Group: Members Posts: 37 Joined: 28-December 16 From: East Tennessee Member No.: 20,703 Region Association: None |
[quote name='Red76' date='Nov 1 2017, 01:10 PM' post='2544356']
[quote name='Red76' post='2543274' date='Oct 29 2017, 05:12 PM'] [quote name='Olympic 914' post='2539901' date='Oct 20 2017, 05:50 PM'] I went through this myself, but mine did run. This may help. http://www.914world.com/bbs2/index.php?sho...=304921&hl= I rigged up a switch to mimic the column switch to put it in the PARK position. [/quote] Hey man, I must have the same motor as you. Mine does exactly the same thing yours did when i bench test it. Can you pass along how you rigged up a switch to trick the motor into parking on the bench test? It would be greatly appreciated. [/quote] It was killing me trying to figure out the wiring diagrams. I read and reread the piece in the shop manual . That just put me to sleep . But buried in the text was a nugget of wisdom that led me to the holy grail! If you look at the contact disc you can see that in park position the center contact and the middle contact will show continuity (IMG:style_emoticons/default/w00t.gif) i hooked up the wires so the motor would run then just watched my light bulb flash each time that position came around. Then just bumped the motor till the light stays on. Thats the park position! [ote] |
|
|
|
| worn |
Nov 1 2017, 04:02 PM
Post
#9
|
|
can't remember Group: Members Posts: 3,150 Joined: 3-June 11 From: Madison, WI Member No.: 13,152 Region Association: Upper MidWest |
QUOTE(McMark @ Oct 25 2017, 10:56 AM) Then grab a bit of purple Scotchbrite pad If this doesn't make sense, I can make a video tomorrow. Or were you thinking of the color of burgundy or merlot? I 'haven't seen der true purple scotchbrite, as in Barney purple. |
 |
|
| Olympic 914 |
Nov 1 2017, 05:21 PM
Post
#10
|
|
Group: Members Posts: 1,662 Joined: 7-July 11 From: Pittsburgh PA Member No.: 13,287 Region Association: North East States |
QUOTE(Red76 @ Oct 29 2017, 07:12 PM) QUOTE(Olympic 914 @ Oct 20 2017, 05:50 PM) I went through this myself, but mine did run. This may help. http://www.914world.com/bbs2/index.php?sho...=304921&hl= I rigged up a switch to mimic the column switch to put it in the PARK position. Hey man, I must have the same motor as you. Mine does exactly the same thing yours did when i bench test it. Can you pass along how you rigged up a switch to trick the motor into parking on the bench test? It would be greatly appreciated. Looks like you figured out a way to determine the park position. I found a picture of the switch I used. 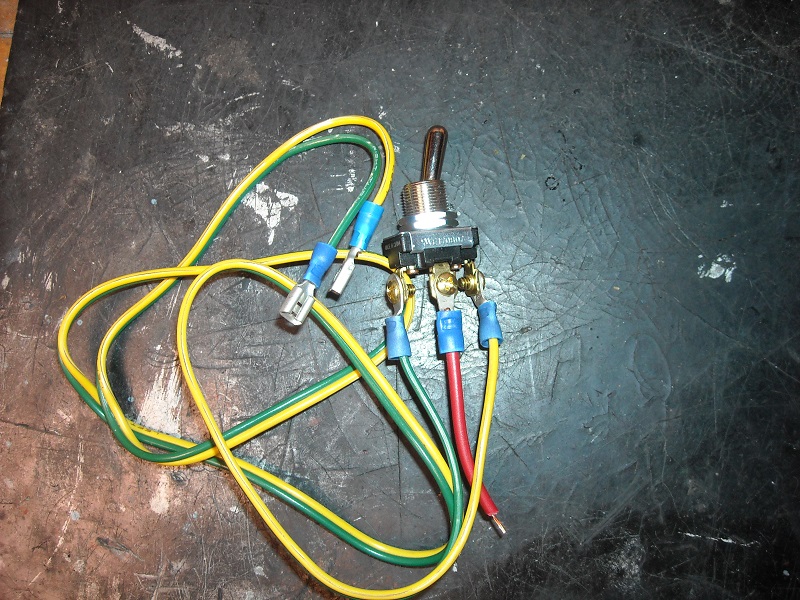 Now lets see if I can get this right again. ------------------------------------------ First connect a ground from battery to the wiper body. the green wire on switch to 31b The red center wire on switch to 53 The yellow wire on switch to 53a positive power wire also connects to 53a ------------------------------------------------ Now when switch is in position to activate the yellow wire wiper motor runs in low speed. (skip center position on switch) When green wire is activated the motor will run until it reaches the park position and then will stop. If you want to test the high speed you would connect the center red wire to 53b instead of 53. and when you flick the switch the other way it will park. This diagram MAY help explain it. In this diagram 53e = 31b on our switch. |
|
|
|
| doug_b_928 |
Mar 16 2019, 03:37 PM
Post
#11
|
|
Senior Member Group: Members Posts: 692 Joined: 17-January 13 From: Winnipeg Member No.: 15,382 Region Association: Canada |
@Olympic 914 or anyone else who understands this... I don't have a switch like Olympic 914 shows but I do have a power probe and a jumper wire. Based on my limited understanding of what I'm reading here, I'm wondering if the following will work (in all cases, of course, the power probe is grounded to the motor and power is placed on 53):
1. To test low speed: put jumper wire between 53 and 53a 2. To test high speed: put jumper wire between 53 and 53b 3. To park motor: put jumper wire between 53 and 31b |
|
|
|
| doug_b_928 |
Mar 17 2019, 05:06 PM
Post
#12
|
|
Senior Member Group: Members Posts: 692 Joined: 17-January 13 From: Winnipeg Member No.: 15,382 Region Association: Canada |
Figured it out. Note that the numbers on my motor are hard to read, but it appears to me that the one terminal that is perpendicular to the other three is 53. When testing apply ground to the ground on the motor, and apply power to 53a. Test the functions as follows:
1. low speed--place jumper wire between 53a and 53. 2. high speed--place jumper wire between 53a and 53b 3. park--place jumper wire between 53 and 31 |
|
|
|
|
1 User(s) are reading this topic (1 Guests and 0 Anonymous Users)
0 Members:

|
Lo-Fi Version | Time is now: 3rd May 2024 - 08:53 AM |
Invision Power Board
v9.1.4 © 2024 IPS, Inc.