|
|
|
Porsche, and the Porsche crest are registered trademarks of Dr. Ing. h.c. F. Porsche AG.
This site is not affiliated with Porsche in any way. Its only purpose is to provide an online forum for car enthusiasts. All other trademarks are property of their respective owners. |
|
|

  |

| malcolm2 |
 Oct 31 2017, 05:12 PM Oct 31 2017, 05:12 PM
Post
#1
|
|
Advanced Member  Group: Members Posts: 2,738 Joined: 31-May 11 From: Nashville Member No.: 13,139 Region Association: South East States |
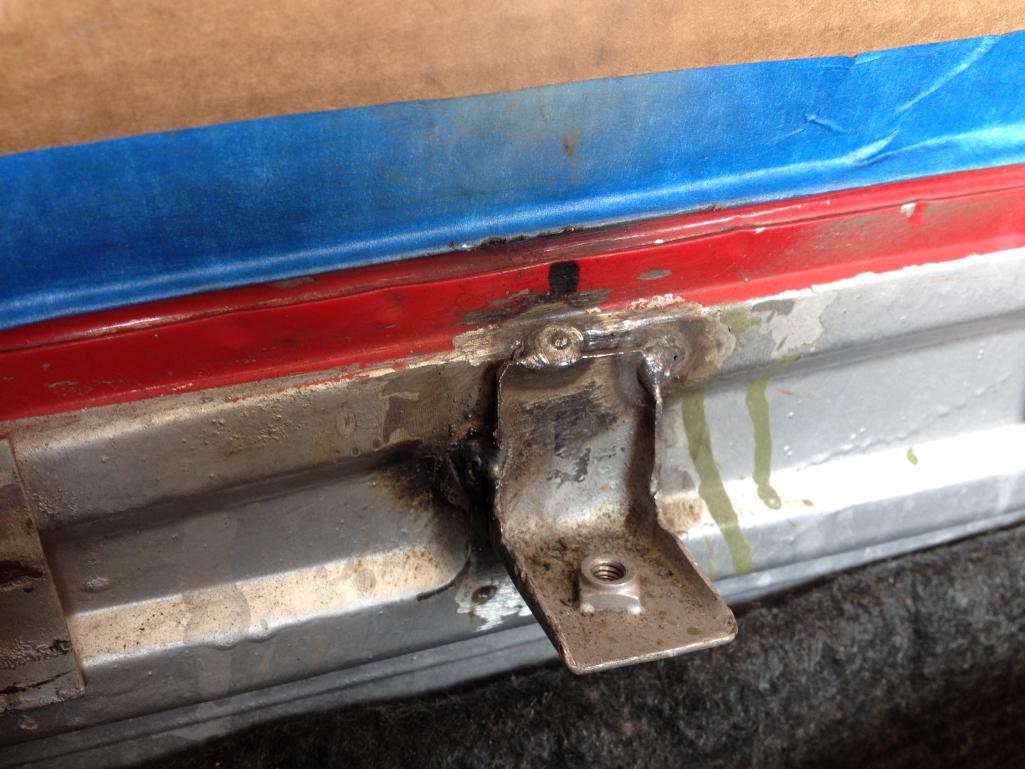
I can think of a couple ways to fix this. Can i hear more ideas?
You can see that there are 4 weld impressions. 3 have pulled a hole in the firewall. 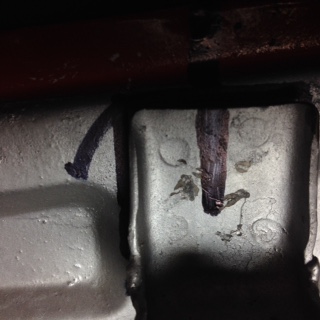 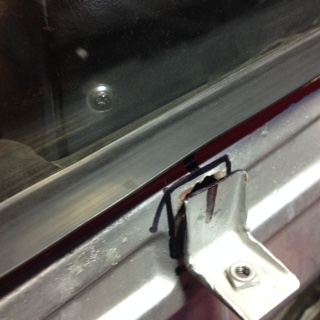 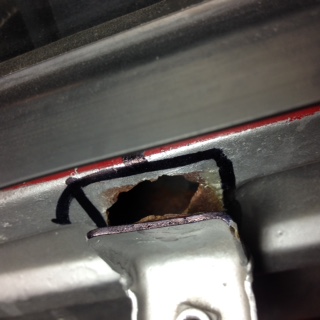 |
   |

 
|
| mzalanka |
Oct 31 2017, 06:08 PM
Post
#2
|
|
Member Group: Members Posts: 116 Joined: 11-July 11 From: Portland, OR Member No.: 13,300 Region Association: None |
Tape & mask window. Wire brush to metal. Tack weld left side, tack weld right side. Careful with heat due to window. Fit lid. Good? Hit with 2K epoxy rattle can. Unmask window. Refit lid. Done.
|
|
|
|
| cary |
Nov 1 2017, 05:40 AM
Post
#3
|
|
Advanced Member Group: Members Posts: 3,900 Joined: 26-January 04 From: Sherwood Oregon Member No.: 1,608 Region Association: Pacific Northwest |
It will need to be patched. Most of the time the spot welds just pop.
Now it's a time vs. money thing. Is the engine in the car ? |
|
|
|
| malcolm2 |
Nov 1 2017, 07:28 AM
Post
#4
|
|
Advanced Member Group: Members Posts: 2,738 Joined: 31-May 11 From: Nashville Member No.: 13,139 Region Association: South East States |
QUOTE(cary @ Nov 1 2017, 06:40 AM)  It will need to be patched. Most of the time the spot welds just pop. Now it's a time vs. money thing. Is the engine in the car ? Oh yeah, I drive the car 4 to 5 days a week. (IMG:style_emoticons/default/driving-girl.gif) Won't be much money, I'll do the work, but it will be a PITA and some driving downtime. (IMG:style_emoticons/default/bootyshake.gif) One method I was thinking about was to remove the seats and back pad. Make a weld repair to the inside. Then maybe drill a hole thru the vertical section of the bracket and the firewall and add small, sturdy plate inside (10 ga or thicker) and bolt it all together. I suppose I could also tack each side in the engine bay, as suggested above. While I had the seats and back pad out, I figured I would do the bolt and plate on the hinge on the other side too. |
|
|
|
| cary |
Nov 1 2017, 08:17 AM
Post
#5
|
|
Advanced Member Group: Members Posts: 3,900 Joined: 26-January 04 From: Sherwood Oregon Member No.: 1,608 Region Association: Pacific Northwest |
I don't have a car to look at right now. Will there be enough room for the lid to open with a bolt in the hinge?
|
|
|
|
| malcolm2 |
Nov 1 2017, 11:44 AM
Post
#6
|
|
Advanced Member Group: Members Posts: 2,738 Joined: 31-May 11 From: Nashville Member No.: 13,139 Region Association: South East States |
QUOTE(cary @ Nov 1 2017, 09:17 AM) I don't have a car to look at right now. Will there be enough room for the lid to open with a bolt in the hinge? I should have checked, prior to removing the lid. But there is a slight "gusset" on each side of the vertical part of the hinge. I will have to re-fit the lid to double check. |
|
|
|
| mzalanka |
Nov 1 2017, 12:33 PM
Post
#7
|
|
Member Group: Members Posts: 116 Joined: 11-July 11 From: Portland, OR Member No.: 13,300 Region Association: None |
I wouldn't second guess Cary as he obviously knows his stuff. The proper long term repair would be to cut, patch, reweld, and address any additional rust on the firewall.
The tack method, though, would be a quick fix for a driver and would be easily reversible if/when you decide on a more permanent repair. You'll need to remove the rear window for anything more significant than a tack weld as the heat could crack it and/or cause the butyl to melt/catch fire (although it kind of looks like your window might be urethaned in?). RD has the hinge bracket available cheap and you could do a thorough repair when the time is right. http://www.restoration-design.com/store/product/PP343 The spot welds on my driver side hinge gave way and I can speak to the effectiveness of two little tacks in working long-term. |
|
|
|
| cary |
Nov 1 2017, 09:54 PM
Post
#8
|
|
Advanced Member Group: Members Posts: 3,900 Joined: 26-January 04 From: Sherwood Oregon Member No.: 1,608 Region Association: Pacific Northwest |
How about doing a combo of your two ideas. Lets use the bolt to pull the skin and the hinge back to the firewall, then weld the sides. 3 to 4 tacks on each side. Let the metal cool to the touch between each weld. Then one tack on the top.
Then get a can of EverCote brush-on seam sealer, remove the bolt and nut and seal it up. Then at a later date do the proper cut out and new hinge bracket. |
|
|
|
| malcolm2 |
Nov 2 2017, 05:57 PM
Post
#9
|
|
Advanced Member Group: Members Posts: 2,738 Joined: 31-May 11 From: Nashville Member No.: 13,139 Region Association: South East States |
looks like cary's combo idea might be the way to go. I was planning on leaving the bolt, but this area of the firewall is doubled. So i can't cinch the bolt down tight like I wanted to do since it is double walled. Everything will collapse. everything below the visible tack welds is single wall.
Damn. When my kids sell the car, I will tell them to blame it on the PO. (IMG:style_emoticons/default/piratenanner.gif) (IMG:style_emoticons/default/piratenanner.gif) (IMG:style_emoticons/default/piratenanner.gif) (IMG:style_emoticons/default/piratenanner.gif) 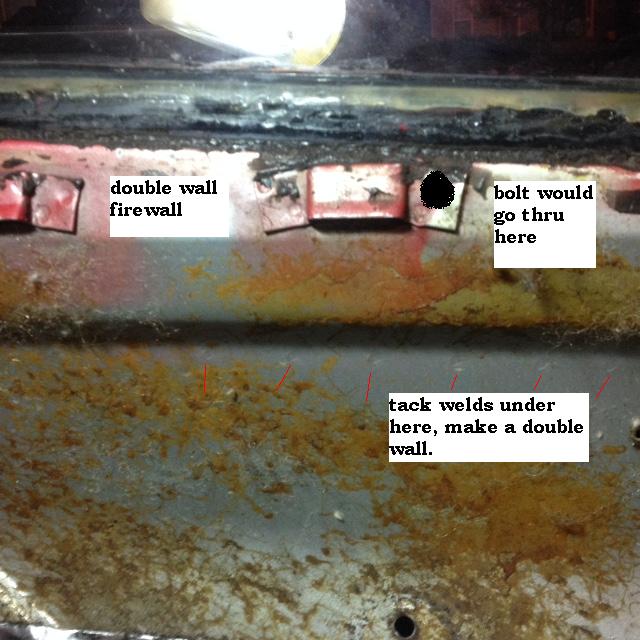 |
|
|
|
| windforfun |
Nov 2 2017, 07:16 PM
Post
#10
|
|
Senior Member Group: Members Posts: 1,771 Joined: 17-December 07 From: Blackhawk, CA Member No.: 8,476 Region Association: None |
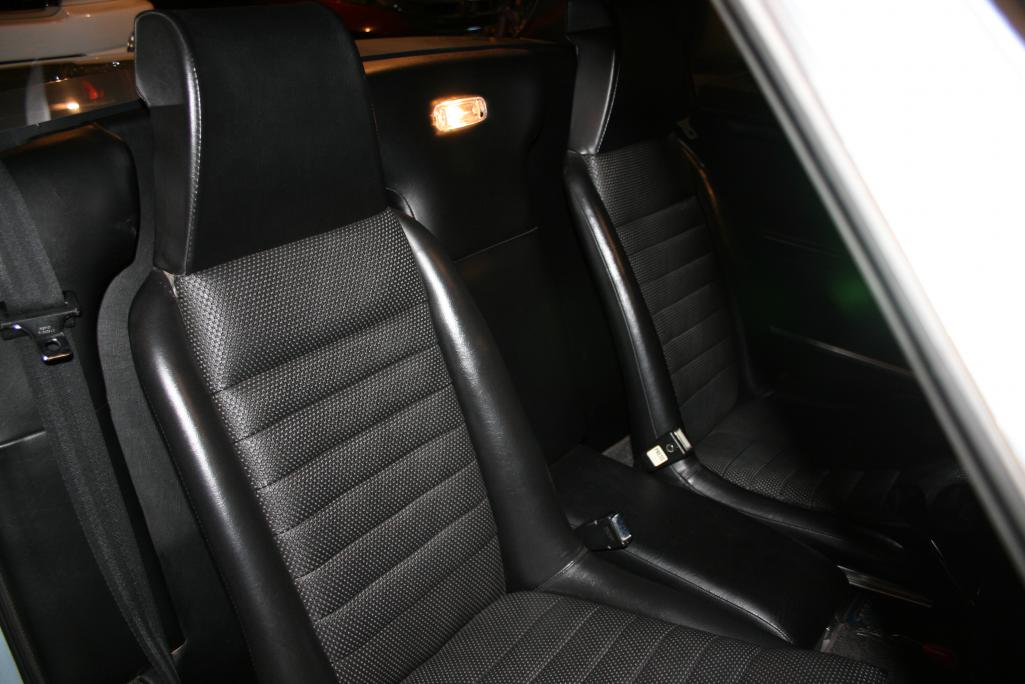
You might want to pull out the pad behind your seats too. BTDT.
|
|
|
|
| malcolm2 |
Nov 2 2017, 07:20 PM
Post
#11
|
|
Advanced Member Group: Members Posts: 2,738 Joined: 31-May 11 From: Nashville Member No.: 13,139 Region Association: South East States |
QUOTE(windforfun @ Nov 2 2017, 08:16 PM) You might want to pull out the pad behind your seats too. BTDT. that yellow goo in the picture is what factory sprayed on in 1975 and used to hold that pad in. I pulled it all out in 2011. Just out of view of the above picture is B-Quiet stuck to the fire wall. You can just see a bit of it in the btm left corner of the picture. The car used to be silver. My guess is that the PO pulled the back window and layed the crappy pad down and painted the car red. |
|
|
|
| windforfun |
Nov 2 2017, 07:23 PM
Post
#12
|
|
Senior Member Group: Members Posts: 1,771 Joined: 17-December 07 From: Blackhawk, CA Member No.: 8,476 Region Association: None |
I'm referring to the interior pad & not the one in the engine well.
|
|
|
|
| malcolm2 |
Nov 2 2017, 07:27 PM
Post
#13
|
|
Advanced Member Group: Members Posts: 2,738 Joined: 31-May 11 From: Nashville Member No.: 13,139 Region Association: South East States |
QUOTE(windforfun @ Nov 2 2017, 08:23 PM) I'm referring to the interior pad & not the one in the engine well. Me too. neither pad is installed. There is very little room in the engine bay. So that crappy pad was pulled too. The only pad in my car is B-quiet. On the interior firewall behind the seats and on the floor.... the metal floor that I welded in. Any remaining floor that had goo on it, had the goo removed. If you look under the 1st few pix you can see that no pad is under the hinge. The pic above is inside. the funky loops are what holds the vinyl back pad to the firewall. |
|
|
|
| windforfun |
Nov 2 2017, 07:33 PM
Post
#14
|
|
Senior Member Group: Members Posts: 1,771 Joined: 17-December 07 From: Blackhawk, CA Member No.: 8,476 Region Association: None |
Interesting. My "73 has no adhesive. In fact, I was able to buy a brand new interior pad from Porsche.
|
|
|
|
| malcolm2 |
Nov 2 2017, 07:42 PM
Post
#15
|
|
Advanced Member Group: Members Posts: 2,738 Joined: 31-May 11 From: Nashville Member No.: 13,139 Region Association: South East States |
QUOTE(windforfun @ Nov 2 2017, 08:33 PM) Interesting. My "73 has no adhesive. In fact, I was able to buy a brand new interior pad from Porsche. Well I assumed it was factory goo. Maybe the PO's painter sprayed it on there to put the pad back. I am not sure what the pads did. I can't imagine that they helped the engine and wind noise very much. I figured I would be just as good without any of them. |
|
|
|
| windforfun |
Nov 2 2017, 07:45 PM
Post
#16
|
|
Senior Member Group: Members Posts: 1,771 Joined: 17-December 07 From: Blackhawk, CA Member No.: 8,476 Region Association: None |
BTW, the spot or tack welds just popped on one of the brackets without damaging the sheet metal. I had a shop bead weld both brackets around their edges. I guess I was lucky.
|
|
|
|
| windforfun |
Nov 2 2017, 07:50 PM
Post
#17
|
|
Senior Member Group: Members Posts: 1,771 Joined: 17-December 07 From: Blackhawk, CA Member No.: 8,476 Region Association: None |
Here's the new pad.
 |
|
|
|
| GaroldShaffer |
Nov 2 2017, 08:26 PM
Post
#18
|
|
You bought another 914? Group: Benefactors Posts: 7,620 Joined: 27-June 03 From: Portage, IN Member No.: 865 Region Association: None |
QUOTE(windforfun @ Nov 2 2017, 08:50 PM) Here's the new pad. I believe the pad he is talking about is the very heavy black sound pad used on the inside that goes between the backpad & firewall. That is glued in place. |
|
|
|
| malcolm2 |
Nov 11 2017, 04:58 PM
Post
#19
|
|
Advanced Member Group: Members Posts: 2,738 Joined: 31-May 11 From: Nashville Member No.: 13,139 Region Association: South East States |
Well I finally got around to finishing this project. As recommended I tacked a few places then re=fit the lid. Here is the pre-fit tack job.
 That ended up taking some time. My bolts were stripped. Once I got that straight everything fit and I tacked and tacked and tacked..... Good enough for driving to Walmart.... |
|
|
|
| cary |
Nov 11 2017, 08:05 PM
Post
#20
|
|
Advanced Member Group: Members Posts: 3,900 Joined: 26-January 04 From: Sherwood Oregon Member No.: 1,608 Region Association: Pacific Northwest |
That dog will hunt ...............
Mask it off and spray with Rustoleum of your choice. |
|
|
|
|
1 User(s) are reading this topic (1 Guests and 0 Anonymous Users)
0 Members:

|
Lo-Fi Version | Time is now: 19th April 2024 - 11:57 PM |
Invision Power Board
v9.1.4 © 2024 IPS, Inc.