|
|
|
Porsche, and the Porsche crest are registered trademarks of Dr. Ing. h.c. F. Porsche AG.
This site is not affiliated with Porsche in any way. Its only purpose is to provide an online forum for car enthusiasts. All other trademarks are property of their respective owners. |
|
|

  |

| Bates |
 Jan 8 2018, 07:39 AM Jan 8 2018, 07:39 AM
Post
#1
|
|
Bates  Group: Members Posts: 68 Joined: 27-December 13 From: Madison, Virginia Member No.: 16,800 Region Association: MidAtlantic Region |
After several years of planning and a few 'false starts', I am back working on my 914.
My name is Bates McLain, I live in Madison, Va, and I have always been a car guy/motorhead or what ever you want to call someone who gets pleasure from making old cars beautiful again. I purchased an ex race car because I figured it was easier to civilize a racer into a street car than fix a pile of rusted seams and 50 year old parts, either way I knew the car needed to come apart pretty much totally to have the finished car suit my plan. I owned two 914s previously. First was a 73 1.7 I bought used from the local Porsche/Audi dealer in 1978. I loved the car, incredible fuel mileage, nimble and never a problem with the Alaska Blue Metalic beauty. I was working as a mechanic at a 'foriegn' car repair shop at the time, where i serviced lots of 914s and other cool cars. I sold that car to a customer about 1980. I missed the car afterwards, somehow the Toyota SR5 pickup didnt actually live up to my expectations or Car and Driver's description, "If BMW made a pickup, this is what it would handle like". I bought my second 914 in 1983, a 1974 2.0, Delphi Green, appearance group, gasburner wheels....and again, like new. I only owned this one about 6 months before my plans changed due to purchasing business that would allow me to double my income and work 4 days a week! So another beauty got away, and was back driving a pickup, but I didnt forget how great those little cars were. In 2013 I found a 73 racecar, with fiberglass flares, already had 5 lug suspension, it was a roller, but it had near zero rust. A near blank canvas to build myself a GT. Here is one of the first pictures I took of the car after I flat towed it home; 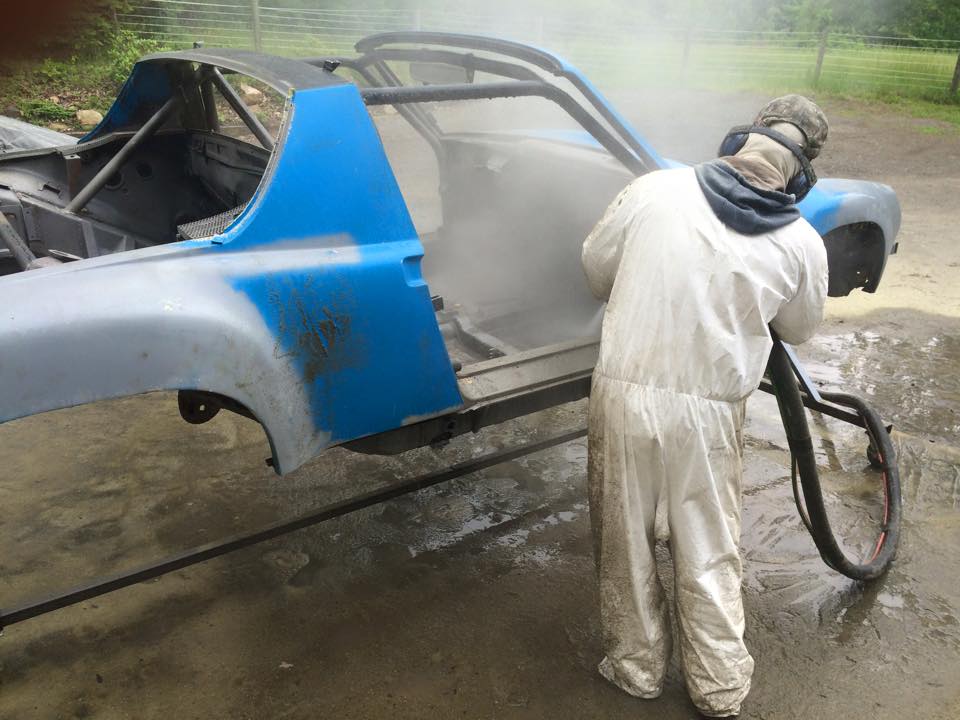 A friend had just purchased a 'Dustless Blasting' system, and his first auto paint removal was my new car. I wanted to see the bare metal of the underside and the known rust trouble spots. We found some rust, but very little. She would need some repairs and alterations, but now I could now see what was under all the darned black paint the P.O. had sprayed on the interior and both trunks and engine compartment. Why do people think race cars need to look like a dark cave inside? No bother all the black cave paint was GONE!! 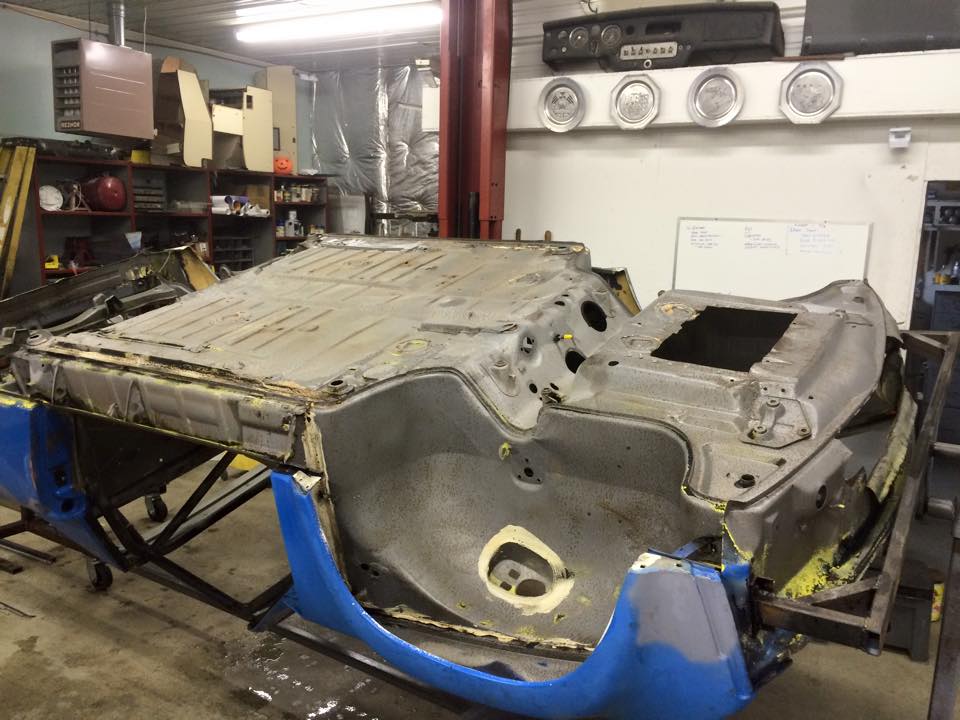 |
   |

 
|
| Cairo94507 |
Jan 8 2018, 08:22 AM
Post
#2
|
|
Michael Group: Members Posts: 9,703 Joined: 1-November 08 From: Auburn, CA Member No.: 9,712 Region Association: Northern California |
Nice. Keep us posted on the progress with pictures. The bottom of the chassis looks decent. (IMG:style_emoticons/default/beerchug.gif)
|
|
|
|
| EdwardBlume |
Jan 8 2018, 08:27 AM
Post
#3
|
|
914 Wizard Group: Members Posts: 12,338 Joined: 2-January 03 From: SLO Member No.: 81 Region Association: Central California |
Looks good. (IMG:style_emoticons/default/aktion035.gif)
|
|
|
|
| Bates |
Jan 8 2018, 09:14 AM
Post
#4
|
|
Bates Group: Members Posts: 68 Joined: 27-December 13 From: Madison, Virginia Member No.: 16,800 Region Association: MidAtlantic Region |
Once I had the chassis back in the shop with paint removed from the underside, both trunks and the engine bay I began to see some troubles;
The car had been hit pretty hard in the right front, damage was evident done by either attempting to 'pull' the right front corner bodywork back out after a 'shunt' or maybe a bad pull from a ditch (if cars could talk). 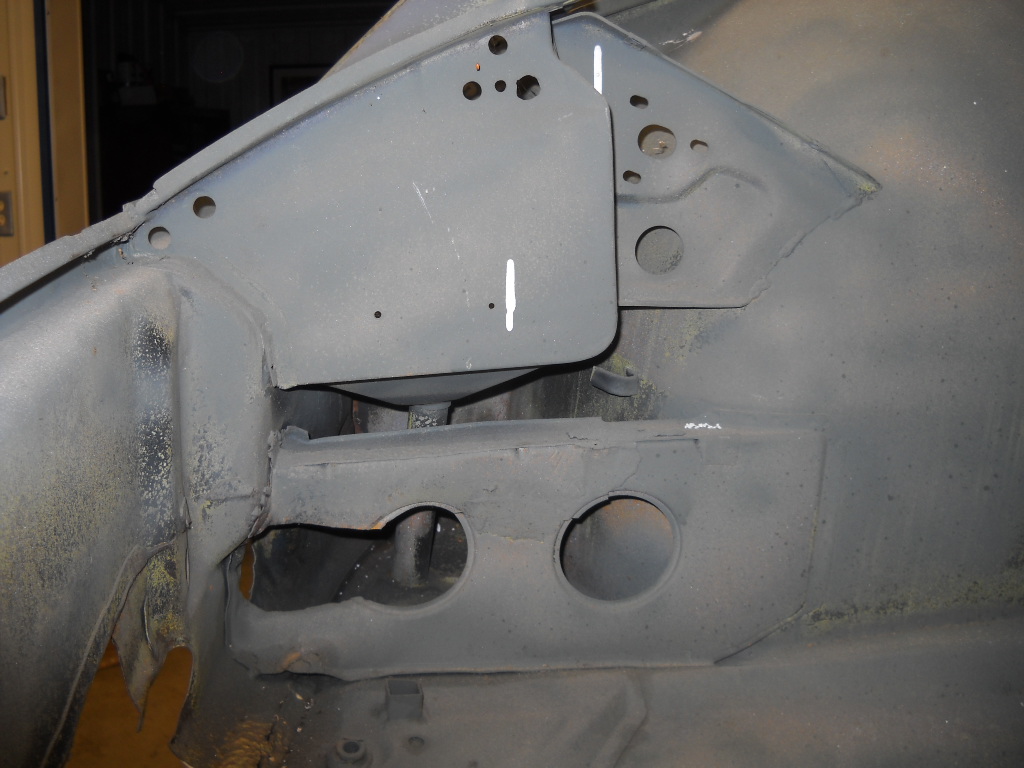 Tear in the panel started some careful measurements of the affected corner. Right front seam was 15mm back and 10mm up from normal. Have some BONDO!!! 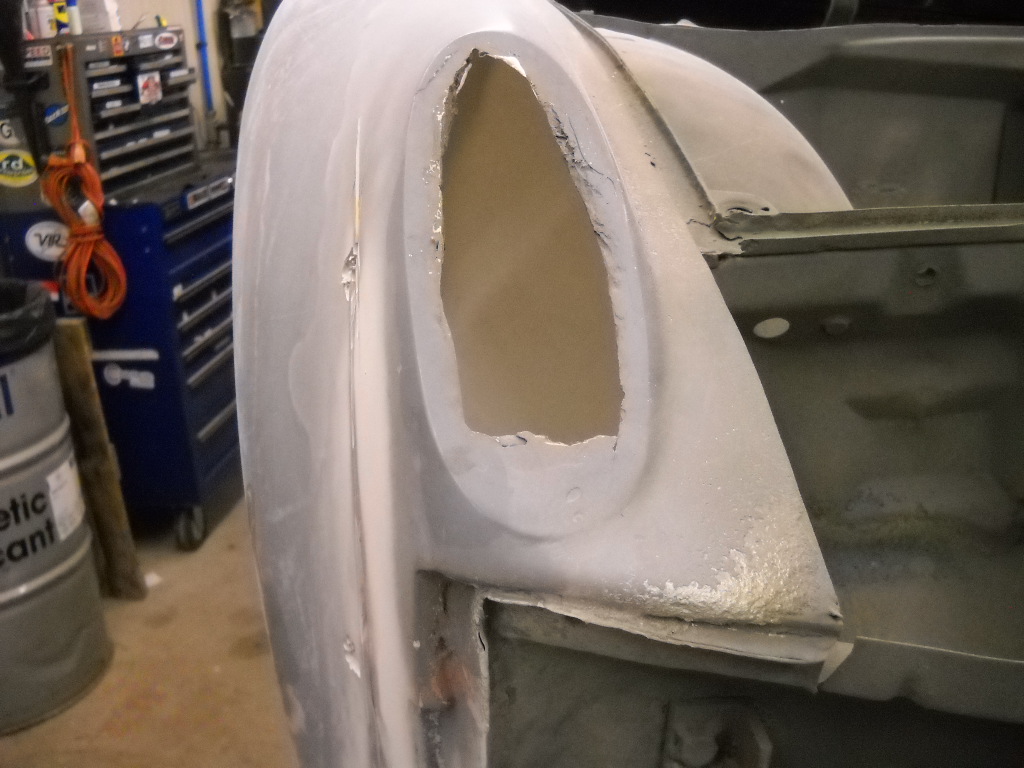 Time to do some exploratory surgery, how much bondo is hiding, whats it gonna take to fix this mess? 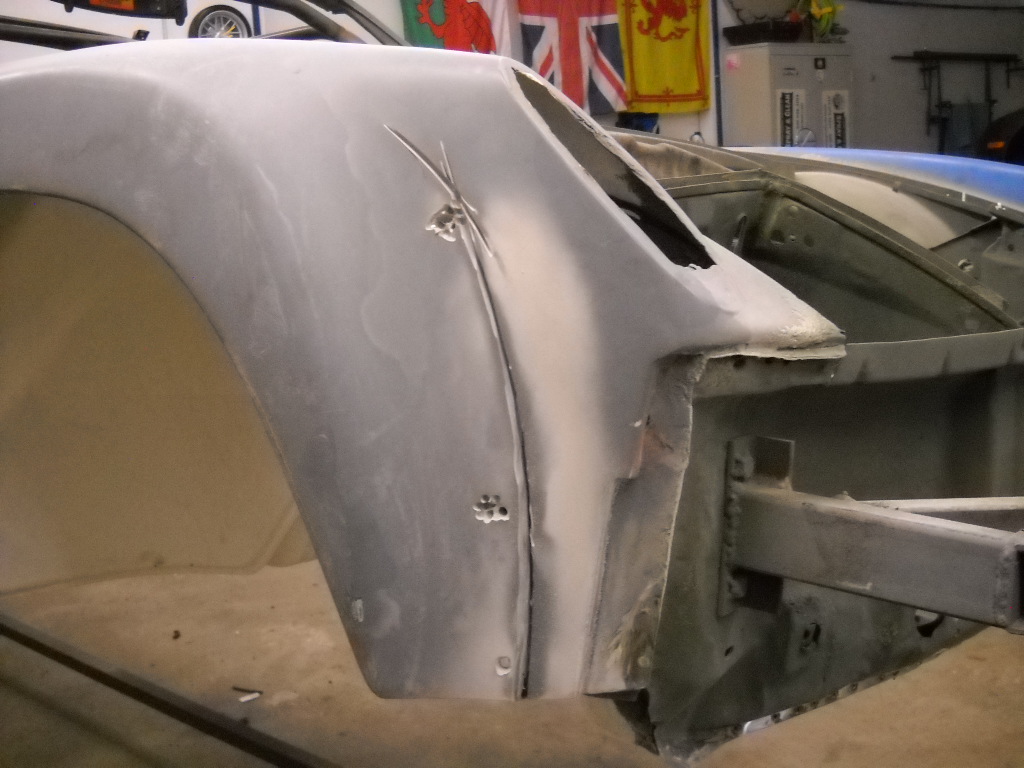 The truth revealed; 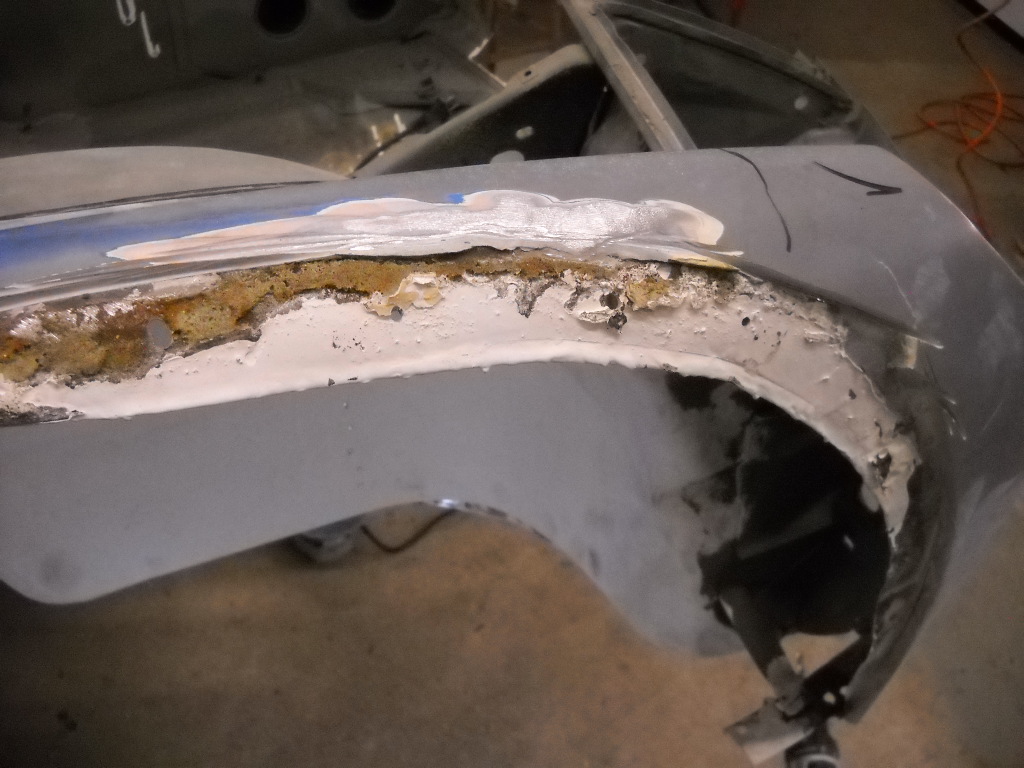 OH Horrors!!![color=#FF0000] 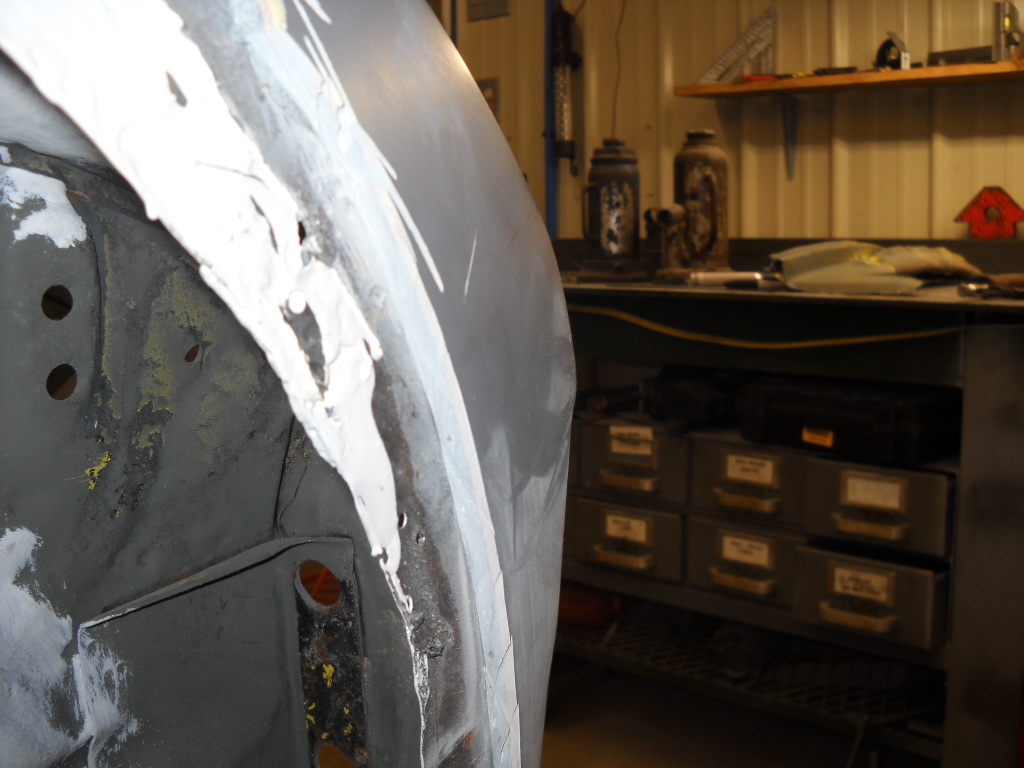 Time to learn some new skills. I was not planning to do any welding on this car if I remember correctly. Not much anyway. This is were I left off last year just before leaving to be rally navigator in the '24 Hours of Lemons' first east coast rally. I helped prep a rally car with my friend Chris Grimm, his Porsche 924S with 4 studded tires, raise the suspension and some other choice mods. Sticker bomb the car at a local brewery, draw a map of the rally with tape on the hood, roof rack with extra spare tire (it is a rally, right), lots of tools and spares. the Retreat From Moscow Rally;  Starting in Mosow, PA then to Buffalo, NY and Pittsburg, PA. Next day Pittsburg to Asheville, NC, (did I mention the snow), 3rd day Asheville to the Tail of the Dragon and then on to Memphis, TN for a waffle tossing contest (really). Final day; Memphis to Paris , KY then down to Barbour Motorsports Park in Alabama, for the finish. (Think about how far we drove!!) It was a hell of a run, go ahead a Google it, if you want to see some very unusual and creative cars!!! Oh, the 924S ran flawlessly, Chris drove extremely well, studded tires in the snow is like cheating! It was a great time, but that is another story. |
|
|
|
| jmitro |
Jan 8 2018, 09:47 AM
Post
#5
|
|
Senior Member Group: Members Posts: 713 Joined: 23-July 15 From: Oklahoma Member No.: 18,986 Region Association: None |
ouch.
is that rust or foam under the bondo? cool project; keep us updated. |
|
|
|
| Bates |
Jan 8 2018, 10:05 AM
Post
#6
|
|
Bates Group: Members Posts: 68 Joined: 27-December 13 From: Madison, Virginia Member No.: 16,800 Region Association: MidAtlantic Region |
That is sand from the sand blasting and a grand amount of fiberglass used to fill the poorly trimmed fiberglass flare installation by the previous owner.
Dustless Blasting uses ground glass,aka beer bottles. The ramp to my shop had the smell of a 'kegger' for a week after the blasting. It was like a beach as the glass hits the metal the glass particles explode and turn into what looks like sand and smells like stale beer. More on that topic later..... there was sand in every cavity of the chassis and inside of every crack and bolt hole. |
|
|
|
| mepstein |
Jan 8 2018, 11:42 AM
Post
#7
|
|
914-6 GT in waiting Group: Members Posts: 19,220 Joined: 19-September 09 From: Landenberg, PA/Wilmington, DE Member No.: 10,825 Region Association: MidAtlantic Region |
QUOTE(Ecke Liebhaber @ Jan 8 2018, 11:05 AM)  That is sand from the sand blasting and a grand amount of fiberglass used to fill the poorly trimmed fiberglass flare installation by the previous owner. Dustless Blasting uses ground glass,aka beer bottles. The ramp to my shop had the smell of a 'kegger' for a week after the blasting. It was like a beach as the glass hits the metal the glass particles explode and turn into what looks like sand and smells like stale beer. More on that topic later..... there was sand in every cavity of the chassis and inside of every crack and bolt hole. Yes, Unfortunately that system isn't all its cracked up to be. It seems as though the way it blasts wet media into cavities, it might actually add to the rust issue. |
|
|
|
| JmuRiz |
Jan 8 2018, 12:35 PM
Post
#8
|
|
914 Guru Group: Members Posts: 5,421 Joined: 30-December 02 From: NoVA Member No.: 50 Region Association: MidAtlantic Region |
Ahh Madison, where the county sport is: giving speeding tickets on Rt 29 (IMG:style_emoticons/default/biggrin.gif)
Always good to see another local-ish build! |
|
|
|
| Bates |
Jan 8 2018, 12:48 PM
Post
#9
|
|
Bates Group: Members Posts: 68 Joined: 27-December 13 From: Madison, Virginia Member No.: 16,800 Region Association: MidAtlantic Region |
QUOTE(JmuRiz @ Jan 8 2018, 01:35 PM) Ahh Madison, where the county sport is: giving speeding tickets on Rt 29 (IMG:style_emoticons/default/biggrin.gif) Always good to see another local-ish build! Just down the '29 Corridor' from you. Not much crime here, local law enforcement needs to keep busy doing something. FYI; I've gotten 4 speeding tickets in my life 3 of them in Madison on rte 29! and All of the 'Madison Tickets' were driving Porsches, 1-914,1-944,1-911, other ticket was in my old Volvo wagon just south of here in Albemarle County, 48 in a 35....Volvo wagon! |
|
|
|
| mb911 |
Jan 8 2018, 03:45 PM
Post
#10
|
|
914 Guru Group: Members Posts: 6,800 Joined: 2-January 09 From: Burlington wi Member No.: 9,892 Region Association: Upper MidWest |
Bates nice to see you here..
Everyone else here I can tell you after a good conversation with Bates he knows whats going on.. This will be a great project.. |
|
|
|
| Bates |
Jan 8 2018, 05:39 PM
Post
#11
|
|
Bates Group: Members Posts: 68 Joined: 27-December 13 From: Madison, Virginia Member No.: 16,800 Region Association: MidAtlantic Region |
Hello Ben,
I can laugh at myself too! These projects are supposed to be fun, and along the way we may learn a thing or two from the experiences. I was having trouble making nice welds Saturday and Sunday, couldn't see the metal getting ready to burn through. This afternoon, I went out and bought stronger reading glasses to wear under the helmet. Shazaam!!! I did a few passes and Ill tell you for a fact, if you cannot see clearly, you sure cannot make a good weld. Talk to you soon. |
|
|
|
| mb911 |
Jan 8 2018, 06:12 PM
Post
#12
|
|
914 Guru Group: Members Posts: 6,800 Joined: 2-January 09 From: Burlington wi Member No.: 9,892 Region Association: Upper MidWest |
QUOTE(Ecke Liebhaber @ Jan 8 2018, 03:39 PM) Hello Ben, I can laugh at myself too! These projects are supposed to be fun, and along the way we may learn a thing or two from the experiences. I was having trouble making nice welds Saturday and Sunday, couldn't see the metal getting ready to burn through. This afternoon, I went out and bought stronger reading glasses to wear under the helmet. Shazaam!!! I did a few passes and Ill tell you for a fact, if you cannot see clearly, you sure cannot make a good weld. Talk to you soon. Thats for sure re seeing while welding.. And yes the projects are supposed to be fun.. I use my project to de-stress.. P.S. your tank will ship this week.. Still catching up on things.. |
|
|
|
| wndsrfr |
Jan 8 2018, 06:37 PM
Post
#13
|
|
Senior Member Group: Members Posts: 1,428 Joined: 30-April 09 From: Rescue, Virginia Member No.: 10,318 Region Association: MidAtlantic Region |
QUOTE(Ecke Liebhaber @ Jan 8 2018, 03:39 PM) This afternoon, I went out and bought stronger reading glasses to wear under the helmet. Shazaam!!! I did a few passes and Ill tell you for a fact, if you cannot see clearly, you sure cannot make a good weld. Here's what I got to fit right inside the helmet lens holder....2.0 diopter lens...magic! I can see! This is an Amazon link, no affiliation but you can get them at any welding supply store.... https://www.amazon.com/Welding-Helmet-Magni...welding+glasses |
|
|
|
| jmitro |
Jan 8 2018, 07:26 PM
Post
#14
|
|
Senior Member Group: Members Posts: 713 Joined: 23-July 15 From: Oklahoma Member No.: 18,986 Region Association: None |
QUOTE(Ecke Liebhaber @ Jan 8 2018, 05:39 PM) if you cannot see clearly, you sure cannot make a good weld. you can say that again! my problem is the auto-dark helmet i use is still too dark to actually see the welds, plus the cheap plastic face shields get scuffed up so easily |
|
|
|
| Bates |
Jan 9 2018, 07:08 AM
Post
#15
|
|
Bates Group: Members Posts: 68 Joined: 27-December 13 From: Madison, Virginia Member No.: 16,800 Region Association: MidAtlantic Region |
QUOTE(jmitro @ Jan 8 2018, 08:26 PM) QUOTE(Ecke Liebhaber @ Jan 8 2018, 05:39 PM) if you cannot see clearly, you sure cannot make a good weld. you can say that again! my problem is the auto-dark helmet i use is still too dark to actually see the welds, plus the cheap plastic face shields get scuffed up so easily My recent purchase of Harbor Freight's best auto darkening helmet was the impetus for the stronger 'reading glasses'. The helmet is absolutely wonderful, huge lens, completely adjustable darkening shades, not the older darkening switch than aligns numbers, this one has infinite shades from grinding shades (dark glasses) to darker than any amperage I use now. (No more 250 amp welding for me) https://www.harborfreight.com/welding/weldi...lmet-63749.html I love the huge lens, but there is no way to clip in a normal dipter lens, so I'm back to switching reading glasses to prescription glasses. I keep the replaceable plastic lens in good shape longer by storing a 'helmet bag' , like the bags supplied with most racing helmets. I have a couple of bags from helmets that became 'out of date' so they wont pass safety tech when racing, so I gave the helmets to a local autocross club and kept the helmet bag for my welding helmets. The bag keeps the welding helmet clean and dust free. I keep a micro fiber towel and a little glasses spritzer in each of the 2 welding helmet bags I have. |
|
|
|
| Bates |
Jan 9 2018, 07:49 AM
Post
#16
|
|
Bates Group: Members Posts: 68 Joined: 27-December 13 From: Madison, Virginia Member No.: 16,800 Region Association: MidAtlantic Region |
Fixing the bent corner;
or Opening a a can of worms..... So now I know the right front is bent, I had already gotten a very rusty donor 914 and stripped the interior, suspension. In order to repair the affected area, which included the front suspension mount, I would need a 'jig' to get the replacement pickup placed correctly. So lets make a jig. I removed the front end from the donor, and brought it in the shop to use to make the jig. 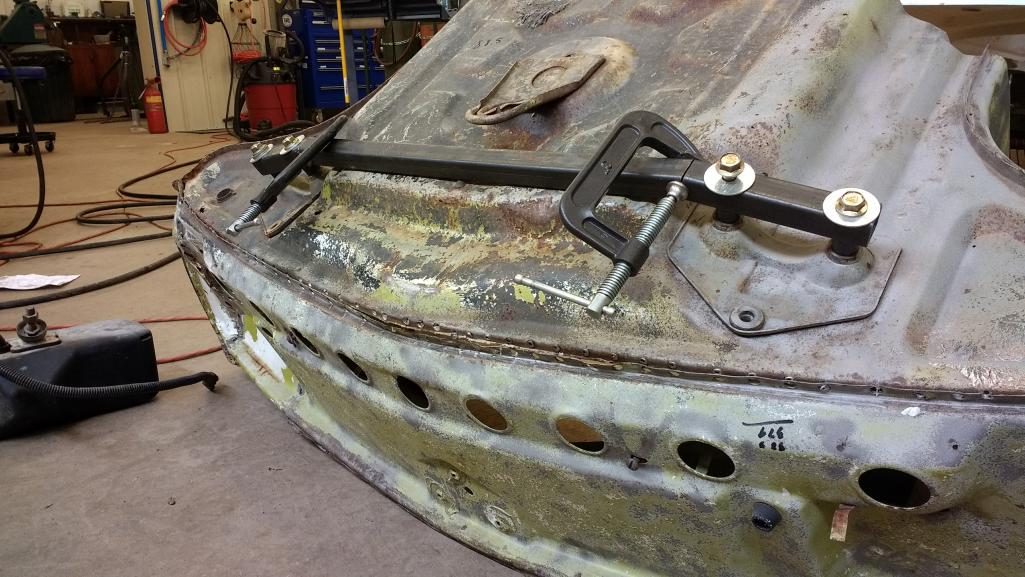 After bracing and welding up the 'jig' Now I can locate the pretty new suspension pickup from Restoration Design! 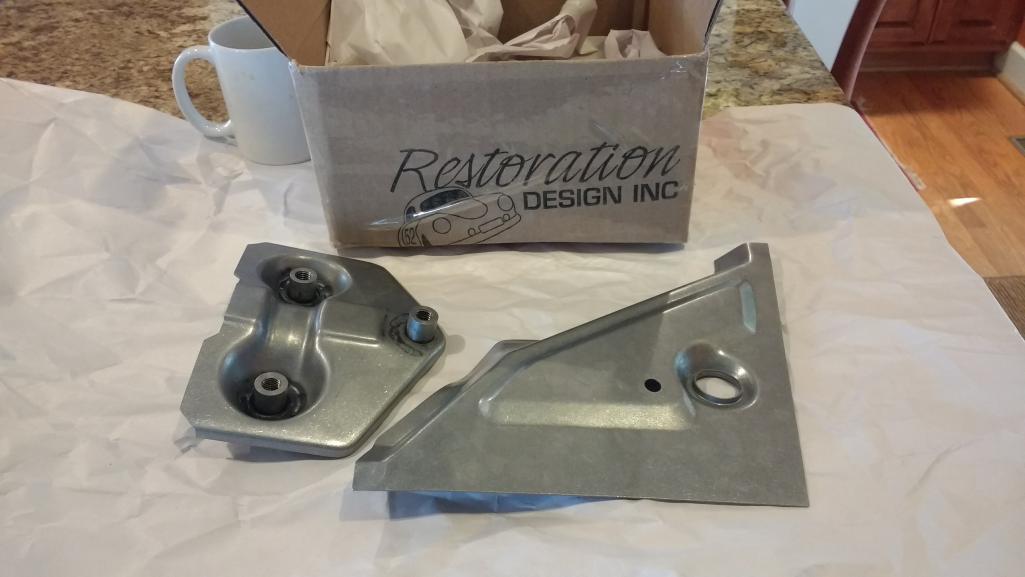 I'll skip forward a bit; the onlly picture I have of the jig is on the car taken last weekend. Here is the finished jig in place locating the new suspension pickup; 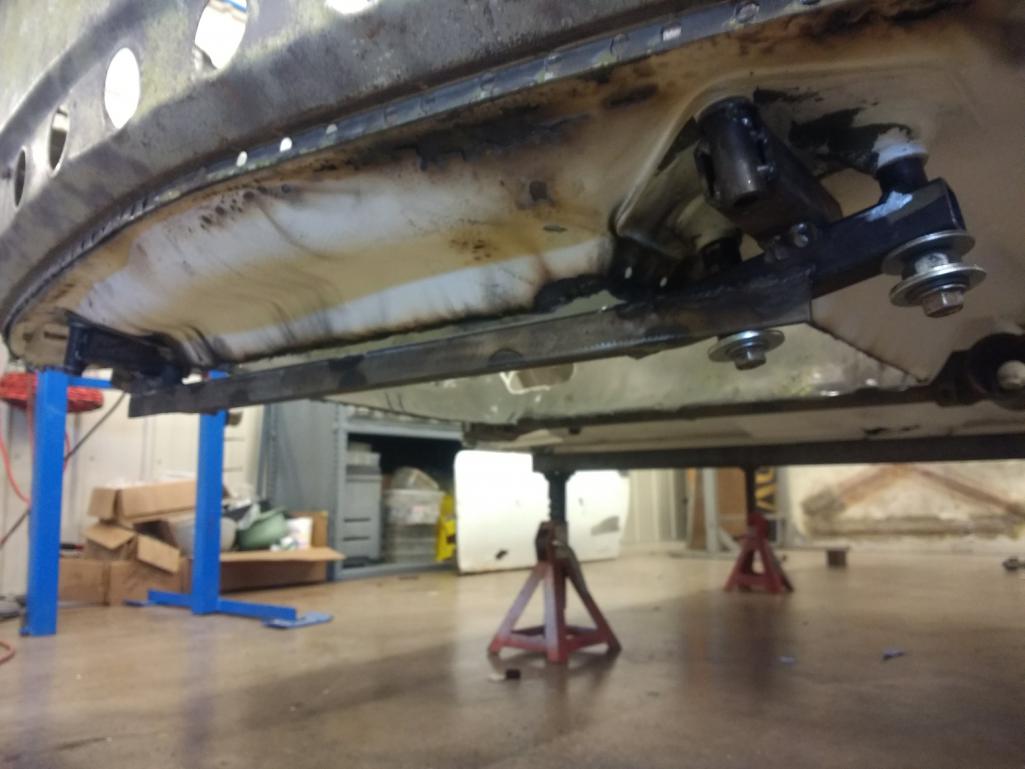 |
|
|
|
| burton73 |
Jan 9 2018, 03:19 PM
Post
#17
|
|
burton73 Group: Members Posts: 3,484 Joined: 2-January 07 From: Los Angeles Member No.: 7,414 Region Association: Southern California |
QUOTE(jmitro @ Jan 8 2018, 05:26 PM) QUOTE(Ecke Liebhaber @ Jan 8 2018, 05:39 PM) if you cannot see clearly, you sure cannot make a good weld. you can say that again! my problem is the auto-dark helmet i use is still too dark to actually see the welds, plus the cheap plastic face shields get scuffed up so easily I have the 2.0 diopter in my helmet and also where a PH lens for computer and stuff that is 20 inches to 30 inches. It really helps as reading glasses are for very close up work. I am so happy with these now. Saw my eye Dr and ordered lots of pairs from Zennie and another on line Glasses Company. Cheep and great Bob B |
|
|
|
| Bates |
Jan 10 2018, 04:32 PM
Post
#18
|
|
Bates Group: Members Posts: 68 Joined: 27-December 13 From: Madison, Virginia Member No.: 16,800 Region Association: MidAtlantic Region |
I've already trimmed the sides and front of the gapeing hole cut out by previous owner(s) for oil cooler.
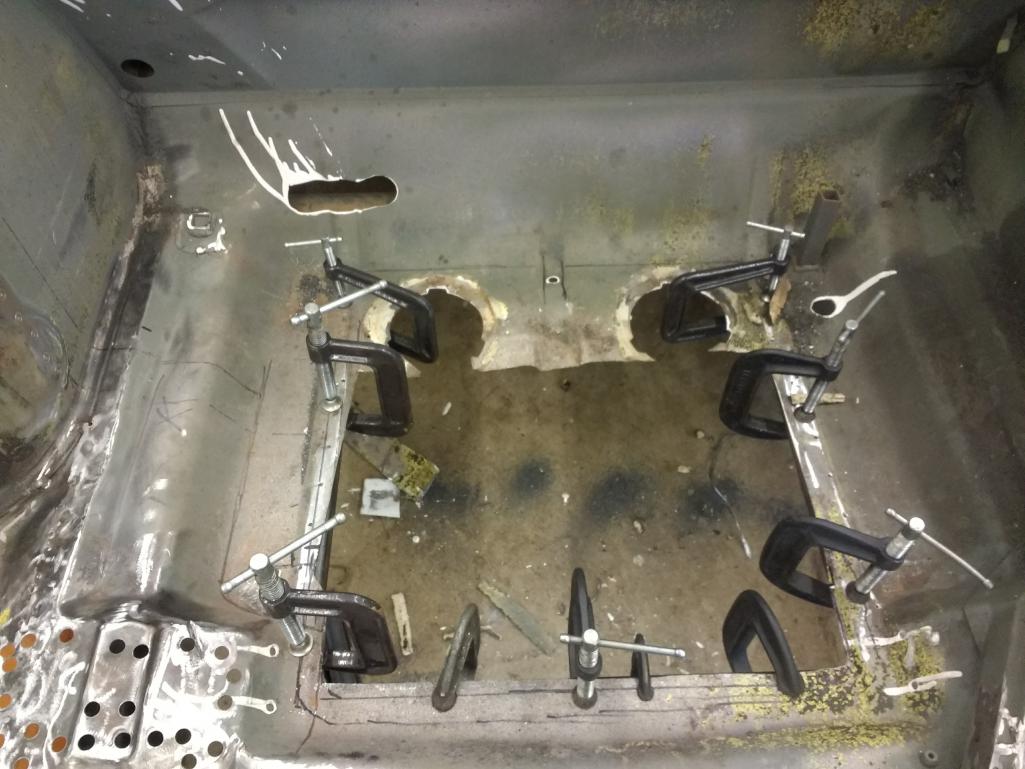 Note the 'pointy' jagged ends at the rear of the hole. I have a lovely hole in on the back of my left hand from one of them where it attacked me through a leather glove. I'm about to get even, and fix the problem forever. Make a Sharpie layout for the new floor and include area for exhaust of hot air and size of louvers: Then, cut the radiuses with a hole saw; Run a 'bead' with the bead roller around the outer edge of the future opening, and roll a step fore/aft down the middle to stiffen the floor; 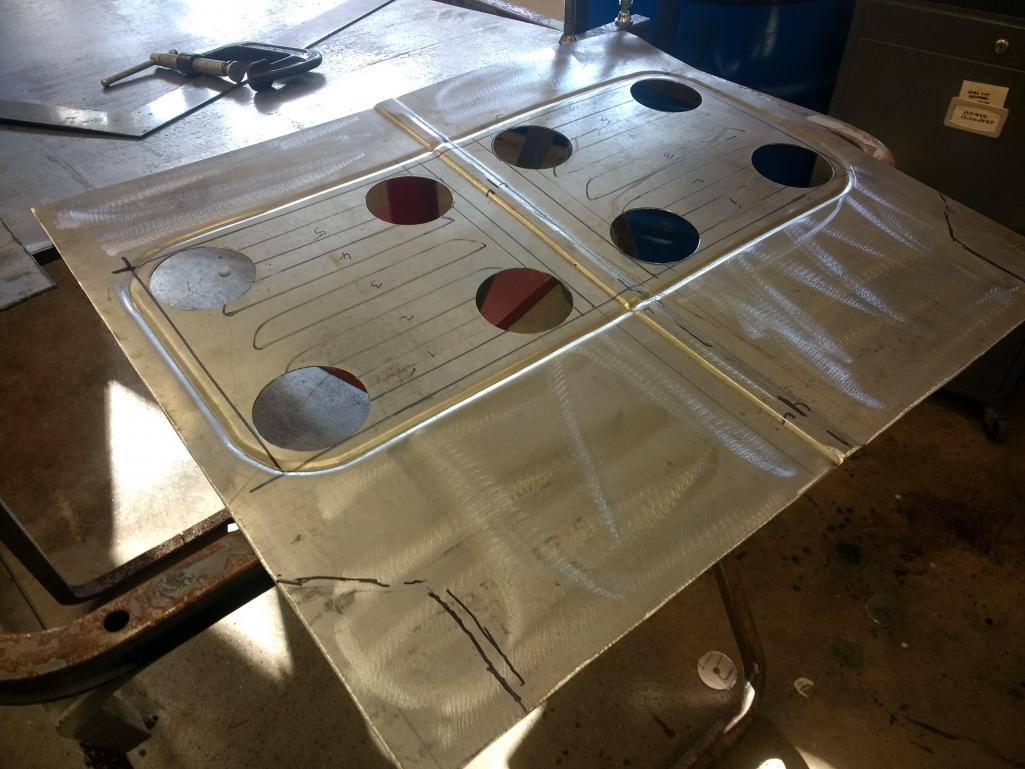 Weld in the floor after removing the new holes where the future louvers will be welded in. 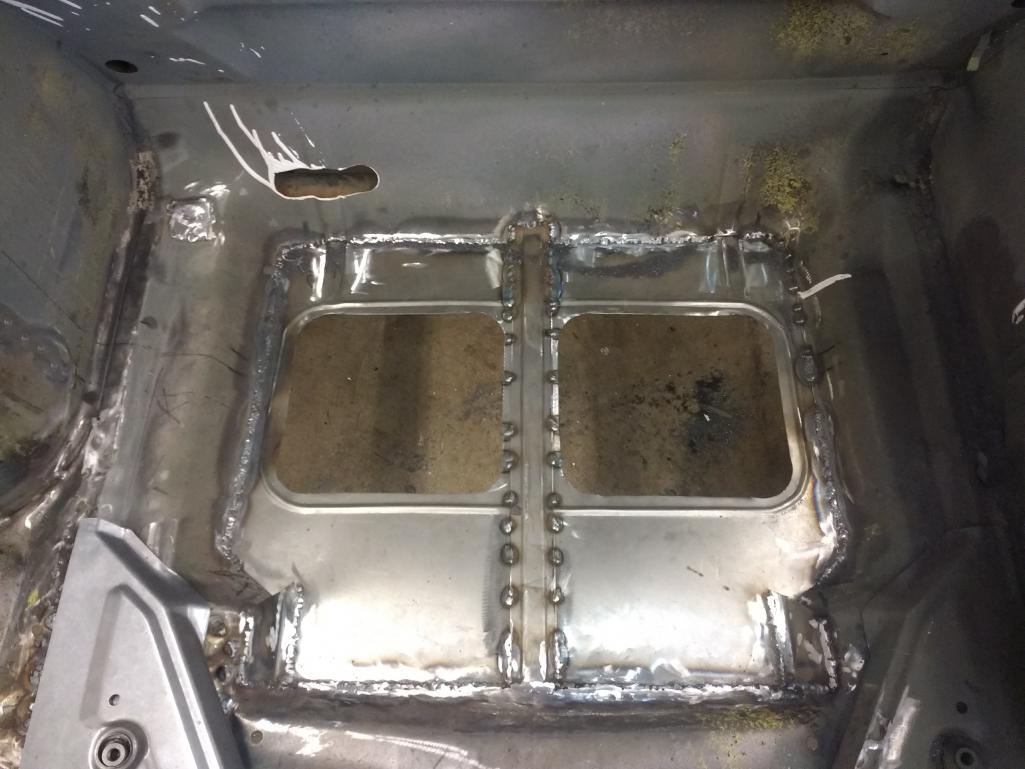 Lets make a couple of louvered panels; Pictures take up too much room, Next Reply Please Bead roller with louver dies installed. I'll roll the dies over the layout on a piece of 20 gauge steel sheet. |
|
|
|
| Bates |
Jan 10 2018, 04:41 PM
Post
#19
|
|
Bates Group: Members Posts: 68 Joined: 27-December 13 From: Madison, Virginia Member No.: 16,800 Region Association: MidAtlantic Region |
Lets make some louvers!!
Bead roller with louver dies installed. I'll roll the dies over the layout on a piece of 20 gauge steel sheet.  Here is what the new panel looks like with one louver rolled in; 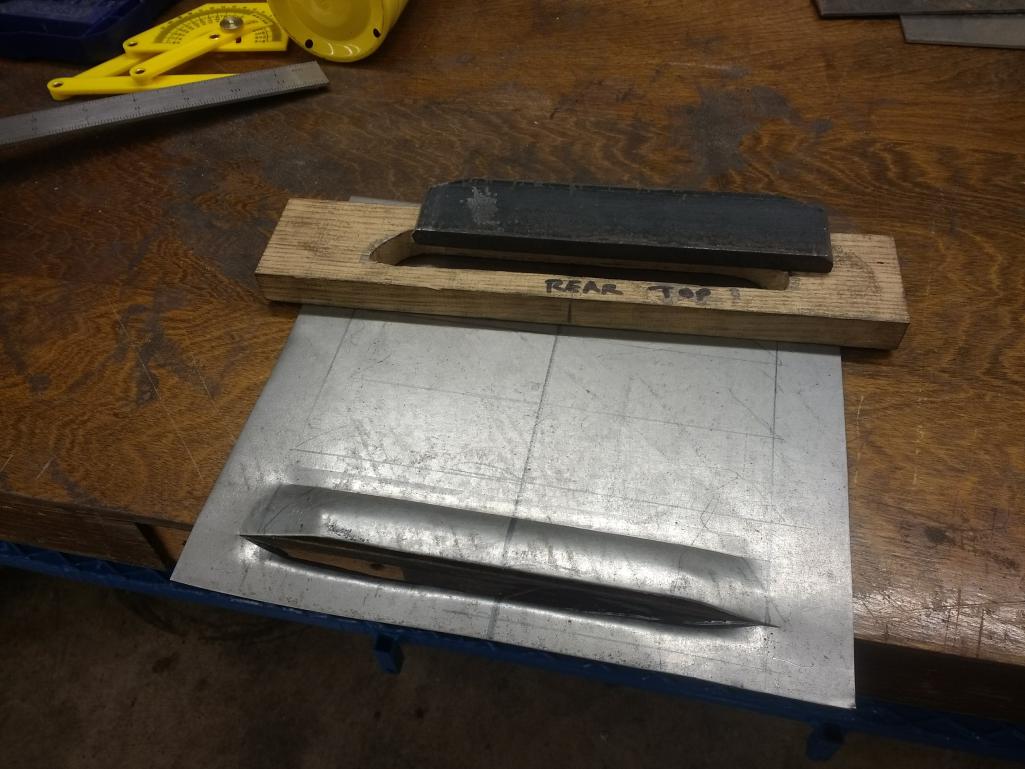 The wooden block and steel bar in the back of the louver are a homemade die to stretch the metal and make the louvers more consistent. OK, I need to find out how to make my images smaller....... not enough room for another picture!!! I've tried Ribbet resizing tool, it does not work with Google images, Google Images where my pics are is absolutely no help. My phone's camera will not let me choose my picture size. |
|
|
|
| Bates |
Jan 10 2018, 09:03 PM
Post
#20
|
|
Bates Group: Members Posts: 68 Joined: 27-December 13 From: Madison, Virginia Member No.: 16,800 Region Association: MidAtlantic Region |
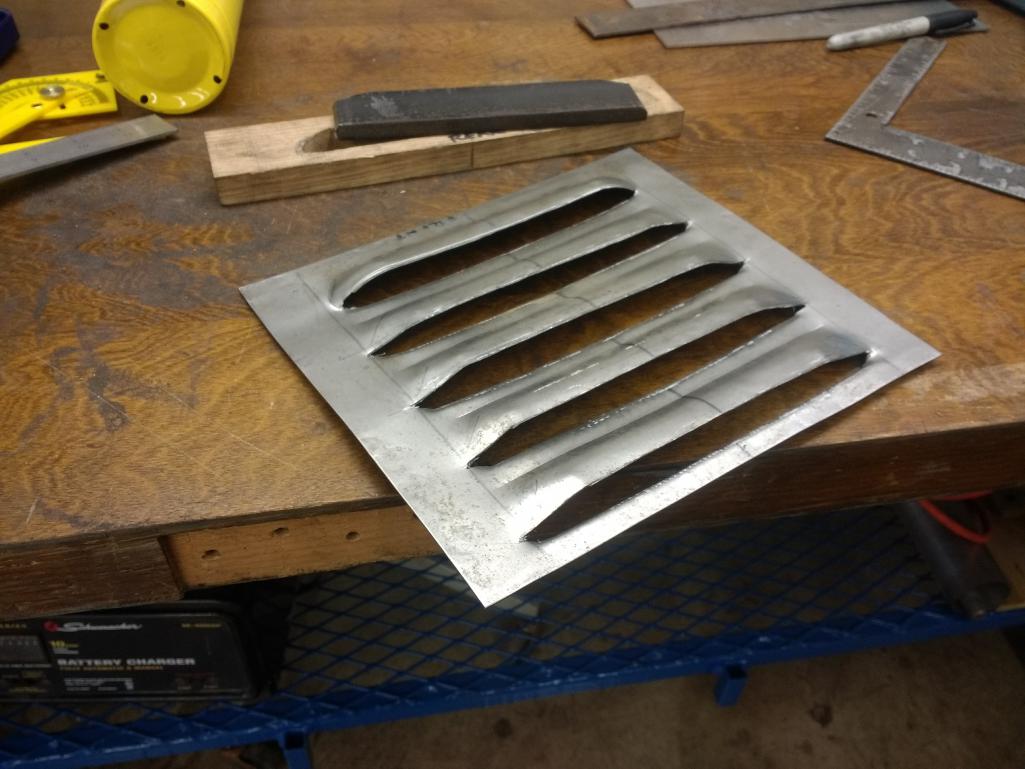 Louvers rolled onto sheet, then stretched with steel die. FYI, I had the die this size from fabricating engine covers (bonnets in proper English) when I was restoring my Morgan 4/4 I made the louvered panels from 20 gauge sheet, as this is easier on my tooling to create the louvers, the floor panel is 18 gauge 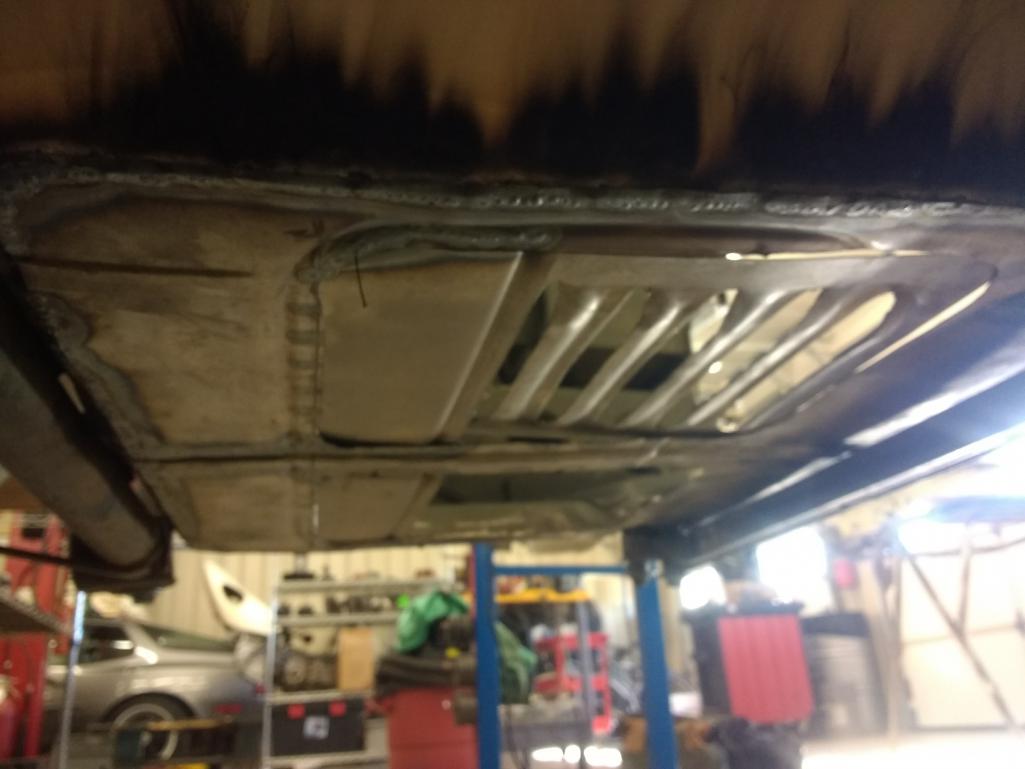 |
|
|
|
|
1 User(s) are reading this topic (1 Guests and 0 Anonymous Users)
0 Members:

|
Lo-Fi Version | Time is now: 19th April 2024 - 02:02 AM |
Invision Power Board
v9.1.4 © 2024 IPS, Inc.