|
|
|
Porsche, and the Porsche crest are registered trademarks of Dr. Ing. h.c. F. Porsche AG.
This site is not affiliated with Porsche in any way. Its only purpose is to provide an online forum for car enthusiasts. All other trademarks are property of their respective owners. |
|
|


| Bates |
 Jan 8 2018, 07:39 AM Jan 8 2018, 07:39 AM
Post
#1
|
|
Bates  Group: Members Posts: 68 Joined: 27-December 13 From: Madison, Virginia Member No.: 16,800 Region Association: MidAtlantic Region |
After several years of planning and a few 'false starts', I am back working on my 914.
My name is Bates McLain, I live in Madison, Va, and I have always been a car guy/motorhead or what ever you want to call someone who gets pleasure from making old cars beautiful again. I purchased an ex race car because I figured it was easier to civilize a racer into a street car than fix a pile of rusted seams and 50 year old parts, either way I knew the car needed to come apart pretty much totally to have the finished car suit my plan. I owned two 914s previously. First was a 73 1.7 I bought used from the local Porsche/Audi dealer in 1978. I loved the car, incredible fuel mileage, nimble and never a problem with the Alaska Blue Metalic beauty. I was working as a mechanic at a 'foriegn' car repair shop at the time, where i serviced lots of 914s and other cool cars. I sold that car to a customer about 1980. I missed the car afterwards, somehow the Toyota SR5 pickup didnt actually live up to my expectations or Car and Driver's description, "If BMW made a pickup, this is what it would handle like". I bought my second 914 in 1983, a 1974 2.0, Delphi Green, appearance group, gasburner wheels....and again, like new. I only owned this one about 6 months before my plans changed due to purchasing business that would allow me to double my income and work 4 days a week! So another beauty got away, and was back driving a pickup, but I didnt forget how great those little cars were. In 2013 I found a 73 racecar, with fiberglass flares, already had 5 lug suspension, it was a roller, but it had near zero rust. A near blank canvas to build myself a GT. Here is one of the first pictures I took of the car after I flat towed it home; 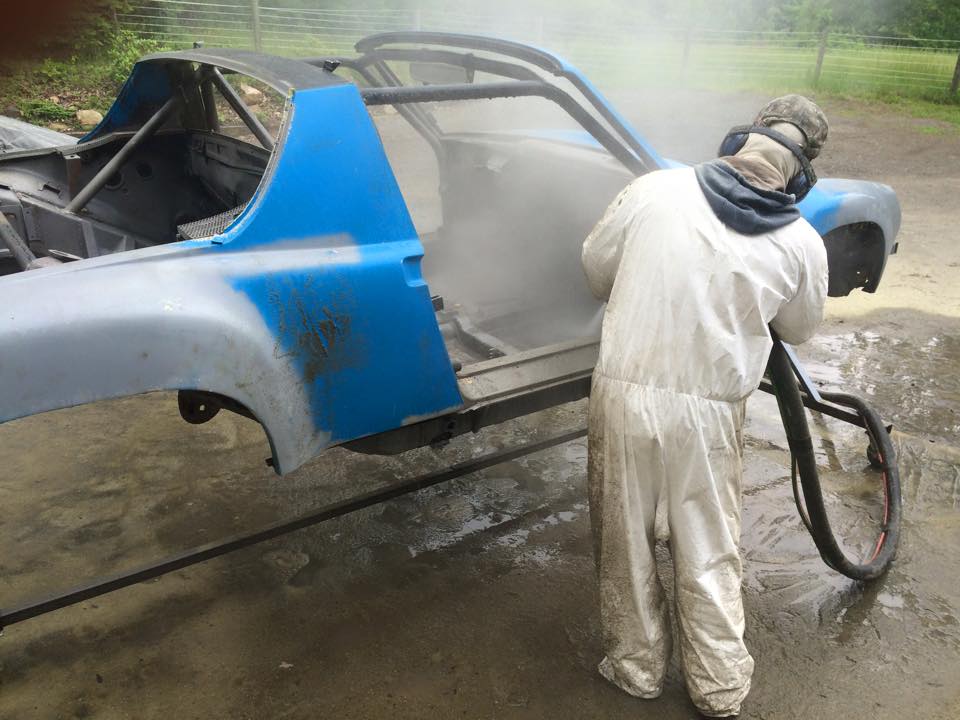 A friend had just purchased a 'Dustless Blasting' system, and his first auto paint removal was my new car. I wanted to see the bare metal of the underside and the known rust trouble spots. We found some rust, but very little. She would need some repairs and alterations, but now I could now see what was under all the darned black paint the P.O. had sprayed on the interior and both trunks and engine compartment. Why do people think race cars need to look like a dark cave inside? No bother all the black cave paint was GONE!! 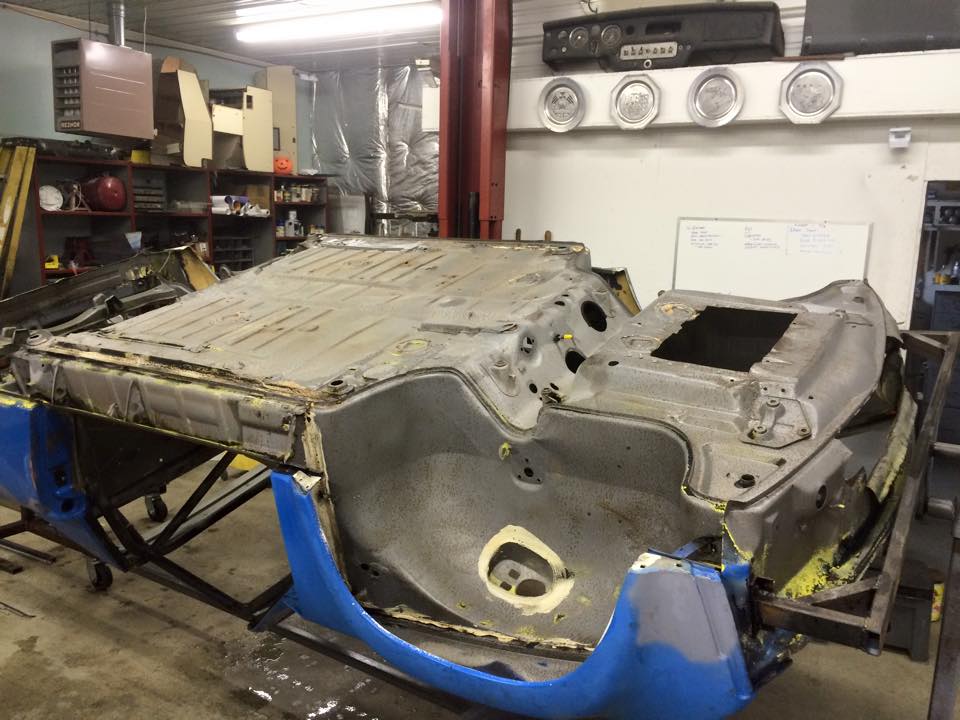 |
   |

 
|
  |
Replies
| Bates |
Jan 15 2018, 09:10 AM
Post
#2
|
|
Bates Group: Members Posts: 68 Joined: 27-December 13 From: Madison, Virginia Member No.: 16,800 Region Association: MidAtlantic Region |
I am doing repairs of my 73 914 chassis in preparation of creating yet another GT clone.
I have started a build thread; GT Build; Flares add flare here; http://www.914world.com/bbs2/index.php?sho...322283&st=0 I thought anyone else who has repaired a 914 may have run into oval rear suspension console mount holes; Here is the suspension pivot , which has a step shoulder on the end that locates the pivot in the suspension console hole. My non digital caliper measures it at .550" The pivot is one I cut in half to see how it was made, easier to deal with also. Here are pictures of measuring my right side console; out of focus, but easy to see needle is .030 larger than the step of the shaft Vertical measurement is .040" larger than the step of the shaft. I want to keep the suspension hole close to original placement, and the original two pieces of stamped plate are in decent condition, so my plan it to make a new locater out of a larger piece of stock; I took a piece of 4140 tubing, .750" o.d., .500" i.d.. First step is to make the i.d. fit the step of the pivot shaft , something just larger than .055". I checked the stock in my lathe and bored the center out to .055" (14mm). So now I have a shaft to create a 'washer' from that has the perfect inside diameter. I'll take it back to the lathe and 'part' the thickness of the two plates that currently have an oval hole inside. After I have a repair washer that is .750" outside diameter, I'll drill a hole .75" in the oval hole and insert the new washer. Here is the rough washer, it is a bit warm from machining, so pliers are in order. Now I'll mark a step bit at the diameter I do not want to exceed with a Sharpie. The red is very visible as I drill, and as soon as I get the hole to the red mark I know to stop. Step drills are good for keeping slightly oval holes on the original hole center when enlarging the hole for repairs. I took the little washer back to the car, de-burred it and metal finished to clean for welding later. placed it in the .75" hole, holding it there with the stepped shaft for placement; I then tacked it in place with my MIG welder, and then ground off any 'proud' weld tacks. I went back after this picture and ran a TIG weld pass around both sides of the new 'washer' . The stepped shaft is now fixed in one location, no moving up and down/ back and forth,. creating havoc when trying to align a suspension. Next step, new roll bar. |
|
|
|
Posts in this topic
 Ecke Liebhaber GT Build; flares add flare Jan 8 2018, 07:39 AM
 Cairo94507 Nice. Keep us posted on the progress with picture... Jan 8 2018, 08:22 AM Edward Blume Looks good. :headbanger: Jan 8 2018, 08:27 AM Ecke Liebhaber Once I had the chassis back in the shop with paint... Jan 8 2018, 09:14 AM jmitro ouch.
is that rust or foam under the bondo?
cool ... Jan 8 2018, 09:47 AM Ecke Liebhaber That is sand from the sand blasting and a grand am... Jan 8 2018, 10:05 AM
Cairo94507 Nice. Keep us posted on the progress with picture... Jan 8 2018, 08:22 AM Edward Blume Looks good. :headbanger: Jan 8 2018, 08:27 AM Ecke Liebhaber Once I had the chassis back in the shop with paint... Jan 8 2018, 09:14 AM jmitro ouch.
is that rust or foam under the bondo?
cool ... Jan 8 2018, 09:47 AM Ecke Liebhaber That is sand from the sand blasting and a grand am... Jan 8 2018, 10:05 AM
 mepstein
That is sand from the sand blasting and a grand a... Jan 8 2018, 11:42 AM JmuRiz Ahh Madison, where the county sport is: giving spe... Jan 8 2018, 12:35 PM Ecke Liebhaber
Ahh Madison, where the county sport is: giving sp... Jan 8 2018, 12:48 PM mb911 Bates nice to see you here..
Everyone else here I... Jan 8 2018, 03:45 PM Ecke Liebhaber Hello Ben,
I can laugh at myself too! These p... Jan 8 2018, 05:39 PM mb911
Hello Ben,
I can laugh at myself too! These ... Jan 8 2018, 06:12 PM wndsrfr
This afternoon, I went out and bought stronger ... Jan 8 2018, 06:37 PM jmitro if you cannot see clearly, you sure cannot make a... Jan 8 2018, 07:26 PM Ecke Liebhaber
[quote name='Ecke Liebhaber' post='2565835' date=... Jan 9 2018, 07:08 AM burton73
if you cannot see clearly, you sure cannot make ... Jan 9 2018, 03:19 PM Ecke Liebhaber Fixing the bent corner;
or
Opening a
a can of worm... Jan 9 2018, 07:49 AM Ecke Liebhaber I've already trimmed the sides and front of th... Jan 10 2018, 04:32 PM Ecke Liebhaber Lets make some louvers!!
Bead roller with... Jan 10 2018, 04:41 PM Ecke Liebhaber
Louvers rolled onto sheet, then stretched with ... Jan 10 2018, 09:03 PM Ecke Liebhaber Louvers on the Morgan were harder, the 3003 alumin... Jan 10 2018, 09:24 PM jmitro love the custom fabrication! Jan 11 2018, 09:41 AM Ecke Liebhaber
love the custom fabrication!
Thanks, rolli... Jan 12 2018, 06:38 AM bbrock Somehow, I missed this thread when it first popped... Jan 12 2018, 11:03 AM Porschef
Somehow, I missed this thread when it first poppe... Jan 12 2018, 03:19 PM Ecke Liebhaber
Somehow, I missed this thread when it first popp... Jan 13 2018, 08:23 AM r_towle how did you make the louvers?
Do you press them in... Jan 13 2018, 02:48 PM Ecke Liebhaber
how did you make the louvers?
Do you press them i... Jan 13 2018, 04:50 PM Mueller Love the fixture for fixing the front suspension p... Jan 13 2018, 03:40 PM Ecke Liebhaber
Love the fixture for fixing the front suspension ... Jan 13 2018, 04:48 PM Ecke Liebhaber pictures show up here;
???? dont know why they dis... Jan 15 2018, 09:35 AM Ecke Liebhaber After grinding off all of the layers of crappy rei... Feb 1 2018, 12:24 PM Ecke Liebhaber I strained my back, so grinding/welding is uncomfo... Feb 1 2018, 12:49 PM
mepstein
That is sand from the sand blasting and a grand a... Jan 8 2018, 11:42 AM JmuRiz Ahh Madison, where the county sport is: giving spe... Jan 8 2018, 12:35 PM Ecke Liebhaber
Ahh Madison, where the county sport is: giving sp... Jan 8 2018, 12:48 PM mb911 Bates nice to see you here..
Everyone else here I... Jan 8 2018, 03:45 PM Ecke Liebhaber Hello Ben,
I can laugh at myself too! These p... Jan 8 2018, 05:39 PM mb911
Hello Ben,
I can laugh at myself too! These ... Jan 8 2018, 06:12 PM wndsrfr
This afternoon, I went out and bought stronger ... Jan 8 2018, 06:37 PM jmitro if you cannot see clearly, you sure cannot make a... Jan 8 2018, 07:26 PM Ecke Liebhaber
[quote name='Ecke Liebhaber' post='2565835' date=... Jan 9 2018, 07:08 AM burton73
if you cannot see clearly, you sure cannot make ... Jan 9 2018, 03:19 PM Ecke Liebhaber Fixing the bent corner;
or
Opening a
a can of worm... Jan 9 2018, 07:49 AM Ecke Liebhaber I've already trimmed the sides and front of th... Jan 10 2018, 04:32 PM Ecke Liebhaber Lets make some louvers!!
Bead roller with... Jan 10 2018, 04:41 PM Ecke Liebhaber
Louvers rolled onto sheet, then stretched with ... Jan 10 2018, 09:03 PM Ecke Liebhaber Louvers on the Morgan were harder, the 3003 alumin... Jan 10 2018, 09:24 PM jmitro love the custom fabrication! Jan 11 2018, 09:41 AM Ecke Liebhaber
love the custom fabrication!
Thanks, rolli... Jan 12 2018, 06:38 AM bbrock Somehow, I missed this thread when it first popped... Jan 12 2018, 11:03 AM Porschef
Somehow, I missed this thread when it first poppe... Jan 12 2018, 03:19 PM Ecke Liebhaber
Somehow, I missed this thread when it first popp... Jan 13 2018, 08:23 AM r_towle how did you make the louvers?
Do you press them in... Jan 13 2018, 02:48 PM Ecke Liebhaber
how did you make the louvers?
Do you press them i... Jan 13 2018, 04:50 PM Mueller Love the fixture for fixing the front suspension p... Jan 13 2018, 03:40 PM Ecke Liebhaber
Love the fixture for fixing the front suspension ... Jan 13 2018, 04:48 PM Ecke Liebhaber pictures show up here;
???? dont know why they dis... Jan 15 2018, 09:35 AM Ecke Liebhaber After grinding off all of the layers of crappy rei... Feb 1 2018, 12:24 PM Ecke Liebhaber I strained my back, so grinding/welding is uncomfo... Feb 1 2018, 12:49 PM |
1 User(s) are reading this topic (1 Guests and 0 Anonymous Users)
0 Members:

|
Lo-Fi Version | Time is now: 26th April 2024 - 08:28 AM |
Invision Power Board
v9.1.4 © 2024 IPS, Inc.