|
|
|
Porsche, and the Porsche crest are registered trademarks of Dr. Ing. h.c. F. Porsche AG.
This site is not affiliated with Porsche in any way. Its only purpose is to provide an online forum for car enthusiasts. All other trademarks are property of their respective owners. |
|
|


| 914_7T3 |
 Jan 12 2018, 08:05 PM Jan 12 2018, 08:05 PM
Post
#1
|
|
Please forgive me, I'm new to all of this!  Group: Members Posts: 1,846 Joined: 3-April 17 From: Los Angeles, CA Member No.: 20,991 Region Association: Southern California |
My car was purchased with nonworking headlights. Switched over to H4s with the initial tune up and there was rust in the buckets and the shop spent some time looking at grounds etc.. and got everything up and going.
Now that the car has been stripped for paint, I have learned that I am dealing with frayed headlight wires. As you can see the shielding is stripped/melted and wires are a bit of a cluster F-ck. Passenger side is worse. What is the best way to deal with this? (IMG:style_emoticons/default/confused24.gif) 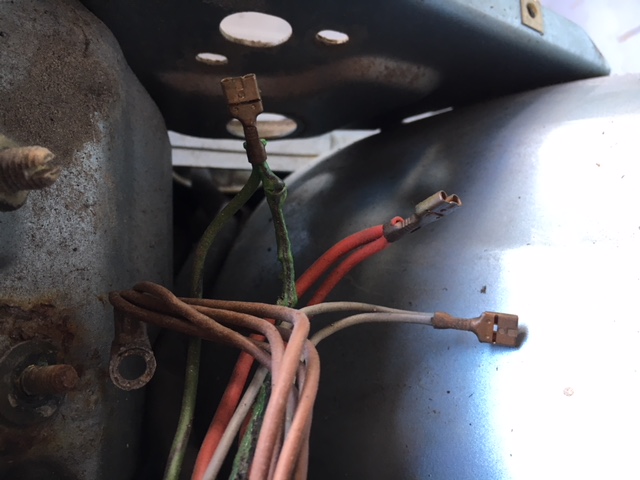  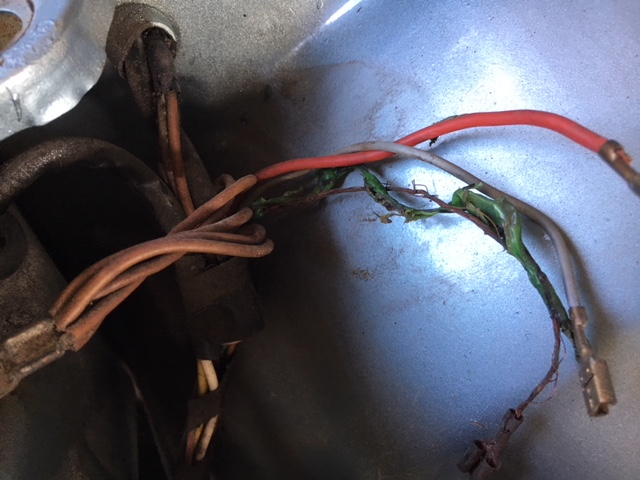 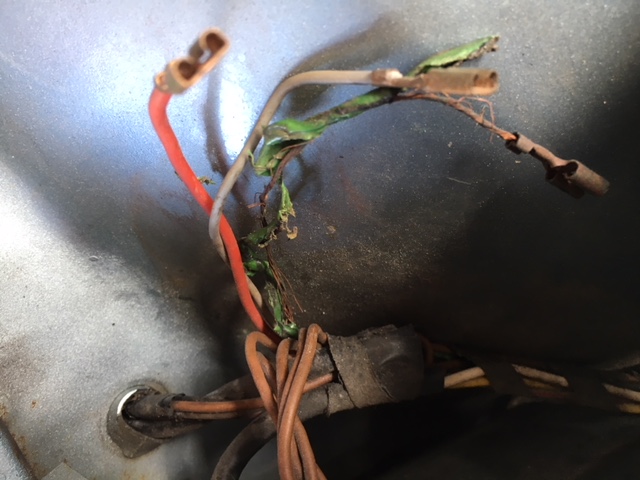 |
   |

 
|
  |
Replies(1 - 15)
| mihai914 |
Jan 12 2018, 08:21 PM
Post
#2
|
|
Senior Member Group: Members Posts: 800 Joined: 2-March 05 From: Montreal, QC Member No.: 3,697 Region Association: None |
How far does the damage go back?
One easy way to deal with it would be to find a good donor harness, take what is needed and splice it in your car. |
|
|
|
| 914_7T3 |
Jan 12 2018, 09:07 PM
Post
#3
|
|
Please forgive me, I'm new to all of this! Group: Members Posts: 1,846 Joined: 3-April 17 From: Los Angeles, CA Member No.: 20,991 Region Association: Southern California |
QUOTE(mihai914 @ Jan 12 2018, 06:21 PM)  How far does the damage go back? One easy way to deal with it would be to find a good donor harness, take what is needed and splice it in your car. It doesn't appear to run too far down the harness, but would want an experienced electric tech to take a look. Once spliced back in, is there a heat shrink shielding that can be used as well? I would use the same green color to keep it proper. FYI, I'm also a Montreal native! (IMG:style_emoticons/default/beerchug.gif) |
|
|
|
| windforfun |
Jan 12 2018, 09:44 PM
Post
#4
|
|
Senior Member Group: Members Posts: 1,771 Joined: 17-December 07 From: Blackhawk, CA Member No.: 8,476 Region Association: None |
I have a harness that you can borrow. Can you solder properly?
|
|
|
|
| 914_7T3 |
Jan 12 2018, 10:13 PM
Post
#5
|
|
Please forgive me, I'm new to all of this! Group: Members Posts: 1,846 Joined: 3-April 17 From: Los Angeles, CA Member No.: 20,991 Region Association: Southern California |
QUOTE(windforfun @ Jan 12 2018, 07:44 PM) I have a harness that you can borrow. Can you solder properly? Thanks, sent you a PM. |
|
|
|
| mihai914 |
Jan 12 2018, 10:26 PM
Post
#6
|
|
Senior Member Group: Members Posts: 800 Joined: 2-March 05 From: Montreal, QC Member No.: 3,697 Region Association: None |
Good thinking on getting a tech to have a look because it may seem fine after a couple of inches but the damage can go further and is hidden under the shielding.
Definitely use some heat shrink tube on each wire and then you can tape it over to make it look stock. Staggering the splicing will help you not have a blob in the harness. A good place in my opinion to splice would be around the spare wheel area. You have plenty of access in case you need to redo a wire and it's not visible right away. Good to hear from a fellow teener owner from Montreal, send some nice weather over (IMG:style_emoticons/default/beer.gif) |
|
|
|
| Mikey914 |
Jan 12 2018, 10:27 PM
Post
#7
|
|
The rubber man Group: Members Posts: 12,638 Joined: 27-December 04 From: Hillsboro, OR Member No.: 3,348 Region Association: None |
The real question is why did it do this? Is the electrical connector broken and somehow shorting out? If all plugs are in they shouldn't touch, but something is causing a short.
Check back how far it goes, but I don't think you need anything other than wire here. |
|
|
|
| mihai914 |
Jan 12 2018, 10:40 PM
Post
#8
|
|
Senior Member Group: Members Posts: 800 Joined: 2-March 05 From: Montreal, QC Member No.: 3,697 Region Association: None |
QUOTE(Mikey914 @ Jan 12 2018, 11:27 PM) The real question is why did it do this? +1 and is it only the headlights or are the wires for the motors also affected? |
|
|
|
| porschetub |
Jan 12 2018, 10:59 PM
Post
#9
|
|
Advanced Member Group: Members Posts: 4,696 Joined: 25-July 15 From: New Zealand Member No.: 18,995 Region Association: None |
(IMG:style_emoticons/default/agree.gif) ,find the issue first Jeff before affecting a repair,a common problem is the wires get out of shape and get pinched as the headlight raises (or lowers?) ,found I had one pinched live wire when I changed the LED lamps ...very close to a melt down (IMG:style_emoticons/default/sad.gif) .
I think you have had the same issue but a dead short,when you are able spit the wires apart and see if the fuse blows before you solder a heatshrink new ones in,good luck. |
|
|
|
| JeffBowlsby |
Jan 12 2018, 11:04 PM
Post
#10
|
|
914 Wiring Harnesses Group: Members Posts: 8,470 Joined: 7-January 03 From: San Ramon CA Member No.: 104 Region Association: None |
Those are the headlight motor wires, not the headlights. You need to inspect that wiring all the back to the fusepanel. Bet you find a short somewhere.
|
 |
|
| bbrock |
Jan 13 2018, 12:17 AM
Post
#11
|
|
914 Guru Group: Members Posts: 5,269 Joined: 17-February 17 From: Montana Member No.: 20,845 Region Association: Rocky Mountains |
It's a little hard to tell from the pics, but that looks like classic rodent damage to me. I just refurbished my entire harness and had to patch in two new wires where mice had made a nest our of the headlight motor wires. They looked exactly like yours. Do a thorough inspection as others have suggested to make sure that's the only issue, but if the insulation looks chewed and not scorched or melted, I'm betting the damage is limited to those free ends..
EDIT: In looking at the pics again, I noticed the same wire is affected on both sides and it does look like there is some scorching. So you probably have a short. If you want to replace the terminals with OEM, here are the digikey links to them: https://www.digikey.com/product-detail/en/t...584CT-ND/456679 and https://www.digikey.com/product-detail/en/t...587CT-ND/456680 The second link is for larger gauge wire to fit terminals on the double wires. In theory, those should work for both single and double 18 gauge, but I found I got better crimpls on single 18 guage using the smaller terminals in the first link. They are inexpensive. If it were me, I'd order some color matching GXL rated 18 gauge wire on ebay. You can splice it in with either quality crimp butt connectors or solder and like others have said, protect the splice with heat shrink. I prefer solder but I guess the aviation industry and military prefer crimp. If you solder, google "lineman's splice" for the correct wrap. To crimp the terminals above, you'll need a crimping tool for uninsulated, open barrell (or F-crimp). I got a pretty cheap tool at Lowe's that makes good crimps but get extra terminals to practice on. If you want color-coordinated heat shrink, PM me and I'll send you some. |
|
|
|
| porschetub |
Jan 13 2018, 12:35 AM
Post
#12
|
|
Advanced Member Group: Members Posts: 4,696 Joined: 25-July 15 From: New Zealand Member No.: 18,995 Region Association: None |
QUOTE(Jeff Bowlsby @ Jan 13 2018, 06:04 PM) Those are the headlight motor wires, not the headlights. You need top inspect that wiring all the back to the fusepanel. Be you find a short somewhere. Opps sorry did't look properly.................. |
|
|
|
| 914_7T3 |
Jan 13 2018, 10:01 AM
Post
#13
|
|
Please forgive me, I'm new to all of this! Group: Members Posts: 1,846 Joined: 3-April 17 From: Los Angeles, CA Member No.: 20,991 Region Association: Southern California |
Appreciate the tips, will post back with updates.
|
|
|
|
| Mike Bellis |
Jan 13 2018, 01:20 PM
Post
#14
|
|
Resident Electrician Group: Members Posts: 8,345 Joined: 22-June 09 From: Midlothian TX Member No.: 10,496 Region Association: None |
Copper conducts a ton of heat. The entire wire will be compromised. Do not try to pull it out of the harness. The melted insulation may be fused to good wire.
Cut back the bad parts of wire and abandon. Run a new wire from the light switch. Or... Replace the entire harness and any damaged wires. |
|
|
|
| windforfun |
Jan 13 2018, 06:54 PM
Post
#15
|
|
Senior Member Group: Members Posts: 1,771 Joined: 17-December 07 From: Blackhawk, CA Member No.: 8,476 Region Association: None |
What bugs me are all the broken strands. This perhaps suggests rodent nibbling. This may have then been followed by a short to ground (no load). All of the car's wiring needs to be inspected at this point. A 1" long lineman's or barrel splice followed by a uniform solder distribution followed by heat shrink tubing is the only way to go. Crimp connectors really need to be soldered too. You must solder after crimping & not before because the crimp pressure will make the solder redistribute & loosen the connection. Cut or nicked strands are a no no. I recommend a thermal insulation stripper. Trust me, I used to work for McDonnell Douglas.
|
|
|
|
| 914_7T3 |
Jan 13 2018, 07:02 PM
Post
#16
|
|
Please forgive me, I'm new to all of this! Group: Members Posts: 1,846 Joined: 3-April 17 From: Los Angeles, CA Member No.: 20,991 Region Association: Southern California |
Great input, and I will include a copy of this thread to the tech that will be evaluating. My body shop has someone that they work with regularly with good results.
I will post an update with their evaluation before green lighting any work. Failing that, windforfun may want to spend some time down here in LA to help me out with this. (IMG:style_emoticons/default/biggrin.gif) |
|
|
|
|
1 User(s) are reading this topic (1 Guests and 0 Anonymous Users)
0 Members:

|
Lo-Fi Version | Time is now: 18th April 2024 - 08:44 AM |
Invision Power Board
v9.1.4 © 2024 IPS, Inc.