|
|
|
Porsche, and the Porsche crest are registered trademarks of Dr. Ing. h.c. F. Porsche AG.
This site is not affiliated with Porsche in any way. Its only purpose is to provide an online forum for car enthusiasts. All other trademarks are property of their respective owners. |
|
|

  |

| jcambo7 |
 Jan 12 2018, 09:51 PM Jan 12 2018, 09:51 PM
Post
#1
|
|
Senior Member  Group: Members Posts: 1,664 Joined: 24-December 08 From: Graham, WA Member No.: 9,867 Region Association: Pacific Northwest |
So as the title states the L bracket on the drivers side broke off. It looks as if a PO had this happen at some point and welded just the sides and tried to weld the top from the engine side of the fire wall. I have been talking to a friend and he suggested grinding the paint down and find the spot welds and then put 4 or 5 rivets in the existing holes and where the spot welds were with some auto body sealant between the mating surfaces.
Another option we considered was getting good firewall piece and riveting it on their until I can weld that piece on properly. I really don't want to have to put her up and do any welding right now since I just got her back on the road after sitting for 3+ years. Anyone have any other ideas or fixes they have done for this? 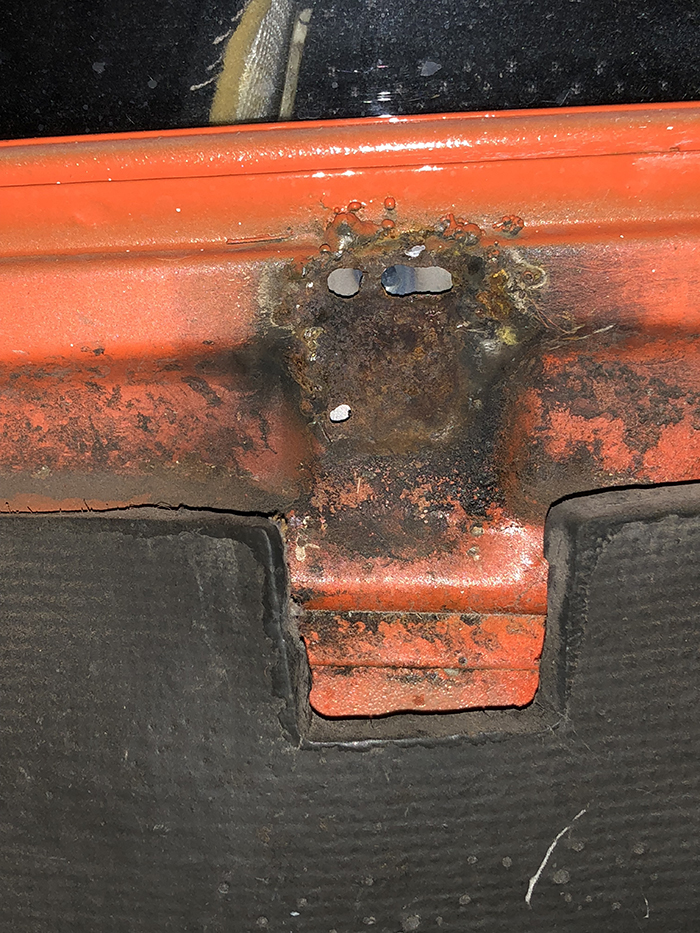 |
   |

 
|
| Mikey914 |
Jan 12 2018, 10:24 PM
Post
#2
|
|
The rubber man Group: Members Posts: 12,638 Joined: 27-December 04 From: Hillsboro, OR Member No.: 3,348 Region Association: None |
If you want a quick fix. You can pop rivet a backer plate on the inside, but it's a hillbilly fix. For the effort, usually easier to just fix it right than do the job 2x.
(IMG:style_emoticons/default/biggrin.gif) (IMG:style_emoticons/default/beer3.gif) (IMG:style_emoticons/default/beer3.gif) (IMG:style_emoticons/default/beer3.gif) (IMG:style_emoticons/default/beer3.gif) (IMG:style_emoticons/default/beer3.gif) |
|
|
|
| jcambo7 |
Jan 12 2018, 10:29 PM
Post
#3
|
|
Senior Member Group: Members Posts: 1,664 Joined: 24-December 08 From: Graham, WA Member No.: 9,867 Region Association: Pacific Northwest |
QUOTE(Mikey914 @ Jan 12 2018, 11:24 PM)  If you want a quick fix. You can pop rivet a backer plate on the inside, but it's a hillbilly fix. For the effort, usually easier to just fix it right than do the job 2x. (IMG:style_emoticons/default/biggrin.gif) (IMG:style_emoticons/default/beer3.gif) (IMG:style_emoticons/default/beer3.gif) (IMG:style_emoticons/default/beer3.gif) (IMG:style_emoticons/default/beer3.gif) (IMG:style_emoticons/default/beer3.gif) I know but I don't want to have to take the back pad off and especially the back window out just to weld it. |
|
|
|
| aharder |
Jan 12 2018, 10:39 PM
Post
#4
|
|
Advanced Member Group: Members Posts: 4,364 Joined: 6-September 11 From: Dallas Texas Member No.: 13,524 Region Association: Southwest Region |
Be very careful with the placement when you re-attach it.
Mine broke and I had it welded back on. It did not get in the correct position  As you can see the gap on the driver side which is the one that I had to re-attach 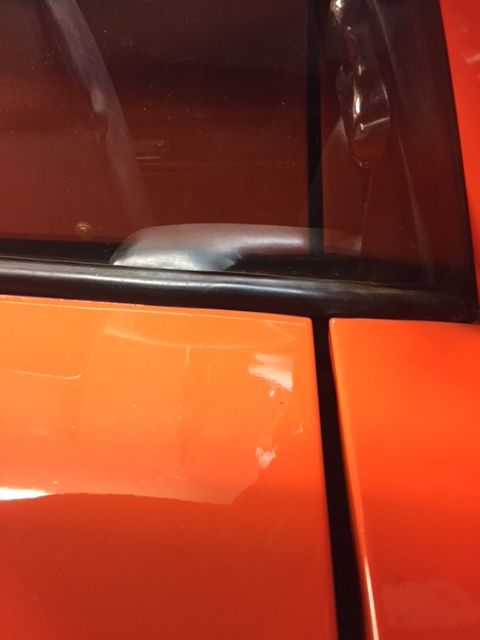 This is the passenger side that has not been modified It makes the clearance between the hood and truck very tight. I'll address it someday, just not the priority today. |
|
|
|
| Maltese Falcon |
Jan 12 2018, 11:00 PM
Post
#5
|
|
Advanced Member Group: Members Posts: 4,629 Joined: 14-September 04 From: Mulholland SoCal Member No.: 2,755 Region Association: None |
I've repaired several of these no damage to the interior back- pad.
You will need a decent MIG welder, and a spray bottle with water. Clean the metal surfaces totally of paint, rust, debris. Place some damp shop towels cover the fan housing, front sheet metal area.Disconnect the battery. Put a couple small tack welds on opposite sides of the bracket to get it holding itself in place. You will need a buddy to spray water + cool those down . Wait about 5 min between welds/ cooling sprays. About 8 welds equally spaced around the bracket will secure it in place, you can add more welding in the future when your back-pad is removed (IMG:style_emoticons/default/smile.gif) Welding thin gauge metal can intimidate you, this is 22 gauge to 16 gauge, so take some practice welds on some scrap metal and set your heat and wire- speed dials. |
|
|
|
| jcambo7 |
Jan 13 2018, 09:54 AM
Post
#6
|
|
Senior Member Group: Members Posts: 1,664 Joined: 24-December 08 From: Graham, WA Member No.: 9,867 Region Association: Pacific Northwest |
QUOTE(Maltese Falcon @ Jan 13 2018, 12:00 AM) I've repaired several of these no damage to the interior back- pad. You will need a decent MIG welder, and a spray bottle with water. Clean the metal surfaces totally of paint, rust, debris. Place some damp shop towels cover the fan housing, front sheet metal area.Disconnect the battery. Put a couple small tack welds on opposite sides of the bracket to get it holding itself in place. You will need a buddy to spray water + cool those down . Wait about 5 min between welds/ cooling sprays. About 8 welds equally spaced around the bracket will secure it in place, you can add more welding in the future when your back-pad is removed (IMG:style_emoticons/default/smile.gif) Welding thin gauge metal can intimidate you, this is 22 gauge to 16 gauge, so take some practice welds on some scrap metal and set your heat and wire- speed dials. Would you have to remove the window to do this? |
|
|
|
| rudedude |
Jan 13 2018, 10:08 AM
Post
#7
|
|
Senior Member Group: Members Posts: 508 Joined: 1-January 05 From: minneapolis, mn Member No.: 3,387 Region Association: Upper MidWest |
I've done it with the window in but i did take out the back pad but that only takes a couple of minutes
|
|
|
|
| mgphoto |
Jan 13 2018, 10:08 AM
Post
#8
|
|
"If there is a mistake it will find me" Group: Members Posts: 1,335 Joined: 1-April 09 From: Los Angeles, CA Member No.: 10,225 Region Association: Southern California |
Products are known as "heat fence", asbestos paste on the opposite side of the weld will disperse the heat so that the paint on the opposite side will not burn.
|
|
|
|
| Maltese Falcon |
Jan 13 2018, 10:46 AM
Post
#9
|
|
Advanced Member Group: Members Posts: 4,629 Joined: 14-September 04 From: Mulholland SoCal Member No.: 2,755 Region Association: None |
James...I've never needed to remove the back window, but you might want to mask off the window as mig welders throw off molten debris that can damage glass. I hit the trigger for a split second and the heat transfer is minimal. If the engine-side sound deadener is easy to move off of the firewall, just space it away with a couple of small wooden wedges...benefit with more room to work (IMG:style_emoticons/default/welder.gif)
|
|
|
|
|
1 User(s) are reading this topic (1 Guests and 0 Anonymous Users)
0 Members:

|
Lo-Fi Version | Time is now: 19th April 2024 - 12:44 AM |
Invision Power Board
v9.1.4 © 2024 IPS, Inc.