|
|
|
Porsche, and the Porsche crest are registered trademarks of Dr. Ing. h.c. F. Porsche AG.
This site is not affiliated with Porsche in any way. Its only purpose is to provide an online forum for car enthusiasts. All other trademarks are property of their respective owners. |
|
|

  |

| earossi |
 Feb 3 2018, 04:03 PM Feb 3 2018, 04:03 PM
Post
#21
|
|
Member  Group: Members Posts: 210 Joined: 8-December 11 From: Chicago, Il Member No.: 13,878 Region Association: Upper MidWest |
QUOTE(mepstein @ Jan 31 2018, 08:49 PM)  QUOTE(earossi @ Jan 31 2018, 09:23 PM) QUOTE(mepstein @ Jan 31 2018, 06:21 PM) QUOTE(earossi @ Jan 31 2018, 07:15 PM) There is a guy over on the Pelican Engine Rebuilding forum who has a cottage business going to fabricate new Porsche wiring harnesses. He's done tons of these and feedback on the forum is extremely good. Not very expensive either. What’s his name? His forum name on the Pelican Engine Rebuilding forum is "timmy2". His name is Dennis. You should be able to get to him via PM or email. He has created replacement harnesses for a number of Porsche models. If he does not have the pattern, you just need to send him your old harness and he'll provide a proper replacement with the correct connectors. And, he is reasonable. I know he does engine harnesses for 6’s. I didn’t realize he did chassis wire harness. He can do any type of harness. You just supply him the old harness and he'll duplicate it "as new". If he has previously done a harness, he will have the schematics to replicate it. He apparently has sources from which to procure all the various connectors one finds on a Porsche harne3ss. |
   |

 
|
| porschetub |
Feb 3 2018, 11:54 PM
Post
#22
|
|
Advanced Member Group: Members Posts: 4,886 Joined: 25-July 15 From: New Zealand Member No.: 18,995 Region Association: None |
Dennis isn't doing full 914 looms or he told me he wasn't interested as he had loads of 911 work on,my 914 experience with him didn't pan out.
Appears things have changed if he's going that way ???? Perry sorted me well. |
 |
|
| doug_b_928 |
Feb 11 2018, 12:38 PM
Post
#23
|
|
Senior Member Group: Members Posts: 714 Joined: 17-January 13 From: Winnipeg Member No.: 15,382 Region Association: Canada |
Until today I haven't had any time for this project since last weekend. But I managed to finish everything in the engine compartment (including replacing the fuel pump wire with a new 12G; thanks Jeff and Brent!
The wiring in the cabin area is what scares me a bit. I'm working my way back to front. I already did the rear window defrost and the passenger seat contact and seat belt contact wiring. Here's a pic of the connector for the passenger seat contact: 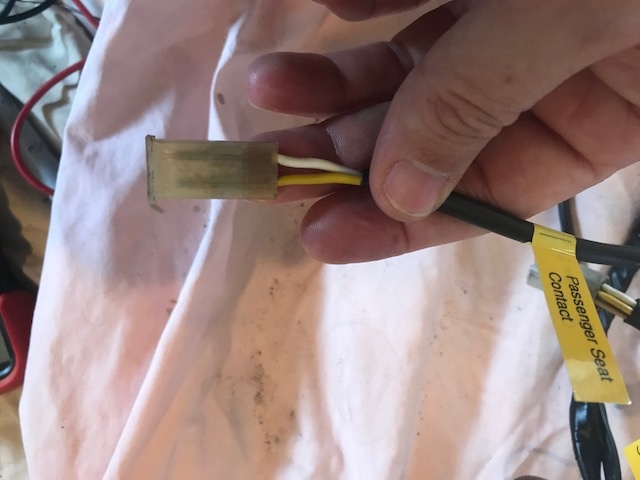 I can get continuity with the wires on the seat sensor when I probe from the back side of the housing, but can't when I probe from the connection/front side of the housing, so think I need to remove the plastic housing so I can clean the contacts. I don't have a spare one of these plastic housings. How does one remove the wires from this particular type of housing (doesn't look to be the same system as the spade connector housings)? |
|
|
|
| bbrock |
Feb 11 2018, 02:04 PM
Post
#24
|
|
914 Guru Group: Members Posts: 5,269 Joined: 17-February 17 From: Montana Member No.: 20,845 Region Association: Rocky Mountains |
I haven't had to remove that one yet, but I believe it is the same principle only on a bullet type connector. I don't remember if there are one or two tangs in there, but look for tabs to press down to let you slide the connectors out the back. I'm sure someone who has done it on these particular connectors will give more specific advice.
I like those wire labels. Is that from a label maker? |
|
|
|
| JeffBowlsby |
Feb 11 2018, 02:29 PM
Post
#25
|
|
914 Wiring Harnesses & Beekeeper Group: Members Posts: 8,978 Joined: 7-January 03 From: San Ramon CA Member No.: 104 Region Association: None |
Its a female hollow tube terminal extractor. I have one, but don't know where to send you the get another...maybe NAPA or someone who sells molex?
|
|
|
|
| doug_b_928 |
Feb 11 2018, 04:39 PM
Post
#26
|
|
Senior Member Group: Members Posts: 714 Joined: 17-January 13 From: Winnipeg Member No.: 15,382 Region Association: Canada |
Thanks guys. I was able to clean the connectors with the housing on to get continuity. Figured maybe I shouldn't mess with that one further until I see if it's a problem.
Next issue: During my ownership the car came with a red GM side marker light as an interior light....Yep... Their connections had fallen apart and most of the requisite wires were not connected. Here's a snip of the wiring diagram for the interior light: 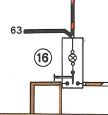 In looking at the wiring diagram, I see what appear to be two power wires: Black with red stripe going to fuse 8, and another black one. I can't tell where the plain black wire goes. Anyone know? I'd like to test its continuity. There is a brown wire with white stripes that connects to both door switches. I've confirmed continuity to both. There are two ground wires as well. One I could trace to the hazard light switch. I can't tell where the other one goes. I thought from the diagram it might be the fresh air fan but didn't see it there. All of these wires have their connectors cut off. I have a new aftermarket interior light, as shown below: 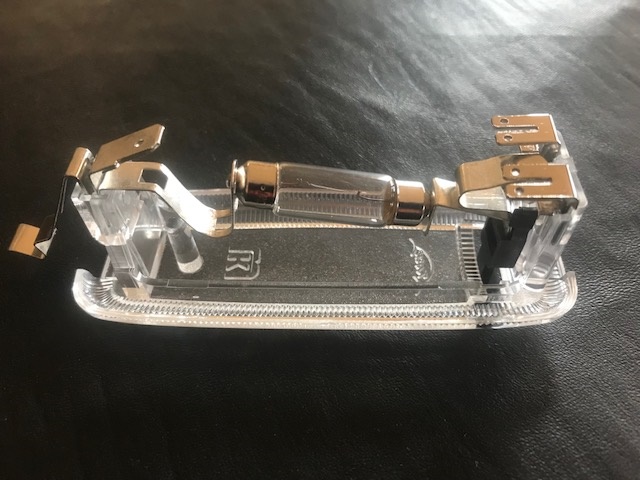 How are the wires to connect to the light? I'm guessing from the diagram that I need to put those small spade connectors on the two grounds and the brown with white stripe and have the latter on one of the double-male connectors on the light and the two grounds on the other double-male connector on the light. Then I need to have the two power wires (black with red and black) going to a single large spade connector that goes on the large male connector on the opposite end of the light. Is that correct? |
|
|
|
| doug_b_928 |
Feb 11 2018, 04:43 PM
Post
#27
|
|
Senior Member Group: Members Posts: 714 Joined: 17-January 13 From: Winnipeg Member No.: 15,382 Region Association: Canada |
@ Brent...Yes, they are from a label maker. I bought yellow tape thinking it might look nice against the Raveena Green paint (showing more the green tint of the paint).
|
|
|
|
| doug_b_928 |
Feb 11 2018, 05:05 PM
Post
#28
|
|
Senior Member Group: Members Posts: 714 Joined: 17-January 13 From: Winnipeg Member No.: 15,382 Region Association: Canada |
update: I see the unknown ground goes to the ground for the heater blower motor in the engine compartment, so that mystery is solved. Still not sure about the black power wire and how to connect all to the light.
|
|
|
|
| JeffBowlsby |
Feb 11 2018, 07:01 PM
Post
#29
|
|
914 Wiring Harnesses & Beekeeper Group: Members Posts: 8,978 Joined: 7-January 03 From: San Ramon CA Member No.: 104 Region Association: None |
See wire 63 on the second page of the schematic. Look for it at the center console. Its unswitched power to the light.
|
|
|
|
| doug_b_928 |
Feb 11 2018, 07:17 PM
Post
#30
|
|
Senior Member Group: Members Posts: 714 Joined: 17-January 13 From: Winnipeg Member No.: 15,382 Region Association: Canada |
Got it. Thanks Jeff!
Looks like I'm there, just need to know how these wires connect to the light. Can anyone comment on my proposed connections above to the light itself? |
|
|
|
| Dave_Darling |
Feb 11 2018, 10:35 PM
Post
#31
|
|
914 Idiot Group: Members Posts: 15,204 Joined: 9-January 03 From: Silicon Valley / Kailua-Kona Member No.: 121 Region Association: Northern California |
Black to the single terminal on the left. Brown to one of the two on the right; brown/white to the other. Not sure about the black/red wire. Could be crimped into the same female connector as the black one.
The black wire should always be "hot". The brown is always ground, the brown/white is grounded only when one door or the other is open. --DD |
|
|
|
| 914_teener |
Feb 11 2018, 11:06 PM
Post
#32
|
|
914 Guru Group: Members Posts: 5,266 Joined: 31-August 08 From: So. Cal Member No.: 9,489 Region Association: Southern California |
QUOTE(doug_b_928 @ Feb 11 2018, 05:17 PM) Got it. Thanks Jeff! Looks like I'm there, just need to know how these wires connect to the light. Can anyone comment on my proposed connections above to the light itself? Jeff is right...if you have a center console the black wire goes for the console gauge lights. The spade terminals for the light shown on the picture are for a ground and switched ground. The switched brown wires came with two wires to one spade terminal and go to the two door switches. Test the switches in your doors first. Ask me how I know. |
|
|
|
| doug_b_928 |
Feb 12 2018, 08:30 AM
Post
#33
|
|
Senior Member Group: Members Posts: 714 Joined: 17-January 13 From: Winnipeg Member No.: 15,382 Region Association: Canada |
Thanks guys. Now I just need to find some of those tiny VW terminal connectors. Which check with my local dealer.
|
|
|
|
| bbrock |
Feb 12 2018, 09:38 AM
Post
#34
|
|
914 Guru Group: Members Posts: 5,269 Joined: 17-February 17 From: Montana Member No.: 20,845 Region Association: Rocky Mountains |
QUOTE(doug_b_928 @ Feb 12 2018, 07:30 AM) Thanks guys. Now I just need to find some of those tiny VW terminal connectors. Which check with my local dealer. If it's the narrow spades you are talking about, this should be it: https://www.digikey.com/product-detail/en/t...745CT-ND/456662 |
|
|
|
| doug_b_928 |
Feb 12 2018, 09:44 AM
Post
#35
|
|
Senior Member Group: Members Posts: 714 Joined: 17-January 13 From: Winnipeg Member No.: 15,382 Region Association: Canada |
Thanks very much Brent. Do you know how to identify the other connectors and insulators for our harness at digikey? Figure if I have to pay shipping might as well get the other items as well instead of splicing in pieces from my spare 74 harness.
|
|
|
|
| gothspeed |
Feb 12 2018, 10:04 AM
Post
#36
|
|
Senior Member Group: Members Posts: 1,539 Joined: 3-February 09 From: SoCal Member No.: 10,019 Region Association: None |
The white striped ground wire comes from the driver side door switch. The constant ground and the white striped ground go to the 'switch side' of the dome light.
|
|
|
|
| bbrock |
Feb 12 2018, 10:04 AM
Post
#37
|
|
914 Guru Group: Members Posts: 5,269 Joined: 17-February 17 From: Montana Member No.: 20,845 Region Association: Rocky Mountains |
QUOTE(doug_b_928 @ Feb 12 2018, 08:44 AM) Thanks very much Brent. Do you know how to identify the other connectors and insulators for our harness at digikey? Figure if I have to pay shipping might as well get the other items as well instead of splicing in pieces from my spare 74 harness. 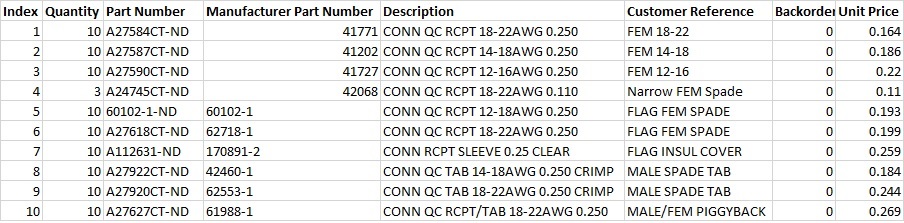 I found the 18-22g terminals work well for the most common wire sizes in the harness. The 14-18g is a little large for the 1.0mm wire. Digikey will also pop small size orders in a USPS envelope so you can keep shipping very cheap. |
|
|
|
| doug_b_928 |
Feb 12 2018, 01:16 PM
Post
#38
|
|
Senior Member Group: Members Posts: 714 Joined: 17-January 13 From: Winnipeg Member No.: 15,382 Region Association: Canada |
Awesome, thanks!
|
|
|
|
| doug_b_928 |
Feb 13 2018, 09:25 PM
Post
#39
|
|
Senior Member Group: Members Posts: 714 Joined: 17-January 13 From: Winnipeg Member No.: 15,382 Region Association: Canada |
Thanks to Brent I'll be ordering new connectors from digikey tomorrow. In the meantime, the next thing I'm not sure about is the heater light. When I got my car way back when the cover was present and just stuck to the 'astro terf' that was used as carpet... So, not only having a proper interior light but also having a correct and working heater light will be a thrill for me after all of these years. I have a new heater light. Here is the base on the bottom:
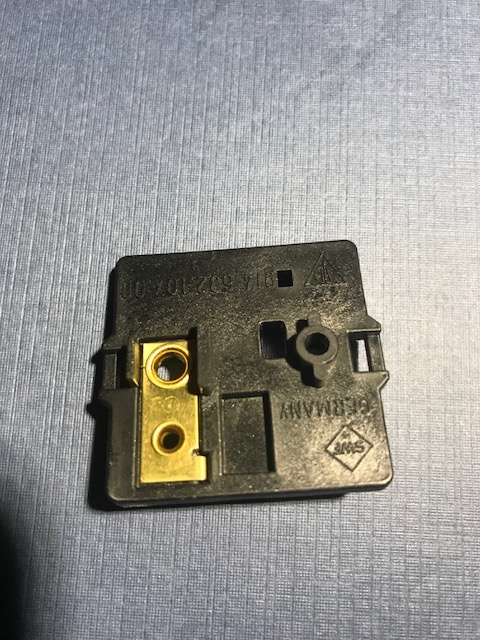 and the topside of the base: 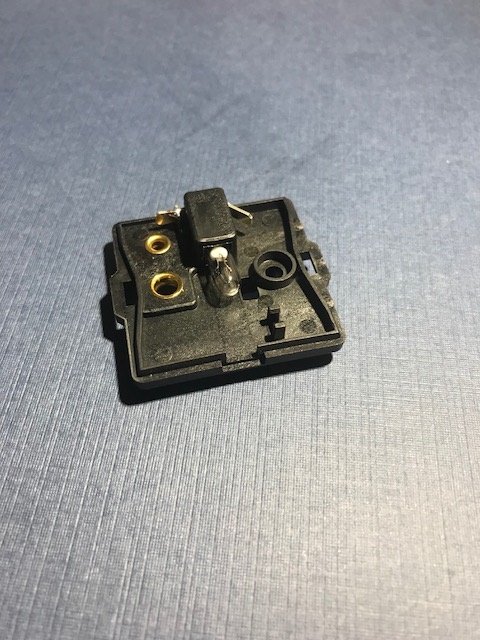 I've already installed a new bulb. I understand from the wiring diagram that a power wire and ground wire will come from the center console gauges. There's a diagram on Jeff's website that appears to be from a different year, but it shows a connector for the ground that would appear to fit under a screw. But in looking at the light base it appears that there are male spades to receive female wire connectors for both positive and ground. So, today's question is, what is the correct connection for this light base? Should a ground wire go directly to the spade connector, or should it go under the screw holding the base down? |
|
|
|
| doug_b_928 |
Feb 13 2018, 09:54 PM
Post
#40
|
|
Senior Member Group: Members Posts: 714 Joined: 17-January 13 From: Winnipeg Member No.: 15,382 Region Association: Canada |
Another quicker question: I think my car has the harness for the interval wiper motor relay, but did not have a relay. Did all 72-76 cars come with the wiring for it and only the relay itself and hook up was optional? Or, did it have to come with the full option to get the wiring? Hope that makes sense.
PS Jeff's website has a really nice summary of how to hook up the relay. |
|
|
|
|
1 User(s) are reading this topic (1 Guests and 0 Anonymous Users)
0 Members:

|
Lo-Fi Version | Time is now: 16th July 2025 - 07:11 PM |
Invision Power Board
v9.1.4 © 2025 IPS, Inc.