|
|
|
Porsche, and the Porsche crest are registered trademarks of Dr. Ing. h.c. F. Porsche AG.
This site is not affiliated with Porsche in any way. Its only purpose is to provide an online forum for car enthusiasts. All other trademarks are property of their respective owners. |
|
|

  |

| Biggles |
 Jun 4 2018, 04:28 AM Jun 4 2018, 04:28 AM
Post
#1
|
|
Member  Group: Members Posts: 205 Joined: 5-September 13 From: UK Member No.: 16,353 Region Association: England |
Hi. Can anyone please confirm if the headlights should come up (but not be on) when only the side lights come on? I would have thought they should only come up and be on, when the headlights are on?
It’s a 1970 car if that makes a difference? Thanks |
   |

 
|
| toolguy |
Jun 4 2018, 07:23 AM
Post
#2
|
|
Senior Member Group: Members Posts: 1,277 Joined: 2-April 11 From: San Diego / El Cajon Member No.: 12,889 Region Association: Southern California |
Yes. . with stock wiring, headlights come up with headlight switch on position 1 [parking lights only]. .
Note. . in the old days of 914 bras, this was a PITA because if you were driving at dusk and turned on the parking lights, they popped up thru the bra headlight flaps which then waved in the breeze. . simple fix was to move the headlight motor wire from the POS1 to the POS2 connection on the switch. . and wire the fog lights to operate in the POS1 gave you a quasi headlight. . Another interesting item is the 'headlight flasher' mode. . remember when Porsche drivers said Hello by flashing their headlight in the daytime ?? 914's couldn't because while the flasher worked the headlights even when down, they were in fact down and no one could see. . simple fix was to rewire the flasher contacts to operate the fog lights instead. . . . some of the useless superfluous info that still clogs my brain. . |
|
|
|
| Biggles |
Jun 4 2018, 12:48 PM
Post
#3
|
|
Member Group: Members Posts: 205 Joined: 5-September 13 From: UK Member No.: 16,353 Region Association: England |
thanks Toolguy for the confirmation. I've obviously got a stock set up but want to change it as it seems pointless the headlights coming up when only the sides are on.
Good point about the flasher - and yes this will be sorted too so the driving lights can be flashed with the headlights down. Not useless info - someone will always want to know ! |
|
|
|
| Larry.Hubby |
Jun 4 2018, 08:58 PM
Post
#4
|
|
Member who doesn't post much, but has a long time in 914s Group: Members Posts: 191 Joined: 24-November 04 From: Palo Alto, CA Member No.: 3,172 Region Association: Northern California |
If you want details about how to change the wires at the headlight switch to keep the headlights from popping up when the switch is pulled out to just the first notch, have a look at the thread excerpt below:
If, like me, you have an early car that pops up its headlights when the headlight switch is pulled out to the first notch, and have always wished it were not so, here's detail on how to do it. You need to pull the headlight switch out by dropping the fuse panel (make sure you disconnect the battery first) and then unscrewing the headlight switch knob and retaining nut. You can then pull the switch out from behind the dash and let it hang down by its own wires. It should then look like this: 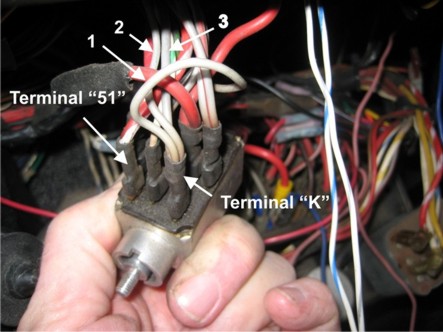 The three numbered light grey wires on terminal “K” are all power feeds for various things. #1 is the power source for the instrument bulbs, #2 is the wire that causes the headlights to pop up, and #3 feeds the optional fog lamp circuit. You can distinguish #2 from #1 and #3 by the diameter of the wire, #1 and #3 being slightly larger than #2. To correct the behavior of the pop-ups, we want to remove wire #2 from terminal “K” and hook it instead to terminal “51” on the opposite side at the front of the switch. Cut wire #2 as close as possible to the connector and crimp on a new female tab connector. Since there are already connections to terminal “51”, the easiest thing to do is use a “piggy-back” connector which provides a second male tab for the wire already on the terminal. If you can find them, there are crimp-on terminals with this feature, but there are also separate piggy-back adaptors, which is what I’ve used here. 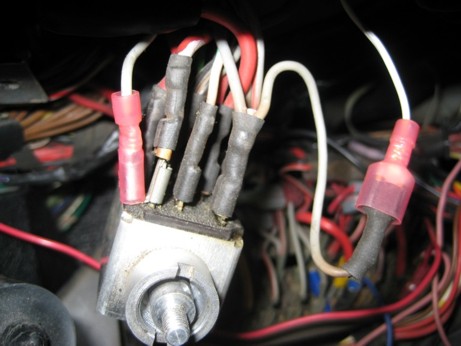 And, since these are hot terminals, I always like to insulate the exposed metal with heat-shrink tubing. 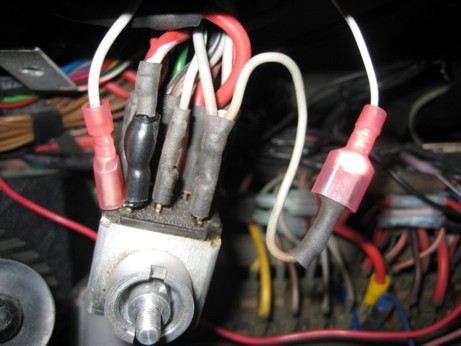 Hope this helps. |
|
|
|
| Biggles |
Jun 5 2018, 01:39 AM
Post
#5
|
|
Member Group: Members Posts: 205 Joined: 5-September 13 From: UK Member No.: 16,353 Region Association: England |
QUOTE(Larry Hubby @ Jun 5 2018, 03:58 AM)  If you want details about how to change the wires at the headlight switch to keep the headlights from popping up when the switch is pulled out to just the first notch, have a look at the thread excerpt below: If, like me, you have an early car that pops up its headlights when the headlight switch is pulled out to the first notch, and have always wished it were not so, here's detail on how to do it. You need to pull the headlight switch out by dropping the fuse panel (make sure you disconnect the battery first) and then unscrewing the headlight switch knob and retaining nut. You can then pull the switch out from behind the dash and let it hang down by its own wires. It should then look like this: The three numbered light grey wires on terminal “K” are all power feeds for various things. #1 is the power source for the instrument bulbs, #2 is the wire that causes the headlights to pop up, and #3 feeds the optional fog lamp circuit. You can distinguish #2 from #1 and #3 by the diameter of the wire, #1 and #3 being slightly larger than #2. To correct the behavior of the pop-ups, we want to remove wire #2 from terminal “K” and hook it instead to terminal “51” on the opposite side at the front of the switch. Cut wire #2 as close as possible to the connector and crimp on a new female tab connector. Since there are already connections to terminal “51”, the easiest thing to do is use a “piggy-back” connector which provides a second male tab for the wire already on the terminal. If you can find them, there are crimp-on terminals with this feature, but there are also separate piggy-back adaptors, which is what I’ve used here. And, since these are hot terminals, I always like to insulate the exposed metal with heat-shrink tubing. Hope this helps. Cheers for the comprehensive reply. V helpful and I’m sure useful for many others |
|
|
|
| rick 918-S |
Jun 5 2018, 03:31 AM
Post
#6
|
|
Hey nice rack! -Celette Group: Members Posts: 21,288 Joined: 30-December 02 From: Now in Superior WI Member No.: 43 Region Association: Northstar Region |
Nice!
|
|
|
|
|
1 User(s) are reading this topic (1 Guests and 0 Anonymous Users)
0 Members:

|
Lo-Fi Version | Time is now: 21st June 2026 - 03:59 AM |
Invision Power Board
v9.1.4 © 2026 IPS, Inc.