|
|
|
Porsche, and the Porsche crest are registered trademarks of Dr. Ing. h.c. F. Porsche AG.
This site is not affiliated with Porsche in any way. Its only purpose is to provide an online forum for car enthusiasts. All other trademarks are property of their respective owners. |
|
|

  |

| jerhofer |
 Oct 25 2018, 02:38 PM Oct 25 2018, 02:38 PM
Post
#121
|
|
Member  Group: Members Posts: 228 Joined: 20-May 18 From: Rockwell, NC Member No.: 22,140 Region Association: South East States |
Since I am waiting for parts for the fuel lines and the wiring, I decided to address the interior. I wasn't happy with the way the fabric was bunched up on the left door pocket. After removing it, I could see that I would have to remove all of the staples, straighten the fabric and then re-staple it. Since I don't have that size of staples, I decided to replace the door pocket with an extra one that came with the car. It is finished in the factory black and has a couple of nicks on the rear end of it. I like the looks of the all black door pocket better as it breaks up all of that gray on the door panel.
(IMG:http://www.914world.com/bbs2/uploads_offsite/i188.photobucket.com-22140-1540499932.1.jpg) (IMG:http://www.914world.com/bbs2/uploads_offsite/i188.photobucket.com-22140-1540499932.2.jpg) (IMG:http://www.914world.com/bbs2/uploads_offsite/i188.photobucket.com-22140-1540499932.3.jpg) (IMG:http://www.914world.com/bbs2/uploads_offsite/i188.photobucket.com-22140-1540499932.4.jpg) |
   |

 
|
| jerhofer |
Oct 25 2018, 03:55 PM
Post
#123
|
|
Member Group: Members Posts: 228 Joined: 20-May 18 From: Rockwell, NC Member No.: 22,140 Region Association: South East States |
The fabric was also loose on the firewall seat panel. To work on it I separated the two sides from the center piece by removing the screws. To totally fix it, I would have had to remove a bunch of staples. So I pulled the fabric back as far as I could from the center of each panel, doused the cardboard panel and the fabric with as much adhesive as I could, waited for the adhesive to become tacky and then used my hands to smooth out the wrinkles from the outside to the center. While it is not perfect, it looks way better than when I started. There was also some loose fabric on the ends of the panel that I re-attached.
(IMG:http://www.914world.com/bbs2/uploads_offsite/i188.photobucket.com-22140-1540504502.1.jpg) (IMG:http://www.914world.com/bbs2/uploads_offsite/i188.photobucket.com-22140-1540504502.2.jpg) (IMG:http://www.914world.com/bbs2/uploads_offsite/i188.photobucket.com-22140-1540504502.3.jpg) (IMG:http://www.914world.com/bbs2/uploads_offsite/i188.photobucket.com-22140-1540504502.4.jpg) (IMG:http://www.914world.com/bbs2/uploads_offsite/i188.photobucket.com-22140-1540504502.5.jpg) (IMG:http://www.914world.com/bbs2/uploads_offsite/i188.photobucket.com-22140-1540504502.6.jpg) |
|
|
|
| raynekat |
Oct 25 2018, 04:05 PM
Post
#124
|
|
Advanced Member Group: Members Posts: 2,170 Joined: 30-December 14 From: Coeur d'Alene, Idaho Member No.: 18,263 Region Association: Pacific Northwest |
You've done a great job on this interior.
And I agree that a bit more black here and there helps to break up the light color. |
|
|
|
| jerhofer |
Oct 25 2018, 04:09 PM
Post
#126
|
|
Member Group: Members Posts: 228 Joined: 20-May 18 From: Rockwell, NC Member No.: 22,140 Region Association: South East States |
QUOTE(raynekat @ Oct 25 2018, 06:05 PM)  You've done a great job on this interior. And I agree that a bit more black here and there helps to break up the light color. Thanks. I have the black lower piece for the right door panel as well. It is in perfect condition. |
|
|
|
| jerhofer |
Oct 26 2018, 02:14 PM
Post
#127
|
|
Member Group: Members Posts: 228 Joined: 20-May 18 From: Rockwell, NC Member No.: 22,140 Region Association: South East States |
I began laying out all of the carpet pieces to see how they fit and to decide in what order they should be installed. The carpet for the tunnel had a very small hole for the shifter and wasn't close to being large enough for the shifter that is in the car. To see how much the hole needed to be enlarged, I removed the shifter so I could slip the carpet over it. I cut four slits into the carpet and then slipped it over the shifter.
(IMG:http://www.914world.com/bbs2/uploads_offsite/i188.photobucket.com-22140-1540584843.1.jpg) (IMG:http://www.914world.com/bbs2/uploads_offsite/i188.photobucket.com-22140-1540584844.2.jpg) (IMG:http://www.914world.com/bbs2/uploads_offsite/i188.photobucket.com-22140-1540584844.3.jpg) Since bumping one's head on the steering wheel is never fun, I removed it. In the process I discovered that it had a nearly two inch spacer. Since I have short legs and relatively long arms, I will probably remove the spacer when I re-install the steering wheel. (IMG:http://www.914world.com/bbs2/uploads_offsite/i188.photobucket.com-22140-1540584845.4.jpg) There were a couple of relays that were dangling under the dash on the left side. In the process of tying them up, I discovered this switch. At first I couldn't figure out what it was for as it has "L" and "R" written on it. Then I realized that it was for the O2 sensor gauge. There was only one gauge but the previous owner had O2 sensors in each side of the exhaust. This switch would allow him to monitor each exhaust separately on one gauge. Pretty clever!!! I won't be using the gauge as the ECU will be monitoring the O2 sensor. (IMG:http://www.914world.com/bbs2/uploads_offsite/i188.photobucket.com-22140-1540584845.5.jpg) |
|
|
|
| jerhofer |
Oct 27 2018, 02:23 PM
Post
#129
|
|
Member Group: Members Posts: 228 Joined: 20-May 18 From: Rockwell, NC Member No.: 22,140 Region Association: South East States |
Before finishing up installing the carpet, I cleaned up the wiring under the dash and installed a different radio. I had this Blaupunkt Brisbane 230 installed in another car. It is very compact as it does not have a CD player. But it does have Bluetooth and both Aux and USB inputs.
(IMG:http://www.914world.com/bbs2/uploads_offsite/i188.photobucket.com-22140-1540671833.1.jpg) (IMG:http://www.914world.com/bbs2/uploads_offsite/i188.photobucket.com-22140-1540671834.2.jpg) (IMG:http://www.914world.com/bbs2/uploads_offsite/i188.photobucket.com-22140-1540671834.3.jpg) With that out of the way, I finished the carpet installation. It was pretty straightforward. Compared to some other cars, the carpet install here was fairly easy and the carpet set from Auto Atlanta fit very well with very few adjustments needed. i did not glue the center sections as I may need access to the shifter and the rest of the tunnel. I am going to try fastening those pieces with Velcro. (IMG:http://www.914world.com/bbs2/uploads_offsite/i188.photobucket.com-22140-1540671834.4.jpg) (IMG:http://www.914world.com/bbs2/uploads_offsite/i188.photobucket.com-22140-1540671834.5.jpg) (IMG:http://www.914world.com/bbs2/uploads_offsite/i188.photobucket.com-22140-1540671834.6.jpg) (IMG:http://www.914world.com/bbs2/uploads_offsite/i188.photobucket.com-22140-1540671834.7.jpg) |
|
|
|
| raynekat |
Oct 28 2018, 02:01 PM
Post
#130
|
|
Advanced Member Group: Members Posts: 2,170 Joined: 30-December 14 From: Coeur d'Alene, Idaho Member No.: 18,263 Region Association: Pacific Northwest |
It all looks super great.
The only thing I might have changed was putting black vinyl at the very top of the door cards....but that's being very picky. Nice work! |
|
|
|
| jerhofer |
Oct 28 2018, 03:30 PM
Post
#131
|
|
Member Group: Members Posts: 228 Joined: 20-May 18 From: Rockwell, NC Member No.: 22,140 Region Association: South East States |
QUOTE(raynekat @ Oct 28 2018, 04:01 PM) It all looks super great. The only thing I might have changed was putting black vinyl at the very top of the door cards....but that's being very picky. Nice work! I like that idea and will look into it. |
|
|
|
| IronHillRestorations |
Oct 28 2018, 03:50 PM
Post
#132
|
|
I. I. R. C. Group: Members Posts: 6,898 Joined: 18-March 03 From: West TN Member No.: 439 Region Association: None |
QUOTE(raynekat @ Oct 28 2018, 12:01 PM) It all looks super great. The only thing I might have changed was putting black vinyl at the very top of the door cards....but that's being very picky. Nice work! I thought the same thing years ago when we did the gray interior. Adding the black adds nice contrast. You're doing a bang up job on the interior! |
|
|
|
| jerhofer |
Oct 28 2018, 07:18 PM
Post
#133
|
|
Member Group: Members Posts: 228 Joined: 20-May 18 From: Rockwell, NC Member No.: 22,140 Region Association: South East States |
QUOTE(IronHillRestorations @ Oct 28 2018, 05:50 PM) QUOTE(raynekat @ Oct 28 2018, 12:01 PM) It all looks super great. The only thing I might have changed was putting black vinyl at the very top of the door cards....but that's being very picky. Nice work! I thought the same thing years ago when we did the gray interior. Adding the black adds nice contrast. You're doing a bang up job on the interior! I looked at the rear of the panel and everything is stapled in place. Not sure I want to tackle that. However, I used some spray dye on the dash of the '64 Corvette that I restored and it turned out great. After masking off the rest of the panel, that may work. Have to think about that. Thanks for the compliment. |
|
|
|
| mepstein |
Oct 28 2018, 07:55 PM
Post
#134
|
|
914-6 GT in waiting Group: Members Posts: 20,290 Joined: 19-September 09 From: Landenberg, PA/Wilmington, DE Member No.: 10,825 Region Association: MidAtlantic Region |
QUOTE(jerhofer @ Oct 28 2018, 09:18 PM) QUOTE(IronHillRestorations @ Oct 28 2018, 05:50 PM) QUOTE(raynekat @ Oct 28 2018, 12:01 PM) It all looks super great. The only thing I might have changed was putting black vinyl at the very top of the door cards....but that's being very picky. Nice work! I thought the same thing years ago when we did the gray interior. Adding the black adds nice contrast. You're doing a bang up job on the interior! I looked at the rear of the panel and everything is stapled in place. Not sure I want to tackle that. However, I used some spray dye on the dash of the '64 Corvette that I restored and it turned out great. After masking off the rest of the panel, that may work. Have to think about that. Thanks for the compliment. The bolster is only removable on the very early ('70) cars. Attached image(s) 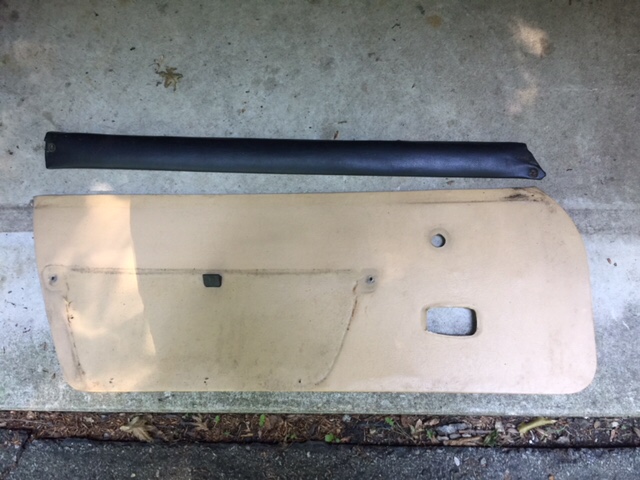
|
|
|
|
| jerhofer |
Oct 29 2018, 02:11 PM
Post
#136
|
|
Member Group: Members Posts: 228 Joined: 20-May 18 From: Rockwell, NC Member No.: 22,140 Region Association: South East States |
Chris Foley's spring for the fuel line and my inline fuel filter arrived Saturday. I cut the line, inserted the spring and fastened the fuel filter in place. The fuel filter is a billet piece that has a replaceable element.
(IMG:http://www.914world.com/bbs2/uploads_offsite/i188.photobucket.com-22140-1540843891.1.jpg) (IMG:http://www.914world.com/bbs2/uploads_offsite/i188.photobucket.com-22140-1540843891.2.jpg) (IMG:http://www.914world.com/bbs2/uploads_offsite/i188.photobucket.com-22140-1540843891.3.jpg) (IMG:http://www.914world.com/bbs2/uploads_offsite/i188.photobucket.com-22140-1540843891.4.jpg) |
|
|
|
| jerhofer |
Oct 30 2018, 02:00 PM
Post
#137
|
|
Member Group: Members Posts: 228 Joined: 20-May 18 From: Rockwell, NC Member No.: 22,140 Region Association: South East States |
I spent the morning crimping on the new terminals on the wiring harness. After lunch I replaced a leaky propane gas line on the motorhome. I also received a call from my powder coater telling me the boomerang was ready. For the princely sum of $5, it looks like new.
(IMG:http://www.914world.com/bbs2/uploads_offsite/i188.photobucket.com-22140-1540929626.1.jpg) My clips for the passenger door panel arrived in today's mail so I could re-install it. I used the black lower armrest part in place of the light gray one. (IMG:http://www.914world.com/bbs2/uploads_offsite/i188.photobucket.com-22140-1540929626.2.jpg) (IMG:http://www.914world.com/bbs2/uploads_offsite/i188.photobucket.com-22140-1540929626.3.jpg) (IMG:http://www.914world.com/bbs2/uploads_offsite/i188.photobucket.com-22140-1540929626.4.jpg) |
|
|
|
| mepstein |
Oct 30 2018, 02:05 PM
Post
#138
|
|
914-6 GT in waiting Group: Members Posts: 20,290 Joined: 19-September 09 From: Landenberg, PA/Wilmington, DE Member No.: 10,825 Region Association: MidAtlantic Region |
Car looks great! (IMG:style_emoticons/default/beerchug.gif)
|
|
|
|
| TravisNeff |
Oct 30 2018, 02:37 PM
Post
#139
|
|
914 Guru Group: Members Posts: 5,082 Joined: 20-March 03 From: Mesa, AZ Member No.: 447 Region Association: Southwest Region |
Looking very nice. I admire your attention to detail.
|
|
|
|
| Dion |
Oct 30 2018, 03:12 PM
Post
#140
|
|
RN Group: Members Posts: 2,920 Joined: 16-September 04 From: Audubon,PA Member No.: 2,766 Region Association: MidAtlantic Region |
I like your interior trim colours. Very cool.
I’ll have to pm you about your fuel filter set up. Interested in that layout. Keep up the great work |
|
|
|
|
1 User(s) are reading this topic (1 Guests and 0 Anonymous Users)
0 Members:

|
Lo-Fi Version | Time is now: 16th December 2025 - 08:39 AM |
Invision Power Board
v9.1.4 © 2025 IPS, Inc.