|
|
|
Porsche, and the Porsche crest are registered trademarks of Dr. Ing. h.c. F. Porsche AG.
This site is not affiliated with Porsche in any way. Its only purpose is to provide an online forum for car enthusiasts. All other trademarks are property of their respective owners. |
|
|

  |

| SirAndy |
 Nov 26 2018, 04:00 PM Nov 26 2018, 04:00 PM
Post
#181
|
|
Resident German  Group: Admin Posts: 42,373 Joined: 21-January 03 From: Oakland, Kalifornia Member No.: 179 Region Association: Northern California |
QUOTE(jerhofer @ Nov 26 2018, 01:50 PM)  In anticipation of installing the engine, I installed the transmission mounts. I think you have the upper brackets upside down, they should look like this: (IMG:http://www.914world.com/bbs2/uploads/post-13474-1507393189_thumb.jpg) |
   |

 
|
| jerhofer |
Nov 26 2018, 04:29 PM
Post
#182
|
|
Member Group: Members Posts: 228 Joined: 20-May 18 From: Rockwell, NC Member No.: 22,140 Region Association: South East States |
QUOTE(SirAndy @ Nov 26 2018, 06:00 PM) QUOTE(jerhofer @ Nov 26 2018, 01:50 PM) In anticipation of installing the engine, I installed the transmission mounts. I think you have the upper brackets upside down, they should look like this: (IMG:http://www.914world.com/bbs2/uploads/post-13474-1507393189_thumb.jpg) Thanks for the tip. |
|
|
|
| jerhofer |
Nov 27 2018, 02:51 PM
Post
#183
|
|
Member Group: Members Posts: 228 Joined: 20-May 18 From: Rockwell, NC Member No.: 22,140 Region Association: South East States |
With the help of a tip about the incorrect placement of the top part of the transmission mount, I rectified that today.
(IMG:http://www.914world.com/bbs2/uploads_offsite/i188.photobucket.com-22140-1543351907.1.jpg) My son was correct in that The Driveshaft Shop had the correct M10 1.5x50mm CV bolts. I picked them up this morning. This afternoon, I assembled the left axle. I began by removing the flange from the rear trailing arm. I then chased the threads and applied the gasket. (IMG:http://www.914world.com/bbs2/uploads_offsite/i188.photobucket.com-22140-1543351908.2.jpg) After placing the boot on the axle, placing lots of grease in it and in the CV joint, I slid the joint on the axle. Instead of a snap ring at the end of the axle, this one used a type of ring that you basically spread out and then screw it onto the axle. (IMG:http://www.914world.com/bbs2/uploads_offsite/i188.photobucket.com-22140-1543351909.3.jpg) (IMG:http://www.914world.com/bbs2/uploads_offsite/i188.photobucket.com-22140-1543351909.4.jpg) (IMG:http://www.914world.com/bbs2/uploads_offsite/i188.photobucket.com-22140-1543351910.5.jpg) With that in place, I bolted the CV to the flange using the bolts with a schnoor washer. I had to insert the flange in the trailing arm and apply the parking brake so I could torque the bolts to 34ft lb. (IMG:http://www.914world.com/bbs2/uploads_offsite/i188.photobucket.com-22140-1543351910.6.jpg) (IMG:http://www.914world.com/bbs2/uploads_offsite/i188.photobucket.com-22140-1543351910.7.jpg) After removing the axle from the car, I assembled the CV joint on the other end. Since I had separated the boot from the flange, I had to re-install it using a crimp style hose clamp with a pinch crimper. (IMG:http://www.914world.com/bbs2/uploads_offsite/i188.photobucket.com-22140-1543351911.8.jpg) (IMG:http://www.914world.com/bbs2/uploads_offsite/i188.photobucket.com-22140-1543351911.9.jpg) With everything installed, I cleaned up the axle and boots. Since these axles are marked left and right, I ran off a "Left" label and applied it to the axle. Again I robbed my wife's clear finger nail polish to permanently secure the label to the axle. (IMG:http://www.914world.com/bbs2/uploads_offsite/i188.photobucket.com-22140-1543351912.10.jpg) Tomorrow I will assemble the right axle, install both of them in the car and get ready for the engine installation. Getting very close now!! |
|
|
|
| 914forme |
Nov 28 2018, 01:44 PM
Post
#184
|
|
Times a wastin', get wrenchin'! Group: Members Posts: 3,896 Joined: 24-July 04 From: Dayton, Ohio Member No.: 2,388 Region Association: None |
Nice job
I will let you know I have since upgraded all my CV Bolts to accept safety wire. I had a set of bolts back out once, and never want to make that mistake again. Over kill yes, now Murphy gets to mess with other areas of my cars. Right now that would be the fact that I like taking them apart. (IMG:style_emoticons/default/poke.gif) |
|
|
|
| jerhofer |
Nov 28 2018, 02:18 PM
Post
#185
|
|
Member Group: Members Posts: 228 Joined: 20-May 18 From: Rockwell, NC Member No.: 22,140 Region Association: South East States |
QUOTE(914forme @ Nov 28 2018, 03:44 PM) Nice job I will let you know I have since upgraded all my CV Bolts to accept safety wire. I had a set of bolts back out once, and never want to make that mistake again. Over kill yes, now Murphy gets to mess with other areas of my cars. Right now that would be the fact that I like taking them apart. (IMG:style_emoticons/default/poke.gif) I need to make a reminder on my computer to check the bolts again after I have driven the car a bit. |
|
|
|
| jerhofer |
Nov 28 2018, 02:41 PM
Post
#186
|
|
Member Group: Members Posts: 228 Joined: 20-May 18 From: Rockwell, NC Member No.: 22,140 Region Association: South East States |
I finished up the right axle today. In Lucky9146's thread, I saw that he used a piece of conduit run from one shock to the other as a place to tie up the axles. I had a piece of threaded rod that was the right length and tied the axles to it.
(IMG:http://www.914world.com/bbs2/uploads_offsite/i188.photobucket.com-22140-1543437680.1.jpg) (IMG:http://www.914world.com/bbs2/uploads_offsite/i188.photobucket.com-22140-1543437680.2.jpg) I found the courage to hook up the power to the ECU. Electromotive's software for the Wintec GT200 only works with Windows. I asked my son if I could borrow his laptop when the time came to plug into a computer. He told me about a program called Parallels that would allow me to install Windows on my MacPro. The program worked as he said it would. I fired up the program, plugged the USB cord, and turned on the ignition. And I was rewarded with the program finding the ECU!! That was a relief. (IMG:http://www.914world.com/bbs2/uploads_offsite/i188.photobucket.com-22140-1543437680.3.jpg) (IMG:http://www.914world.com/bbs2/uploads_offsite/i188.photobucket.com-22140-1543437680.4.jpg) (IMG:http://www.914world.com/bbs2/uploads_offsite/i188.photobucket.com-22140-1543437680.5.jpg) I rolled the motor and tranny under the car. My buddy Reese will be here tomorrow at 9:00 and we will see about getting this bad boy into the car!!! Prayers would be appreciated!! (IMG:http://www.914world.com/bbs2/uploads_offsite/i188.photobucket.com-22140-1543437680.6.jpg) (IMG:http://www.914world.com/bbs2/uploads_offsite/i188.photobucket.com-22140-1543437681.7.jpg) |
|
|
|
| IronHillRestorations |
Nov 28 2018, 10:14 PM
Post
#187
|
|
I. I. R. C. Group: Members Posts: 6,899 Joined: 18-March 03 From: West TN Member No.: 439 Region Association: None |
Lock and Load!
|
|
|
|
| ChrisFoley |
Nov 28 2018, 10:19 PM
Post
#188
|
|
I am Tangerine Racing Group: Members Posts: 8,016 Joined: 29-January 03 From: Bolton, CT Member No.: 209 Region Association: None |
Question,
is there a recess for those CV gaskets so metal to metal contact is achieved when the bolts are tightened? If not, the gasket will squeeze out and allow the bolts to lose torque. |
|
|
|
| jerhofer |
Nov 29 2018, 06:12 AM
Post
#189
|
|
Member Group: Members Posts: 228 Joined: 20-May 18 From: Rockwell, NC Member No.: 22,140 Region Association: South East States |
QUOTE(ChrisFoley @ Nov 29 2018, 12:19 AM) Question, is there a recess for those CV gaskets so metal to metal contact is achieved when the bolts are tightened? If not, the gasket will squeeze out and allow the bolts to lose torque. There is no recess. |
|
|
|
| jerhofer |
Nov 29 2018, 03:34 PM
Post
#190
|
|
Member Group: Members Posts: 228 Joined: 20-May 18 From: Rockwell, NC Member No.: 22,140 Region Association: South East States |
The engine is in!!! Took the two of us a couple hours to finagle it into position. It was really close on each side at the upper shock bolt. The tin in those areas was bent previously in that area and now I know why. But the plus side is that we knew we had th engine centered in the engine bay as it was rubbing on both sides. I had to unplug the center COP connector for clearance. At the rear, we had to remove the transmission mounts and then re-mount it once we had the transmission closer to being in the proper place.
(IMG:http://www.914world.com/bbs2/uploads_offsite/i188.photobucket.com-22140-1543527250.1.jpg) (IMG:http://www.914world.com/bbs2/uploads_offsite/i188.photobucket.com-22140-1543527250.2.jpg) (IMG:http://www.914world.com/bbs2/uploads_offsite/i188.photobucket.com-22140-1543527250.3.jpg) (IMG:http://www.914world.com/bbs2/uploads_offsite/i188.photobucket.com-22140-1543527250.4.jpg) (IMG:http://www.914world.com/bbs2/uploads_offsite/i188.photobucket.com-22140-1543527250.5.jpg) (IMG:http://www.914world.com/bbs2/uploads_offsite/i188.photobucket.com-22140-1543527251.6.jpg) (IMG:http://www.914world.com/bbs2/uploads_offsite/i188.photobucket.com-22140-1543527251.7.jpg) |
|
|
|
| ndfrigi |
Nov 29 2018, 05:38 PM
Post
#192
|
|
Advanced Member Group: Members Posts: 2,970 Joined: 21-August 11 From: Orange County Member No.: 13,474 Region Association: Southern California |
QUOTE(jerhofer @ Nov 26 2018, 02:29 PM) QUOTE(SirAndy @ Nov 26 2018, 06:00 PM) QUOTE(jerhofer @ Nov 26 2018, 01:50 PM) In anticipation of installing the engine, I installed the transmission mounts. I think you have the upper brackets upside down, they should look like this: (IMG:http://www.914world.com/bbs2/uploads/post-13474-1507393189_thumb.jpg) Thanks for the tip. wait i know that tranny! hehehe my 75 1.8 after I installed that tranny. Well Stacey owned the car since last June 2017. Your car is almost there to be driven! That is a fast project after you bought it from your family friend. I’m sure the previous owner would love to see it after your done with it. |
|
|
|
| jerhofer |
Dec 1 2018, 03:28 PM
Post
#193
|
|
Member Group: Members Posts: 228 Joined: 20-May 18 From: Rockwell, NC Member No.: 22,140 Region Association: South East States |
First thing yesterday I hooked up the heater cables.
(IMG:http://www.914world.com/bbs2/uploads_offsite/i188.photobucket.com-22140-1543699686.1.jpg) The day became more complicated once I began installing the axles. I had placed the axles in the trailing arms prior to installing the motor. I torqued the CV bolts and the main axle nut. Now I was ready to attach the CV's to the transmission flange. When I went to turn the hub to line up the CV bolt holes, it would not move. I checked to make sure the parking brake was off and it was. After considering things for a bit, I backed out the outer CV bolts and the hub would move. To test what bolt size would work, I placed some washers on the bolts to effectively make the bolts shorter. Even then, after trying different combinations of washers, I still was having an issue with everything locking up. At this point I decided the axle had to come out of the trailing arm. There wasn't room to take the axle out with the CV joined to the flange so I separated them and pulled the axle out separately. With the axle out, I could see that there wasn't much clearance between the rear of the flange and the inside of the trailing arm and could see where the paint had been rubbed off when turning the flange with no axle attached. At this point I wasn't sure what to do. I wondered it I could shim the flange away from the inside of trailing arm. To check on that, I called Chris Foley. He had never heard of someone having this issue before but, then again, he hadn't dealt with the axles and flanges that were being used here. He did not think it would be a good idea to shim the flange. He also reiterated his concern about using the CV gaskets. He said there were some applications that called for these gaskets but not with the CV's that I was using. I thanked him for his help and suggestions. The end of yesterday saw me driving to The Driveshaft Shop to get twelve 45mm bolts to replace the 50mm bolts I was using. The 50mm bolts worked on the transmission flange as there was plenty of clearance on the rear of them. This morning I removed all of the gaskets. To give a bit more clearance on the rear of the flange, I broke out the die grinder and took a bit off the outer edge and at each threaded hole. I installed the outer flange and maneuvered the axle into place. To line up the holes, I used a small pick to find the hole. To raise the bottom of the CV a bit, I stuck a thin screwdriver between the flange and the trailing arm. Once I got that first bolt started, I used the pick to find the second hole opposite that first bolt. With that bolt started, it was a simple matter to start the rest of the bolts. I torqued the bolts to spec and torqued the axle nut and, voila, I was able to turn the hub. Success. Now I could installed the CV on the transmission flange. I repeated this on the other side. This whole process took up my entire day. There were many trips and down my ladder to engage and dis-engage the parking brake. So I am a bit behind on getting the car ready to start but am relieved that I have a job completed that I knew was going to be an issue since everything here was modified. And, as anyone knows who works with CV joints, I spent a good bit of time cleaning up my counter, my tools and me!! (IMG:http://www.914world.com/bbs2/uploads_offsite/i188.photobucket.com-22140-1543699686.2.jpg) (IMG:http://www.914world.com/bbs2/uploads_offsite/i188.photobucket.com-22140-1543699686.3.jpg) (IMG:http://www.914world.com/bbs2/uploads_offsite/i188.photobucket.com-22140-1543699686.4.jpg) |
|
|
|
| mepstein |
Dec 1 2018, 06:14 PM
Post
#194
|
|
914-6 GT in waiting Group: Members Posts: 20,291 Joined: 19-September 09 From: Landenberg, PA/Wilmington, DE Member No.: 10,825 Region Association: MidAtlantic Region |
Thanks for all the pics and commentary. Glad to see you are working things out.
This line looks a bit concerning but may be just the perspective. Attached image(s) 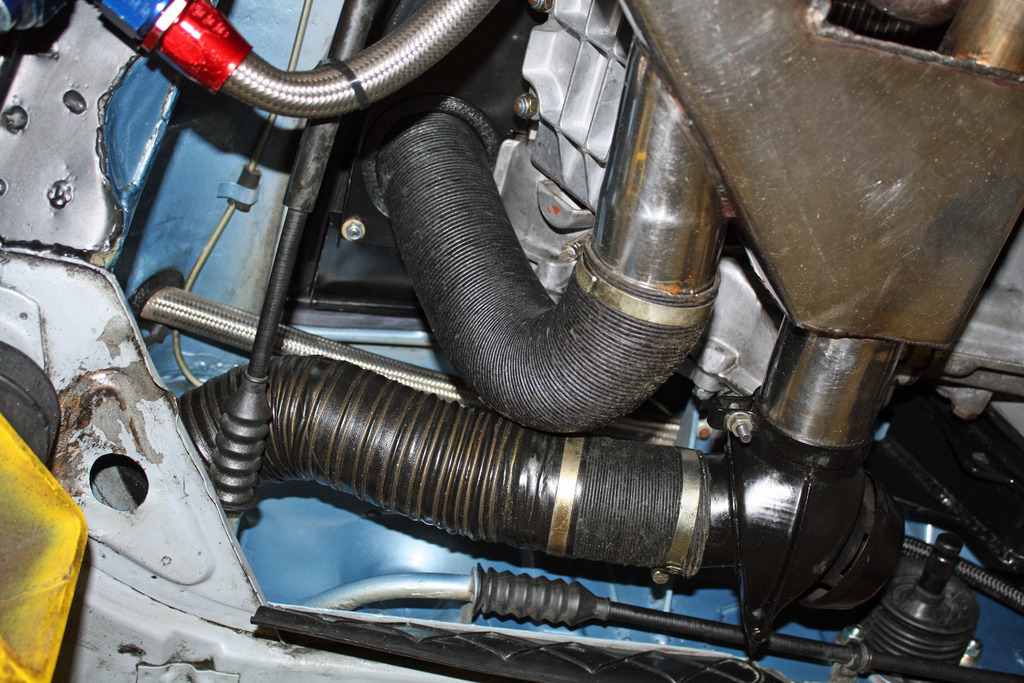
|
|
|
|
| Cairo94507 |
Dec 1 2018, 06:42 PM
Post
#195
|
|
Michael Group: Members Posts: 10,525 Joined: 1-November 08 From: Auburn, CA Member No.: 9,712 Region Association: Northern California |
Nice work. Speaking of oil lines, I really like the oil drain valve you installed in the line to make oil changes quick and simple without breaking loose the main line connection. I want to add something like that to my oil line as I remember well changing the oil on my other two sixes and having to break that main fitting loose to drain the oil. I would prefer not to have to disturb that connection once it is made and it does not leak. (IMG:style_emoticons/default/beerchug.gif)
|
|
|
|
| mepstein |
Dec 1 2018, 06:48 PM
Post
#196
|
|
914-6 GT in waiting Group: Members Posts: 20,291 Joined: 19-September 09 From: Landenberg, PA/Wilmington, DE Member No.: 10,825 Region Association: MidAtlantic Region |
I did that kind of fitting on my car. Our race car tech liked it but told me not to run it until I safety wire it.
Although it points straight down in this pic, I set it up so the exit on the T is parallel to the ground. Attached image(s) 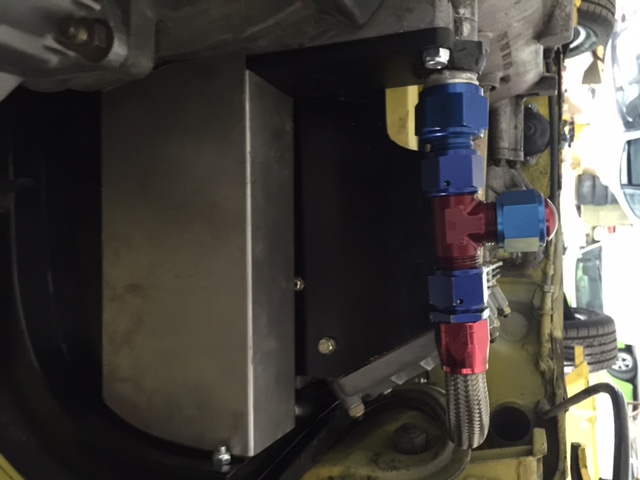
|
|
|
|
| Cairo94507 |
Dec 1 2018, 07:04 PM
Post
#197
|
|
Michael Group: Members Posts: 10,525 Joined: 1-November 08 From: Auburn, CA Member No.: 9,712 Region Association: Northern California |
The safety wire tip is a good one for sure. (IMG:style_emoticons/default/beerchug.gif)
|
|
|
|
| jerhofer |
Dec 1 2018, 08:27 PM
Post
#198
|
|
Member Group: Members Posts: 228 Joined: 20-May 18 From: Rockwell, NC Member No.: 22,140 Region Association: South East States |
QUOTE(Cairo94507 @ Dec 1 2018, 08:42 PM) Nice work. Speaking of oil lines, I really like the oil drain valve you installed in the line to make oil changes quick and simple without breaking loose the main line connection. I want to add something like that to my oil line as I remember well changing the oil on my other two sixes and having to break that main fitting loose to drain the oil. I would prefer not to have to disturb that connection once it is made and it does not leak. (IMG:style_emoticons/default/beerchug.gif) It was there when I bought the car. It is kind of hanging now. I need to make a bracket for it to secure it better. |
|
|
|
| jerhofer |
Dec 1 2018, 08:32 PM
Post
#199
|
|
Member Group: Members Posts: 228 Joined: 20-May 18 From: Rockwell, NC Member No.: 22,140 Region Association: South East States |
QUOTE(mepstein @ Dec 1 2018, 08:14 PM) Thanks for all the pics and commentary. Glad to see you are working things out. This line looks a bit concerning but may be just the perspective. It is OK but like I said in the comment above, I do want to secure it better. (IMG:http://www.914world.com/bbs2/uploads_offsite/i188.photobucket.com-22140-1543717926.1.jpg) |
|
|
|
| 914forme |
Dec 1 2018, 08:48 PM
Post
#200
|
|
Times a wastin', get wrenchin'! Group: Members Posts: 3,896 Joined: 24-July 04 From: Dayton, Ohio Member No.: 2,388 Region Association: None |
You can use all sorts of other methods, but safety wire is the king and is why it is still used and sanctioned by racing organizations. Just remember to make sure to wire it in the right direction.
|
|
|
|
|
2 User(s) are reading this topic (2 Guests and 0 Anonymous Users)
0 Members:

|
Lo-Fi Version | Time is now: 17th December 2025 - 03:48 AM |
Invision Power Board
v9.1.4 © 2025 IPS, Inc.