|
|
|
Porsche, and the Porsche crest are registered trademarks of Dr. Ing. h.c. F. Porsche AG.
This site is not affiliated with Porsche in any way. Its only purpose is to provide an online forum for car enthusiasts. All other trademarks are property of their respective owners. |
|
|

  |

| jerhofer |
 Jun 18 2018, 03:23 PM Jun 18 2018, 03:23 PM
Post
#21
|
|
Member  Group: Members Posts: 228 Joined: 20-May 18 From: Rockwell, NC Member No.: 22,140 Region Association: South East States |
There was some surface rust in the battery tray. I don't understand why it was rusty as you can plainly see the outline of the Optima battery. I used a wire brush and some light sanding on the affected areas. I then applied a coat of POR15 to the area where the battery sits. This stuff dries as hard as a rock and is to be used directly over rusty areas to prevent further rust. I plan on using a sealed battery as well and this treatment should prevent future issues.
(IMG:http://www.914world.com/bbs2/uploads_offsite/i188.photobucket.com-22140-1529356992.1.jpg) (IMG:http://www.914world.com/bbs2/uploads_offsite/i188.photobucket.com-22140-1529356992.2.jpg) With that done, I spent the remainder of the afternoon cleaning the engine. I removed the intake manifolds so I could do a better job of cleaning them separately. Looks better but I still have a ways to go. I need to order the seals for the "holy trinity" of oil leaks at the rear of the motor. Now is the time to make sure it doesn't leak. When I adjust the valves, I will be installing new seals on the valve covers. (IMG:http://www.914world.com/bbs2/uploads_offsite/i188.photobucket.com-22140-1529356993.3.jpg) (IMG:http://www.914world.com/bbs2/uploads_offsite/i188.photobucket.com-22140-1529356993.4.jpg) (IMG:http://www.914world.com/bbs2/uploads_offsite/i188.photobucket.com-22140-1529356993.5.jpg) (IMG:http://www.914world.com/bbs2/uploads_offsite/i188.photobucket.com-22140-1529356993.6.jpg) (IMG:http://www.914world.com/bbs2/uploads_offsite/i188.photobucket.com-22140-1529356994.7.jpg) |
   |

 
|
| Dion |
Jun 18 2018, 03:34 PM
Post
#22
|
|
RN Group: Members Posts: 2,926 Joined: 16-September 04 From: Audubon,PA Member No.: 2,766 Region Association: MidAtlantic Region |
That’s a beautiful 14! What colour is that?
It looks almost like Marathon blue but not quite. Nice power plant as well. Having been in 914Daves car this past weekend, wow that 3.2 has plenty of kick. Enjoy! Really nice. |
|
|
|
| jerhofer |
Jun 18 2018, 04:38 PM
Post
#23
|
|
Member Group: Members Posts: 228 Joined: 20-May 18 From: Rockwell, NC Member No.: 22,140 Region Association: South East States |
QUOTE(Dion @ Jun 18 2018, 05:34 PM)  That’s a beautiful 14! What colour is that? It looks almost like Marathon blue but not quite. Nice power plant as well. Having been in 914Daves car this past weekend, wow that 3.2 has plenty of kick. Enjoy! Really nice. Thanks. It is not marathon blue, but, as you say, it is close. It is a GM color. |
|
|
|
| mepstein |
Jun 18 2018, 05:11 PM
Post
#24
|
|
914-6 GT in waiting Group: Members Posts: 20,696 Joined: 19-September 09 From: Landenberg, PA/Wilmington, DE Member No.: 10,825 Region Association: MidAtlantic Region |
Looking forward to the trim restore. It’s a weak point on a lot of our cars. New costs a fortune.
|
 |
|
| jerhofer |
Jun 21 2018, 04:10 PM
Post
#26
|
|
Member Group: Members Posts: 228 Joined: 20-May 18 From: Rockwell, NC Member No.: 22,140 Region Association: South East States |
To make the 9" wheels work on the rear, I needed to install longer wheel studs. First I had to remove them. I found a stud remover on eBay. It is huge but worked great.
Because it is so heavy duty, I could use my impact wrench. (IMG:http://www.914world.com/bbs2/uploads_offsite/i188.photobucket.com-22140-1529619045.1.jpg) (IMG:http://www.914world.com/bbs2/uploads_offsite/i188.photobucket.com-22140-1529619045.2.jpg) (IMG:http://www.914world.com/bbs2/uploads_offsite/i188.photobucket.com-22140-1529619045.3.jpg) I found a tool at O'Reilly's for installing studs. It has a ball bearing that rests against the flange. This allows it to turn when you are tightening down the stud rather than have the nut dig into the flange or a washer. It also worked very well and could be used with the impact wrench. (IMG:http://www.914world.com/bbs2/uploads_offsite/i188.photobucket.com-22140-1529619046.4.jpg) (IMG:http://www.914world.com/bbs2/uploads_offsite/i188.photobucket.com-22140-1529619046.5.jpg) (IMG:http://www.914world.com/bbs2/uploads_offsite/i188.photobucket.com-22140-1529619046.6.jpg) (IMG:http://www.914world.com/bbs2/uploads_offsite/i188.photobucket.com-22140-1529619046.7.jpg) With the studs in place, I could install the new 914-6 rotors and the rebuilt 914 calipers. I am missing one hard brake line so I will have to do some digging through the tons of parts that I got with the car to see if it is there. (IMG:http://www.914world.com/bbs2/uploads_offsite/i188.photobucket.com-22140-1529619046.8.jpg) |
|
|
|
| jerhofer |
Jun 22 2018, 03:05 PM
Post
#27
|
|
Member Group: Members Posts: 228 Joined: 20-May 18 From: Rockwell, NC Member No.: 22,140 Region Association: South East States |
I finished up the rear brakes by installing the pads and the hard brake lines.
(IMG:http://www.914world.com/bbs2/uploads_offsite/i188.photobucket.com-22140-1529701543.1.jpg) (IMG:http://www.914world.com/bbs2/uploads_offsite/i188.photobucket.com-22140-1529701543.2.jpg) (IMG:http://www.914world.com/bbs2/uploads_offsite/i188.photobucket.com-22140-1529701543.3.jpg) Next up was hooking up the parking brake. I attached one side but I could not get the other side to extend far enough to reach rear brake caliper. (IMG:http://www.914world.com/bbs2/uploads_offsite/i188.photobucket.com-22140-1529701543.4.jpg) After consulting Ed and the internet, I discovered that removing the boot at the firewall where the brake cable tubes are, there were adjusting nuts. Just behind the parking brake lever inside the car, there is a plate which covers the cables. Each cable attaches to one side of the lever. As you can see in the photo below, the lever was at an angle which meant one parking brake would be applied earlier, and probably with more force, than the other side. By adjusting the cables at the firewall, I was able to hook up both cables and to make the lever straight across inside the car. Once I adjust the brake pads on the calipers, the parking brake should now apply equal pressure to both rear brakes. (IMG:http://www.914world.com/bbs2/uploads_offsite/i188.photobucket.com-22140-1529701543.5.jpg) (IMG:http://www.914world.com/bbs2/uploads_offsite/i188.photobucket.com-22140-1529701544.6.jpg) (IMG:http://www.914world.com/bbs2/uploads_offsite/i188.photobucket.com-22140-1529701544.7.jpg) (IMG:http://www.914world.com/bbs2/uploads_offsite/i188.photobucket.com-22140-1529701544.8.jpg) (IMG:http://www.914world.com/bbs2/uploads_offsite/i188.photobucket.com-22140-1529701544.9.jpg) Now I have to try to convince my wife to help me bleed the brakes. Back when we were both doing track events, this was a regular routine prior to each event. It was a pain in the rear for her, but we never had our brakes go soft at the track. |
|
|
|
| Mueller |
Jun 22 2018, 04:16 PM
Post
#28
|
|
914 Freak! Group: Members Posts: 17,155 Joined: 4-January 03 From: Antioch, CA Member No.: 87 Region Association: None |
Looking great, that motor is going to be fun!
|
|
|
|
| Dave_Darling |
Jun 25 2018, 06:23 PM
Post
#30
|
|
914 Idiot Group: Members Posts: 15,339 Joined: 9-January 03 From: Silicon Valley / Kailua-Kona Member No.: 121 Region Association: Northern California |
I very strongly recommend that you use 0.004" clearance for the rear brake pads! The 0.008" number results in lousy pedal feel and a handbrake that doesn't hold very well.
I have often wondered if they were thinking of the total clearance (each side of the rotor) when they published the 0.008" figure? --DD |
|
|
|
| jerhofer |
Jun 25 2018, 07:31 PM
Post
#31
|
|
Member Group: Members Posts: 228 Joined: 20-May 18 From: Rockwell, NC Member No.: 22,140 Region Association: South East States |
QUOTE(Dave_Darling @ Jun 25 2018, 08:23 PM) I very strongly recommend that you use 0.004" clearance for the rear brake pads! The 0.008" number results in lousy pedal feel and a handbrake that doesn't hold very well. I have often wondered if they were thinking of the total clearance (each side of the rotor) when they published the 0.008" figure? --DD I had a couple of 914's back in the eighties but I did not work on them. So these things I am learning now are all new to me. These parking brakes are quite different from those on the 911's I have owned. I appreciate the heads up. This is one of the reasons I post my projects on cars on enthusiast forums. The feedback is invaluable. My wife retired from teaching about 20 years ago and took up art. She does oil paintings and has a gallery in Salisbury, NC. About ten years ago I retired. Since then I have bought good cars and did my best to make them better. I enjoy the process and figuring out new things. Which is why I have not done the same car more than once. Below are links to some of the other project cars I have done. I have enjoyed all of them. Neither my wife and I are content to sit around and do nothing. So, most days my wife goes to her gallery to paint and I go to the garage. Works for us!! http://forums.pelicanparts.com/porsche-911...67-912-6-a.html http://forums.pelicanparts.com/porsche-944...-944-turbo.html https://www.corvetteforum.com/forums/c1-and...y-64-coupe.html http://www.peachparts.com/shopforum/vintag...0sel-4-5-a.html And just to show the seed doesn't drop very far from the tree, here is a link to my son's project. His is much more adventurous than mine. We found a roller 1979 911SC into which he is installing a Tesla P85 motor. It will have a RSR body with very wide wheels and tires. http://www.diyelectriccar.com/forums/showthread.php?t=192602 |
|
|
|
| jerhofer |
Aug 11 2018, 04:21 PM
Post
#32
|
|
Member Group: Members Posts: 228 Joined: 20-May 18 From: Rockwell, NC Member No.: 22,140 Region Association: South East States |
We are back from our five week motorhome trip and I am ready to get back to working on the car. As I had written previously, I had sent the sail panel trim away to have it refinished. The pieces were here when we returned and they look better than new. I didn't have really good "before" photos but you can get an idea of the improvement with these images. The left side short piece was in the worst condition.
(IMG:http://www.914world.com/bbs2/uploads_offsite/i188.photobucket.com-22140-1534026080.1.jpg) (IMG:http://www.914world.com/bbs2/uploads_offsite/i188.photobucket.com-22140-1534026080.2.jpg) (IMG:http://www.914world.com/bbs2/uploads_offsite/i188.photobucket.com-22140-1534026081.3.jpg) (IMG:http://www.914world.com/bbs2/uploads_offsite/i188.photobucket.com-22140-1534026081.4.jpg) (IMG:http://www.914world.com/bbs2/uploads_offsite/i188.photobucket.com-22140-1534026081.5.jpg) For those of you who may have some interest, here is a link to his website: https://www.dellmetalpolishing.com/index2.html He charged me $160 for all three pieces. Part of the stash of parts that came with the car were five Fuch's 15x6 deep dish heart wheels. I cleaned them up today and am trying to determine the build date. I took this photo of one of the inside spokes but I don't know what to look for to determine the date. I would like to know as I will be selling these. (IMG:http://www.914world.com/bbs2/uploads_offsite/i188.photobucket.com-22140-1534026081.6.jpg) |
|
|
|
| mepstein |
Aug 11 2018, 04:30 PM
Post
#33
|
|
914-6 GT in waiting Group: Members Posts: 20,696 Joined: 19-September 09 From: Landenberg, PA/Wilmington, DE Member No.: 10,825 Region Association: MidAtlantic Region |
The date is on the inner ridge between the pedals but not on the pedals on the back of the wheel, near where the center cap sits. A set of 5 in good condition is $4-4,500.
I just sold a single one in fair condition for $750. Attached thumbnail(s) 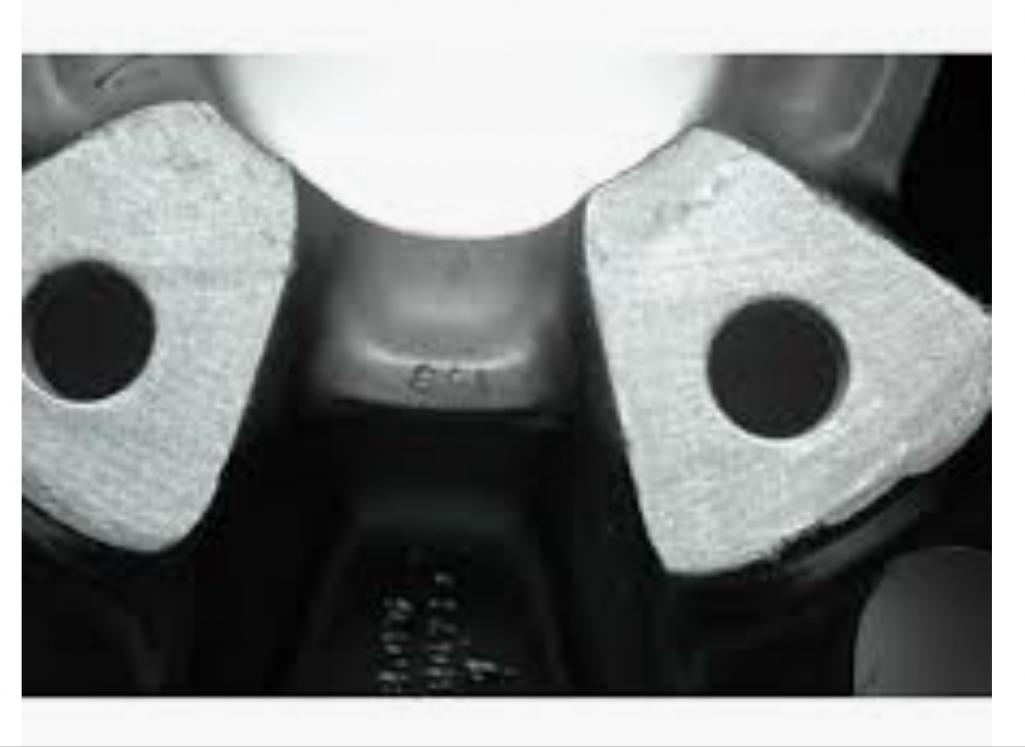
|
|
|
|
| pete000 |
Aug 11 2018, 04:44 PM
Post
#34
|
|
Senior Member Group: Members Posts: 1,887 Joined: 23-August 10 From: Bradenton Florida Member No.: 12,094 Region Association: South East States |
Ha! that's not rust ! Keep posting on the Fi conversion.
|
|
|
|
| mepstein |
Aug 11 2018, 08:19 PM
Post
#36
|
|
914-6 GT in waiting Group: Members Posts: 20,696 Joined: 19-September 09 From: Landenberg, PA/Wilmington, DE Member No.: 10,825 Region Association: MidAtlantic Region |
I wouldn't let them go for less than $4K and I would start at $4,500 on early911sregistry and pelican.
|
|
|
|
| ClayPerrine |
Aug 11 2018, 09:06 PM
Post
#37
|
|
Life's been good to me so far..... Group: Admin Posts: 16,542 Joined: 11-September 03 From: Hurst, TX. Member No.: 1,143 Region Association: NineFourteenerVille |
That car is absolutely beautiful. I can remember seeing it at a couple of the MUSR events with the previous owner.
I like the EFI conversion. |
|
|
|
| jerhofer |
Aug 16 2018, 05:15 PM
Post
#38
|
|
Member Group: Members Posts: 228 Joined: 20-May 18 From: Rockwell, NC Member No.: 22,140 Region Association: South East States |
I haven't had much time to work on the car since returning from our trip. Too much catching up to do after being gone for five weeks. The wire shelves in our motorhome refrigerator were showing some rust where the finish had failed. I bead blasted those (many, many hours as it is tedious to blast round things) and took them to a powder coater today. My powder coater is very reasonable and new shelves are very expensive. So it should be worth the time spent in the blast cabinet.
To free up some room, I did fine time to place ads for a few items on this forum. I have lots of other parts that came with the car if anybody has a need. I do have an extra 901 tranny. I asked the previous owner about its condition. He got it from a friend of his who had totaled his car many years ago. His recollection is that it was working fine at the time it was removed but he cannot remember how many miles were on it. Pm me if you need something and I will see if I have it. |
|
|
|
| rgalla9146 |
Aug 16 2018, 07:12 PM
Post
#39
|
|
Advanced Member Group: Members Posts: 4,962 Joined: 23-November 05 From: Paramus NJ Member No.: 5,176 Region Association: None |
What a beautiful car ! Headed back on the road......enjoy the process.
The asymmetrical yoke that pulls the Ebrake cables is mounted upside down. Turn it over so that 'OBEN' faces up. I think oben is German for UP ! |
|
|
|
| jerhofer |
Aug 16 2018, 08:24 PM
Post
#40
|
|
Member Group: Members Posts: 228 Joined: 20-May 18 From: Rockwell, NC Member No.: 22,140 Region Association: South East States |
QUOTE(rgalla9146 @ Aug 16 2018, 09:12 PM) What a beautiful car ! Headed back on the road......enjoy the process. The asymmetrical yoke that pulls the Ebrake cables is mounted upside down. Turn it over so that 'OBEN' faces up. I think oben is German for UP ! Thanks for the info. I will try to remember to do that. |
|
|
|
|
2 User(s) are reading this topic (2 Guests and 0 Anonymous Users)
0 Members:

|
Lo-Fi Version | Time is now: 18th May 2026 - 09:42 PM |
Invision Power Board
v9.1.4 © 2026 IPS, Inc.