|
|
|
Porsche, and the Porsche crest are registered trademarks of Dr. Ing. h.c. F. Porsche AG.
This site is not affiliated with Porsche in any way. Its only purpose is to provide an online forum for car enthusiasts. All other trademarks are property of their respective owners. |
|
|

  |

| ChrisFoley |
 Dec 2 2018, 07:05 AM Dec 2 2018, 07:05 AM
Post
#201
|
|
I am Tangerine Racing  Group: Members Posts: 8,016 Joined: 29-January 03 From: Bolton, CT Member No.: 209 Region Association: None |
QUOTE(jerhofer @ Dec 1 2018, 04:28 PM)  There were many trips and down my ladder to engage and dis-engage the parking brake. Here's a tip to save some time - actuate the parking brake lever on the caliper with a vice grip clamp. Its easy to apply more braking force that way than with the cockpit lever. (IMG:style_emoticons/default/beer.gif) |
   |

 
|
| 914forme |
Dec 2 2018, 01:06 PM
Post
#202
|
|
Times a wastin', get wrenchin'! Group: Members Posts: 3,896 Joined: 24-July 04 From: Dayton, Ohio Member No.: 2,388 Region Association: None |
Great Tip Chris. Thanks for sharing
|
|
|
|
| Biggles |
Dec 2 2018, 02:17 PM
Post
#203
|
|
Member Group: Members Posts: 200 Joined: 5-September 13 From: UK Member No.: 16,353 Region Association: England |
QUOTE(Cairo94507 @ Dec 2 2018, 12:42 AM) Nice work. Speaking of oil lines, I really like the oil drain valve you installed in the line to make oil changes quick and simple without breaking loose the main line connection. I want to add something like that to my oil line as I remember well changing the oil on my other two sixes and having to break that main fitting loose to drain the oil. I would prefer not to have to disturb that connection once it is made and it does not leak. (IMG:style_emoticons/default/beerchug.gif) I'd highly recommend doing this modification. Trying to undo the oil unions is a real pain as you'd know. This is my installation using a 3 way valve and removable handle. 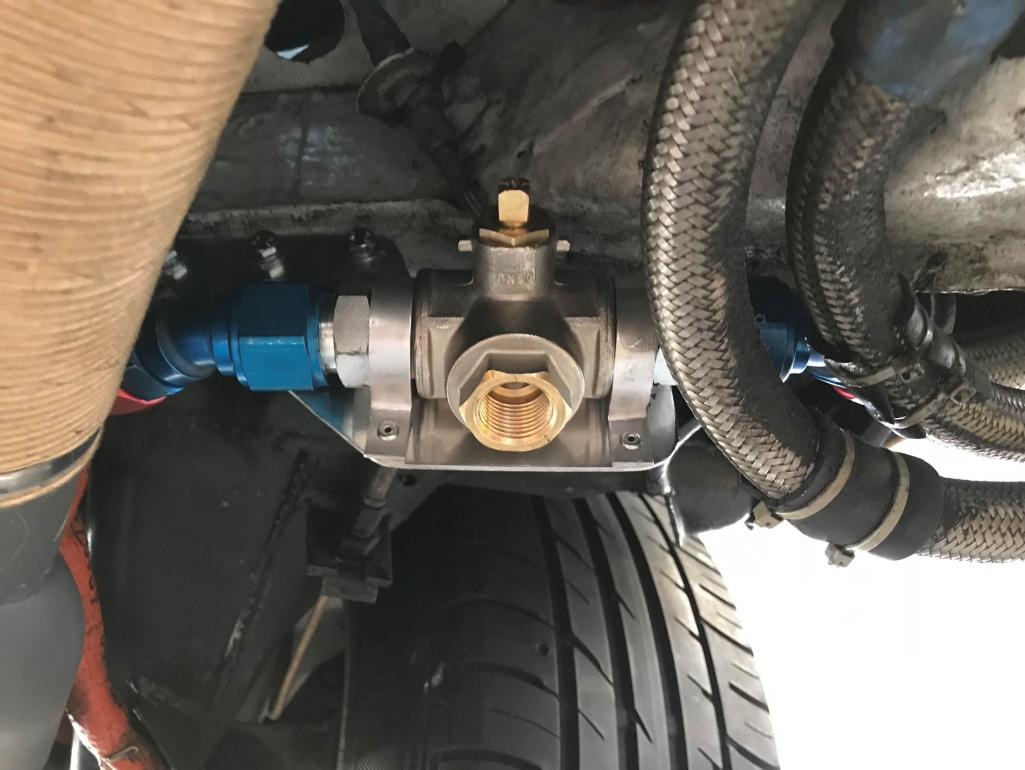 |
|
|
|
| jerhofer |
Dec 2 2018, 08:27 PM
Post
#204
|
|
Member Group: Members Posts: 228 Joined: 20-May 18 From: Rockwell, NC Member No.: 22,140 Region Association: South East States |
QUOTE(Biggles @ Dec 2 2018, 04:17 PM) QUOTE(Cairo94507 @ Dec 2 2018, 12:42 AM) Nice work. Speaking of oil lines, I really like the oil drain valve you installed in the line to make oil changes quick and simple without breaking loose the main line connection. I want to add something like that to my oil line as I remember well changing the oil on my other two sixes and having to break that main fitting loose to drain the oil. I would prefer not to have to disturb that connection once it is made and it does not leak. (IMG:style_emoticons/default/beerchug.gif) I'd highly recommend doing this modification. Trying to undo the oil unions is a real pain as you'd know. This is my installation using a 3 way valve and removable handle. Is that a 1" valve? Where did you find the adapters to go from this pipe fitting to AN? Thanks. |
|
|
|
| Biggles |
Dec 3 2018, 02:04 AM
Post
#205
|
|
Member Group: Members Posts: 200 Joined: 5-September 13 From: UK Member No.: 16,353 Region Association: England |
QUOTE(jerhofer @ Dec 3 2018, 02:27 AM) QUOTE(Biggles @ Dec 2 2018, 04:17 PM) QUOTE(Cairo94507 @ Dec 2 2018, 12:42 AM) Nice work. Speaking of oil lines, I really like the oil drain valve you installed in the line to make oil changes quick and simple without breaking loose the main line connection. I want to add something like that to my oil line as I remember well changing the oil on my other two sixes and having to break that main fitting loose to drain the oil. I would prefer not to have to disturb that connection once it is made and it does not leak. (IMG:style_emoticons/default/beerchug.gif) I'd highly recommend doing this modification. Trying to undo the oil unions is a real pain as you'd know. This is my installation using a 3 way valve and removable handle. Is that a 1" valve? Where did you find the adapters to go from this pipe fitting to AN? Thanks. I had a shop install it, but most likely NPT or metric. We have plenty of places to get something to fit a valve, sure you would too - Earls is a very good option |
|
|
|
| jerhofer |
Dec 3 2018, 05:49 PM
Post
#206
|
|
Member Group: Members Posts: 228 Joined: 20-May 18 From: Rockwell, NC Member No.: 22,140 Region Association: South East States |
QUOTE(Biggles @ Dec 3 2018, 04:04 AM) QUOTE(jerhofer @ Dec 3 2018, 02:27 AM) QUOTE(Biggles @ Dec 2 2018, 04:17 PM) QUOTE(Cairo94507 @ Dec 2 2018, 12:42 AM) Nice work. Speaking of oil lines, I really like the oil drain valve you installed in the line to make oil changes quick and simple without breaking loose the main line connection. I want to add something like that to my oil line as I remember well changing the oil on my other two sixes and having to break that main fitting loose to drain the oil. I would prefer not to have to disturb that connection once it is made and it does not leak. (IMG:style_emoticons/default/beerchug.gif) I'd highly recommend doing this modification. Trying to undo the oil unions is a real pain as you'd know. This is my installation using a 3 way valve and removable handle. Is that a 1" valve? Where did you find the adapters to go from this pipe fitting to AN? Thanks. I had a shop install it, but most likely NPT or metric. We have plenty of places to get something to fit a valve, sure you would too - Earls is a very good option I have the parts on the way. |
|
|
|
| jerhofer |
Dec 3 2018, 08:26 PM
Post
#208
|
|
Member Group: Members Posts: 228 Joined: 20-May 18 From: Rockwell, NC Member No.: 22,140 Region Association: South East States |
The next step was to install the rod through the shift cup as a test to make sure everything fit and to check for clearance issues.
(IMG:http://www.914world.com/bbs2/uploads_offsite/i188.photobucket.com-22140-1543890394.1.jpg) The rod had to be removed so the console cap could be installed. Once the cap was on, I could insert the shift rod through the shift cup and out the rear of the shift console after lubricating the bushings. There is a flat spot on the shift rod where an M8 bolt is used to secure the shift cup to the rod. Once all that is in place, the boots can be installed on both ends of the shift rod. (IMG:http://www.914world.com/bbs2/uploads_offsite/i188.photobucket.com-22140-1543890394.2.jpg) (IMG:http://www.914world.com/bbs2/uploads_offsite/i188.photobucket.com-22140-1543890394.3.jpg) (IMG:http://www.914world.com/bbs2/uploads_offsite/i188.photobucket.com-22140-1543890394.4.jpg) (IMG:http://www.914world.com/bbs2/uploads_offsite/i188.photobucket.com-22140-1543890394.5.jpg) After installing the u-joints and the stub shafts on the shift rod and the front shift rod, a new center shift tube must be made. The stock center shift tubes are way to long for this application and there is no need for a kink in them. After pondering what I was going to use to make this rod, I thought of the stock front shift rod that we had cut one end off of. I dug it out and it was the close to being the correct length. At the rear, this rod slid over the stub shaft. At the front, the two stubs would need to be butt welded. I called my son and he came over after work. To show him how I thought everything would work, I used a hose clamp to fasten the front stubs together. He thought my idea would work. We measured how long this rod would be once it is welded to both shift stubs. Once we had the measurement, we removed the shift stubs and he took everything with him to make the center shift tube. (IMG:http://www.914world.com/bbs2/uploads_offsite/i188.photobucket.com-22140-1543890394.6.jpg) (IMG:http://www.914world.com/bbs2/uploads_offsite/i188.photobucket.com-22140-1543890394.7.jpg) (IMG:http://www.914world.com/bbs2/uploads_offsite/i188.photobucket.com-22140-1543890395.8.jpg) (IMG:http://www.914world.com/bbs2/uploads_offsite/i188.photobucket.com-22140-1543890395.9.jpg) (IMG:http://www.914world.com/bbs2/uploads_offsite/i188.photobucket.com-22140-1543890395.10.jpg) |
|
|
|
| jerhofer |
Dec 3 2018, 08:37 PM
Post
#209
|
|
Member Group: Members Posts: 228 Joined: 20-May 18 From: Rockwell, NC Member No.: 22,140 Region Association: South East States |
While I was waiting for my son to arrive, I installed the muffler. I had sanded it down and had it powder coated a metallic sliver. On my previous project, the '73 Mercedes 280SEL 4.5, I had the exhaust manifold heat shields powder coated using this same material. After many heat cycles, those shields looked the same as the day I put them on. This covering is supposed to be good for 450 degrees.
(IMG:http://www.914world.com/bbs2/uploads_offsite/i188.photobucket.com-22140-1543891043.1.jpg) (IMG:http://www.914world.com/bbs2/uploads_offsite/i188.photobucket.com-22140-1543891044.2.jpg) (IMG:http://www.914world.com/bbs2/uploads_offsite/i188.photobucket.com-22140-1543891044.3.jpg) I also had time to install the crankcase vent hose. (IMG:http://www.914world.com/bbs2/uploads_offsite/i188.photobucket.com-22140-1543891044.4.jpg) (IMG:http://www.914world.com/bbs2/uploads_offsite/i188.photobucket.com-22140-1543891044.5.jpg) |
|
|
|
| jerhofer |
Dec 4 2018, 04:50 PM
Post
#210
|
|
Member Group: Members Posts: 228 Joined: 20-May 18 From: Rockwell, NC Member No.: 22,140 Region Association: South East States |
My son texted me this morning saying the shift rod was at the front desk at TRD where he works. I picked it up and then called my powder coater. I asked when he was going to do satin black and he said next week. But he was doing gloss black today. I blasted the rod and took it to him for a coating. About an hour later, he texted me that it was done. Another $10 well spent but lots of running around today.
(IMG:http://www.914world.com/bbs2/uploads_offsite/i188.photobucket.com-22140-1543963831.1.jpg) (IMG:http://www.914world.com/bbs2/uploads_offsite/i188.photobucket.com-22140-1543963832.2.jpg) (IMG:http://www.914world.com/bbs2/uploads_offsite/i188.photobucket.com-22140-1543963832.3.jpg) (IMG:http://www.914world.com/bbs2/uploads_offsite/i188.photobucket.com-22140-1543963833.4.jpg) After mowing leaves (the grass is growing slowly but the leaves are still falling), i did have time to install the fuel hoses to the fuel rail. (IMG:http://www.914world.com/bbs2/uploads_offsite/i188.photobucket.com-22140-1543963833.5.jpg) (IMG:http://www.914world.com/bbs2/uploads_offsite/i188.photobucket.com-22140-1543963834.6.jpg) With the shift rod installed, the bottom of the engine is nearly done. I have to install the O2 sensor, attach the ground from the transmission to the body, and run the cable from the battery to the starter. (IMG:http://www.914world.com/bbs2/uploads_offsite/i188.photobucket.com-22140-1543963834.7.jpg) |
|
|
|
| TravisNeff |
Dec 4 2018, 05:04 PM
Post
#211
|
|
914 Guru Group: Members Posts: 5,082 Joined: 20-March 03 From: Mesa, AZ Member No.: 447 Region Association: Southwest Region |
Great progress! What did you coat the gearbox with?
|
|
|
|
| pete000 |
Dec 4 2018, 07:57 PM
Post
#212
|
|
Senior Member Group: Members Posts: 1,887 Joined: 23-August 10 From: Bradenton Florida Member No.: 12,094 Region Association: South East States |
Nice upgrades !
|
|
|
|
| jerhofer |
Dec 4 2018, 08:05 PM
Post
#213
|
|
Member Group: Members Posts: 228 Joined: 20-May 18 From: Rockwell, NC Member No.: 22,140 Region Association: South East States |
QUOTE(TravisNeff @ Dec 4 2018, 07:04 PM) Great progress! What did you coat the gearbox with? Thanks. I don't know anything about the coating. The transmission came with the car and had this finish. |
|
|
|
| jerhofer |
Dec 4 2018, 08:11 PM
Post
#214
|
|
Member Group: Members Posts: 228 Joined: 20-May 18 From: Rockwell, NC Member No.: 22,140 Region Association: South East States |
Brad Mayeur re-built the transmission with the aluminum intermediate plate and a Quaife differential. It was rebuilt in 2006 and has been out of the car since then. So it is fresh.
|
|
|
|
| jerhofer |
Dec 5 2018, 03:38 PM
Post
#215
|
|
Member Group: Members Posts: 228 Joined: 20-May 18 From: Rockwell, NC Member No.: 22,140 Region Association: South East States |
I worked on some odds and ends today. I adjusted the clutch cable so that I can pull the clutch pedal 3/4" towards the rear. I had done a preliminary adjustment of the throttle cable. I had my wife push the gas pedal to the floor so I could see if the butterflies were opening all the way. They were, which was a surprise. I accidentally happened to adjust it correctly.
I worked on the seal around the engine tin to get it into place. Then, I ran the wire from the battery to the starter and fastened the transmission ground strap. (IMG:http://www.914world.com/bbs2/uploads_offsite/i188.photobucket.com-22140-1544045891.1.jpg) (IMG:http://www.914world.com/bbs2/uploads_offsite/i188.photobucket.com-22140-1544045892.2.jpg) Next up was installing the O2 sensor. There was a ton of excess wire so I bunched it up and used a large shrink tube to secure it. (IMG:http://www.914world.com/bbs2/uploads_offsite/i188.photobucket.com-22140-1544045892.3.jpg) (IMG:http://www.914world.com/bbs2/uploads_offsite/i188.photobucket.com-22140-1544045892.4.jpg) (IMG:http://www.914world.com/bbs2/uploads_offsite/i188.photobucket.com-22140-1544045892.5.jpg) (IMG:http://www.914world.com/bbs2/uploads_offsite/i188.photobucket.com-22140-1544045893.6.jpg) I also plugged in all of the ECU connectors. (IMG:http://www.914world.com/bbs2/uploads_offsite/i188.photobucket.com-22140-1544045893.7.jpg) Oil was poured into the tank. I tried to add gas but, fortunately, after pouring a bit in, I stopped to check for leaks. And I had a big one!! After cleaning up the gas, I put the car back on the lift to see what happened. It appears to have come out of the overflow tube as it was still wet. All of my connections at the tank were dry. Not sure how this happened. It was the end of the day so I decided to look into that in the morning. I must not have had the filler from my gas can far enough down into the tank. Once I get that resolved, I should be ready for the first startup. Hopefully tomorrow will see that happening. |
|
|
|
| Tdskip |
Dec 5 2018, 05:50 PM
Post
#216
|
|
Advanced Member Group: Members Posts: 3,747 Joined: 1-December 17 From: soCal Member No.: 21,666 Region Association: None |
Fingers crossed - big moment.
Thanks for documenting your progress! |
|
|
|
| pete000 |
Dec 5 2018, 05:51 PM
Post
#217
|
|
Senior Member Group: Members Posts: 1,887 Joined: 23-August 10 From: Bradenton Florida Member No.: 12,094 Region Association: South East States |
All those modern connectors and sensors look funny in a old 914...
|
|
|
|
| jerhofer |
Dec 5 2018, 07:54 PM
Post
#218
|
|
Member Group: Members Posts: 228 Joined: 20-May 18 From: Rockwell, NC Member No.: 22,140 Region Association: South East States |
QUOTE(pete000 @ Dec 5 2018, 07:51 PM) All those modern connectors and sensors look funny in a old 914... Hopefully, they all work!!! |
|
|
|
| jerhofer |
Dec 6 2018, 03:40 PM
Post
#219
|
|
Member Group: Members Posts: 228 Joined: 20-May 18 From: Rockwell, NC Member No.: 22,140 Region Association: South East States |
No start-up today. My first job was to find out why I was leaking fuel. It was my fault. When I was redoing the overflow line, I lifted up the tank a bit so I could feed the line down to the hole. In doing that, I pulled the return line off at the tunnel. i pulled the tank, tightened up the clamp even more than I had before, put everything back together and added some fuel. No leak there.
However, at little bit later I smelled fuel. It was leaking at the return line at the firewall. There is that 90 degree brass fitting that I had rotated slightly to make it run parallel with the bottom of the car. In so doing, I had evidently loosened the fitting. Because I had to pull that line back towards the rear to get to the nut, I drained the tank and removed the tank again so I could unhook that line I had just fastened. After tightening everything using new clamps and re-installing the tank, I added gas and everything is finally dry. I did have some fuel in the tunnel so I removed the console, pulled back the carpet and opened the windows to let everything dry out. All of this work was completed by 10:00AM so I could still have started the motor. Up to this point, I had not checked my clutch adjustment to make sure the clutch was working. I enlisted my wife, put the car in gear and had her push in the clutch. It didn't allow me to roll the car. I adjusted it even tighter, but to no avail. The last time she pushed the clutch in I watched from underneath and could see that the clutch fork was hitting against the rear part of the opening. I had not checked the clutch fork ball as this was the same transmission that had been in the car in the past. I called Brad Mayeur to talk about this with him. He agreed that the ball needed to be shimmed if the clutch fork was hitting against the transmission. I also mentioned to him that the car now had a Kennedy Engineering flywheel and clutch. He said that changed everything. For one thing, on a Kennedy clutch, you do not adjust the clutch pedal so you can pull it back 3/4". Correctly adjusted, there will be no pullback as the throwout bearing places pressure on the pressure plate all the time. He said he has talked to Kennedy about this but they say there is no problem with their setup. Brad wonders about long term issues with that pressure. My buddy Reese has a transmission jack that I have used more than he has. Since he lives just up the street, I walked up there and rolled it back to my shop. He also had a very thin wall 14mm deep socket that should work on removing the ball. Brad says that, after removing the muffler and unhooking everything, I should be able to move it back far enough with the axles still attached to get to the ball. He recommended beginning with a 1mm thick washer. He also mentioned that the threads have to be sealed as the ball threads open into the case. (IMG:http://www.914world.com/bbs2/uploads_offsite/i188.photobucket.com-22140-1544132424.1.jpg) So I get to have even more fun on this project!!! The weather is supposed to be terrible here this weekend so I wouldn't be driving the car anyway. I have a question about the starter. When Reese saw it recently, he wondered if there was a more compact starter that would work. Any suggestions? |
|
|
|
| Larmo63 |
Dec 6 2018, 05:00 PM
Post
#220
|
|
Advanced Member Group: Members Posts: 4,267 Joined: 3-March 14 From: San Clemente, Ca Member No.: 17,068 Region Association: Southern California |
Your project looks great and it's a fun read the way you are documenting this build.
One thing I did notice: I'd recommend some kind of burp tank off of the oil filler neck where you have the small air filter. I had a little K & N filter like yours and eventually it filled up with enough oil to get a bit messy. I used a 911 washer bottle that rides right below that area. It basically sits there, the braided hose holds it in place. "The devil is in the details." Carry on. |
|
|
|
|
3 User(s) are reading this topic (3 Guests and 0 Anonymous Users)
0 Members:

|
Lo-Fi Version | Time is now: 17th December 2025 - 02:08 AM |
Invision Power Board
v9.1.4 © 2025 IPS, Inc.