|
|
|
Porsche, and the Porsche crest are registered trademarks of Dr. Ing. h.c. F. Porsche AG.
This site is not affiliated with Porsche in any way. Its only purpose is to provide an online forum for car enthusiasts. All other trademarks are property of their respective owners. |
|
|

  |

| HarveyH |
 Jun 23 2018, 01:02 PM Jun 23 2018, 01:02 PM
Post
#1
|
|
Member  Group: Members Posts: 450 Joined: 19-June 03 From: Downingtown, PA Member No.: 843 |
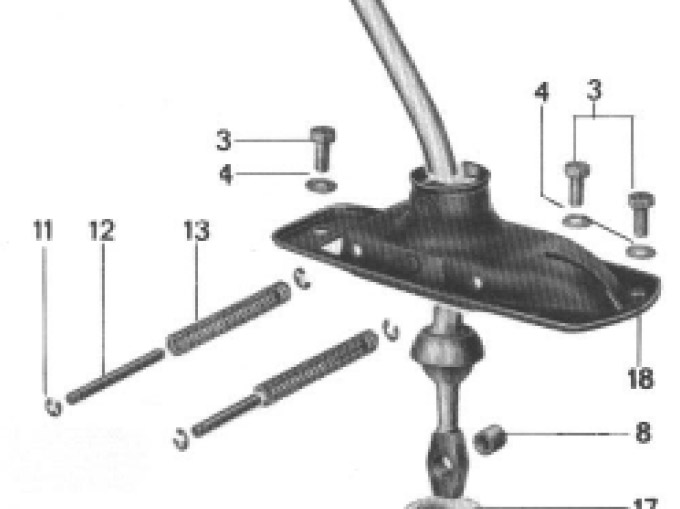
Converting back from a short shift to a stock shift lever. Any tips or tricks for reinstalling the Stop Plate Springs (Item #13)?
 Thanks, Harvey |
   |

 
|
| mlindner |
Jun 23 2018, 01:26 PM
Post
#2
|
|
Senior Member Group: Members Posts: 1,509 Joined: 11-November 11 From: Merrimac, WI Member No.: 13,770 Region Association: Upper MidWest |
Took me about ten trys, Bend the sprint kinda "C" shaped with the pin only started. As you compress the spring into position (very hard) keep pushing the pin in further using workbench edge. Best, Mark
|
|
|
|
| dlee6204 |
Jun 23 2018, 01:40 PM
Post
#3
|
|
Howdy Group: Members Posts: 2,162 Joined: 30-April 06 From: Burnsville, NC Member No.: 5,956 |
(IMG:style_emoticons/default/agree.gif)
I start the pin on one side and make the spring into a c-shape and use a small screw driver from the other side. Straighten the spring out and push pin further as I pull screwdriver out. |
|
|
|
| xperu |
Jun 23 2018, 01:40 PM
Post
#4
|
|
TEXAS Group: Members Posts: 597 Joined: 13-June 06 From: League City Texas Member No.: 6,213 Region Association: None |
I really struggled with this, after several attempts I finally got it . Keep at it, wear eye protection . Mike Kelly
|
|
|
|
| troth |
Jun 23 2018, 01:58 PM
Post
#5
|
|
Member Group: Members Posts: 151 Joined: 17-August 16 From: CT/WA Member No.: 20,305 Region Association: None |
QUOTE(dlee6204 @ Jun 23 2018, 03:40 PM)  (IMG:style_emoticons/default/agree.gif) I start the pin on one side and make the spring into a c-shape and use a small screw driver from the other side. Straighten the spring out and push pin further as I pull screwdriver out. The screw driver on the other side is key. Make sure you put one of the retaining clips on before you start. Lots of curse words if you accidentally push it too far. |
|
|
|
| wysri9 |
Jun 24 2018, 01:24 AM
Post
#6
|
|
Member Group: Members Posts: 199 Joined: 23-August 13 From: Aberdeen, Scotland Member No.: 16,291 Region Association: England |
QUOTE(troth @ Jun 23 2018, 12:58 PM) QUOTE(dlee6204 @ Jun 23 2018, 03:40 PM) (IMG:style_emoticons/default/agree.gif) I start the pin on one side and make the spring into a c-shape and use a small screw driver from the other side. Straighten the spring out and push pin further as I pull screwdriver out. The screw driver on the other side is key. Make sure you put one of the retaining clips on before you start. Lots of curse words if you accidentally push it too far. So I did this just the other day. I tried to post then but my computer was playing up and would not load the photos (IMG:style_emoticons/default/mad.gif) Anyway all now seems well so here goes. I hated the randomness of the process with screwdrivers etc. and worried about the safety so came up with a process which worked well. Still need an extra pair of hands though. I used a piece of threaded bar (5mm) and a bit of broom handle to make a pull handle (below)which could be installed as per the photo 2. Then the spring can be secured on the rod with the washer (just slightly bigger than the OD of the copper pipe) and nut. Pull the handle to compress the spring with the base plate firmly supported and then have somebody place the half pipe over the spring and hold firmly . The length of the copper pipe needs to be the full length of the compressed spring so it sits within the washer. The threaded rod can then be unscrewed by hand and the pin (with one circlip installed) can be pushed in once the washer and nut have been flicked out with a small screwdriver. It took a couple of goes to perfect the technique but I found it much more controlled. The person holding the pipe down needs to do so firmly as that spring wants to bend out! I did have to do a little levering under the spring to get it positioned perfectly but again as longs the pipe is firmly held down there is no issue. Good luck! Attached thumbnail(s) 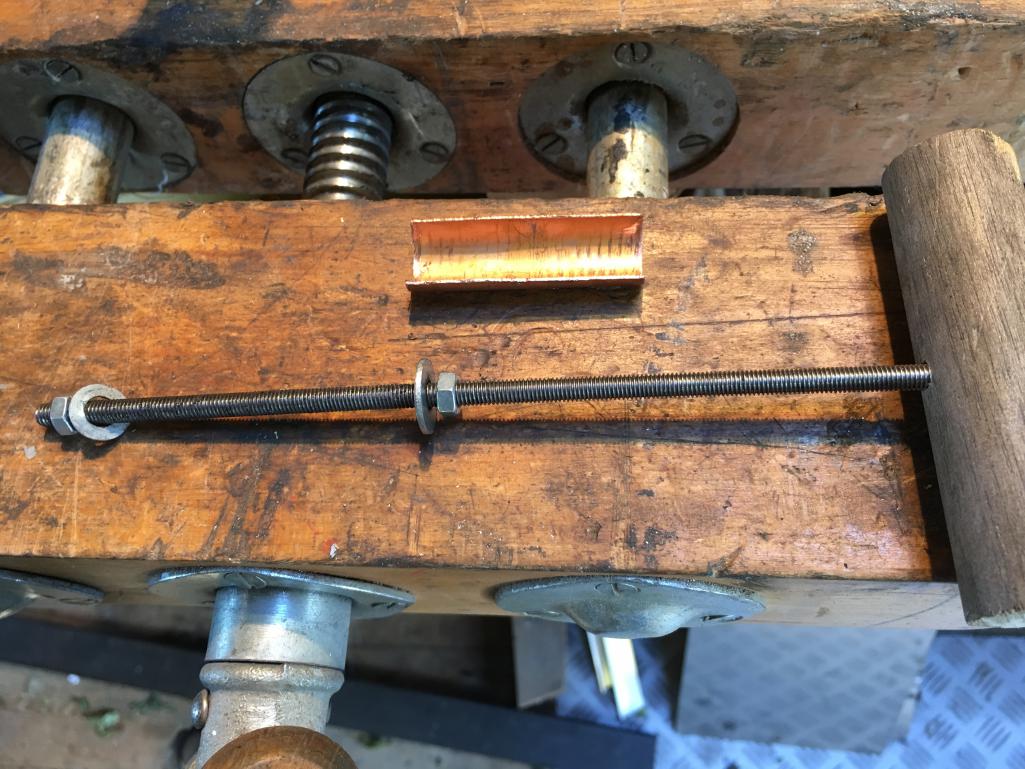
|
|
|
|
| wysri9 |
Jun 24 2018, 01:28 AM
Post
#7
|
|
Member Group: Members Posts: 199 Joined: 23-August 13 From: Aberdeen, Scotland Member No.: 16,291 Region Association: England |
QUOTE(wysri9 @ Jun 24 2018, 12:24 AM) QUOTE(troth @ Jun 23 2018, 12:58 PM) QUOTE(dlee6204 @ Jun 23 2018, 03:40 PM) (IMG:style_emoticons/default/agree.gif) I start the pin on one side and make the spring into a c-shape and use a small screw driver from the other side. Straighten the spring out and push pin further as I pull screwdriver out. The screw driver on the other side is key. Make sure you put one of the retaining clips on before you start. Lots of curse words if you accidentally push it too far. So I did this just the other day. I tried to post then but my computer was playing up and would not load the photos (IMG:style_emoticons/default/mad.gif) Anyway all now seems well so here goes. I hated the randomness of the process with screwdrivers etc. and worried about the safety so came up with a process which worked well. Still need an extra pair of hands though. I used a piece of threaded bar (5mm) and a bit of broom handle to make a pull handle (below)which could be installed as per the photo 2. Then the spring can be secured on the rod with the washer (just slightly bigger than the OD of the copper pipe) and nut. Pull the handle to compress the spring with the base plate firmly supported and then have somebody place the half pipe over the spring and hold firmly . The length of the copper pipe needs to be the full length of the compressed spring so it sits within the washer. The threaded rod can then be unscrewed by hand and the pin (with one circlip installed) can be pushed in once the washer and nut have been flicked out with a small screwdriver. It took a couple of goes to perfect the technique but I found it much more controlled. The person holding the pipe down needs to do so firmly as that spring wants to bend out! I did have to do a little levering under the spring to get it positioned perfectly but again as longs the pipe is firmly held down there is no issue. Good luck! Attached thumbnail(s) 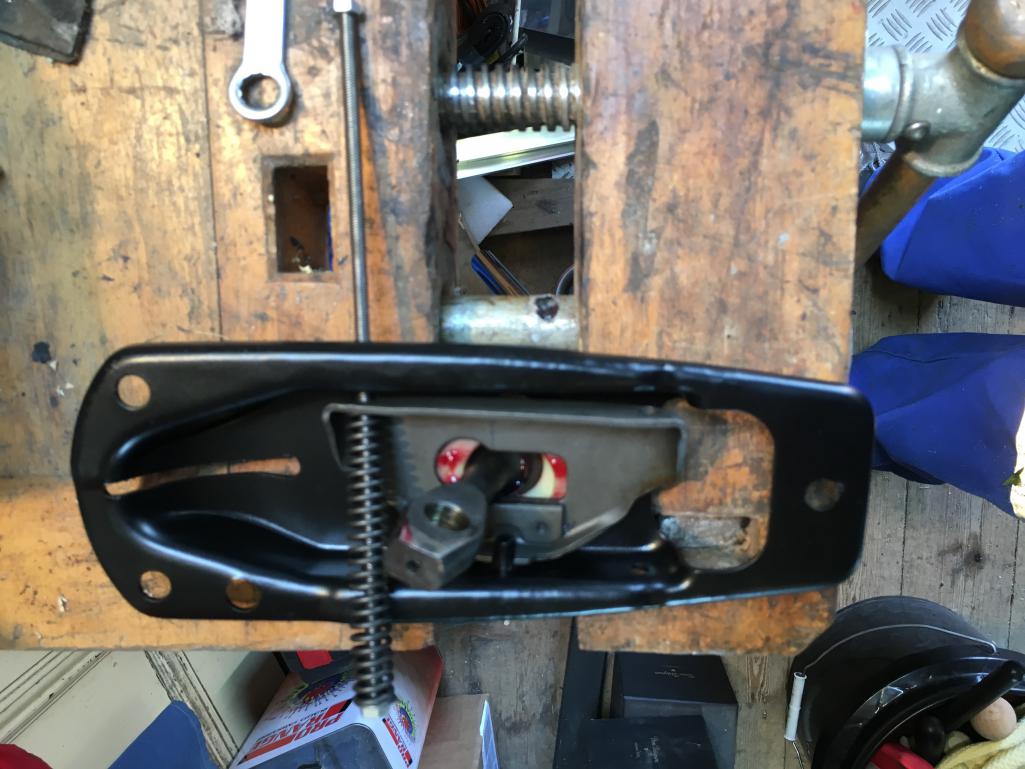 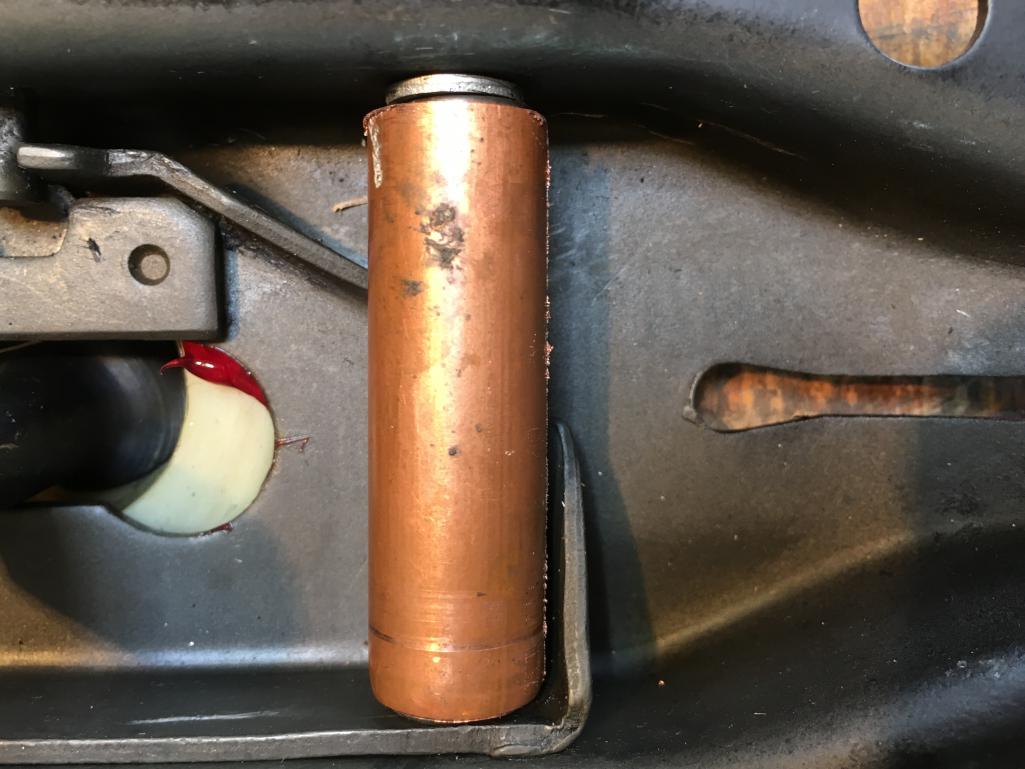
|
|
|
|
| rhodyguy |
Jun 24 2018, 06:47 AM
Post
#8
|
|
Chimp Sanctuary NW. Check it out. Group: Members Posts: 22,054 Joined: 2-March 03 From: Orion's Bell. The BELL! Member No.: 378 Region Association: Galt's Gulch |
You guys are making this a harder job than it needs to be. The pipe is going to restrict the movement of detent plate? One man job. no fancy tools required.
|
|
|
|
| wysri9 |
Jun 24 2018, 07:53 AM
Post
#9
|
|
Member Group: Members Posts: 199 Joined: 23-August 13 From: Aberdeen, Scotland Member No.: 16,291 Region Association: England |
QUOTE(rhodyguy @ Jun 24 2018, 05:47 AM) You guys are making this a harder job than it needs to be. The pipe is going to restrict the movement of detent plate? One man job. no fancy tools required. The pipe (or half pipe) is only there whilst the pin is inserted. It contains the sideways movement of the spring until it is constrained by the pin. |
|
|
|
| HarveyH |
Jun 25 2018, 03:26 PM
Post
#10
|
|
Member Group: Members Posts: 450 Joined: 19-June 03 From: Downingtown, PA Member No.: 843 |
Thanks for the information. Used a 1/4" pin punch to work from the opposite side. A bit fiddly, but no words I haven't used before; (IMG:style_emoticons/default/headbang.gif) got it back together and reinstalled.
Harvey |
|
|
|
|
1 User(s) are reading this topic (1 Guests and 0 Anonymous Users)
0 Members:

|
Lo-Fi Version | Time is now: 19th April 2024 - 07:00 AM |
Invision Power Board
v9.1.4 © 2024 IPS, Inc.