|
|
|
Porsche, and the Porsche crest are registered trademarks of Dr. Ing. h.c. F. Porsche AG.
This site is not affiliated with Porsche in any way. Its only purpose is to provide an online forum for car enthusiasts. All other trademarks are property of their respective owners. |
|
|

  |

| Cracker |
 Jul 24 2018, 08:10 PM Jul 24 2018, 08:10 PM
Post
#121
|
|
Advanced Member  Group: Members Posts: 2,148 Joined: 2-February 10 From: Atlanta (area) Member No.: 11,316 Region Association: South East States |
Dan - I certainly am not trying to bring you down...sorry it came across that way. I look forward to seeing you restore your car - enjoy the process. I know you will appreciate the end result. (IMG:style_emoticons/default/beerchug.gif)
Cracker |
   |

 
|
| 914forme |
Jul 24 2018, 08:34 PM
Post
#122
|
|
Times a wastin', get wrenchin'! Group: Members Posts: 3,899 Joined: 24-July 04 From: Dayton, Ohio Member No.: 2,388 Region Association: None |
I would start buy building a nice solid level frame jig that at least marks all your suspension points. You would want to build this off a know good chassis. Even if that is using pieces from the donor car to build the jig. This will allow you to take the front and back sections and make them one with out much going wrong.
It can still go wrong but at least you have a solid base to measure off of and work from. A few sticks of steel and you will be a much happier person doing this reconstruction project. Best of luck. Jeff Hail's cart is a very nice one. I have a set of jigs from Tangerine Racing that I will also use to build one they pickup the rear suspension points. Use a steal cross bar for the front, and build the jigs from there to the front Arm points. Or find a Bench and 914 fixtures. (IMG:style_emoticons/default/icon8.gif) I think it can be saved, I would just do the foundation work first. |
|
|
|
| dan10101 |
Jul 24 2018, 10:26 PM
Post
#123
|
|
TORQUE-o-holic Group: Members Posts: 1,140 Joined: 29-April 03 From: Eagle Point, Or Member No.: 626 Region Association: Pacific Northwest |
QUOTE(Cracker @ Jul 24 2018, 07:10 PM)  Dan - I certainly am not trying to bring you down...sorry it came across that way. I look forward to seeing you restore your car - enjoy the process. I know you will appreciate the end result. (IMG:style_emoticons/default/beerchug.gif) Cracker Not at all, That's all on my end. You all are just giving your best opinion and I do appreciate it. I am enjoying this. Thanks |
|
|
|
| dan10101 |
Jul 24 2018, 11:49 PM
Post
#124
|
|
TORQUE-o-holic Group: Members Posts: 1,140 Joined: 29-April 03 From: Eagle Point, Or Member No.: 626 Region Association: Pacific Northwest |
Actually I will have a doner car that looks pretty solid. We planed on doing measurements, but a jig won't be hard to create and a lot more accurate. I think someone else mentioned this as well. Thanks for the tip. I'm already drawing it up as I write this. I've got a great scrap metal place a couple miles away.
Thanks QUOTE(914forme @ Jul 24 2018, 07:34 PM) I would start buy building a nice solid level frame jig that at least marks all your suspension points. You would want to build this off a know good chassis. Even if that is using pieces from the donor car to build the jig. This will allow you to take the front and back sections and make them one with out much going wrong. It can still go wrong but at least you have a solid base to measure off of and work from. A few sticks of steel and you will be a much happier person doing this reconstruction project. Best of luck. Jeff Hail's cart is a very nice one. I have a set of jigs from Tangerine Racing that I will also use to build one they pickup the rear suspension points. Use a steal cross bar for the front, and build the jigs from there to the front Arm points. Or find a Bench and 914 fixtures. (IMG:style_emoticons/default/icon8.gif) I think it can be saved, I would just do the foundation work first. |
|
|
|
| dan10101 |
Aug 6 2018, 10:39 AM
Post
#125
|
|
TORQUE-o-holic Group: Members Posts: 1,140 Joined: 29-April 03 From: Eagle Point, Or Member No.: 626 Region Association: Pacific Northwest |
I'm a bit late in getting an update out. But at least I've been busy.
We made a 1800 mile trip to pickup a donor car in LA and stopped by Roger Sheridan's place in Paso Robles to pickup the fiberglass front end. Quite the trip, but except for smoke virtually everywhere along the way, and taking GPS routes the weren't always the smartest choice, the trip was uneventful. (the way I like it.) My wife decided I should not embark on this journey by myself, so she came along to keep me company. And aside from asking every couple of hours "Tell me again, Why are you getting this car??" She didn't see the beauty of a pristine body. I look at bodies all the time, I know a good one from a bad one. We'll this one is just what the dr ordered. So, I'm going to cut it up and fix mine. Yeah, I know, I'm a bad person. (IMG:style_emoticons/default/sawzall-smiley.gif) So there is a method to my madness. The rear of the Screamcicle has a lot of work done to it. Custom work that I don't want to redo. The side vents don't come with Rogers kit. They are beautifully molded into the side. The firewall is custom and done to mm of the engine rotating components. the roll cage is custom incorporated into the front and rear sections as well as fit into the dash. The fiberglass work is bonded to the tub and worked in nicely to make it look like it's always been there. The rear deck lid has a custom spoiler that molds into the rear fenders. Enough of my rationalizing. Here's my plan of attack. Corner balance check blue car - done, it looks to be what I expected from a stock car without drivetrain. No huge variances. Inspect for previous damage - No damage whatsoever.. Ok, the paint is faded... Put blue car on the rack and remove suspension - today I hope, (it's gonna be hot and smokey) Build chassis jig - got the major parts to construct the jig. more on that Bolt to front and rear bumper mounts, could be a challenge to unbolt, I need to work that out. Add arms that locate the mounting points. Check and adjust for gaps Bolt together jig and blue car Unbolt blue car Put the suspension back on the blue car so I can roll it out. Put white car on rack Pull engine and trans Unbolt suspension Move chassis jig into place Cut nose off white car leaving a couple inches for overlap Measure and cut nose off blue car leaving a couple of inches for overlap Mount nose to the jig and body leaving overlap Connect both pieces are in place and mated using coleco connections Measure and mark for cutting line Plasma cut thru both pieces leaving a clean line on which to butt weld. (IMG:style_emoticons/default/welder.gif) Possibly do this in sections leaving sections always connected. still working this out. Once the nose is in place and the suspension point are where they should be, then I'll cut out the bad A pillar and do that repair. (IMG:style_emoticons/default/sawzall-smiley.gif) I know I'm leaving things out, but you get the jist. Oh, my wife had a great idea for the rear end. Make a tire trailer for it. The white car already has a receiver hitch. 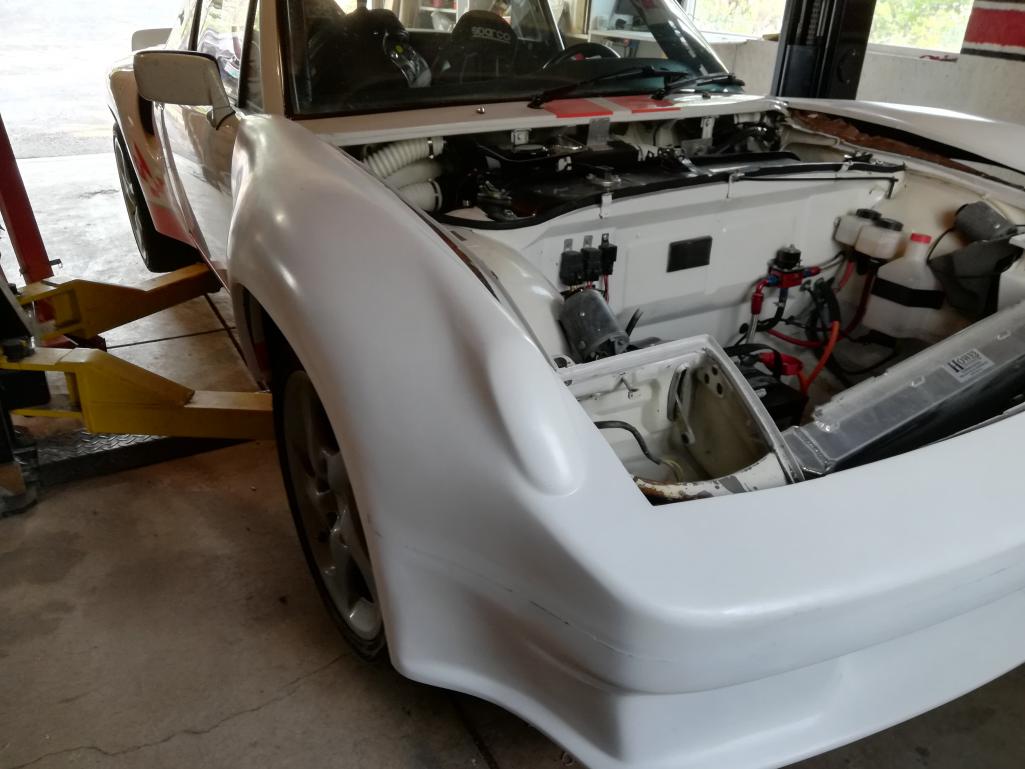 |
|
|
|
| dan10101 |
Aug 6 2018, 04:20 PM
Post
#126
|
|
TORQUE-o-holic Group: Members Posts: 1,140 Joined: 29-April 03 From: Eagle Point, Or Member No.: 626 Region Association: Pacific Northwest |
Well it didn't take long to remove the suspension, brakes etc.
After doing some cleanup, I started working on the Jig or at least the frame. And i need to do more research for removable or at least adjustable arms. |
|
|
|
| Andyrew |
Aug 6 2018, 04:53 PM
Post
#127
|
|
Spooling.... Please wait Group: Members Posts: 13,381 Joined: 20-January 03 From: Riverbank, Ca Member No.: 172 Region Association: Northern California |
PICS?
(IMG:style_emoticons/default/thisthreadisworthlesswithoutpics.gif) Lets see your drawing for the jig your looking to make! I think you should build the jig base, then have the pieces that will bolt to the 914 go straight up. You could do round tube arms with a center peg. Have about 6 inches of fixture that bolts to your welded bench arm. That way you can pull with it still if you need to. This is the Celette fixtures for the 914... (IMG:http://www.914world.com/bbs2/uploads/post-419-1533326567_thumb.jpg) |
|
|
|
| dan10101 |
Aug 6 2018, 11:53 PM
Post
#128
|
|
TORQUE-o-holic Group: Members Posts: 1,140 Joined: 29-April 03 From: Eagle Point, Or Member No.: 626 Region Association: Pacific Northwest |
Nag nag nag..
Ok, here's a picture. Welded the 3" 1/4" square tube together. It's pretty square and flat. note: welding thick metal is fun... 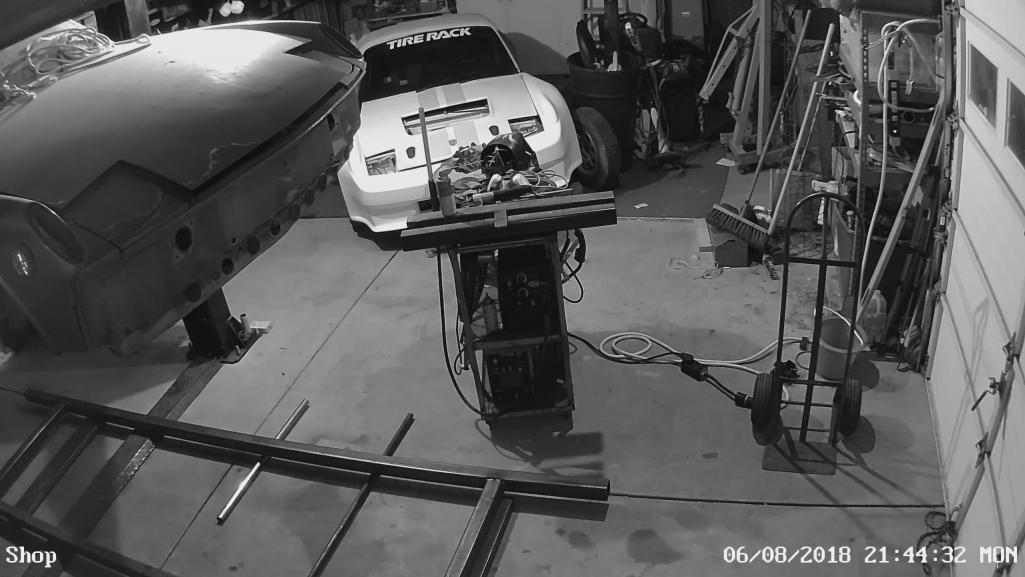 I'm thinking of this kind of leg with a fixed adjustable portion and another that will roll. I really am having trouble moving it around so it need to be easier. not my picture but someone doing something similar.  |
|
|
|
| horizontally-opposed |
Aug 7 2018, 12:16 AM
Post
#129
|
|
Advanced Member Group: Members Posts: 3,456 Joined: 12-May 04 From: San Francisco Member No.: 2,058 Region Association: None |
There was a 996 GT2 near here years ago, that was clipped. Whole front end. Really nice job, and the car was great.
There was a 997 GT3 RS that came over the Corkscrew and t-boned a car that spun. Also clipped—from the fuel tank~ forward. A friend selling that car disclosed it, and the buyer's PPI guys called to say "Are you sure? Because we can't find ANY evidence." It can be done well. (IMG:style_emoticons/default/welder.gif) |
|
|
|
| dan10101 |
Aug 7 2018, 08:54 AM
Post
#130
|
|
TORQUE-o-holic Group: Members Posts: 1,140 Joined: 29-April 03 From: Eagle Point, Or Member No.: 626 Region Association: Pacific Northwest |
QUOTE(horizontally-opposed @ Aug 6 2018, 11:16 PM) There was a 996 GT2 near here years ago, that was clipped. Whole front end. Really nice job, and the car was great. There was a 997 GT3 RS that came over the Corkscrew and t-boned a car that spun. Also clipped—from the fuel tank~ forward. A friend selling that car disclosed it, and the buyer's PPI guys called to say "Are you sure? Because we can't find ANY evidence." It can be done well. (IMG:style_emoticons/default/welder.gif) Thanks for the encouraging words. The goal is to make it straight and strong. |
|
|
|
| Chris H. |
Aug 7 2018, 09:27 AM
Post
#131
|
|
Senior Member Group: Members Posts: 4,093 Joined: 2-January 03 From: Chicago 'burbs Member No.: 73 Region Association: Upper MidWest |
I remember a race prepped narrow body 914 that was re-clipped in the Chicago area. It was white with a Japanese flag on the hood in case anyone remembers it. The owner said something in the suspension gave way and he hit a wall straight on at fairly high speed. It was really smashed but had a cage in it. The bent stuff was cut off and the front clip was swapped out. He seemed happy with the repair and was still driving it and racing it years later.
|
|
|
|
| tazz9924 |
Aug 7 2018, 01:38 PM
Post
#132
|
|
Senior Member Group: Members Posts: 755 Joined: 31-May 15 From: Mooresville NC Member No.: 18,779 Region Association: None |
How much did you get that whole fiberglass front clip for?
|
|
|
|
| dan10101 |
Aug 7 2018, 02:35 PM
Post
#133
|
|
TORQUE-o-holic Group: Members Posts: 1,140 Joined: 29-April 03 From: Eagle Point, Or Member No.: 626 Region Association: Pacific Northwest |
QUOTE(Chris H. @ Aug 7 2018, 08:27 AM) I remember a race prepped narrow body 914 that was re-clipped in the Chicago area. It was white with a Japanese flag on the hood in case anyone remembers it. The owner said something in the suspension gave way and he hit a wall straight on at fairly high speed. It was really smashed but had a cage in it. The bent stuff was cut off and the front clip was swapped out. He seemed happy with the repair and was still driving it and racing it years later. Love a happy ending. |
|
|
|
| dan10101 |
Aug 7 2018, 02:38 PM
Post
#134
|
|
TORQUE-o-holic Group: Members Posts: 1,140 Joined: 29-April 03 From: Eagle Point, Or Member No.: 626 Region Association: Pacific Northwest |
QUOTE(tazz9924 @ Aug 7 2018, 12:38 PM) How much did you get that whole fiberglass front clip for? It's a Sheridan nose. On their website for 1200. http://sheridanmotorsports.com/porsche_parts_pricing.html No shipping, I picked it up and saved several hundred. It's just the nose, front bumper, and fenders. Hood is extra. I'm going to try to make mine work, it's got a lot of custom work done to it as well. |
|
|
|
| burton73 |
Aug 7 2018, 03:06 PM
Post
#135
|
|
Senior member, and old dude Group: Members Posts: 4,050 Joined: 2-January 07 From: Los Angeles Member No.: 7,414 Region Association: Southern California |
Dan,
I feel very hopeful on the reworking of your car. We are all watching and in your corner. The very best of luck on it. Be safe my friend. Bob B (IMG:style_emoticons/default/sawzall-smiley.gif) (IMG:style_emoticons/default/welder.gif) (IMG:style_emoticons/default/wub.gif) |
|
|
|
| dan10101 |
Aug 7 2018, 06:11 PM
Post
#136
|
|
TORQUE-o-holic Group: Members Posts: 1,140 Joined: 29-April 03 From: Eagle Point, Or Member No.: 626 Region Association: Pacific Northwest |
QUOTE(burton73 @ Aug 7 2018, 02:06 PM) We are all watching Eeekk Well, I guess that's good. In case I do something really stupid. Maybe I should share my shop camera. That way if I fall over someone can call 911. |
|
|
|
| dan10101 |
Aug 7 2018, 08:52 PM
Post
#137
|
|
TORQUE-o-holic Group: Members Posts: 1,140 Joined: 29-April 03 From: Eagle Point, Or Member No.: 626 Region Association: Pacific Northwest |
Ok, here is an updated drawing of the very homemade chassis jig I'm building.
Basically it's 3x3" 1/4" thick square tube. 13' long, but the working rectangle is 10' x 42" in this drawing I've added a second set of 3' bracing. When I start adding arms I'll determine where those should ultimately go. This is not designed to be multiple use. When I'm done, I'll probably cut the ends off it and turn it into a welding table. Unless someone else wants it for 914 jig use, then I might consider selling it. I'm working on the legs right now. Making the plates that will insert and weld into the legs that will contain the 3/4" bolts that will allow leveling adjustments. They will raise it approx 15" off the concrete allowing me to get under it to make the initial connections. Next to the fixed legs will be roller legs with bracing between the 2 for strength. Found some heavy duty rollers similar to the picture in the above post for a reasonable price. They should serve well. I may have to trailer it out of the shop, ( I don't have a flat parking area next to the shop) The hard part will be getting the arms in place. I found some 1 1/2" square tubing and some 1 1/4 square tubing that slide into each other snugly. I'll begin by creating plates for each of the mounting areas, such as the rear bumper mounts, suspension pickup points, trans mounts. I want to keep those holes very snug to the bolts. Then do some initial tack welds to where the arms will connect to the jig. Depending on how sturdy the arms are, I may brace them somehow. To each other, or to the jig. It will likely become a spaghetti nest of arms. There are 6 in the rear on each side, 5 in the front on each side. That's 22 arms sticking up all over the place. If I add the jacking points it becomes unruly. I welcome thoughts on that and anything else... 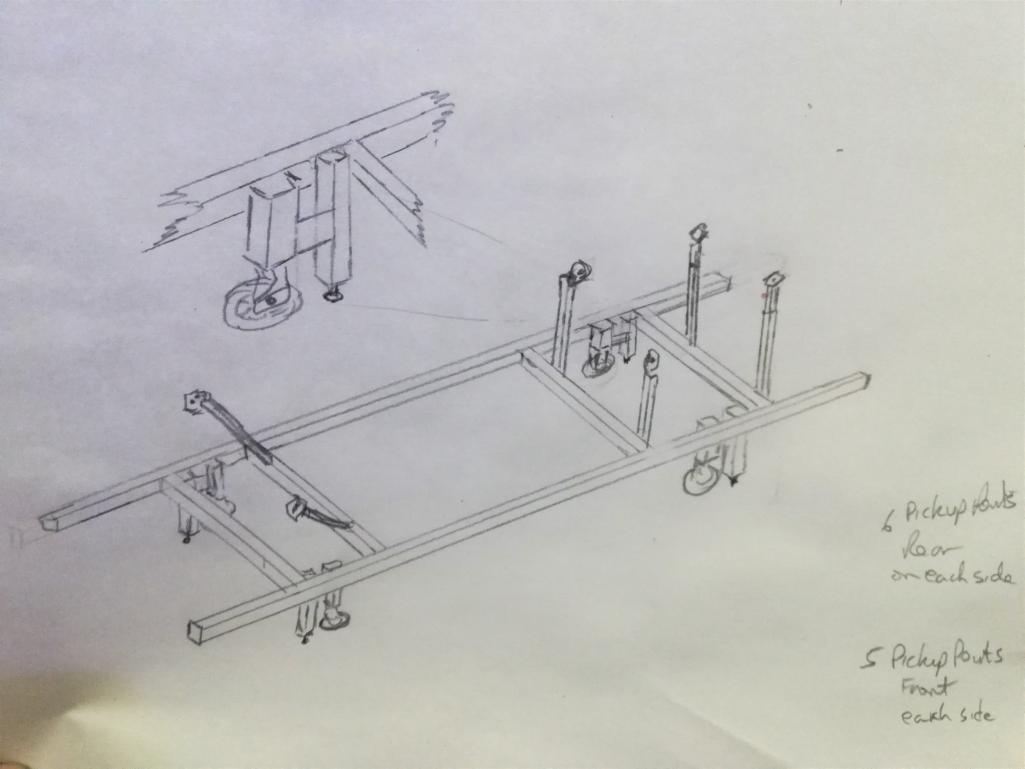 |
|
|
|
| Andyrew |
Aug 7 2018, 09:32 PM
Post
#138
|
|
Spooling.... Please wait Group: Members Posts: 13,381 Joined: 20-January 03 From: Riverbank, Ca Member No.: 172 Region Association: Northern California |
I think you need to at least pick up the transmission mount as well as the upper front suspension bolts.
You will essentially be holding the chassis in place with only the rear suspension when you cut off the front end so at least having a point for the pinch weld to rest in the front would be ideal. It would also be a good place to clamp the body while your welding to prevent the main chassis from moving. The more you do the better, especially up front. You can always just leave the pieces off and put them on if you find you need to fit the chassis more precisely. |
|
|
|
| dan10101 |
Aug 7 2018, 09:38 PM
Post
#139
|
|
TORQUE-o-holic Group: Members Posts: 1,140 Joined: 29-April 03 From: Eagle Point, Or Member No.: 626 Region Association: Pacific Northwest |
I will be doing all the front pickup points. I'll try to do the rears as well. The engine mount is kinda a floating point. But I could make it fixed with a big tube of some sort to fill the hole rather than let it float around. Anyway, I'll try to do them all, we'll see.
|
|
|
|
| ChrisFoley |
Aug 8 2018, 07:17 AM
Post
#140
|
|
I am Tangerine Racing Group: Members Posts: 8,031 Joined: 29-January 03 From: Bolton, CT Member No.: 209 Region Association: None |
I like the way you're doing it Dan.
There is so much custom work on the chassis that full replacement would be a much larger project. |
|
|
|
|
2 User(s) are reading this topic (2 Guests and 0 Anonymous Users)
0 Members:

|
Lo-Fi Version | Time is now: 21st July 2026 - 02:49 AM |
Invision Power Board
v9.1.4 © 2026 IPS, Inc.