|
|
|
Porsche, and the Porsche crest are registered trademarks of Dr. Ing. h.c. F. Porsche AG.
This site is not affiliated with Porsche in any way. Its only purpose is to provide an online forum for car enthusiasts. All other trademarks are property of their respective owners. |
|
|

  |

| Andyrew |
 Aug 10 2018, 10:14 PM Aug 10 2018, 10:14 PM
Post
#161
|
|
Spooling.... Please wait  Group: Members Posts: 13,381 Joined: 20-January 03 From: Riverbank, Ca Member No.: 172 Region Association: Northern California |
The rear 2 plates won't be on the 74 chassis. That's for the big bumpers.
|
   |

 
|
| dan10101 |
Aug 10 2018, 10:35 PM
Post
#162
|
|
TORQUE-o-holic Group: Members Posts: 1,140 Joined: 29-April 03 From: Eagle Point, Or Member No.: 626 Region Association: Pacific Northwest |
QUOTE(Andyrew @ Aug 10 2018, 09:14 PM)  The rear 2 plates won't be on the 74 chassis. That's for the big bumpers. (IMG:style_emoticons/default/WTF.gif) (IMG:style_emoticons/default/barf.gif) (IMG:style_emoticons/default/confused24.gif) (IMG:style_emoticons/default/hissyfit.gif) (IMG:style_emoticons/default/headbang.gif) Never say that I don't learn things.. every single day.... |
|
|
|
| Andyrew |
Aug 11 2018, 01:12 AM
Post
#163
|
|
Spooling.... Please wait Group: Members Posts: 13,381 Joined: 20-January 03 From: Riverbank, Ca Member No.: 172 Region Association: Northern California |
Im gonna guess you didnt have those big torx 45 drivers for those bolts and it probably killed 3 hrs of your day... (IMG:style_emoticons/default/sad.gif)
I should have mentioned to you that the bumpers front/rear would be slightly different for your 74 vs your 76 donor... Sorry.. |
|
|
|
| JFJ914 |
Aug 11 2018, 06:28 AM
Post
#164
|
|
Senior Member Group: Benefactors Posts: 813 Joined: 13-June 03 From: Alpharetta, GA Member No.: 814 Region Association: South East States |
QUOTE(dan10101 @ Jul 22 2018, 10:37 AM) Nice pictures. Soooo, for us West Coast guys, what IS in that gas can... (IMG:style_emoticons/default/drunk.gif) (IMG:style_emoticons/default/beer3.gif) (IMG:style_emoticons/default/barf.gif) I remember it as tasting very much like a Manhattan. It was gooooodddddd! |
|
|
|
| dan10101 |
Aug 11 2018, 09:09 AM
Post
#165
|
|
TORQUE-o-holic Group: Members Posts: 1,140 Joined: 29-April 03 From: Eagle Point, Or Member No.: 626 Region Association: Pacific Northwest |
QUOTE(Andyrew @ Aug 11 2018, 12:12 AM) Im gonna guess you didnt have those big torx 45 drivers for those bolts and it probably killed 3 hrs of your day... (IMG:style_emoticons/default/sad.gif) I should have mentioned to you that the bumpers front/rear would be slightly different for your 74 vs your 76 donor... Sorry.. Those were from the Bimmer. Yes, I did, and I was so proud that I found a set of 4 bolts and even had the torx bit for them. Oh well. I was going to ask about the front bumper. I guess I'll just go with the chassis pickup points and call it good. It seems to work well for the jig that 6not4 built. I don't need bumper mounts for the front, so it won't matter that they are different. |
|
|
|
| dan10101 |
Aug 11 2018, 09:11 AM
Post
#166
|
|
TORQUE-o-holic Group: Members Posts: 1,140 Joined: 29-April 03 From: Eagle Point, Or Member No.: 626 Region Association: Pacific Northwest |
QUOTE(John Jentz @ Aug 11 2018, 05:28 AM) QUOTE(dan10101 @ Jul 22 2018, 10:37 AM) Nice pictures. Soooo, for us West Coast guys, what IS in that gas can... (IMG:style_emoticons/default/drunk.gif) (IMG:style_emoticons/default/beer3.gif) (IMG:style_emoticons/default/barf.gif) I remember it as tasting very much like a Manhattan. It was gooooodddddd! (IMG:style_emoticons/default/drunk.gif) I've never had a Manhattan, I may have to expand my horizons... |
|
|
|
| dan10101 |
Aug 16 2018, 12:43 AM
Post
#167
|
|
TORQUE-o-holic Group: Members Posts: 1,140 Joined: 29-April 03 From: Eagle Point, Or Member No.: 626 Region Association: Pacific Northwest |
another update.
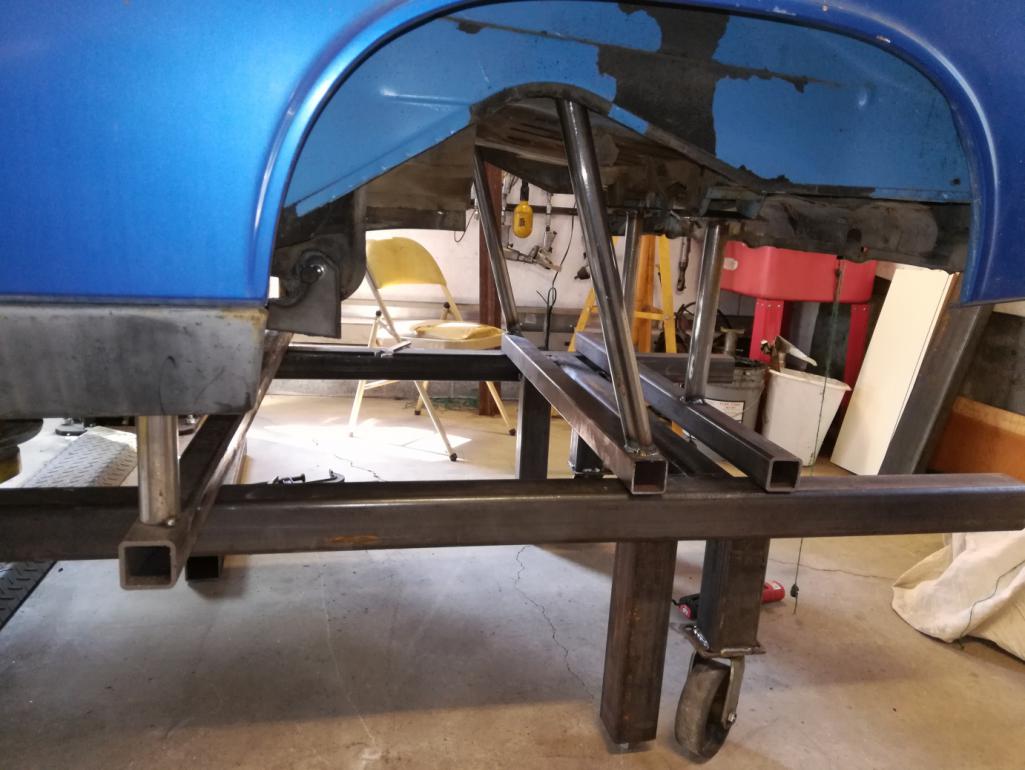
The weekend was a wash, but weekdays are for working so I got a bit done. I made the mounting plates for each of the chassis mounting points. (minus the bumper mounts, since apparently I assumed too much..) So, now I'm working on cross members that will accept the arms that will weld to the plates. I have two mocked up, in the pictures below. I decided on round 1.5" tubing instead of square tube mostly due to being able to index the tube to get a nice perpendicular (isn't that a fun word) connection to the jig cross members.. I'm finding that I will probably need to finish weld at least 2 of them so that I can hang the Jig frame and get the exact measurements of the other arms. I'm thinking that I will go and get some more 2" square tube along with some 6" bolts to go thru the 3" + 2" square and mount them to the main Jig for consistency. Before I do that I will align and level the main Jig frame. (not that I think it matters but only because it may at some point down the road.) then I will trim and final weld the 2 end mounting points. (rear trans mount and front lower control arms mount). Then build and tack weld the remaining arms. if all looks good, finish weld and call it good. I may add some cross bracing that will reinforce the arm positioning. I'll have a better idea once I get that far. 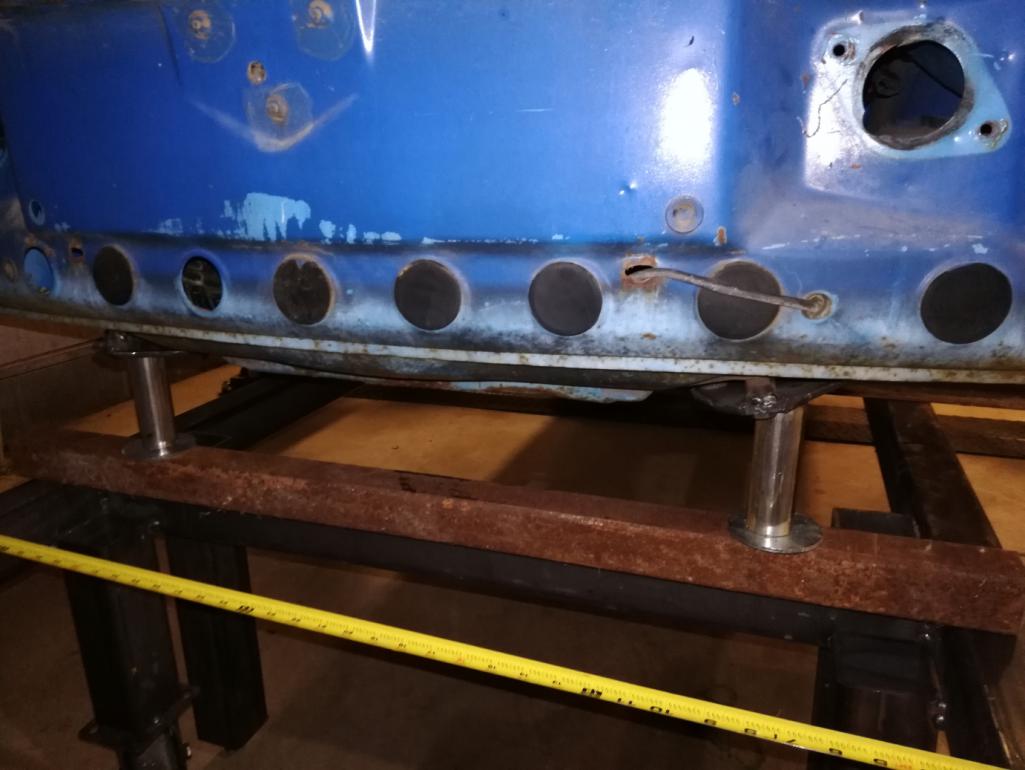 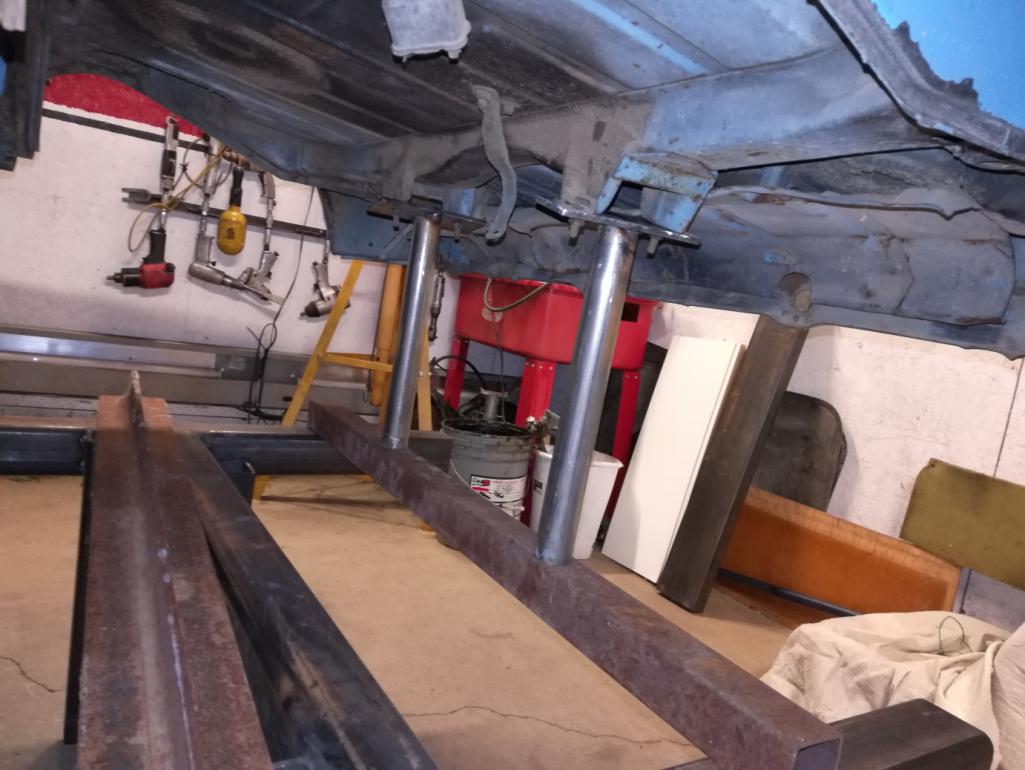 |
|
|
|
| dan10101 |
Aug 17 2018, 04:35 PM
Post
#168
|
|
TORQUE-o-holic Group: Members Posts: 1,140 Joined: 29-April 03 From: Eagle Point, Or Member No.: 626 Region Association: Pacific Northwest |
Another update.
Now the front and rear arms are fixed I moved the jig forward so there is about a 2" jig overhand on front and rear. Leaves more options down the road. I remade one of the front arms that was too short. When working on a slanted plate, the arm length changes with positioning on the plate. Then welded the front and rear arms to the the 2x2 cross bracing. (Also picked up some more 2x2 so I could be more consistent with the build) Also picked up some 6" 3/8" bolts that will be used to locate and somewhat hold the cross arms. They will also be welded, but the bolts will allow them welds to be cut and still retain the mounting positions. Since I now know the exact lengths of the other arms, (well somewhat). I can begin cutting them out and welding them to the cross braces. I can't wait to start working on the white car. 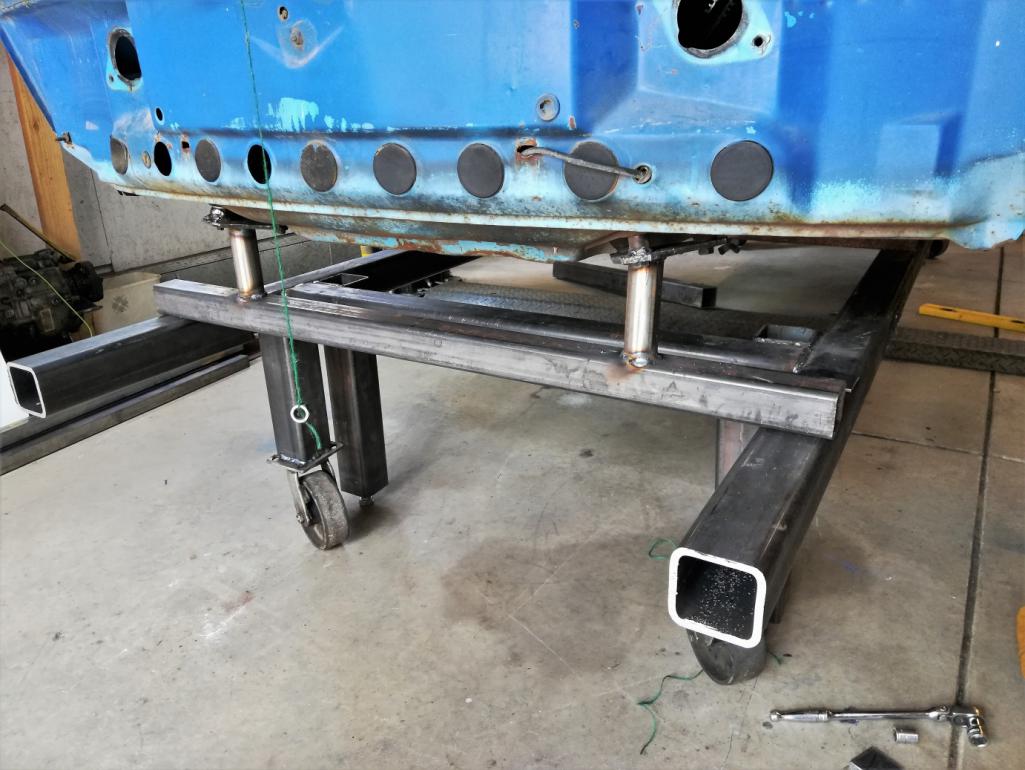 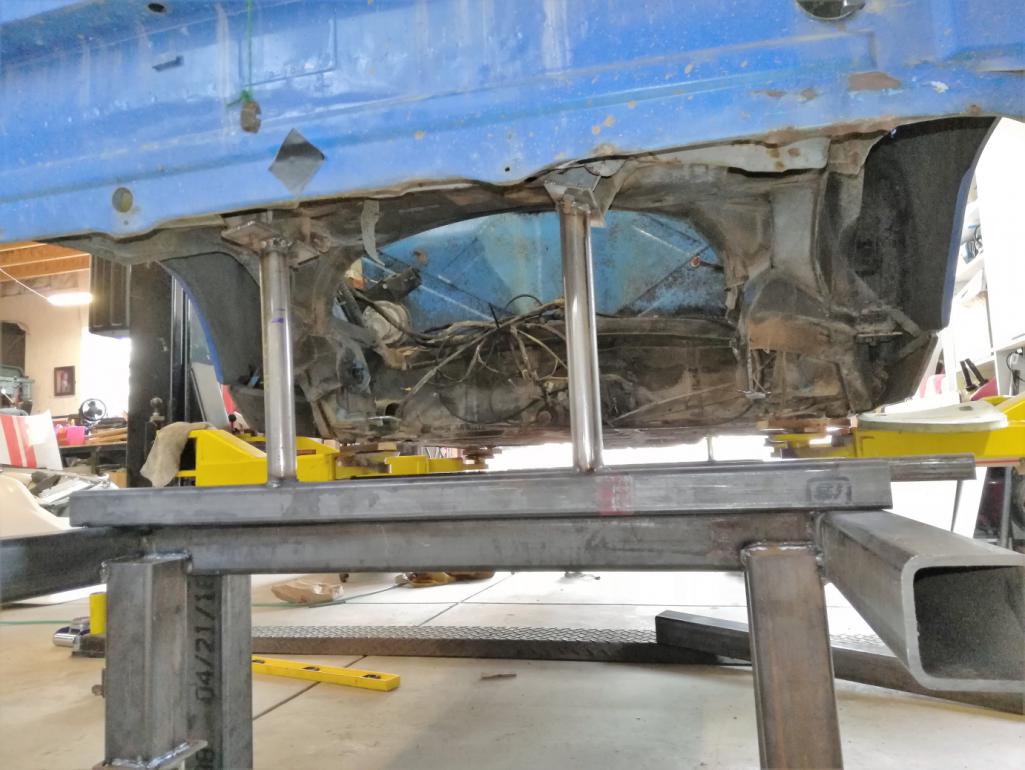 |
|
|
|
| Andyrew |
Aug 17 2018, 05:14 PM
Post
#169
|
|
Spooling.... Please wait Group: Members Posts: 13,381 Joined: 20-January 03 From: Riverbank, Ca Member No.: 172 Region Association: Northern California |
|
|
|
|
| dan10101 |
Aug 20 2018, 12:09 AM
Post
#170
|
|
TORQUE-o-holic Group: Members Posts: 1,140 Joined: 29-April 03 From: Eagle Point, Or Member No.: 626 Region Association: Pacific Northwest |
Continue to make progress on the Jig. A couple more arms to make and it will be ready to test. I say test, because it might be a challenge to unbolt and separate from the body. Ive already make some adjustments to the arms to allow it to drop down and away. I'll make the remaining arms and give it a try.
  |
|
|
|
| Andyrew |
Aug 20 2018, 10:46 AM
Post
#171
|
|
Spooling.... Please wait Group: Members Posts: 13,381 Joined: 20-January 03 From: Riverbank, Ca Member No.: 172 Region Association: Northern California |
If your concern is not being able to lift it straight up you could unbolt and separate the arms from the jig on the ones that look like they will bind.
I think it looks great. Did you get any body/seam clamps? I think doing one clamp on the front of the long would be a good idea. Give you something strong to hold the front of the body with while you separate the bad pieces. |
|
|
|
| dan10101 |
Aug 20 2018, 02:12 PM
Post
#172
|
|
TORQUE-o-holic Group: Members Posts: 1,140 Joined: 29-April 03 From: Eagle Point, Or Member No.: 626 Region Association: Pacific Northwest |
QUOTE(Andyrew @ Aug 20 2018, 09:46 AM) If your concern is not being able to lift it straight up you could unbolt and separate the arms from the jig on the ones that look like they will bind. I think it looks great. Did you get any body/seam clamps? I think doing one clamp on the front of the long would be a good idea. Give you something strong to hold the front of the body with while you separate the bad pieces. I'm not sure what you mean by seam clamps. Here is what I just purchased from Eastwood. BTW, the package of 8 is from Harbor Freight. 1/2 the price, 2x the clamps. 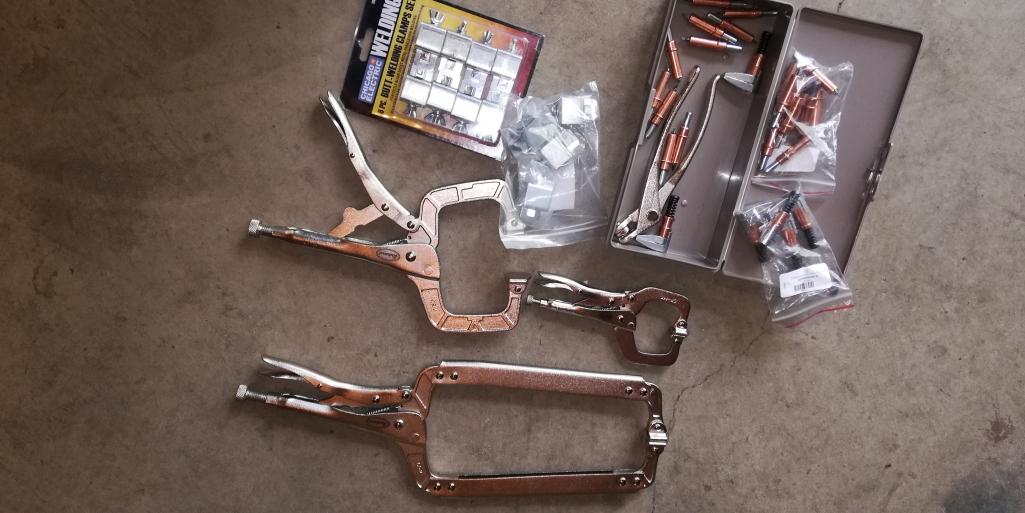 A mid day update. All the arms are built. I have to finish welding a couple on the front. Then shim the cross bracing where it lifted. Most are flush, but a couple I got to hot too soon and they shrunk. I think I'm going to tac weld the cross bracing before I drill it. I can test the arms for clearance and so on, make sure they aren't in a bind. When it's where I want it, I'll begin drilling positioning pins/mounting bolts. That will be a chore as most have to be done from the bottom. Then I might throw a couple more welds on the cross bracing. i don't intend to remove arms until I'm done with the project. Then the welds can be cut off and the positioning pins/bolts can be used to relocate for future use if need be. Forgive my ugly welds. (IMG:style_emoticons/default/welder.gif) It's hard to get in a good position and I always rush these things. I switched to square tubing on a couple on the back. It just made more sense. 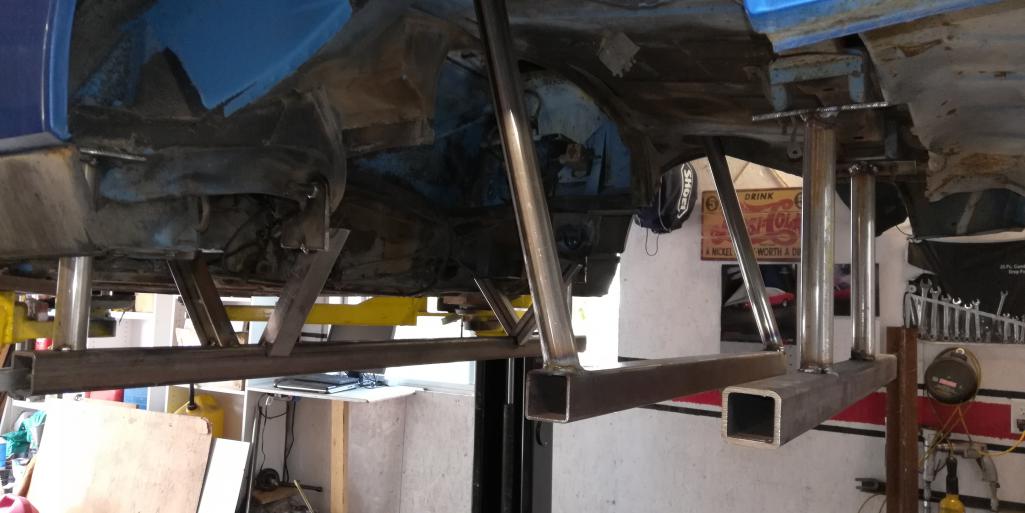 |
|
|
|
| dan10101 |
Aug 20 2018, 04:44 PM
Post
#173
|
|
TORQUE-o-holic Group: Members Posts: 1,140 Joined: 29-April 03 From: Eagle Point, Or Member No.: 626 Region Association: Pacific Northwest |
We have Liftoff!
It's only being held by spot welds. (well, heavy spot welds.) I still need to drill alignment holes and add the bolts. Then I'll call it done. 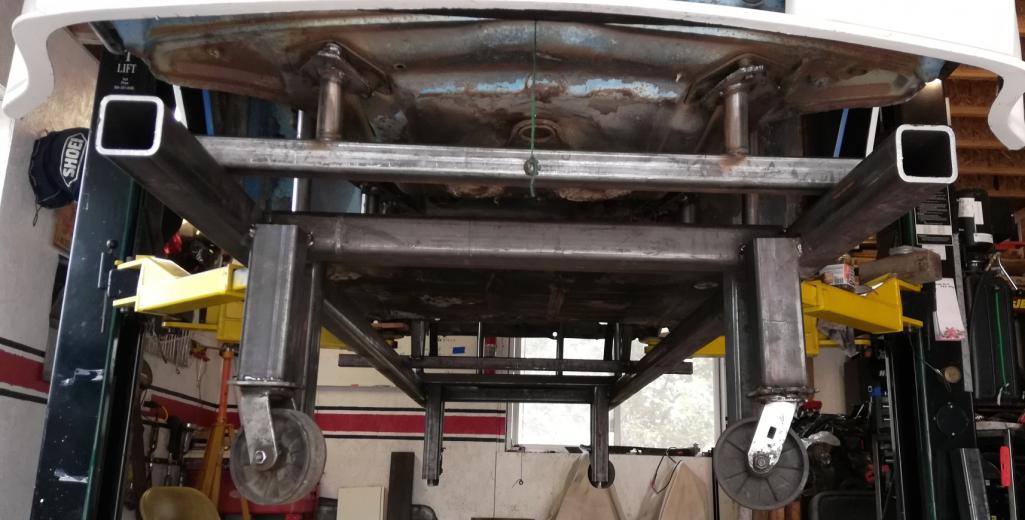 |
|
|
|
| dan10101 |
Aug 21 2018, 10:41 PM
Post
#174
|
|
TORQUE-o-holic Group: Members Posts: 1,140 Joined: 29-April 03 From: Eagle Point, Or Member No.: 626 Region Association: Pacific Northwest |
Ok, this is more like liftoff.
The arms are made, they are solid. No bracing needed. They seem to be holding in place without heat warpage. I did make a tactical error on the motor mount bracket. I put it on top of the mount since it was flat and easier to locate. Does make it very difficult to drop the frame. So I made a cut and bent it out of the way. i can put it back later if I want to once the jig is in place on the white car. Next step is to put it back on the blue car. Make sure everything aligns. Then drill for alignment bolts. Then I can pull it off for good and reassemble the blue car suspension to make it a roller again. Then the fun begins... 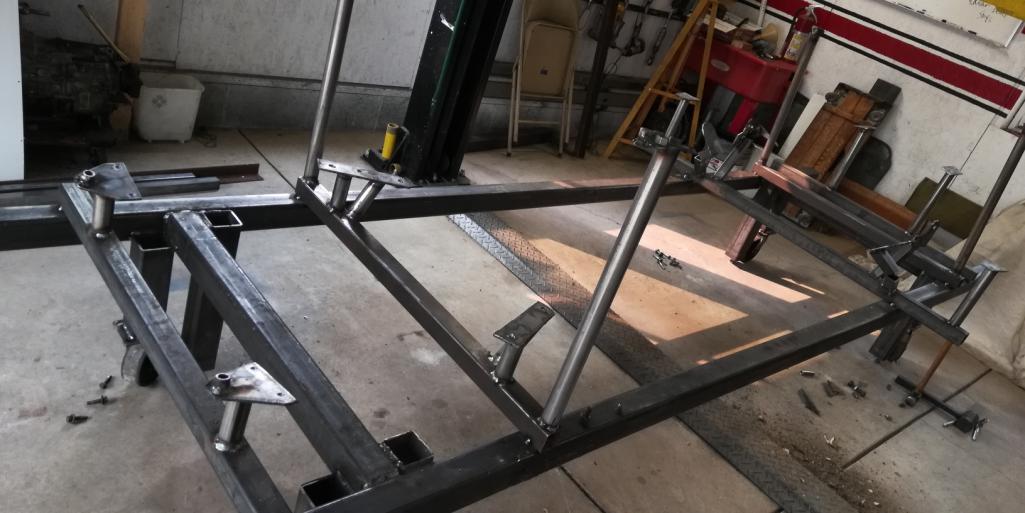 |
|
|
|
| ChrisFoley |
Aug 22 2018, 05:35 AM
Post
#175
|
|
I am Tangerine Racing Group: Members Posts: 8,031 Joined: 29-January 03 From: Bolton, CT Member No.: 209 Region Association: None |
Looks great Dan!
I'd be inclined to separate the strut tower pieces from the lower brackets though. |
|
|
|
| dan10101 |
Aug 22 2018, 09:39 AM
Post
#176
|
|
TORQUE-o-holic Group: Members Posts: 1,140 Joined: 29-April 03 From: Eagle Point, Or Member No.: 626 Region Association: Pacific Northwest |
QUOTE(Racer Chris @ Aug 22 2018, 04:35 AM) Looks great Dan! I'd be inclined to separate the strut tower pieces from the lower brackets though. You bring up a good point. One of the questionable spots is the circled area under the drivers seat. I may need to do something different there if I have to pull it into position. 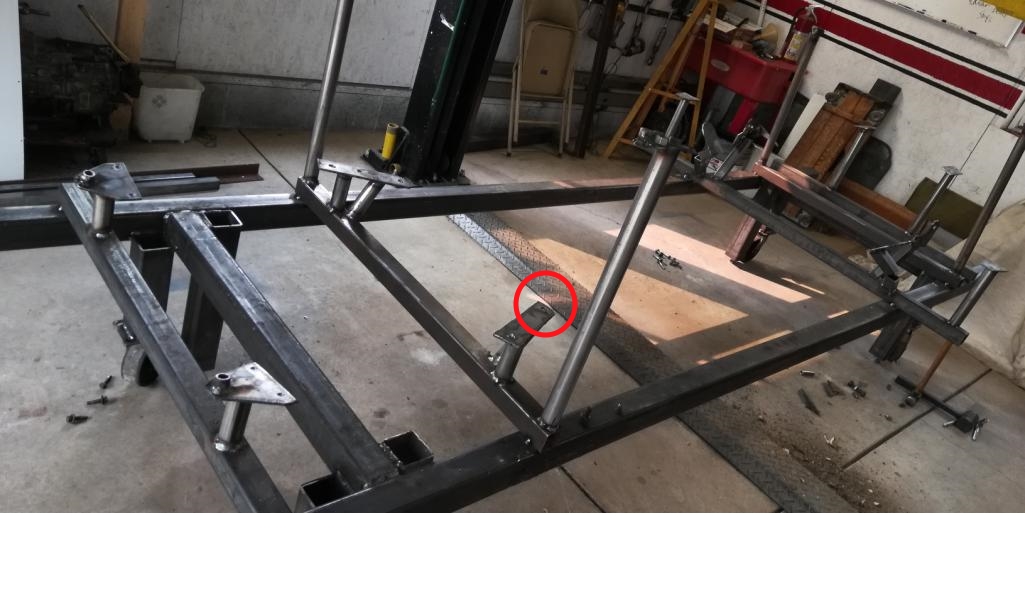 |
|
|
|
| ValcoOscar |
Aug 22 2018, 09:49 AM
Post
#177
|
|
Garage Life Group: Members Posts: 2,658 Joined: 19-November 13 From: SoCal Member No.: 16,669 Region Association: Southern California |
Dan-
I am impressed with what you have accomplished in less than 2 months. It would have taken me 3X as long...congrats. You're a man on a mission and it helps that experienced members are chiming in to offer their input. No doubt this car found the right home (IMG:style_emoticons/default/beerchug.gif) I can't wait to see it in person someday in the near future. Oscar |
 |
|
| dan10101 |
Aug 22 2018, 10:22 AM
Post
#178
|
|
TORQUE-o-holic Group: Members Posts: 1,140 Joined: 29-April 03 From: Eagle Point, Or Member No.: 626 Region Association: Pacific Northwest |
QUOTE(ValcoOscar @ Aug 22 2018, 08:49 AM) You're a man on a mission and it helps that experienced members are chiming in to offer their input. Oscar Thanks Oscar, It does most definitely help. 40 years ago, I struggled through repairs with books checked out from the library. it's a different world. |
|
|
|
| dan10101 |
Aug 22 2018, 11:14 PM
Post
#179
|
|
TORQUE-o-holic Group: Members Posts: 1,140 Joined: 29-April 03 From: Eagle Point, Or Member No.: 626 Region Association: Pacific Northwest |
A quick update.
I completed the reassembly of the chassis and Jig. Only minor adjustments needed. YAY! one more disassembly and it's done. My Datsun friend came over and we assembled the suspension for the blue donor and rolled it out of the shop! After some Laurel and Hardy efforts in getting the Z car in the shop, we were able to pull the engine on Z car and determine the cause of the 'ceased engine'. it was the flywheel rubbing on the trans bell housing. a bit more work to do on the Z car and we'll be back to our regular program. |
|
|
|
| dan10101 |
Aug 24 2018, 09:10 AM
Post
#180
|
|
TORQUE-o-holic Group: Members Posts: 1,140 Joined: 29-April 03 From: Eagle Point, Or Member No.: 626 Region Association: Pacific Northwest |
The Z car is running.
https://www.youtube.com/watch?v=PNTN7Soy__4...eature=youtu.be The BMW suspension is on deck. (IMG:style_emoticons/default/icon_bump.gif) Then back to our regular scheduled program. In the meantime. I'm shopping for wheels. I really want to go with something like this with a deep dish, but I can't find it anywhere. Anyone have any ideas? I have 3" spacers I can remove and use that distance as dish... 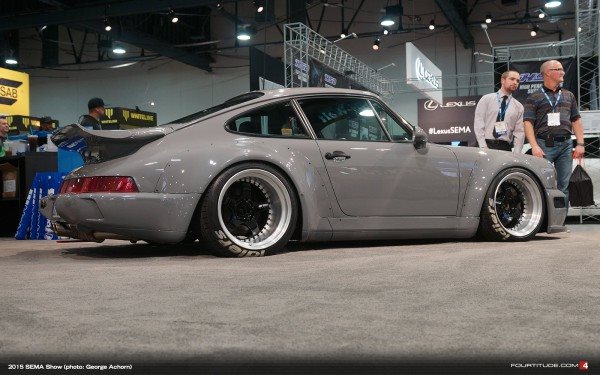 |
|
|
|
|
1 User(s) are reading this topic (1 Guests and 0 Anonymous Users)
0 Members:

|
Lo-Fi Version | Time is now: 21st July 2026 - 07:38 AM |
Invision Power Board
v9.1.4 © 2026 IPS, Inc.