|
|
|
Porsche, and the Porsche crest are registered trademarks of Dr. Ing. h.c. F. Porsche AG.
This site is not affiliated with Porsche in any way. Its only purpose is to provide an online forum for car enthusiasts. All other trademarks are property of their respective owners. |
|
|

  |

| djway |
 Nov 12 2018, 09:10 PM Nov 12 2018, 09:10 PM
Post
#261
|
|
Senior Member  Group: Members Posts: 787 Joined: 16-October 15 From: Riverside Member No.: 19,266 Region Association: Southern California |
I always spray with phosphoric acid diluted to the proper strength. It can remain rust free for quite some time after that. No need to prime
|
   |

 
|
| Andyrew |
Nov 12 2018, 09:42 PM
Post
#262
|
|
Spooling.... Please wait Group: Members Posts: 13,381 Joined: 20-January 03 From: Riverbank, Ca Member No.: 172 Region Association: Northern California |
Now is the best time to prime it. The oils in your hands will cause for issues with rusting as well as surface prep. I would lightly scuff the metal with a pad and wax and grease it then prime it. Thin it really well like I spoke and just give it two or three thin coats.
|
|
|
|
| dan10101 |
Nov 12 2018, 10:54 PM
Post
#263
|
|
TORQUE-o-holic Group: Members Posts: 1,140 Joined: 29-April 03 From: Eagle Point, Or Member No.: 626 Region Association: Pacific Northwest |
QUOTE(djway @ Nov 12 2018, 07:10 PM)  I always spray with phosphoric acid diluted to the proper strength. It can remain rust free for quite some time after that. No need to prime If I was doing this in spring thru summer, I would try it. Kevin Tetz from Trucks talked about something like this. I really wanted to wait a bit, but I'm pushing a timeline against colder weather. It's going to be harder and harder to get this kind of weather for spraying. Plus I'll need another slot to get the color on it. At least the inside part so I can put it back together. I'll wait for the outer panels until it warms up. Anyway it gives me a reason to push... |
|
|
|
| dan10101 |
Nov 12 2018, 11:31 PM
Post
#264
|
|
TORQUE-o-holic Group: Members Posts: 1,140 Joined: 29-April 03 From: Eagle Point, Or Member No.: 626 Region Association: Pacific Northwest |
QUOTE(Andyrew @ Nov 12 2018, 07:42 PM) Now is the best time to prime it. The oils in your hands will cause for issues with rusting as well as surface prep. I would lightly scuff the metal with a pad and wax and grease it then prime it. Thin it really well like I spoke and just give it two or three thin coats. I thought about that as well. It's so pristine, any fingerprint or glove print leaves a mark. (I need some clean gloves). I'll get this done in the next few days. Here I am cleaning the welding areas under the car, It will be a pain working underneath hot sparks, but probably less painful than bending over the fender to do it from above. And it will look better... 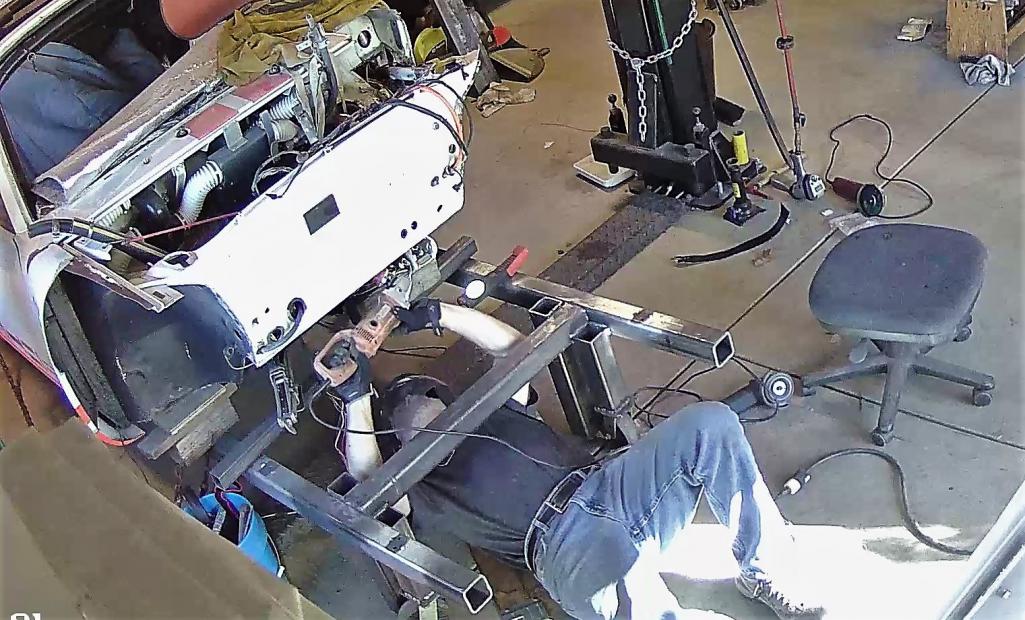 Here's me with the wire wheel accident. It just jumped into my shirt and dug in. I'll be putting a second handle on that grinder if I use it again. 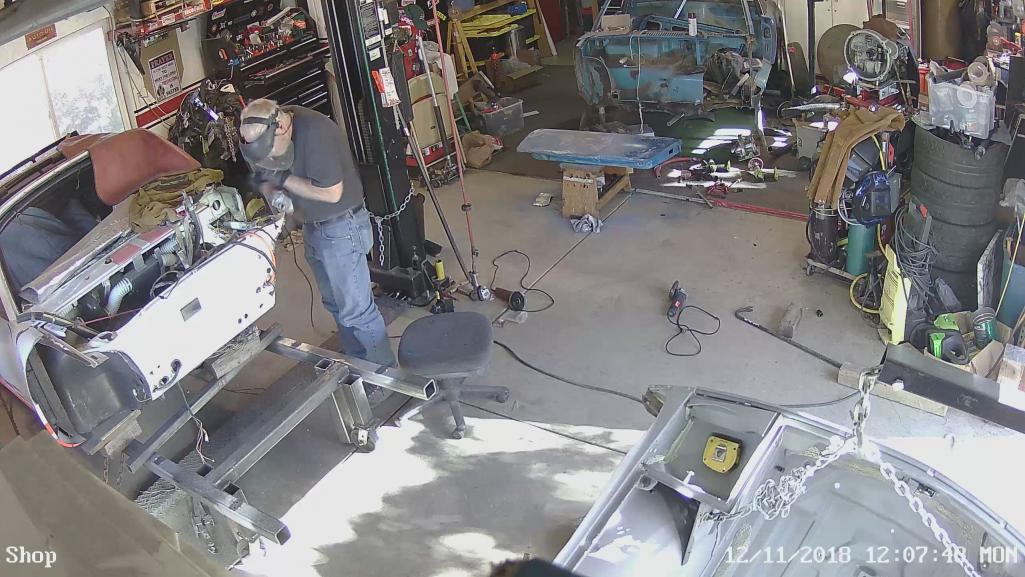 |
|
|
|
| djway |
Nov 13 2018, 12:31 AM
Post
#265
|
|
Senior Member Group: Members Posts: 787 Joined: 16-October 15 From: Riverside Member No.: 19,266 Region Association: Southern California |
Even if you prime the finger touch will still be the same problem.
You always clean, clean, clean before you lay paint. |
|
|
|
| dan10101 |
Nov 13 2018, 01:01 AM
Post
#266
|
|
TORQUE-o-holic Group: Members Posts: 1,140 Joined: 29-April 03 From: Eagle Point, Or Member No.: 626 Region Association: Pacific Northwest |
QUOTE(djway @ Nov 12 2018, 10:31 PM) Even if you prime the finger touch will still be the same problem. You always clean, clean, clean before you lay paint. Good point. Been there done that sold the car, but have the pictures to remind me of that booboo... |
|
|
|
| 914forme |
Nov 13 2018, 08:42 AM
Post
#267
|
|
Times a wastin', get wrenchin'! Group: Members Posts: 3,899 Joined: 24-July 04 From: Dayton, Ohio Member No.: 2,388 Region Association: None |
Don't forget to increase your gas flow if you can. Welding upside down with MIG or TIG can give you all sorts of fits as the shield gas is heavier that air, so your loosing the protection of the weld puddle.
Ben can go into way more details than I can on this one. You didn't happen to make the frame jig so you could lay it over on its side did you? (IMG:style_emoticons/default/idea.gif) for my build Also your work is looking great, way to stay after it. |
|
|
|
| dan10101 |
Nov 13 2018, 09:26 AM
Post
#268
|
|
TORQUE-o-holic Group: Members Posts: 1,140 Joined: 29-April 03 From: Eagle Point, Or Member No.: 626 Region Association: Pacific Northwest |
QUOTE(914forme @ Nov 13 2018, 06:42 AM) Don't forget to increase your gas flow if you can. Welding upside down with MIG or TIG can give you all sorts of fits as the shield gas is heavier that air, so your loosing the protection of the weld puddle. Ben can go into way more details than I can on this one. You didn't happen to make the frame jig so you could lay it over on its side did you? (IMG:style_emoticons/default/idea.gif) for my build Also your work is looking great, way to stay after it. Good tip on the gas flow. No I didn't make it to go upside down. (I've had enough of that this year..) I'm using an Eastwood 175 MIG. If anyone has any welding tips or settings, I would appreciate it. I got a taste of welding thin sheetmetal on the door but I'll need more practice before I go in for the kill. |
|
|
|
| Mike Bellis |
Nov 13 2018, 09:32 PM
Post
#269
|
|
Resident Electrician Group: Members Posts: 8,348 Joined: 22-June 09 From: Midlothian TX Member No.: 10,496 Region Association: None |
Wear a dust mask to cut down on metallic boogers. Not good to breath all that shite.
|
|
|
|
| dan10101 |
Nov 13 2018, 09:53 PM
Post
#270
|
|
TORQUE-o-holic Group: Members Posts: 1,140 Joined: 29-April 03 From: Eagle Point, Or Member No.: 626 Region Association: Pacific Northwest |
Sneak Peak...
It's not quite there yet, but it's close...  |
|
|
|
| dan10101 |
Nov 13 2018, 09:55 PM
Post
#271
|
|
TORQUE-o-holic Group: Members Posts: 1,140 Joined: 29-April 03 From: Eagle Point, Or Member No.: 626 Region Association: Pacific Northwest |
QUOTE(Mike Bellis @ Nov 13 2018, 07:32 PM) Wear a dust mask to cut down on metallic boogers. Not good to breath all that shite. Yeah, after a hat, glasses, ear muffs, long sleeves, I tend to forget that part. Welding is even worse with that big old helmet. |
|
|
|
| dan10101 |
Nov 16 2018, 12:09 AM
Post
#272
|
|
TORQUE-o-holic Group: Members Posts: 1,140 Joined: 29-April 03 From: Eagle Point, Or Member No.: 626 Region Association: Pacific Northwest |
I put some primer on the replacement pieces.
Like the ‘this page is blank purposely’, there are a few spots that I didn’t prime, or left a bit sparse so that I could weld those spots without spending hours undoing today's work. I did previously put some weld thru primer on those spots. Not actually a big deal to many, but for me, it’s the first time I did this on my own. Normally Andrew has his hands in this type of work. I’m feeling pretty accomplished for this mundane task. Prepping, building a ‘booth’, venting with a good fan, mixing paint (I got this wrong the first time), adjusting the gun and the compressor, laying down the wet stuff, finally cleaning up. It turned out pretty good. I’m just glad it’s all hidden by outer layers. (IMG:style_emoticons/default/smile.gif) 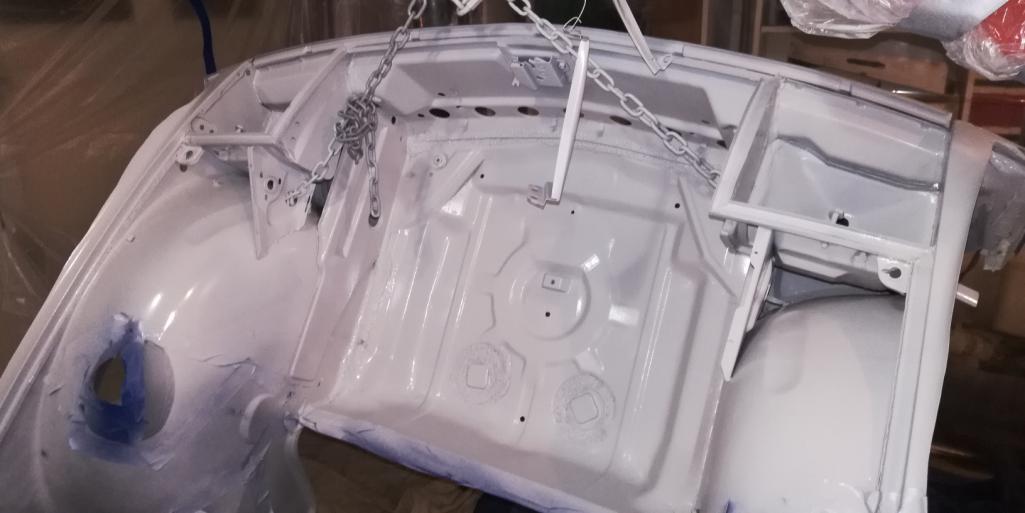 |
|
|
|
| Tbrown4x4 |
Nov 16 2018, 03:37 AM
Post
#273
|
|
Senior Member Group: Members Posts: 708 Joined: 13-May 14 From: Port Orchard, WA Member No.: 17,338 Region Association: None |
QUOTE(Mike Bellis @ Nov 13 2018, 07:32 PM) Wear a dust mask to cut down on metallic boogers. Not good to breath all that shite. Second that. My son's old boss (long time welder/shop owner) started getting random nose bleeds. When he finally went to the doctor, they found a large tumor in his nasal cavity. They are still trying to figure out how bad it is. Wear your protective gear! PS. Great work! Lots of fun to watch this process. |
|
|
|
| dan10101 |
Nov 27 2018, 04:23 PM
Post
#274
|
|
TORQUE-o-holic Group: Members Posts: 1,140 Joined: 29-April 03 From: Eagle Point, Or Member No.: 626 Region Association: Pacific Northwest |
Can someone tell me what gauge metal I'm working with? When I measure it each piece seems inconsistent. I would think they would all be the same except for maybe structure.
Getting closer to welding and I need some practice. |
|
|
|
| Andyrew |
Nov 27 2018, 04:30 PM
Post
#275
|
|
Spooling.... Please wait Group: Members Posts: 13,381 Joined: 20-January 03 From: Riverbank, Ca Member No.: 172 Region Association: Northern California |
QUOTE(dan10101 @ Nov 27 2018, 02:23 PM) Can someone tell me what gauge metal I'm working with? When I measure it each piece seems inconsistent. I would think they would all be the same except for maybe structure. Getting closer to welding and I need some practice. 20-18ga |
|
|
|
| 914forme |
Nov 28 2018, 01:39 PM
Post
#276
|
|
Times a wastin', get wrenchin'! Group: Members Posts: 3,899 Joined: 24-July 04 From: Dayton, Ohio Member No.: 2,388 Region Association: None |
I use these when I don't have the fume extractors running. (IMG:style_emoticons/default/icon8.gif) how dirty they get
Might upgrade to this one. |
|
|
|
| dan10101 |
Nov 28 2018, 07:08 PM
Post
#277
|
|
TORQUE-o-holic Group: Members Posts: 1,140 Joined: 29-April 03 From: Eagle Point, Or Member No.: 626 Region Association: Pacific Northwest |
QUOTE(914forme @ Nov 28 2018, 11:39 AM) I use these when I don't have the fume extractors running. (IMG:style_emoticons/default/icon8.gif) how dirty they get Might upgrade to this one. I normally use one of these to deal with my 45 year old beard. https://www.amazon.com/dp/B01M67SJ0S/ref=ss...ce-e3b457f31c52 I have one of these somewhere, It would fit under the helmet better. https://www.amazon.com/dp/B07DX4LCD5/ref=ss...88-2fb63616cf11 |
|
|
|
| dan10101 |
Nov 28 2018, 07:26 PM
Post
#278
|
|
TORQUE-o-holic Group: Members Posts: 1,140 Joined: 29-April 03 From: Eagle Point, Or Member No.: 626 Region Association: Pacific Northwest |
update:
Still working on trimming and fitting. I took many measurements of the before and after. Before on the blue car. After on the white/blue car. I'm within 1/4 inch now and hoping to get it a bit closer. Michael says it's good at 1/8". For me it depends on where that 1/8" lies. He actually was impressed with my work so far. Right now I have it apart and working a few items as I expect this to be the last time I take it apart before putting some welds on it. Moving the clutch pedal over 1". Maybe the brake too, but we'll see. that mounting board is hard as heck... pardon my language (IMG:style_emoticons/default/wink.gif), dulled 3 drill bits so far. also turning it back rightside up. it was upside down before due to fitment. Then some of the structure around the inner fender needs some work. So I'll do it "while I'm in there" and before I close it up. I'll cut and fit the cowl piece but not final weld it until the 2 pieces come together. Teaser Picture. Michael and I both wanted to see it with the front end on... 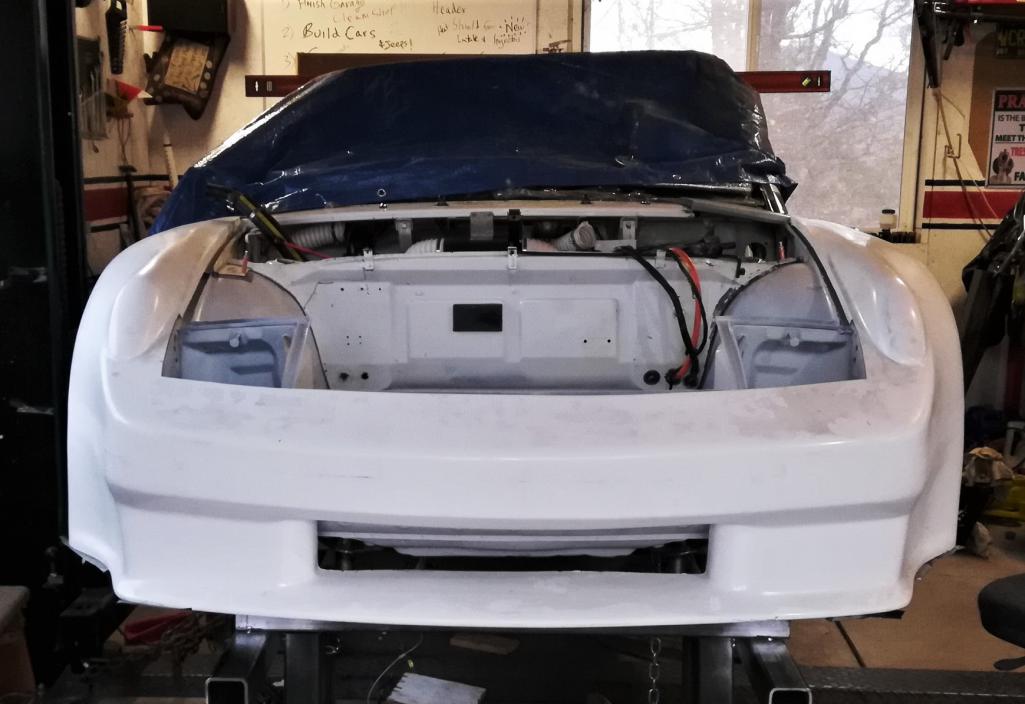 |
|
|
|
| ChrisFoley |
Nov 28 2018, 10:23 PM
Post
#279
|
|
I am Tangerine Racing Group: Members Posts: 8,031 Joined: 29-January 03 From: Bolton, CT Member No.: 209 Region Association: None |
QUOTE(dan10101 @ Nov 27 2018, 05:23 PM) Can someone tell me what gauge metal I'm working with? 1mm 19 ga. |
|
|
|
| djway |
Nov 28 2018, 10:33 PM
Post
#280
|
|
Senior Member Group: Members Posts: 787 Joined: 16-October 15 From: Riverside Member No.: 19,266 Region Association: Southern California |
QUOTE(914forme @ Nov 28 2018, 11:39 AM) I use these when I don't have the fume extractors running. (IMG:style_emoticons/default/icon8.gif) how dirty they get Might upgrade to this one. The simple mask let it junk all around the edges. Go for the better tighter fit. |
|
|
|
|
1 User(s) are reading this topic (1 Guests and 0 Anonymous Users)
0 Members:

|
Lo-Fi Version | Time is now: 21st July 2026 - 11:50 AM |
Invision Power Board
v9.1.4 © 2026 IPS, Inc.