|
|
|
Porsche, and the Porsche crest are registered trademarks of Dr. Ing. h.c. F. Porsche AG.
This site is not affiliated with Porsche in any way. Its only purpose is to provide an online forum for car enthusiasts. All other trademarks are property of their respective owners. |
|
|

  |

| rick 918-S |
 Jan 9 2019, 10:06 AM Jan 9 2019, 10:06 AM
Post
#321
|
|
Hey nice rack! -Celette  Group: Members Posts: 21,146 Joined: 30-December 02 From: Now in Superior WI Member No.: 43 Region Association: Northstar Region |
Good work (IMG:style_emoticons/default/thumb3d.gif)
|
   |

 
|
| dan10101 |
Jan 9 2019, 10:20 AM
Post
#322
|
|
TORQUE-o-holic Group: Members Posts: 1,140 Joined: 29-April 03 From: Eagle Point, Or Member No.: 626 Region Association: Pacific Northwest |
QUOTE(djway @ Jan 9 2019, 01:01 AM)  Any picts of the corner weight rig? Did you try moving those scales around and get an average? You could be closer than you think. They're called Ruggles scales. They used to sell them on ebay.  Given that I don't have the weight where it's supposed to be, I'm not ready to be that precise. But it's a cheap set of scales, so it makes sense to move them to make sure I don't have one or 2 out of wack. It told me what I needed to know, that the car CAN be corner balanced and aligned. When I do the end corner balance, I'll do your suggestion and move them around to see how the weight changes. The scales are 4 to 1. The numbers in orange are the actual scale weights. The numbers in blue are x4. So if I'm off 1# the spreadsheet moves 4# of weight around. Not ideal, but better than nuttin... 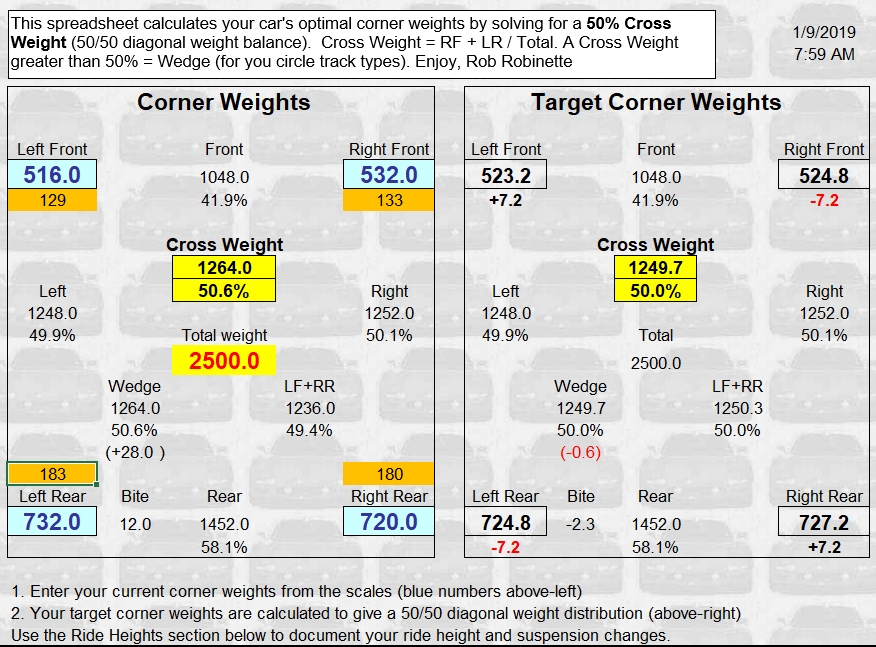 |
|
|
|
| Zippy69 |
Jan 9 2019, 10:58 AM
Post
#323
|
|
Member Group: Members Posts: 60 Joined: 18-March 12 From: NJ Member No.: 14,276 Region Association: None |
QUOTE(dan10101 @ Jan 9 2019, 08:20 AM) QUOTE(djway @ Jan 9 2019, 01:01 AM) Any picts of the corner weight rig? Did you try moving those scales around and get an average? You could be closer than you think. They're called Ruggles scales. They used to sell them on ebay. Given that I don't have the weight where it's supposed to be, I'm not ready to be that precise. But it's a cheap set of scales, so it makes sense to move them to make sure I don't have one or 2 out of wack. It told me what I needed to know, that the car CAN be corner balanced and aligned. When I do the end corner balance, I'll do your suggestion and move them around to see how the weight changes. The scales are 4 to 1. The numbers in orange are the actual scale weights. The numbers in blue are x4. So if I'm off 1# the spreadsheet moves 4# of weight around. Not ideal, but better than nuttin... Last time the car was corner balanced in May 2011 this is what we had Porsche Weight Weighed on Longacre Corner Weight Scales at NE Motorsports on 5/10/11. With ¼ tank of fuel, Floor mat carpets out. No Top Total Weight: 2557 lbs. LF 522 RF 573 LR 760 RR 702 Top in Trunk Total Weight: 2581 lbs. LF 520 RF 570 LR 774 RR 717 Top in Trunk /Me In Car (231 lbs.) Total Weight: 2812 lbs. LF 600 RF 601 LR 861 RR 750 |
|
|
|
| dan10101 |
Jan 9 2019, 11:24 AM
Post
#324
|
|
TORQUE-o-holic Group: Members Posts: 1,140 Joined: 29-April 03 From: Eagle Point, Or Member No.: 626 Region Association: Pacific Northwest |
That's funny, I have that document sitting on my desk along with a bunch of others I'll be scanning into the computer for future reference. BTW, You did provide over the top documentation. (IMG:style_emoticons/default/first.gif)
I was doing a WAG on the weights. I thru 4 batteries in the front trunk, 210# in the passenger seat. No top, No mufflers, No gas tank or gas, no coolant, etc etc.. I'll put it together and get some real readings. If my weights are way off of those previous readings, I'll get a second opinion.. (IMG:style_emoticons/default/smile.gif) Right now, it's just me.. If I get bored, I'll do a scale comparison, that would make me feel better... meanwhile, back to burning wire... (IMG:style_emoticons/default/welder.gif) |
|
|
|
| dan10101 |
Jan 26 2019, 09:19 PM
Post
#325
|
|
TORQUE-o-holic Group: Members Posts: 1,140 Joined: 29-April 03 From: Eagle Point, Or Member No.: 626 Region Association: Pacific Northwest |
Here is your Rolex 24 hr update https://imsatv.imsa.com/
The Screamsicle non-entry is still in the pits. Some delay due to family events but progress to resume shortly. Prior to the shutdown I was able to pull the oil pan and happy to report that nothing out of the ordinary was found. In fact it looks like the engine was just rebuilt, (which I guess is actually true even though it's been 10+ years). So back together it goes, I'll run it as is and if it blows, it blows.  On the welding front, I'm making progress, I still have to cram my big body under the dash and do some overhead spots, but the easy stuff is done. (IMG:style_emoticons/default/smile.gif). I hope to be done with the welding by next weekend. (goals are good). Then I'll tackle some priming and maybe even some final coat for the parts unseen. |
|
|
|
| dan10101 |
Feb 6 2019, 11:36 PM
Post
#326
|
|
TORQUE-o-holic Group: Members Posts: 1,140 Joined: 29-April 03 From: Eagle Point, Or Member No.: 626 Region Association: Pacific Northwest |
Welding update…. It’s DONE! (well mostly, I’m sure I’ll find more to do if I look hard enough)
I spent some time cleaning up the areas that won’t be accessible after I get it assembled. So I put some primer and paint in the areas around the firewall and gas tank as well as under where the suspension will be mounted. Since the underside was previously painted black, I finished it off with a black matte. My next step was to attach the front suspension. Easier said than done. First I needed to mount the clutch master cyl. But, I wanted to mount it in the proper position not upside down as it was.. I found out quickly that they did it for a reason, because the master and the steering rack wants to occupy the same space. I’m sure a couple of you already told me that, but I had to try. So that means I had to bleed the clutch master right side up before mounting it upside down. That also means I had to connect the clutch slave, and the clutch slave bracket, but that means I had to reassemble the oil pickup tube and oil pan. Having done all that I realized that the clutch throwout lever wasn’t engaging properly so I had to pull the trans back and reengage it correctly. I had previously pulled the transaxle out but not put it back in correctly. (There are no books on this) Ok, where was I (are you still following this?) Can you see why this is taking so long? Now the transaxle is back in, correctly engaging the throwout bearing. The gearshift cables are re-connected. The slave cylinder is connected, and guess what. It didn’t need bleeding. It works great. So now I need to flip the slave cyl over to gain room for the steering rack and then… mount the wildwood brackets and pedals, mount the front suspension, run the fuel line, fuel pump, filters, fuel tank, etc cut out the opening for the radiator, fab up radiator mounting brackets, etc. run the hoses. Reassemble the heater, vent hoses, and water lines to the heater core. Cut out turn signal light openings in the fiberglass fenders. Then mount those lights. I also have to do the one part that is still 914. That is assemble the headlight buckets. Now comes the fun part. Wiring it all back up. I labeled it all and marked it down on paper and lots of photos. But it will still be ‘fun’. I left out an important part. That is mounting the fiberglass fender and front bumper assembly. So I’ll probably insert that in to the mix where appropriate. Oh and the windshield install. And the door. And a tune-up. And the seat mod, and roll bar mods. And some day I’ll get to paint… So, there are a few bits to accomplish in the next month before the first autocross. (IMG:style_emoticons/default/av-943.gif) (IMG:style_emoticons/default/av-943.gif) (IMG:style_emoticons/default/av-943.gif) |
|
|
|
| Andyrew |
Feb 7 2019, 12:47 AM
Post
#327
|
|
Spooling.... Please wait Group: Members Posts: 13,380 Joined: 20-January 03 From: Riverbank, Ca Member No.: 172 Region Association: Northern California |
Month???
That would be 3 years for me... Great work so far!!! I've seen the pictures you guys haven't and it looks fantastic (IMG:style_emoticons/default/smile.gif) |
|
|
|
| djway |
Feb 7 2019, 02:07 AM
Post
#328
|
|
Senior Member Group: Members Posts: 787 Joined: 16-October 15 From: Riverside Member No.: 19,266 Region Association: Southern California |
Congrats on another stage conquered.
What is the heater setup like? That is one part I have not settled on yet. |
|
|
|
| tygaboy |
Feb 7 2019, 08:20 AM
Post
#329
|
|
914 Guru Group: Members Posts: 5,724 Joined: 6-October 15 From: Petaluma, CA Member No.: 19,241 Region Association: Northern California |
Go Dan GO! (IMG:style_emoticons/default/cheer.gif)
And pics... we need the pics! |
 |
|
| dan10101 |
Feb 7 2019, 10:00 AM
Post
#330
|
|
TORQUE-o-holic Group: Members Posts: 1,140 Joined: 29-April 03 From: Eagle Point, Or Member No.: 626 Region Association: Pacific Northwest |
QUOTE(djway @ Feb 7 2019, 12:07 AM) Congrats on another stage conquered. What is the heater setup like? That is one part I have not settled on yet. Basically the heater is a standard water heater core fed by 2 heater hoses coming from the v8. They feed down the driver’s side long and up into the front above the driver’s feet. They feed the custom box shown, (maybe a hot rod product?). That feeds what I believe are standard 914 air distribution valves. Here are a couple pictures before I molested it... 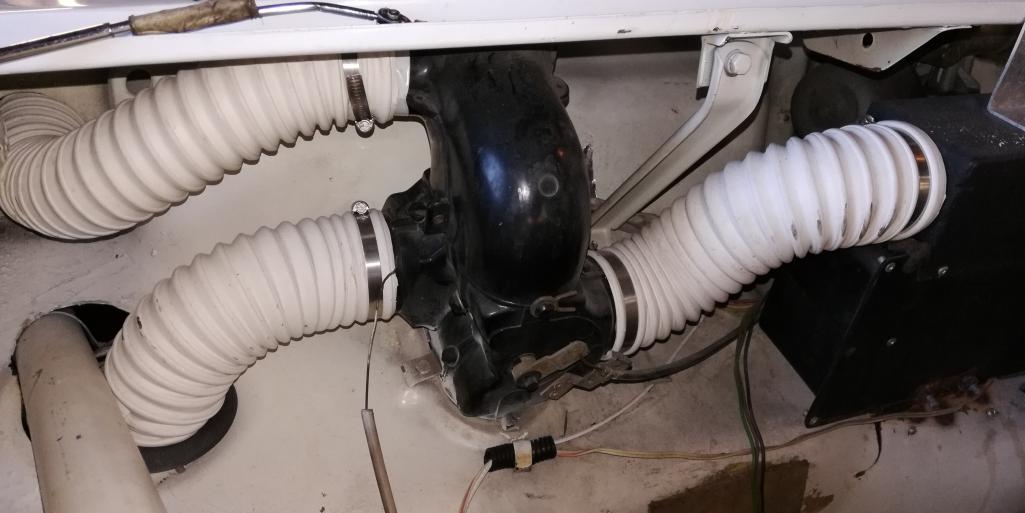 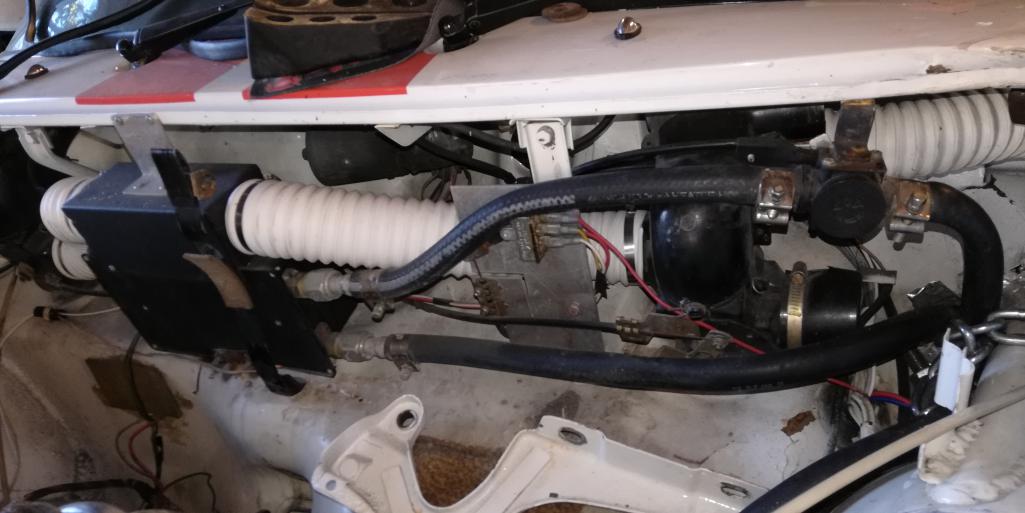 |
|
|
|
| dan10101 |
Feb 7 2019, 10:23 AM
Post
#331
|
|
TORQUE-o-holic Group: Members Posts: 1,140 Joined: 29-April 03 From: Eagle Point, Or Member No.: 626 Region Association: Pacific Northwest |
QUOTE(tygaboy @ Feb 7 2019, 06:20 AM) I need to take a few more pictures. And edit them so they fit on the website. But here are some teasers. 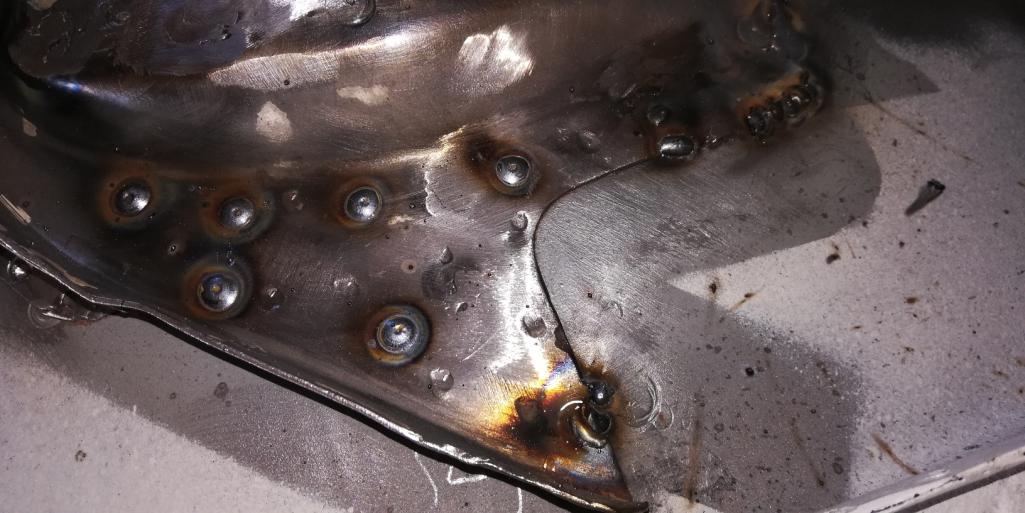 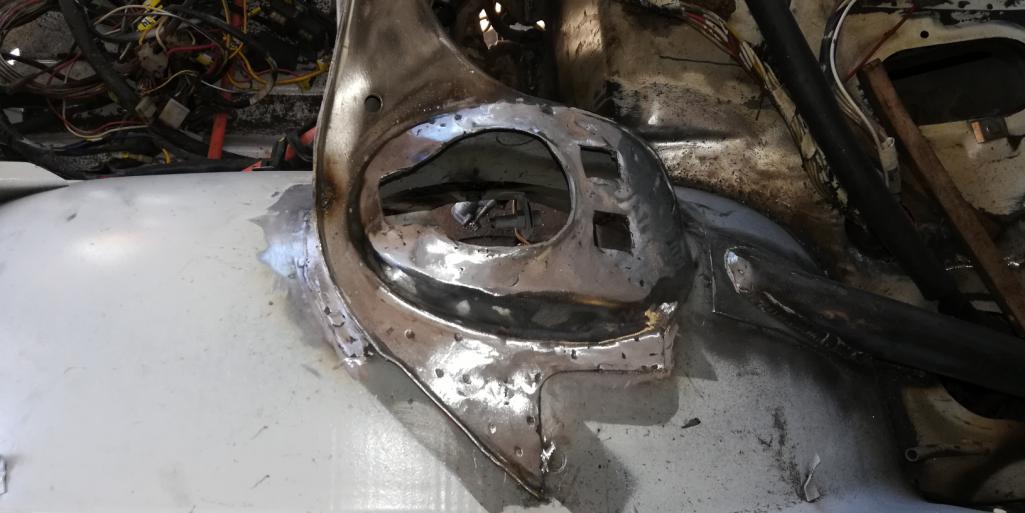 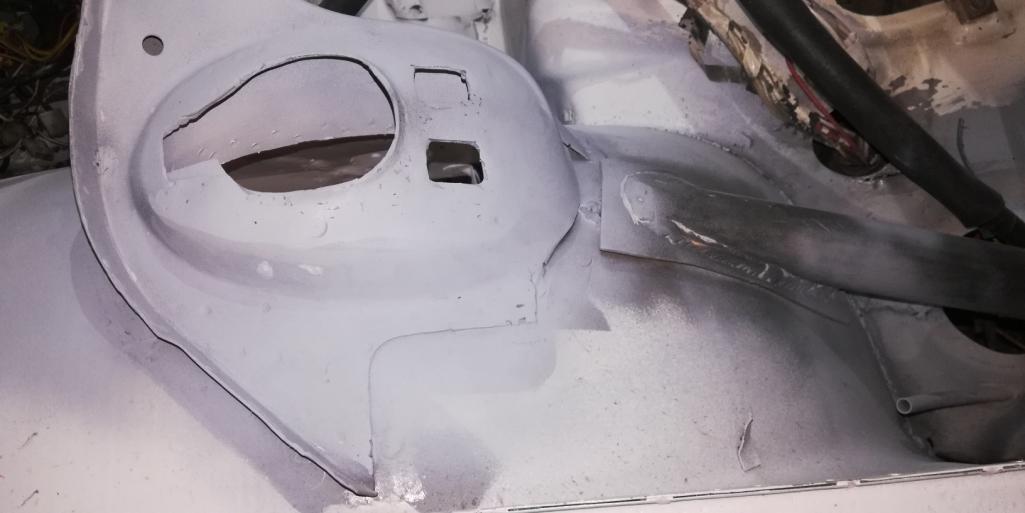 |
|
|
|
| Zippy69 |
Feb 7 2019, 03:05 PM
Post
#332
|
|
Member Group: Members Posts: 60 Joined: 18-March 12 From: NJ Member No.: 14,276 Region Association: None |
QUOTE(dan10101 @ Feb 6 2019, 09:36 PM) Welding update…. It’s DONE! (well mostly, I’m sure I’ll find more to do if I look hard enough) I spent some time cleaning up the areas that won’t be accessible after I get it assembled. So I put some primer and paint in the areas around the firewall and gas tank as well as under where the suspension will be mounted. Since the underside was previously painted black, I finished it off with a black matte. My next step was to attach the front suspension. Easier said than done. First I needed to mount the clutch master cyl. But, I wanted to mount it in the proper position not upside down as it was.. I found out quickly that they did it for a reason, because the master and the steering rack wants to occupy the same space. I’m sure a couple of you already told me that, but I had to try. So that means I had to bleed the clutch master right side up before mounting it upside down. That also means I had to connect the clutch slave, and the clutch slave bracket, but that means I had to reassemble the oil pickup tube and oil pan. Having done all that I realized that the clutch throwout lever wasn’t engaging properly so I had to pull the trans back and reengage it correctly. I had previously pulled the transaxle out but not put it back in correctly. (There are no books on this) Ok, where was I (are you still following this?) Can you see why this is taking so long? Now the transaxle is back in, correctly engaging the throwout bearing. The gearshift cables are re-connected. The slave cylinder is connected, and guess what. It didn’t need bleeding. It works great. So now I need to flip the slave cyl over to gain room for the steering rack and then… mount the wildwood brackets and pedals, mount the front suspension, run the fuel line, fuel pump, filters, fuel tank, etc cut out the opening for the radiator, fab up radiator mounting brackets, etc. run the hoses. Reassemble the heater, vent hoses, and water lines to the heater core. Cut out turn signal light openings in the fiberglass fenders. Then mount those lights. I also have to do the one part that is still 914. That is assemble the headlight buckets. Now comes the fun part. Wiring it all back up. I labeled it all and marked it down on paper and lots of photos. But it will still be ‘fun’. I left out an important part. That is mounting the fiberglass fender and front bumper assembly. So I’ll probably insert that in to the mix where appropriate. Oh and the windshield install. And the door. And a tune-up. And the seat mod, and roll bar mods. And some day I’ll get to paint… So, there are a few bits to accomplish in the next month before the first autocross. (IMG:style_emoticons/default/av-943.gif) (IMG:style_emoticons/default/av-943.gif) (IMG:style_emoticons/default/av-943.gif) Good work Dan! Been there done that regarding clutch lever! LOL That's why we put those really nice studs on the engine so it is easier to properly install the transaxle and specifically the fork. Re the master cylinder ...we re-enforced and fabbed up that floor mounting area with the wrong stroke master (Couldn't get enough throw with 1 1/8" so went to 1.4") and when we purchased the 1.4" master we realized the mounting bolts were opposite! I will never know WHY Wilwood in their infinite wisdom did that! After contemplating changes and a few beers later we decided the easiest solution was to mount it upside down after bleeding! (Reservoir/Low pressure side comes in from bottom instead of top). It works fine as long as no air gets in system. Make sure system adjusted correctly as you will have just enough throw to properly engage or disengage the clutch. Ask me how I know this... LOL Best, Paul |
|
|
|
| dan10101 |
Feb 7 2019, 03:24 PM
Post
#333
|
|
TORQUE-o-holic Group: Members Posts: 1,140 Joined: 29-April 03 From: Eagle Point, Or Member No.: 626 Region Association: Pacific Northwest |
QUOTE(Zippy69 @ Feb 7 2019, 01:05 PM) Good work Dan! Been there done that regarding clutch lever! LOL That's why we put those really nice studs on the engine so it is easier to properly install the transaxle and specifically the fork. Re the master cylinder ...we re-enforced and fabbed up that floor mounting area with the wrong stroke master (Couldn't get enough throw with 1 1/8" so went to 1.4") and when we purchased the 1.4" master we realized the mounting bolts were opposite! I will never know WHY Wilwood in their infinite wisdom did that! After contemplating changes and a few beers later we decided the easiest solution was to mount it upside down after bleeding! (Reservoir/Low pressure side comes in from bottom instead of top). It works fine as long as no air gets in system. Make sure system adjusted correctly as you will have just enough throw to properly engage or disengage the clutch. Ask me how I know this... LOL Best, Paul Those studs are the best! That was the easiest part of the work. Allowed me to move the trans in bit by bit until it bit the throwout bearing. I'm not too worried about the clutch master. But thanks for the encouragement. I am thinking about doing dual brake masters, I really like the idea of dual fluid containment systems. I'll put it together with the single for now, but was wondering if you had considered this? |
|
|
|
| Zippy69 |
Feb 7 2019, 03:48 PM
Post
#334
|
|
Member Group: Members Posts: 60 Joined: 18-March 12 From: NJ Member No.: 14,276 Region Association: None |
QUOTE(dan10101 @ Feb 7 2019, 01:24 PM) QUOTE(Zippy69 @ Feb 7 2019, 01:05 PM) Good work Dan! Been there done that regarding clutch lever! LOL That's why we put those really nice studs on the engine so it is easier to properly install the transaxle and specifically the fork. Re the master cylinder ...we re-enforced and fabbed up that floor mounting area with the wrong stroke master (Couldn't get enough throw with 1 1/8" so went to 1.4") and when we purchased the 1.4" master we realized the mounting bolts were opposite! I will never know WHY Wilwood in their infinite wisdom did that! After contemplating changes and a few beers later we decided the easiest solution was to mount it upside down after bleeding! (Reservoir/Low pressure side comes in from bottom instead of top). It works fine as long as no air gets in system. Make sure system adjusted correctly as you will have just enough throw to properly engage or disengage the clutch. Ask me how I know this... LOL Best, Paul Those studs are the best! That was the easiest part of the work. Allowed me to move the trans in bit by bit until it bit the throwout bearing. I'm not too worried about the clutch master. But thanks for the encouragement. I am thinking about doing dual brake masters, I really like the idea of dual fluid containment systems. I'll put it together with the single for now, but was wondering if you had considered this? Probably a good idea re dual brake. My list of repairs/customizations/modifications was very long as you can see by all of the documentation that I provided. Never made it that far down the list as it was in the optional category. One thing comes to mind as you are assembling the wiring in front of car. We paid less attention to most of the wiring in that area so double check and make sure grommets are used on all wiring thru firewalls while it is apart. We did some, it was on my list to look at but never got to it. Lastly did you ever determine source of the ticking sound in top of the motor. Sounds like a stuck lifter to me? This only appeared after the car sat for some time. Might be worth exploring? |
|
|
|
| dan10101 |
Feb 7 2019, 06:23 PM
Post
#335
|
|
TORQUE-o-holic Group: Members Posts: 1,140 Joined: 29-April 03 From: Eagle Point, Or Member No.: 626 Region Association: Pacific Northwest |
QUOTE(Zippy69 @ Feb 7 2019, 01:48 PM) Probably a good idea re dual brake. My list of repairs/customizations/modifications was very long as you can see by all of the documentation that I provided. Never made it that far down the list as it was in the optional category. One thing comes to mind as you are assembling the wiring in front of car. We paid less attention to most of the wiring in that area so double check and make sure grommets are used on all wiring thru firewalls while it is apart. We did some, it was on my list to look at but never got to it. Lastly did you ever determine source of the ticking sound in top of the motor. Sounds like a stuck lifter to me? This only appeared after the car sat for some time. Might be worth exploring? I'll be updating the wiring as I go. I should do the whole thing. But, the wires seem to be fine, I'll add some wire looms and I think it will be ok. Yes and grommets. I haven't pulled the valve covers, but I didn't hear any excessive noise using a stethoscope. They were all consistently the same. My noise test involved many things, but the one that gave me the biggest clue is insulating the headers using sound deadening material. I have a video showing a dramatic difference in sound isolating the bottom end, with and without the material. I did pull the oil pan but found nothing other than the oil pickup tube o-ring was black instead of orange. That could be the difference in manufacturers, but the new one seems fatter. There was no foaming indication that that was the problem, but we'll see. I put it back together and I'll let it warm up and see what noise I get. |
|
|
|
| djway |
Feb 7 2019, 10:11 PM
Post
#336
|
|
Senior Member Group: Members Posts: 787 Joined: 16-October 15 From: Riverside Member No.: 19,266 Region Association: Southern California |
QUOTE(dan10101 @ Feb 7 2019, 08:00 AM) QUOTE(djway @ Feb 7 2019, 12:07 AM) Congrats on another stage conquered. What is the heater setup like? That is one part I have not settled on yet. Basically the heater is a standard water heater core fed by 2 heater hoses coming from the v8. They feed down the driver’s side long and up into the front above the driver’s feet. They feed the custom box shown, (maybe a hot rod product?). That feeds what I believe are standard 914 air distribution valves. Here are a couple pictures before I molested it... Thanks for the pictures. So the hot water comes from the rear? I wonder if there’s any way to come from the front by the radiator? |
|
|
|
| dan10101 |
Feb 7 2019, 10:26 PM
Post
#337
|
|
TORQUE-o-holic Group: Members Posts: 1,140 Joined: 29-April 03 From: Eagle Point, Or Member No.: 626 Region Association: Pacific Northwest |
QUOTE(djway @ Feb 7 2019, 08:11 PM) Thanks for the pictures. So the hot water comes from the rear? I wonder if there’s any way to come from the front by the radiator? Just brainstorming here... I wonder if there would be a way to take the hot side hose and run it thru the heater core. You would either need to split it so that it could flow more and either put a flapper valve to allow excess pressure to go directly to the radiator. But at the same time you would probably need to be able to shut off flow thru the heater core when it gets too warm in the cab. Another thought.. pull heat directly from the radiator. Hmm. like above you would need to come up with a way to completly shut off hot air going into the passenger compartment, but I think this would be an easier solution to implement. |
|
|
|
| Andyrew |
Feb 7 2019, 10:30 PM
Post
#338
|
|
Spooling.... Please wait Group: Members Posts: 13,380 Joined: 20-January 03 From: Riverbank, Ca Member No.: 172 Region Association: Northern California |
QUOTE(djway @ Feb 7 2019, 08:11 PM) QUOTE(dan10101 @ Feb 7 2019, 08:00 AM) QUOTE(djway @ Feb 7 2019, 12:07 AM) Congrats on another stage conquered. What is the heater setup like? That is one part I have not settled on yet. Basically the heater is a standard water heater core fed by 2 heater hoses coming from the v8. They feed down the driver’s side long and up into the front above the driver’s feet. They feed the custom box shown, (maybe a hot rod product?). That feeds what I believe are standard 914 air distribution valves. Here are a couple pictures before I molested it... Thanks for the pictures. So the hot water comes from the rear? I wonder if there’s any way to come from the front by the radiator? Generally cars get heat to the heater core before the radiator so it heats up the passengers first. Also with the thermostat opening at 160-200+ degrees that could take significant time before air starts blowing hot. Thus these systems take hot air directly from the engine and feed it back into the system between the thermostat and the block. There are 914 guys who have taken the easy route of pulling the heat closer to the radiator and I remember hearing that complaint. |
|
|
|
| djway |
Feb 7 2019, 10:45 PM
Post
#339
|
|
Senior Member Group: Members Posts: 787 Joined: 16-October 15 From: Riverside Member No.: 19,266 Region Association: Southern California |
QUOTE(Andyrew @ Feb 7 2019, 08:30 PM) QUOTE(djway @ Feb 7 2019, 08:11 PM) QUOTE(dan10101 @ Feb 7 2019, 08:00 AM) QUOTE(djway @ Feb 7 2019, 12:07 AM) Congrats on another stage conquered. What is the heater setup like? That is one part I have not settled on yet. Basically the heater is a standard water heater core fed by 2 heater hoses coming from the v8. They feed down the driver’s side long and up into the front above the driver’s feet. They feed the custom box shown, (maybe a hot rod product?). That feeds what I believe are standard 914 air distribution valves. Here are a couple pictures before I molested it... Thanks for the pictures. So the hot water comes from the rear? I wonder if there’s any way to come from the front by the radiator? Generally cars get heat to the heater core before the radiator so it heats up the passengers first. Also with the thermostat opening at 160-200+ degrees that could take significant time before air starts blowing hot. Thus these systems take hot air directly from the engine and feed it back into the system between the thermostat and the block. There are 914 guys who have taken the easy route of pulling the heat closer to the radiator and I remember hearing that complaint. Thanks for the information. I have never worked with water before (IMG:style_emoticons/default/smile.gif) So run from the back it is. Unless, running an electric water pump changes things as I believe the heater core was fed off a section of the water pump. I'm confused LOL |
|
|
|
| burton73 |
Feb 8 2019, 10:53 AM
Post
#340
|
|
Senior member, and old dude Group: Members Posts: 3,931 Joined: 2-January 07 From: Los Angeles Member No.: 7,414 Region Association: Southern California |
QUOTE(Zippy69 @ Feb 7 2019, 01:48 PM) QUOTE(dan10101 @ Feb 7 2019, 01:24 PM) QUOTE(Zippy69 @ Feb 7 2019, 01:05 PM) Good work Dan! Been there done that regarding clutch lever! LOL That's why we put those really nice studs on the engine so it is easier to properly install the transaxle and specifically the fork. Re the master cylinder ...we re-enforced and fabbed up that floor mounting area with the wrong stroke master (Couldn't get enough throw with 1 1/8" so went to 1.4") and when we purchased the 1.4" master we realized the mounting bolts were opposite! I will never know WHY Wilwood in their infinite wisdom did that! After contemplating changes and a few beers later we decided the easiest solution was to mount it upside down after bleeding! (Reservoir/Low pressure side comes in from bottom instead of top). It works fine as long as no air gets in system. Make sure system adjusted correctly as you will have just enough throw to properly engage or disengage the clutch. Ask me how I know this... LOL Best, Paul Those studs are the best! That was the easiest part of the work. Allowed me to move the trans in bit by bit until it bit the throwout bearing. I'm not too worried about the clutch master. But thanks for the encouragement. I am thinking about doing dual brake masters, I really like the idea of dual fluid containment systems. I'll put it together with the single for now, but was wondering if you had considered this? Probably a good idea re dual brake. My list of repairs/customizations/modifications was very long as you can see by all of the documentation that I provided. Never made it that far down the list as it was in the optional category. One thing comes to mind as you are assembling the wiring in front of car. We paid less attention to most of the wiring in that area so double check and make sure grommets are used on all wiring thru firewalls while it is apart. We did some, it was on my list to look at but never got to it. Lastly did you ever determine source of the ticking sound in top of the motor. Sounds like a stuck lifter to me? This only appeared after the car sat for some time. Might be worth exploring? Hi Dan, I want to point out one more time that Bill, that built you car offered me the pre-drilled, bent metal plate for the duel brake masters and the clutch. You can see it in my photo. I got the shorter Willwood masters and it clears the Carrera rack. It tight but it clears the rubber bellows and all. You have a drive by wire throttle that makes it very nice. Maybe Bill bent the metal just in case he wanted to go with 3 masters. Bob B 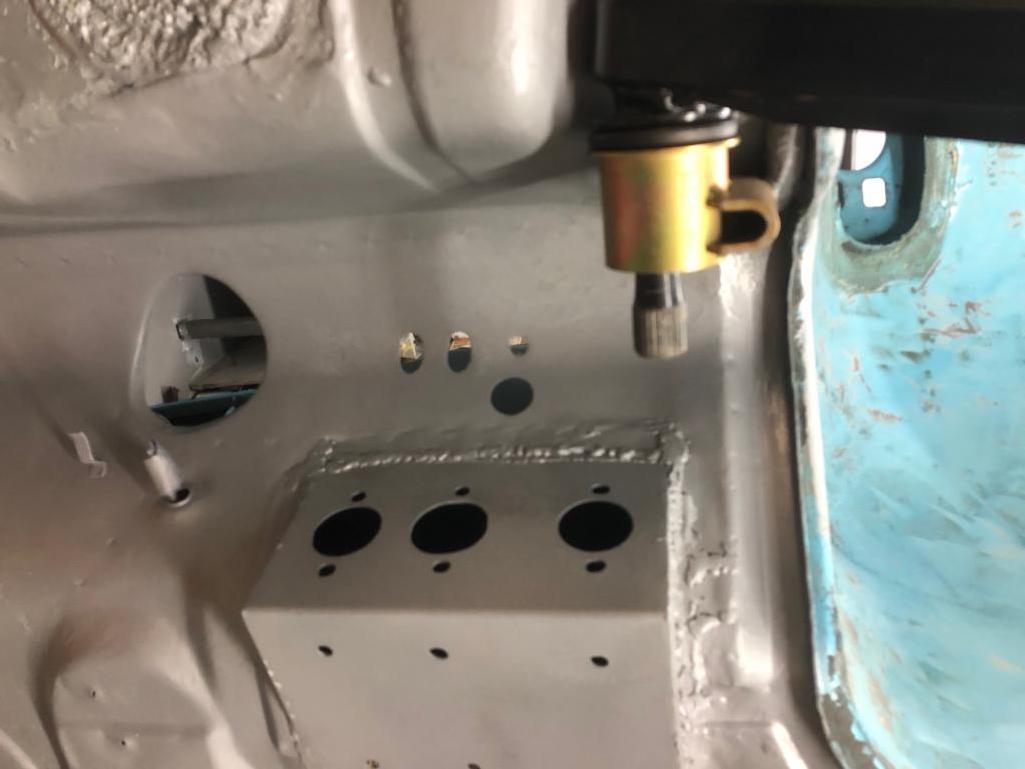 |
|
|
|
|
1 User(s) are reading this topic (1 Guests and 0 Anonymous Users)
0 Members:

|
Lo-Fi Version | Time is now: 19th December 2025 - 11:50 PM |
Invision Power Board
v9.1.4 © 2025 IPS, Inc.