|
|
|
Porsche, and the Porsche crest are registered trademarks of Dr. Ing. h.c. F. Porsche AG.
This site is not affiliated with Porsche in any way. Its only purpose is to provide an online forum for car enthusiasts. All other trademarks are property of their respective owners. |
|
|


| Nogoodwithusernames |
 Aug 9 2018, 03:15 PM Aug 9 2018, 03:15 PM
Post
#1
|
|
Member  Group: Members Posts: 235 Joined: 31-May 16 From: Nor-Cal Member No.: 20,051 Region Association: None |
Is anyone making a kit like the one Mr. Bland was making before he passed? My car already has a reflector and solenoid kit installed but of course it's iffy and requires two people when it does work (to depress the trunk lid). Or maybe have a list of components or some instructions for anything like it?
Figured after finishing up brakes this weekend *fingers crossed* I should make sure the rear trunk works since I've got a road trip planned with it in a few months. http://www.914world.com/bbs2/index.php?act...f=4&t=17486 |
   |

 
|
  |
Replies(1 - 19)
| dr914@autoatlanta.com |
Aug 9 2018, 03:21 PM
Post
#2
|
|
914 Guru Group: Members Posts: 7,821 Joined: 3-January 07 From: atlanta georgia Member No.: 7,418 Region Association: None |
you could adjust the solenoid lever to start the piston further down in the solenoid, that will make it pop every time.
QUOTE(Nogoodwithusernames @ Aug 9 2018, 02:15 PM)  Is anyone making a kit like the one Mr. Bland was making before he passed? My car already has a reflector and solenoid kit installed but of course it's iffy and requires two people when it does work (to depress the trunk lid). Or maybe have a list of components or some instructions for anything like it? Figured after finishing up brakes this weekend *fingers crossed* I should make sure the rear trunk works since I've got a road trip planned with it in a few months. http://www.914world.com/bbs2/index.php?act...f=4&t=17486 |
|
|
|
| burton73 |
Aug 9 2018, 05:04 PM
Post
#3
|
|
burton73 Group: Members Posts: 3,508 Joined: 2-January 07 From: Los Angeles Member No.: 7,414 Region Association: Southern California |
Put a strong wire on the solenoid bracket so if your battery is dead or you need to get into the rear trunk in an emergence you can grab the wire from under the rear bumper and releases the rear trunk. Lots of guys do that. Look it up on search Engen.
And do what the Dr. George says Bob B |
|
|
|
| Nogoodwithusernames |
Aug 20 2018, 10:58 AM
Post
#4
|
|
Member Group: Members Posts: 235 Joined: 31-May 16 From: Nor-Cal Member No.: 20,051 Region Association: None |
Alright well I couldn't see any way to adjust the solenoid, lever, or bracket on mine. I got a 10foot pull cable (took much searching as no bike cables are that long!) on the way as well as some fittings for it, all available from amazon. Then I'll fab up a new bracket for the latch end to utilize the cable instead of the solenoid.
I'd much rather the security of releasing the trunk from the cabin vs a cable dangling under the car. I'll try to get lots of photos and do up a thread detailing the build so other people can do it too if they want. If anyone has photos of where things go inside the car on the Engman kit or photos of the templates that would be much appreciated. |
|
|
|
| Nogoodwithusernames |
Oct 23 2018, 01:58 PM
Post
#5
|
|
Member Group: Members Posts: 235 Joined: 31-May 16 From: Nor-Cal Member No.: 20,051 Region Association: None |
Well I've made some progress on this since my last post, I've got a cable coiled in the engine compartment that I can use to pop the rear trunk latch. I've been hesitant to drill any holes to run it up to the cockpit without your input first though.
My two options I'm thinking of are running it right above the engine cover pull knob and 3d printing a similar cover and knob to match, or running it under the driver seat like how I think the original Engman version was done. I'm having a hard time telling where I would need to drill through the sheet metal in the engine bay to come out in the right spot inside though and want guidance before hand to avoid having to weld up any extra holes. All thoughts/opinions/pictures are welcome. |
|
|
|
| mepstein |
Oct 23 2018, 02:12 PM
Post
#6
|
|
914-6 GT in waiting Group: Members Posts: 19,245 Joined: 19-September 09 From: Landenberg, PA/Wilmington, DE Member No.: 10,825 Region Association: MidAtlantic Region |
QUOTE(Nogoodwithusernames @ Aug 20 2018, 12:58 PM) Alright well I couldn't see any way to adjust the solenoid, lever, or bracket on mine. I got a 10foot pull cable (took much searching as no bike cables are that long!) on the way as well as some fittings for it, all available from amazon. Then I'll fab up a new bracket for the latch end to utilize the cable instead of the solenoid. I'd much rather the security of releasing the trunk from the cabin vs a cable dangling under the car. I'll try to get lots of photos and do up a thread detailing the build so other people can do it too if they want. If anyone has photos of where things go inside the car on the Engman kit or photos of the templates that would be much appreciated. Tandem bike brake and derailleur cables are long enough. They just have to be special ordered. |
|
|
|
| bmtrnavsky |
Oct 23 2018, 04:44 PM
Post
#7
|
|
Member Group: Members Posts: 355 Joined: 20-October 07 From: Longview, TX Member No.: 8,245 Region Association: Southwest Region |
I never could get the solenoid to work quite right so I just use the wire all the time. Actually pretty easy to get in... If you know how! (IMG:style_emoticons/default/lol-2.gif)
QUOTE(burton73 @ Aug 9 2018, 03:04 PM) Put a strong wire on the solenoid bracket so if your battery is dead or you need to get into the rear trunk in an emergence you can grab the wire from under the rear bumper and releases the rear trunk. Lots of guys do that. Look it up on search Engen. And do what the Dr. George says Bob B |
|
|
|
| Mike Bellis |
Oct 23 2018, 06:57 PM
Post
#8
|
|
Resident Electrician Group: Members Posts: 8,345 Joined: 22-June 09 From: Midlothian TX Member No.: 10,496 Region Association: None |
Solenoids don't work really well if the throw is too tight. They work much better if the solenoid mechanism is slightly loose. Weather it is cable or lever actuated, the solenoid torque is minimal at its first movement and gains torque as it moves.
So... If it is a cable pull, loosen the cable slightly, not too much. Just so the solenoid motion starts before it pulls on the cable. 1/8" is usually enough slack. Lever style mechanism is slightly more difficult to adjust but is doable. |
|
|
|
| Mark Henry |
Oct 23 2018, 07:45 PM
Post
#9
|
|
that's what I do! Group: Members Posts: 20,065 Joined: 27-December 02 From: Port Hope, Ontario Member No.: 26 Region Association: Canada |
My 914 has a dealer (aftermarket) installed pull and reflector. The handle is just a standard T pull bicycle wire, the latch hardware is all stamped and cad plated.
Biggest issue is to the cab it's a long run with too many turns. You could mount the pull in the engine bay. One member mounted a small black knob through the LH small stationary engine bay vent grill. He did a nice job and it was kind of stealth. |
|
|
|
| Mark Henry |
Oct 23 2018, 07:53 PM
Post
#10
|
|
that's what I do! Group: Members Posts: 20,065 Joined: 27-December 02 From: Port Hope, Ontario Member No.: 26 Region Association: Canada |
How hard would it be to do a vacuum power lock?
Almost every old watercooled VW has a power lock vacuum pump in the trunk. |
|
|
|
| barefoot |
Oct 24 2018, 04:59 AM
Post
#11
|
|
Senior Member Group: Members Posts: 1,269 Joined: 19-March 13 From: Charleston SC Member No.: 15,673 Region Association: South East States |
QUOTE(burton73 @ Aug 9 2018, 07:04 PM) Put a strong wire on the solenoid bracket so if your battery is dead or you need to get into the rear trunk in an emergence you can grab the wire from under the rear bumper and releases the rear trunk. Lots of guys do that. Look it up on search Engen. And do what the Dr. George says Bob B Mine had the solenoid non-operative, and a heavy wire routed straight down thru a small hole in the trunk floor long enough to just sit above the bottom of the valance. Much easier than a ling cable thingy. |
|
|
|
| Nogoodwithusernames |
Oct 24 2018, 09:54 AM
Post
#12
|
|
Member Group: Members Posts: 235 Joined: 31-May 16 From: Nor-Cal Member No.: 20,051 Region Association: None |
Just to clarify a couple things. The solenoid is gone (well sitting in the trunk still, but disconnected and will be gone)
I want to run the pull cable up to the cockpit instead of under the car for a few reasons, first is overall security. I also think it would look much more finished and like something the factory would have done if they went this route, and I don't want to have to reach down under the car every time I want to get into the trunk. So my question at this point is where to drill to get into the cockpit. Should I just drill from the inside where I want it, and see where it comes out the other side? |
|
|
|
| jim912928 |
Oct 24 2018, 02:05 PM
Post
#13
|
|
Senior Member Group: Members Posts: 1,485 Joined: 8-January 04 From: Granger, IN Member No.: 1,536 Region Association: Upper MidWest |
I'm not home to snap pictures (can this weekend)...but I did install the engman kit. Mine routes thru the trunk, into the engine compartment, and if I remember right I brought it in near the floor on the drivers side. I then drilled a hole in the raised channel that separates the front floor pan from the rear floor pan (cable runs under the carpet behind and under the drivers seat). The pull looks nice and stock just under the seat. To pop the trunk I just reach between my legs and pull the knob.
|
|
|
|
| Nogoodwithusernames |
Oct 24 2018, 04:00 PM
Post
#14
|
|
Member Group: Members Posts: 235 Joined: 31-May 16 From: Nor-Cal Member No.: 20,051 Region Association: None |
QUOTE(jim912928 @ Oct 24 2018, 01:05 PM) I'm not home to snap pictures (can this weekend)...but I did install the engman kit. Mine routes thru the trunk, into the engine compartment, and if I remember right I brought it in near the floor on the drivers side. I then drilled a hole in the raised channel that separates the front floor pan from the rear floor pan (cable runs under the carpet behind and under the drivers seat). The pull looks nice and stock just under the seat. To pop the trunk I just reach between my legs and pull the knob. If you could get some photos when you're home of routing through the engine compartment and up into the cockpit that would be fantastic! Much appreciated. |
|
|
|
| worn |
Oct 24 2018, 04:14 PM
Post
#15
|
|
can't remember Group: Members Posts: 3,149 Joined: 3-June 11 From: Madison, WI Member No.: 13,152 Region Association: Upper MidWest |
[quote name='jim912928' date='Oct 24 2018, 01:05 PM' post='2659966']
I'm not home to snap pictures (can this weekend)...but I did install the engmankit [/quote] Please take the photos cause I need to prevent a reoccurrence of the locked out of the trunk syndrome. [/quote] I just reach between my legs and pull the knob. [/quote] Sounds really convenient. |
|
|
|
| pvollma |
Oct 24 2018, 09:09 PM
Post
#16
|
|
Member Group: Members Posts: 205 Joined: 12-May 13 From: Camp Hill, PA Member No.: 15,862 Region Association: MidAtlantic Region |
QUOTE(worn @ Oct 24 2018, 06:14 PM) Please take the photos cause I need to prevent a reoccurrence of the locked out of the trunk syndrome. Or just replace the remote release altogether:  |
|
|
|
| Nogoodwithusernames |
May 20 2019, 03:27 PM
Post
#17
|
|
Member Group: Members Posts: 235 Joined: 31-May 16 From: Nor-Cal Member No.: 20,051 Region Association: None |
Been a while since an update, but this is just about wrapped up. My dad 3D printed me the knob and bezel piece to go inside the cabin, so some sanding and painting on those to get them cleaned up and then I can put it all together one last time. I'll be sure to get some photos when it's installed for everyone's viewing pleasure.
Also if anyone wants I can take some measurements and links to parts if anyone wants to duplicate what I've done. |
|
|
|
| rjames |
May 21 2019, 09:52 AM
Post
#18
|
|
I'm made of metal Group: Members Posts: 3,917 Joined: 24-July 05 From: Shoreline, WA Member No.: 4,467 Region Association: Pacific Northwest |
QUOTE(pvollma @ Oct 24 2018, 08:09 PM) QUOTE(worn @ Oct 24 2018, 06:14 PM) Please take the photos cause I need to prevent a reoccurrence of the locked out of the trunk syndrome. Or just replace the remote release altogether: Personal opinion, but I hate the look of a reflector with a lock drilled and mounted through the center. Reflector with no lock, or no reflector. |
|
|
|
| Nogoodwithusernames |
May 27 2019, 06:16 PM
Post
#19
|
|
Member Group: Members Posts: 235 Joined: 31-May 16 From: Nor-Cal Member No.: 20,051 Region Association: None |
Alright as promised here are a few photos. @914werke reached out to me and will possibly be doing a run of these (or similar) if there is enough interest. If you would want to buy one send him a PM.
The in-car knob and bezel piece were 3D printed then I did some finish work (sanding and painting) to clean up the stepped layers the 3D printer leaves, before installing in the same manner the original pieces. P.S. after taking a photo with flash back under the relay board I realize it could use a good vacuuming down there (IMG:style_emoticons/default/biggrin.gif) Attached thumbnail(s) 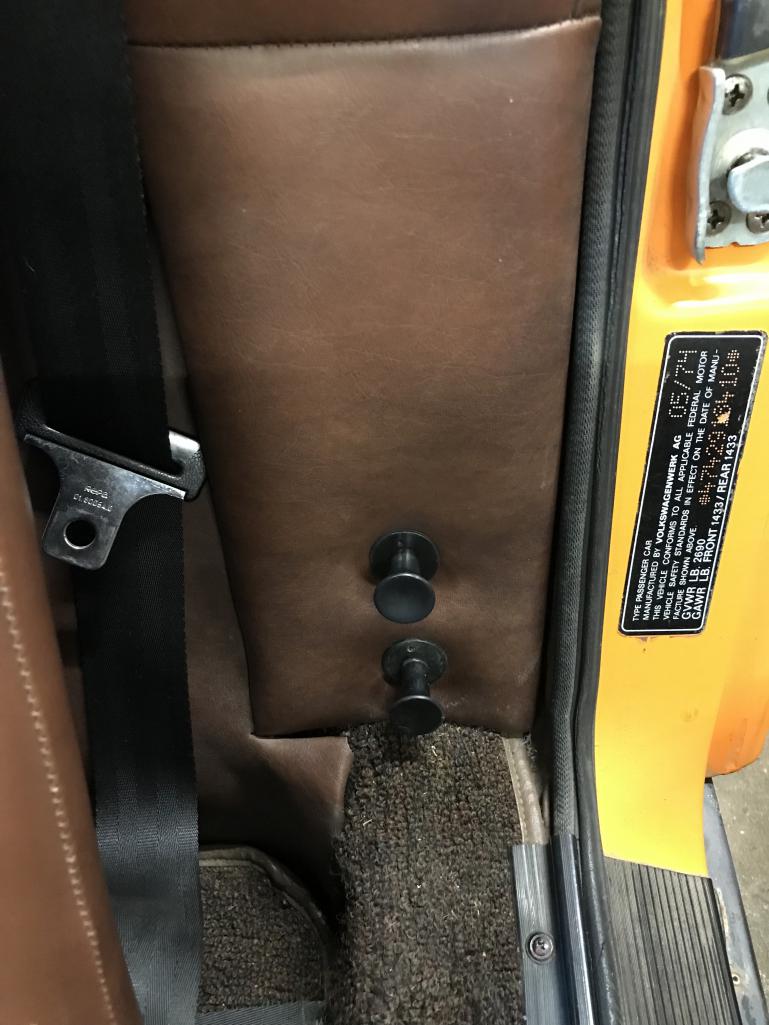 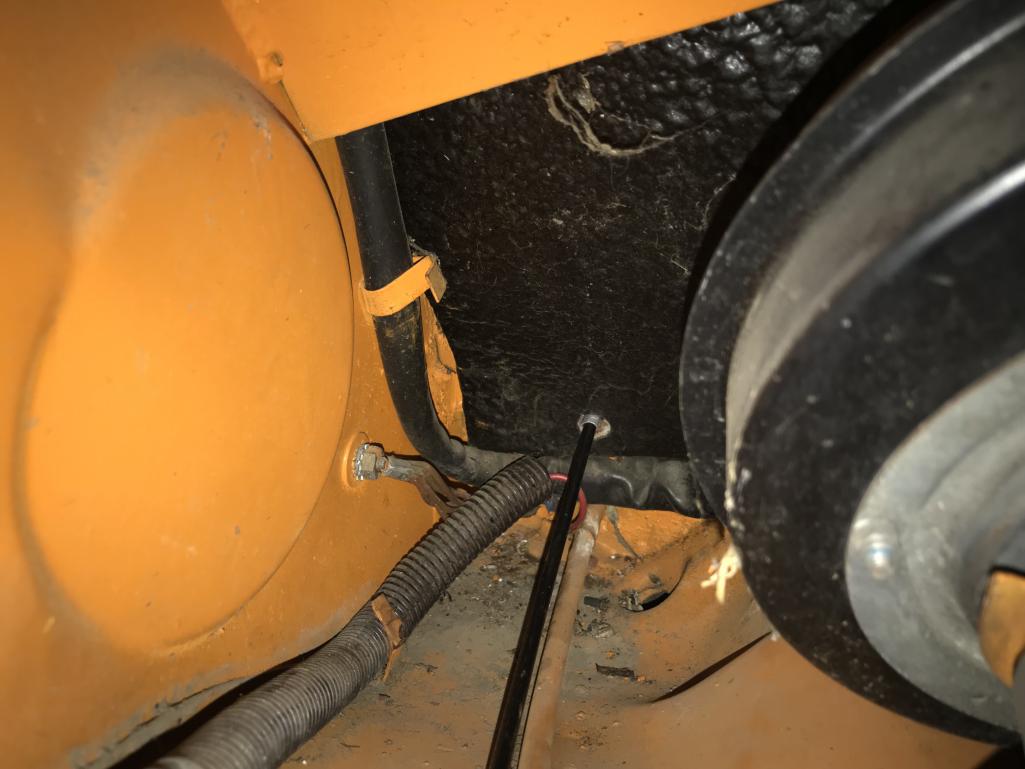
|
|
|
|
| Nogoodwithusernames |
May 27 2019, 06:18 PM
Post
#20
|
|
Member Group: Members Posts: 235 Joined: 31-May 16 From: Nor-Cal Member No.: 20,051 Region Association: None |
Hand-made bracket based off the solenoid bracket that was previously installed.
Attached thumbnail(s) 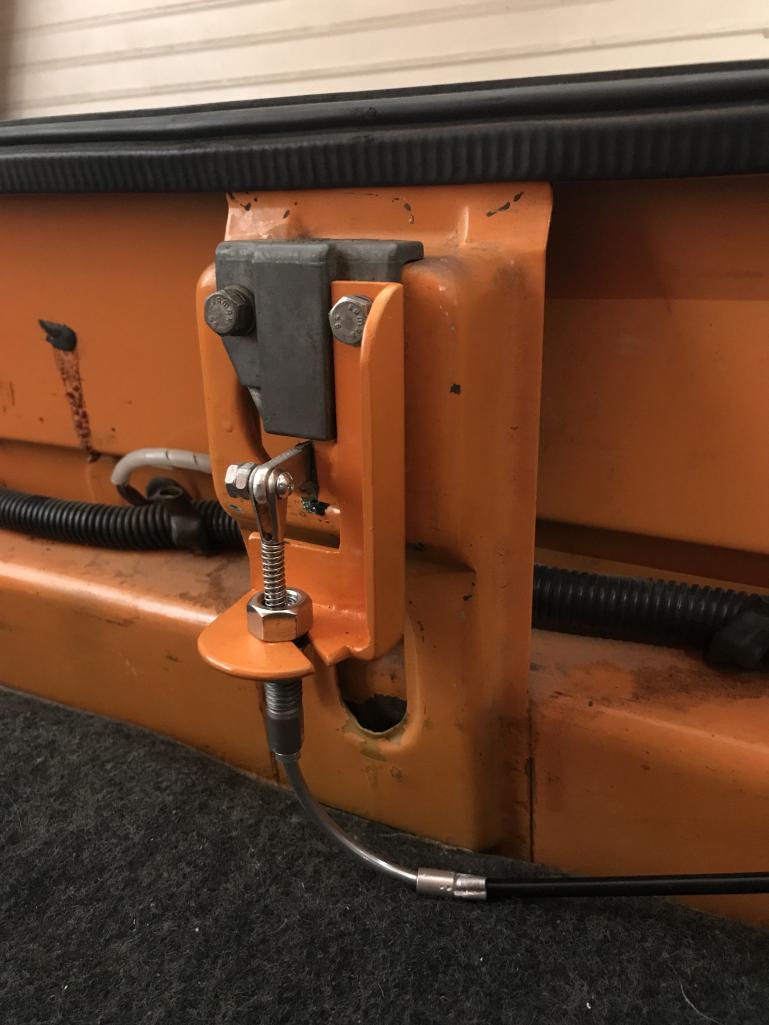
|
|
|
|
|
1 User(s) are reading this topic (1 Guests and 0 Anonymous Users)
0 Members:

|
Lo-Fi Version | Time is now: 30th April 2024 - 02:07 AM |
Invision Power Board
v9.1.4 © 2024 IPS, Inc.