|
|
|
Porsche, and the Porsche crest are registered trademarks of Dr. Ing. h.c. F. Porsche AG.
This site is not affiliated with Porsche in any way. Its only purpose is to provide an online forum for car enthusiasts. All other trademarks are property of their respective owners. |
|
|

  |

| ruby914 |
 Aug 14 2018, 01:59 AM Aug 14 2018, 01:59 AM
Post
#1
|
|
Senior Member  Group: Members Posts: 720 Joined: 26-April 09 From: Hawthorne, Ca Member No.: 10,305 Region Association: None |
It looks like both front fenders were replaced at some time in my cars life.
I can't say they did a bad job but they never replaced the seam seal. Originally was there a bead of seam seal at the bottom of this gap between the caul and fender? The 3 mm gap narrows to about 1 mm at the bottom. I am thinking I should fill that 1 mm gap. The way it is now water can drip thru in areas. I am not sure if that is a good thing or bad. (IMG:style_emoticons/default/confused24.gif) Attached thumbnail(s) 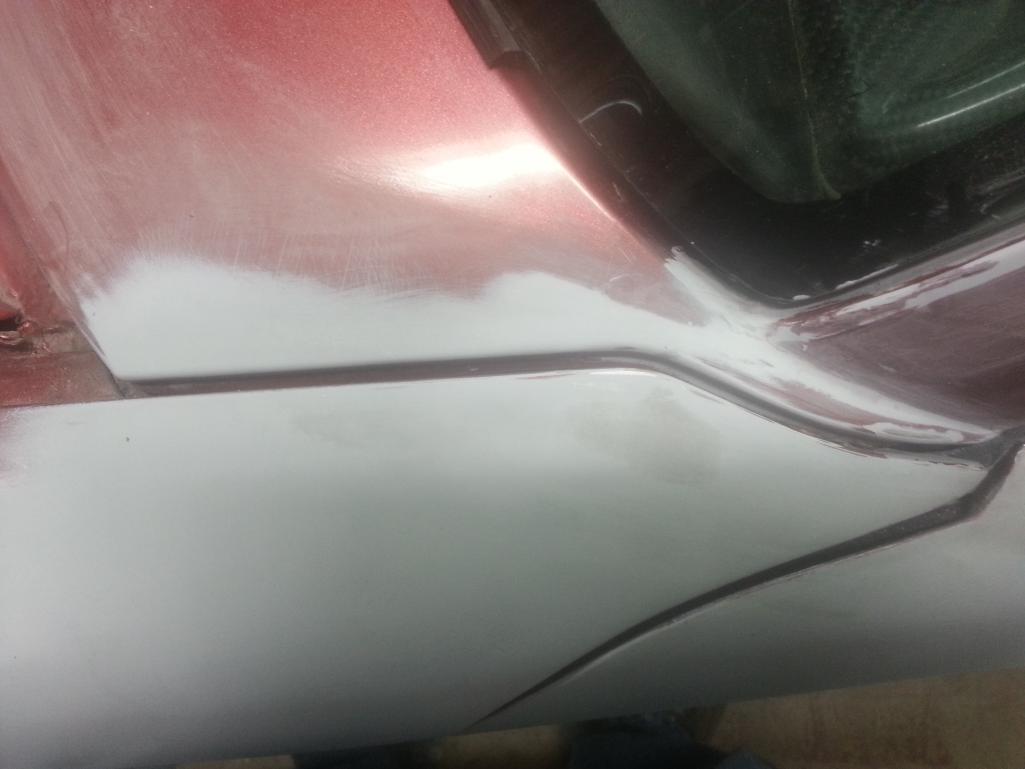
|
   |

 
|
| ndfrigi |
Aug 14 2018, 03:32 AM
Post
#2
|
|
Advanced Member Group: Members Posts: 2,928 Joined: 21-August 11 From: Orange County Member No.: 13,474 Region Association: Southern California |
There should be a seal on that gap. 914rubber sells them.
 |
|
|
|
| 914GT |
Aug 14 2018, 08:20 AM
Post
#3
|
|
Senior Member Group: Members Posts: 1,100 Joined: 11-October 04 From: Tucson Member No.: 2,923 Region Association: Southwest Region |
I’ve brushed epoxy primer deep into that seam to help prevent rusting. It may be hard to get seam sealer in there and not possibly interfere fitting in the rubber seal.
|
|
|
|
| dr914@autoatlanta.com |
Aug 14 2018, 08:45 AM
Post
#4
|
|
914 Guru Group: Members Posts: 7,814 Joined: 3-January 07 From: atlanta georgia Member No.: 7,418 Region Association: None |
definitely install the cowl to fender seal, we have made them for years after the factory discontinued them, critical to keep the water out and this is an expansion joint as well if really going for it!! (LOL). Install them after the car is painted and thoroughly dried. And do not load the paint up in this "gutter" or the seal may be hard to install and chip the thick paint. George Hussey
|
|
|
|
| DRPHIL914 |
Aug 14 2018, 08:45 AM
Post
#5
|
|
Dr. Phil Group: Members Posts: 5,758 Joined: 9-December 09 From: Bluffton, SC Member No.: 11,106 Region Association: South East States |
Fender was not replaced, the gap is normal and would have that seal in there like Noel said. You can clean out that channel and make sure its clean then epoxy primer and sealer, but not seam sealer, then the rubber seal.
|
|
|
|
| mgphoto |
Aug 14 2018, 08:46 AM
Post
#6
|
|
"If there is a mistake it will find me" Group: Members Posts: 1,335 Joined: 1-April 09 From: Los Angeles, CA Member No.: 10,225 Region Association: Southern California |
No seam sealer topside, tons underneath.
Paint and primer is enough to protect the top seam with the bead in place. |
|
|
|
| ruby914 |
Aug 14 2018, 10:54 AM
Post
#7
|
|
Senior Member Group: Members Posts: 720 Joined: 26-April 09 From: Hawthorne, Ca Member No.: 10,305 Region Association: None |
Thanks guys,
I did clean out the channel and epoxy prime with a brush on the passenger side. The tons of seam seal bottom side was removed by the PO. Even with out all that seam seal it's hard to imagine how they removed and replaced the fender or how it was constructed at the factory. I do have the rubber seal and intend to install it after paint. The seam seal I was thinking of top side would not interfere with the rubber seal. Calling this channel an "Expansion joint" helps my understanding of why it was constructed this way. I recall someone telling me welding / fill it up was not a good Idea for that reason. My concern is the rubber seal not keeping 100% of the water out after it is installed. Now there are areas that the water will leak down in front of the door seal near the hinge. Good to keep water out of the seam but I feel its not the original design intent. Maybe the ton of seam seal fills this from the bottom? It is next to impossible to take clear photos. I try to show a hole where water would drain thru in this photo. Not sure if this was the original intent. Attached thumbnail(s) 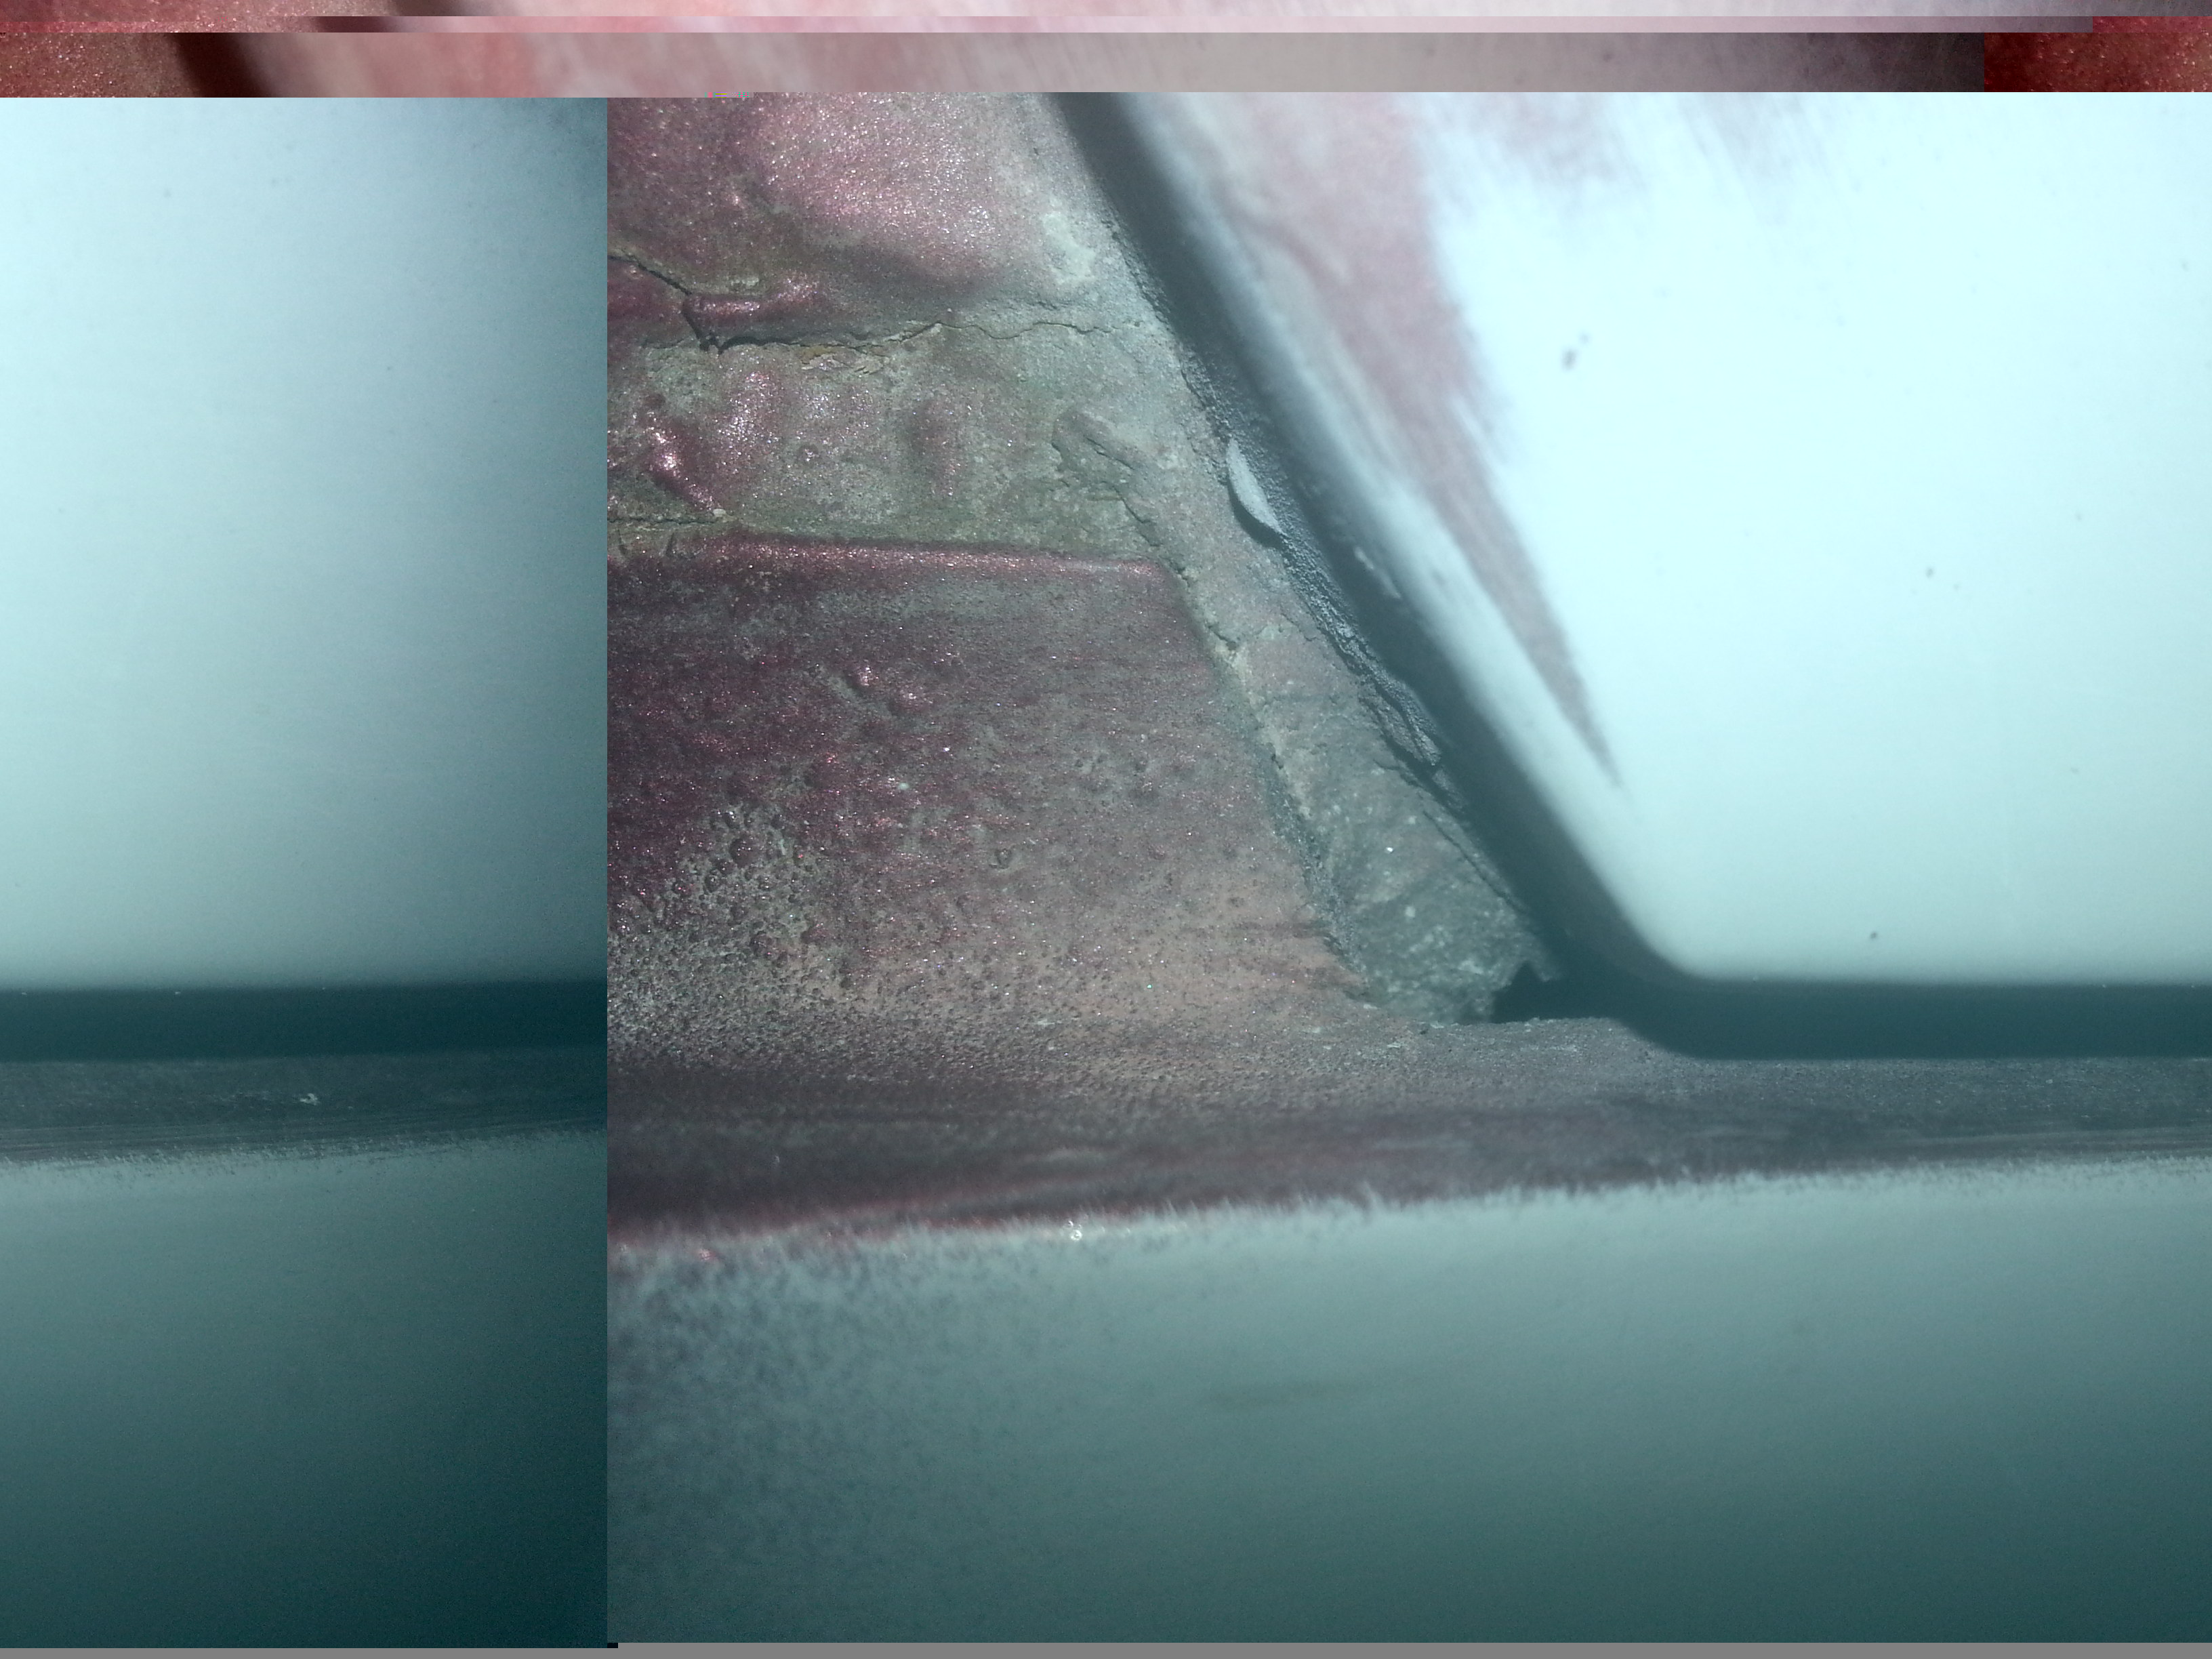
|
|
|
|
| Mikey914 |
Aug 14 2018, 03:08 PM
Post
#8
|
|
The rubber man Group: Members Posts: 12,638 Joined: 27-December 04 From: Hillsboro, OR Member No.: 3,348 Region Association: None |
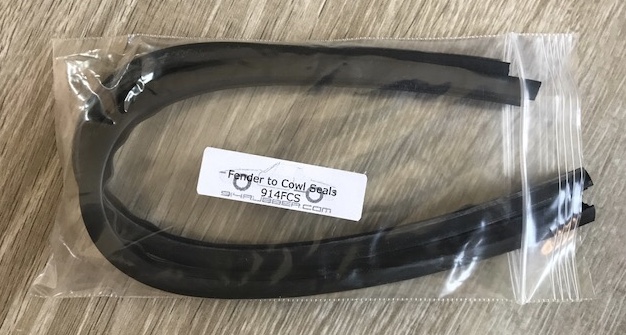
Pretty normal to remove these. The OEM were a PVC, we madevours out of rubber tight enough you can push in with some hand soap. You can also easily remove and reinstall if you wish.
https://shop.914rubber.com/914-Fender-to-co...m?categoryId=-1 Attached thumbnail(s) 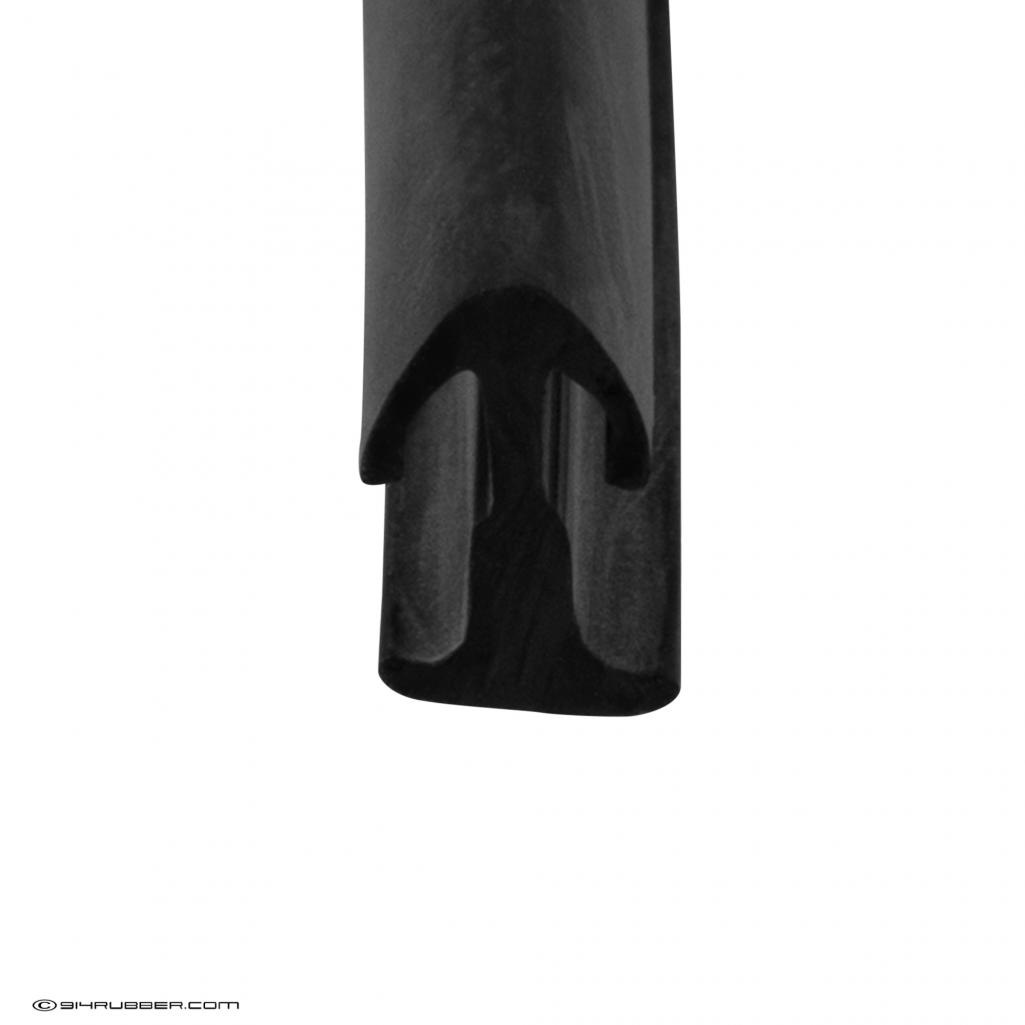
|
|
|
|
| SirAndy |
Aug 14 2018, 04:05 PM
Post
#9
|
|
Resident German Group: Admin Posts: 41,605 Joined: 21-January 03 From: Oakland, Kalifornia Member No.: 179 Region Association: Northern California |
QUOTE(ruby914 @ Aug 14 2018, 09:54 AM)  I try to show a hole where water would drain thru in this photo. That looks like a rust hole ... (IMG:style_emoticons/default/sad.gif) |
 |
|
| ruby914 |
Aug 15 2018, 01:28 AM
Post
#10
|
|
Senior Member Group: Members Posts: 720 Joined: 26-April 09 From: Hawthorne, Ca Member No.: 10,305 Region Association: None |
QUOTE(SirAndy @ Aug 14 2018, 03:05 PM) QUOTE(ruby914 @ Aug 14 2018, 09:54 AM) I try to show a hole where water would drain thru in this photo. That looks like a rust hole ... (IMG:style_emoticons/default/sad.gif) See, that's what I have a hard time with. Snooping around in this hard to see spot, it looks like the fender was replaced and the new(er) fender was gnarled in the process. I don't see thinning as rust would do. Its more like an intentional trim to fit thing, kind of a square edge, some new welds and spot welds rewelded (IMG:style_emoticons/default/confused24.gif). Like someone removed the fender to trim some rust. So, normally this channel runs into the trunk channel and would be water tight? With only the fender to cowl and trunk seals keeping water out. (IMG:style_emoticons/default/idea.gif) |
|
|
|
| ruby914 |
Aug 15 2018, 02:27 AM
Post
#11
|
|
Senior Member Group: Members Posts: 720 Joined: 26-April 09 From: Hawthorne, Ca Member No.: 10,305 Region Association: None |
I found this old thread.
http://www.914world.com/bbs2/index.php?showtopic=110572 The question was never fully answered, not even by Porsche. I have a feeling Porsche wanted excess water to drip down between the red and blue lines rather than be trapped under the fender to cowl seal. Problem is they seam sealed this weep hole shut from the bottom side, I think. This may have been a fix for more water than expected going down this path. I saw a photo of maybe a 911 that had a gutter to help channel the water under this seam. I am not sure yet how this will turn out but I an leaning toward Strawman Geoff's thinking. Strategic use of seam seal to fill the smaller gap. Not sure if I will keep a weep hole. Attached image(s) 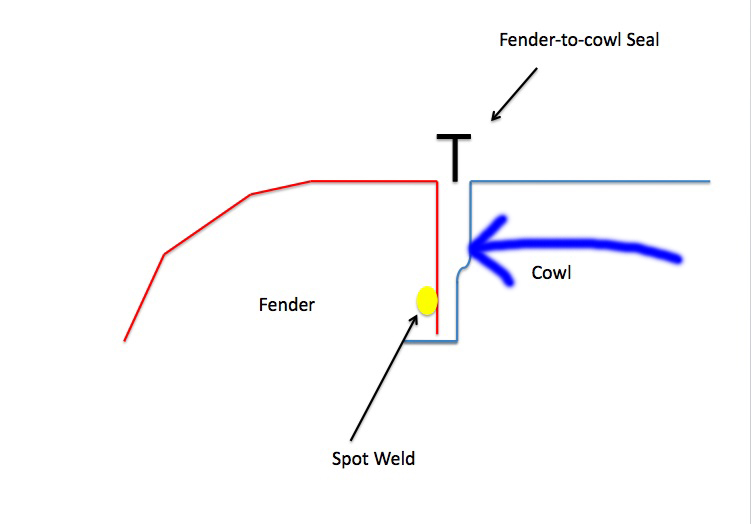
|
|
|
|
| SirAndy |
Aug 15 2018, 10:35 AM
Post
#12
|
|
Resident German Group: Admin Posts: 41,605 Joined: 21-January 03 From: Oakland, Kalifornia Member No.: 179 Region Association: Northern California |
QUOTE(ruby914 @ Aug 15 2018, 01:27 AM) Problem is they seam sealed this weep hole shut from the bottom side I don't think this is a weep hole. On my car that part is brazed shut with what i assume is factory brazing. No hole there ... (IMG:style_emoticons/default/idea.gif) |
|
|
|
| ruby914 |
Aug 15 2018, 11:44 AM
Post
#13
|
|
Senior Member Group: Members Posts: 720 Joined: 26-April 09 From: Hawthorne, Ca Member No.: 10,305 Region Association: None |
QUOTE(SirAndy @ Aug 15 2018, 09:35 AM) QUOTE(ruby914 @ Aug 15 2018, 01:27 AM) Problem is they seam sealed this weep hole shut from the bottom side I don't think this is a weep hole. On my car that part is brazed shut with what i assume is factory brazing. No hole there ... (IMG:style_emoticons/default/idea.gif) Interesting. I just got back to my car and with out the ton of seam seal the joint really looks to function so water will not puddle under the rubber seal. My car is a 73. My car was not brazed but welded on the Aft end. Assuming my car is in no way factory work. Drivers side is very clean and and open up to the weld. So clean on the underside it looks like they didn't finish spot or tack welding it. The metal is set back so a weal weld is not possible. The passenger side, I put the epoxy primer in years ago, looks like it had one more tack weld. But still a clear path for water. With this I was steering back away from sealing water tight. It the words of Strawman "If memory serves, it was a factory goober/snot weld that tied those two pieces together... not a traditional pinch/spot weld." I came back to ask the world about the factory seam seal on the underside. If the seal is only below the horizontal pinch weld, water will pass thru. If seal is on top it, fills that passage. I looked at a 914 6 the other day. I think, it had seal top and bottom. But again, not factory work. SirAndy, yours is brazed front to back without the "ton" of seam seal on top of that? |
|
|
|
| SirAndy |
Aug 15 2018, 11:54 AM
Post
#14
|
|
Resident German Group: Admin Posts: 41,605 Joined: 21-January 03 From: Oakland, Kalifornia Member No.: 179 Region Association: Northern California |
QUOTE(ruby914 @ Aug 15 2018, 10:44 AM) SirAndy, yours is brazed front to back without the "ton" of seam seal on top of that? No, only the corner of the larger channel is brazed, where the soft rubber seal for the front hood would sit. The part that has a hole in your picture. The small channel between the fender and the cowl area looks just like yours, with no seam sealer on top. Without the hard rubber seal in the small channel, water can freely run either forward into the front trunk hood channel or backward and drip into the space between the fender and the door. (IMG:style_emoticons/default/shades.gif) |
|
|
|
| mgphoto |
Aug 15 2018, 04:40 PM
Post
#15
|
|
"If there is a mistake it will find me" Group: Members Posts: 1,335 Joined: 1-April 09 From: Los Angeles, CA Member No.: 10,225 Region Association: Southern California |
There are 2 mig welds that hold the fender to the inner fender/cowl section.
Midway through and at the rear of the fender attachment. 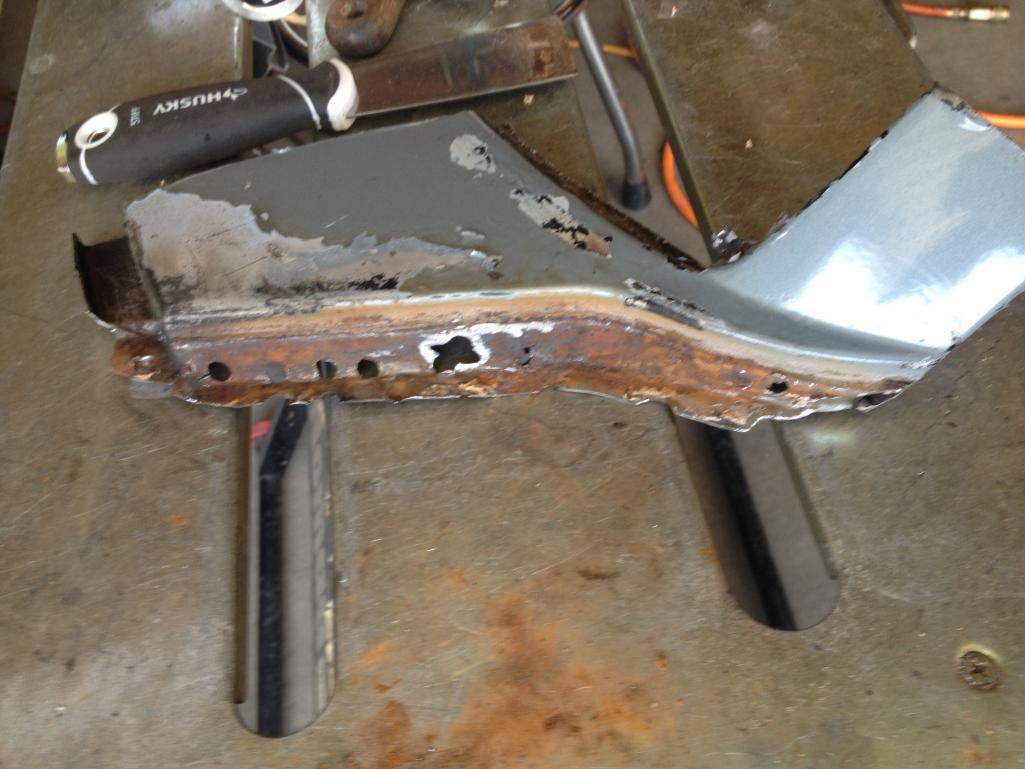 The brazing is to keep the 2 fender sections together inner and outer. 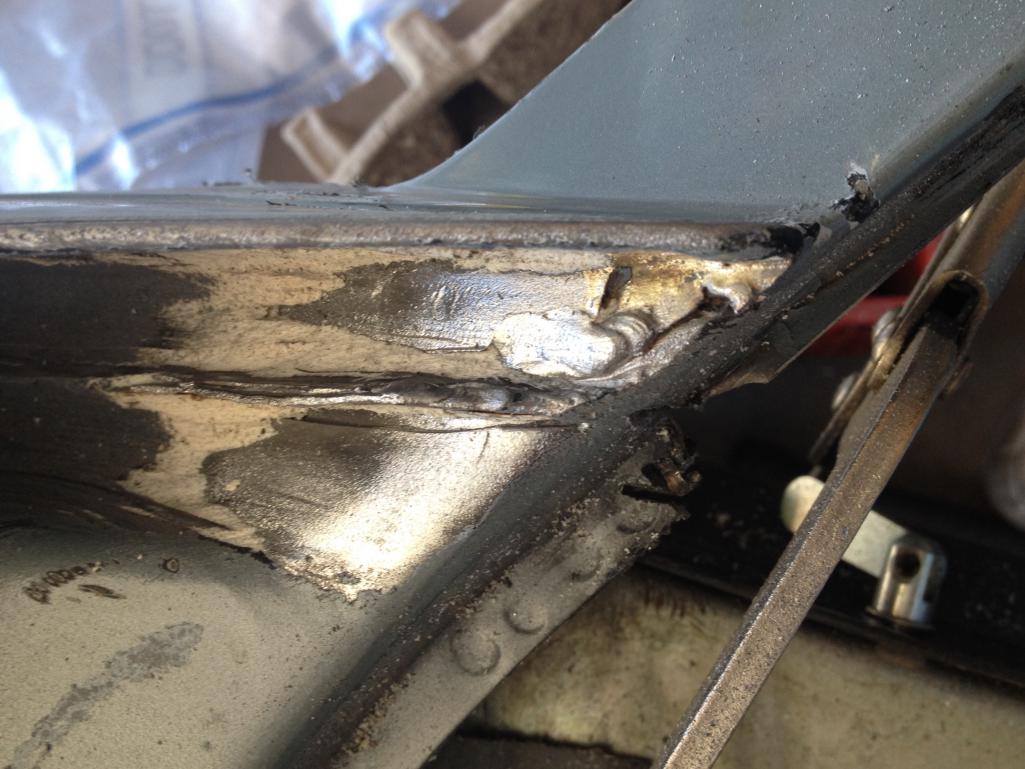 Seen here just above the rearward mig weld, normally covered with seam sealer. There doesn't seem to be any drain, as most I've seen are rusted. |
|
|
|
| Rand |
Aug 15 2018, 05:42 PM
Post
#16
|
|
Cross Member Group: Members Posts: 7,409 Joined: 8-February 05 From: OR Member No.: 3,573 Region Association: None |
I hate seam sealer and seals like this. Whether it's caul or cowl I find that if you care to check it, it's much easier to keep it clean and dry so you can see what's going on without some goofy sealer garbage hiding what's happening underneath. Seal it where it matters so you don't have to wonder what's under. To each his own. (IMG:style_emoticons/default/smile.gif)
$.02 |
|
|
|
| ruby914 |
Aug 16 2018, 01:46 AM
Post
#17
|
|
Senior Member Group: Members Posts: 720 Joined: 26-April 09 From: Hawthorne, Ca Member No.: 10,305 Region Association: None |
mqphoto, thanks for the photos. Best I can tell your 2nd photo shows the fender still on with seal above the horizontal seam filling what I am seeing as a possible drainage point.
My thinking is with a good rubber seal, water should never get below the seal. If it did, I wouldn't want it to stay there long. A weep hole may not be a bad idea. This would prevent water from running down the front trunk channel under the trunk seal. That is a rust area also. The draw back, that very little water that makes it past the rubber seal would go down toward the door stay hing that's basically a hole in the frame. I will do some water flow test tomorrow. Attached image(s) 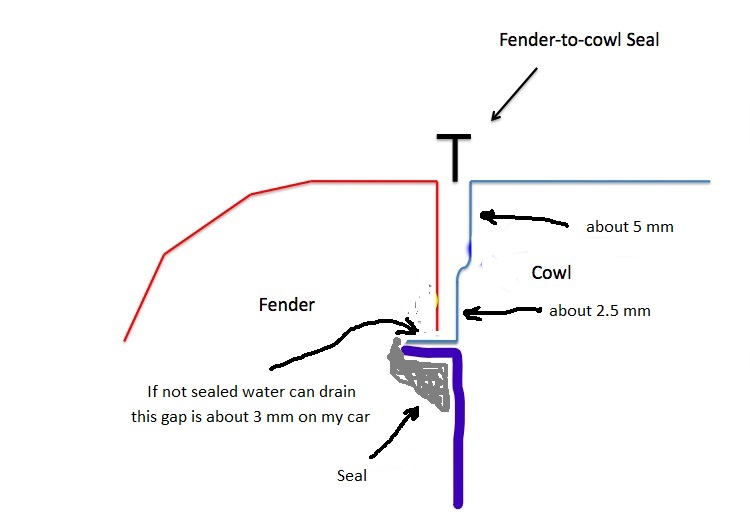
|
|
|
|
| Matty900 |
Aug 16 2018, 02:00 AM
Post
#18
|
|
Senior Member Group: Members Posts: 1,269 Joined: 21-February 15 From: Oregon Member No.: 18,454 Region Association: Pacific Northwest |
QUOTE(ruby914 @ Aug 16 2018, 12:46 AM) mqphoto, thanks for the photos. Best I can tell your 2nd photo shows the fender still on with seal above the horizontal seam filling what I am seeing as a possible drainage point. My thinking is with a good rubber seal, water should never get below the seal. If it did, I wouldn't want it to stay there long. A weep hole may not be a bad idea. This would prevent water from running down the front trunk channel under the trunk seal. That is a rust area also. The drawback, that very little water that makes it past the rubber seal would go down toward the door stay hing that's basically a hole in the frame. I will do some water flow test tomorrow. (IMG:style_emoticons/default/agree.gif) Cary and I were discussing this looking at several of the cars on the rotisseries. I believe the consensus was that there was an opening to allow water to not pool in the gap there but is something that should be cleaned out every few years to make sure they are not getting gummed up and holding water in there. When you are working this area I would recommend that you test fit the seal before going to paint to make sure your gap is correct and the depth is uniform so that they will be able to fit when it is time to put them on. I am pretty sure Cary has the photos. I will ask him. |
|
|
|
| DRPHIL914 |
Aug 16 2018, 07:14 AM
Post
#19
|
|
Dr. Phil Group: Members Posts: 5,758 Joined: 9-December 09 From: Bluffton, SC Member No.: 11,106 Region Association: South East States |
I ran into this issue after having had the car just painted, almost not able to get the cowl seal in due to decreased gap from primer and paint, so for sure follow Matt's advice and test fit these before to make sure they will fit after.
Phil |
|
|
|
| ruby914 |
Aug 16 2018, 10:14 AM
Post
#20
|
|
Senior Member Group: Members Posts: 720 Joined: 26-April 09 From: Hawthorne, Ca Member No.: 10,305 Region Association: None |
Thanks Matty any photos would be great.
So to fill or not to fill? Epoxy is good to seal but not to fill a large flexible gaps that have been called an expansion joints. So if I was to fill this joint, I think epoxy covered with a flexible seam seal would be best. I have a SEM seal tube that has a very small tip that may get down to fill this area neatly. Attached image(s) 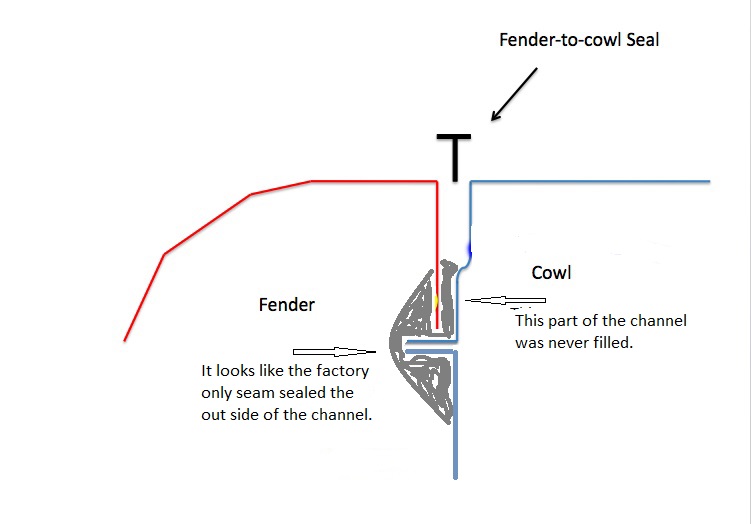
|
|
|
|
|
1 User(s) are reading this topic (1 Guests and 0 Anonymous Users)
0 Members:

|
Lo-Fi Version | Time is now: 23rd April 2024 - 06:41 PM |
Invision Power Board
v9.1.4 © 2024 IPS, Inc.