|
|
|
Porsche, and the Porsche crest are registered trademarks of Dr. Ing. h.c. F. Porsche AG.
This site is not affiliated with Porsche in any way. Its only purpose is to provide an online forum for car enthusiasts. All other trademarks are property of their respective owners. |
|
|

  |

| raynekat |
 Aug 22 2018, 04:51 PM Aug 22 2018, 04:51 PM
Post
#1
|
|
Advanced Member  Group: Members Posts: 2,171 Joined: 30-December 14 From: Coeur d'Alene, Idaho Member No.: 18,263 Region Association: Pacific Northwest |
Getting ready to install my new Sekurit windshield in the 71 914.
I've got both 3/8" and 5/16" butyl tape. Sounds like the smaller 5/16" is the correct way to go. I've also got a can of the butyl primer which I plan on using on both the pinch weld and the window itself where the butyl tape will be in contact. I've already installed the windshield trim clips. Today I just set the windshield in place without the butyl to see how it fit. Looks to be very good with the windshield sitting inside all of the trim clips. The gap between the windshield and the pinch weld is approx is just a bit more than 1/8" which should work with the smaller diameter butyl tape. My main question concerns the two rubber setting blocks that are supposed go below the window. How are these placed such that you can still get the lower windshield trim snapped into place? Seems like these two rubber setting blocks are only going to be in the way. I'm actually considering putting the setting blocks on top of a couple of the trim clips. That way you can still get the trim into the trim clip and the setting block can still function as it was designed to. The only issue is that the small plastic pin from the trim clip will be holding up the setting block. See any problems with this? |
   |

 
|
| larryM |
Aug 22 2018, 08:58 PM
Post
#2
|
|
emoze Group: Members Posts: 891 Joined: 1-January 03 From: mid- California Member No.: 65 Region Association: Northern California |
QUOTE(raynekat @ Aug 22 2018, 03:51 PM)  Getting ready to install my new Sekurit windshield in the 71 914. My main question concerns the two rubber setting blocks that are supposed go below the window. Seems like these two rubber setting blocks are only going to be in the way. just remove the blocks after the "glue" has set - no longer relevant or needed - better: cut 'em shorter so they will not interfere & still hold up the glass during install iirc somewhere a "book" says to install 3 "blocks" center & toward each "side" after setting it - to prevent sagging or drift |
|
|
|
| PanelBilly |
Aug 22 2018, 09:27 PM
Post
#3
|
|
914 Guru Group: Members Posts: 5,996 Joined: 23-July 06 From: Kent, Wa Member No.: 6,488 Region Association: Pacific Northwest |
Harbor Freight has some glass suction handles that are cheep and make it easy to place the windshield.
|
|
|
|
| IronHillRestorations |
Aug 23 2018, 05:45 AM
Post
#4
|
|
I. I. R. C. Group: Members Posts: 6,950 Joined: 18-March 03 From: West TN Member No.: 439 Region Association: None |
I wouldn't take them out, they help keep the glass in place. Cut a taper on one side so the trim will slide by
|
|
|
|
| dr914@autoatlanta.com |
Aug 23 2018, 07:25 AM
Post
#5
|
|
914 Guru Group: Members Posts: 8,241 Joined: 3-January 07 From: atlanta georgia Member No.: 7,418 Region Association: None |
use 1/4 inch butyl tape and the blocks do not get in the way, if they are the small factory ones
QUOTE(raynekat @ Aug 22 2018, 03:51 PM) Getting ready to install my new Sekurit windshield in the 71 914. I've got both 3/8" and 5/16" butyl tape. Sounds like the smaller 5/16" is the correct way to go. I've also got a can of the butyl primer which I plan on using on both the pinch weld and the window itself where the butyl tape will be in contact. I've already installed the windshield trim clips. Today I just set the windshield in place without the butyl to see how it fit. Looks to be very good with the windshield sitting inside all of the trim clips. The gap between the windshield and the pinch weld is approx is just a bit more than 1/8" which should work with the smaller diameter butyl tape. My main question concerns the two rubber setting blocks that are supposed go below the window. How are these placed such that you can still get the lower windshield trim snapped into place? Seems like these two rubber setting blocks are only going to be in the way. I'm actually considering putting the setting blocks on top of a couple of the trim clips. That way you can still get the trim into the trim clip and the setting block can still function as it was designed to. The only issue is that the small plastic pin from the trim clip will be holding up the setting block. See any problems with this? |
|
|
|
| ChrisFoley |
Aug 23 2018, 07:42 AM
Post
#6
|
|
I am Tangerine Racing Group: Members Posts: 8,031 Joined: 29-January 03 From: Bolton, CT Member No.: 209 Region Association: None |
We use 3/8" here. I don't like the fit with 5/16" and would never even consider 1/4" for windshields.
We use the 5/16" for rear windows. |
|
|
|
| rgalla9146 |
Aug 23 2018, 07:46 AM
Post
#7
|
|
Advanced Member Group: Members Posts: 4,981 Joined: 23-November 05 From: Paramus NJ Member No.: 5,176 Region Association: None |
I just installed my Sigla windshield last week using 5/16" butyl
I'm not sure what you mean where you say 'the pins will interfere' You've pushed the pins in to secure the clips right ? It is most important that there is room between each clip and the glass so the clips can flex toward the glass to allow the trim to snap in. Do a trial fit using tape extending from the glass to the frame to establish the ideal position. The rubber blocs at the bottom may interfere with the trim. |
|
|
|
| Mikey914 |
Aug 23 2018, 10:25 AM
Post
#8
|
|
The rubber man Group: Members Posts: 12,782 Joined: 27-December 04 From: Hillsboro, OR Member No.: 3,348 Region Association: None |
As far as thickness goes, I prefer the 3/8"(10MM). Why, because it's all getting compressed anyhow right? so it allows more material to help make a better seal. technically the OEM material is 8mm (5/16"), it also had a heating wire to make it easier to heat up.
SO when you have the choice of less sealing material or more, what do you prefer? Thicker material will have to compress more, but in my opinion offers a better seal. I stretch mine when I install so effectively it is a smaller diameter. |
|
|
|
| larryM |
Aug 23 2018, 10:46 PM
Post
#9
|
|
emoze Group: Members Posts: 891 Joined: 1-January 03 From: mid- California Member No.: 65 Region Association: Northern California |
QUOTE(Perry Kiehl @ Aug 23 2018, 04:45 AM) I wouldn't take them out, they help keep the glass in place. Cut a taper on one side so the trim will slide by a'yup - other sources say to install blocks after you have set the glass, to prevent "drift" or sagging - maybe that's 'cuz butyl does not set as quick & hard as the new modern stickum used by glass shops? the manual says to use 4mm spacers for install but that looks 'way too "short" - looks to me more like 8-10mm block needed under the glass to position it to be centered in the frame correctly - my car now has 6-7mm rubber blocks in there with "tapers" "up" thus not interfering with outer edge of trim (on aftermarket PPG glass) - 914Rubber pictures show tapered spacers 914Rubber says their setting block is 7cm long, 1/2cm deep (5mm), 1/4 cm "tall" or thick (2.5mm) - per telecon with Christopher - that would be 'way too thin center my existing glass in the frame ? - maybe oem glass was a bit "larger"? - thus only 4mm or less was needed) i'm looking for a better option |
|
|
|
| raynekat |
Aug 25 2018, 12:24 PM
Post
#10
|
|
Advanced Member Group: Members Posts: 2,171 Joined: 30-December 14 From: Coeur d'Alene, Idaho Member No.: 18,263 Region Association: Pacific Northwest |
Getting ready for the windshield install tomorrow hopefully.
First off....getting all the materials needed. Going with 3/8" butyl tape vs 5/16" or any other size (more on that later). Also using the supplied rubber standoff blocks with a twist. I used 3M adhesive cleaner and DuPont quik prep to make sure the glass and pinch weld area are squeaky clean. Rubber gloves. Butyl primer. I went with the CRL pinch weld primer. Small craft paint brush for applying the butyl primer as the brush-in-the-can is too big and unwieldly for precision placement of the primer. 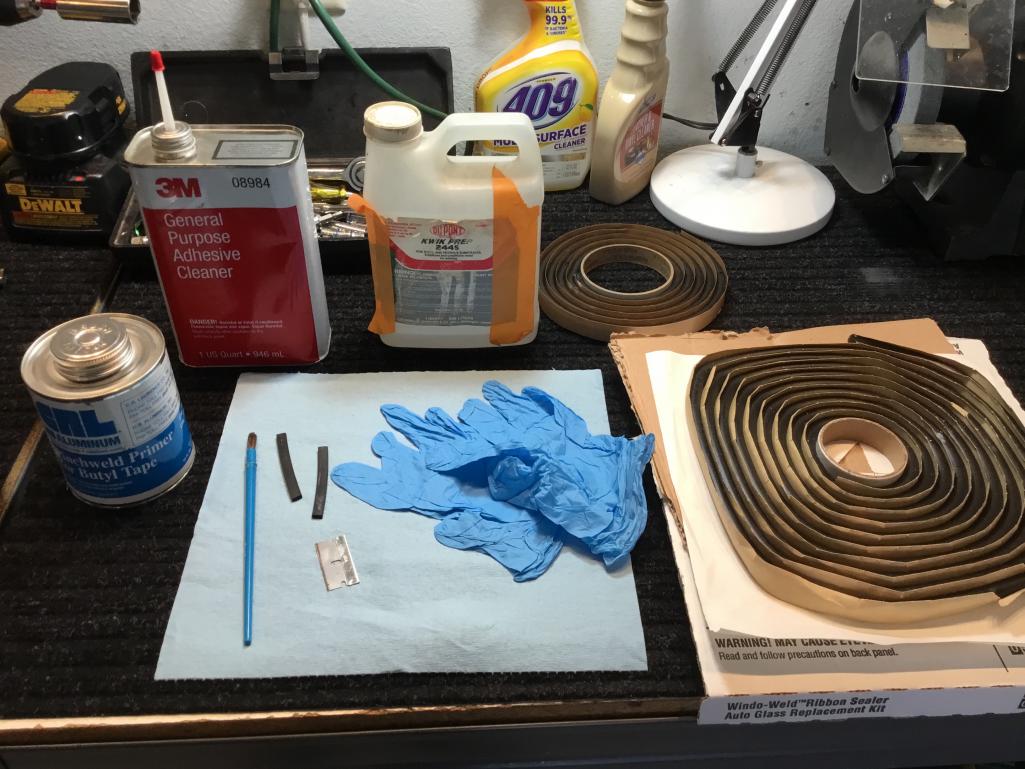 |
|
|
|
| raynekat |
Aug 25 2018, 12:30 PM
Post
#11
|
|
Advanced Member Group: Members Posts: 2,171 Joined: 30-December 14 From: Coeur d'Alene, Idaho Member No.: 18,263 Region Association: Pacific Northwest |
Put down a small swath of butyl primer around the perimeter of the glass where the butyl tape will be in contact.
Even if you're a bit messy putting the primer down, after it dries you just go back with a sharp new single edge razor blade and clean it up to your liking. Although likely not necessary, I will give the primer a full day to dry or cure even though it looked dry within minutes. This butyl primer is weird stuff. Looks like the consistency of grease almost. Very thick and pasty. Goes down fairly rough but dries quickly and appears much smoother as well when dry. Mystical stuff.... As it only seems to dry after you get it out of the can and spread thinly on something. What's that all about? (IMG:style_emoticons/default/wink.gif) 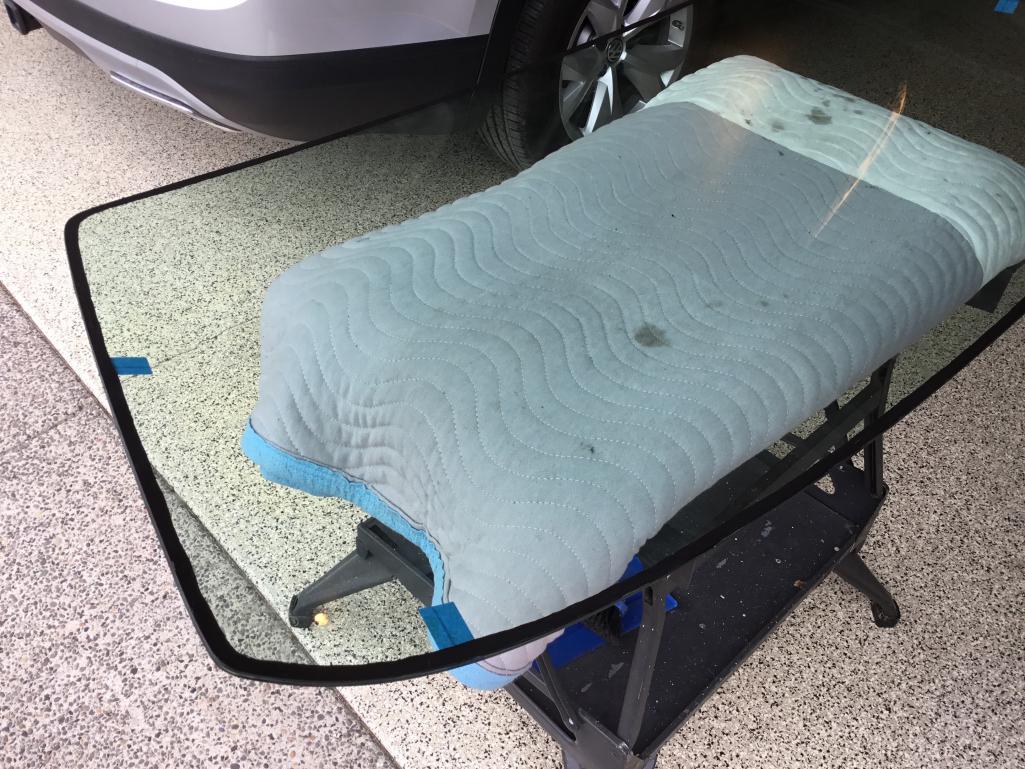 |
|
|
|
| raynekat |
Aug 25 2018, 12:46 PM
Post
#12
|
|
Advanced Member Group: Members Posts: 2,171 Joined: 30-December 14 From: Coeur d'Alene, Idaho Member No.: 18,263 Region Association: Pacific Northwest |
Next put a swath of the primer in the pinch weld area where the butyl tape will go.
This is definitely where the craft brush comes in handy. Must easier to apply the primer with this guy. I had pre-fit the windshield earlier and put some blue tape with lines for helping with the alignment of the glass later when it's installed onto the butyl tape. This is where I decided what size/thickness of butyl tape I'd be using. You can take measurements from the glass to the pitch weld to see what it will take. The 5/16" just wasn't going to fill up the gap....although the gap wasn't all that big. I'm agreeing with Mark (914Rubber) in that the more butyl tape you can get in contact with the windshield and pitch weld....the better. My Sekurit windshield fit completely within all of the trim clips so the "dry" alignment was very easy to accomplish. The blue tape and lines are for alignment aids when the windshield gets lowered into place for the final time. You just can't have too much help for something like this. I'd don't want to do this a 2nd time.... (IMG:style_emoticons/default/w00t.gif) 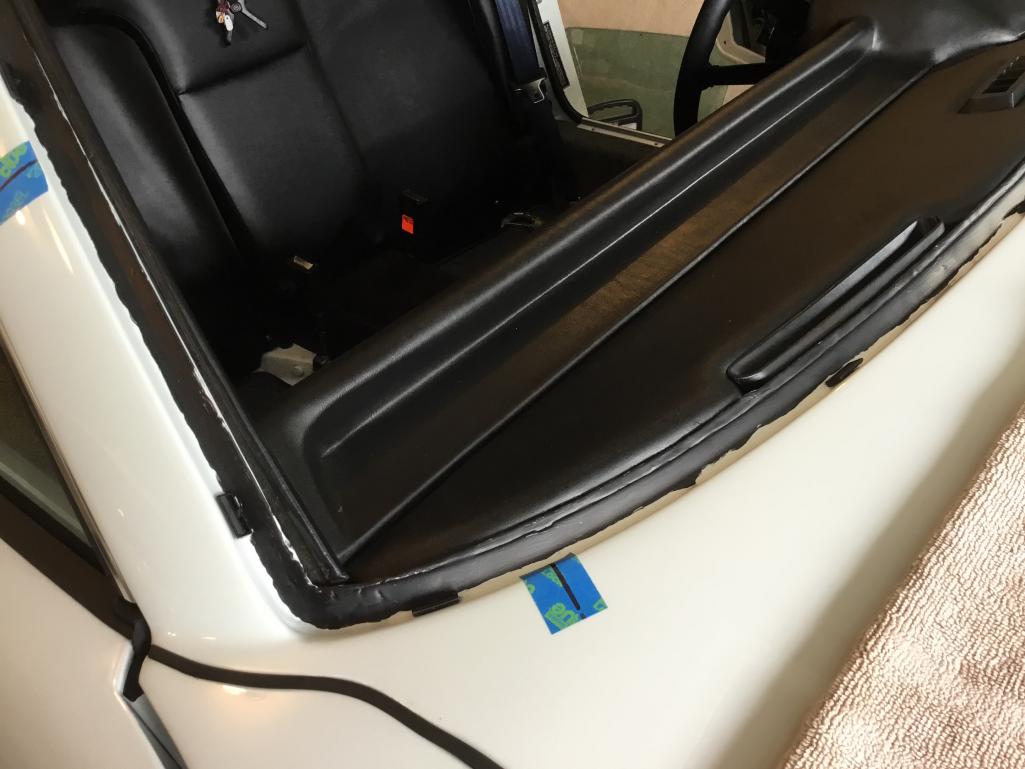 |
|
|
|
| raynekat |
Aug 25 2018, 12:50 PM
Post
#13
|
|
Advanced Member Group: Members Posts: 2,171 Joined: 30-December 14 From: Coeur d'Alene, Idaho Member No.: 18,263 Region Association: Pacific Northwest |
My solution to where to place the rubber standoff blocks is as follows.
I cut each my blocks into 3 similar length sections giving me 6 total. Then I placed/glued them on top of the trim clips. This will give me the exact standoff distance I needed, with the added bonus of not getting in the way of the windshield trim installation. So there will be 6 of these small blocks sitting on top of the trim clips all along the bottom of the windshield. More than enough to do their job. 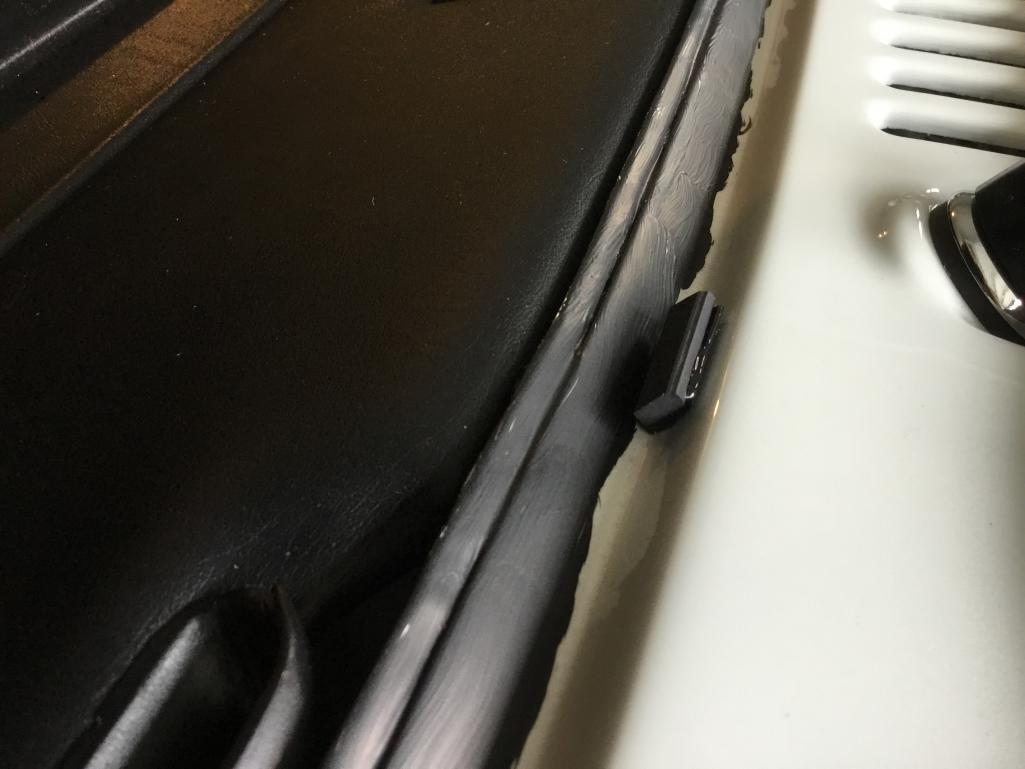 |
|
|
|
| raynekat |
Aug 25 2018, 12:51 PM
Post
#14
|
|
Advanced Member Group: Members Posts: 2,171 Joined: 30-December 14 From: Coeur d'Alene, Idaho Member No.: 18,263 Region Association: Pacific Northwest |
Tomorrow will be butyl tape placement and windshield installation.
There will be some beer drinking tonight to get me "primed." (IMG:style_emoticons/default/beer.gif) (IMG:style_emoticons/default/beerchug.gif) (IMG:style_emoticons/default/beer3.gif) |
|
|
|
| raynekat |
Aug 30 2018, 02:03 AM
Post
#15
|
|
Advanced Member Group: Members Posts: 2,171 Joined: 30-December 14 From: Coeur d'Alene, Idaho Member No.: 18,263 Region Association: Pacific Northwest |
Well, the windshield is finally in.
With the wife's help, on the 3rd attempt, we got it. Had a bit of trouble getting it centered using our alignment tape in the corners. Finally went with alignment tape in the middle of the windshield and that worked. The 3/8" butyl was almost too thick to get the trim snapped in, but enough coaxing of the windshield down into the frame and butyl had all the trim in place and secure. The 5/16" looked way too small, so we went with the larger butyl tape. 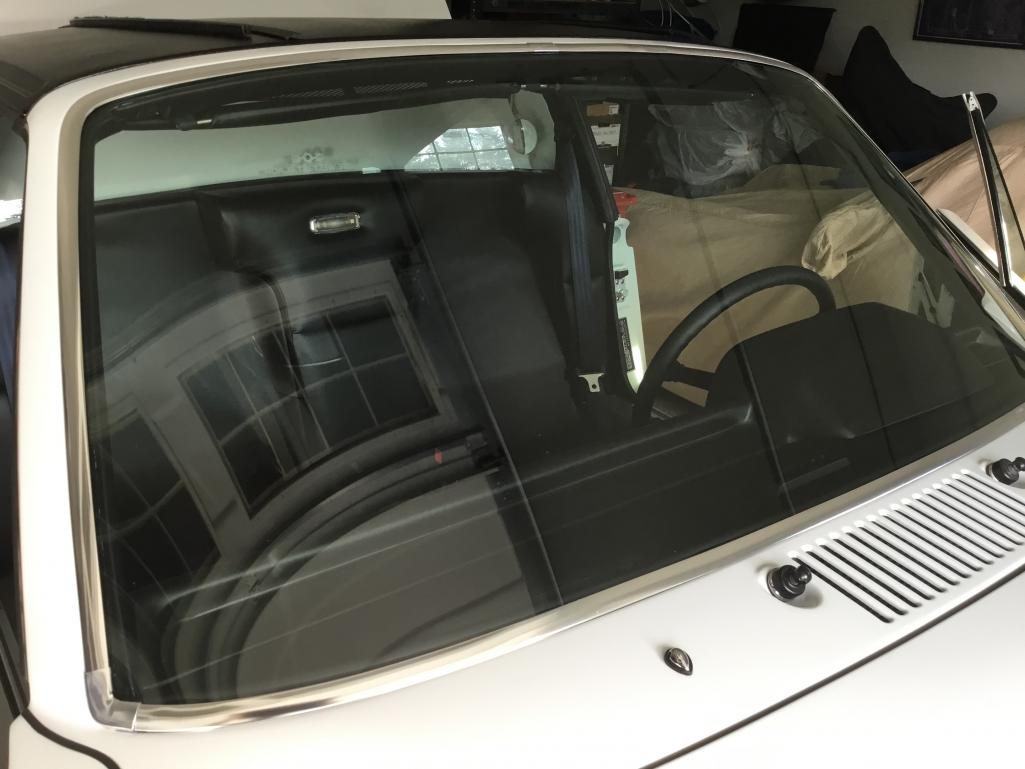 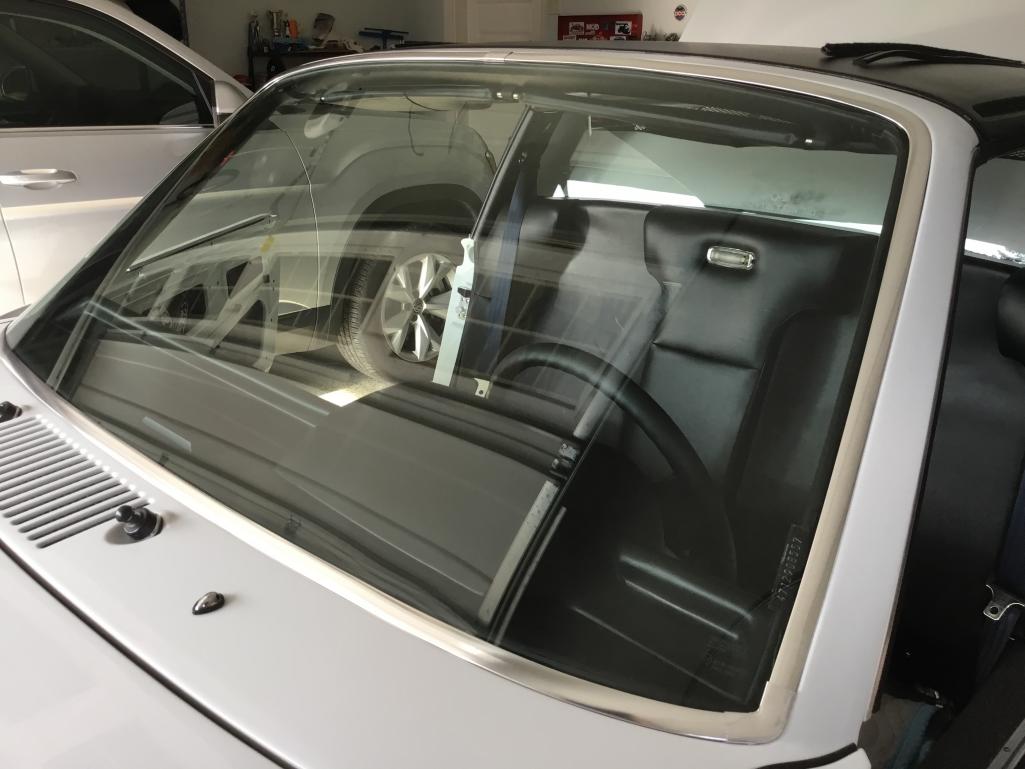 |
|
|
|
| raynekat |
Aug 30 2018, 02:10 AM
Post
#16
|
|
Advanced Member Group: Members Posts: 2,171 Joined: 30-December 14 From: Coeur d'Alene, Idaho Member No.: 18,263 Region Association: Pacific Northwest |
The windshield came from Prosource.
Took about 9 months to acquire it, but the quality was very noticeable. It was Sekurit and manufactured in Finland. Very durable windshield and the quality in the edge and fit was easy to see. I used a Workmate with a moving blanket when working on the glass. Never had any issues like some mention of the glass cracking, etc. One thing to note was the performance of the butyl primer. It really made for a very sticky surface on both the windshield and the pinch weld for the butyl to adhere to. That windshield is not going anywhere. I truly believe that windshield will keep you in the car....but I'll depend on my seatbelt to take care of that task. 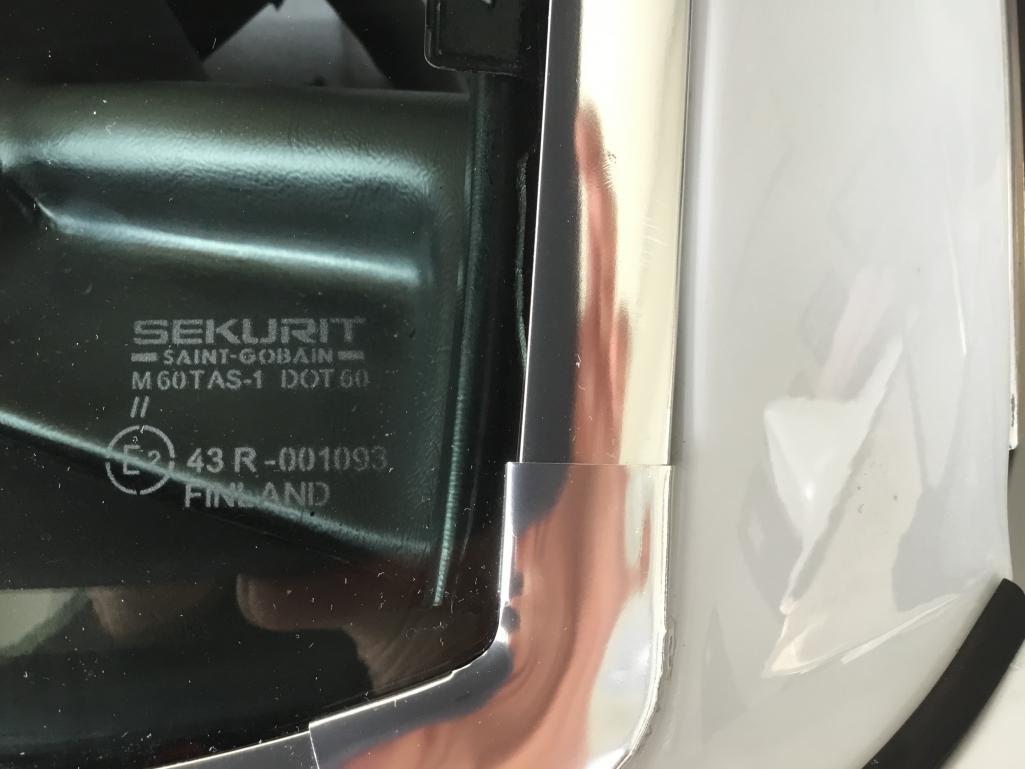 The seal that goes between the windshield and the dashboard was easily pushed into place after the windshield was installed. I didn't do it before the glass install as it seemed that it would make it harder to push the windshield down into the butyl on the lower edge of the glass.  |
|
|
|
|
1 User(s) are reading this topic (1 Guests and 0 Anonymous Users)
0 Members:

|
Lo-Fi Version | Time is now: 18th July 2026 - 05:01 AM |
Invision Power Board
v9.1.4 © 2026 IPS, Inc.