|
|
|
Porsche, and the Porsche crest are registered trademarks of Dr. Ing. h.c. F. Porsche AG.
This site is not affiliated with Porsche in any way. Its only purpose is to provide an online forum for car enthusiasts. All other trademarks are property of their respective owners. |
|
|

  |

| Superhawk996 |
 Nov 10 2019, 07:19 PM Nov 10 2019, 07:19 PM
Post
#181
|
|
914 Guru  Group: Members Posts: 7,935 Joined: 25-August 18 From: Woods of N. Idaho Member No.: 22,428 Region Association: Galt's Gulch |
Did a little measuring and it turns out that the bore used for the 911 engine 2.4L CIS injector cups are about 0.020" oversize to the standard drill that would be used for a 3/8 NPT tap.
This should be OK. Since a NPT thread form is a taper the oversize hole will result in two things: 1) the tapped thread will have slightly less than the standard thread engagement within the thread form. 2) the plug having to sit just a little deeper in the taperd thread to estalish a full seal. So I went ahead a trial tapped one of the heads for a 3/8 NPT plug. I'll go ahead and pick up a few Earls Aluminum NPT plugs and will make sure it fits and seals well before I do the others. 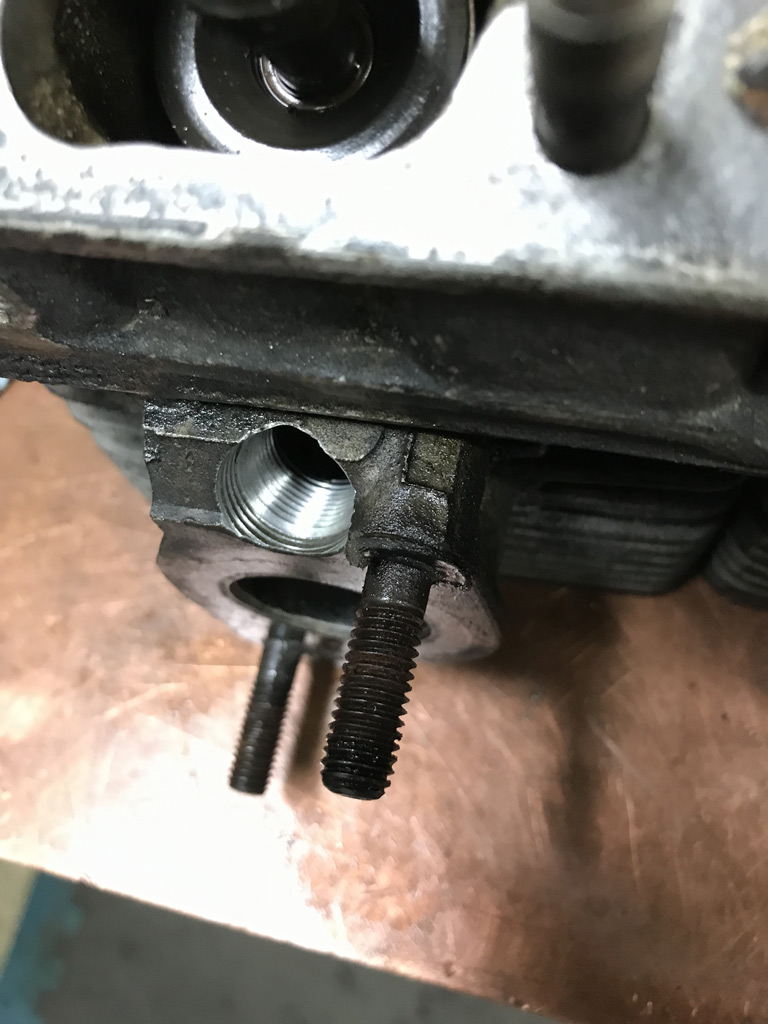 |
   |

 
|
| Superhawk996 |
Nov 10 2019, 07:31 PM
Post
#182
|
|
914 Guru Group: Members Posts: 7,935 Joined: 25-August 18 From: Woods of N. Idaho Member No.: 22,428 Region Association: Galt's Gulch |
I also did a little machine work on the GA004310 case that came with this car.
The first job was to drill out and Heli-Coil one of the M6 cheeseheads that was seized. This was straightforwad and drama free. Love when that happens. (IMG:style_emoticons/default/piratenanner.gif) 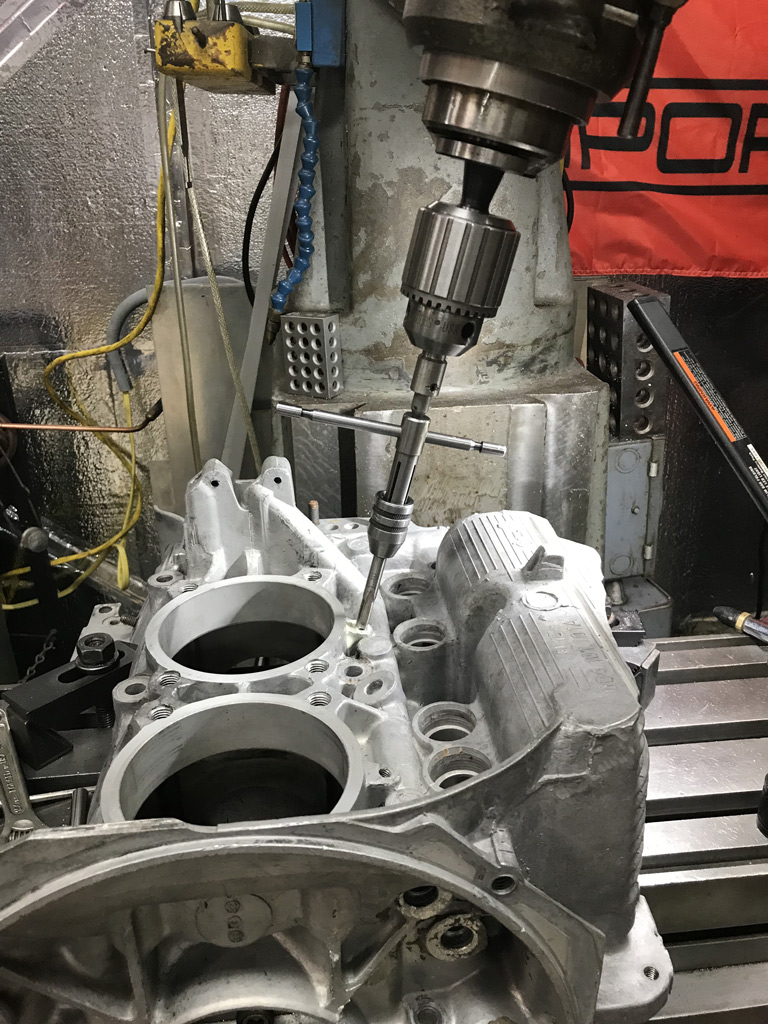 The other job is a bit of a head scratcher. (IMG:style_emoticons/default/idea.gif) When I got this engine running it was leaking oil pretty badly from the oil pressure sensor. Somewhere in it's life, someone swapped the OEM pressure sensor and managed to strip it. Their hope was that lots of PTFE tape was going to seal it and that just wasn't the way it works. This car and this engine had such a rough life -- it is almost laughable if it weren't so sad. 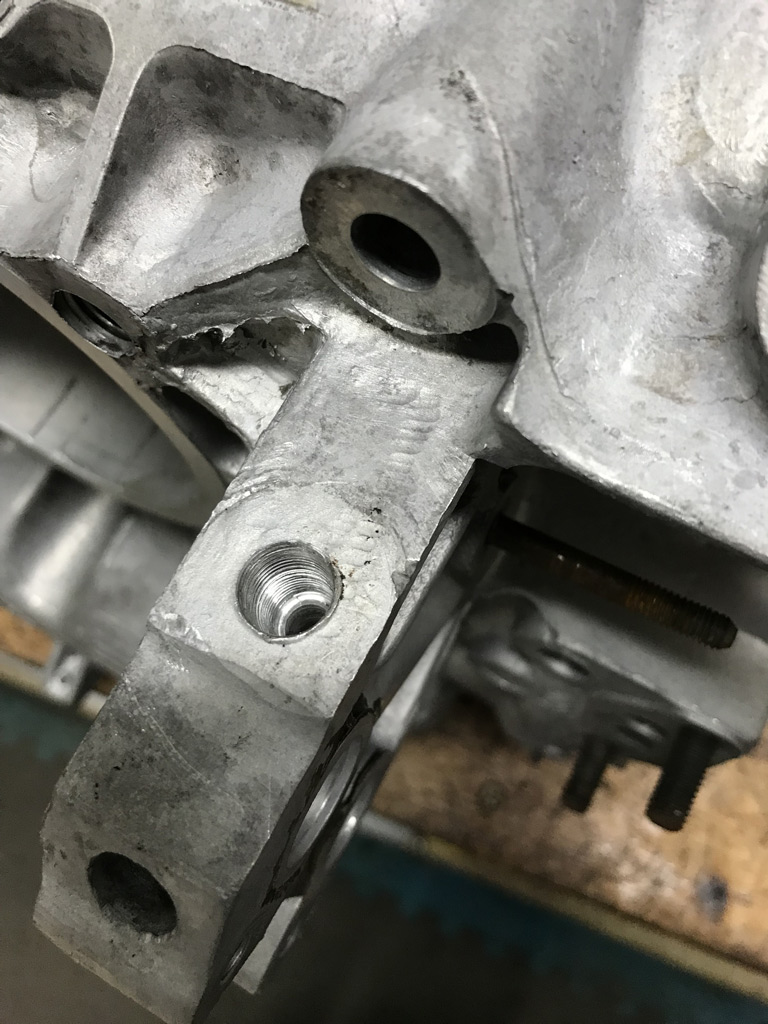 I had hoped that there would be enough material there to run the 1/8" NPT tap in a bit deeper and get enough thread to get a decent seal. As it turns out, that isn't going to happen either. Although I was able to reestablish some thread, the tapped bottomed within the bore before I was able to create much new thread. So now I think I have only two options 1) Weld the hole, drill, and retap. I don't see a good way to weld up this bore, it is pretty deep and I don't want to put a ton of heat into the area and end up having to remachine the oil cooler ports or something stupid. 2) Cut the bore oversize to 1/2", create a shrink fit aluminum plug, weld that around the top to ensure a leak free seal, then drill and tap a new NPT bore. I'm leaning toward this option. Need to think about this overnight and see if I come up with a better plan before chips begin to fly tomorrow. Anyone else ever repaired this oil pressure sensor thread area? How did you do it? |
|
|
|
| gereed75 |
Nov 10 2019, 11:35 PM
Post
#183
|
|
Senior Member Group: Members Posts: 1,443 Joined: 19-March 13 From: Pittsburgh PA Member No.: 15,674 Region Association: North East States |
This may not be a fix that meets your standard, but why not drill and thread for 1/4 NPT and put in a 1/4 x 1/8 adapter?
|
 |
|
| Superhawk996 |
Nov 11 2019, 06:04 AM
Post
#184
|
|
914 Guru Group: Members Posts: 7,935 Joined: 25-August 18 From: Woods of N. Idaho Member No.: 22,428 Region Association: Galt's Gulch |
QUOTE(gereed75 @ Nov 11 2019, 12:35 AM)  This may not be a fix that meets your standard, but why not drill and thread for 1/4 NPT and put in a 1/4 x 1/8 adapter? @Gereed75 This is a really good suggestion. It speaks to why I felt the need to sleep on it before making chips. I need to do some closer measurement but I"m concerened about 3 things: 1) In side view of this area, there isn't a whole lot of meat there for anything other than a 1/8" NPT thread bore (see photo below of 1/4" adapter on top). The size of a 1/4" NPT is large enough that it is going to be a close call on thinning out the material too much. This also seriously limits how big I can make an aluminum plug. In the case of a 1/8" NPT tap, the top of the taper is about 0.403" (major diameter). If I make a 1/2" plug, that only leaves 0.097" of diameter and 0.0485" (just over 1mm) of wall thickness (worst case @ full tap depth which won't happen) once I re-tap the machined the welded in plug. That really isn't much wall thickness after re-tapping. I wouldn't worry about it in steel but obviously we're dealing with aluminum here. Might not be so bad since I would never go full depth on the NPT tap. Here is a quick sketch (Not to Scale) of what's being considered for an aluminum plug. 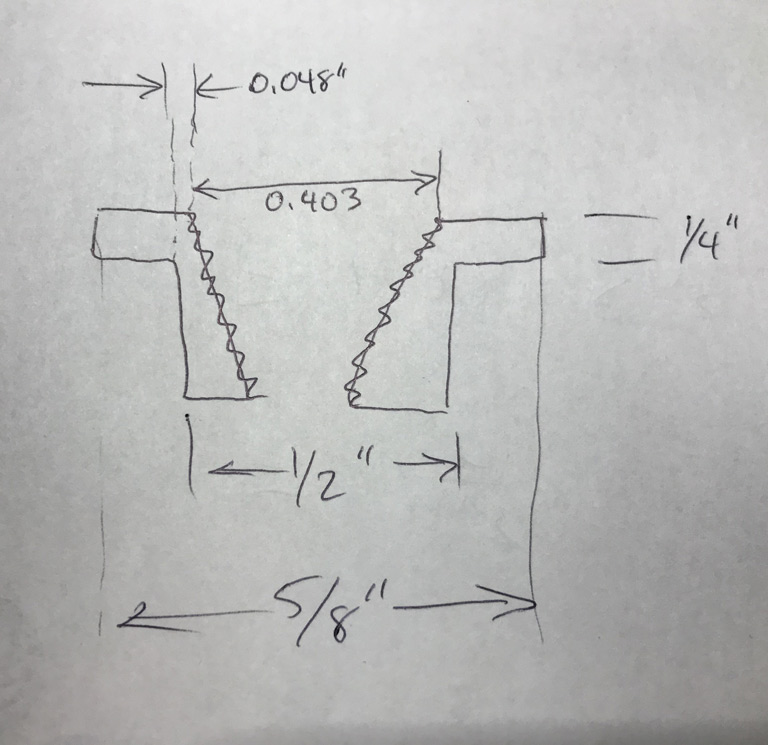 2) the added height of a 1/4" to 1/8" NPT addapter won't fit under the engine tin nicely. Likewise, it could be difficult to service later on with the tin installed. All my tin is out to powder coat - so I don't have tin to check this. (IMG:style_emoticons/default/sad.gif) 3) In general, the threaded in 1/4" to 1/8" adapter adds another potential leak path. Here's the situation from the side view. 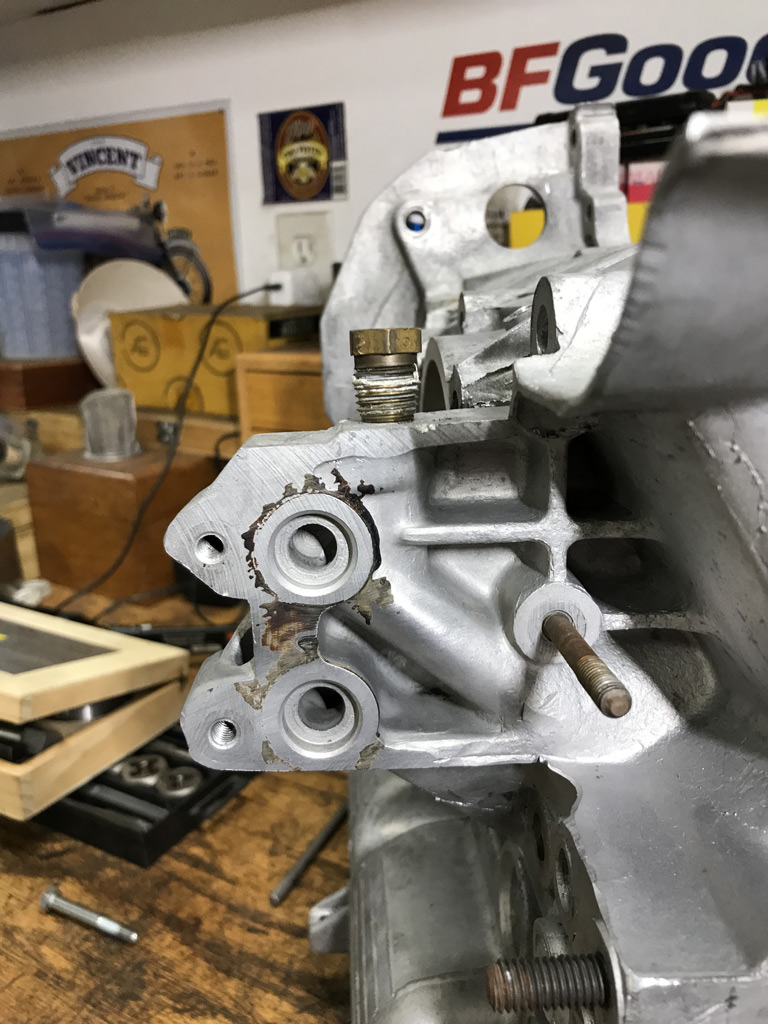 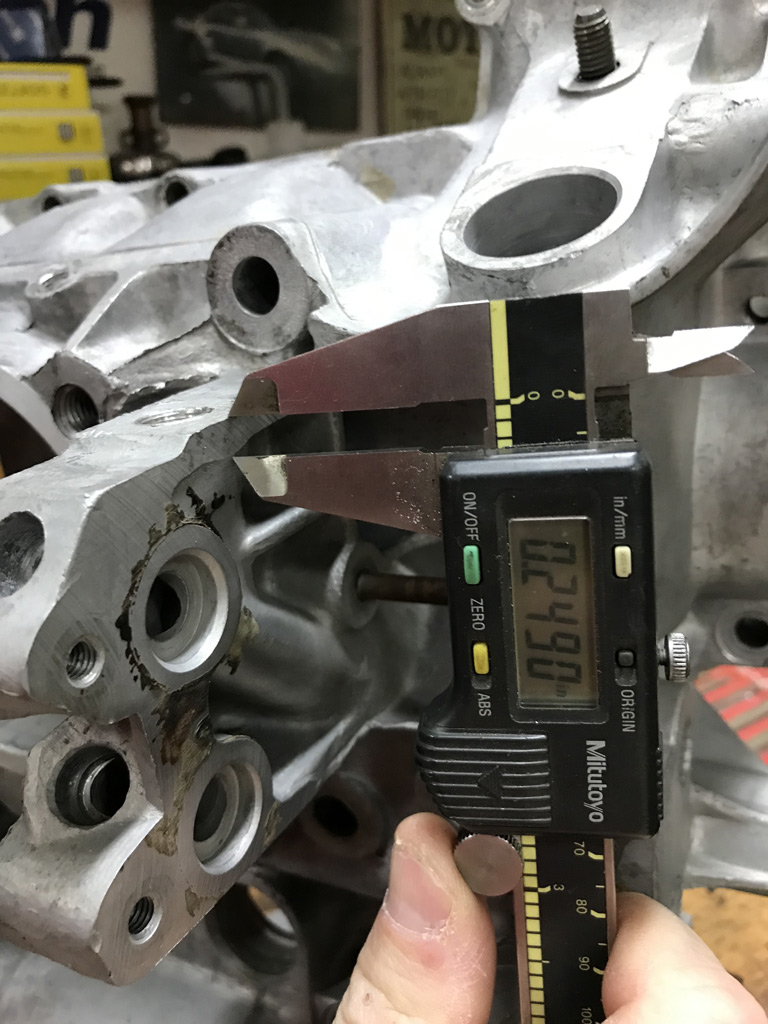 |
|
|
|
| Superhawk996 |
Nov 11 2019, 06:27 AM
Post
#185
|
|
914 Guru Group: Members Posts: 7,935 Joined: 25-August 18 From: Woods of N. Idaho Member No.: 22,428 Region Association: Galt's Gulch |
I've also considering 1/8" NPT Heli-coils or Time-Sert now that I've thought about this a bit more after a good nights sleep.
The main issue is that the NPT Heli-coil uses a 3/8" drill. A 3/8 drill is already a loose fit to this hole. Having an oversize hole on a Heli-coil bore seems like a near certain leak path. The other issue is a 1/8" NPT Heli-coil kit runs from $80-100. I don't see myself ever needing to use it again in my lifetime so it becomes a pretty large cost for a one use solution, that might still end up leaking. (IMG:style_emoticons/default/sad.gif) A 1/8" NPT Time-Sert looks more appealing since the drill size is 13/32 (0.406") and this will be just barely large enough to clear out the stripped threads. I trust a Time-Sert to seal better than a Heli-coil if installed with some Loctite. About the same cost as the Heli-coil kit. (IMG:style_emoticons/default/idea.gif) Hmm. |
|
|
|
| Superhawk996 |
Nov 11 2019, 07:38 PM
Post
#186
|
|
914 Guru Group: Members Posts: 7,935 Joined: 25-August 18 From: Woods of N. Idaho Member No.: 22,428 Region Association: Galt's Gulch |
I pulled the trigger on fabrication of a ferrule to fix the stripped pressure sensor port. It just seemed like the right thing to do. It will be a solid fix that won't leak and there is no extra cost for one time use Time-Sert's (just my time), and there is no need to wait for Time-Serts to arrive. I wanted to keep this machine work moving forward.
After some measurement and a bit of a rethink on the dimensions I decided to only cut the lower bore to 7/16". The upper counterbore is 5/8". The upper 5/8" segment is 0.375" in length and the lower 7/16 segment is 0.25" in length. The bore in the case was cut on-size and the ferrule was built 0.002" oversize for a shink fit. Here's a little video of the work to find the center line of the pressure port bore. https://www.youtube.com/watch?v=FtXTVeNxI7w Reamed the lower bore for a nice smooth finish. 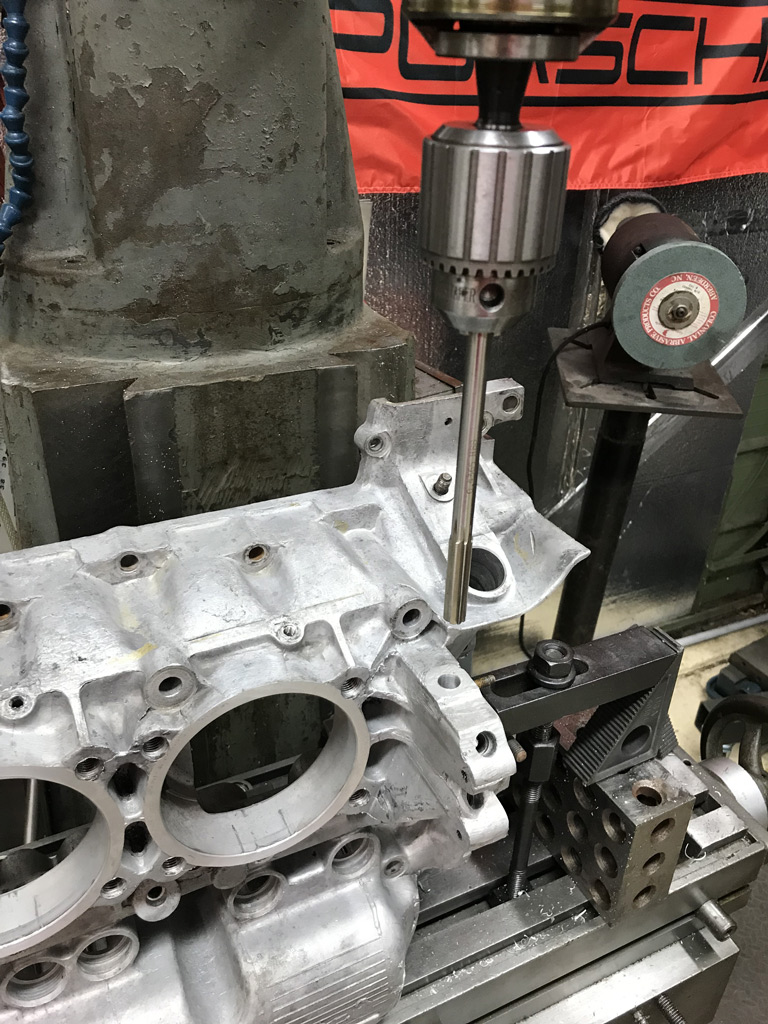 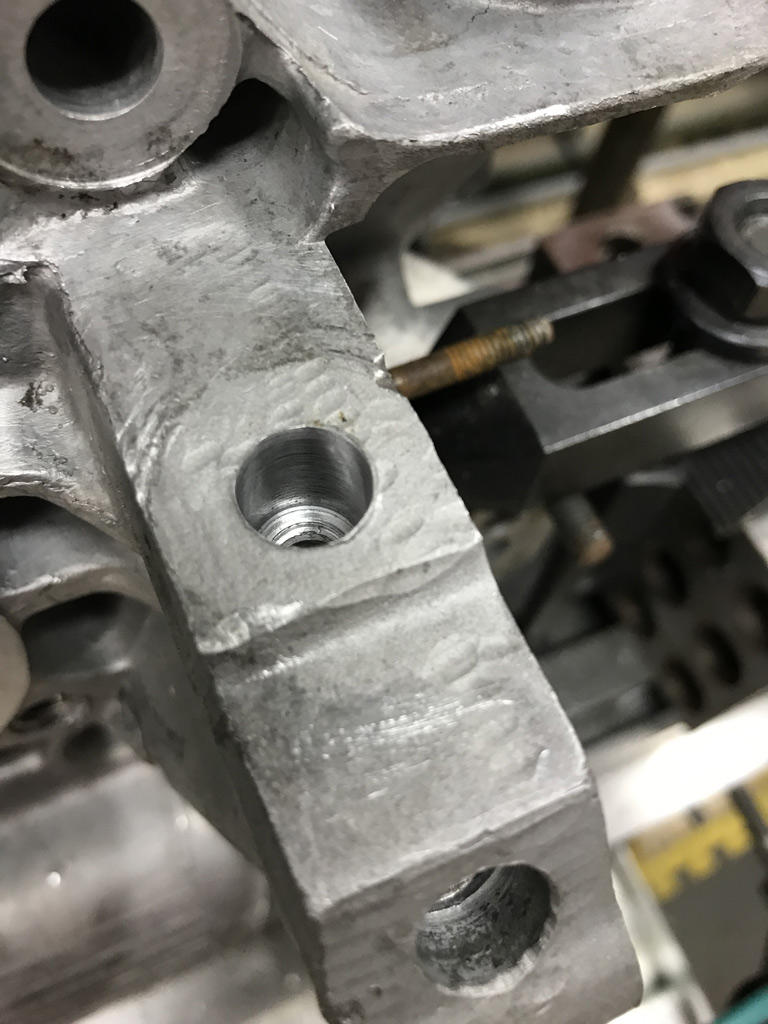 Then the 5/8" counterbore was cut 0.25" deep. 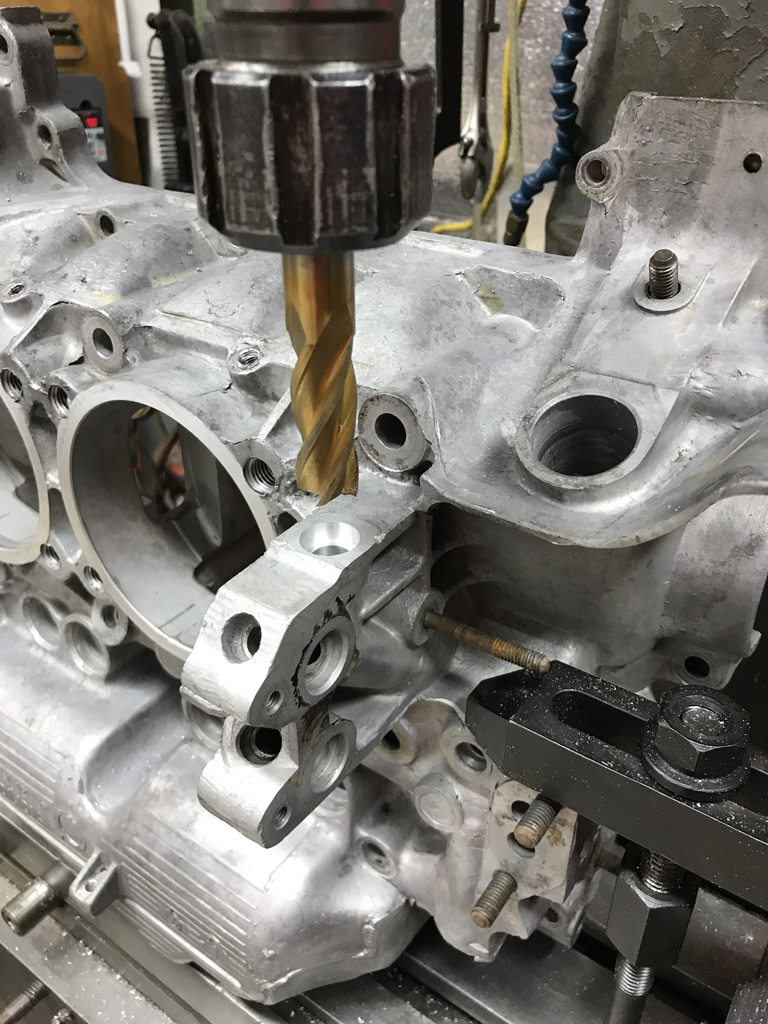 Then it was time to make the ferrule. 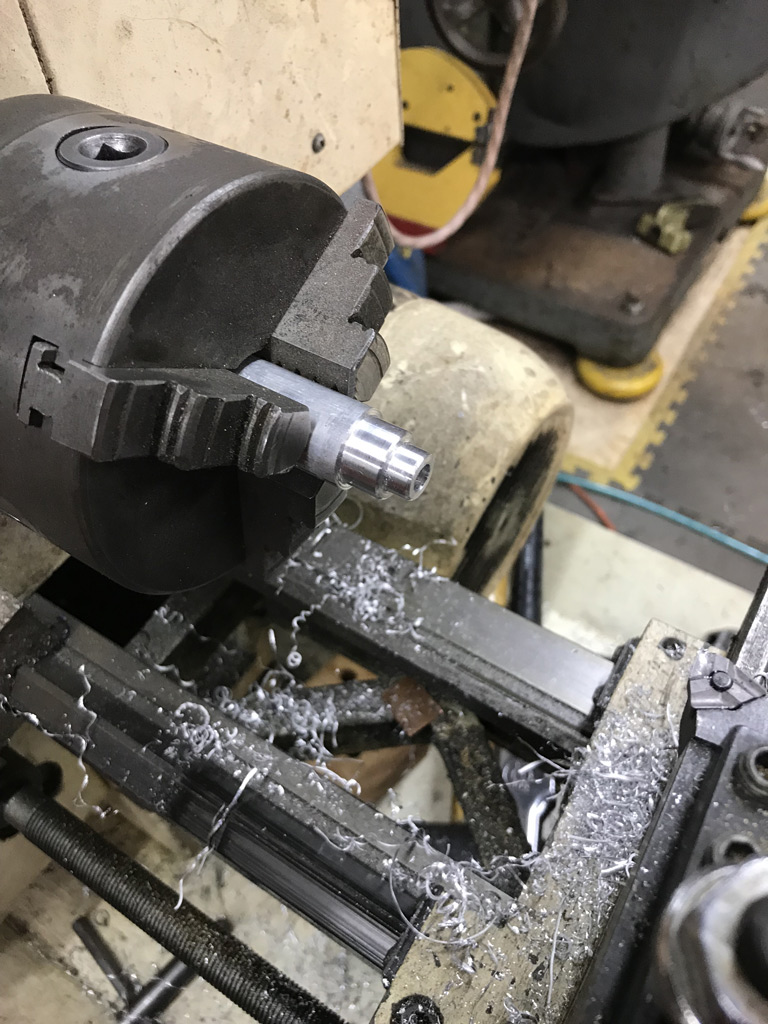 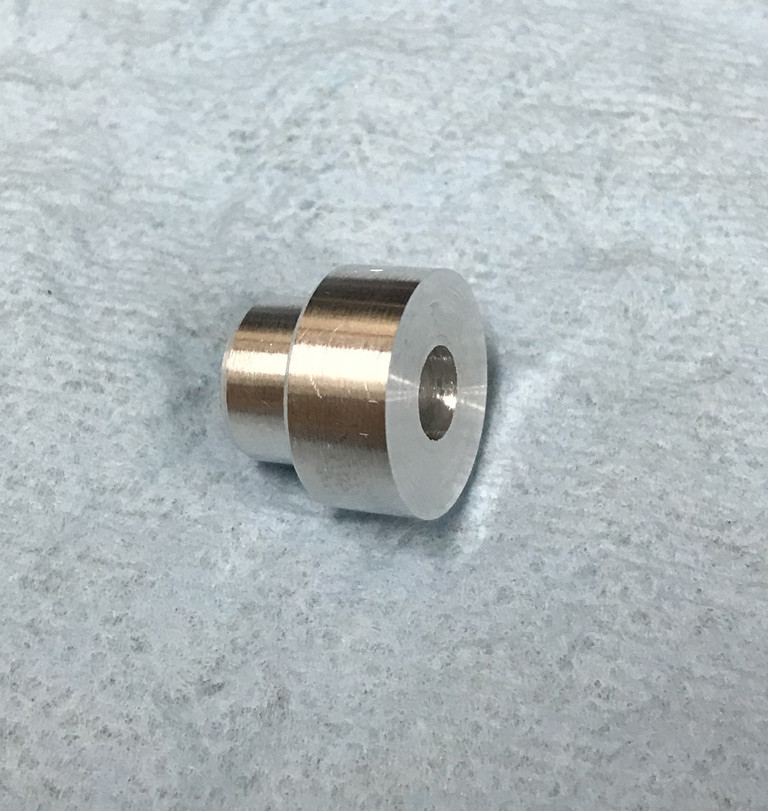 Put the ferrule in the freezer for about 1/2 hour, then heated the case with a rosebud oxy-acetylene torch and then tapped the ferrule home. 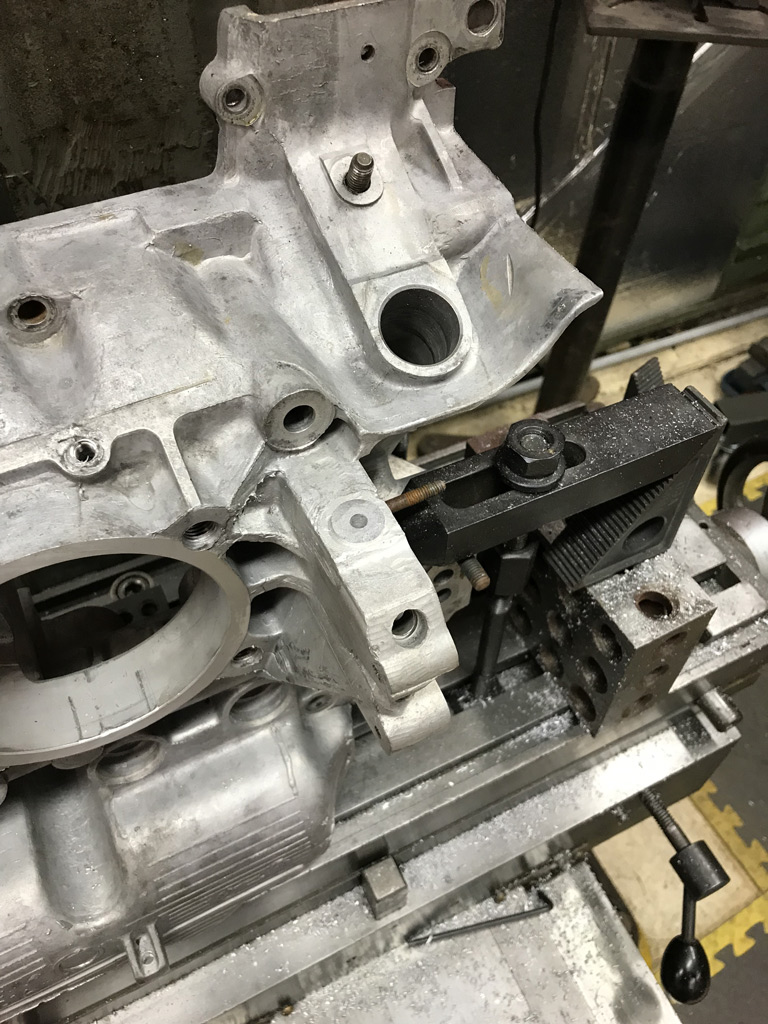 You'll notice I made the ferrule so that it stands proud of the surface by about 1/8" to give me something to weld to. It also gives me more material for the taper. The OEM Oil pressure sensor only theads in about 1/4" so having a 3/8" long section that is 5/8" diameter will give me plenty of material to tap into without thining the wall of the 7/16" diameter lower section. Once I have the port tapped to 1/8" NPT, I'll surface the top of the ferrule again for a nice flat surface. And for good measure I welded the top 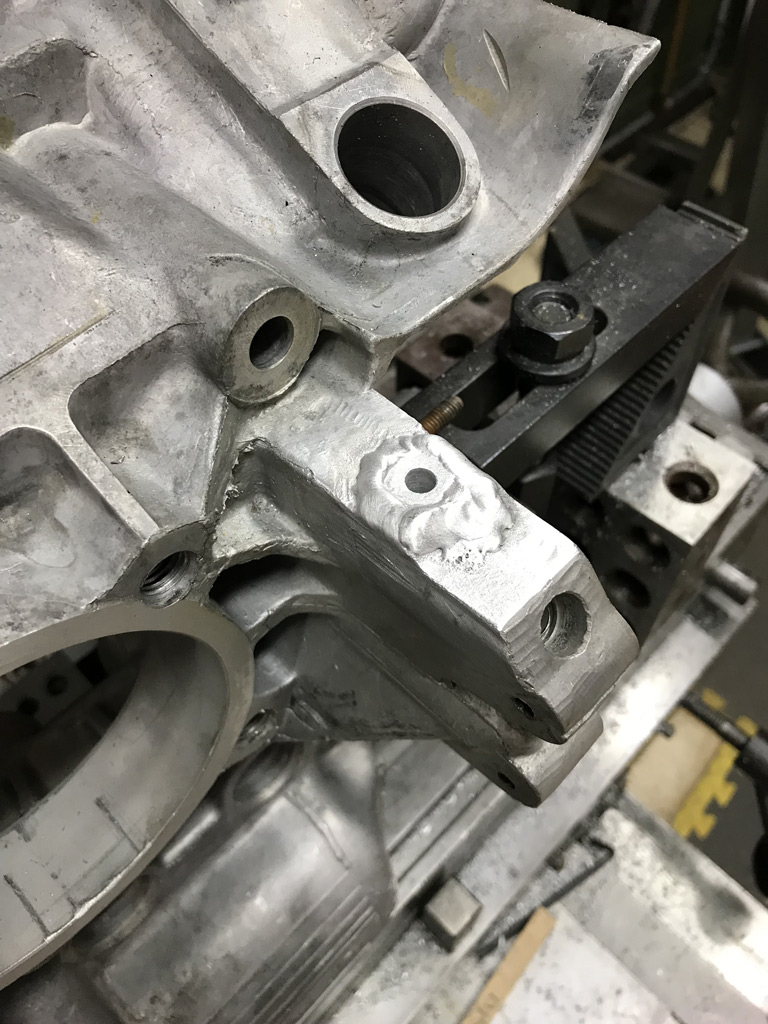 Drilled, tapped to 1/8" NPT and milled the top once things cooled back to room temperature. 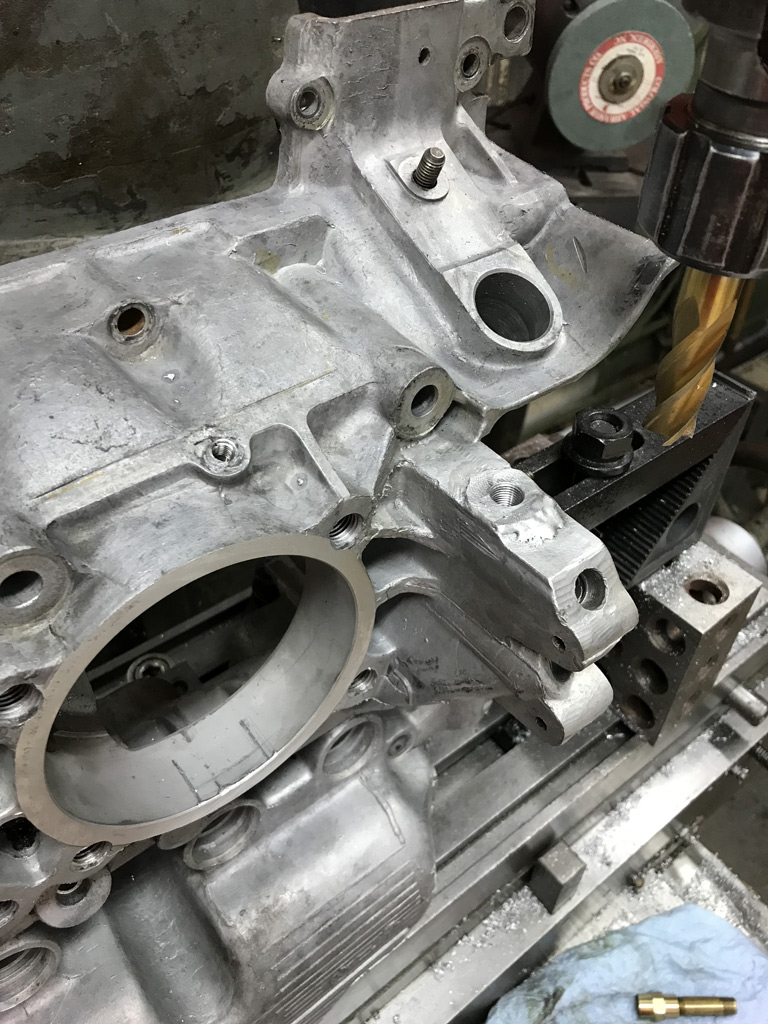 And finally, this critical machining project is finished. 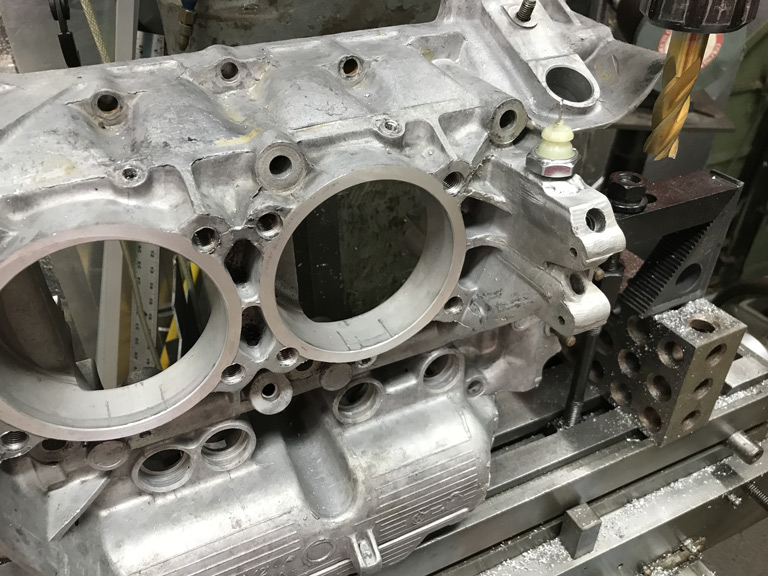 |
|
|
|
| Superhawk996 |
Nov 14 2019, 08:13 AM
Post
#187
|
|
914 Guru Group: Members Posts: 7,935 Joined: 25-August 18 From: Woods of N. Idaho Member No.: 22,428 Region Association: Galt's Gulch |
Sorry to be jumping back and forth between the Type 4 GA004310 build and the teardown work for the 2.4L 911 engine but unfortunately this is the way I'm having to work at the moment.
Needed to get the 911 heads torn down and off my bench to free up space and to get them ready to be shipped to Ollies. 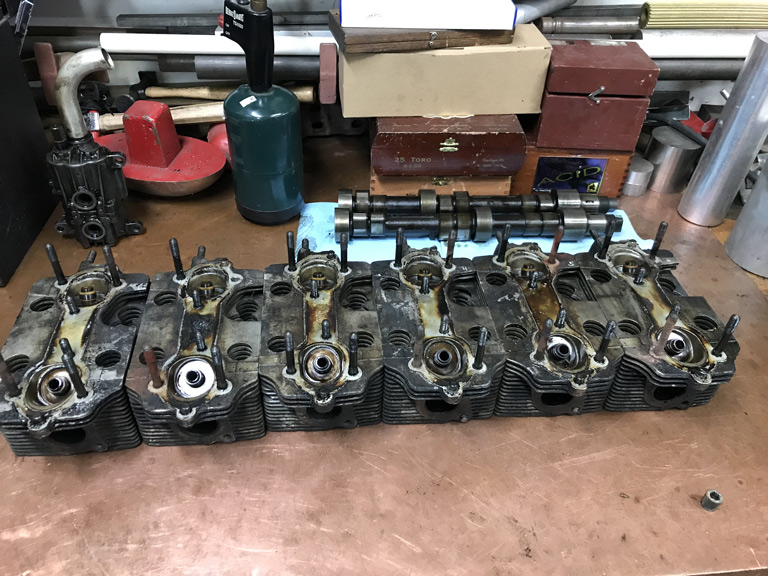 During the tear down I thought I find nearly all the valves to be bent based on the witness marks in the pistons. As it turns out only the #6 cylinder exhaust valve is bent to the point that it can easily be seen visually. https://www.youtube.com/watch?v=x_P2JQpI5S8 Curiously, the #6 intake valve retainer was also cracked. 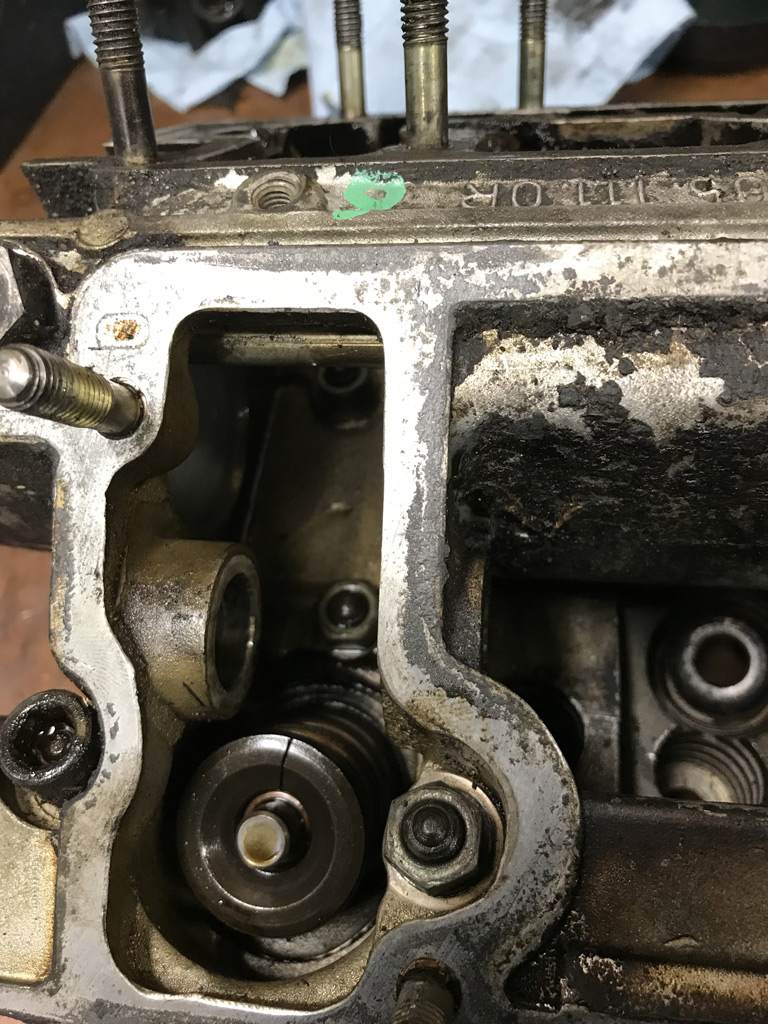 All the other exhaust valves had some pretty excessive carbon and light corrosion around the seat area but didn't seem to be terribly torn up to account for why I was getting such high leakdown off the exhuast valves. I may chuck up the #4, and #5 valves today out of curiosity and put a dial indicator on them. However, it is a moot point. Since #6 is clearly bent, I'll reaplace all valves, springs, retainers, and keepers. At this point I'm still not exactly sure what happened to this engine but I'm going to lean towards it having been over rev'd to the point that valves kissed pistons and cracked the #6 intake valve retainer. |
|
|
|
| Superhawk996 |
Nov 14 2019, 10:17 AM
Post
#188
|
|
914 Guru Group: Members Posts: 7,935 Joined: 25-August 18 From: Woods of N. Idaho Member No.: 22,428 Region Association: Galt's Gulch |
Looks like the 3/8" NPT plugs are going to be a workable solution for plugging the CIS injector ports.
Might need to think about making plugs later that can completely fill the old CIS bore so that I don't have a flow interruption where the old CIS port merges with the intake port but at this point, I think that is over-thinking it. I can make custom port plugs later on if it becomes necessary to improve airflow and/or to keep fuel better atomized. The only real way to answer that is on a flow bench. I suspect it isn't much of an issue given that the orginal 2.4L MFI 911E made 160HP with a similar flow interruption in the intake port area. The 911S was good for 190HP but did have larger valves and larger intake ports but the MFI still would have had an interruption in the intake port for the MFI injectors. 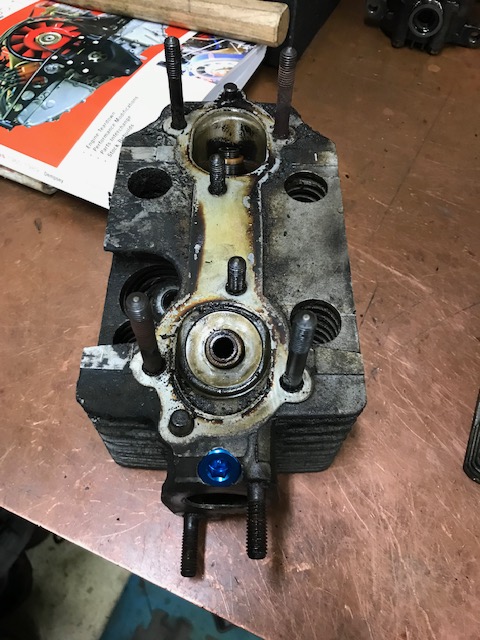 |
|
|
|
| kroelofsen |
Nov 14 2019, 11:33 AM
Post
#189
|
|
Member Group: Members Posts: 102 Joined: 27-June 19 From: The Netherlands Member No.: 23,255 Region Association: Europe |
(IMG:style_emoticons/default/smilie_pokal.gif) That is realy nice work! With the right machinery things become much easier...
|
|
|
|
| Superhawk996 |
Nov 14 2019, 12:39 PM
Post
#190
|
|
914 Guru Group: Members Posts: 7,935 Joined: 25-August 18 From: Woods of N. Idaho Member No.: 22,428 Region Association: Galt's Gulch |
QUOTE(kroelofsen @ Nov 14 2019, 12:33 PM) (IMG:style_emoticons/default/smilie_pokal.gif) That is realy nice work! With the right machinery things become much easier... Indeed. However, believe it or not, I didn't have to do any machine work on the CIS injector ports. The CIS hole was very close (slightly oversize) to the size needed for a 3/8 NPT tap. I just got lucky on that one! For anyone that thinks you need all the fancy tools, I can tell you I did my 1st car's restoration with not much more than a basic socket set, a pair of vice grips, a couple of adjustable wrenches, and a ball peen hammer. I only bought an air compressor right before I did the paint work and at that point in my life, the compressor amounted to 1/2 month of pay! I also distinctly remember deciding about 30 years ago at that point in time that I had to find a better paying career that would allow me to play with cars full time and would afford me the opportunity to have nicer tools. I eventually became an automotive engineer. I'd say it all worked OK. (IMG:style_emoticons/default/biggrin.gif) |
|
|
|
| Superhawk996 |
Nov 14 2019, 12:55 PM
Post
#191
|
|
914 Guru Group: Members Posts: 7,935 Joined: 25-August 18 From: Woods of N. Idaho Member No.: 22,428 Region Association: Galt's Gulch |
Given that I've had the sickness for about 30 years why stop now. I've been on vacation this week and mostly trying to catch up on neglected errands, and spending time with family.
Yesterday while visiting my father, I decided to retrieve a couple of transmissions that I've had in storage with him for about the last 24 years. Total on hand - 4 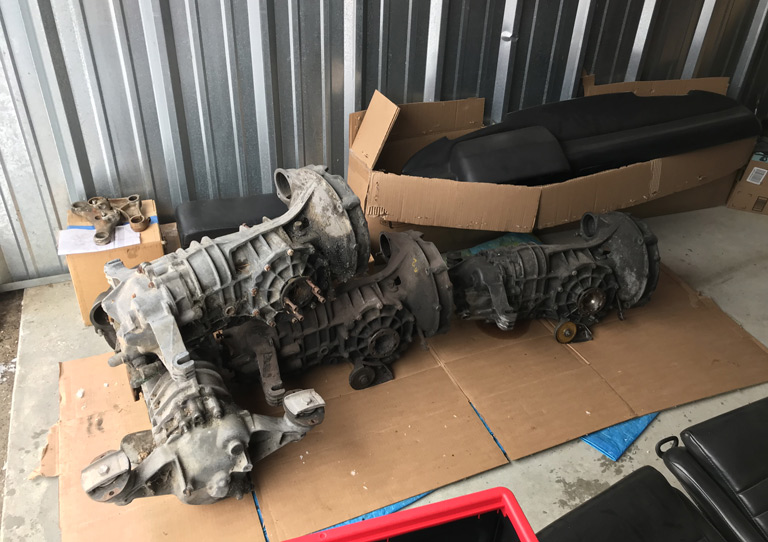 One that came with this car, one came with engine GA000099, and now these two on hand. 3 are side shifters and somehow I have a tailshifter even though I've always had 73's. I must have bought it ages ago for parts (IMG:style_emoticons/default/confused24.gif) I should now have plenty of donor parts to put together at least one really solid transmission. Won't know until I get inside them though. @Dr Evil A while back I purchased a Dr. Evil trans rebuild DVD to get a different perspective on how to properly rebuild these even though I've done a couple in the pre-internet era. Highly entertaining DVD's. Every now and again there is a comment in there that he just slips in that is hilarious. The best part might have been the labeling on the disks. 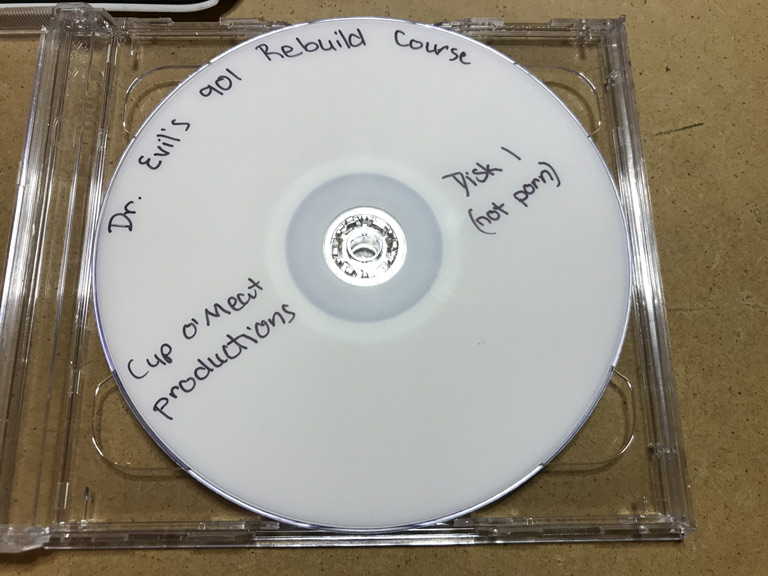  (IMG:style_emoticons/default/av-943.gif) |
|
|
|
| Superhawk996 |
Nov 24 2019, 04:01 PM
Post
#192
|
|
914 Guru Group: Members Posts: 7,935 Joined: 25-August 18 From: Woods of N. Idaho Member No.: 22,428 Region Association: Galt's Gulch |
2.4L case, rods, and heads are now off to Ollies. Now its just a waiting game until they can do the work and wait for the bill.
Looking forward to the holiday weekend to get some quality garage time in. Neck is healed, pinched nerve is finally under control courtesy of Advil. Should be able to do some chassis work this coming long weekend. (IMG:style_emoticons/default/piratenanner.gif) In anticipation of that, I've just been continuing to gather parts. 5 lug conversion plan is starting to come together courtesy of Garold and Larmo! 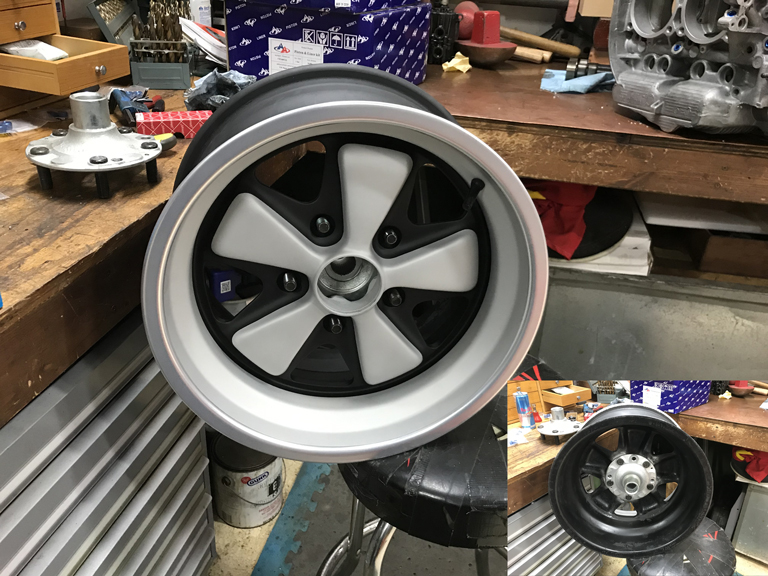 |
|
|
|
| Superhawk996 |
Nov 24 2019, 04:15 PM
Post
#193
|
|
914 Guru Group: Members Posts: 7,935 Joined: 25-August 18 From: Woods of N. Idaho Member No.: 22,428 Region Association: Galt's Gulch |
The negative cash flow from the 914 is bad enough but I've also come to realize a new problem.
With the 914 tying up the garage, I don't have anywhere to work on the rest of the fleet. The choice is either work on them out in the open or pay someone else to do the dirty work. My Jeep has penchant for developing dragging front calipers that need to be replaced every 4 years or so. With winter coming it was time to get that taken care of so I have a snow vehicle. Simultaneously, while commuting to work last week, the Mazda MPV parts hauler decided to spit out the #1 spark plug. I purchased the MPV used last fall for dirt cheap. It served me well so far by picking up two engines and hauling parts to/from storage, but, apparently somewhere in it's past, someone stripped the spark plug threads and it finally let loose. My wife now realizes just how much my labor is worth. (IMG:style_emoticons/default/smile.gif) $1000 bill to repair the two of them in the same week! (IMG:style_emoticons/default/sad.gif) That sucks! I really hate paying others to do what I can for myself! Next time, I may just have to do it in the driveway! (IMG:style_emoticons/default/happy11.gif) |
|
|
|
| porschetub |
Nov 24 2019, 04:35 PM
Post
#194
|
|
914 Guru Group: Members Posts: 5,130 Joined: 25-July 15 From: New Zealand Member No.: 18,995 Region Association: None |
Really impressed with your machine skills I have that but no gear to do it on ,up until recently I had use of a mill and lathe ,when I was a chief engineer on ships I had all this to work with in my spare time and sometimes when I was on "watch" on easy days,miss that part of the job.
Lots of stuff for folks to learn from your thread ,keep it up (IMG:style_emoticons/default/smilie_pokal.gif) (IMG:style_emoticons/default/beer.gif) . |
|
|
|
| Superhawk996 |
Nov 24 2019, 07:09 PM
Post
#195
|
|
914 Guru Group: Members Posts: 7,935 Joined: 25-August 18 From: Woods of N. Idaho Member No.: 22,428 Region Association: Galt's Gulch |
QUOTE(porschetub @ Nov 24 2019, 05:35 PM) Really impressed with your machine skills I have that but no gear to do it on ,up until recently I had use of a mill and lathe ,when I was a chief engineer on ships I had all this to work with in my spare time and sometimes when I was on "watch" on easy days,miss that part of the job. Lots of stuff for folks to learn from your thread ,keep it up (IMG:style_emoticons/default/smilie_pokal.gif) (IMG:style_emoticons/default/beer.gif) . @porschetub Chief engineer on ships sounds like an ultra cool job. Ton's of cool machinery on a ship! |
|
|
|
| Superhawk996 |
Nov 24 2019, 07:15 PM
Post
#196
|
|
914 Guru Group: Members Posts: 7,935 Joined: 25-August 18 From: Woods of N. Idaho Member No.: 22,428 Region Association: Galt's Gulch |
One minor project completed today between Honey-Do projects of planting fall bulbs & yard chores.
Cleaned up one of the 2.4L cam tower housings. I don't have a lot of confidence in handing these off to my local machine shop for hot tanking. The surface finish between the heads and the cam tower housing is a very fine, almost lapped surface finish that doesn't rely on a gasket between the heads and the cam tower. I'm a bit afraid that someone will end up banging parts on wire racks and/or metal benches. Plus, evertime I get parts back from the tank I still end up having to do a good hand scrub to get to my standard for cleanliness. Used one of my favorite cleaners for motorcycles. S100 is the product name. It does a good job of breaking down grease deposits and then rinsing away clean. Still a lot of work involved with various brushes to get into the nooks but it turned out pretty well for about an hour and a half worth of work. Good enough for now. Will do final cleanup when engine is closer to assembly. Attached image(s) 
|
|
|
|
| eatpez |
Nov 25 2019, 11:27 AM
Post
#197
|
|
Newbie Group: Members Posts: 18 Joined: 4-October 18 From: Michigan Member No.: 22,543 Region Association: North East States |
I love this thread and love the fact that you are also local to me. Inspires me to update my thread and continue the body work on my chassis, although the recent spell of really cold weather makes that more difficult without a properly heated garage.
If you ever need a second pair of hands, don't hesitate to send me a PM. |
|
|
|
| Superhawk996 |
Nov 25 2019, 06:59 PM
Post
#198
|
|
914 Guru Group: Members Posts: 7,935 Joined: 25-August 18 From: Woods of N. Idaho Member No.: 22,428 Region Association: Galt's Gulch |
@eatpez
Reddy Heater 55000 BTU kerosene heater has been my only heat for 20+ years. (IMG:style_emoticons/default/confused24.gif) Over the years I’ve added insulation. I just insulated my 1960’s vintage metal garage doors last year. Should have done that a decade ago. Don’t need fancy heat. Sure would be nice though! I dream of building my dream pole barn with a lift and radiant floor heat .. . Maybe someday! (IMG:style_emoticons/default/drooley.gif) Start basic. Don't let perfect be the enemy of good enough! Brent Brock Has done amazing work out of a Harbor Freight temporary carport. I think Jeff Hail had a saying in his post to the effect of be the Spirit Of Can! Channel it. Don’t let obstacles stop you! Not even the crap we call winter. |
|
|
|
| bbrock |
Nov 25 2019, 11:06 PM
Post
#199
|
|
914 Guru Group: Members Posts: 5,269 Joined: 17-February 17 From: Montana Member No.: 20,845 Region Association: Rocky Mountains |
QUOTE(Superhawk996 @ Nov 25 2019, 05:59 PM) Brent Brock Has done amazing work out of a Harbor Freight temporary carport. (IMG:style_emoticons/default/biggrin.gif) Full disclosure though. The tent was in addition to a radiant floor heated (albeit cramped) garage. And I complain frequently. Kudos to you for soldiering on without central heat. I do envy your toys though. (IMG:style_emoticons/default/drooley.gif) |
|
|
|
| Superhawk996 |
Nov 29 2019, 03:23 PM
Post
#200
|
|
914 Guru Group: Members Posts: 7,935 Joined: 25-August 18 From: Woods of N. Idaho Member No.: 22,428 Region Association: Galt's Gulch |
Well another win some lose some day.
Picked up engine tin from Powder Coat. Overall I'm very happy with how it turned out even if it did take extraordinarily long. 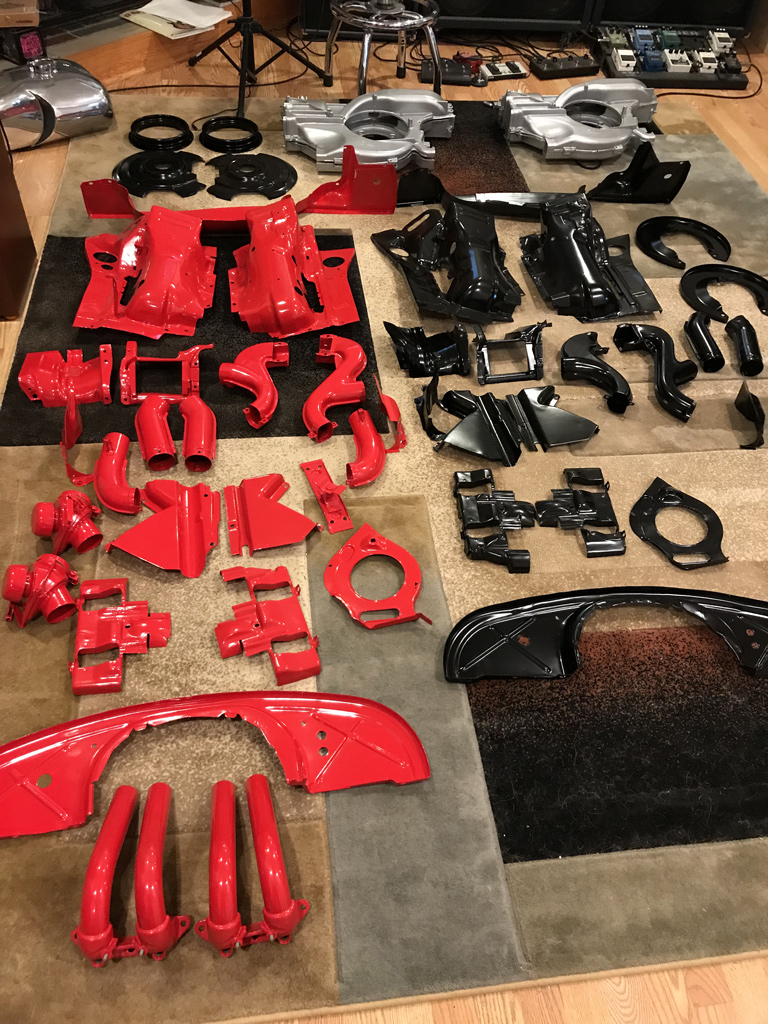 The red was done in gloss and the black in satin. I'm pretty happy how the repairs turned out. I wasn't sure how much coverage I'd get with the powder coat. Overall, I'm happy but I can see a little of the weld seam in the engine tin I had to fabricate to reair the A/C butchery. 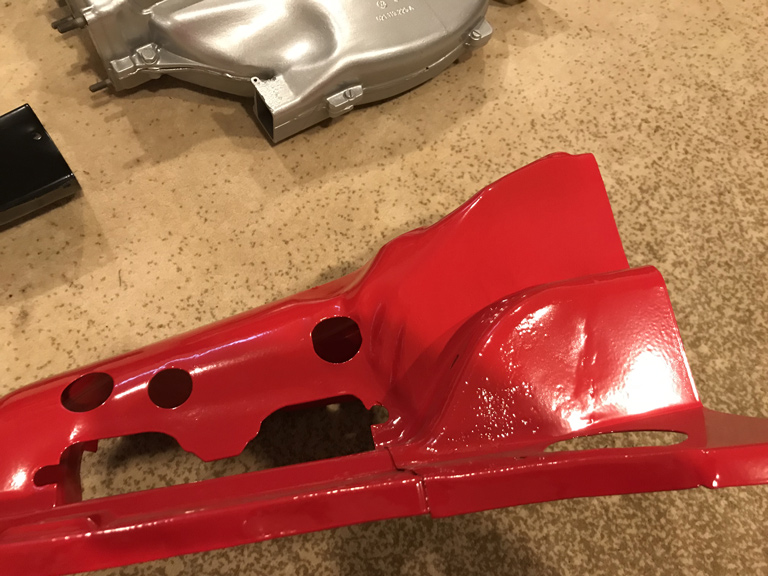 The Black Satin definately hides better than the gloss. Here is the tin that had the crack repair under the coil. 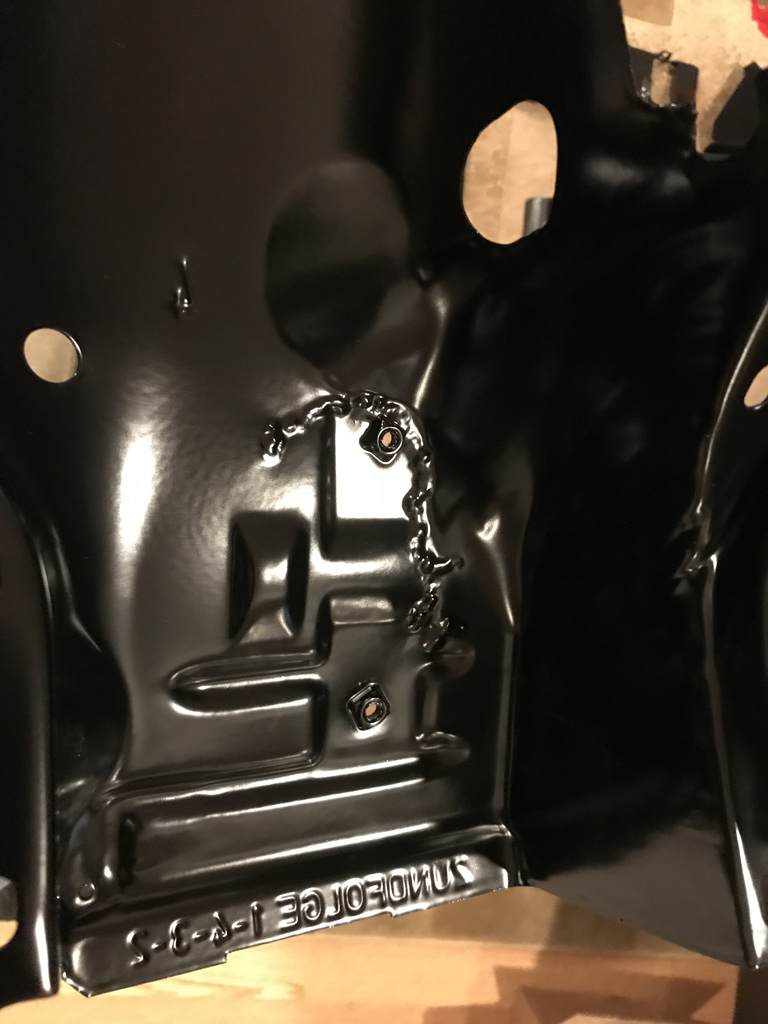 and the top side 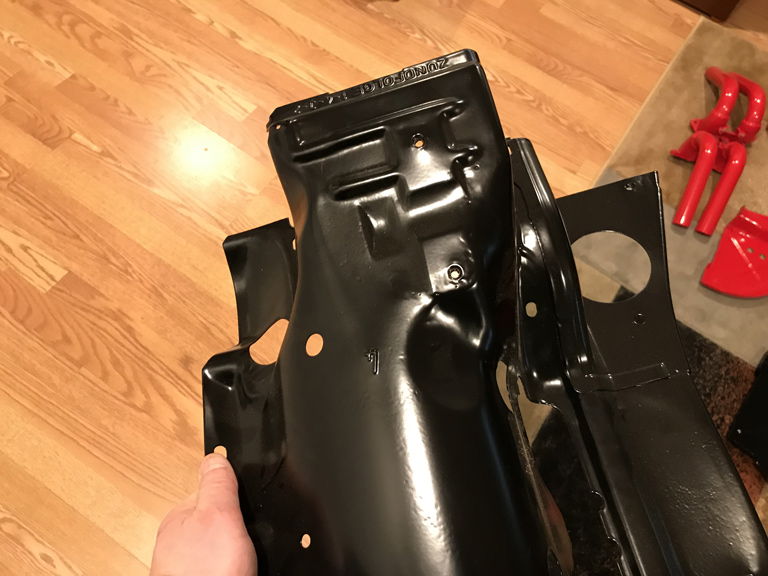 And of course there is always one little oopsie the you don't see coming. Looks like I missed a rust spot. When the tin was sandblasted it looks like it blew out and of course the powder coater just chugged along. 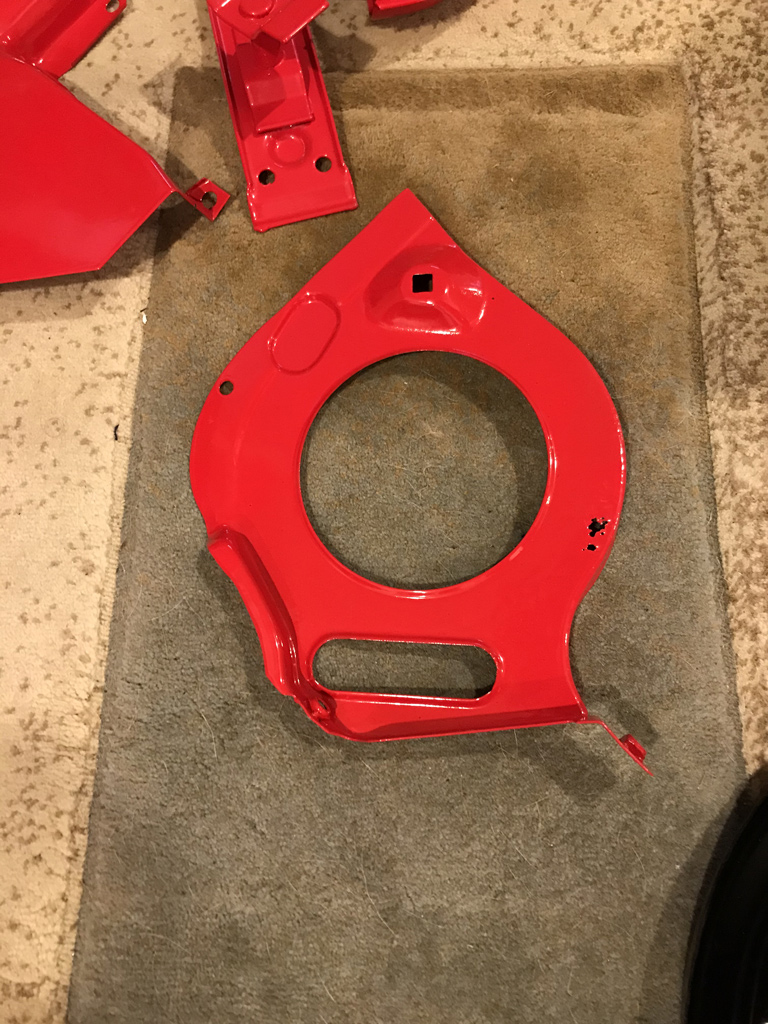 Oh well. At least this isn't on a visible area. I may just epoxy it a bit . . . or I may try to find another piece and have it powder coated seperately. We'll see. |
|
|
|
|
1 User(s) are reading this topic (1 Guests and 0 Anonymous Users)
0 Members:

|
Lo-Fi Version | Time is now: 4th July 2026 - 05:58 PM |
Invision Power Board
v9.1.4 © 2026 IPS, Inc.