|
|
|
Porsche, and the Porsche crest are registered trademarks of Dr. Ing. h.c. F. Porsche AG.
This site is not affiliated with Porsche in any way. Its only purpose is to provide an online forum for car enthusiasts. All other trademarks are property of their respective owners. |
|
|

  |

| mepstein |
 Nov 29 2019, 03:32 PM Nov 29 2019, 03:32 PM
Post
#201
|
|
914-6 GT in waiting  Group: Members Posts: 20,795 Joined: 19-September 09 From: Landenberg, PA/Wilmington, DE Member No.: 10,825 Region Association: MidAtlantic Region |
I've often found rust holes after the fact when doing engine tin. That's one of the reasons our shop won't do outside parts for a fee. Too many little gotchas that can triple the time you can charge for.
|
   |

 
|
| Superhawk996 |
Nov 29 2019, 03:44 PM
Post
#202
|
|
914 Guru Group: Members Posts: 7,935 Joined: 25-August 18 From: Woods of N. Idaho Member No.: 22,428 Region Association: Galt's Gulch |
QUOTE(mepstein @ Nov 29 2019, 04:32 PM)  I've often found rust holes after the fact when doing engine tin. That's one of the reasons our shop won't do outside parts for a fee. Too many little gotchas that can triple the time you can charge for. @mepstein It all went pretty well on the whole. Only once piece out of many, so, no worries. I spent a lot of time welding cracks and straightening before I sent it out. Speaks more to my lack of quality control than the powder coater's. He probably didn't even see it when suited up in the blast booth and depending on the lighting, may not even have seen it when applying the powder. Doing retail repair work is definately a risk. Sort of explains why so many shops (not just yours) don't do outside work anymore. I worked retail in college. You get some dicey characters! |
 |
|
| Superhawk996 |
Dec 7 2019, 08:10 PM
Post
#203
|
|
914 Guru Group: Members Posts: 7,935 Joined: 25-August 18 From: Woods of N. Idaho Member No.: 22,428 Region Association: Galt's Gulch |
Due to holiday's and work it seems like I haven't been making much progress. Last weekend was largely sent with the remnants of the 2.4L CIS & intake system tying to first get it taken apart so it fits in smaller boxes and then to determine what is salvageable.
Today, I spent a little time today messing with Ben's DIY oil tank kit. Fit up and laser cutting are top notch. Unfortunately my welding technique doesn't quite lend itself to the nice, neat, uniform stack of dimes look. Functional -- yes. Pretty -- No. (IMG:style_emoticons/default/dry.gif) Maybe someday. Anyway, here are a couple quick pictures of the work so far. 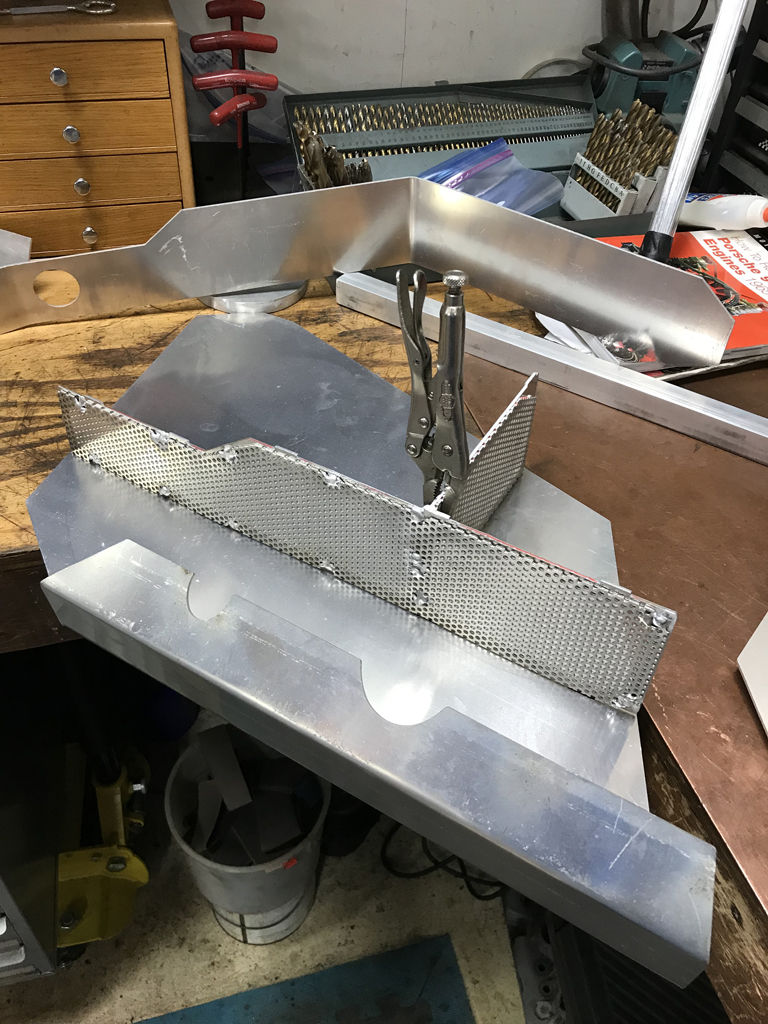 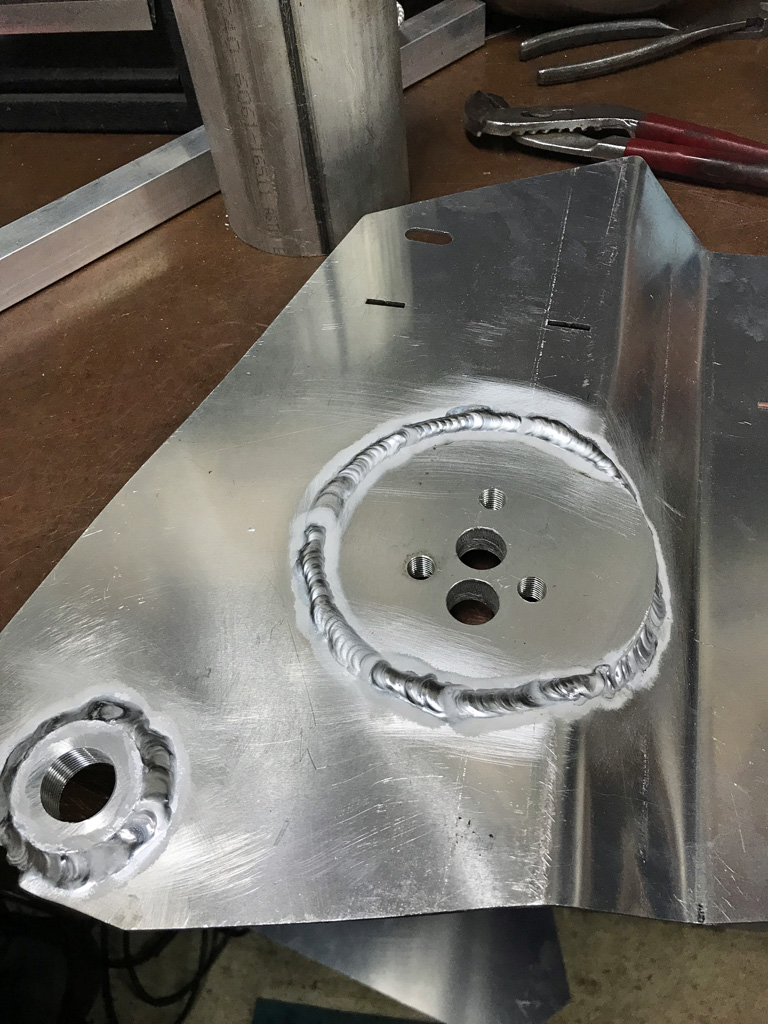 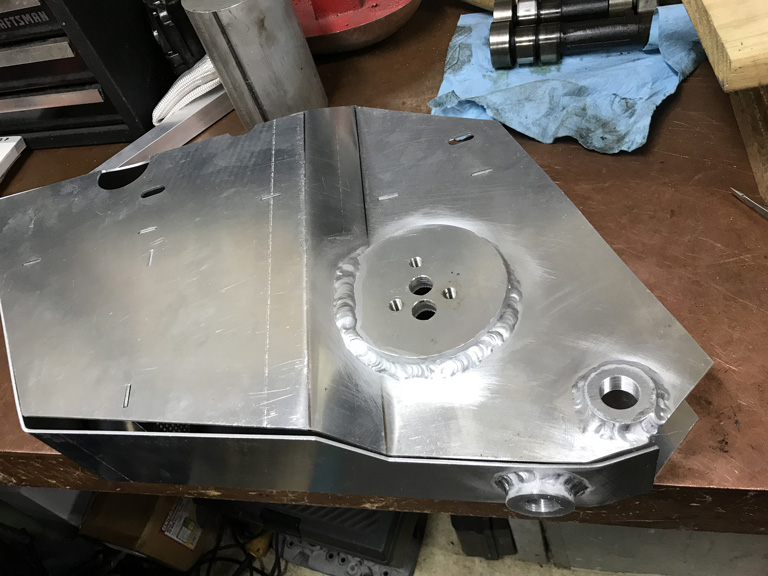 |
|
|
|
| mb911 |
Dec 7 2019, 09:06 PM
Post
#204
|
|
914 Guru Group: Members Posts: 7,794 Joined: 2-January 09 From: Burlington wi Member No.: 9,892 Region Association: Upper MidWest |
@superhawk996
The top baffle needs 2 holes in it.. 1 for the filtered return oil to remove air from the oil and the. One for the oil filler neck/dipstick area.. |
|
|
|
| Superhawk996 |
Dec 8 2019, 09:03 AM
Post
#205
|
|
914 Guru Group: Members Posts: 7,935 Joined: 25-August 18 From: Woods of N. Idaho Member No.: 22,428 Region Association: Galt's Gulch |
QUOTE(mb911 @ Dec 7 2019, 10:06 PM) @superhawk996 The top baffle needs 2 holes in it.. 1 for the filtered return oil to remove air from the oil and the. One for the oil filler neck/dipstick area.. @mb911 Yup. Waiting on that sweet Black Friday group buy of GT filler necks to arrive. (IMG:style_emoticons/default/piratenanner.gif) Easy to burn in the holes by blowing out the Aluminum screen with the TIG Electrode. Certainly appreciate the reminder though. I'm still playing with the best way to do the internal oil lines. I think I also need to get an oil filter console in my hands before I do that. I'm tempted to do a light surface cut on the big console disk to make it perfectly flat. However, that needs to be done after all backside welding is complete otherwise the welding will warp the flatness of the disk when I weld on the back side return lines. I'd rather do that machine work before I have a fully assembled tank. Probably overthinking this since I'm betting your intent was that this could be assembled without the need for any machine work under the assumption that the console 0-ring will accomodate any minor unflatness. (IMG:style_emoticons/default/idea.gif) |
|
|
|
| mb911 |
Dec 8 2019, 09:56 AM
Post
#206
|
|
914 Guru Group: Members Posts: 7,794 Joined: 2-January 09 From: Burlington wi Member No.: 9,892 Region Association: Upper MidWest |
QUOTE(Superhawk996 @ Dec 8 2019, 07:03 AM) QUOTE(mb911 @ Dec 7 2019, 10:06 PM) @superhawk996 The top baffle needs 2 holes in it.. 1 for the filtered return oil to remove air from the oil and the. One for the oil filler neck/dipstick area.. @mb911 Yup. Waiting on that sweet Black Friday group buy of GT filler necks to arrive. (IMG:style_emoticons/default/piratenanner.gif) Easy to burn in the holes by blowing out the Aluminum screen with the TIG Electrode. Certainly appreciate the reminder though. I'm still playing with the best way to do the internal oil lines. I think I also need to get an oil filter console in my hands before I do that. I'm tempted to do a light surface cut on the big console disk to make it perfectly flat. However, that needs to be done after all backside welding is complete otherwise the welding will warp the flatness of the disk when I weld on the back side return lines. I'd rather do that machine work before I have a fully assembled tank. Probably overthinking this since I'm betting your intent was that this could be assembled without the need for any machine work under the assumption that the console 0-ring will accomodate any minor unflatness. (IMG:style_emoticons/default/idea.gif) Correct.. The o ring does a pretty good job of sealing.. |
|
|
|
| Superhawk996 |
Dec 8 2019, 10:06 AM
Post
#207
|
|
914 Guru Group: Members Posts: 7,935 Joined: 25-August 18 From: Woods of N. Idaho Member No.: 22,428 Region Association: Galt's Gulch |
QUOTE(mb911 @ Dec 8 2019, 10:56 AM) Correct.. The o ring does a pretty good job of sealing.. @mb911 Thanks Ben, appreciate the oversight. You have some awesome products! I'm absolutely amazed at how little tweaking it took to get the console disk, and the fitting bungs to fit. The laser cutting is nearly spot on. Part of my rationale for doing this as DIY in the first place is to get more seat time with the welder, it's the only way to improve my Aluminum welding consistency. |
|
|
|
| mb911 |
Dec 8 2019, 11:37 AM
Post
#208
|
|
914 Guru Group: Members Posts: 7,794 Joined: 2-January 09 From: Burlington wi Member No.: 9,892 Region Association: Upper MidWest |
QUOTE(Superhawk996 @ Dec 8 2019, 08:06 AM) QUOTE(mb911 @ Dec 8 2019, 10:56 AM) Correct.. The o ring does a pretty good job of sealing.. @mb911 Thanks Ben, appreciate the oversight. You have some awesome products! I'm absolutely amazed at how little tweaking it took to get the console disk, and the fitting bungs to fit. The laser cutting is nearly spot on. Part of my rationale for doing this as DIY in the first place is to get more seat time with the welder, it's the only way to improve my Aluminum welding consistency. Practice makes perfect |
|
|
|
| Superhawk996 |
Dec 8 2019, 09:48 PM
Post
#209
|
|
914 Guru Group: Members Posts: 7,935 Joined: 25-August 18 From: Woods of N. Idaho Member No.: 22,428 Region Association: Galt's Gulch |
Shifted gears a little bit as I work to clean up the garage and get rid of parts that I've been tripping over for months.
Goal is to get ready to get back to doing chassis work. I've had a chunk of donor sheetmetal sitting on the floor that will be needed to fix the driver side fender inner to floor pan area that is rusted out. Here is the starting point. 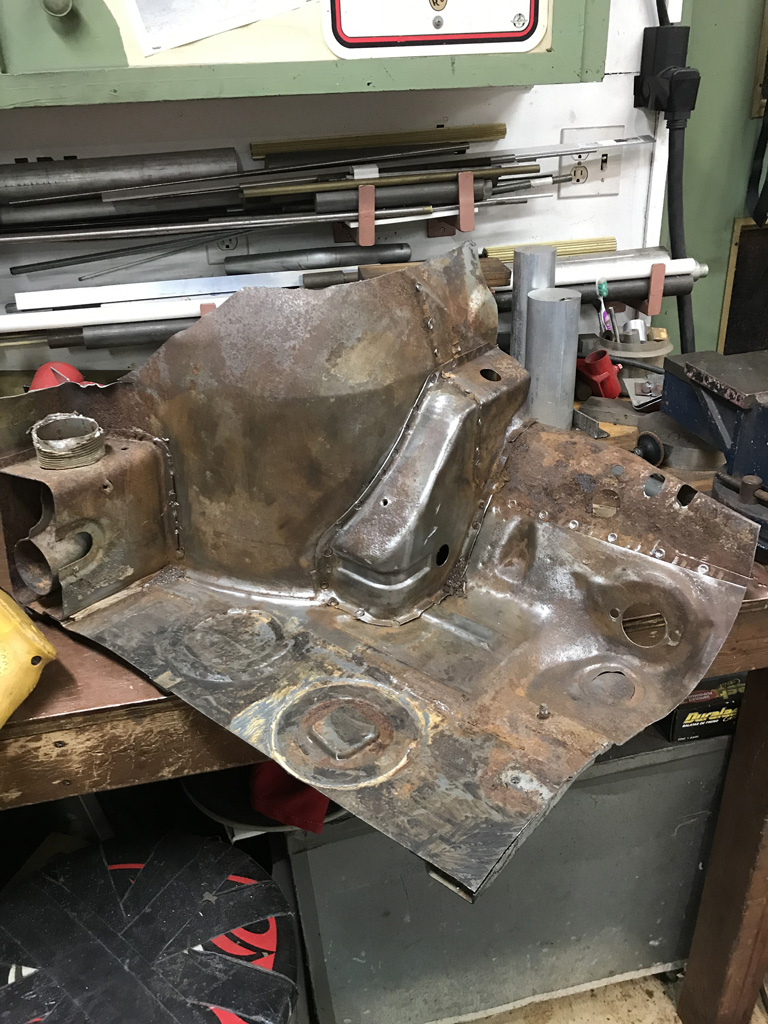 This piece of sheetmetal that holds the pedal boad is basically completely gone at the bottom on my car. This donor part is a good start but will still need some TLC to get it ready but it's better than trying to fabricate from scratch. 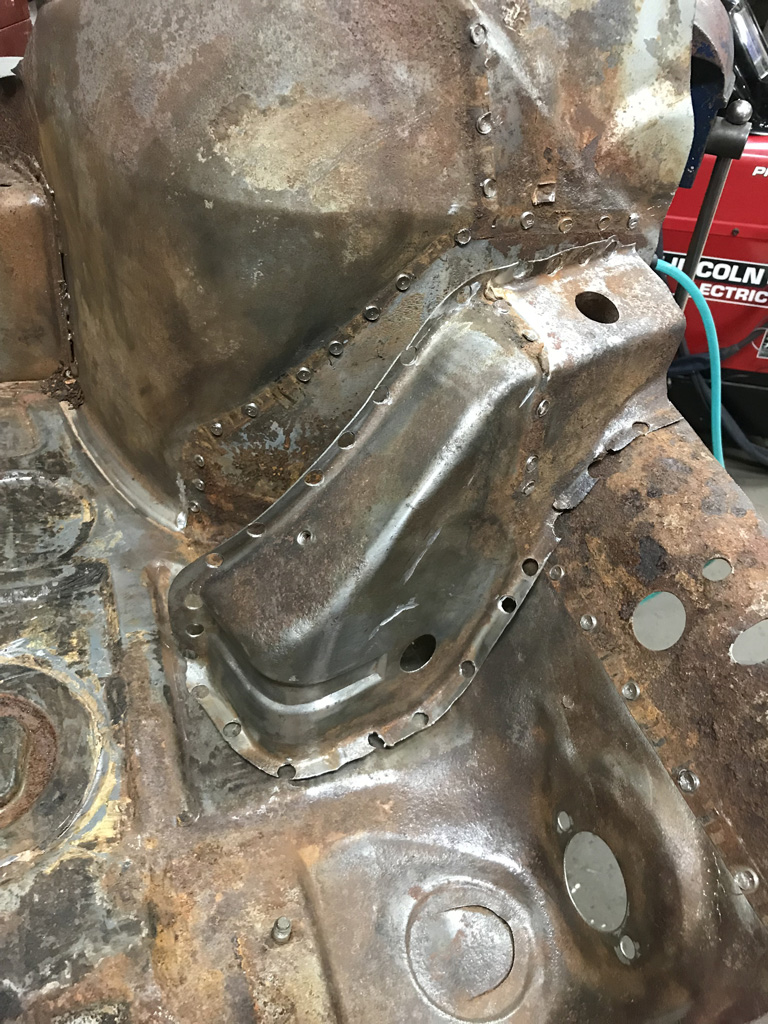 And here are all the parts discected. Much easier to store under a bench and out of my way for now. 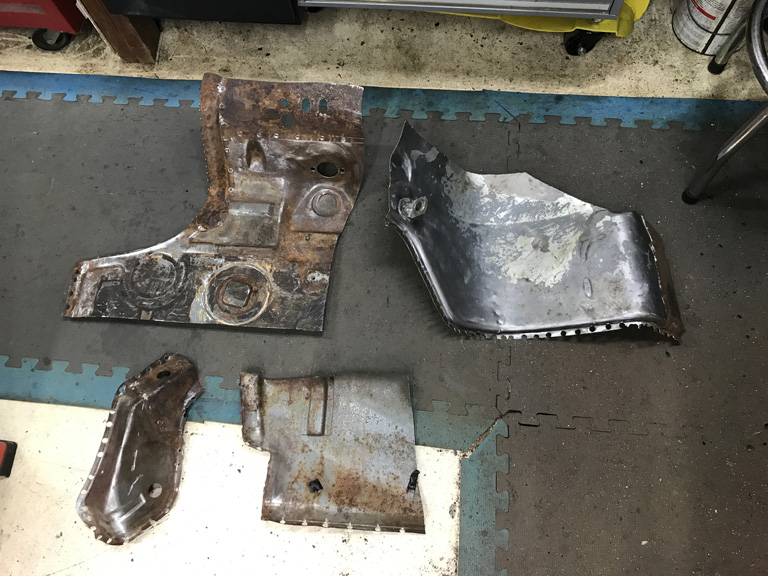 |
|
|
|
| tygaboy |
Dec 9 2019, 09:33 AM
Post
#210
|
|
914 Guru Group: Members Posts: 5,837 Joined: 6-October 15 From: Petaluma, CA Member No.: 19,241 Region Association: Northern California |
Spot weld hell... (IMG:style_emoticons/default/wacko.gif) I feel for you, brother.
|
|
|
|
| Superhawk996 |
Dec 13 2019, 06:49 PM
Post
#211
|
|
914 Guru Group: Members Posts: 7,935 Joined: 25-August 18 From: Woods of N. Idaho Member No.: 22,428 Region Association: Galt's Gulch |
@mb911
Ben, would you be able to post a picture of how you do your tank internals? Did some more work today on the oil tank internals the plumbing to feed the filter was straight foraward. 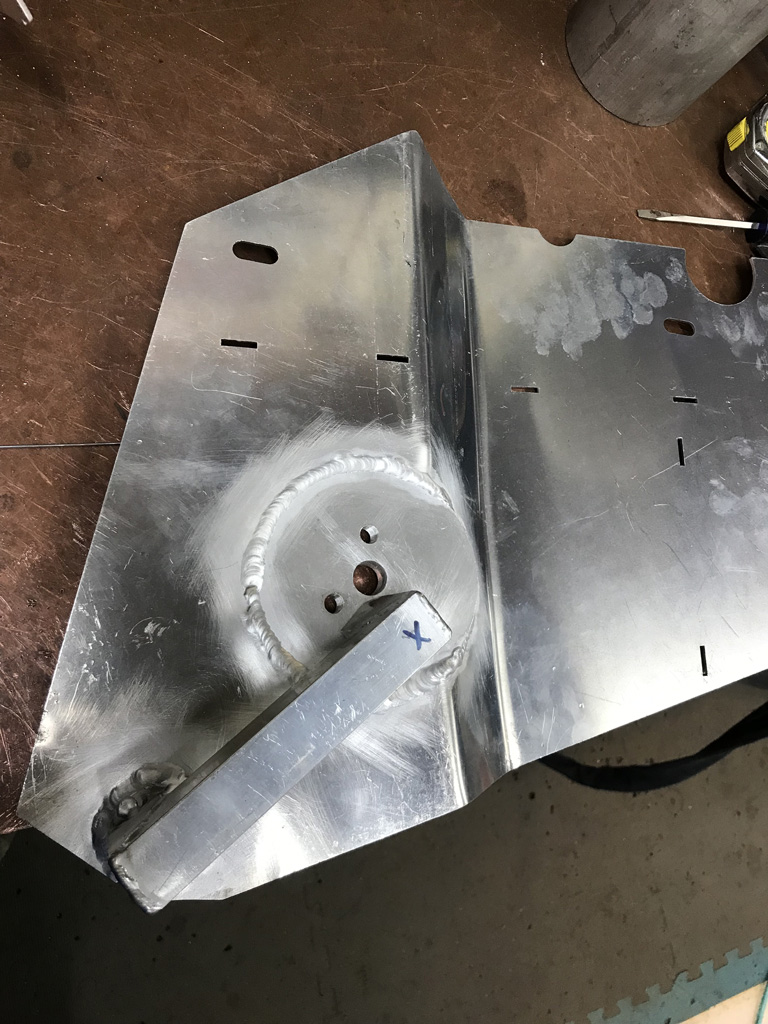 But since I don't have a GT filler neck in hand yet, I'm not sure which side the dip stick tube runs toward. Right, left, or maybe right down the center. The only picture i have of it is ambigious.  I'd prefer to route the filterd oil outlet to the right side to get more time with the screens to deairate the oil. 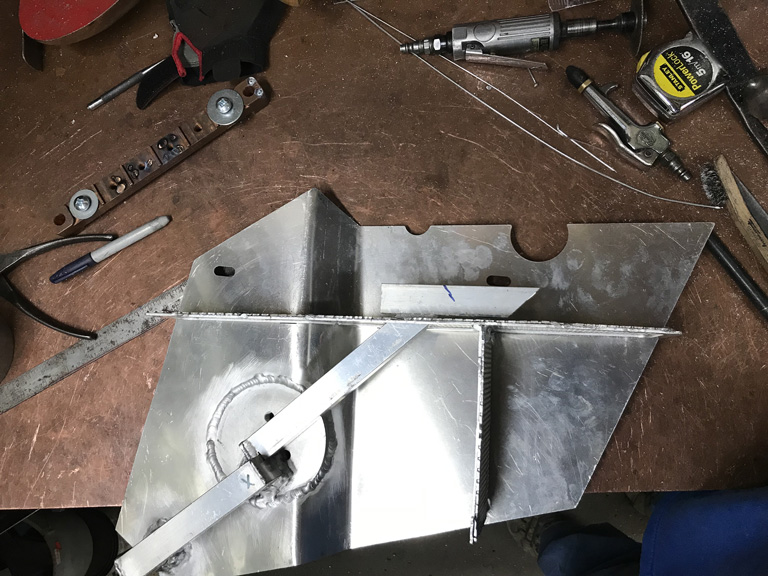 But I'm not sure if this routing will interfere with the dipstick tube. The other option is to creat a U-turn back to the other side like the OEM tank but I'd rather not have to do this. 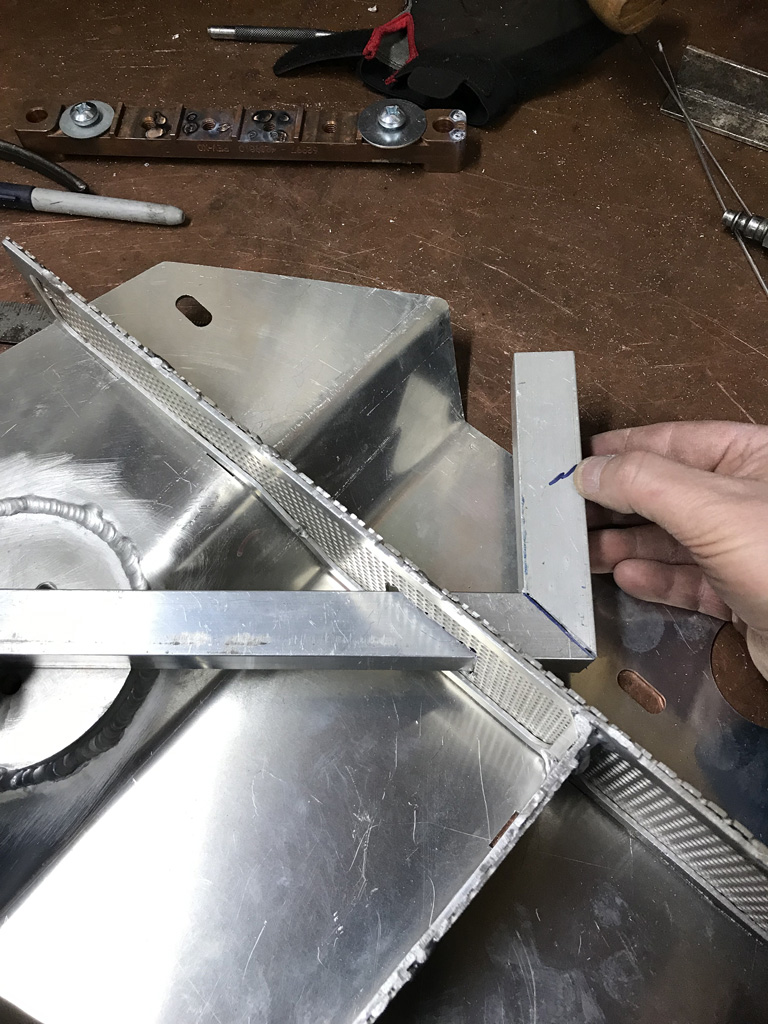 Any photos of your internals and/or a confirmation on which side the GT filler dipstick runs to would the awesome. |
|
|
|
| mb911 |
Dec 13 2019, 07:14 PM
Post
#212
|
|
914 Guru Group: Members Posts: 7,794 Joined: 2-January 09 From: Burlington wi Member No.: 9,892 Region Association: Upper MidWest |
This is a super quick sketch..
Ps your filler came today.. 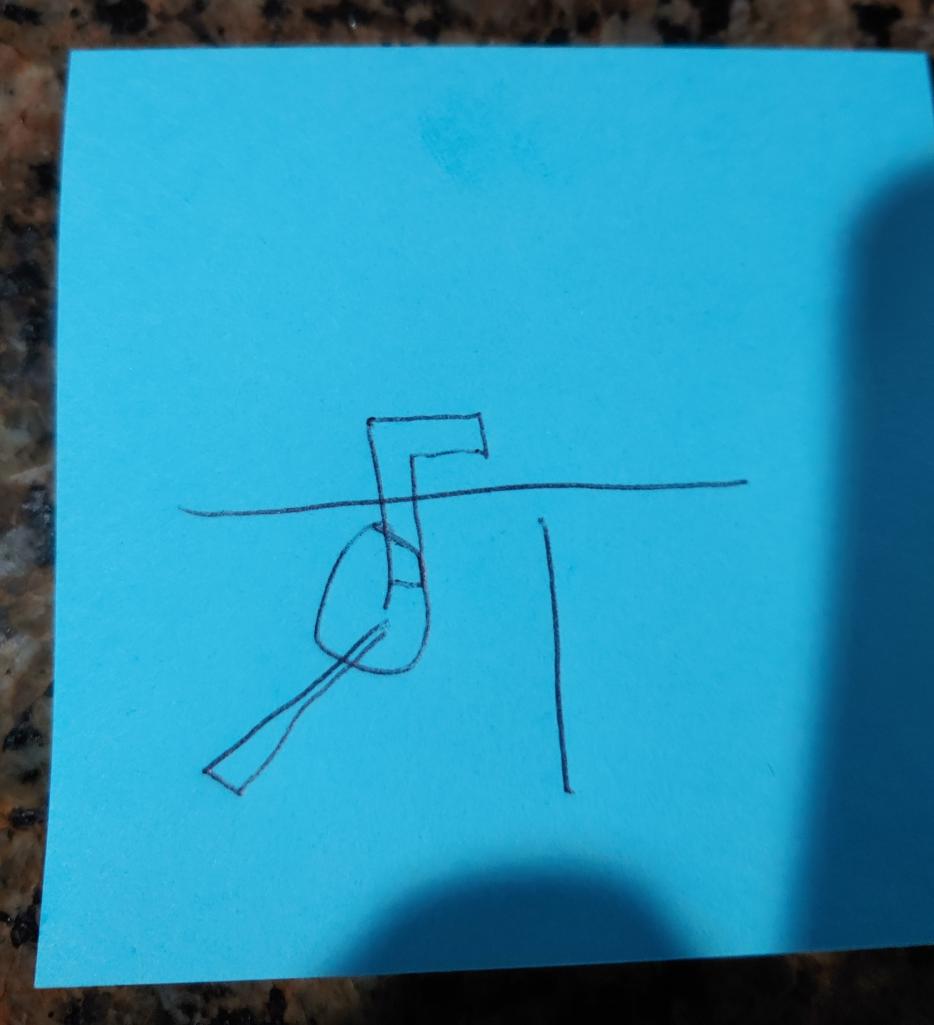 |
|
|
|
| Superhawk996 |
Dec 13 2019, 07:23 PM
Post
#213
|
|
914 Guru Group: Members Posts: 7,935 Joined: 25-August 18 From: Woods of N. Idaho Member No.: 22,428 Region Association: Galt's Gulch |
Perfect. Thank you Ben. Roughly aligns to what I wanted to do. I'll keep filtered oil exit closer to the vertical screen / baffle.
|
|
|
|
| sixnotfour |
Dec 14 2019, 01:12 AM
Post
#214
|
|
914 Wizard Group: Members Posts: 11,276 Joined: 12-September 04 Member No.: 2,744 Region Association: NineFourteenerVille |
I dont know your 911 2.4 plan, but the 2.4 cis intake ports are tiny..Ollies gonna bore em out ??
Also as you did on the type 4sale case is what I do to the 2.4 cis inj. ports press in a shaft and weld the the top..when porting , smooth transition...lots of irons in the fire.. (IMG:style_emoticons/default/smash.gif) (IMG:style_emoticons/default/beerchug.gif) |
|
|
|
| mb911 |
Dec 14 2019, 09:20 AM
Post
#215
|
|
914 Guru Group: Members Posts: 7,794 Joined: 2-January 09 From: Burlington wi Member No.: 9,892 Region Association: Upper MidWest |
@superhawk996
Make sure the mesh is at the exit of the bypass and extends 4-6 inches from there.. The idea is to remove the air bubbles from the oil.. Thats also the plan with the vertical baffle.. Ps I decided to make more tanks.. I just ordered more laser cuts.. Oh and pss.. I just hit my 4 year anniversary on my build.. |
|
|
|
| Tdskip |
Dec 14 2019, 09:38 AM
Post
#216
|
|
Advanced Member Group: Members Posts: 3,783 Joined: 1-December 17 From: soCal Member No.: 21,666 Region Association: None |
Thanks for the updates, great thread.
|
|
|
|
| Superhawk996 |
Dec 14 2019, 10:12 AM
Post
#217
|
|
914 Guru Group: Members Posts: 7,935 Joined: 25-August 18 From: Woods of N. Idaho Member No.: 22,428 Region Association: Galt's Gulch |
QUOTE(sixnotfour @ Dec 14 2019, 02:12 AM) the 2.4 cis intake ports are tiny..Ollies gonna bore em out ?? (IMG:style_emoticons/default/happy11.gif) I don't see port size (or HP) as a measure of my manhood. (IMG:style_emoticons/default/biggrin.gif) (IMG:style_emoticons/default/confused24.gif) I'm still deciding since 2.4L's are a bit of an odd bird. The valves are all 46mm/40mm for T, E, and S. The 2.4T heads have a 33mm exhaust port which is right between the E (32mm) and the S (36mm) so I'm not too worried about exhaust port size. The intake is a 30mm port which is 2mm smaller than most of the earlier heads at 32mm and about 36mm for the S variants. Where it gets interesting is that a 2.4LT variant is 140 HP & 148.5 ft*lb of torque @ 4000. the 2.4L 911E is 165 HP@6200 & 151 lb*ft@4500 rpm. So what is the take away? Remember the formula (RPM * T) / 5252=HP. So the only way the E has an advantage is that it makes about the same torque but up to higher RPM's. The small 30mm intake port keeps flow velocity high which is a good thing at lower RPM's (i.e. good in town driveability). What it doesn't do is breath as well at the high RPM's but let's be honest, how often are you driving at 6200 RPM in a daily driver? When I had my Miata my daily goal was to hit redline (7200) at least once a day with it but it was only a short temporary burst here and there when accelerating. Never was able to drive there for extended periods of time. (IMG:style_emoticons/default/sad.gif) I'm tempted to stay at 30mm in the short term and see how I like it. Since want to go to ITB's and modern FI I think some breathing capability will open up just by losing the long 2.4L CIS runners. But that will also degrade some of the low end torque as the runner length diminishes with ITB's. Or, it may lean in favor of more RPM but at lower torque which could end up being a wash. They can easily opened up at any time if I don't like them. The bigger problem is PMO ITB's only have 34mm as their smallest port. (IMG:style_emoticons/default/sad.gif) I see no need for 34mm ports with a 2.4L. From what I see online, I'm a bit worried that I'll have to do my own ITB's, modify PMO's, or maybe fabricate some sort of Plenum and runner system from the 2.4L CIS runners (IMG:style_emoticons/default/barf.gif) At this point Ollies hasn't even called to discuss so I'm still deciding. |
|
|
|
| Superhawk996 |
Dec 14 2019, 10:33 AM
Post
#218
|
|
914 Guru Group: Members Posts: 7,935 Joined: 25-August 18 From: Woods of N. Idaho Member No.: 22,428 Region Association: Galt's Gulch |
QUOTE(mb911 @ Dec 14 2019, 10:20 AM) For anyone cosidering Ben's tanks, his welded and assembled tank is a great value. (IMG:style_emoticons/default/beerchug.gif) Lot's of time fitting, welding, etc. go into putting this together from scratch and that is by no means a reflection on the materials. The laser cut parts are great. The fit is very close. But fitup and tweaking is just part of the metal fabrication game! For me I'm a automotive mascochist (why else would anyone have a 914?) and love doing fab work and wanted to spend more time with my welder practicing aluminum welding so it is awsome. (IMG:style_emoticons/default/cheer.gif) But, I assure you, the price delta between DIY and finished product is well spent . . . just install and go your merry way! |
|
|
|
| TravisNeff |
Dec 14 2019, 11:04 AM
Post
#219
|
|
914 Guru Group: Members Posts: 5,082 Joined: 20-March 03 From: Mesa, AZ Member No.: 447 Region Association: Southwest Region |
I am loving this thread. Especially your copper topped welding table - that rocks!
|
|
|
|
| Superhawk996 |
Dec 14 2019, 11:23 AM
Post
#220
|
|
914 Guru Group: Members Posts: 7,935 Joined: 25-August 18 From: Woods of N. Idaho Member No.: 22,428 Region Association: Galt's Gulch |
QUOTE(TravisNeff @ Dec 14 2019, 12:04 PM) I am loving this thread. Especially your copper topped welding table - that rocks! Thank you. (IMG:style_emoticons/default/smile.gif) It makes life so much easier for welding. Last weekend I finally got fed up and tired of reconnecting my welding ground from the table top to the my vise. Sometimes it's just easier to use the vise to hold somthing when welding. Side project was to cut another piece of coppper and extend my copper top under the vise, TIG'd the copper sheets together and then put the vise back on top. Ta da! No more need to keep moving the ground cable back and forth. (IMG:style_emoticons/default/biggrin.gif) The copper bench top is also nice because it is soft and friendly to machined surfaces that sometimes get placed on it! |
|
|
|
|
1 User(s) are reading this topic (1 Guests and 0 Anonymous Users)
0 Members:

|
Lo-Fi Version | Time is now: 4th July 2026 - 05:58 PM |
Invision Power Board
v9.1.4 © 2026 IPS, Inc.