|
|
|
Porsche, and the Porsche crest are registered trademarks of Dr. Ing. h.c. F. Porsche AG.
This site is not affiliated with Porsche in any way. Its only purpose is to provide an online forum for car enthusiasts. All other trademarks are property of their respective owners. |
|
|

  |

| Superhawk996 |
 Mar 14 2020, 04:42 PM Mar 14 2020, 04:42 PM
Post
#261
|
|
914 Guru  Group: Members Posts: 7,935 Joined: 25-August 18 From: Woods of N. Idaho Member No.: 22,428 Region Association: Galt's Gulch |
Completed the build out of the longitudinal today. With a little luck, I'll get the long welded in tomorrow or at least tacked in for yet another round of suspension measurements. (IMG:style_emoticons/default/rolleyes.gif)
Started by mocking it up using Cleco's 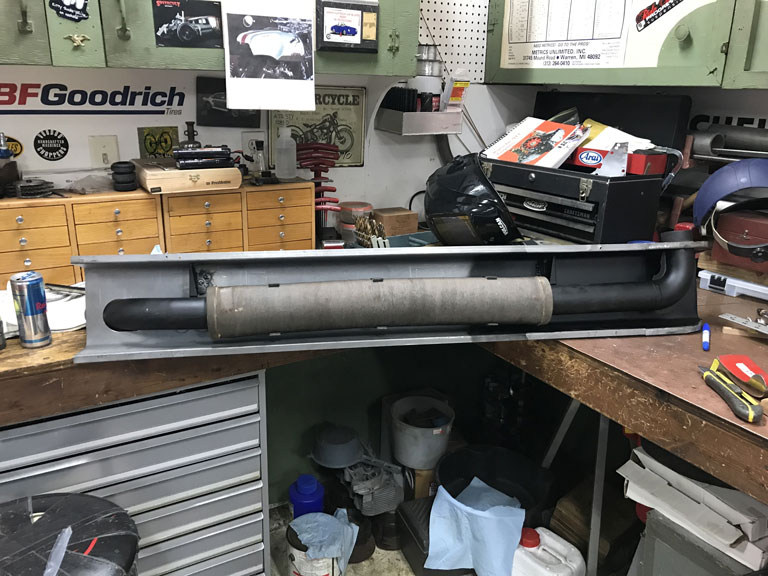 Decided to use solid rivits to secure the spring steel heater tube holders to the long. Same as the OEM attachment method. 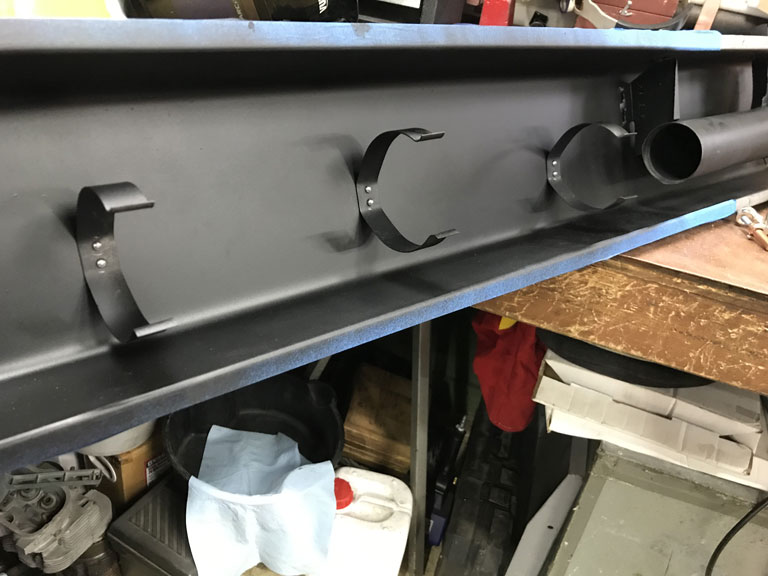 Unfortunately the reproduction longitudinal doesn't have the same offset recess as the original. This leaves the bucked rivets overflush to the longitudinal inner surface. 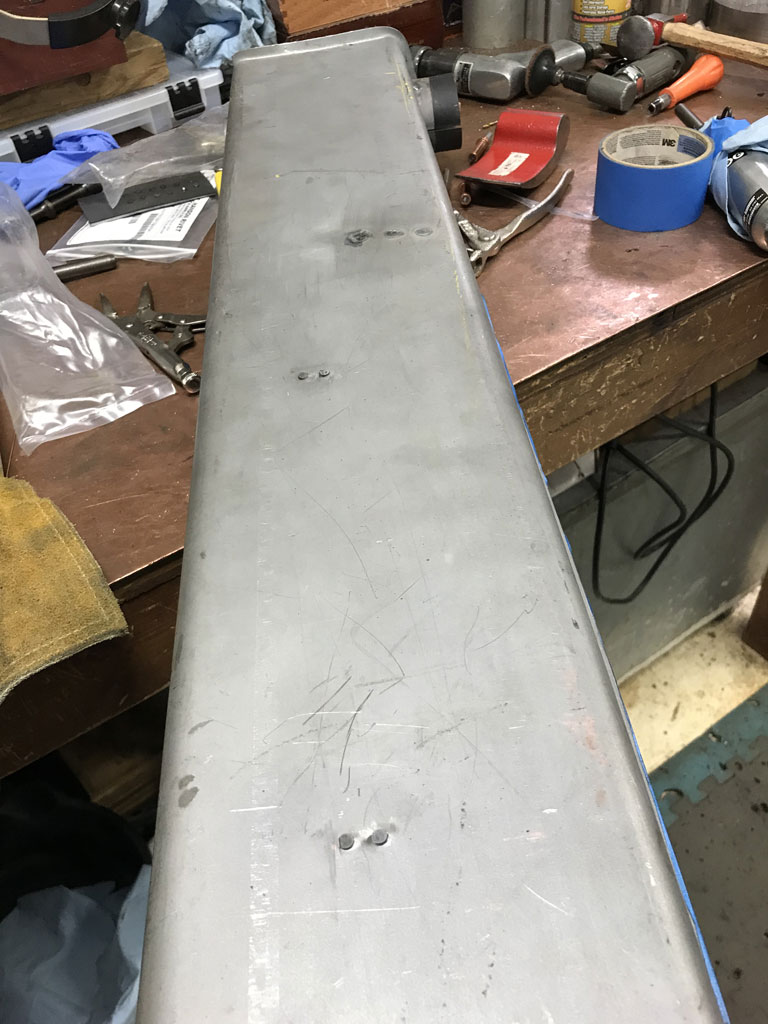 Hopefully these don't show though the carpet later on. I guesss in the worst case, I could put a thin layer of open cell foam over them to help smooth things out. Least of my worries at this point. |
   |

 
|
| bbrock |
Mar 14 2020, 06:37 PM
Post
#262
|
|
914 Guru Group: Members Posts: 5,269 Joined: 17-February 17 From: Montana Member No.: 20,845 Region Association: Rocky Mountains |
Those longs don't appear to have the recesses stamped into the bottom either. Glad to see someone else OCD enough to use solid rivets on the hose brackets. I don't know why I did it, but it had to be done. I can't imagine those rivets will show through the carpet. (IMG:style_emoticons/default/beerchug.gif)
|
 |
|
| tygaboy |
Mar 14 2020, 07:11 PM
Post
#263
|
|
914 Guru Group: Members Posts: 5,837 Joined: 6-October 15 From: Petaluma, CA Member No.: 19,241 Region Association: Northern California |
You had me at "Clecos"... (IMG:style_emoticons/default/laugh.gif)
|
|
|
|
| Superhawk996 |
Mar 14 2020, 07:57 PM
Post
#264
|
|
914 Guru Group: Members Posts: 7,935 Joined: 25-August 18 From: Woods of N. Idaho Member No.: 22,428 Region Association: Galt's Gulch |
QUOTE(bbrock @ Mar 14 2020, 08:37 PM)  Those longs don't appear to have the recesses stamped into the bottom either. Yeah. Not to thrilled about that. I looked around at AA and RD and it didn't seem to me that anyone really had a longitudinal that was a true reproduction. I get it. It would be a more complex tool and ultimatley no one really sees it directly once installed. Would have been nice to have the option for 100% reproduction though! I guess I'm just happy to have the part at all. (IMG:style_emoticons/default/happy11.gif) |
|
|
|
| Superhawk996 |
Mar 17 2020, 09:05 AM
Post
#265
|
|
914 Guru Group: Members Posts: 7,935 Joined: 25-August 18 From: Woods of N. Idaho Member No.: 22,428 Region Association: Galt's Gulch |
(IMG:style_emoticons/default/piratenanner.gif)
After a year apart, the front of the vehicle has been reunited with the rear. 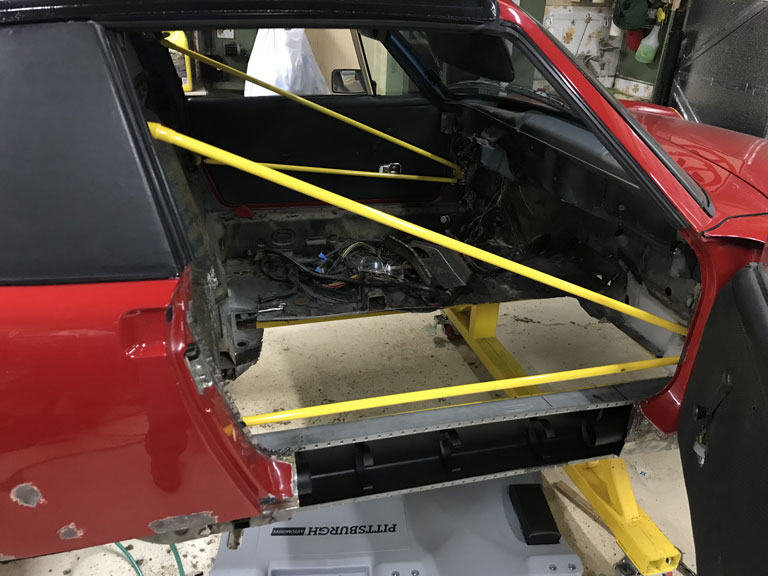 In the process of getting ready to weld the long to the front fender area I had to clear off some primer and I got carried away. I decided to strip the undercoating out of the fender well. Love the flail wheel for this. Makes quick and easy work of it and can do so without completely stripping the OEM paint underneath. 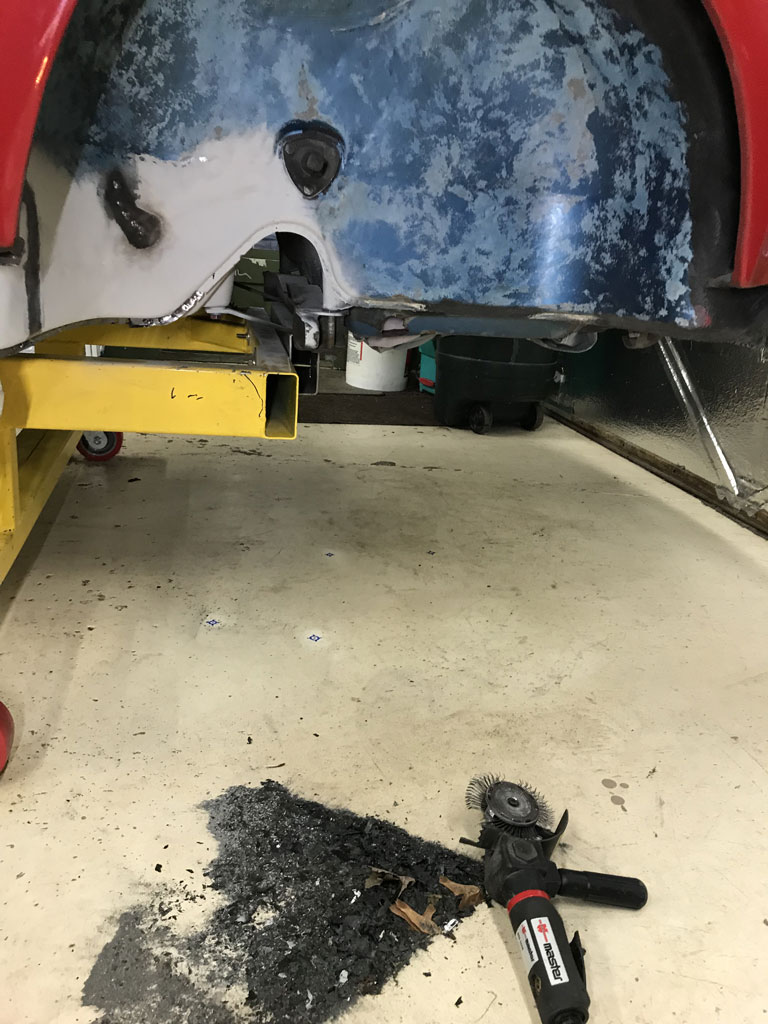 In the process, I'm now noticing that the passenger side front fender has been replaced at some point - potentially in conjunction with prior accident (on left side) that probably led to the addition of flares? Odd. Color of the panel looks like it might have been NOS sheetmetal. The underside of the panel certainly wasn't primered with the same primer as the panel exterior. Ah, the mysteries of a vintage car. If only they could speak and tell the tale. 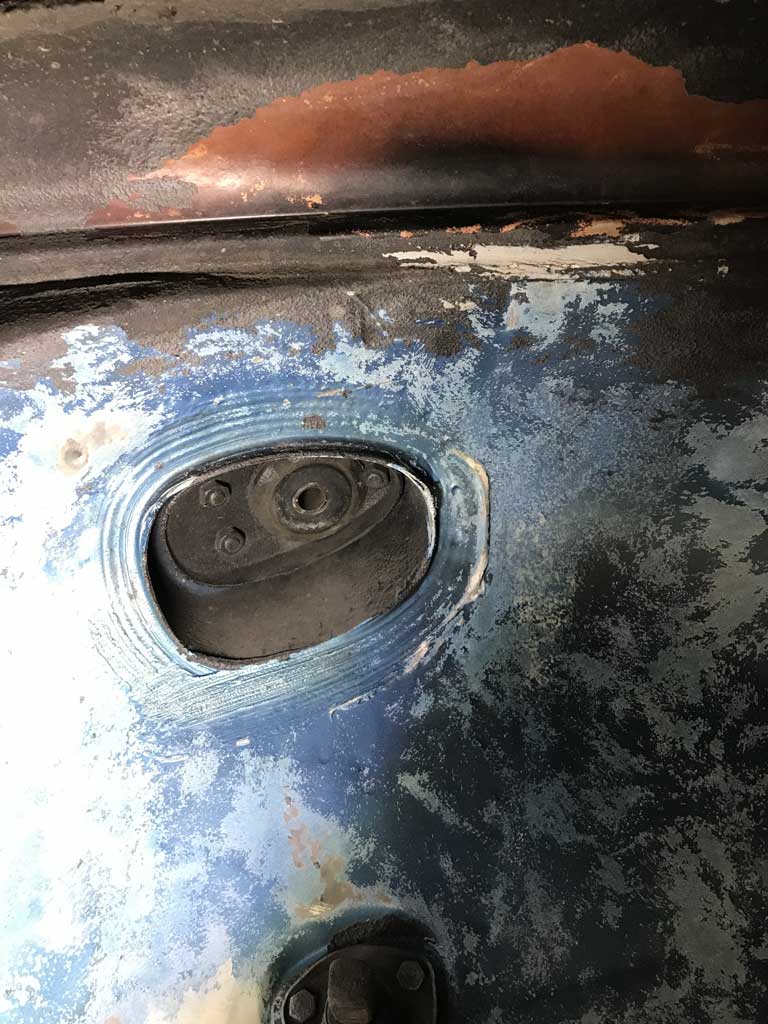 Will update my VIN registry to reflect non-OEM front passenger side fender. |
|
|
|
| Superhawk996 |
Mar 21 2020, 01:35 PM
Post
#266
|
|
914 Guru Group: Members Posts: 7,935 Joined: 25-August 18 From: Woods of N. Idaho Member No.: 22,428 Region Association: Galt's Gulch |
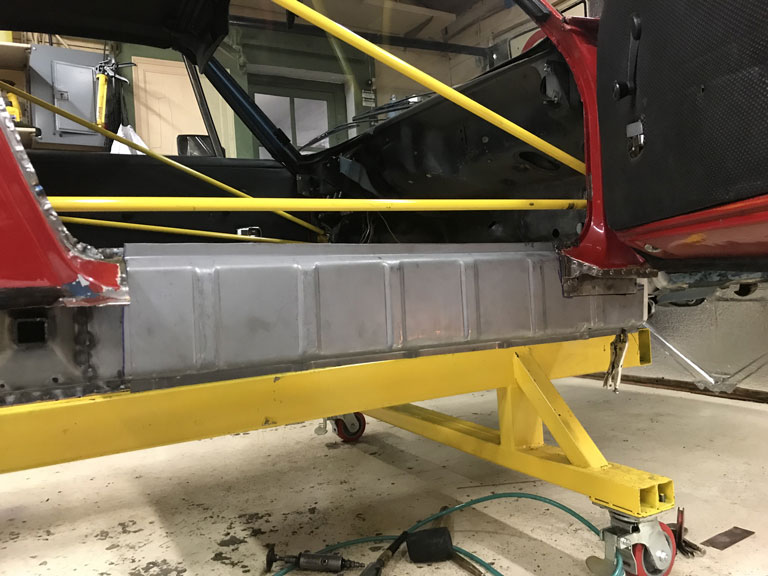
Fitting up the longitudinal outers. Finally starting to feel like some progress is being made. (IMG:style_emoticons/default/biggrin.gif)
  |
|
|
|
| bbrock |
Mar 21 2020, 01:49 PM
Post
#267
|
|
914 Guru Group: Members Posts: 5,269 Joined: 17-February 17 From: Montana Member No.: 20,845 Region Association: Rocky Mountains |
Such a great feeling when those outer longs go on. (IMG:style_emoticons/default/piratenanner.gif)
|
|
|
|
| Superhawk996 |
Apr 4 2020, 02:18 PM
Post
#268
|
|
914 Guru Group: Members Posts: 7,935 Joined: 25-August 18 From: Woods of N. Idaho Member No.: 22,428 Region Association: Galt's Gulch |
@Bbrock
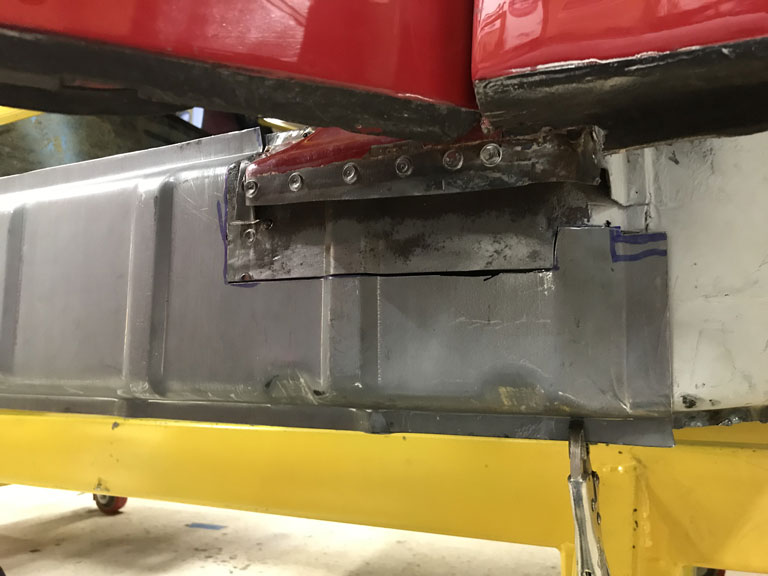
@Mb911 @tygaboy @Jeff Hail Need some tribal wisdom. Maybe talk me off the ledge if it's warranted. (IMG:style_emoticons/default/blink.gif) Before I welded in the passenger side outer long I had the passenger side door gaps just about perfect with what I thought was a hint of preload on the wide side. I welded so slowly it took about 3 days of on/off welding to get this bugger buttoned up. I knew that when I removed the door braces I'd have some shrink. I think I got a little more than I expected and definately more than I wanted. (IMG:style_emoticons/default/headbang.gif) It seems to me that my passenger side door gap is a hint too tight (3mm but consistent). Being an OCD engineer, I'm on the verge of starting to cut welds and trying to push it back out and then reweld. I don't like this idea either since that opens up all sorts of possibilites for further screw ups and more shrinkage. For what it's worth this car has been hit in the left front and was clipped so it's not like I have a virgin driver side to measure from. Although it was clipped, I've spent tons of hours measureing my suspension pick up points, door post gaps, header to roll bar gaps, etc., none of these has moved since welding in the longitudinal. 3mm gap just looks too tight to me. But at the same time it seems crazy to try to cut & re-weld for 1 - 1.5mm of improvment. Well, here's what I have. Although you can see the door braces in the photo, they are just leaning on the firewall, not connected to anything. Passenger side overall 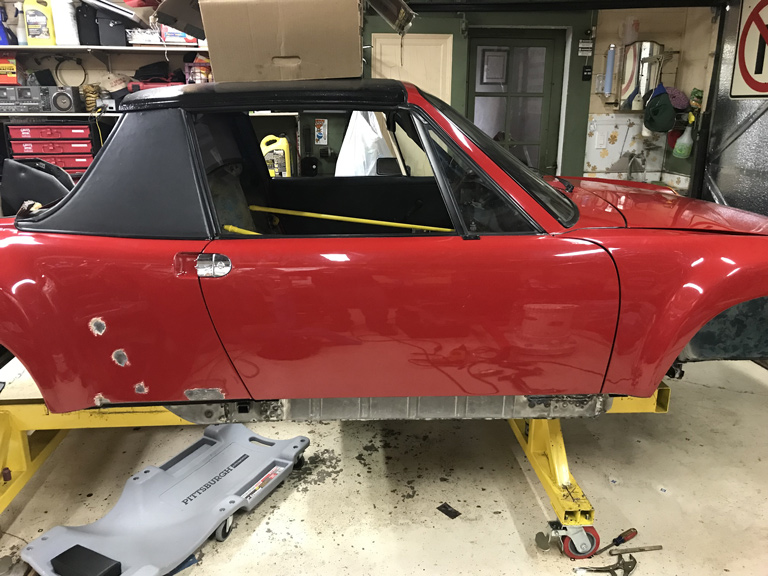 Passenger rear  Passenger front 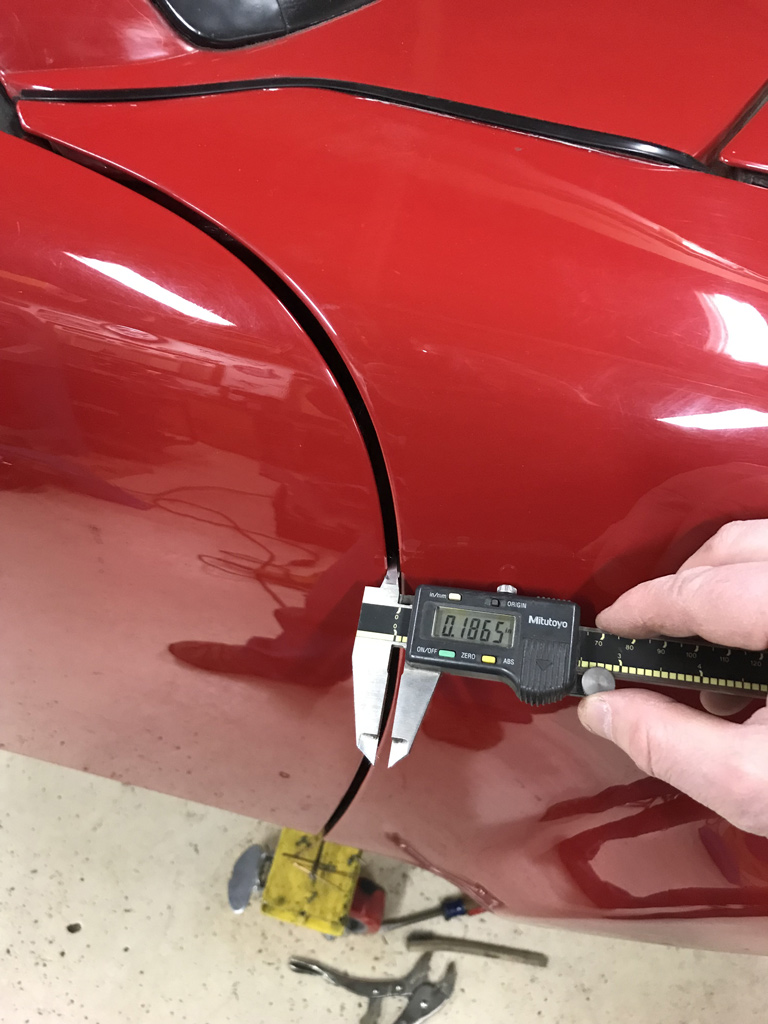 Driver rear 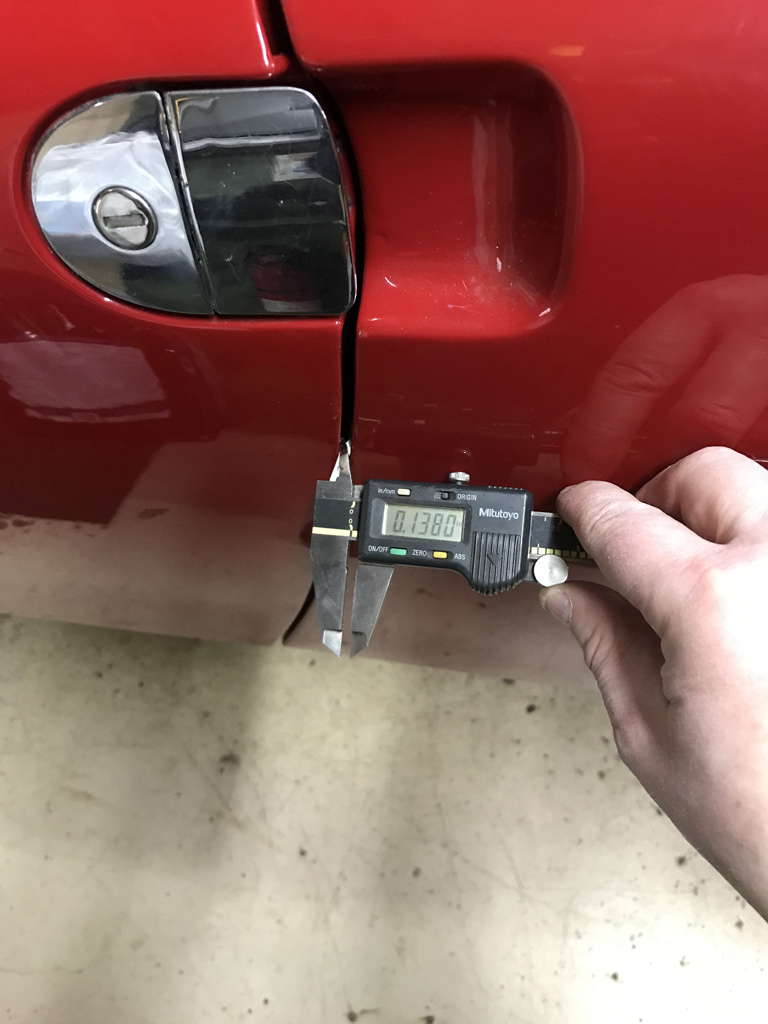 Driver front 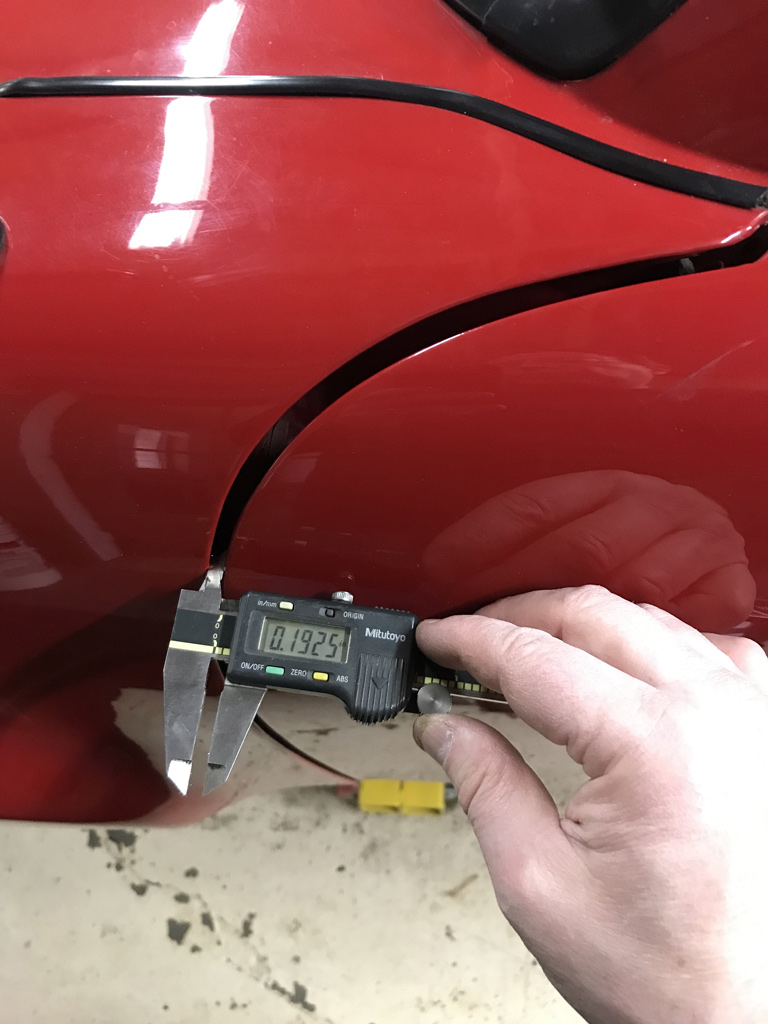 |
|
|
|
| Superhawk996 |
Apr 4 2020, 02:22 PM
Post
#269
|
|
914 Guru Group: Members Posts: 7,935 Joined: 25-August 18 From: Woods of N. Idaho Member No.: 22,428 Region Association: Galt's Gulch |
I'm contemplating other solutions.
One might be to mill 1mm of the front of the door hinges to pull them forward about 1mm. I'm just worried this may have other implications for things like striker fits and/or fit of the triangular quarter window to the A-pillar. 1mm = 0.040" and doesn't sure seem like much but to me it looks like a country mile. (IMG:style_emoticons/default/barf.gif) Other ideas? Time to go work on another unrelated project before I do something unwarranted. |
|
|
|
| tygaboy |
Apr 4 2020, 03:00 PM
Post
#270
|
|
914 Guru Group: Members Posts: 5,837 Joined: 6-October 15 From: Petaluma, CA Member No.: 19,241 Region Association: Northern California |
OK, this may sound totally hack but...
I swapped my late doors for a set of early ones. The early ones are a little "longer" and I had what I felt looked like too tight a fit at the rear, particularly on the driver side. WARNING: GRAPHIC CAR-NAGE follows! CWs and other purist-types may want to avoid this post! So I took a 2x4 and small sledge hammer (I know, I know!), opened the door and bonked on the hinges, essentially driving the A pillar's hinge mounting surface forward until the front/rear door gaps sorta split the difference. I also found that I could open the door just a bit and use it as a lever to set the door's up/down alignment to the body. Stating the obvious: go slowly if you try this approach. I was surprised how easy it was to move the hinge area forward (and backward, if you go too far!) I figured "Hey, these things are +/- 3mm so what's the big deal?" (IMG:style_emoticons/default/happy11.gif) What can I say, it worked for me. The doors open/close/latch and lock just fine. YMMV. Here's the best shot I currently have of how it turned out. Let me know if you'd rather I remove the pic. Attached thumbnail(s) 
|
|
|
|
| Superhawk996 |
Apr 4 2020, 04:06 PM
Post
#271
|
|
914 Guru Group: Members Posts: 7,935 Joined: 25-August 18 From: Woods of N. Idaho Member No.: 22,428 Region Association: Galt's Gulch |
@Tygaboy .
Hmm. I sort of like the idea. I've definately reefed them up at the rear using the door as leverage to get the gap consistency I wanted. When you did the "tweaking" did you just leave the door in place and hammer on the door hinge; bolts and all? Seems like that would be the way to go to do easy visual checks of the progress. As another interesting tid bit, the passenger door on this car is an early doors - no impact bar and are clearly from another car (yellow on passenger side under the door trim). I thought early and late doors had the same dimensions but differed only in impact bar and window regulator style. If that is true, that the early doors are a smidge longer that might help explain why the driver side door is a bit tighter at the rear too. This car is an early build 73 - April and I know some early 73's had the earlier doors too so I never thought much of it other than that someone had swapped this door for sure and I haven't dug into the driver door to see what it is yet. |
|
|
|
| mb911 |
Apr 4 2020, 04:14 PM
Post
#272
|
|
914 Guru Group: Members Posts: 7,794 Joined: 2-January 09 From: Burlington wi Member No.: 9,892 Region Association: Upper MidWest |
I agree with Chris .. You could also use a porta power to stretch it a bit.. My passenger front gap is not ideal.. I still have to work it through..
|
|
|
|
| mepstein |
Apr 4 2020, 04:22 PM
Post
#273
|
|
914-6 GT in waiting Group: Members Posts: 20,795 Joined: 19-September 09 From: Landenberg, PA/Wilmington, DE Member No.: 10,825 Region Association: MidAtlantic Region |
QUOTE(Superhawk996 @ Apr 4 2020, 06:06 PM) @Tygaboy . Hmm. I sort of like the idea. I've definately reefed them up at the rear using the door as leverage to get the gap consistency I wanted. When you did the "tweaking" did you just leave the door in place and hammer on the door hinge; bolts and all? Seems like that would be the way to go to do easy visual checks of the progress. As another interesting tid bit, the passenger door on this car is an early doors - no impact bar and are clearly from another car (yellow on passenger side under the door trim). I thought early and late doors had the same dimensions but differed only in impact bar and window regulator style. If that is true, that the early doors are a smidge longer that might help explain why the driver side door is a bit tighter at the rear too. This car is an early build 73 - April and I know some early 73's had the earlier doors too so I never thought much of it other than that someone had swapped this door for sure and I haven't dug into the driver door to see what it is yet. I've never heard of early doors being longer. |
|
|
|
| bbrock |
Apr 4 2020, 04:44 PM
Post
#274
|
|
914 Guru Group: Members Posts: 5,269 Joined: 17-February 17 From: Montana Member No.: 20,845 Region Association: Rocky Mountains |
QUOTE(tygaboy @ Apr 4 2020, 02:00 PM) WARNING: GRAPHIC CAR-NAGE follows! CWs and other purist-types may want to avoid this post! The HORROR!!!! (IMG:style_emoticons/default/yikes.gif) I can't believe you did that... but... that is exactly what I did. (IMG:style_emoticons/default/aktion035.gif) I had a door that was sagging plus an unacceptable wide gap that could not adjust out. After puzzling it over for a long time, I discover that the upper hinge post had indeed stretch from years of door weight and possibly a teenager or two leaning on an open door. So... Bang, bang, Maxwell's silver hammer came down upon its head... There is easily a mm of adjustment to be had there. |
|
|
|
| tygaboy |
Apr 4 2020, 04:51 PM
Post
#275
|
|
914 Guru Group: Members Posts: 5,837 Joined: 6-October 15 From: Petaluma, CA Member No.: 19,241 Region Association: Northern California |
QUOTE(mepstein @ Apr 4 2020, 03:22 PM) I've never heard of early doors being longer. @mepstein - I didn't mean to imply they were, by design, longer than late doors, only that the set I have ended up being longer than the lates that were on the car. All within the usual tolerances for these cars. I suspect I just happen to end up with a set of each that may be on the inner/outer ranges. Also, and this may have zero to do with any of this, but my suspension pickup mounting points measured way outside (longer) of the specs available on this site - see my build for details, if interested. |
|
|
|
| mepstein |
Apr 4 2020, 04:55 PM
Post
#276
|
|
914-6 GT in waiting Group: Members Posts: 20,795 Joined: 19-September 09 From: Landenberg, PA/Wilmington, DE Member No.: 10,825 Region Association: MidAtlantic Region |
QUOTE(tygaboy @ Apr 4 2020, 06:51 PM) QUOTE(mepstein @ Apr 4 2020, 03:22 PM) I've never heard of early doors being longer. @mepstein - I didn't mean to imply they were, by design, longer than late doors, only that the set I have ended up being longer than the lates that were on the car. All within the usual tolerances for these cars. I suspect I just happen to end up with a set of each that may be on the inner/outer ranges. Also, and this may have zero to do with any of this, but my suspension pickup mounting points measured way outside (longer) of the specs available on this site - see my build for details, if interested. Yea, the way these cars were made, I could see one line worker fitting it tight while another fit it loose and getting 1-5 mm difference in the final fit. |
|
|
|
| tygaboy |
Apr 4 2020, 04:58 PM
Post
#277
|
|
914 Guru Group: Members Posts: 5,837 Joined: 6-October 15 From: Petaluma, CA Member No.: 19,241 Region Association: Northern California |
QUOTE(Superhawk996 @ Apr 4 2020, 03:06 PM) @Tygaboy . When you did the "tweaking" did you just leave the door in place and hammer on the door hinge; bolts and all? Seems like that would be the way to go to do easy visual checks of the progress. Yep, doors in place for the exact reason you mentioned. BAM, BAM, check. Repeat as needed. Just watch the end of the piece of wood you use as the hinge bolts may chew it up and you just want to know what your pounding against. |
|
|
|
| Superhawk996 |
Apr 6 2020, 08:03 AM
Post
#278
|
|
914 Guru Group: Members Posts: 7,935 Joined: 25-August 18 From: Woods of N. Idaho Member No.: 22,428 Region Association: Galt's Gulch |
I haven't had a chance to bonk the doors yet though strangely I'm exited about the prospect of it. I would be such a simple & elegant solution.
I spent a little bit of time cleaning up the garage and working on couple other projects. 1st, as I was cleaning I passed by this gleaming gem. I had completely forgotten to thank @mepstein for his generorsity in passing along this shining addtion to 2.4L six fan. I think this will be a spectacular accent piece when the fan gets painted or powdercoated. (IMG:style_emoticons/default/pray.gif) 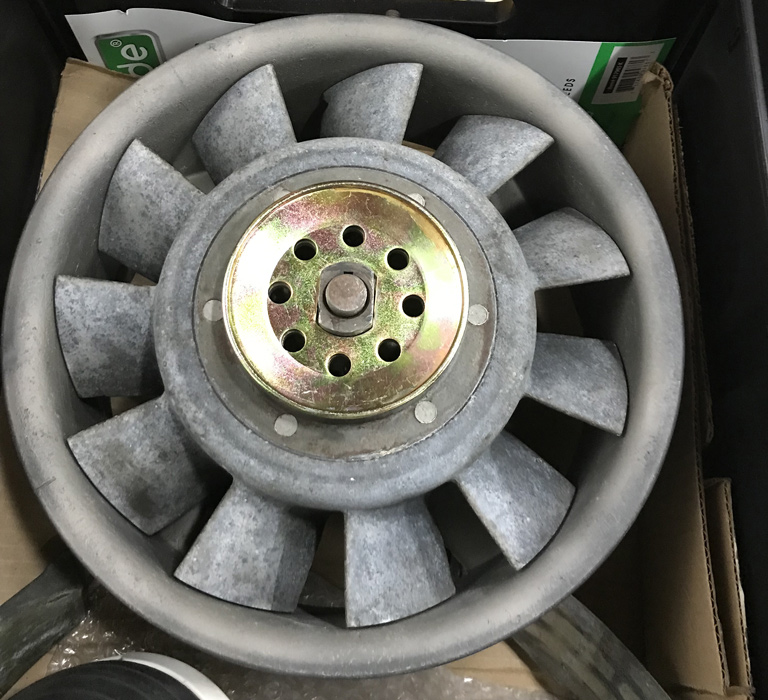 |
|
|
|
| Superhawk996 |
Apr 6 2020, 08:20 AM
Post
#279
|
|
914 Guru Group: Members Posts: 7,935 Joined: 25-August 18 From: Woods of N. Idaho Member No.: 22,428 Region Association: Galt's Gulch |
I also spent some time working on engine tin.
Want to plead with those of you that have hacked up 2.0L passenger side tin from A/C installs, please don't toss it. It can be fixed and made to be perfectly serviceable. (IMG:style_emoticons/default/welder.gif) If you have 2.0L passenger side hacked cylinder tin that you're contemplating scrapping feel free to send it my way! (IMG:style_emoticons/default/laugh.gif) Starting point: 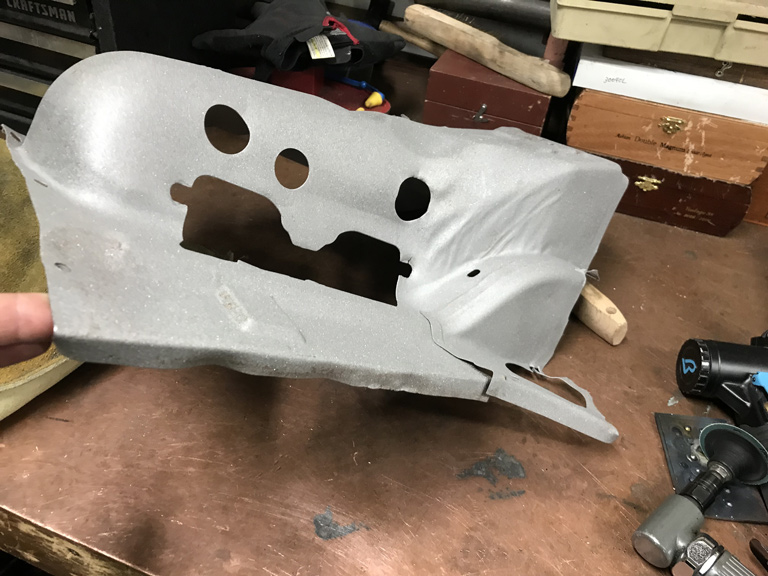 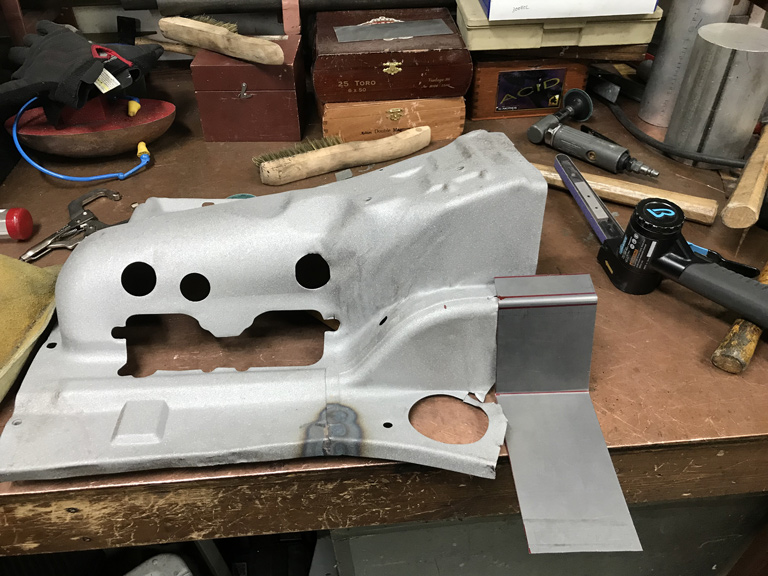 Finished serviceable tin: 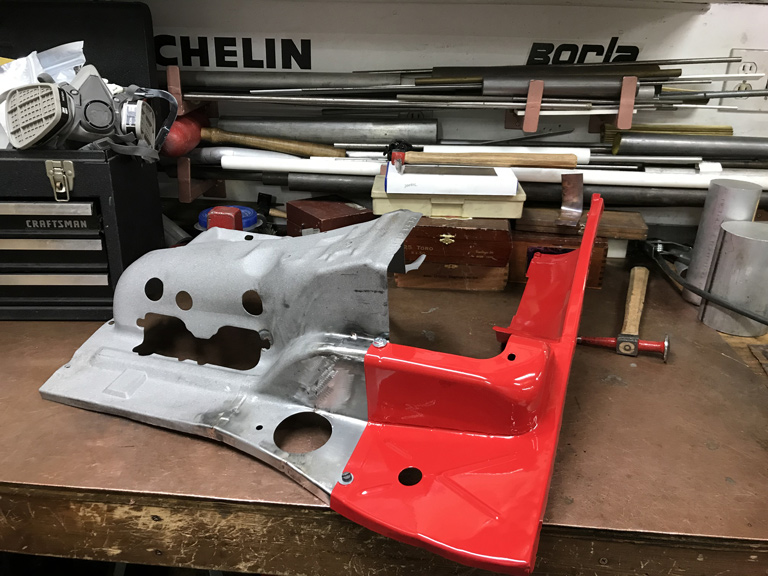 |
|
|
|
| bbrock |
Apr 6 2020, 08:56 AM
Post
#280
|
|
914 Guru Group: Members Posts: 5,269 Joined: 17-February 17 From: Montana Member No.: 20,845 Region Association: Rocky Mountains |
Nice work on that tin (IMG:style_emoticons/default/smilie_pokal.gif) What is it about those six fans that make them so sexy? (IMG:style_emoticons/default/drooley.gif)
|
|
|
|
|
1 User(s) are reading this topic (1 Guests and 0 Anonymous Users)
0 Members:

|
Lo-Fi Version | Time is now: 4th July 2026 - 04:45 PM |
Invision Power Board
v9.1.4 © 2026 IPS, Inc.